Category: News

  • Denman or Bounce Curl Brush I Tested Both to See Which Works Best for Different Hair Types

    Denman or Bounce Curl Brush I Tested Both to See Which Works Best for Different Hair Types

    Choosing the right styling brush can completely change how your curls look and feel, especially when deciding between two cult favorites. In this hands-on comparison, I tested the Denman and Bounce Curl brushes to see how each performs on different hair textures, curl patterns, and styling routines. This guide is written for readers in the United States who want practical, real-world results rather than marketing claims. From wash day definition to daily refreshes, this breakdown focuses on performance, ease of use, and which brush truly delivers for your hair type.

    Denman brush performance on different hair types

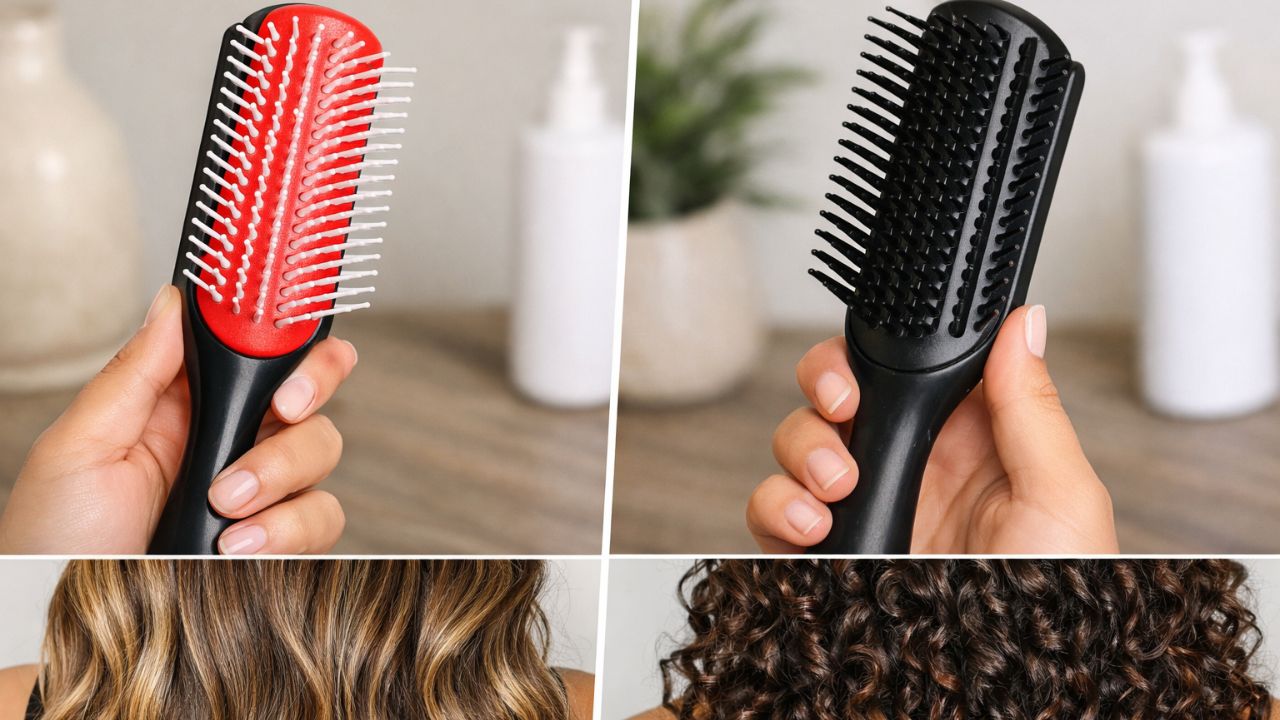
    The Denman brush has long been a staple for curl definition, particularly for those with wavy to coily hair. During testing, it stood out for its curl clumping power and ability to create uniform sections with minimal effort. On thicker textures, the brush offered controlled tension styling that helped smooth frizz while shaping curls evenly. However, finer hair sometimes felt weighed down, especially without adjusting rows. Its classic styling design works best when paired with slip-heavy products, making it ideal for intentional styling sessions rather than quick routines.

    Bounce Curl brush results for modern curl routines

    The Bounce Curl brush is clearly designed with modern curl routines in mind. Its unique edges made defined curl ribbons easy to achieve, even for beginners. While testing on loose curls and waves, the brush delivered lightweight volume boost without pulling or snagging. It also excelled at refresh days, offering gentle detangling action that preserved curl shape. Compared to traditional brushes, it felt more intuitive and forgiving, especially for those who prefer faster styling with consistent results.

    Denman vs Bounce Curl brush comparison for real use

    When comparing both brushes side by side, the differences became very clear in daily use. The Denman favored structured routines and provided precise curl control for defined styles, while the Bounce Curl brush leaned toward flexibility and ease. For mixed textures, Bounce Curl offered balanced styling comfort without technique-heavy steps. Meanwhile, Denman delivered salon-style definition but required more time and product. Your choice ultimately depends on whether you value control or convenience in your routine.

    Final thoughts after testing both brushes

    After extended testing, it’s clear that neither brush is universally better—they simply serve different needs. The Denman shines in routines that prioritize structure and polish, delivering long-lasting curl shape with patience. The Bounce Curl brush supports a more relaxed approach, offering easy everyday styling and flexibility across curl types. For those experimenting with techniques, having both can create routine styling versatility and adapt to changing hair goals over time.

    Feature Denman Brush Bounce Curl Brush
    Best Hair Types Wavy to Coily Wavy to Curly
    Styling Speed Moderate Fast
    Ease of Use Technique-based Beginner-friendly
    Ideal Use Wash day styling Wash & refresh days

    Frequently Asked Questions (FAQs)

    1. Which brush is better for beginners?

    The Bounce Curl brush is generally easier for beginners due to its intuitive design.

    2. Can the Denman brush work on fine hair?

    Yes, but it works best when rows are adjusted and lightweight products are used.

    3. Is the Bounce Curl brush good for thick hair?

    It performs well on thick hair but may offer less tension than a Denman.

    4. Do I need both brushes?

    Having both helps cover different styling needs, but one is enough for most routines.

  • One Night of Poor Sleep Could Reveal Your Risk for Over 100 Health Conditions Scientists Say

    One Night of Poor Sleep Could Reveal Your Risk for Over 100 Health Conditions Scientists Say

    A ground breaking AI model created by Stanford University researchers and their collaborators may one day predict a person’s risk for more than 100 different health conditions — all without the individual needing to be awake.

    According to a newly published study, the Sleep FM AI model examines a wide range of physiological signals to estimate future risks of dementia, heart failure, and all-cause mortality, using data from just one night of sleep.

    Sleep FM: A Foundation Model Trained on Massive Sleep Data

    Sleep FM is a foundation model, similar in concept to Chat GPT, but instead of learning from text, it learns from sleep. The system was trained on nearly 600,000 hours of sleep recordings collected from about 65,000 individuals.

    Rather than words or sentences, Sleep FM processes 5-second segments of sleep data gathered from multiple sleep clinics, allowing it to recognize complex biological patterns.

    How Sleep Data Was Collected Using Polysomnography

    The sleep information was gathered using polysomnography (PSG), a comprehensive and widely trusted method often considered the gold standard of sleep studies. This approach relies on multiple sensors to monitor brain activity, heart rhythms, breathing patterns, eye movement, and leg motion during sleep.

    “We record an amazing number of signals when we study sleep,” says Emmanuel Mignot, a Stanford sleep medicine professor and co-senior author of the study.

    Teaching AI to Learn From Missing Biological Signals

    To evaluate Sleep FM, researchers introduced a new training strategy known as leave-one-out contrastive learning. In this method, one type of physiological signal — such as airflow or pulse data — is intentionally removed, requiring the AI to infer missing information from the remaining biological signals.

    The team then paired this sleep data with tens of thousands of long-term patient health records, spanning up to 25 years of follow-up across a wide age range.

    Predicting Over 130 Diseases From Sleep Patterns

    After reviewing more than 1,041 disease categories, SleepFM successfully predicted 130 health conditions with notable accuracy based solely on sleep data.

    The model showed particularly strong performance in forecasting cancers, pregnancy-related complications, cardiovascular diseases, and mental health disorders, achieving a C-index above 0.8.

    High Accuracy Across Multiple Prediction Models

    SleepFM also performed well under the AUROC classification framework, which measures how accurately the model distinguishes between individuals who do or do not experience specific health events within a six-year prediction window.

    Overall, Sleep FM outperformed existing predictive models, especially in identifying risks for Parkinson’s disease, heart attacks, strokes, chronic kidney disease, prostate cancer, breast cancer, and overall mortality.

    Why Mismatched Body Signals Matter Most

    While some sleep stages and data types proved more predictive than others, the strongest insights came from imbalances between bodily systems.

    In particular, physiological signals that appeared out of sync — such as a brain showing sleep patterns while the heart appeared alert — were among the most reliable indicators of future disease risk.

    “A brain that looks asleep but a heart that looks awake seemed to signal trouble,” Mignot explains.

    Limitations and Future Potential of Sleep-Based AI

    The researchers acknowledge several limitations, including changes in clinical practices over time and the fact that the data came from patients already referred for sleep studies, meaning some segments of the general population were underrepresented.

    Despite these challenges, the study highlights the life-saving potential of AI in healthcare. Future applications could integrate Sleep FM with wearable sleep devices, enabling continuous, real-time health monitoring.

    AI Learning the Language of Sleep

    Just as large language models learn human communication by analyzing text, Sleep FM is learning to interpret sleep itself.

  • Move Over Milk Iced Vanilla Nails Are the Cool Creamy Manicure Trend Taking Over This Year

    Move Over Milk Iced Vanilla Nails Are the Cool Creamy Manicure Trend Taking Over This Year

    For fans of hyper-natural manicures, iced vanilla nails have become the ultimate creamy, refined finish gracing fingertips right now — and they may be the most adaptable nail trend yet.

    Although 2026 nail trends are set to introduce bold petrol blues and eye-catching accents, soft and creamy hues continue to stand the test of time, especially during seasonal transitions. A growing emphasis on nail health has also pushed many toward shades that create a luminous your-nails-but-better effect. As a result, sheer and gently tinted manicures are expected to remain popular in the months ahead. One look already gaining momentum is iced vanilla — a style that has existed in previous years but now appears glossier, more refined, and easier to achieve than ever.

    What Defines an Iced Vanilla Manicure?

    True to its name, this manicure feels fresh, cool, and creamy, much like vanilla gelato. The colour is softly clouded with a delicate off-white tint, making it perfect for anyone seeking a subtle yet luxurious-looking manicure suitable for every occasion.

    In essence, iced vanilla nails are glassy and milky, with a faint creamy tone rather than a stark white finish. They are typically paired with clean nail shapes such as almond or squoval, enhancing their polished and elegant appearance.

    Sheer, Opaque, and Chrome Variations

    We’ve seen ultra-sheer versions that subtly enhance the natural nail using custom-blended shades, as well as more opaque, chantilly cream-inspired finishes. Some styles even feature icy chrome overlays that evoke the look of vanilla syrup, adding a modern edge to the classic aesthetic.

    The Role of Custom Nail Blends

    Custom nail blends are expected to play a major role this year, following the popularity of trends like 2025’s rosehip oil nails. Many people are now focused on finding the perfect nude or sheer pink that complements their individual skin tone. Few have mastered this approach better than celebrity manicurist Harriet Westmoreland, whose softly tinted, glossy nail looks have become instantly recognisable on social media.

    Her signature vanilla-inspired manicures have sparked multiple trends, and last year she introduced her own range of Glass Gel polishes called Vanilla Gloss. The collection includes sheer, high-shine vanilla tones designed to be worn alone for a natural finish or layered to create a customised look. For gel manicure lovers, this range offers an effortless path to the perfect iced vanilla style.

    Why Milky Vanilla Nails Keep Trending

    This family of milky vanilla manicures has been steadily gaining popularity for good reason. Sheer nail polishes suit every setting and consistently deliver a classic, elegant result. They’re particularly appealing during January and February, when many want a refreshing alternative to deep winter reds and burgundies.

    Even if gel manicures aren’t your preference, the look can easily be recreated with regular polish or requested from a nail artist. Thanks to rising demand, more brands are now offering their own versions of softly tinted, vanilla-toned shades.

    A Timeless, Effortlessly Luxe Choice

    At this point, milky vanilla cream nails have earned their place as a timeless staple. Keeping these shades on hand ensures a quick, polished, and reliably luxurious manicure. With the shift away from heavy, opaque colours, the availability of delicate, sheer finishes continues to grow — making iced vanilla nails easier than ever to embrace.

  • Some Grey Hair Ages You Gracefully While Other Types Don’t Here’s Why

    Some Grey Hair Ages You Gracefully While Other Types Don’t Here’s Why

    Grey hair is often seen as a natural marker of aging, but not all grey hair creates the same impression. In the United States, where personal style and self-expression are closely tied to confidence, some people find their grey strands make them look refined, while others feel instantly older. The difference isn’t just about age—it’s about tone, texture, placement, and how well grey blends with your overall look. Understanding why certain grey hair looks graceful while other types don’t can help you embrace it with confidence instead of frustration.

    Why Some Grey Hair Looks Elegant and Youthful

    Grey hair that appears graceful usually has balance and intention behind it. When silver strands blend smoothly with natural tones, they create soft color contrast rather than harsh lines. Hair that reflects light well often gives off a natural silver shine, which reads as healthy and polished. Even distribution matters too, as even grey placement avoids the patchy look many people dislike. Finally, confident styling enhances overall facial harmony, making grey hair feel like a feature, not a flaw. When these elements come together, grey hair can elevate your appearance instead of aging it.

    Types of Grey Hair That Can Instantly Age Your Look

    Some grey hair feels aging because it clashes with the rest of your appearance. Dull strands lacking moisture often create a flat matte finish that looks tired rather than chic. When grey appears in isolated sections, it causes uneven color patches that draw attention for the wrong reasons. Coarse texture can exaggerate lines, leading to a rough hair texture that feels older. Paired with outdated cuts, this results in a dated overall appearance. These factors combined make grey hair seem accidental instead of intentional.

    How Hair Texture and Styling Shape Grey Hair Aging

    Texture and styling play a huge role in how grey hair is perceived. Fine hair with volume creates light reflective strands that soften facial features. On the other hand, limp styles highlight visible scalp contrast, which can feel aging. Modern cuts add movement, offering intentional modern styling that reframes grey as stylish. Regular care routines support healthy hair movement, ensuring grey looks lively rather than dull. With the right texture and style, grey hair becomes a statement instead of a concern.

    Understanding the Real Difference Grey Hair Makes

    The real distinction between graceful and aging grey hair lies in care, confidence, and context. Grey hair paired with thoughtful grooming sends confident aging signals instead of decline. When people stop fighting it, they often experience personal style clarity that reshapes how others perceive them. Grey works best when it supports balanced facial features and aligns with lifestyle choices. Ultimately, embracing grey intentionally creates authentic mature beauty that feels natural and empowering.

    Grey Hair Factor Graceful Effect Aging Effect
    Color Tone Soft silver blend Harsh white contrast
    Texture Smooth and shiny Dry and coarse
    Distribution Evenly spread Patchy sections
    Styling Modern haircut Outdated style
    Maintenance Regular care routine Neglected upkeep

    Frequently Asked Questions (FAQs)

    1. Does grey hair always make you look older?

    No, well-maintained grey hair can look elegant and youthful.

    2. Why does my grey hair look dull?

    Dullness usually comes from dryness or lack of proper hair care.

    3. Can styling really change how grey hair looks?

    Yes, modern cuts and volume can dramatically improve its appearance.

    4. Is it better to blend grey hair or leave it natural?

    Both work, as long as the choice looks intentional and suits you.

  • This Is the One Exercise Everyone Over 65 Should Prioritise According to a Certified Trainer

    This Is the One Exercise Everyone Over 65 Should Prioritise According to a Certified Trainer

    I’ve spent 15 years as a certified personal trainer, working closely with many older adults. One of the very first movements I introduce to clients aged 65 and above is the chair squat.

    This simple exercise helps build strength in the legs, hips, and core, while also supporting better balance and coordination. It’s easy to adjust, making it suitable for beginners and adaptable as strength improves.

    Who Can Do Chair Squats?

    If you have a chair nearby, you can perform chair squats too. They are safe and effective for beginners of all ages, not just seniors.

    Before starting any new exercise routine, it’s important to check with your healthcare provider, especially if you have existing medical conditions.

    What You’ll Need

    You won’t need any special equipment beyond a sturdy chair. Depending on your mobility or injury history, you may also benefit from a clear wall or a second chair for added stability.

    Recommended Reps and Progression

    If you’re new to chair squats, start with 1 set of 5 repetitions. As your strength improves, gradually increase to 12 reps per set. From there, build up slowly until you can comfortably complete 3 sets of 10–12 reps.

    How to Perform a Chair Squat

    • Stand with your feet hip-width apart, positioning a chair directly behind you.
    • Lift your arms forward until they reach shoulder height.
    • Push your hips back and bend your knees, slowly lowering yourself toward the chair.
    • Lightly tap your hips on the seat, then press through your feet to return to standing.
    • Repeat for your chosen number of repetitions.

    Trainer Tips for Better Form

    • Initiate the movement from your hips, not your knees.
    • Imagine pushing your hips back as if you’re closing a car door behind you.
    • If you’re just starting out, feel free to sit fully on the chair before standing again.
    • Use a wall or a second chair in front of you for extra balance support if needed.
    • Once the movement feels easy, increase difficulty by holding a dumbbell, using a lower chair, or removing the chair altogether.

    Benefits of Chair Squats

    Like traditional bodyweight squats, chair squats strengthen key lower-body muscles such as the quadriceps, hamstrings, glutes, and hip muscles. The chair limits range of motion and acts as a safety guide, reducing the risk of poor form or injury.

    This movement also supports everyday functional strength, making daily tasks like standing up from a couch, getting out of a car, or rising from the toilet much easier.

    In addition, chair squats can help enhance balance, bone density, and overall confidence, making them an accessible and effective form of resistance training for nearly all ability levels.

  • You Just Bought a Slow Cooker Here Are 13 Nutritious Recipes to Start Making Right Away

    You Just Bought a Slow Cooker Here Are 13 Nutritious Recipes to Start Making Right Away

    Not sure what to cook in your brand-new slow cooker? These easy, beginner-friendly slow cooker and crockpot recipes are the perfect place to start. From filling dinners to party-ready dips, each recipe is designed to help you enjoy delicious meals with minimal effort. When you’re craving something comforting and hands-off, try the Slow-Cooker Sweet Potato & Black Bean Chili or the Barbecue Pulled Chicken to put your slow cooker to good use.

    Slow-Cooker Sweet Potato & Black Bean Chili

    This hearty sweet potato and black bean chili delivers a satisfying balance of sweet and spicy flavors. For a smoky kick, swap standard chili powder for chipotle and ancho chile powder, or use reduced-sodium taco or fajita seasoning for a flavorful twist.

    Slow-Cooker Vegetable Soup

    This comforting vegetable soup is filling, nourishing, and an easy way to enjoy more vegetables. It’s a simple, wholesome option that keeps you satisfied.

    Barbecue Pulled Chicken

    This BBQ pulled chicken puts a fresh spin on traditional pulled pork by slow-cooking chicken in a tangy tomato-based sauce. Top it with sliced jalapeños, red onions, and sour cream for a bold finish. Serve it as a sandwich, over mashed potatoes, or even on whole-grain spaghetti. Pair it with shredded napa cabbage tossed with low-fat mayonnaise, cider vinegar, celery seed, and honey for a complete meal.

    White Chicken Chili

    This healthy white chicken chili delivers an impressive 22 grams of protein per serving and fits well into a diabetes-friendly eating plan. For a lighter option, top it with Greek yogurt instead of sour cream to keep it creamy while reducing fat and calories.

    Slow-Cooker Oatmeal

    This is an easy way to serve a crowd a warm, hearty breakfast. Assemble everything in the slow cooker the night before and wake up to perfectly creamy oatmeal. The slow cooker removes the need for constant stirring and ensures a smooth texture.

    Slow-Cooker Curried Butternut Squash Soup

    Skip roasting and let your slow cooker do all the work in this curried butternut squash soup. Simply add the ingredients to the crock pot, set it, and enjoy an easy, healthy dinner or packable lunches.

    Slow-Cooker Chicken & Orzo with Tomatoes & Olives

    This load-and-go meal transforms basic chicken breast and whole-wheat orzo with Mediterranean flavors like lemon and olives. It’s a complete, satisfying dish—just add a green salad.

    Slow-Cooker Vegan Chili

    This easy vegan chili is packed with wholesome ingredients like pinto and black beans, red pepper, tomatoes, and butternut squash. After a bit of chopping, everything goes straight into the slow cooker, making it an ideal weeknight dinner. Finish with fresh avocado and chopped cilantro for extra flavor.

    Slow-Cooker Spinach Artichoke Dip

    This creamy, crowd-pleasing dip comes together effortlessly in the crock pot. Keep it warm throughout your gathering so every bite has perfectly melted cheese.

    Slow-Cooker Potato Soup

    This easy slow-cooker potato soup includes all the classic toppings you love—bacon, cheese, and scallions. Pair it with a salad for a comforting dinner with just 15 minutes of active prep time. It’s also great for casual parties—serve it straight from the slow cooker and let guests customize their bowls. For a vegetarian version, use vegetable broth and skip the bacon.

    Slow-Cooked Sweet and Sour Cabbage

    This dish gets its signature sweet-and-sour flavor from a blend of cloves, cabbage, and cider vinegar. Don’t leave out the apples—their natural sweetness adds a worthwhile finishing touch.

    Slow-Cooker Buffalo Chicken Dip

    This healthier take on classic Buffalo chicken dip cooks entirely in the slow cooker, making it an easy, hands-off appetizer. Keep it warm for games, parties, or casual gatherings, and serve with carrot sticks, celery sticks, and tortilla chips for dipping.

  • This New Grey Hair Covering Trend Helps You Look Younger Without Using Traditional Hair Dye

    This New Grey Hair Covering Trend Helps You Look Younger Without Using Traditional Hair Dye

    Grey hair is no longer something people feel pressured to hide, especially in India where beauty trends are shifting toward healthier, low-maintenance routines. A new grey hair covering trend is helping people look younger without relying on traditional hair dye. Instead of harsh chemicals, this approach focuses on gentle colour blending, nourishing treatments, and smart styling techniques that soften the appearance of greys. The result is a more natural, refreshed look that aligns with modern lifestyles, busy schedules, and growing awareness about scalp and hair health.

    A modern grey hair covering trend gaining popularity

    This modern grey hair covering trend is built around subtle enhancement rather than complete colour change. Many people are choosing tinted conditioners, colour-depositing masks, or herbal blends that gradually tone grey strands. These methods work with your natural shade, creating depth and shine instead of flat colour. Users love the soft colour blend, the gradual visible change, and the natural hair finish it delivers. Because the process is gentle, hair feels healthier over time. The approach fits perfectly with people who want flexibility, minimal upkeep, and a look that still feels authentic rather than overly styled.

    Why this grey hair trend helps you look younger

    Looking younger often comes down to how fresh and balanced your hair appears. This grey hair trend reduces harsh contrasts between grey and dark strands, which can age the face. By smoothing tone variations, it creates a softer frame around facial features. Many notice a brighter overall tone, a less harsh contrast, and a more polished appearance after regular use. Because these products also condition the hair, strands look shinier and fuller, which naturally signals youth and vitality without drastic changes.

    How this trend replaces traditional hair dye routines

    Traditional hair dye often requires frequent touch-ups and exposure to strong chemicals. This new grey hair covering trend offers an alternative that fits modern routines. Instead of long salon sessions, people integrate these products into regular washing or weekly care. The benefits include low maintenance routine, scalp friendly formula, flexible colour control, and reduced chemical exposure. Over time, users appreciate the freedom to adjust intensity or stop anytime, making it ideal for those seeking control without long-term commitment.

    Summary or Analysis

    This new grey hair covering trend reflects a broader shift toward mindful beauty choices. Rather than hiding greys completely, it enhances natural hair in a way that feels effortless and healthy. The combination of care and colour delivers confidence through simplicity, healthier looking strands, and age positive styling. For many in India, it strikes the right balance between looking youthful and staying true to oneself, proving that modern beauty is more about smart choices than dramatic transformations.

    Feature New Grey Hair Trend Traditional Hair Dye
    Application style Gradual and flexible Full colour coverage
    Maintenance level Low and adjustable High with frequent touch-ups
    Hair health impact Nourishing and gentle Can be drying
    Commitment required Short-term, optional Long-term colour commitment

    Frequently Asked Questions (FAQs)

    1. What is this new grey hair covering trend?

    It uses gentle toning products to blend greys naturally without harsh dyes.

    2. Is this trend suitable for all hair types?

    Yes, most formulas are designed to work on different hair textures.

    3. How long does it take to see results?

    Most people notice visible improvement within a few uses.

    4. Can I stop using it anytime?

    Yes, the colour fades gradually without leaving harsh regrowth lines.

  • A Beginners Guide to Starting Yoga for Runners Looking to Improve Mobility Strength and Recovery

    A Beginners Guide to Starting Yoga for Runners Looking to Improve Mobility Strength and Recovery

    Many runners dabble in yoga, especially during certain seasons, only to abandon their mats beside forgotten toe spreaders and rolled-up compression socks. Sometimes yoga feels too slow, sometimes uncomfortable, or it may seem like it’s doing nothing to improve your running. Most often, the problem isn’t yoga itself—it’s not knowing where to place your focus. These four poses offer a smart, practical starting point.

    Why Yoga Matters for Runners

    For runners new to yoga, the goal isn’t stretching just to become more flexible. It’s about giving overworked muscles a gentle break, improving mobility, and easing tension where it tends to build. When practiced with intention, yoga becomes less about stretching deeply and more about supporting a strong, steady stride.

    Low Lunge for Hip Balance

    Low lunge softly opens the front of the hips while encouraging the glutes to stabilize. This balance is especially valuable for runners who spend long hours with hips slightly flexed—both while running and sitting.

    • Step one foot forward into a lunge and lower the back knee to the floor.
    • Stack the front knee over the ankle and lift the torso so shoulders align over hips.
    • Rest hands on the thighs or floor and hold for 20–30 seconds per side.

    Beginner tip: Avoid forcing depth. A shorter stance still delivers benefits without stressing the lower back.

    Half Split for Controlled Hamstring Stretching

    Half split targets the hamstrings in a controlled way, which is ideal when those muscles already feel taxed from running. It allows a stretch without placing strain on the lower back.

    • From low lunge, shift hips back and gently straighten the front leg.
    • Keep the foot lightly flexed and hinge from the hips instead of rounding the spine.
    • Hold for 20–30 seconds per side using the floor, blocks, or thigh for support.

    Beginner tip: A small bend in the knee is perfectly fine. The stretch should stay in the muscle, not behind the knee.

    Bridge Pose to Reinforce Strength

    Bridge pose builds strength in the glutes and supports the hamstrings while opening the front of the hips. For runners, this reinforces good posture when fatigue starts to creep in.

    • Lie on your back with knees bent and feet hip-width apart.
    • Press through the heels and lift the hips, keeping ribs down and hips level.
    • Hold for 20–30 seconds and repeat once or twice.

    Beginner tip: Lift only to a height you can control. Think steady and strong, not maximum height.

    Reclined Figure Four for Deep Hip Relief

    This pose focuses on the glutes and deep hip muscles that help guide knee alignment and stride control. It’s especially useful after a run when standing poses feel like too much.

    • Lie on your back and cross one ankle over the opposite knee.
    • Let the top knee open naturally, staying there or drawing the legs toward the chest.
    • Relax the head and shoulders and breathe slowly for about 30 seconds per side.

    Beginner tip: If the stretch feels intense, keep the bottom foot grounded for less intensity.

    Be Kind to Your Body

    Yoga should feel supportive, not like another hard workout to push through. If a pose causes sharp pain, numbness, or simply feels wrong, ease back or skip it. There’s no benefit in forcing positions and no single “perfect” way to practice. The aim is to meet your body where it is and step off the mat feeling better than when you started.

    Why You Don’t Need a Long Run Every Weekend

    The weekly long run has become deeply ingrained in running culture, but it may not be as essential as many believe. Performance coach and author Steve Magness recently summed it up simply: long runs are valuable, but they don’t need to happen every single week. Spacing them out can sometimes lead to better results.

    Your Calendar Isn’t a Training Plan

    The traditional seven-day training week is a human-made structure, not a biological requirement. While it fits neatly into work schedules, the body doesn’t respond based on calendar days. Many coaches now plan training in longer blocks. Luke Humphrey of Hanson’s Coaching Services notes that a microcycle—typically seven days—can extend to 10 to 14 days. The Hanson’s Brooks Distance Project, for example, uses a 10-day cycle with a long run every tenth day.

    Recovery Is What Makes Training Work

    Training only delivers results when the body has time to recover. Without planned recovery, fatigue can shift from productive to harmful. Research published in Frontiers in Sports and Active Living shows that extended periods of high-demand training without sufficient recovery increase the risk of non-functional overreaching and overtraining syndrome.

    Running resource site Run161 suggests building load for two to three microcycles, then following with a reduced-load cycle. If easy runs constantly feel hard, scheduled recovery may be the missing piece.

    How a 14-Day Cycle Can Work

    A longer training cycle often means giving each weekend a different purpose. One includes a longer, more demanding run, while the other features a shorter, more comfortable option. Hard workouts can then be placed when you’re best prepared, rather than when the calendar dictates.

    The Simplest Training Boost You’re Probably Missing

    Many runners nail their workouts but remain largely inactive the rest of the day—sitting at desks, on couches, or in front of screens. This is where NEAT, or non-exercise activity thermogenesis, comes in. These everyday movements don’t count as workouts and won’t show up on Strava, but they play a meaningful role in overall health and running performance.

    What NEAT Really Means

    NEAT includes calories burned through everyday actions that aren’t structured exercise. Walking around the house, carrying groceries, climbing stairs, standing while cooking, or doing laundry all count. These movements may seem small, but together they add up.

    Why NEAT Matters for Runners

    Even runners with consistent training schedules can spend most of the day sitting. NEAT helps fill in those gaps, keeping the body active outside workouts. A large study following more than 45,000 women over 20 years found that more sedentary time was linked to lower odds of healthy aging, while light activity improved those odds. Simply replacing an hour of TV with light movement made a measurable difference.

    How to Add More NEAT Today

    Start small and weave movement into your routine. Take a short walk after meals, stand during low-focus work, pace while on phone calls, choose stairs when possible, or do a quick lap around the block in the evening. Light movement is the goal—it doesn’t need to be intense or impressive to be effective.

  • Master These 4 Standing Exercises at 60 and Prove You’re Fitter Than Most People in Their 50s

    Master These 4 Standing Exercises at 60 and Prove You’re Fitter Than Most People in Their 50s

    Staying fit after 60 is less about lifting heavier weights or exercising longer and more about functional strength, balance, and movement quality. Research consistently shows that exercise programs built around real-life movement patterns—such as standing, walking, stepping, and balance challenges—lead to meaningful improvements in adults over 60. These programs enhance gait speed, mobility, balance, and overall ability to perform daily activities more effectively than traditional training methods.

    This matters because every routine task, from standing up from a chair to climbing stairs, depends on strong and stable movement systems. When these systems function well, the body becomes more resilient. Standing-based exercises encourage muscles and the nervous system to work together, supporting joint stability, postural control, and muscular endurance without placing unnecessary strain on the joints. The result is a style of fitness that feels more natural and practical.

    The four standing movements below test more than raw strength—they assess real-world capability. Performing them with confidence at 60 suggests greater stability, coordination, and overall fitness than many people years younger. Each exercise integrates the shoulders, core, hips, and legs so the body moves as one unit, which is essential for long-term health and performance.

    4 Daily Standing Drills That Reduce Belly Overhang Better Than Ab Workouts After 45

    Single-Leg Balance With Reach

    Balance is not only about avoiding falls; it reflects how well muscles, joints, and sensory systems work together. Standing on one leg while reaching engages the glutes, core, ankles, and proprioceptive systems at the same time. This challenges the body to stay centered and controlled. As balance improves, confidence during walking, turning, and stair use also increases—abilities that often decline early with age. Performed with focus, this movement builds functional strength far beyond basic balance holds.

    How to Do It

    • Stand upright near a chair or counter for support
    • Lift one foot slightly off the floor
    • Reach the opposite arm forward, then extend it overhead
    • Keep hips level and spine tall
    • Hold with control, then switch sides

    4 Daily Chair Drills That Strengthen Your Core Better Than Floor Work After 55

    Hip Hinge to Stand Walk

    This movement trains the body to generate power from the hips rather than overloading the lower back or knees. The hinge combined with a deliberate walk requires coordination between the shoulders, core, and hips, reinforcing full-body movement patterns. With regular practice, walking becomes smoother, posture improves, and strength transfers more easily to everyday tasks like lifting groceries or rising from low seating.

    How to Do It

    • Stand tall with feet hip-width apart
    • Push hips back while maintaining a neutral spine
    • Pause briefly, then drive hips forward to stand
    • Take a slow, controlled step forward
    • Repeat the hinge and step sequence for several reps

    6 Daily Exercises That Build Strength Better Than Machines After 50

    Standing Half-Squat With Arm Raise

    While squats strengthen the legs, adding an arm raise transforms this into a total-body exercise. The combination strengthens the shoulders, upper back, and core while the legs generate force. Coordinating the squat with arm movement raises the heart rate without impact, reinforces posture, and creates tension through the midsection. After 60, this pattern better prepares the body for lifting, reaching, and everyday power demands than isolated machine exercises.

    How to Do It

    • Stand with feet set wide in a squat stance
    • Lower into a partial squat with knees tracking forward
    • As you rise, lift arms out to shoulder height
    • Keep chest open and core engaged
    • Move smoothly through each repetition

    The 12-Minute Standing Fat-Burner for Women Over 50

    Side Step With Knee Lift

    Side-to-side strength is often overlooked, yet it plays a major role in stability when changing direction. This movement activates the hip abductors, adductors, and deep core muscles while also challenging balance and coordination. Raising the knee adds a rotational stability demand, making this a powerful indicator of functional fitness. Mastery of this exercise strongly supports confidence and control during daily movement.

    How to Do It

    • Stand tall with feet together
    • Step sideways into a wider stance
    • Lift the trailing knee toward waist height
    • Land softly and switch sides
    • Maintain core engagement throughout
  • Seven Minute Hip Mobility Routine Reduces Tightness and Improves Daily Movement

    Seven Minute Hip Mobility Routine Reduces Tightness and Improves Daily Movement

    My hips have always been tight but they feel worse during this season. I work long hours at my desk and the stiffness builds up quickly. I take shorter steps when I walk and feel twinges when I run. Standing up after sitting too long brings that familiar ache. I know mobility work helps but it has to fit my schedule. When I’m busy I stick with routines under 10 minutes because they’re easier to do consistently. That’s why I tried a seven-minute hip mobility routine from Lindsey Bomgren who is a NASM-certified personal trainer. She posts as @nourishmovelove & promised the routine would loosen tight hips fast without equipment or taking much time. I did it regularly for three weeks & noticed three important things that changed how my hips feel every day.

    Lindsey’s 7-Minute Hip Mobility Routine

    Lindsey’s hip mobility routine features seven exercises, each lasting one minute. She highlights in the video that you can pause at any time to spend extra moments on exercises that feel especially beneficial. The routine includes:

    90/90 internal rotation knee drops

    90/90 pigeon pose

    90/90 rear knee and heel lifts

    tabletop hip circles

    frog rocks

    V-sit leg lifts

    Cossack squats

    This sequence is effective because it moves your hips through multiple positions and patterns in a short time. It targets both internal and external hip rotation, movements often overlooked but essential for comfortable walking, running, and sitting. The 90/90 exercises penetrate deep into the hip capsule, while frog rocks and tabletop hip circles enhance range of motion in various directions. This routine balances mobility and strength work, as the V-sit leg lifts and Cossack squats engage muscles to maintain extended positions, ensuring long-lasting mobility improvements.

    Three Changes Noticed After Trying the Routine

    Hips Felt Looser Without Forcing Stretches

    What surprised me was how quickly my hips became looser without the uncomfortable strain of deep stretching. The routine progresses slowly between positions, using 90/90 variations and hip circles to improve flexibility in a gentle, effective way. After just one week, everyday movements like rising from a chair or taking longer steps felt smoother. By week three, the usual stiffness after sitting all day had noticeably decreased, which felt like a real win.

    Improved Hip Mobility in Multiple Dimensions

    This routine goes beyond basic flexibility. Exercises like V-sit leg lifts and Cossack squats challenge your hips through various ranges while keeping muscles active in deeper positions. Over three weeks, I noticed progress in movements involving internal and external rotation that had previously felt restricted. My hips now feel balanced and supported all day, rather than temporarily loose after a single session.

    Short Duration Encourages Consistency

    Although seven minutes seems brief, that compact duration makes the routine easy to stick with. On busy days, it felt manageable to fit in during work breaks or even before bed, when I might otherwise skip exercise. Maintaining this routine almost daily created more noticeable results than occasional longer workouts ever did.

    Final Verdict

    After three weeks, this routine has become a regular part of my mobility practice. Its short length makes it easy to maintain, yet it delivers real results. For anyone who sits for most of the day, this is an accessible and effective method to loosen tight hips and improve overall mobility.