Blog

  • This Boiled Rosemary Habit From My Grandmother Instantly Changes How Your Home Feels

    This Boiled Rosemary Habit From My Grandmother Instantly Changes How Your Home Feels

    That moment often arrives when a forgotten kitchen habit quietly returns: a saucepan of rosemary gently simmering, releasing a crisp, herbal aroma that drifts through the house and creates a feeling that the space can finally breathe again.

    Why rosemary continues to reappear in contemporary homes

    From rocky Mediterranean slopes to compact apartments and family houses, rosemary has travelled through generations. It thrives in pots, rests on windowsills, seasons weekend meals, and increasingly finds a place in modern wellbeing habits. Long before words like aromatherapy or productivity entered everyday language, people were already boiling rosemary sprigs in water.

    In many Brazilian households, grandmothers still share the tradition of simmering rosemary to “refresh the air” after tense moments or demanding days. Comparable practices exist across Europe and the Middle East, where the herb has symbolised memory, clarity, and protection for centuries.

    Beneath the folklore lies a simple principle: natural aromas can influence mood and perception, gently shaping how a room feels. Today, this revived habit aligns with a global preference for affordable, low-effort ways to feel more comfortable at home, especially as living spaces double as offices, retreats, and places of concern.

    How simmering rosemary interacts with mind and body

    Rosemary leaves contain several volatile compounds, including 1,8-cineole, camphor, and borneol. Heating the herb in water releases these elements into the steam, allowing them to spread through the air and be inhaled naturally.

    This is where science and tradition intersect. Research from Northumbria University in the UK showed that participants exposed to rosemary aroma performed significantly better on certain memory and attention tasks than those in a control group. The fragrance did not transform abilities overnight, but measurable improvements in focus were observed.

    The explanation is relatively direct: aromatic molecules travel from the nose to brain regions linked to alertness and memory. Smell reaches the limbic system rapidly, influencing emotions and stress responses faster than many conscious efforts. The clean, sharp scent of rosemary often signals a mental reset, even before any cognitive effects are noticed.

    Rosemary also offers mild antimicrobial and antioxidant qualities. While it does not replace cleaning or ventilation, it contributes to a general sense of freshness and renewal within the home.

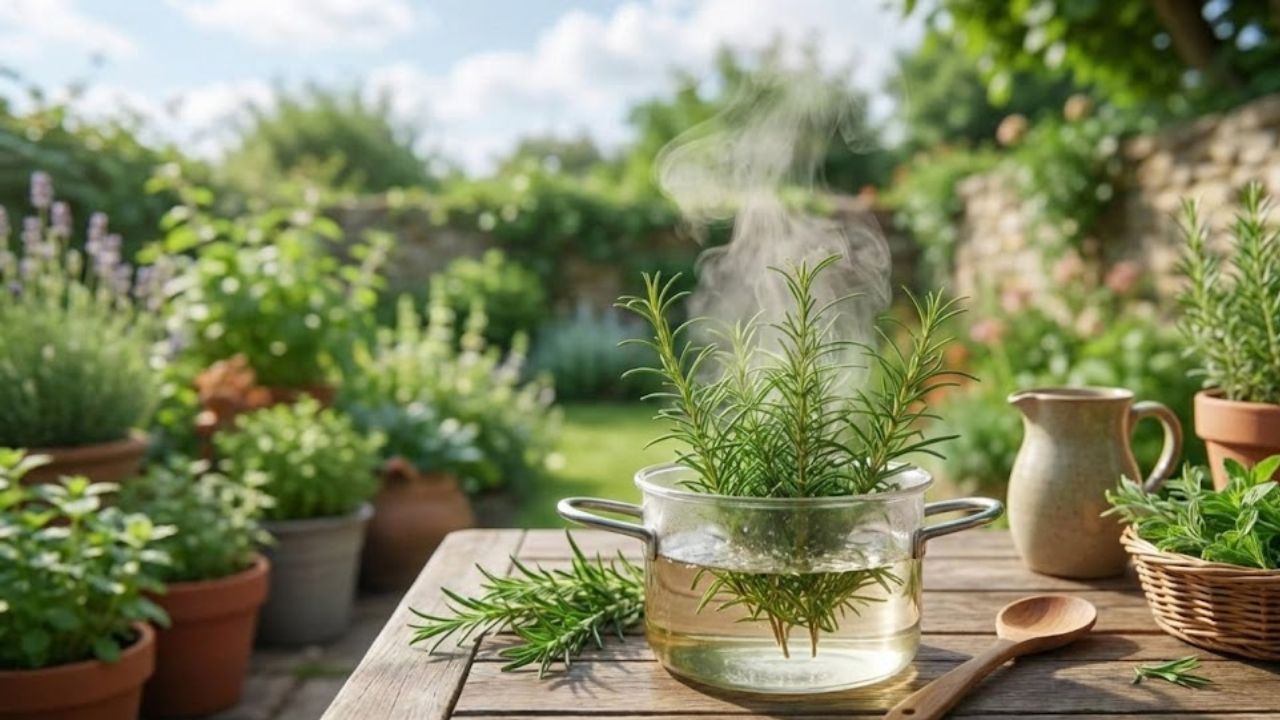
    The stove-top rosemary ritual, explained step by step

    Creating a gentle, house-filling rosemary fragrance requires no special tools. A simple pot and water are enough to start.

    Easy way to simmer rosemary at home

    • Fill a small saucepan halfway with cold water.
    • Add three to five fresh rosemary sprigs, or one tablespoon of dried leaves.
    • Heat until the water reaches a boil.
    • Reduce to a low simmer for 10 to 20 minutes, adding water if needed.
    • Keep the pot uncovered so the steam can circulate.

    The aroma spreads slowly, moving from the kitchen into nearby rooms. Many people associate this ritual with specific moments, such as before visitors arrive, during study time, or after a stressful call, allowing the scent to become linked to a calmer mood.

    Once cooled, the liquid can be strained into a spray bottle and reused as a light fabric or room mist. In this way, one pot serves twice: first as steam, then as a subtle refresher for soft furnishings.

    When a diffuser becomes the better option

    For those who prefer not to monitor a stove or who share living spaces, essential oil diffusers offer a convenient alternative. A few drops of rosemary oil in water can produce a similar scent with minimal effort.

    Common ways to use rosemary indoors

    • Boiling fresh rosemary: creates a strong, natural aroma but requires supervision.
    • Essential oil in a diffuser: provides consistent intensity, though oil quality varies.
    • Spray made from rosemary infusion: allows targeted use but has a shorter shelf life.

    Diluted essential oils can also be blended. Rosemary pairs well with citrus oils like lemon or orange for kitchens, or with lavender in bedrooms to soften its stimulating edge.

    From “heavy energy” to modern stress science

    Older generations often describe emotional tension in simple terms, saying a house feels heavy or stagnant. Modern psychology uses different language, yet addresses similar experiences. Ongoing stress, digital noise, and unfinished tasks all contribute to mental overload.

    A small ritual, such as preparing rosemary on the stove, creates a deliberate pause. Repeating the same steps trains the brain to associate the action with slowing down, much like a familiar cup signals the start of tea time.

    While it does not solve underlying problems, boiling rosemary frames the day with intention rather than reaction. Therapists often recommend cues like this, and scent works particularly well because it is subtle and screen-free.

    Safety notes and practical considerations

    Despite its gentle reputation, a few precautions are important. Individuals with asthma or fragrance sensitivity should begin with small amounts and brief exposure. Babies and pets may respond differently to strong scents, so keeping at least one unscented room is wise.

    • Never leave a simmering pot unattended.
    • Avoid applying undiluted essential oil directly to skin.
    • Use food-grade rosemary or trusted oils.
    • Seek medical advice before heavy oil use if pregnant or managing epilepsy or respiratory conditions.

    The main risk often lies in unrealistic expectations. A pleasant aroma cannot replace professional care, but it can complement calming habits such as mindful breathing or tidying a space.

    Beyond the saucepan: everyday rosemary uses

    Rosemary easily extends into other small routines. Dried sprigs in linen cupboards add scent and help deter insects. A potted plant near a workspace allows for a quick sensory break by gently crushing a leaf.

    Cooking with rosemary reinforces the same aromatic note, linking meals with comfort and continuity. Simple dishes like roasted vegetables or potatoes seasoned with the herb echo the fragrance used around the home.

    Cooled rosemary water can also be added to basic homemade cleaners with vinegar and water, improving the smell of everyday chores without turning them into something complicated. Across all these uses, the pattern remains the same: a modest plant that quietly supports a clearer, more intentional home atmosphere, starting with nothing more than water, heat, and a handful of fragrant leaves.

  • Women Using Rice Water Hair Rinse Are Seeing Faster Hair Growth in Just 14 Days

    Women Using Rice Water Hair Rinse Are Seeing Faster Hair Growth in Just 14 Days

    Across India, women are rediscovering an age-old beauty ritual that promises healthier, faster-growing hair without expensive products. Rice water hair rinse, once used quietly in many households, is now gaining attention for its visible results within just two weeks. Rich in nutrients and easy to prepare at home, this natural rinse fits perfectly into modern routines focused on gentle, chemical-free care. From students to working professionals, many women say the change in hair texture, strength, and length feels surprisingly quick and deeply satisfying.

    Rice Water Hair Rinse for Faster Natural Hair Growth

    Using rice water as a hair rinse works because it delivers nutrients directly to the scalp and strands. The starchy liquid left after soaking rice contains amino acids and vitamins that support root nourishment and improve scalp circulation. When applied regularly, it helps reduce breakage, allowing women to notice visible length retention sooner than expected. Many users also report stronger hair strands that feel smoother after just a few washes. In India’s varied climate, this rinse is especially helpful because it balances dryness while avoiding heavy residue that can weigh hair down.

    How Rice Water Rinse Supports Healthy Hair Growth

    One reason rice water shows results quickly is its effect on overall hair health. The rinse helps repair damaged cuticles, leading to improved hair elasticity and less snapping during combing. Women who massage it gently into the scalp often experience reduced hair fall within days. Over time, consistent use supports natural shine boost and enhances scalp strength, creating the right environment for growth. Instead of forcing new growth, rice water protects existing hair, which is why the length becomes noticeable faster without harsh treatments.

    Why Women Prefer Rice Water Hair Rinse at Home

    Another big advantage of rice water is how simple it is to include in weekly routines. It requires no special tools and offers budget-friendly care for women of all ages. Because it is mild, it suits sensitive scalp types and avoids the dryness caused by many shampoos. Regular users appreciate the low chemical exposure and the sense of following a traditional beauty method passed down through generations. For busy lifestyles, this rinse provides noticeable benefits without long salon visits or costly products.

    Summary and Hair Care Insight

    Rice water hair rinse is not a miracle shortcut, but it is a practical way to support healthier growth naturally. In just 14 days, many women notice better texture, less fall, and a subtle increase in length due to consistent scalp care. The key lies in gentle application routine and patience rather than overuse. When combined with balanced nutrition and basic hair hygiene, this rinse becomes part of a sustainable hair habit that respects natural growth cycles. For Indian women seeking simple solutions, it offers a realistic growth approach rooted in tradition.

    Aspect Rice Water Hair Rinse
    Preparation Time 10–15 minutes at home
    Recommended Use 2–3 times per week
    Suitable Hair Type Dry, normal, mildly oily
    Visible Results Within 10–14 days
    Main Benefit Stronger, healthier hair length

    Frequently Asked Questions (FAQs)

    1. Can rice water really help hair grow faster?

    It supports healthier hair, which reduces breakage and makes growth more noticeable.

    2. How often should women use rice water on hair?

    Using it two to three times a week is generally enough for visible results.

    3. Is rice water safe for sensitive scalps?

    Yes, when not fermented too long, it is usually gentle and well tolerated.

    4. Should rice water replace conditioner completely?

    No, it works best as a rinse alongside regular conditioning habits.

  • Washing Bedding at This Winter Temperature Quietly Eliminates Dust Mites Without Ruining Fabric

    Washing Bedding at This Winter Temperature Quietly Eliminates Dust Mites Without Ruining Fabric

    Outside, your breath turns white in the cold. Indoors, the radiator ticks softly while the duvet feels thick, heavy, and reassuring. As you shake the pillowcase, a fine haze of dust floats briefly in the pale winter light. What you can’t see are the dust mites—microscopic residents that thrive in the same warmth that keeps you comfortable.

    You scroll through your phone beneath the covers, still irritated by last night’s sneezing. Hot wash or cold wash? Cotton or wool cycle? Care labels suggest one thing, allergy forums another. You want better sleep and clearer breathing without shrinking fabrics or dulling colours. Quietly, hidden among the small numbers on the washing machine dial, there is a specific temperature that makes all the difference.

    The overlooked winter dust mite issue

    Dust mites are often linked to summer—heat, humidity, and restless nights. Winter feels cleaner, with closed windows and crisp air. Yet this is when mites flourish most. Central heating dries the air just enough for comfort, but not enough to disturb them.

    Your mattress and duvet create a perfect refuge: warm, protected, and full of skin flakes they feed on. As you add extra blankets and pull the duvet closer on cold nights, you create an ideal microclimate. The result is often itchy eyes, blocked noses, and broken sleep in the early hours.

    The real solution is not washing more often or using extreme heat. It is washing at the right temperature, often enough to interrupt their cycle. In winter, that temperature is lower than many assume, yet more effective over time. The balance lies in a narrow range—warm enough to reduce mites and allergens, gentle enough to protect fabrics.

    Why everyday washing habits miss the mark

    A British allergy charity once examined how people actually wash their bedding. The results showed good intentions but inconsistent habits. Many admitted they default to the same 30°C mixed cycle all year round. The gap between label advice and real-life routines was striking.

    Imagine a couple in a small flat, drying clothes on radiators because outdoor air is freezing. They share one duvet, multiple pillows, and a washing machine with a 90°C cotton cycle they never use. Morning congestion is blamed on the building or nearby pets, while dust mites quietly thrive.

    When they switch to a consistent 60°C wash for sheets and pillowcases, things slowly change. Colours remain intact, fabrics survive, and morning stuffiness eases over several weeks. The right winter temperature succeeds where endless low-temperature washes fail.

    Understanding the temperature that works

    From a scientific perspective, dust mites do not react to heat in an instant. Studies show they begin to struggle in the mid-50s °C, and a well-maintained 60°C cycle significantly reduces both mites and their allergens. There is no need to boil your bedding to see results.

    Extremely hot cycles like 90°C are harsh on textiles. They weaken fibres, fade colours, and damage elastic over time. At the other end, the popular 30°C eco cycle protects fabric and energy bills but leaves mites largely untouched. This is why 60°C becomes the winter sweet spot for bedding that allows it.

    • This cleaning tool works better when not used daily
    • This common plant placement mistake limits growth potential
    • How a 10-second pause before replying reduces conflict
    • Goodbye fines? Authorities unveil new official speed camera tolerances that could change how motorists are penalized
    • Legendary rock band retires after 50 years “the hit everyone knows”
    • Fishermen accused of lying as orcas blamed after sharks attack their anchor rope in terrifying sea showdown
    • Soon a driving licence withdrawal for senior motorists after a certain age?
    • Why doing nothing for five minutes can improve focus afterward

    The logic is straightforward. Combine a stable 60°C wash with effective detergent and proper drum movement, and you reach the point where mites and allergens are significantly reduced. Repeating this through winter keeps their numbers low, rather than chasing them with occasional extreme washes.

    A winter wash routine that delivers results

    For most standard cotton bedding, the temperature that works best in winter is 60°C. Not a hesitant 40°C, and not an aggressive 90°C. A regular 60°C cotton cycle, used weekly or every ten days for sheets and pillowcases, changes the balance.

    This level of heat disrupts dust mites while remaining safe for most modern linens when care labels allow it. Duvet covers, fitted sheets, and pillowcases tolerate it well when the drum is not overloaded. Think of this approach as ongoing maintenance, not punishment.

    Duvets and pillows require more care. Some synthetic fillings tolerate 60°C, while feather options often prefer 40°C. When higher heat isn’t possible, pairing a 60°C cover wash with thorough drying—either high-heat tumble drying or very cold, dry outdoor air—helps reduce allergens.

    Let’s be honest: nobody does this perfectly. Sheet changes are often delayed in winter when the cold makes the task feel exhausting. That’s why a realistic rhythm matters more than strict discipline.

    A sensible winter target is washing pillowcases weekly at 60°C, with full sheets and duvet covers every one to two weeks. This slows mite rebound without wearing out fabrics. If your machine includes an allergy or hygiene 60°C program, it often holds the temperature longer, improving effectiveness.

    The most common mistake isn’t missing a wash—it’s combining everything on a quick 30–40°C cycle and wondering why nights still feel stuffy. The right temperature, used less often, works better than frequent low-heat cycles.

    “Once we stopped avoiding 60°C and used it only for bedding, my son’s night coughing dropped from daily to occasional,” says Anna, 36, living in a small London flat with electric heating. “Our sheets still look fine. What really changed was how we sleep.”

    Small, practical changes can have a surprisingly large emotional effect. On a cold evening, climbing into bedding washed at the right temperature brings a sense of comfort and reassurance. It quietly affects how you breathe, rest, and feel at home.

    • Use 60°C for sheets and pillowcases when labels allow
    • Rotate pillowcases more frequently during winter
    • Dry bedding thoroughly using heat or very dry air
    • Keep winter-only bedding sets suitable for regular warm washes

    Preserving fabrics while reducing dust mites

    Many laundry decisions are driven by fear of damaging expensive or beloved bedding. In reality, 60°C is not a fabric killer, especially for quality cotton. Greater damage comes from overloading the machine, excessive friction, and harsh detergents.

    Winter is a good time to simplify routines. Use one dependable detergent, avoid heavy bleach, stick to a consistent 60°C bedding cycle, and reduce spin speeds when fabrics seem delicate. Textiles last longer when they avoid extreme swings between very low and very high temperatures.

    That moment when a favourite duvet cover looks slightly dull or less soft often results from excessive heat or product use, not from a balanced 60°C wash. Fabric care is about consistency, not avoiding warmth altogether.

    Shifting your mindset helps. Instead of seeing hot washes as punishment, view 60°C as a targeted tool. You are not boiling everything out of fear—you are choosing a precise temperature that balances cleaner bedroom air and longer-lasting bedding.

    Some people add an extra rinse to remove detergent residue that can irritate skin. Others rely on allergen-proof mattress and pillow covers and relax their washing schedule slightly. The technical choices matter, but so does the peace of mind that comes from knowing you’ve done enough.

    Winter nights will always feel longer and heavier. Still, understanding that a simple, regular 60°C routine can shift the balance in your favour carries quiet power. It’s not a gadget or a miracle product—just a number on the dial that finally makes sense.

    Next time you strip the bed on a grey afternoon, steam clouding the mirror, those care labels may look different. You’ll know that between too cold to matter and hot enough to damage lies a working range where mites lose and fabric survives.

    On paper, it’s only a few degrees. In daily life, it can mean the difference between waking congested and waking with the calm sense that your bed is truly clean—a comfort your lungs, skin, and sleep quietly notice every night.

    • Optimal winter temperature: 60°C wash for cotton sheets and pillowcases – reduces dust mites without harming fabric
    • Realistic routine: Weekly pillowcases, sheets every 1–2 weeks – supports easier breathing without extreme habits
    • Fabric care balance: Avoid 90°C extremes and harsh products – extends bedding life while keeping it clean
  • This Bear Spot the Difference Puzzle Will Seriously Test Your Observation Skills

    This Bear Spot the Difference Puzzle Will Seriously Test Your Observation Skills

    Observation puzzles have become a popular way to sharpen the mind, and this tricky bear difference challenge is a perfect example. In India, such visual games are widely shared across social media and learning platforms because they combine entertainment with mental exercise. This puzzle invites readers to closely inspect two nearly identical bear images and spot subtle changes. It’s not just about finding differences quickly; it’s about training the brain to slow down, concentrate, and notice details that are often overlooked in everyday life.

    Observation Skills Tested Through a Bear Difference Puzzle

    This bear difference puzzle is designed to push your visual attention beyond casual looking. At first glance, the images appear identical, but careful scanning reveals small changes that demand patience. Engaging with puzzles like this strengthens pattern recognition by forcing the brain to compare shapes, colors, and positions. Many players miss the hidden differences because they rush instead of observing calmly. Taking your time improves mental focus, helping you stay present and methodical while solving the challenge.

    Why Bear Difference Puzzles Improve Observation Skills

    Solving visual puzzles regularly acts as gentle brain training for people of all ages. When you search for differences, your eyes and mind work together to enhance quick observation without feeling stressful. These puzzles reward careful detail spotting, encouraging players to trust their instincts while double-checking assumptions. Over time, repeated practice builds cognitive stamina, allowing you to stay attentive for longer periods, both in puzzles and real-life situations.

    How to Approach a Tricky Bear Difference Puzzle Successfully

    A smart strategy can make these puzzles far more enjoyable. Start by scanning the images slowly instead of jumping into timed challenges. Move section by section to reduce mistakes and build error awareness. This approach enhances perceptual accuracy, helping you notice even the smallest visual shifts. With consistent effort, puzzles become a tool for self improvement, boosting patience and sharpening everyday observation habits.

    What This Puzzle Reveals About Your Thinking Style

    Beyond entertainment, this bear puzzle offers insight into how you process information. Regular engagement encourages daily practice that strengthens focus over time. Successfully spotting differences supports confidence building, especially for those who doubt their attention skills. The challenge also promotes mental agility, making it easier to adapt to new visual tasks. Most importantly, it proves that learning through play is effective, turning problem-solving into fun learning rather than a chore.

    Aspect Description
    Puzzle Type Spot-the-difference visual challenge
    Main Focus Improving observation and attention
    Difficulty Level Moderate to tricky
    Suitable For Teens, adults, and seniors
    Key Benefit Sharper visual awareness

    Frequently Asked Questions (FAQs)

    1. What is a bear difference puzzle?

    It is a visual game where players find small differences between two similar bear images.

    2. Are observation puzzles good for the brain?

    Yes, they help improve focus, attention, and visual processing skills.

    3. How long should I spend on one puzzle?

    Spending a few calm minutes is ideal, as rushing often leads to missed details.

    4. Can children play these puzzles?

    Absolutely, they are safe and beneficial for developing early observation skills.

  • Optical Illusion Test That Confuses Many—Find 1965 Quickly

    Optical Illusion Test That Confuses Many—Find 1965 Quickly

    Optical illusions are an entertaining way to see how well your brain interprets visual details. They push your mind to work harder by presenting images that appear uniform at first glance but hide subtle differences. Today’s brain teaser combines focus, speed, and sharp observation. The goal is simple yet tricky: can you find the number 1965 hidden among dozens of 1995s in just 9 seconds?

    What Makes This Puzzle Tricky

    At first look, the puzzle seems easy. The image appears to repeat the same number—1995—over and over again. However, concealed within this grid is one carefully placed variation: 1965. The distinction is minimal, with only one digit changing from a ‘9’ to a ‘6’, making it easy to miss when surrounded by identical patterns.

    The difficulty comes from repetition. Our brains naturally skim over familiar shapes and sequences, assuming they are all the same. This visual shortcut makes the single different number harder to detect. Finding 1965 within 9 seconds puts your attention span and visual sharpness to the test, especially under time pressure.

    Why Optical Illusions Benefit Your Brain

    Beyond entertainment, optical illusion puzzles provide real mental advantages. Here’s how challenges like this support cognitive health:

    Improves Attention to Small Details

    These puzzles train your brain to notice tiny differences hidden among similar objects. This skill is useful in daily life, from spotting mistakes to analyzing information carefully. Regular practice strengthens your ability to focus on fine details.

    Boosts Pattern Recognition Skills

    Distinguishing between nearly identical numbers enhances pattern recognition. This ability plays a key role in learning, problem-solving, and understanding complex information. The puzzle encourages your brain to process visual data more effectively.

    Increases Cognitive Speed

    The 9-second limit pushes your brain to react quickly. By training yourself to identify differences at speed, you improve mental processing time, which is valuable for fast decision-making and everyday tasks.

    Strengthens Focus and Concentration

    The repetitive layout can easily distract your mind. Staying locked in on the task sharpens your concentration under pressure, a transferable skill that benefits work, study, and daily responsibilities.

    The Solution Explained

    The secret to solving this puzzle lies in spotting the slight digit change. The number 1965 replaces one ‘9’ with a ‘6’, creating a subtle but important difference.

    • The unique number includes a ‘6’ instead of a ‘9’, breaking the pattern.
    • It is positioned toward the lower-right area of the image.
    • Carefully scanning each number individually makes the variation easier to detect.

    This exercise demonstrates how focusing on individual elements helps your brain isolate important details within repetitive visuals.

    Tips to Get Better at Spotting Differences

    If this challenge felt difficult, that’s completely normal. Like any mental skill, improvement comes with practice.

    Practice Consistently

    Solving puzzles regularly trains your brain to process visuals faster and more accurately. Begin with simpler challenges and gradually move to harder ones.

    Pay Attention to Minor Changes

    Train your eyes to notice small variations in numbers, shapes, or positions. The more you focus on fine details, the quicker you’ll spot differences.

    Slow Down Before Speeding Up

    When starting out, don’t rush. Take time to carefully examine each element. As your confidence grows, your speed will naturally improve.

    Explore Similar Brain Teasers

    Try other spot-the-difference, number-based, or pattern puzzles. These exercises strengthen visual processing and help your brain adapt to recognizing subtle changes.

    Why These Optical Illusion Tests Are So Enjoyable

    Optical illusion challenges combine fun with mental stimulation. They offer a refreshing break from routine while still providing a productive brain workout. Successfully finding the hidden number brings a sense of achievement that keeps you engaged.

    These puzzles also work well in social settings, encouraging friendly competition and shared problem-solving. Whether you want to sharpen your mind, test your awareness, or simply enjoy a clever challenge, optical illusions deliver both entertainment and mental benefits.

    Final Takeaway

    Puzzles like “Spot the Number 1965 among 1995s” challenge your visual perception, focus, and mental speed. While the difference between the numbers is subtle, identifying it within a repeated pattern is what makes the task engaging. These challenges are more than just fun—they help strengthen attention, improve pattern recognition, and keep your brain alert. The next time you encounter an optical illusion, take it on with confidence and enjoy the mental boost that comes with it.

  • Goodbye Kitchen Islands as a Smarter More Elegant 2026 Layout Quietly Takes Over Homes

    Goodbye Kitchen Islands as a Smarter More Elegant 2026 Layout Quietly Takes Over Homes

    Across the United States, kitchen design is entering a quiet but meaningful shift as homeowners rethink the dominance of traditional islands. Once considered a must-have feature, bulky islands are being replaced by smarter layouts that prioritize flow, flexibility, and visual calm. The 2026 kitchen trend leans toward refined planning rather than oversized centerpieces, reflecting how people actually cook, move, and gather at home. This change is not about losing function, but about gaining elegance and efficiency through layouts that feel lighter, more intentional, and better suited to modern living.

    Why Kitchen Islands Are Fading From Modern Kitchen Layouts

    For years, islands symbolized luxury, but many homeowners now see their limits in everyday use. Large islands often interrupt movement and dominate smaller kitchens, making spaces feel crowded instead of open. Designers are responding with layouts that emphasize space-saving flow and smoother transitions between prep, cooking, and dining areas. Storage is being redistributed into walls and tall cabinetry, offering integrated storage without blocking sightlines. The result is clean sightlines that visually expand the room. This shift reflects modern kitchen planning that values comfort and usability over oversized statements.

    Smarter Kitchen Layout Trends Replacing the Classic Island

    The new layouts gaining popularity focus on adaptability rather than one fixed centerpiece. Peninsulas, wall-facing workstations, and modular tables create flexible work zones that can change throughout the day. These designs support dining adaptability, allowing kitchens to shift easily from cooking to casual meals or remote work. By opening up central floor space, homeowners enjoy better social circulation when entertaining guests. This approach also improves compact efficiency, making it ideal for both apartments and larger homes seeking a calmer, more organized feel.

    Elegant Kitchen Design Ideas Shaping Homes in 2026

    Elegance in 2026 kitchens is defined less by size and more by subtle intelligence. Appliances are concealed, storage blends seamlessly into walls, and layouts emphasize hidden functionality that keeps surfaces uncluttered. Natural finishes and muted tones create material harmony, replacing visual noise with warmth. This understated approach supports quiet luxury, where quality is felt rather than displayed. By avoiding trend-heavy features, these kitchens achieve timeless appeal, ensuring they remain stylish and practical well beyond the current design cycle.

    How the New Kitchen Layout Reflects Changing Lifestyles

    The move away from islands highlights a broader design evolution shaped by how people live today. Kitchens are no longer just showpieces; they are workspaces, gathering spots, and everyday hubs. Layouts that remove obstacles improve everyday practicality while supporting multitasking and shared use. As homes adapt to long-term needs, these layouts feel like future-ready homes rather than short-lived trends. Ultimately, the success of this shift lies in thoughtful layouts that quietly enhance comfort without demanding attention.

    Layout Feature Traditional Island 2026 Smart Layout
    Floor Space Often restricted More open movement
    Storage Style Centralized Distributed cabinetry
    Flexibility Fixed structure Adaptable zones
    Visual Impact Heavy focal point Clean, minimal look
    Long-Term Use Trend-dependent Lifestyle-focused

    Frequently Asked Questions (FAQs)

    1. Are kitchen islands completely disappearing in 2026?

    No, they are becoming less common, with smarter layouts preferred in many homes.

    2. What is replacing kitchen islands most often?

    Peninsulas, wall-based workstations, and modular tables are popular alternatives.

    3. Do island-free kitchens reduce functionality?

    No, functionality is often improved through better flow and smarter storage placement.

    4. Are these new layouts suitable for small homes?

    Yes, they are especially effective in smaller spaces where openness matters.

  • This Quick 8 Minute Workout Helps Build Lean Muscle Efficiently and Fits Easily Into Busy Days

    This Quick 8 Minute Workout Helps Build Lean Muscle Efficiently and Fits Easily Into Busy Days

    Finding time to exercise can feel overwhelming, especially with packed schedules and daily responsibilities. That’s why this quick 8 minute workout is gaining attention across India as a practical way to stay active without sacrificing hours at the gym. Designed to target major muscle groups, this short routine focuses on efficiency, consistency, and smart movement rather than long sessions. Whether you’re a professional juggling work deadlines or someone managing family commitments, this approach proves that building lean muscle doesn’t always require extended workouts.

    Why a Quick 8 Minute Workout Builds Lean Muscle

    This quick 8 minute workout works because it emphasizes intensity over duration. By performing focused movements back-to-back, your muscles stay under tension, which supports strength development and toning. Short workouts like this also encourage better consistency, since they’re easier to fit into daily routines. Instead of skipping exercise altogether, people are more likely to commit when they know it only takes minutes. With time efficient training, muscle focused movements, steady calorie burn, and minimal rest periods, the body is challenged enough to stimulate lean muscle growth without excessive fatigue.

    How This 8 Minute Lean Muscle Workout Fits Busy Days

    The biggest advantage of an 8 minute lean muscle workout is how seamlessly it blends into busy lifestyles. You can complete it before work, during a lunch break, or even at home in the evening. There’s no need for elaborate equipment or long warm-up sessions, making it practical for small spaces. This approach removes common excuses related to time and access. With short daily commitment, no gym dependency, flexible workout timing, and simple exercise structure, staying consistent becomes far more achievable for people managing demanding schedules.

    Maximizing Results From an 8 Minute Muscle Routine

    To get the most from an 8 minute muscle routine, proper form and focus are essential. Moving with control ensures that the targeted muscles are doing the work, not momentum. Pairing the workout with balanced nutrition and adequate rest further supports muscle recovery and growth. While the session is short, effort level matters greatly. When done correctly, controlled body movements, full muscle engagement, consistent weekly practice, and supportive recovery habits can turn a brief routine into a powerful tool for long-term fitness progress.

    Summary and Practical Takeaways

    This quick workout approach highlights that effective fitness doesn’t always mean long hours of training. For many people, shorter routines are easier to maintain and less mentally draining. Over time, consistency plays a bigger role than workout length. By focusing on effort, form, and regular practice, this method supports sustainable results. With realistic fitness goals, manageable workout length, long term consistency, and balanced lifestyle approach, an 8 minute routine can become a reliable part of a healthier daily routine.

    Workout Aspect Details
    Total Duration 8 Minutes
    Equipment Needed None or Minimal
    Workout Location Home or Office
    Primary Benefit Lean Muscle Building
    Ideal Frequency 3–5 Times Per Week

    Frequently Asked Questions (FAQs)

    1. Is an 8 minute workout really effective?

    Yes, when performed with intensity and proper form, it can support lean muscle development.

    2. Do beginners need prior fitness experience?

    No, the routine can be adjusted to suit beginners and gradually progressed.

    3. Can this replace longer workouts?

    It can complement or temporarily replace longer sessions for busy periods.

    4. How soon can results be noticed?

    With consistency, many people notice strength and tone improvements within weeks.

  • Short Haircuts for Fine Hair That Create Volume and Make Strands Look Thicker

    Short Haircuts for Fine Hair That Create Volume and Make Strands Look Thicker

    At the salon right after the lunch crowd leaves you can see her right away. She twists the ends of her bob with her fingers while looking at her reflection that seems flatter with each second under the bright mirror lights. Her hair is clean and shiny but it lies completely flat against her cheeks. The stylist picks up a section and drops it and the whole style falls apart like a cake that didn’t rise properly. They both laugh but her eyes show a hint of sadness. She takes out her phone and shows a photo of short bouncy full hair that clearly belongs to someone who has more hair than she does. She says she just wants it to look thicker like she has said the same thing at every appointment for the past five years. The stylist smiles and picks up the scissors and suggests a different cut. After three quick cuts the hair suddenly looks alive. Something changed even though it’s hard to explain what happened. The secret is not about having more hair. It’s about getting the right short haircut for fine hair.

    Short fine hair explained: why some cuts flatten volume while others enhance it

    Fine hair behaves a bit like silk thread: soft to the touch, lightweight, and quick to slip out of shape. When the cut is wrong, strands cling to the scalp, especially around the crown and jawline. That’s how the unwanted “helmet” look appears — flat roots, no movement, and hair that feels thinner than it really is.

    With short styles, placement is everything. When length lands in the wrong spot, fine strands can look even more limp. A blunt jaw-length bob with no layering, for example, tends to stick to the face. The real secret lies in strategic length, smart layering, and careful weight removal. That’s where volume starts to show up naturally.

    One Tuesday afternoon in London, stylist Maya R. demonstrated this perfectly. A client arrived with an overgrown long bob that hadn’t been trimmed in nine months. The ends looked uneven, and the roots appeared oily just hours after washing. The hair wasn’t damaged — it was simply extremely fine.

    Maya recommended a softly layered bixie cut, blending elements of a bob and a pixie. She cropped the back, kept length at the front, and exposed the neck. Fifteen minutes later, the same hair appeared nearly 30% fuller. The client’s reaction wasn’t excitement at first, but surprise: “Wait… that’s all my hair?” That’s the power of a well-designed cut.

    From a technical perspective, fine hair struggles with two things: misplaced weight and heavy blunt lines. When too much bulk sits at the bottom, everything gets dragged downward. The roots never have a chance to lift.

    Volume-enhancing short cuts work by redistributing that weight. Excess bulk is removed where it flattens the shape, while soft structure is added to encourage lift at the crown and face. Airy layers, undercut napes, and slightly uneven edges prevent strands from clumping together. The result: hair that looks thicker without actually growing.

    The four best short haircuts that make fine hair appear fuller

    The first standout option is the bixie haircut. This pixie-bob hybrid is ideal for fine hair because it keeps gentle length around the face while shaping the back and sides closer to the head.

    This contrast instantly creates visual dimension. Subtle crown layers prevent the hair from lying flat in one sheet. With a touch of texturizing cream, individual strands separate and reflect light, creating the illusion of density. It also grows out gracefully, making it practical for anyone who doesn’t visit the salon often.

    The second favorite is the modern French bob. Not the heavy, perfectly blunt version, but a softened, slightly broken cut that falls between the lip and jaw. The ends are diffused, while internal layers stay invisible.

    On low-effort days, it tucks neatly behind the ears. On better days, a quick upside-down rough-dry delivers that effortless Parisian feel. For many with fine hair, this is the first style where flat roots finally stop being a daily frustration.

    Third comes the soft layered pixie. This isn’t an ultra-short, sharp style, but a feathered shape with movement. The sides and back are tapered for a clean outline, while the top remains longer for flexibility.

    Fine hair benefits here because there’s less weight pulling downward. A small amount of mousse at the roots and a quick blast from the dryer often does all the styling work. It’s especially freeing for anyone who’s spent years hiding behind longer, lifeless lengths.

    The fourth reliable option is the stacked nape bob. Shorter and graduated at the back, with longer front sections that angle toward the chin. From the side, it forms a soft diagonal. From the back, the stacked layers create a gentle curve.

    This structure builds volume directly into the shape. The stacking lifts hair at the occipital bone, keeping the silhouette full. Worn straight, it looks sleek. Styled with waves and a touch of sea salt spray, it can look like twice the hair.

    Key point Details Why it matters to readers
    Best cut for ultra-fine, flat hair A soft layered pixie or bixie with extra length on top and lighter sides. Avoid razor-thin ends; ask for scissors and subtle texturizing instead. Gives instant volume at the roots and makes morning styling faster, especially if your hair collapses within hours.
    Ideal styling products Lightweight mousse at the roots, sea salt or texturizing spray on mid-lengths, and a dry shampoo for day two. Skip heavy serums and oils near the scalp. Helps keep hair lifted and full without that greasy, weighed-down effect that fine hair gets too easily.
    How often to trim Every 6–8 weeks for a bob or stacked bob, 4–6 weeks for a pixie or bixie. Ask for micro-adjustments instead of dramatic reshapes each time. Keeps the shape sharp so your hair doesn’t collapse into a flat, triangular mass that

    How to style short fine hair so volume actually lasts

    The right haircut solves only half the problem; drying technique finishes the job. Fine hair needs to be lifted while it’s still damp. Once it dries flat against the scalp, regaining volume becomes difficult.

    Start by rough-drying with your head upside down until hair is about 80% dry. Use your fingers instead of a brush to lift at the crown. Once upright, a round brush can be used lightly to smooth ends or add a bend. A golf-ball-sized amount of lightweight mousse at the roots can significantly boost lift.

    In real life, styling is often rushed. In a busy coworking bathroom one Monday morning, a woman with a fresh French bob had only five minutes and a travel straightener. What worked wasn’t perfection.

    She dampened the front pieces slightly, lifted the roots with her fingers, and used warm air to set them. The back stayed imperfect, but the style looked intentional. Practical styling beats flawless routines.

    The biggest mistake with fine hair is overusing products. More product usually means heavier roots, not more volume. Thick creams, rich serums, and layered sprays quickly weigh strands down.

    Realistically, nobody styles perfectly every day. That’s why day-two habits matter. Applying a light layer of dry shampoo at night helps absorb oil before it builds up. Sleeping with your part flipped to the opposite side keeps roots lifted by morning.

    • Blot hair gently using a microfiber towel or cotton T-shirt — never rub
    • Apply styling products only to mid-lengths and ends
    • Use mousse or root spray sparingly at the scalp

    Living with short fine hair: confidence, experimentation, and ease

    Choosing short hair with fine strands is often more than a style decision. It can feel like a quiet rebellion against years of ponytails that never looked full enough. Cutting it short often means letting go of comparisons.

    On one evening train ride, a woman in her forties ran her fingers through her stacked bob and said, “I finally stopped waiting for my hair to be something it isn’t.” That moment said more than any product recommendation ever could.

    There’s a unique feeling when a cut reveals your neck, jawline, and cheekbones. Short hair on fine texture often brings that sense of freedom — familiar, yet new.

    The experience isn’t always smooth. Some weeks the fringe won’t cooperate, or humidity takes over. Some mornings you air-dry and accept the softness; other days you refine every bend. Both approaches are valid.

    Between the bixie, the French bob, the soft pixie, and the stacked bob, most people eventually discover a shape family that suits them. From there, it’s just small adjustments — a shorter fringe, a lifted crown, a different part.

    The real shift happens when the question changes from “How do I hide fine hair?” to “How do I let this texture shine?” On the page, it sounds subtle. In the mirror, it changes everything.

  • What Really Happens to Your Body When You Commit to Doing Just 15 Squats Every Day

    What Really Happens to Your Body When You Commit to Doing Just 15 Squats Every Day

    Committing to a simple daily habit like doing 15 squats may seem too easy to matter, but over time it can lead to noticeable physical changes. In India, where many people struggle to fit long workouts into busy routines, this short exercise offers a practical way to stay active at home. Squats engage large muscle groups, stimulate circulation, and gently challenge your balance. When performed consistently, even this small effort can support strength, mobility, and overall fitness, making it a realistic starting point for anyone looking to improve their health without equipment.

    How doing 15 squats every day strengthens your muscles

    When you commit to this habit, your body starts adapting by activating key muscle groups in the lower body. Your thighs, hips, and glutes work together to lift and lower your weight, which gradually improves lower body strength. Over days and weeks, repeated movement enhances muscle activation and encourages better coordination. You may also notice improved posture, as squats demand core engagement to stay balanced. Even with just a few repetitions, this routine promotes functional movement that supports everyday tasks like sitting, standing, and climbing stairs more comfortably.

    Daily squats and their impact on metabolism and energy

    Squats are a compound exercise, meaning they involve several muscles at once, which slightly elevates your heart rate. This helps encourage metabolic efficiency by prompting your body to burn more energy during and after the movement. Practicing them daily can improve blood circulation, delivering oxygen more effectively to working muscles. Many people report feeling a gentle boost in alertness due to natural energy lift after completing their set. Over time, this habit can support calorie usage without the fatigue associated with longer, intense workouts.

    What happens to your joints when you commit to daily squats

    Performed with proper form, squats can be beneficial for joint health rather than harmful. The controlled bending and straightening of the knees and hips promote joint mobility and encourage lubrication within the joints. This regular movement helps build supporting muscles around the knees, offering better stability. Squats also reinforce movement control, which may reduce stiffness caused by long hours of sitting. As flexibility improves, many notice enhanced balance support, making daily activities feel smoother and more confident.

    Why a small daily habit can lead to lasting results

    The real power of doing 15 squats every day lies in consistency rather than intensity. This manageable routine helps create exercise consistency without overwhelming your schedule. Over time, repeated effort builds habit formation, making physical activity feel normal instead of forced. Small wins like this contribute to long term fitness by keeping your body active and adaptable. Most importantly, it encourages a sustainable routine that can be expanded gradually as strength and confidence grow.

    Aspect Effect of 15 Daily Squats
    Muscle Strength Gradual improvement in legs and hips
    Time Required Less than 2 minutes per day
    Equipment No equipment needed
    Joint Health Supports mobility when done correctly
    Energy Levels Light boost from daily movement

    Frequently Asked Questions (FAQs)

    1. Is doing 15 squats every day enough for beginners?

    Yes, it is a safe and manageable starting point for most beginners.

    2. Can daily squats help with weight management?

    They can support calorie use but work best alongside healthy habits.

    3. Will squats harm my knees?

    No, proper form usually supports knee strength rather than harming it.

    4. When will I notice results from daily squats?

    Most people notice subtle changes in strength within a few weeks.

  • This Filter Like Concealer Covers Dark Circles and Acne So Well It Replaced My Foundation Completely

    This Filter Like Concealer Covers Dark Circles and Acne So Well It Replaced My Foundation Completely

    After years of enjoying mostly clear skin with only the occasional breakout, I believed acne was behind me. That changed in November, when I experienced a wave of hormonal acne unlike anything before. On my dermatologist’s advice, I started using Differin—a retinoid that speeds up cell turnover and pushes pimples to the surface faster to help clear them. This process, often called a retinol purge, means breakouts can intensify before they improve, and I’m currently right in that phase.

    A Confidence Boost in the Middle of a Retinoid Purge

    I don’t believe in masking skin with makeup—I see it more as enhancing natural features. Still, these breakouts have undeniably affected my confidence. Thankfully, I found reliable support in a high-performance concealer. I’ve trusted the Hourglass Vanish Airbrush Concealer for years to erase dark under-eye circles and subtly correct discoloration for a smooth, airbrushed look without heavy foundation. When I finally tried it on pimples and post-acne marks, I realized just how versatile it truly is.

    Why This Concealer Delivers a Flawless, Blurred Finish

    While blemishes don’t completely disappear, the silky, lightweight formula evens out my skin tone and creates a soft-focus, blurring effect that looks natural in real life. Even better, it lasts all day. Although I carry it for touch-ups, I rarely need them. Unlike many concealers, this weightless and waterproof formula stays crease-free, making it a favorite for both brightening under-eyes and concealing imperfections.

    High Pigment Coverage With Minimal Product

    Thanks to its high pigment concentration, just one or two small dots provide impressive coverage. I apply it under my eyes with a slightly damp Beauty Blender sponge for a smooth finish, then use the Hourglass Vanish Seamless Finish Concealer Brush on pimples and acne marks. To set everything, I finish with the Givenchy Prisme Libre Illuminating and Color-Correcting Loose Powder. With this routine, foundation isn’t necessary.

    What Other Shoppers Are Saying

    I’m far from the only person impressed by this luxury concealer. One Amazon shopper shared that it “blends like a dream,” describing the texture as “very creamy” and easy to apply. Another reviewer called it a “game changer,” noting that it “completely hides dark circles and brightens up the whole face,” while still feeling lightweight with impressive coverage.

    A Go-To Concealer for Multiple Skin Concerns

    If you’re dealing with active breakouts, hyperpigmentation, fine lines, or dark under-eye circles, this $38 Hourglass concealer is hard to beat. Available in 32 shades on Amazon, it has earned a permanent place in my routine—and it’s worth exploring alongside other concealers from some of my favorite beauty brands.