Blog

  • Optical Illusion Challenge: Can You Find the Inverted 76 Among Inverted 67s in 7 Seconds

    Optical Illusion Challenge: Can You Find the Inverted 76 Among Inverted 67s in 7 Seconds

    Do you believe you have a sharp eye and the ability to notice even the smallest details? Optical illusion IQ challenges have become a popular way to test focus and observation in just a few seconds. They appear simple and harmless, yet they quietly force your brain to work harder than expected. This challenge is designed to see how well you can detect subtle differences under time pressure.

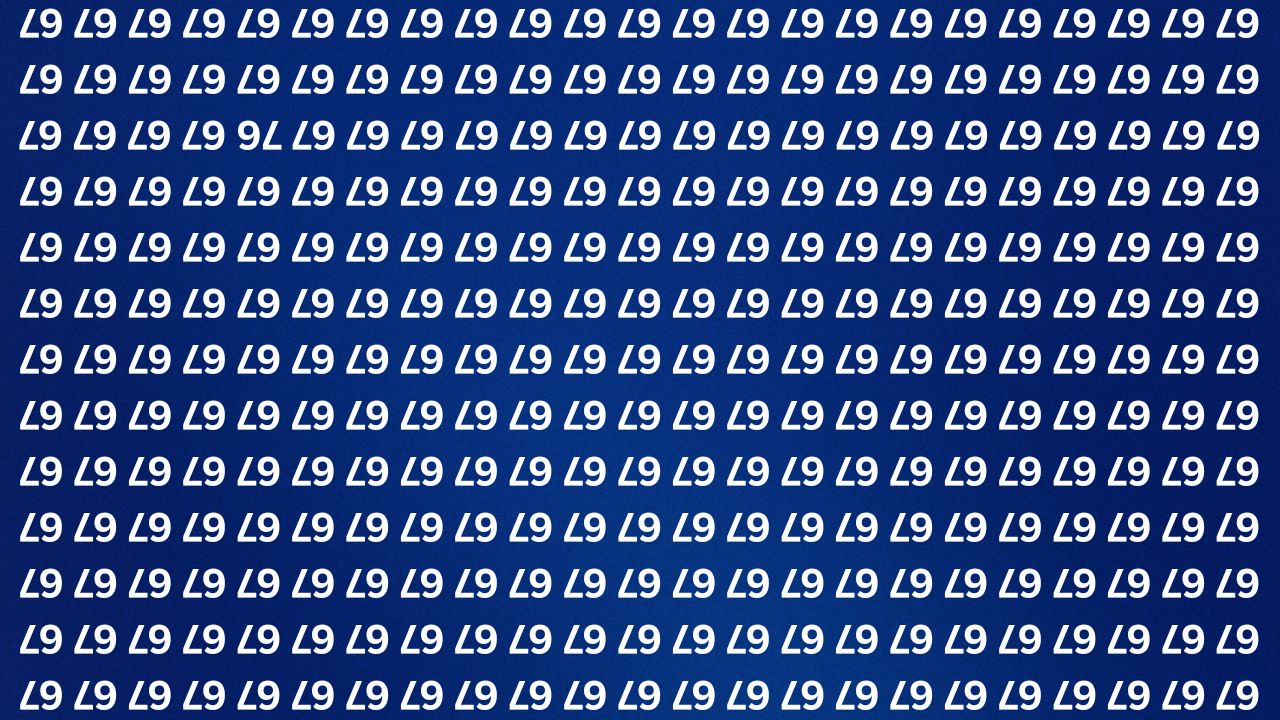
    In this visual puzzle, you are presented with a grid filled with inverted 67s. At first look, the pattern seems completely identical. However, hidden within the grid is one inverted 76. Your task is to find it within seven seconds. The short time limit, combined with the deceptive layout, pushes your brain to rely on assumptions instead of careful analysis.

    Why Optical Illusion IQ Tests Work So Well

    Optical illusion IQ tests do not rely on memorized facts or mathematical ability. Instead, they focus on how efficiently your brain processes visual information. When exposed to repeating shapes or numbers, your mind naturally seeks patterns and shortcuts. While helpful in daily life, these shortcuts often lead to mistakes in illusion-based puzzles.

    Such challenges test attention to detail, visual discrimination, and processing speed. Although they do not calculate IQ in a scientific way, they provide useful insight into how well you concentrate when faced with confusing visuals. This is why many people enjoy them as quick and effective mental exercises.

    Breaking Down the Inverted 76 Among Inverted 67s Puzzle

    This challenge becomes more difficult because every number in the grid is upside down. Your eyes are not simply reading numbers; they are decoding mirrored shapes. Most of the grid is filled with inverted 67s, tightly arranged to overwhelm your visual system.

    Hidden among them is a single inverted 76. The difference is difficult to detect because both numbers share similar lines and curves when flipped. As you scan the grid, your brain assumes uniformity, making it easy for the odd number to remain unnoticed.

    The Role of the Seven-Second Timer

    Seven seconds sounds reasonable, but it feels much shorter once the timer begins. Your eyes race across the grid, often following familiar scanning patterns such as left to right or top to bottom. You trust your brain to alert you if something looks different.

    Unfortunately, repetition reduces awareness. After a few moments, your brain starts auto-filling information, convincing you that everything looks the same. This is the exact moment when the inverted 76 is most likely to be missed.

    Why the Inverted 76 Blends In So Easily

    The difficulty lies in how digits change when inverted. A flipped 7 can resemble an “L” shape, while a flipped 6 may look like a mirrored 9. When surrounded by inverted 67s, the inverted 76 does not stand out clearly.

    Your brain focuses on the overall pattern instead of analyzing each digit individually. Because the numbers share similar outlines, the unique one blends into the grid almost perfectly. Only careful observation reveals the difference.

    The Answer Revealed

    If you could not find the inverted 76 within seven seconds, that is completely normal. The hidden number is located in the lower-right section of the grid. This area is often skipped because many people begin scanning from the top or center.

    Once the location is known, the difference becomes obvious. The shape formed by the inverted 7 and 6 creates a slightly different outline compared to the surrounding numbers. When highlighted, the illusion loses its effect instantly.

    This sudden clarity is a defining feature of optical illusions. What once seemed invisible becomes obvious, leaving many wondering how they missed it.

    What This Puzzle Says About Your Brain

    Challenges like this demonstrate how strongly expectations shape perception. When your brain expects to see inverted 67s, it filters information to support that belief. Anything that contradicts it may be ignored unless you slow down and examine details carefully.

    Those who spot the inverted 76 quickly often focus on individual shapes rather than the full pattern. Missing it does not indicate lower intelligence. It simply reflects how the brain prioritizes speed over precision.

    Why Optical Illusion Challenges Spread So Fast Online

    Optical illusion IQ tests perform well online because they are quick, engaging, and shareable. A seven-second challenge fits perfectly into modern browsing habits, encouraging friendly competition and curiosity.

    They also invite repeat attempts. Even after seeing the solution, many people try again, convinced they can improve. This combination of challenge, surprise, and satisfaction keeps these puzzles widely shared.

    Final Thoughts: Did You Find the Inverted 76?

    Whether you spotted the inverted 76 instantly or needed help, this illusion offered a mental workout. It tested your focus, challenged your assumptions, and demonstrated how easily perception can be deceived.

  • Relax and Reset With 8 Yoga Poses Designed to Release Stress and Support Recovery

    Relax and Reset With 8 Yoga Poses Designed to Release Stress and Support Recovery

    In a world that moves at an increasingly rapid pace, stress has become part of everyday life for many people. While stress is a natural reaction to challenges, long-term stress can negatively affect both mental clarity and physical health. Yoga provides an effective way to ease stress and restore calm. By combining controlled breathing, gentle movement, and deep relaxation, yoga helps release tension and supports emotional balance. Below are eight yoga poses designed to reduce stress and encourage inner peace.

    1. Child’s Pose (Balasana)

    Child’s Pose is a deeply soothing posture that helps release built-up tension in the back, neck, and shoulders. This gentle forward fold allows the body to fully relax, making it especially effective for stress relief.

    How to Do It:

    • Begin on your hands and knees in a tabletop position.
    • Bring your big toes together, separate your knees, and slowly sit your hips back toward your heels.
    • Extend your arms forward or rest them alongside your body, whichever feels more comfortable.
    • Lower your forehead to the mat and focus on slow, steady breathing.

    Benefits:

    • Releases tension in the back, neck, and shoulders.
    • Encourages relaxation and helps quiet the mind.

    2. Downward-Facing Dog (Adho Mukha Svanasana)

    Downward-Facing Dog is a full-body stretch that helps ease physical tension while calming the mind. It lengthens the hamstrings and calves, relieves strain in the back and shoulders, and supports mental clarity by improving circulation.

    How to Do It:

    • Start in a tabletop position with wrists under shoulders and knees under hips.
    • Tuck your toes and lift your hips upward, forming an inverted “V” shape.
    • Press your heels gently toward the floor, keeping hands shoulder-width apart.
    • Hold for 30 seconds to 1 minute while breathing deeply.

    Benefits:

    • Stretches the legs, spine, and shoulders.
    • Enhances circulation and reduces mental fatigue.

    3. Legs Up the Wall (Viparita Karani)

    Legs Up the Wall is a restorative pose that helps soothe the nervous system. It promotes deep relaxation, improves circulation, and is especially helpful for easing fatigue and tension in the lower body.

    How to Do It:

    • Sit close to a wall and gently lie back while extending your legs upward.
    • Align your body comfortably and rest your arms by your sides with palms facing up.
    • Close your eyes and breathe slowly, allowing the body to fully relax.
    • Remain in the pose for 5 to 10 minutes.

    Benefits:

    • Reduces tension in the legs and lower back.
    • Supports deep relaxation and stress relief.

    4. Cat-Cow Pose (Marjaryasana-Bitilasana)

    Cat-Cow Pose is a gentle flow that moves the spine through flexion and extension. This rhythmic movement helps release stiffness in the spine and neck while encouraging relaxation and mental calm.

    How to Do It:

    • Begin in a tabletop position with proper alignment.
    • Inhale and arch your back, lifting your chest and tailbone.
    • Exhale as you round your spine, drawing your chin toward your chest.
    • Continue flowing between the two movements for 1 to 2 minutes.

    Benefits:

    • Loosens tension in the spine, neck, and shoulders.
    • Calms the nervous system and improves flexibility.

    5. Corpse Pose (Savasana)

    Savasana is the final relaxation pose commonly practiced at the end of a yoga session. It allows the body to rest completely and absorb the benefits of the practice, making it highly effective for stress reduction.

    How to Do It:

    • Lie flat on your back with legs extended and arms resting by your sides.
    • Turn your palms upward and gently close your eyes.
    • Focus on your breath and consciously release tension throughout the body.
    • Stay in the pose for 5 to 10 minutes.

    Benefits:

    • Promotes deep relaxation and stress relief.
    • Calms the mind and relaxes the entire body.

    6. Seated Forward Fold (Paschimottanasana)

    Seated Forward Fold is a grounding posture that stretches the hamstrings and spine while encouraging a calm, inward focus. It helps ease physical tightness and supports emotional relaxation.

    How to Do It:

    • Sit on the mat with both legs extended straight ahead.
    • Inhale to lengthen your spine, then exhale as you fold forward from the hips.
    • Reach for your shins or feet while keeping the spine long.
    • Hold for 30 seconds to 1 minute.

    Benefits:

    • Releases tension in the back, hamstrings, and shoulders.
    • Helps quiet the mind and reduce stress.

    7. Cobra Pose (Bhujangasana)

    Cobra Pose is a gentle backbend that opens the chest and lengthens the spine. It helps relieve tension in the back and shoulders while encouraging emotional openness and relaxation.

    How to Do It:

    • Lie face down with legs extended and hands placed beneath your shoulders.
    • Press lightly into your palms as you lift your chest off the mat.
    • Keep elbows close to your sides and engage your lower back.
    • Hold the pose for 15 to 30 seconds.

    Benefits:

    • Stretches the chest, spine, and shoulders.
    • Encourages emotional release and relaxation.

    8. Wide-Legged Forward Fold (Prasarita Padottanasana)

    Wide-Legged Forward Fold is a calming stretch that targets the hamstrings, hips, and lower back. This pose helps release physical tension and supports a relaxed nervous system.

    How to Do It:

    • Stand with your feet set wide apart.
    • Inhale to lengthen your spine, then exhale as you fold forward from the hips.
    • Allow your head to lower toward the floor while keeping legs straight.
    • Hold for 30 seconds to 1 minute.

    Benefits:

    • Reduces tension in the hips, hamstrings, and lower back.
    • Promotes mental calm and stress relief.

    Conclusion

    Yoga serves as a valuable practice for managing stress and encouraging relaxation. The eight poses outlined above—Child’s Pose, Downward-Facing Dog, Legs Up the Wall, Cat-Cow Pose, Savasana, Seated Forward Fold, Cobra Pose, and Wide-Legged Forward Fold—are effective for easing tension, calming the mind, and restoring balance. Regularly including these poses in your routine can help support emotional well-being and create a lasting sense of peace.

  • These 7 Yoga Poses Improve Flexibility While Building Strength and Control

    These 7 Yoga Poses Improve Flexibility While Building Strength and Control

    Yoga is widely valued for its ability to enhance flexibility and strength at the same time. Through a blend of stretching movements and strength-focused postures, yoga improves overall mobility while helping muscles become stronger and more toned. If your goal is to increase flexibility or develop functional strength, these seven yoga poses support both outcomes. Below are seven effective yoga poses that promote a healthy balance of strength and flexibility.

    1. Downward-Facing Dog (Adho Mukha Svanasana)

    Downward-Facing Dog is a foundational yoga posture that builds strength in the arms, shoulders, and core while delivering a deep stretch to the hamstrings, calves, and spine. Because it activates several muscle groups at once, it supports both strength development and flexibility improvement.

    How to Do It:

    • Begin in a tabletop position with wrists under shoulders and knees under hips.
    • Tuck your toes and lift your hips upward, forming an inverted “V” shape.
    • Keep hands shoulder-width apart and feet hip-width apart, pressing heels toward the mat.
    • Hold the pose for 30 seconds to 1 minute.

    Benefits:

    • Builds strength in the shoulders, arms, and core.
    • Improves flexibility in the hamstrings, calves, and back.

    2. Warrior II (Virabhadrasana II)

    Warrior II is a strong standing posture that develops lower-body and core strength while increasing flexibility in the hips and shoulders. This pose activates multiple muscle groups, helping the body gain strength and flexibility at the same time.

    How to Do It:

    • Stand with your feet set wide apart.
    • Turn one foot outward and bend the front knee to a 90-degree angle.
    • Extend both arms out to the sides, parallel to the floor.
    • Hold for 30 seconds to 1 minute, then switch sides.

    Benefits:

    • Strengthens the legs, hips, and core.
    • Opens the hips and chest, improving flexibility.

    3. Chair Pose (Utkatasana)

    Chair Pose is an intense posture that targets leg, glute, and core strength while supporting flexibility in the hips and lower back. It is especially useful for building endurance and functional muscle strength.

    How to Do It:

    • Stand tall with feet together and bend your knees as if sitting into a chair.
    • Lift your arms overhead while keeping your chest raised and spine straight.
    • Hold for 30 seconds to 1 minute, engaging your core and glutes.

    Benefits:

    • Builds strength in the legs, glutes, and core.
    • Enhances flexibility in the hips and lower back.

    4. Crescent Lunge (Anjaneyasana)

    Crescent Lunge helps develop strength in the legs, glutes, and core while increasing flexibility in the hips and quadriceps. This pose combines a deep stretch with muscular engagement for balanced conditioning.

    How to Do It:

    • From a standing position, step one foot back and bend the front knee to 90 degrees.
    • Keep the back leg extended and press the heel toward the floor.
    • Raise your arms overhead, keeping the chest open and core active.
    • Hold for 30 seconds to 1 minute, then change sides.

    Benefits:

    • Strengthens the legs, glutes, and core.
    • Stretches the hips, quadriceps, and back.

    5. Bridge Pose (Setu Bandhasana)

    Bridge Pose focuses on strengthening the glutes, lower back, and core while stretching the chest, neck, and spine. It offers a strong balance between muscle engagement and flexibility.

    How to Do It:

    • Lie on your back with knees bent and feet flat on the floor, hip-width apart.
    • Press your feet into the mat and lift your hips upward.
    • Engage your core and glutes as you hold the pose for 20 to 30 seconds.
    • Lower your hips slowly back to the mat.

    Benefits:

    • Strengthens the glutes, lower back, and core.
    • Improves flexibility in the chest, spine, and neck.

    6. Downward Dog to Cobra Flow

    This flowing sequence blends Downward-Facing Dog with Cobra Pose, delivering both strength-building and deep stretching effects. It targets the upper body, core, and spine while enhancing flexibility in the back and hips.

    How to Do It:

    • Begin in Downward-Facing Dog with hips lifted.
    • Shift forward into plank, then lower your chest toward the mat.
    • Press into Cobra Pose, lifting the chest with elbows slightly bent.
    • Hold for a few breaths, then return to Downward-Facing Dog.
    • Repeat for 5 to 10 breaths.

    Benefits:

    • Builds strength in the shoulders, arms, and core.
    • Increases flexibility in the chest, spine, and hamstrings.

    7. Pigeon Pose (Eka Pada Rajakapotasana)

    Pigeon Pose is a deep hip-opening posture that stretches the hip flexors, glutes, and lower back while supporting strength and stability in the legs and core. It is especially effective for improving hip flexibility.

    How to Do It:

    • Start in a tabletop position and bring one knee forward behind your wrist.
    • Extend the opposite leg straight behind you, keeping hips level.
    • Lower your torso forward, resting on forearms or extending arms ahead.
    • Hold for 30 seconds to 1 minute, then switch sides.

    Benefits:

    • Stretches the hips, glutes, and lower back.
    • Strengthens the legs and core for better stability.

    Final Thoughts

    Practicing these seven yoga poses regularly can help you build strength while improving flexibility, leading to a more balanced body. Each pose targets key muscle groups, supports mobility, and encourages controlled stretching. With consistent practice, these movements contribute to improved strength, flexibility, posture, and overall physical balance.

  • Slow Yoga Movements Improve Flexibility Enhance Control and Support Mind Body Balance

    Slow Yoga Movements Improve Flexibility Enhance Control and Support Mind Body Balance

    Flexibility improves through patience and calm breathing, not by forcing the body into intense stretches. The focus should always be on allowing muscles to lengthen naturally over time. Slow yoga is one of the safest and most effective ways to improve flexibility, especially for people who feel stiff, spend long hours sitting, or are returning to movement after a break. The five slow yoga poses below prioritize controlled movement, mindful breathing, and gentle stretching to help the body open up without unnecessary strain.

    How Slow Yoga Helps Improve Flexibility

    Slow yoga gives your muscles the time they need to truly relax. Moving too quickly through poses can trigger tension as the body tries to protect itself. By entering and holding postures slowly and intentionally, the nervous system begins to settle, allowing muscles to release tightness more naturally. This method reduces injury risk while supporting long-lasting flexibility gains.

    Beyond flexibility, slow yoga also supports joint mobility, healthy circulation, and body awareness. With consistent practice, even short daily sessions can create noticeable changes. Over time, you may find that everyday movements feel easier and your body feels more comfortable overall.

    Seated Side Stretch for Spine and Waist Mobility

    The seated side stretch gently opens the spine and the muscles surrounding the ribs and waist. It promotes upper-body flexibility while encouraging deep, steady breathing. Sit comfortably on the floor with your legs crossed or extended forward. Place your right hand beside you on the floor. Inhale and lift your left arm overhead. As you exhale, lean slowly to the right, keeping both hips grounded.

    Hold the position for six to ten slow breaths, feeling the stretch along the left side of your body. Switch sides and repeat. This pose helps ease stiffness caused by prolonged sitting and supports smoother spinal movement.

    Butterfly Pose to Release Hips and Inner Thighs

    Butterfly Pose is especially effective for loosening tight hips and inner thighs, making it ideal for people who sit for most of the day. Sit upright and bring the soles of your feet together, allowing your knees to fall naturally outward. Hold your feet or ankles with your hands and maintain a straight spine while breathing slowly.

    If comfortable, gently lean forward from your hips while keeping your back long. Avoid forcing the knees downward. Hold the pose for one to three minutes. Regular practice supports better hip flexibility and encourages improved posture.

    Low Lunge for Hip Flexors and Lower Body Stretch

    Hip flexors often become tight due to extended sitting. The low lunge offers a steady, controlled stretch that opens these muscles safely. Step one foot forward into a lunge position while lowering the back knee to the floor. Align your front knee directly over your ankle.

    Slowly shift your hips forward while keeping your torso upright. Rest your hands on your hips or thighs. Stay for eight to twelve breaths, then switch sides. This pose enhances flexibility in the hips, thighs, and lower back.

    Reclined Hamstring Stretch for Safe Muscle Lengthening

    This reclined stretch gently targets the hamstrings while protecting the lower back. Lie on your back with one leg extended along the floor. Bend the opposite knee and hold behind your thigh or calf. Gradually straighten the raised leg toward the ceiling until you feel a comfortable stretch.

    Keep your shoulders relaxed and breathe evenly. Hold for one to two minutes before switching legs. This stretch helps reduce lower-body tightness and supports improved hamstring flexibility.

    Child’s Pose for Full-Body Relaxation

    Child’s Pose is a restorative position that encourages the entire body to release tension. It gently stretches the spine, hips, and shoulders while promoting mental calmness. Kneel on the floor and sit back onto your heels. Fold forward, resting your forehead on the floor or a cushion.

    You may extend your arms forward or let them rest beside your body. Hold the pose for two to three minutes, breathing slowly and allowing your muscles to soften. This deep relaxation supports flexibility by letting the body fully unwind.

    Practicing These Yoga Poses Safely

    Always enter each stretch slowly and with control. You should feel mild tension, not pain. If your breathing becomes strained, ease out slightly. Props such as cushions or yoga blocks can make poses more comfortable and accessible. Evening sessions often work well since muscles are naturally warmer, though gentle morning practice is also effective when approached carefully.

    How Often to Practice for Noticeable Results

    Consistency matters more than intensity. Practicing these five poses three to five times per week can lead to visible flexibility improvements within a few weeks. Short sessions are effective when done regularly. Flexibility develops gradually, so allow your body time to adapt without rushing progress.

    Who Can Benefit from Slow Yoga

    Slow yoga is well suited for beginners, older adults, and individuals seeking a low-impact way to stay active. It also supports recovery from injuries and helps ease muscle and joint stiffness. The gentle pace allows the body to release tension without force.

    People experiencing high stress often benefit from slow yoga because it helps calm the nervous system. Athletes can also gain value from this practice by addressing tight muscles and improving mobility, creating a healthier balance between strength and flexibility. Always adjust poses to your current ability and stop if discomfort arises.

    Setting Up a Calm Yoga Environment

    Select a quiet area with enough space to move freely. Soft lighting and minimal distractions help create a relaxing atmosphere. Wear comfortable clothing that allows unrestricted movement and use a supportive mat to enhance comfort during practice.

    Closing Your Yoga Session

    After completing the poses, take a brief moment to lie down or sit quietly for about a minute. Observe how your body feels and notice your breathing. This pause allows the benefits of your practice to settle in. Slow yoga supports flexibility in a safe, gradual way, helping reduce stiffness and making daily movement feel easier and more comfortable.

  • I tried a Pilates-style deep core workout and noticed major body changes

    I tried a Pilates-style deep core workout and noticed major body changes

    After trying a full week of Pilates instead of my regular gym workouts I realized that Pilates creates mixed feelings for someone like me who loves the gym and running.

     I definitely noticed the low-impact benefits and felt my muscles working in ways that made me stronger in unexpected areas. But as a busy mum & fitness writer I don’t have much time for exercise.

     I struggled to dedicate a full hour to something that didn’t excite me. That’s when I discovered Zoe & Emily from @zoandemfit. Their six-move Pilates-inspired ab workout let me get all the stress-relieving and body-lengthening benefits of Pilates in just 15 minutes at home. Here’s how the workout works and what happened when I gave it a try.

    This 15-minute Pilates ab workout combines six core exercises in a compact session. You work for 45 seconds on each exercise & rest for 10 seconds between them. The routine includes:

    – Boat hold heel taps

    – Side plank twists to dip

    – Arm pulses

    – Dead bugs

    – Bear mountain climbers

    – Leg raises with hip extension

     You only need an exercise mat for comfort during floor exercises. No other equipment is required beyond your body weight and enough room to move freely. Beginners should not worry if these exercises seem unfamiliar. The workout moves at a steady pace with gradual transitions that are simple to follow when you watch Zoe and Emily demonstrate each movement. I grabbed a yoga mat and started the video to test the routine myself.

    My core was absolutely burning during this workout. The session targeted my abs intensely and especially worked the transversus abdominis which is the deepest abdominal layer.

    As I progressed through side plank twists & dips & arm pulses and then dead bugs I noticed my obliques and hip flexors joining in. Moving my arms and legs while keeping my core tight forced me to engage my abs even more to control each movement and I felt it throughout the entire session.

     Many exercises in this routine are compound movements so even though my abs and core were the main focus my whole body got involved. The side plank variations & bear mountain climbers made my shoulders and upper back work hard to support me while I kept my midsection braced.

    My quads were also burning during the boat hold heel taps and bear mountain climbers and my hamstrings got a good stretch during the leg raises with hip extension.

    Even though this workout focuses on abs these other muscles still need to stay active to help you move smoothly through each exercise. Your body really does work as one unit. You notice this especially when you slow down and pay attention to all the muscles working together during every repetition.

    If your hip flexors click during this workout it might mean your abdominal muscles are not working hard enough or that you are not engaging your core properly. That is not the only possible reason since it could also relate to your range of motion or mobility or even a health condition. If the clicking causes pain you should stop and talk to your doctor. During my barre teacher training I learned that when your hip flexors click during moves like heel taps or deadbugs it usually happens because the stabilizing muscles are not fully engaged to keep your pelvis steady. These stabilizing muscles are mainly your abs & glutes. The clicking sound is typically your hip flexor tendon snapping over bone. This is not harmful but it serves as a reminder to slow down and check your alignment & tighten your core a bit more. I found it useful to support my neck during the final 15 seconds of the arm pulses and to switch to pulsing one arm at a time. When things became too intense I paused for a quick reset which made a big difference. Taking a few seconds to correct your form is always better than pushing through and risking injury.

    What struck me most was the amount of core training I managed to fit into a brief session without it feeling like a typical abdominal workout. Several exercises definitely targeted my abs but the mix of movements meant I hardly realized how intensely my core was engaged until I felt the burn.

    There were no repetitive crunches or long plank holds. Instead I moved my arms and legs together while performing patterns that seemed unrelated to standard core training.

    The flow between exercises worked well. I moved from lying down to side planks to bear planks and back to the floor again. I focused more on the next movement than on discomfort or boredom. The entire routine felt intentional and kept my attention throughout. It delivered the usual Pilates advantages without making me check the time constantly.

    This routine delivers excellent functional training benefits in just 15 minutes. The exercises replicate common daily movements such as bending and twisting and reaching. This means you are preparing your body to handle real-world activities more effectively rather than simply completing a workout. Regular practice helps develop better body awareness and movement efficiency while enhancing your coordination & balance. Many people assume Pilates sessions need to last between 45 and 60 minutes. This workout challenges that assumption. I found it completely satisfying in only 15 minutes and it remained enjoyable throughout. When practiced regularly these shorter routines effectively strengthen your core while improving general fitness and flexibility.

  • Full-Body Strength Yoga: 10 Poses That Support Fitness and Total Body Power

    Full-Body Strength Yoga: 10 Poses That Support Fitness and Total Body Power

    Yoga goes far beyond flexibility. It is a highly effective practice for building strength, toning muscles, and improving overall fitness. While yoga is often linked to stretching and relaxation, many poses actively engage muscle groups, boost endurance, and support full-body balance. Below are ten powerful yoga poses that help create a strong, stable, and well-toned body.

    1. Plank Pose (Phalakasana)

    Plank Pose is one of the most effective postures for developing core strength and total-body stability. Holding this position activates the arms, shoulders, back, and core, creating a solid base for advanced poses.

    How to Do It:

    • Begin in a tabletop position with wrists under shoulders and knees under hips.
    • Step both feet back, extending the legs and forming a straight line from head to heels.
    • Engage your core and hold for 30 seconds to 1 minute while keeping the body steady.

    Benefits:

    • Strengthens the core, shoulders, and arms.
    • Supports better posture and alignment.

    2. Warrior I (Virabhadrasana I)

    Warrior I is a strong standing posture that targets the legs, glutes, and core while opening the chest and shoulders. It helps improve lower-body strength and stamina.

    How to Do It:

    • Stand tall and step one foot back, bending the front knee to a 90-degree angle.
    • Keep the back leg straight with the heel pressing into the mat.
    • Raise your arms overhead, relaxing the shoulders and opening the chest.
    • Hold for 30 seconds to 1 minute on each side.

    Benefits:

    • Builds strength in the legs, hips, and core.
    • Stretches the arms, shoulders, and chest.

    3. Warrior II (Virabhadrasana II)

    Warrior II focuses on strengthening the thighs, hips, and core while enhancing balance and endurance. It is ideal for improving lower-body stamina.

    How to Do It:

    • From Warrior I, rotate the hips and shoulders to face the side.
    • Extend the arms parallel to the floor, keeping the front knee bent.
    • Distribute your weight evenly between both feet.
    • Hold for 30 seconds to 1 minute on each side.

    Benefits:

    • Strengthens the thighs, hips, and core.
    • Enhances balance and stability.

    4. Four-Limbed Staff Pose (Chaturanga Dandasana)

    Chaturanga Dandasana is a demanding pose that develops upper-body and core strength. It is commonly used in flowing yoga sequences.

    How to Do It:

    • Begin in Plank Pose.
    • Lower the body slowly, keeping elbows close to the ribs at a 90-degree bend.
    • Maintain a straight line from head to heels with the core engaged.
    • Hold briefly, then press back into Plank.

    Benefits:

    • Strengthens the arms, shoulders, chest, and core.
    • Improves muscular endurance and control.

    5. Boat Pose (Navasana)

    Boat Pose is a powerful core-focused posture that enhances abdominal strength, balance, and stability.

    How to Do It:

    • Sit on the mat with knees bent and feet flat.
    • Lean back slightly and lift the legs, forming a “V” shape.
    • Extend the arms forward while keeping the spine straight.
    • Hold for 30 seconds to 1 minute.

    Benefits:

    • Strengthens the core, spine, and hip flexors.
    • Improves balance and coordination.

    6. Downward-Facing Dog (Adho Mukha Svanasana)

    Downward-Facing Dog is a foundational pose that strengthens the entire body while offering a deep stretch.

    How to Do It:

    • Start on hands and knees in a tabletop position.
    • Tuck the toes and lift the hips upward, forming an inverted “V”.
    • Place hands shoulder-width apart and feet hip-width apart.
    • Hold for 30 seconds to 1 minute.

    Benefits:

    • Strengthens the arms, shoulders, and legs.
    • Supports flexibility and alignment.

    7. Cobra Pose (Bhujangasana)

    Cobra Pose is a gentle backbend that strengthens the spine, chest, and arms while encouraging better posture.

    How to Do It:

    • Lie face down with legs extended and hands under the shoulders.
    • Press into the palms and lift the chest, lengthening the spine.
    • Keep elbows slightly bent and shoulders relaxed.
    • Hold for 15 to 30 seconds.

    Benefits:

    • Strengthens the back, chest, and arms.
    • Improves posture by opening the chest.

    8. Chair Pose (Utkatasana)

    Chair Pose is an intense standing posture that builds lower-body and core strength while improving balance.

    How to Do It:

    • Stand with feet together and bend the knees as if sitting back.
    • Lift the arms overhead and keep the chest upright.
    • Hold for 30 seconds to 1 minute.

    Benefits:

    • Strengthens thighs, hips, and core.
    • Builds endurance and stability.

    9. Bridge Pose (Setu Bandhasana)

    Bridge Pose strengthens the glutes, lower back, and core while also stretching the chest and spine.

    How to Do It:

    • Lie on your back with knees bent and feet hip-width apart.
    • Press the feet down and lift the hips toward the ceiling.
    • Engage the glutes and core.
    • Hold for 20 to 30 seconds before lowering.

    Benefits:

    • Strengthens the glutes, core, and lower back.
    • Enhances posture and spinal flexibility.

    10. Crow Pose (Bakasana)

    Crow Pose is an arm balance that challenges upper-body strength, core engagement, and focus.

    How to Do It:

    • Begin in a squat with feet close together.
    • Place hands shoulder-width apart on the mat.
    • Bend the elbows slightly and lift the feet off the floor.
    • Hold for 10 to 20 seconds before lowering down.

    Benefits:

    • Builds strength in the arms, shoulders, and core.
    • Improves balance, coordination, and concentration.

    Conclusion

    Yoga is a powerful tool for building strength and muscle tone. These poses engage major muscle groups, improve balance, enhance flexibility, and support overall physical strength. Whether you are a beginner or an experienced practitioner, adding these poses to your routine helps create a strong foundation, better posture, and improved endurance. Practicing these poses regularly can lead to noticeable improvements in total-body strength.

  • Tinted Lip Oils Are Everywhere in 2026 These 11 Lead the Trend Right Now

    Tinted Lip Oils Are Everywhere in 2026 These 11 Lead the Trend Right Now

    Last week, I stepped into Sephora for the first time in months hoping to find a new lip product—and instantly felt overwhelmed. Even as a seasoned beauty editor, the sheer volume of options was dizzying. Between crowded aisles, half-used testers, and endless finishes and formulas, it’s hard to know where to start. How do you choose from hundreds of lip products? What actually separates a lip balm from a lip gloss? At Cosmo, answering these questions is part of the job. Our team cuts through the clutter by testing dozens of formulas to identify what truly works.

    While many popular lip looks rely on layering liners, balms, and stains, tinted lip oils simplify everything with one easy swipe. These hybrid formulas combine nourishing skincare benefits, the high-shine finish of a gloss, and a soft wash of color. The result is a multitasking product that delivers effortless, polished lips. Team Cosmo has tested nearly every tinted lip oil available to pinpoint the best options for long-lasting hydration. Ahead are the standout picks that offer instant shine and pigment while keeping lips comfortable over time.

    Saie Glossybounce Delivers Plush Shine Without Stickiness

    Saie’s Glossybounce creates a pillowy lip feel with a smooth, non-sticky texture. The shade “Bounce,” a warm mauve, is especially versatile and flattering for daily wear. Its glassy finish enhances the lips instantly, while the moisturizing formula helps maintain softness for hours. A single swipe provides noticeable hydration and a silky finish that lasts well before reapplication is needed.

    One Cosmo editor says: “The way this makes my lips so soft and juicy is unreal. It perfectly balances a hydrating lip oil, sheer tint, and high-shine gloss.” —Lauren Balsamo, Beauty Director

    Gisou Honey Lip Oil Offers Deep, Lasting Hydration

    Gisou’s Honey Lip Oil earned its reputation by delivering true lip hydration from the first use. Now available in tinted shades, it offers everything from subtle mauves to richer reds. One swipe leaves lips feeling plush and nourished for hours, making it ideal for low-makeup days when a natural boost is all you want.

    One Cosmo editor says: “I loved the original clear version, but the tinted shades made me fully obsessed. They’re lightweight, smell great, and pair perfectly with lip liner for everyday wear.” —Beth Gillette, Beauty Editor

    YSL’s Oil-in-Stick Blends Balm Comfort With Glossy Tint

    This innovative stick formula applies like a balm but performs like a lip oil hybrid. It melts effortlessly onto the lips, leaving a soft glossy finish with just enough pigment to enhance natural color. The lightweight texture makes it perfect for everyday, low-effort wear without looking patchy or heavy.

    One Cosmo editor says: “It’s the ultimate multitasker. You get buildable pigment, a juicy shine, and real hydration thanks to mango oil and hyaluronic acid.” —Jasmine Hyman, Assistant Beauty Editor

    Dior Lip Oil Evolves With Richer Color and Longer Wear

    Dior’s viral lip oil reshaped the beauty landscape when it launched, inspiring countless dupes. The updated formula now features enhanced pigment, a slightly thicker texture, and improved hydration. These upgrades help the oil wear longer while maintaining its signature shine. It has also earned repeated recognition in Cosmo’s Readers’ Choice Beauty Awards.

    One Cosmo editor says: “I keep this with me at all times. The upgraded version feels even better, with a gentle minty tingle and a plush applicator that makes application effortless.” —BG

    e.l.f. Glow Reviver Proves Great Lip Oils Can Be Affordable

    This under-$10 option delivers impressive performance at a budget-friendly price. Available in multiple shades, it features a nourishing formula, minty freshness, and a cushiony applicator. The quality rivals far pricier products, making it a standout value.

    One Cosmo editor says: “From the sleek packaging to the ultra-soft feel, this lip oil feels luxurious. It keeps my lips soft and glossy all day.” —Julee Wilson, Beauty Editor-at-Large

    Summer Fridays Dream Lip Oil Perfects the Minimal Look

    While the brand’s balms are well-known, Dream Lip Oil stands out for its all-in-one performance. The formula hydrates, protects, and softens while delivering a sheer, shiny tint. With a curated range of pinks, nudes, and browns, it suits everyday wear effortlessly.

    One Cosmo editor says: “It feels like a light lip serum with just the right amount of color. Perfect for no-makeup makeup days.” —JH

    Merit Lip Oil Keeps Things Lightweight and Chic

    Merit’s lip oil combines minimalist packaging with a thin, comfortable formula. Powered by squalane, it delivers hydration without heaviness. The tint is sheer but buildable, allowing for customizable color intensity.

    One Cosmo editor says: “I love layering it over lipstick for a hydrated finish and subtle shine. It’s lighter than most lip oils, which makes it easy to wear.” —LB

    Kulfi Lip Oil Stain Merges Long Wear With Nourishment

    Kulfi’s formula bridges the gap between lip stain longevity and lip oil hydration. Infused with mango seed oil and coconut oil, it conditions lips while leaving behind lasting color.

    One Cosmo editor says: “It somehow manages to be both a lip stain and a juicy oil. My lips stay glossy, and the tint lasts even after it dries down.” —BG

    L’Oréal Paris Lip Oil Adds Subtle Plumping Power

    This tinted lip oil pairs hydration with a temporary plumping effect. The blend of hyaluronic acid and peptides smooths lips while enhancing volume. Unlike many plumpers, it keeps lips comfortable and moisturized.

    One Cosmo editor says: “It stayed on for hours and felt incredibly hydrating. The light tingle fades quickly without irritation.” —JH

    Tarte Maracuja Lip Oil Offers Mask-Level Moisture

    Tarte’s Maracuja line continues to expand with new shades while maintaining its deeply hydrating formula. A blend of 15 plant oils and vitamin E delivers moisture comparable to an overnight lip mask. The wide shade range adds versatility.

    One Cosmo editor says: “It’s thicker and slightly tacky, but that gives it longer staying power. I reach for it when I don’t want constant touch-ups.” —BG

    NARS Orgasm Lip Oil Brings Iconic Glow to Lips

    The famous Orgasm shade now comes in a lip oil format, offering a peachy-pink shimmer that enhances natural lip color. The subtle shimmer creates a soft glow effect without feeling overdone.

    One Cosmo editor says: “I’ve loved the blush for years, and the lip oil version lives up to the hype. It’s effortlessly flattering.” —LB

    Lip Oil vs. Lip Gloss: What’s the Difference?

    A lip oil is primarily skincare-focused, formulated with nourishing oils, emollients, and hydrating ingredients that absorb over time while leaving a natural shine. A lip gloss, on the other hand, prioritizes pigment and shine, with hydration often fading once the gloss wears off.

    Are Lip Oils Hydrating?

    Yes. Lip oils are packed with plant-based oils, hyaluronic acid, and vitamin E, which work together to support the lip barrier and maintain softness. These ingredients help lips feel smooth and comfortable both during wear and after the shine fades.

  • This Spot the Difference Puzzle Challenges Your Focus With a Confusing Boy Illustration

    This Spot the Difference Puzzle Challenges Your Focus With a Confusing Boy Illustration

    Are you ready for a mental challenge? Spot the Difference puzzles have always been a popular way to test your observation skills. Today we have an exciting puzzle for you called Spot the 3 Differences in the Boy Doodling with Color Pencils. This brain teaser shows two almost identical images of a young boy who is focused on drawing with colorful pencils. However there is a twist. Three small differences have been hidden between the two pictures and you only have 10 seconds to find them. The clock is ticking so let’s start this fun challenge.

    Why “Spot the Difference” Puzzles Offer More Than Simple Entertainment

    Spot the Difference puzzles may seem like lighthearted fun, but they deliver meaningful mental benefits. These challenges require intense focus, encouraging the brain to concentrate on fine visual details. As you compare nearly identical images, your skill in detecting subtle visual changes gradually improves. The activity also supports short-term memory, as your mind tracks patterns and object positions. Along with cognitive benefits, these puzzles provide a relaxing mental pause that can ease stress and lift mood. This blend of enjoyment and brain engagement makes them valuable for overall mental well-being.

    The Challenge Explained: Find the 3 Differences in the Boy’s Drawing Scene

    In this engaging puzzle, you are presented with two images of a boy doodling with colorful pencils. At first glance, both scenes look completely identical. However, a closer look reveals three hidden differences placed carefully throughout the images. These changes may appear in the background, the boy’s appearance, or the objects nearby. The real challenge is slowing down and observing each detail closely instead of trusting your initial impression.

    The 10-Second Countdown Starts Now

    You have only 10 seconds to identify all three differences. As the clock ticks, your brain must respond quickly and accurately. Carefully scan the entire scene—the boy, his clothes, the desk, the pencils, and the surrounding background. Differences might show up as color shifts, missing items, or slightly altered shapes. Remaining calm and following a steady scanning pattern improves your chances of success.

    Effective Techniques to Spot Differences Faster

    Begin by examining the background, where small changes are often overlooked. Next, review the boy’s clothing details, checking for missing buttons, color variations, or pattern changes. Then move to the doodling tools, as pencils and crayons frequently feature subtle color differences. Use a structured viewing approach rather than jumping randomly, keeping your focus steady to catch every clue.

    The Answer Revealed: The Three Hidden Differences

    If finding all three differences was tricky, the solution is here. First, the wall clock displays a different time in each image, with slightly changed hand positions. Second, a button on the boy’s shirt appears in one image but is missing in the other. Third, one crayon changes color, shifting from purple in one image to yellow in the other. These details are easy to miss, especially under time pressure.

    How “Spot the Difference” Puzzles Train Your Brain

    Spot the Difference challenges help strengthen visual processing by teaching the brain to analyze images more efficiently. The time limit encourages faster thinking, improving mental agility. With regular practice, attention to detail becomes sharper, supporting everyday tasks, learning, and work. What begins as a simple puzzle gradually evolves into a powerful cognitive exercise.

    Where to Discover More “Spot the Difference” Challenges

    If you enjoyed this puzzle, there are many ways to find more. Puzzle apps provide themed challenges with adjustable difficulty and progress tracking. Websites often feature daily or weekly puzzles, sometimes with competitive elements. Books and magazines offer screen-free options for relaxation, while online communities regularly share new puzzles you can enjoy alone or with others.

  • These Winter Nail Polish Colors Are Defining a Clean, Modern Seasonal Style

    These Winter Nail Polish Colors Are Defining a Clean, Modern Seasonal Style

    Royal purple and ruby red remain standout choices for True Winter color lovers, but they are far from the only options this season. Those drawn to neutral nail shades will find an impressive range, while fans of cool-toned colors can explore more variations of white than expected. Just like freshly fallen snow sparkling under sunlight, winter whites reveal depth and nuance. The same applies to gray hues, along with rich burgundy tones such as cranberry, deep berry, and merlot. World champion nail artist and beauty educator Valeriia Telemaniuk shared with Byrdie that winter consistently revives classic nail aesthetics. As a result, French manicures, cool grays, blues, and refined red shades—both bold and subtle—are set to dominate the colder months.

    Chocolate Ganache Brown Nails Take Center Stage

    Once-trending brownie pudding nails are making room for a deeper winter favorite: ganache brown. Nail artist and educator Sofiia Mazur describes this shade as a rich, decadent brown reminiscent of melted dark chocolate. Colors similar to Red Iguana’s Ganache gel or Dazzle Dry’s Fringe capture this luxurious tone perfectly. Ganache brown feels warm, polished, and elevated, making it an ideal choice for the colder season. It delivers a sense of quiet confidence on the nails while pairing effortlessly with gold accessories, neutral wardrobes, and minimalist black outfits.

    Muted Berry Shades Bring Depth and Soft Elegance

    This winter marks a shift toward deeper, grounding nail colors. Juanita Huber-Millet, founder and creative director of Townhouse Salons, notes increasing interest in espresso browns, soft mauves, and muted berry tones. These shades offer a refined balance of warmth and sophistication without feeling overpowering. In particular, muted berries serve as a subtle alternative to bright reds, adding richness and dimension while remaining suitable for everyday wear.

    Pearlescent Ocean Blue for a Light Winter Touch

    Light ocean blue nails with a delicate pearlescent finish are emerging as a fresh winter favorite. Nail professional Amy Ling Lin describes these shades as calming, radiant, and uplifting. Colors like Sundays Studio’s L09 introduce a gentle contrast to the season’s darker palette. The pearl-like sheen reflects light beautifully, creating a soft glow that feels airy yet refined. This shade brings a sense of quiet joy while maintaining a modern, polished appearance.

    Cool Gray Neutrals Redefine Winter Style

    Cool gray nail colors are quickly becoming a winter staple. According to OPI Global Ambassador Coca Michelle, these shades feel sleek, effortless, and sophisticated, making them easy to pair with seasonal outfits. Cool gray also complements a wide range of jewelry, especially for those who enjoy mixed metals. Popular choices such as OPI Peace of Mined, Case of Glamnesia, and Suzi Talks with Her Hands deliver a refined, versatile finish suitable for any occasion.

    Deep Navy Blue as a Seasonal Reset Shade

    Classic navy blue nails are being embraced as the perfect post-holiday transition color. This timeless shade offers a calming presence while carrying winter seamlessly into the New Year. Navy works equally well for formal events and everyday office wear, making it a reliable favorite. Shades like OPI Less is Norse, Havin’ a Candy Ol’ Time, and Suzi & the Arctic Fox provide rich, wearable interpretations of this enduring color.

    The Growing Appeal of Barely-There Nails

    As winter settles in, many are gravitating toward minimal, barely-there nail looks. Huber-Millet highlights a rise in demand for soft milky tones, cool neutrals, and understated pastels. Shades such as Coconut Milk, Glazed Marshmallow, and Milkshake from Townhouse’s Flawless Collection feel clean, calming, and refreshing. These subtle colors offer a visual reset after autumn’s deeper hues.

    Warm Deep Reds Remain a Winter Essential

    A warm, deep red continues to define winter nail trends year after year. Amy Ling Lin describes this shade as chic, cozy, and quietly striking. It instantly adds warmth during colder months while remaining polished and festive. This versatile color moves seamlessly from everyday sophistication to holiday-ready elegance, making it a consistent seasonal favorite.

    Earth-Toned Metallics Add Subtle Shine

    Earth-inspired metallic finishes are set to make an impact this winter. Sofiia Mazur points to shades like bronze, clay gold, and olive chrome, often styled with matte or stone-like textures. These tones reflect light softly, creating a muted, luxurious glow rather than a high-shine finish. Influenced by runway collections such as Balmain’s fall show, earthy metallics work beautifully as full-color looks or refined accents.

    Black Cherry Nails Offer Refined Drama

    Black cherry nail shades strike a balance between deep darkness and subtle red warmth. Mazur explains that this blend keeps the color elegant, versatile, and wearable. Long embraced by fashion icons and celebrities, black cherry pairs effortlessly with evening attire as well as casual staples like oversized blazers or vintage denim. It remains a dependable cold-season classic.

    Crisp White Nails Embrace Winter Minimalism

    Clean white nails are enjoying renewed popularity this winter. Following Pantone’s selection of Cloud Dancer, pure white shades such as Mineral Fusion Ice Breaker are gaining attention. This color reflects the essence of snowy landscapes, frosty mornings, and cozy winter textures. Once associated mainly with summer, white has firmly established itself as a key shade in winter minimalism.

    Soft Gray-Lavender Blends for Cool Seasons

    Gray-lavender nail tones combine cool gray with a subtle hint of purple, making them particularly well-suited for winter. Telemaniuk notes that shorter days and cooler atmospheres are leading clients toward muted, soothing shades like this. Gray-lavender feels modern, understated, and refined, offering a chic option that aligns perfectly with the colder months.

  • This Simple Lip Liner Technique Makes Lips Look Fuller Without Going Outside the Natural Line

    This Simple Lip Liner Technique Makes Lips Look Fuller Without Going Outside the Natural Line

    In the quiet corner of a café restroom, a girl quickly fixes her lips, unaware that others are watching. Those waiting nearby notice how effortless her routine seems. Two quick passes with a pencil, a soft press of her lips together, then a hint of gloss. There is no dramatic overlining and no heavy contour. When she lifts her head, her lips look naturally smooth, relaxed, and subtly plump, as though she has just come back from a restful getaway. Nothing appears obvious, yet the transformation is unmistakable.

    The Difference You Notice Later

    Later, standing in front of your own mirror, you try to copy the same effect. You use the same pencil, the same gloss, and even mimic her expression. Still, the result feels flat. Your lips look fine, but they lack depth. That is when it becomes clear that the difference is not the product, but the exact placement. A tiny, nearly invisible adjustment changes everything. What once seemed insignificant reveals itself as the entire secret.

    Why Focus Matters More Than Size

    This technique is not designed to make lips look dramatically bigger. Instead, it directs where the eye naturally rests. Traditional lip-liner advice often promotes tracing outside the lip line, blending, and filling everything in. While that approach had its moment, in natural daylight it can feel disconnected from the face. Heavy overlining may photograph well, but up close it can appear out of balance with natural features.

    The Shift in Modern Lip Techniques

    Today’s makeup artists are stepping away from obvious enhancement. Rather than forcing the illusion of a larger mouth, they aim for subtle emphasis. The fullness you notice is not exaggerated; it emerges as a side effect of precise placement. This is why the technique translates so well in selfies, video calls, and everyday interactions. The change feels gentle, yet the result looks polished and intentional.

    Precision Over Heavy Definition

    The real transformation happens in millimetres, not bold outlines. Once you understand where liner is actually placed, the entire concept of lip lining changes. The goal is not to redraw your lips, but to highlight their natural structure. This micro-level precision keeps the finish believable, softly enhanced, and never obviously drawn on.

    Where Makeup Artists Apply Liner

    When you study professional techniques closely, a clear pattern emerges. Artists avoid strongly defining the corners of the mouth. Instead, they concentrate on three key areas: the peaks of the cupid’s bow, the center of the lower lip, and the soft pads just off-center. The edges stay light and diffused, creating an outline that feels more like a suggestion than a statement.

    Why the Result Looks So Natural

    A London-based makeup artist once shared that she relies on the same affordable lip pencil for every client, adjusting only the placement based on how light reflects off their lips. Clients often assume cosmetic treatments were involved. Her response is always the same: a simple liner and a thoughtful technique. The most common feedback she receives is that people look well-rested. The effect delivers not just fullness, but balance and harmony across the face.

    The Visual Science Behind the Effect

    Our eyes do not scan faces evenly. They are drawn to contrast and subtle changes in shape. The dip of the cupid’s bow, the curve at the center of the lower lip, and the spots where gloss catches light naturally pull attention. Enhancing these points while keeping the corners soft allows the brain to interpret lips as fuller without detecting a harsh outline.

    A Technique for Soft, Natural Fullness

    Start with dry lips and a relaxed mouth. Choose a sharpened nude liner that closely matches your natural lip tone. Lightly connect the peaks of the cupid’s bow with a soft line just above the natural dip. Move to the center of the lower lip and draw a short arc slightly outside the natural line, keeping it no wider than your iris. Leave the outer sections mostly untouched. Blend gently with your fingertip and apply gloss only at the center. Restraint is what keeps the result realistic.

    Why This Method Works in Everyday Life

    This soft-blur approach feels less like armor and more like enhancement. Minor imperfections fade into the overall look, making it forgiving on rushed mornings or low-energy days. Under different lighting, the lips remain defined at the center and soft along the edges, moving naturally with every expression. It is makeup created for real, unfiltered faces, not frozen images.

    Key Differences at a Glance

    Classic Lip Liner Method Soft-Blur Lip Approach
    Strong, noticeable overlining Gentle emphasis on the center of the lips
    Sharp and well-defined outer edges Softly diffused, blended corners
    Highly structured lip outline Natural-looking depth with a smooth finish
    Best suited for photos and videos Enhances lips naturally in everyday light