Blog

  • 25 Gel Nail Ideas for January Ranging From Soft Winter Whites to High Shine Glam Glitter Looks

    25 Gel Nail Ideas for January Ranging From Soft Winter Whites to High Shine Glam Glitter Looks

    The start of a new year is the perfect moment for a fresh manicure. When cold weather, packed schedules, or stubborn nail beds make regular polish fade too quickly, gel nails are always the go-to choice. Step into January with long-lasting gel designs that elevate your look and stay flawless well beyond one week. From rich solid colors to playful skittle styles and sparkling celestial accents, the possibilities are endless. If you’re feeling undecided, these gel nail ideas are ideal for January.

    Winter White Abstract Nails

    Give your classic white manicure a modern twist with abstract swirls and curves. Tracing the shapes with silver chrome polish adds dimension and a striking finish.

    Brown Velvet Nails

    Add warmth to the winter season with a brown velvet gel manicure. The cozy undertone paired with a soft shimmer makes this look especially fitting for January.

    Winter Wonderland Nails

    Winter charm doesn’t end with the holidays. Glittery French tips paired with delicate snowflake accents keep your nails sparkling all season long.

    Lavender Velvet Nails

    Lavender hues are trending strong in 2026, and a velvet finish takes this gentle purple shade to a whole new level of elegance.

    Bold Stripe Maximalist Nails

    For lovers of statement manicures, this colorful striped design delivers maximum impact. Bright tones and creative patterns make it a standout choice for the New Year.

    Short and Sweet Gel Nails

    Sometimes simplicity shines the most. Short baby pink gel nails offer a clean, polished look that feels effortlessly beautiful and timeless.

    Twinkling Star Nails

    Elevate neutral gel nails with metallic gold stars. Keep the design refined by using fine lines or opt for star stickers for an easy yet dazzling effect.

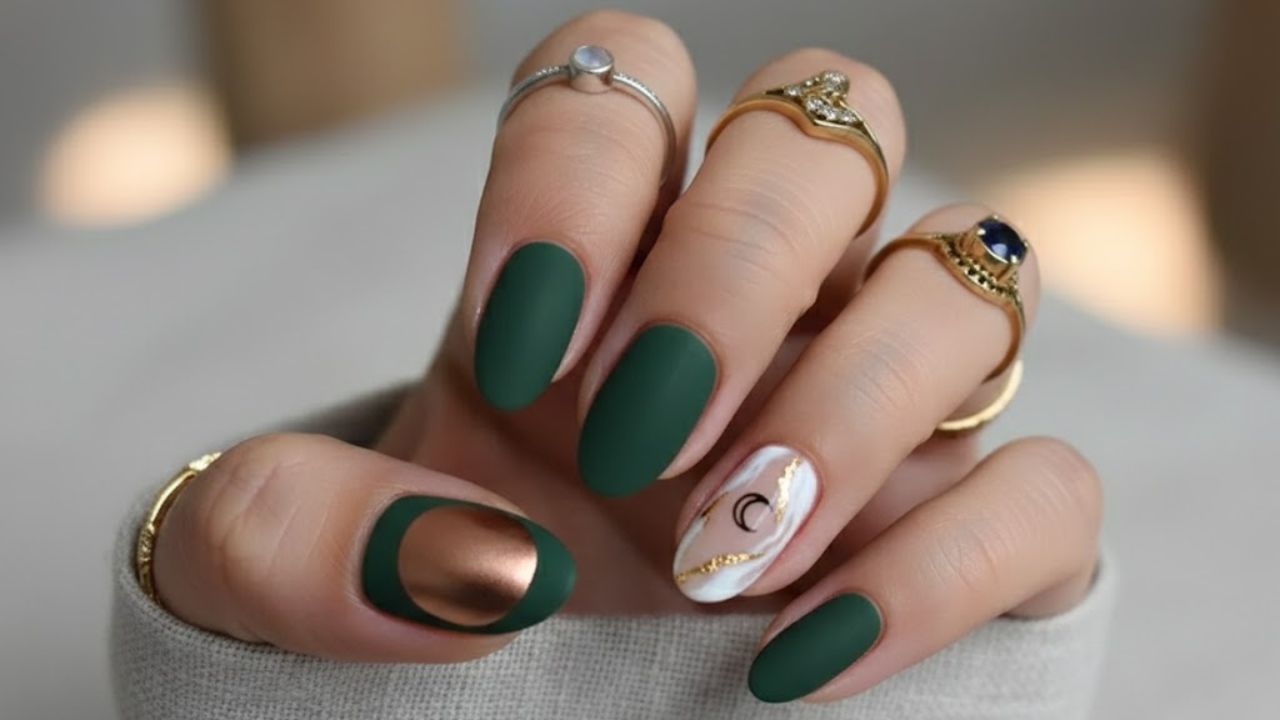
    Lush Green Monochrome Nails

    Deep forest green gel nails exude luxury. Jewel tones like this feel rich and refined, whether paired with a classic almond shape or a more playful silhouette.

    Jewel Tone Skittle Nails

    Can’t decide on just one color? Skittle nails featuring multiple jewel tones with glitter and pearlescent finishes create a glamorous, eye-catching look.

    White Peak Nail Design

    A chic alternative to French tips, these nails feature a neutral pink base topped with crisp double white peaks for a sharp yet minimalist finish.

    Stormy Grey Nails

    Opaque grey gel nails feel cozy and winter-ready while remaining versatile. A glossy gel top coat enhances the shine and longevity.

    Chocolate Drizzle Nails

    This cozy manicure uses chocolate brown tones with a creative drizzle effect that mimics melting chocolate, offering a playful twist on a popular style.

    Thermal Gel Color-Changing Nails

    These nails shift between purple and burgundy depending on temperature. With January’s cold weather, the color transformation becomes instantly noticeable.

    Soft Faded Purple Gradient Nails

    Gradient gel nails continue to trend, blending blue seamlessly into soft purple. The smooth fade keeps the look delicate and visually balanced.

    Blonde Tortoise Shell Nails

    Animal prints don’t have to be bold. This design uses white and grey tones to create a subtle, blonde tortoise effect that feels modern and fresh.

    Icy Blue Winter Nails

    Capture winter vibes with an icy blue gel manicure. Snowflake accents and colorful French tips add seasonal charm without overpowering the design.

    Dark and Starry Nail Set

    Alternating between black and natural bases creates contrast, while sparkling star accents add a refined, celestial touch.

    Cherry Cola Gel Nails

    These deep cherry-toned nails sit just shy of black, delivering a bold and edgy look that pairs effortlessly with darker winter outfits.

    Minimal Sheer Gel Nails

    For a clean and polished appearance, sheer neutral gel nails are the answer. Perfect shaping and tidy cuticles complete this refined aesthetic.

    Wicked Green Nails

    Vibrant green gel nails channel bold, dramatic energy. This striking shade brings instant personality to short, neatly shaped nails.

    Ruby Star French Tips

    Black French tips paired with gold stars and ruby accents offer a vintage-inspired look. Securing the gems properly ensures the design stays intact.

    Dark Star Accent Nails

    Short black gel nails decorated with gold glitter stars create a nostalgic and playful style that feels both youthful and chic.

    Icy Aqua Gel Nails

    Pearlescent aqua-blue polish evokes glacial waters, enhanced by a subtle iridescent shimmer that adds depth and glow.

    Mismatched White Nail Designs

    A unified white palette with varied geometric patterns balances consistency and creativity, making the manicure visually engaging.

    Gold Chrome Gel Nails

    Gold chrome nails deliver a luxurious finish. The metallic tone acts as a neutral, pairing seamlessly with winter wardrobes while adding a polished edge.

  • Safe Henna Hair Dye Blends That Deliver Rich Long-Lasting Colour Without Chemical Damage

    Safe Henna Hair Dye Blends That Deliver Rich Long-Lasting Colour Without Chemical Damage

    The first time I used henna to dye my hair the kitchen smelled like an old pharmacy. The air carried scents of wet dirt & dried leaves that felt warm and strangely pleasant like someone had soaked soil in hot water. A ceramic bowl sat on the counter filled with deep green paste that looked thick and shiny like melted chocolate mixed with plant matter. I paused for a moment with the spoon hanging over the bowl and wondered if this muddy mixture could really work as well as the shiny boxes of hair dye at the drugstore. Then I dipped the brush in the paste and sectioned my hair and spread it through my strands. The henna felt cool and thick like a face mask on my scalp and this natural hair color started to stain my hands & my hair & later changed how I thought about beauty.

    Why Henna Still Feels Magical in a World of Chemicals

    Walking down a modern hair dye aisle can feel intense—strong chemical odors, flashy claims, and fine-print warnings everywhere. To achieve a specific shade, many people accept ammonia, peroxide, and synthetic formulas as unavoidable. Henna offers a completely different experience. Sourced from the Lawsonia inermis plant, henna has been used for thousands of years to naturally color hair, skin, and fabric. When blended with warm liquid, its lawsone pigment releases slowly and binds gently to keratin. Instead of stripping hair, henna coats each strand with a translucent layer, leaving hair stronger, shinier, and healthier. Its earthy scent—more like leaves and tea than perfume—turns coloring into a calming ritual rather than a rushed cosmetic task.

    Choosing Pure, Transparently Labeled Henna

    The quality of henna is everything. True henna should be 100% pure, body-art-quality powder, free from metallic salts and synthetic dyes. Many bad results come from so-called compound hennas that hide chemical additives. High-quality henna feels soft and finely sifted, smells grassy and fresh, and never sparkles or smells artificial. Freshness is essential, as henna loses its staining strength over time. Reading labels carefully and buying from responsible sources matters. You are not just purchasing color—you are choosing a plant grown, harvested, and ground with care. When henna is treated as a living material, hair results become richer and more consistent.

    Creating a Simple and Effective Henna Setup

    Henna does not require fancy equipment. A glass, ceramic, or stainless-steel bowl, spoon, gloves, applicator brush, plastic wrap, and an old towel are sufficient. Reactive metals should be avoided, and hands and clothing should always be protected. More important than tools is patience. Henna works slowly, releasing color over hours rather than minutes. Compared to quick chemical dyes, henna feels more like preparing a slow-cooked meal—deliberate, calm, and rewarding.

    Ingredient Main Advantage Best Suited For
    Amla Powder Balances bright red tones into cooler auburn shades while adding volume People wanting to tone down orange hues and achieve a natural brown-red look
    Indigo Powder Deepens henna results into dark brown or almost black shades Those seeking strong grey coverage or rich brunette hair color
    Cassia (Neutral Henna) Adds shine and mild golden warmth without strong color change Light or blonde hair types looking for gloss and softness
    Black Tea / Coffee Enhances depth and richness of the overall hair tone Medium to dark hair needing a deeper and more intense finish
    Chamomile Tea Gently brightens hair with natural golden highlights Lighter hair shades wanting a soft sun-kissed effect
    Aloe Vera Gel Boosts moisture, smoothness, and paste consistency Dry, curly, or damaged hair requiring extra hydration
    Essential Oils (Lavender, Rosemary) Improves aroma and supports scalp relaxation or stimulation Users sensitive to henna smell or focused on scalp health

    A Classic Henna Recipe for Warm Copper Shades

    The most basic recipe produces warm copper tones. Mix pure henna powder with strong warm tea until it reaches a yogurt-like consistency. Optional lemon juice or apple cider vinegar can assist dye release if the scalp tolerates mild acidity. Allow the mixture to rest for 4–8 hours until the color deepens. Apply evenly to clean hair, wrap securely, and leave on for 2–4 hours. After rinsing, the color may appear bright orange at first, but it will oxidize over several days into a more natural copper or auburn, depending on the starting hair color.

    Achieving Auburn and Brown Tones with Plant Blends

    Henna shades can be softened or darkened using other natural powders. Blending henna with amla tones down brightness, adds cooler auburn hues, and supports hair texture. For brown or chocolate shades, a two-step method works best: apply henna first to create a red base, then follow with indigo to deepen the color. This approach offers better control and predictable results, especially for light to medium hair, producing shades from chestnut to near black.

    Henna Gloss for Soft Color and Extra Shine

    For a lighter effect, a henna gloss is an excellent option. Combine a small amount of henna paste with a silicone-free conditioner and apply it like a hair mask. Leave it on for 45–90 minutes before rinsing. This method delivers subtle warmth, gentle highlights, and noticeable shine without a dramatic color change. It is an ideal way to explore henna before committing to a full application.

    Finding Your Perfect Shade Through Layering

    Henna builds color gradually. Each application adds depth, richness, and gloss. Light hair becomes golden-copper, medium hair shifts toward chestnut or auburn, and dark hair reveals red tones in sunlight. Gray strands turn into warm highlights rather than disappearing entirely. Because henna fades slowly, starting gently is recommended. You can always deepen the shade with future layers while preserving overall hair health.

    Safety Considerations and Hair History Awareness

    Even natural dyes require caution. Always perform a patch test by applying a small amount to the skin, rinsing, and observing for 24–48 hours. Extra care is needed if hair has previously been treated with chemical dyes, particularly those containing metallic salts. Pure henna is generally safe, but low-quality products can cause unpredictable reactions. Protect the hairline with oil, ensure proper ventilation, and allow adequate processing time without rushing.

    Aftercare and Long-Lasting Results

    Rinsing henna takes time, but warm water and patience help remove the paste fully. Many people avoid shampooing for the first 24 hours to allow the color to settle. Over the next few days, the shade deepens and stabilizes. With gentle cleansing and minimal sulfates, henna color lasts well. Regular root touch-ups or occasional gloss treatments keep color even while maintaining strength and shine.

    The Subtle Strength of Plant-Based Hair Color

    Henna works with natural hair rather than against it. Grays become highlights, and natural variations remain part of the look. Choosing henna is a quiet move away from harsh chemicals and rushed beauty routines. It encourages patience, earthiness, and connection. The result is not a perfectly uniform salon shade, but a living color shaped by time, light, and nature—one that feels personal and grounded.

  • Psychologists Say Adults Who Distance From Parents Often Share These 7 Early Life Experiences

    Psychologists Say Adults Who Distance From Parents Often Share These 7 Early Life Experiences

    Sometimes, distance grows quietly—through missed replies, fewer visits, or simple birthday texts. From the outside, it may seem like ingratitude or hypersensitivity. From the inside, it’s often a survival mechanism. Many adults who step back from their parents don’t broadcast grievances online or seek public closure. They simply carve out space, breathe, and explore new ways of living. What remains unseen is the childhood these adults endured, shaping the boundaries they now need to protect themselves.

    Seven Subtle Patterns Behind Adult Distance

    1. Becoming the Family’s Emotional Caretaker Too Soon

    Adults who reduce contact often share a childhood marked by parentification. They were the peacemakers, the “little adults,” absorbing emotions that were never theirs. While other kids rode bikes or played freely, they learned to read moods like weather forecasts—anticipating slamming doors or silent tensions. By their teens, they were managing crises, soothing parents, and handling adult responsibilities. In adulthood, pulling back isn’t cruel; it’s the first chance to breathe for themselves. The distance is a boundary against a role they never volunteered for, a way to reclaim their life and autonomy.

    2. Emotions Were Ignored or Mocked

    Many adults remember being told their feelings were overblown or inconvenient. Tears were met with “toughen up” or laughter, leaving them to internalize pain. Vulnerability became risky, and emotions went underground. As adults, they maintain distance not to punish, but to protect their inner life. They finally allow themselves to feel without judgment, creating a safe space where their feelings matter. When parents complain about coldness, the real truth is: “I stopped bringing you my feelings because you never wanted to see them.”

    3. Love Came With Conditions

    Conditional love is a common thread: affection when rules were followed, distance when expectations weren’t met. Compliments, hugs, and attention were rewards for performance. Adults who step back often do so to experiment with relationships free of emotional strings. They are learning that love doesn’t require a price, that saying no doesn’t have to trigger guilt, and that presence doesn’t equate to payment. This quiet withdrawal is a way to reclaim peace while redefining what love and connection truly mean in adulthood.

    4. Learning to Resist Guilt

    Distance is rarely sudden. It often begins with subtle shifts: delayed texts, shorter visits, or saying no to obligations. Adults who grew up with guilt as a constant companion practice sitting with it without succumbing. Techniques include setting small boundaries, predefining visit lengths, or preparing neutral statements for conflict. These incremental steps reshape relationships over time. Distance becomes a tool for self-preservation, a chance to participate without being emotionally bulldozed, and a way to reclaim autonomy without drama.

    5. Reclaiming Identity After Being Unseen

    Many who step back were never fully seen for who they truly were. Childhood labels—“the smart one,” “the difficult one,” “the disappointment”—persisted into adulthood. Choosing distance allows them to explore their authentic selves, free from family-imposed roles. They often build chosen families—friends and mentors who truly recognize them. In these spaces, the contrast between past invisibility and present recognition is stark. Distance becomes less about punishment and more about living where their current identity is acknowledged and respected.

    Key point Details Why it matters to readers
    Recognising signs of emotional parentification Look back at childhood: were you mediating adult conflicts, handling bills, or consoling a parent more than they comforted you? That pattern often repeats in adult relationships. Helps you see distance not as random rebellion but as a correction to a role you never should’ve carried in the first place.
    Setting “micro-boundaries” before big ones Start with smaller changes: shorten calls, refuse one topic, leave a visit on time. Observe how your body reacts and how your parents respond. Makes the process safer and less explosive, so you don’t burn out or feel forced to cut all contact overnight.
    Building a support system outside the family Cultivate 1–3 people who know the real story — friend, partner, therapist, colleague. Share what happens after family interactions and how it affects you. Reduces the loneliness and self-doubt that often come when you challenge long-standing family dynamics.

    6. The Quiet Strength of Setting Boundaries

    For adults pulling away, each boundary is a form of self-care. Whether it’s a brief call, a limited visit, or refusing to discuss triggering topics, these small acts are powerful. They reshape family dynamics without dramatic confrontations, gradually teaching that respect and space are essential. Over time, these practices foster resilience and autonomy, allowing individuals to love without being consumed or defined by past roles.

    7. Choosing Distance as a Form of Survival

    From the outside, it may look like coldness or indifference. Inside, it is a conscious decision to protect mental and emotional health. Adults who create space do so not out of lack of love, but as a means of survival and self-preservation. They navigate the tension between familial loyalty and loyalty to themselves, often inventing new ways to relate to family—one boundary, one conversation, one measured distance at a time. In stepping back, they claim a life where they can finally exist on their own terms.

  • 9 Parenting Behaviours Psychologists Say Can Lead to Long Term Childhood Unhappiness

    9 Parenting Behaviours Psychologists Say Can Lead to Long Term Childhood Unhappiness

    At a nearby table, a young boy quietly aligned sugar packets while his mother typed away on her laptop, half listening, half nodding. Each time he tried to speak, she murmured, “One second, sweetheart,” never looking up. Ten minutes later, he swept the packets to the floor, eyes flashing. Her sharp reply—“What is wrong with you?”—sent a hush across the room. Psychologists call this pattern conditional positive regard. Praise comes with performance: “I’m proud of you… because you got an A.” Outwardly, these families may seem ideal—high achievers, polite children—but studies show conditional love predicts resentment, anxiety, and perfectionism, leaving children who smile on cue yet feel empty inside.

    Overcontrol That Stifles Independence

    Some households resemble air-traffic towers: precise schedules, micromanaged meals, restricted choices. Developmental psychology emphasizes that children need autonomy to become emotionally healthy. Consider a 10-year-old girl passionate about drawing, whose father pushes coding classes instead, schedules her afternoons, and corrects her speech. She stops drawing, not out of boredom, but because there’s no space for her interests. Overcontrolled children respond with quiet compliance or explosive rebellion. Lacking autonomy, they risk depression, low motivation, and chronic tension, appearing well-behaved externally while internally feeling that their life is controlled by someone else.

    Invalidating Emotions and the “Toughen Up” Myth

    “Stop crying, it’s not a big deal.” “Other kids have it worse.” Comments like these, often meant to toughen children, are forms of emotional invalidation. A boy scraping his knee, told “Come on, be a man,” learns to suppress feelings. Research shows that emotion-dismissing parenting leads to difficulty regulating mood, anxiety, and aggressive outbursts. Kids internalize that their feelings are wrong, resulting in either explosive reactions later or emotional numbness. Developing emotional literacy—understanding what you feel and why—is crucial for happiness, and invalidation interrupts that process.

    Parentification: Children as Emotional Caretakers

    Some children grow up anticipating their parents’ moods, acting as diplomats or caregivers. This role-reversal, known as parentification, can involve making tea for a stressed parent or absorbing adult worries about relationships or finances. Though praised for maturity, these children often feel exhausted and unseen, suppressing their own needs. Chronic parentification correlates with higher rates of depression and strained adult relationships. Happiness becomes linked to stabilizing others rather than attending to one’s own emotions, creating long-term challenges with rest, boundaries, and intimacy.

    Silent Treatment and Withholding Love

    When parents retreat after conflict—no words, no eye contact—the child experiences emotional coldness as a form of control. Even brief silence triggers panic: “Am I still loved?” A teenager coming home late may face days of unspoken reprimand, leading to hyper-vigilance or emotional shutdown. Studies show that social rejection activates the same brain regions as physical pain. Love withdrawal erodes a child’s sense of stable affection, teaching them that love depends on perfect compliance, which undermines authentic joy and emotional security.

    Helicopter Parenting and Learned Helplessness

    Overprotective parents often rescue children from challenges, tying shoelaces, completing homework, or speaking for them. While caring on the surface, this fosters learned helplessness. A 7-year-old whose parent constantly intervenes may freeze at tasks at 12, lacking confidence in their own abilities. Happiness requires not just safety, but a sense of capability and achievement. When children never experience manageable risk or problem-solving, anxiety and low self-esteem quietly replace the joy of accomplishment.

    Performance Obsession in a Comparison Culture

    Modern children grow up amid constant metrics—grades, likes, rankings. Parents who reinforce this focus shift the home into a performance-first arena. A child showing a messy drawing may hear about math drills next, learning to prioritize achievement over curiosity. Research links performance obsession to higher stress, lower intrinsic motivation, and burnout. When self-worth ties to measurable outcomes, play, exploration, and simple joy diminish, undermining the brain’s natural reward system and narrowing happiness to fleeting spikes after success.

    Chronic Distraction and “Phubbing” Children

    One subtle but harmful trend is parental distraction, often called phubbing. A parent scrolling on a phone while a child seeks attention signals, “You are less important than this screen.” Research links this behavior to loneliness and behavioral issues in children. Kids develop a fragile sense of self-worth when the reflection they need from caregivers is consistently absent. Unhappiness emerges subtly, from acting out to reclaim attention or retreating into personal screens, creating parallel isolation for both generations.

    The Cost of Never Apologizing

    In some families, parents never admit mistakes. The adult is infallible; the child must conform. This rigid dynamic fosters obedience but also resentment, fear, and emotional distance. Research on relationship repair highlights that acknowledging harm—saying “I’m sorry”—heals bonds and teaches children how to navigate mistakes in relationships. Without repair, children internalize distorted lessons about power, responsibility, and vulnerability, leaving a lasting impact on intimacy and trust.

    Shifting Patterns Without Self-Blame

    Most parents do not intend to make children unhappy. Patterns emerge from habit, stress, or inexperience. Psychology offers hope: tiny shifts—pausing before reacting, asking questions instead of lecturing—can gradually change the emotional climate. Simple practices like dedicating undivided attention, naming feelings before fixing problems, or circling back after a conflict help children feel seen. Repairable parenting fosters cooperation, emotional resilience, and authentic happiness, teaching children that relationships can bend without breaking.

    Everyday Micro-Moments Matter

    Psychology doesn’t provide scripts but highlights impactful patterns. Small moments—a genuine laugh at a child’s joke, a quick apology after snapping, allowing a shy child to stay quiet—accumulate into a child’s understanding of love. Honest, reflective responses to moments of rupture—acknowledging mistakes and learning from them—create an environment where happiness and emotional security can quietly thrive. Shifting from control to connection is about unlearning old reflexes and building new, repairable patterns in daily life.

    Point clé Détail Intérêt pour le lecteur
    Amour conditionnel Relier la valeur de l’enfant à la performance crée anxiété et perfectionnisme Identifier des phrases et réflexes à transformer en soutien inconditionnel
    Sur‑contrôle et sur‑protection Décisions imposées et sauvetage constant minent l’autonomie Comprendre pourquoi un enfant obéissant peut être intérieurement malheureux
    Invalidation émotionnelle Minimiser les émotions brouille le “compas intérieur” de l’enfant Apprendre à accueillir les émotions sans tout accepter au niveau des comportements
  • This Pantry Staple Makes Hardwood Floors Shine So Well Homeowners Swear By It

    This Pantry Staple Makes Hardwood Floors Shine So Well Homeowners Swear By It

    The late afternoon sun cut across the living room, exposing every streak, scuffed patch, and footprint pressed into what were meant to be beautiful hardwood floors. It was the kind of light that shows everything. A friend stepped inside, glanced down, paused, and offered the polite response: “Oh, I love your floors.”

    They were oak floors, once expensive and full of warmth. Years of kids, a dog, and winter boots had stripped away that deep, honey-colored glow. The usual fixes had already been tried—overpriced “miracle” cleaners, sticky polishes that left residue, and homemade mixtures that smelled sharp but changed nothing.

    A Quiet Tip That Made Old Floors Look Alive Again

    An older neighbor shared a simple suggestion with the calm confidence of experience. “Use this,” she said. The change wasn’t just about looking cleaner. The floors looked alive again.

    The Pantry Staple Hardwood Owners Trust

    The unexpected hero is plain white vinegar. Not specialty cleaners or branded formulas, but the basic bottle often tucked behind cooking oil. When mixed correctly, it helps hardwood floors catch the light again in a way that feels natural.

    Diluted vinegar carries a sharp, familiar scent and, unlike many commercial products, it doesn’t leave a sticky film. Instead, it cuts through layers of residue left by soaps, waxes, and everyday buildup that dull the natural beauty of wood.

    Used properly, vinegar doesn’t coat the surface. It clears it. The wood grain becomes more defined, colors deepen, and the floor no longer feels sealed under a plastic-like layer.

    A Real-Life Example of the Difference

    Jenna, a busy homeowner in her thirties with two kids and a high-energy labrador, had tested multiple brand-name polishes. Each promised a “mirror shine,” but delivered slippery floors and cloudy patches from product buildup.

    One weekend, she tried a simple mixture she found online: one cup of white vinegar in a bucket of warm water. She mopped once, let the floor dry, and took a photo because the result felt unreal.

    The contrast was striking. The earlier surface looked tired and grey. The refreshed floor showed clean reflections and visible wood lines—no artificial gloss, just honest shine. She summed it up simply: “The solution cost less than a dollar.”

    Why Vinegar Works When Other Products Fail

    This method spreads quietly among homeowners and professional cleaners for a reason. Vinegar’s mild acidity, when diluted, breaks down old cleaner residue, mineral deposits, and everyday grime that flattens hardwood’s appearance.

    Most commercial shine products add a layer—acrylics, oils, or silicones—that looks good briefly, then attracts dust and streaks. Vinegar removes what doesn’t belong so the original finish can perform as intended.

    While it doesn’t repair scratches, clearing buildup around them often makes them less noticeable. Light reflects more evenly, and the floor simply looks clearer.

    How to Use Vinegar for a Natural Hardwood Shine

    The formula is straightforward: 1 cup of white vinegar to 1 gallon (about 4 liters) of warm water. Mix gently and avoid adding more vinegar than needed.

    Begin by sweeping or vacuuming thoroughly, as grit quickly ruins shine. Lightly dampen a microfiber mop—never soaking—and clean in small sections, following the grain when possible.

    Allow the floor to air-dry naturally. Within minutes, the dull haze often fades and a soft glow returns, sometimes noticeable only after stepping out and back into the room.

    Common Mistakes to Avoid

    Vinegar is best used as an occasional reset, not a daily cleaner. Using it too often can stress the finish. Most homes benefit from this method once every few weeks.

    Avoid vinegar on unsealed or waxed wood. If the finish is uncertain, test a hidden area first and observe how it dries.

    Some manufacturers discourage vinegar use in official guidelines, but many experienced cleaners rely on this exact method because it delivers consistent results without artificial shine.

    Simple Habits That Keep Floors Looking Better

    • Use microfiber mops to prevent streaks and lint.
    • Replace the solution once it turns cloudy.
    • Add a drop or two of essential oil if the scent is strong.
    • Keep shoes by the door to reduce grit.
    • Spot-clean spills instead of re-mopping entire rooms.

    Why This Simple Method Feels So Satisfying

    There’s something quietly reassuring about achieving beautiful floors without shelves of products. Just one pantry staple, warm water, and a few focused minutes.

    When sunlight falls on clean wood instead of dull streaks, the room feels calmer and more intentional. The change isn’t about perfection—it’s about seeing real improvement in a lived-in space.

    This technique spreads quietly through neighbors and cleaning professionals. It’s rarely the headline solution, yet it’s the one people keep using long after trendy products are forgotten.

    The shine doesn’t rely on strict routines. It’s forgiving, effective, and rewarding almost immediately—one reason this simple habit tends to last.

  • Brain Teaser Challenge Push Your Vision Skills by Spotting 3 Differences in the Deer Images Fast

    Brain Teaser Challenge Push Your Vision Skills by Spotting 3 Differences in the Deer Images Fast

    Brain teaser challenges continue to gain popularity because they offer a quick and effective way to strengthen thinking abilities. Among them, visual puzzles stand out for their ability to test how well you can detect small changes between two nearly identical images. In this challenge, you are asked to spot three differences between two deer pictures in just nine seconds.

    At first glance, both images appear exactly the same. However, subtle hidden details separate them. This puzzle pushes your brain to stay focused, process visual information quickly, and avoid making assumptions. The short time limit adds pressure, turning it into a true test of attention to detail and mental focus.

    Why Spot the Difference Puzzles Work So Well

    Visual brain teasers are effective because they challenge the brain’s natural shortcuts. When two images look almost identical, the brain tends to assume they are the same, saving mental energy but creating blind spots where small changes go unnoticed.

    In this deer challenge, the scene feels familiar right away. That familiarity makes it harder to catch subtle differences. The puzzle forces the brain to slow down and question what it thinks it already recognizes. Shifting from automatic viewing to intentional observation is what makes these challenges so powerful.

    The added time pressure increases difficulty. Nine seconds may sound reasonable, but it keeps the mind alert and tense, making every second count.

    What This Deer Brain Teaser Actually Tests

    This challenge goes beyond simple eyesight. It evaluates several cognitive skills at once. Visual attention is essential, as you must detect fine details that do not stand out immediately.

    Short-term memory also plays a role. As your eyes move between images, your brain must remember details and compare them accurately. Visual processing speed is equally important since the task must be completed quickly.

    People who regularly solve puzzles like this often develop stronger focus over time. Consistent exposure to visual challenges can help train the brain to notice details more efficiently in daily life.

    Smart Ways to Tackle the Puzzle

    Many people struggle with this challenge not because it is too hard, but because they use an unstructured approach. Random scanning rarely delivers good results. A more organized method significantly improves accuracy.

    Start by focusing on the main subject, which is the larger deer. Carefully examine its antlers, body patterns, and posture. Then shift your attention to secondary elements, such as the smaller deer and nearby plants.

    Breaking the image into sections prevents your eyes from skipping important areas. Comparing one feature at a time works far better than scanning the entire scene at once. Remaining calm is crucial, as rushing often leads to missed details.

    The Three Differences Explained Simply

    If you could not find all three differences within the time limit, they become easier to recognize once explained. The first difference appears in the antlers of the larger deer. In one image, a branch on the right side of the antlers is missing, slightly altering their shape.

    The second difference is found on the body of the larger deer. A small white spot near its back is visible in one image but missing in the other. Because it blends naturally with the fur, it is easy to overlook.

    Also Read

    • Spot the Inverted 77 Hidden Among Inverted 74 in 9 Seconds

    The third difference is located near the baby deer. The plants around its feet change in shape and size between the two images. This background variation is subtle and often the last detail people notice.

    Why These Differences Are Easy to Miss

    Each change is designed to blend naturally into the scene. The missing antler branch does not dramatically affect the deer’s appearance. The white spot looks like a natural fur variation, and the altered plants fit seamlessly into the forest setting.

    Because these differences feel realistic, the brain does not immediately flag them as unusual. The puzzle takes advantage of normal visual expectations, making it more challenging than it appears at first glance.

    The Benefits of Solving Visual Brain Teasers

    Visual brain teasers offer more than entertainment. Research on cognitive activity suggests that regular mental challenges can help maintain mental sharpness and improve focus. While puzzles alone do not increase intelligence, they help strengthen attention and patience.

    Spot the difference puzzles are especially effective for improving observation skills. Over time, people who practice these challenges often become quicker at noticing small changes in everyday situations.

    They also provide a healthy mental break. Unlike passive scrolling, puzzles actively engage the brain, making them a productive way to relax.

    Why This Deer Puzzle Gets Shared So Often

    This deer brain teaser is highly shareable because it is simple to understand and quick to try. No special instructions are required. The time limit adds excitement, and people naturally want to compare results with others.

    The moment the differences are revealed often sparks surprise and conversation. That reaction helps puzzles like this spread quickly across social platforms.

    Final Thoughts on the Deer Spot the Difference Challenge

    Finding three differences in the deer images within nine seconds shows how easily small details can be missed. What seems obvious at first glance often hides subtle changes that require careful observation.

    Whether you spotted all the differences right away or needed an explanation, this brain teaser offers a valuable mental workout. Practicing challenges like this can sharpen focus, improve attention to detail, and keep the mind alert.

  • 6 Eye Shadow Primers That Keep Makeup Smooth Vibrant and Completely Crease Free All Day Long

    6 Eye Shadow Primers That Keep Makeup Smooth Vibrant and Completely Crease Free All Day Long

    This article may contain compensation from retailers or from purchases made through select product links. The right eye shadow primer often determines whether your makeup stays fresh all day or fades within hours. With just one layer, a high-quality primer helps eye shadow look more vibrant, blend effortlessly, and remain crease-free. Think of it as essential prep for your eyelids before any color goes on.

    Modern formulas do more than improve wear time. They help smooth texture, balance uneven tone, and offer added benefits such as hydration or oil control. If fine lines are a concern or shimmer shades tend to lose impact, choosing the right primer can noticeably transform the final look. Below are editor- and artist-approved picks that prove flawless eye makeup starts well before applying shadow.

    Editor-Approved Eye Shadow Primers That Perform

    The Urban Decay Eye Primer Potion has been a longtime favorite among editors and professional makeup artists. Miami-based artist Natalie Dresher has noted that it helps eye shadow stay intact without settling into fine lines or feeling heavy. The formula is lightweight with a serum-like consistency that spreads evenly without clumping or patchiness.

    It leaves a slight tackiness that grips shadow without becoming sticky. The Original shade appears sheer and translucent, Eden offers a matte beige finish, and Sin delivers a soft champagne shimmer. An anti-aging version designed for mature skin includes plumping peptides and brown algae. Overall, this primer works well for nearly anyone wanting longer-lasting eye makeup.

    Best All-Day Wear: Primer That Locks in Color

    Why It Stands Out

    Milk Hydro Grip Eye Primer applies invisibly and acts like gentle adhesive for eye shadow without settling into lines. Pittsburgh-based makeup artist Patty Bell explains that its thin texture makes it easy to blend across the delicate eyelid area. Once set, it helps keep eye makeup intact for up to eight hours.

    The formula includes hyaluronic acid for moisture and a softly blurred finish, along with blue agave to enhance grip. Added niacinamide and aloe support hydration. Bell also recommends using it under the eyes to help minimize concealer creasing, making it a versatile option.

    Ideal for Mature Lids: Smooth, Comfortable Hold

    Why It’s a Smart Pick

    The NYX Professional Makeup Ultimate Shadow & Liner Primer is a budget-friendly favorite that delivers impressive performance. The lightweight formula spreads quickly and feels comfortable on the skin, making application simple for beginners and pros alike.

    It comes in four natural-looking shades that can double as subtle cream shadows. These tones help camouflage veins and even out discoloration while creating a smooth base. Infused with vitamin E, the primer helps maintain moisture and reduces the risk of dryness or flaking throughout the day.

    Top Budget Pick: Professional Results at a Lower Price

    Why Artists Trust It

    NARS Pro-Prime Smudge Proof Eyeshadow Base is a behind-the-scenes essential that enhances every eye look. The sheer formula melts into the skin, leaving a barely noticeable layer that grips shadow effectively.

    New York City makeup artist Nick Barose has shared that he values how it holds pigment without altering color or feeling heavy. The formula contains rice extract and sea whip extract to hydrate and protect the delicate eye area. It wears more like skincare, improving blendability while preventing dryness.

    Best for Dry Eyelids: A Base That Prevents Flaking

    Why It Works

    If you regularly use Too Faced palettes, the brand’s Shadow Insurance Eye Primer helps those shades perform better. The formula includes oil-absorbing silica to manage shine and keep lids smooth.

    Its silky, colorless texture suits all skin tones and creates a dependable base for stronger color payoff and easier blending. The waterproof formula resists smudging and fading, even in humid conditions. While marketed for extended wear, it comfortably lasts through long days.

    Best for Oily Lids: Reliable Control That Lasts

    Why It’s Worth Using

    The Laura Mercier Eye Basics Primer is available in two shades designed to correct and balance eyelid tone. The light blue shade helps neutralize purple and red undertones, while the peach shade brightens dull-looking lids for a more refreshed appearance.

    Once applied, eyelids appear smooth and even, and eye shadow stays in place with both powder and cream formulas. The skincare-inspired formula includes aloe for soothing hydration, lanolin acid to seal in moisture, and safflower seed oil to nourish the skin.

  • Hygiene After 65 Experts Reveal the Shower Frequency That Truly Supports Long-Term Health

    Hygiene After 65 Experts Reveal the Shower Frequency That Truly Supports Long-Term Health

    The bathroom carried a light scent of lavender and lingering steam when Margaret, 72, called her daughter to the doorway. “Do I really need to shower every day?” she asked, one hand gripping the rail, the other resting on her hip. Her skin looked reddened and slightly shiny, as if it had been scrubbed a little too hard, a little too often.

    Her doctor had already warned her to be cautious: blood pressure concerns, balance issues, and dry skin on her legs that cracked easily. Yet for most of her life, she had heard the same message — good people bathe daily. Cleanliness meant discipline, and discipline was believed to equal health.

    Just across the hall, her husband George had not used the shower in four days. Instead, he cleaned himself with a warm cloth, freshened up, and returned to his crossword puzzle. He looked fine and even felt better than when he tried to follow the so-called daily shower rule.

    Between them, an uncomfortable question hovered in the tiled air: how often should older adults actually shower?

    The answer specialists now share is neither daily nor weekly. It sits somewhere in between — and it surprises most people.

    What Is the Right Shower Frequency After 65?

    Ask ten people over 65 how often they shower, and you will hear ten different routines. Some insist a morning rinse is essential to start the day. Others worry about slipping, feeling dizzy, or simply lacking the energy to complete the full process.

    Beneath these habits, a quiet shift is taking place among geriatric doctors and dermatologists: the traditional daily shower rule no longer suits aging bodies.

    After 65, the skin becomes thinner, drier, and more fragile. Natural oils decrease, and tiny cracks form more easily. Hot water and strong soaps can turn sensitive skin into a problem zone.

    When specialists are asked about ideal frequency, many reach the same conclusion: two to three showers per week are usually sufficient for most healthy seniors, paired with daily targeted washing of key areas. Not every day. Not just once a week. A balanced, flexible approach that is gentler on the body.

    One geriatrician in the United States often shares the story of Frank, 79, who came in complaining of unexplained itching. He showered every morning at 7 a.m., scrubbing with a strong antibacterial gel to “kill germs.” His arms and legs were raw, and his back was dotted with red patches.

    The doctor suggested reducing showers to three times a week and switching to a mild, fragrance-free cleanser. Frank hesitated. “Won’t I smell?” he asked. Three weeks later, he returned with calmer skin, better sleep, and his wife admitted — smiling — that he smelled exactly the same.

    Studies following older adults at home reveal similar patterns. Those who force themselves into daily showers often experience more dermatitis, small skin cuts, and infections. People who space out showers but maintain simple hygiene — quick cleaning of underarms, groin, feet, along with hand and face washing and clean clothes — often do just as well, if not better.

    On paper, two or three showers per week may sound minimal. In real bathrooms, for aging bodies, it often becomes the ideal balance between cleanliness and skin protection.

    Why Less Frequent Showering Makes Sense With Age

    The logic becomes clear once understood. Skin is not just something to scrub; it is a living protective barrier. It hosts helpful bacteria and yeasts that defend against irritation and infection.

    Hot water, long showers, and harsh soaps strip this barrier, remove beneficial microbes, and create tiny openings in the skin. While younger skin repairs itself quickly, healing slows after 65.

    This changes the equation. Hygiene is no longer about “more is better.” It becomes about doing enough, at the right pace, in the right way. That is why many experts now prefer the term smart hygiene instead of maximum hygiene.

    Building a Practical Shower Routine After 65

    The most effective routines are the ones people can realistically maintain. Standing under hot water for 15 minutes, bending, reaching, washing hair, drying, and moisturizing can feel like a marathon for a tired body or an unsteady head.

    Many geriatric care teams now recommend a simple structure: two to three full showers per week, plus a short mini-wash on other days.

    On shower days, guidance is usually consistent. Keep water lukewarm, not hot. Limit showers to 5–10 minutes. Focus on areas prone to odor or infection, such as underarms, groin, feet, and skin folds. Use a mild, pH-balanced cleanser only where needed, allowing the rest of the body to be rinsed with water alone.

    On non-shower days, a quick routine using a warm washcloth or gentle wipes is often enough: face, neck, underarms, groin, bottom, and feet. Clean underwear and socks quietly handle much of the hygiene work.

    • An old-style moisturizer, not from major brands, ranked number one by dermatology experts
    • Toilet parasites on Hadrian’s Wall: research reveals Roman soldiers lived with gut worms
    • Scientists raise concerns about Nivea cream, worrying many parents
    • A common mistake that makes washing machines less effective
    • He followed GPT-4 advice to get rich — the outcome surprised everyone
    • Goodbye clear horizons: how atmospheric particles are changing visibility
    • What walking slowly with hands behind your back reveals, according to psychology
    • A young worker drills a hole and uncovers 7 kg of pure galena, earning a €19,878 bonus

    Routines must also account for fear and fatigue. Many older adults have experienced a slip, a dizzy spell, or a moment of panic on a slick shower floor. These memories linger.

    This is why occupational therapists emphasize that safe hygiene supports mental well-being. A shower chair, non-slip mat, grab bar, or handheld shower head can transform bathing from a stressful task into something manageable.

    Families often worry about judgment. “What will the nurse think if Dad doesn’t shower daily?” Medically, many professionals acknowledge that a calm, clean routine with two showers per week and solid daily basics is often healthier than pushing habits that lead to falls or conflict.

    As one geriatric nurse put it:

    “For most of my patients over 70, my goal isn’t daily shower perfection. It’s staying clean, comfortable, and safe. That usually means two or three showers a week.”

    This approach is not about laziness. It reflects adaptation to bodies that get dizzy, knees that resist bending, and backs that no longer twist easily. Science is finally aligning with what many seniors have already learned through experience.

    Problems often arise from overly hot water, aggressive antibacterial gels, rough sponges, and skipping moisturizer afterward. These habits can turn each shower into a skin assault.

    A gentler method works better: short, warm, targeted showers followed immediately by a simple, fragrance-free moisturizer on legs, arms, and dry areas. It may seem small, but its impact grows over time.

    • Ideal full showers: 2–3 times per week for most over 65s
    • Daily care: Underarms, groin, feet, face, and hands cleaned
    • Water temperature: Warm, not hot, 5–10 minutes maximum
    • Products: Mild, fragrance-free, pH-balanced cleansers
    • Safety tools: Grab bars, non-slip mats, shower chair if needed

    Redefining Cleanliness and Health Later in Life

    Hygiene after 65 is about more than soap and water. It involves dignity, routine, and self-respect. Many older adults fear smelling unpleasant, especially when care begins to involve family members or caregivers.

    Showering less often can feel like giving up or becoming “that old person.” Yet evidence consistently shows that two or three showers per week, supported by thoughtful daily care, often protect against odor, infection, and skin issues just as well — sometimes better — than strict daily showers.

    Clean clothes, breathable fabrics, regularly changed sheets, and good oral hygiene play equally important roles. A loved grandparent may smell of laundry and tea rather than soap, and still be completely clean.

    When expectations shift, bathroom tensions often ease. A father who resists daily showers may accept twice-weekly ones if he feels understood. A mother afraid of falling may welcome a relaxed, seated shower routine instead of constant pressure.

    These small adjustments can lead to fewer arguments, less skin damage, fewer falls, and calmer mornings. This balance — between body, mind, and daily life — is what experts truly mean by ideal frequency.

    Ultimately, the question becomes personal: what rhythm keeps you or your loved one both clean and comfortable? Guidelines open the door, but they do not lock it. Between “not daily” and “not weekly,” there is room to create a routine that respects age, habits, fears, and small comforts.

    That may be why this topic resonates so deeply. It speaks to something intimate: how we wish to be cared for when the body begins to change the rules.

    • Optimal frequency: 2–3 full showers per week for most over 65s — reduces guilt about not showering daily
    • Daily mini-wash: Targeted cleaning of key areas — maintains freshness without exhaustion
    • Skin protection: Short, warm showers with gentle products and moisturizer — lowers dryness and infection risk
  • 5-Minute Focus Yoga: A Quick Routine to Improve Concentration

    5-Minute Focus Yoga: A Quick Routine to Improve Concentration

    Staying focused has become difficult in our modern world. Distractions surround us whether we work from home or study or just try to concentrate during the day. Yoga offers an effective solution for improving mental clarity and focus. Adding a simple five-minute yoga routine to your daily schedule can clear your mind & reduce stress while sharpening your ability to concentrate. This article presents a short yoga sequence that helps boost focus and mental clarity. The practice works because it combines physical movement with controlled breathing and mindful awareness. These elements work together to calm the nervous system and bring attention back to the present moment. When you feel scattered or overwhelmed during your day you can use this quick routine to reset your mental state. The sequence requires no special equipment & can be done almost anywhere. You only need enough space to stretch your arms & a few minutes of uninterrupted time. The poses are simple enough for beginners but effective for experienced practitioners as well. Starting with intentional breathing helps transition your mind from external distractions to internal awareness. This breathing foundation supports the physical poses that follow. Each movement serves a specific purpose in releasing tension and directing energy toward mental clarity.

    Mountain Pose (Tadasana): Build Focus From the Ground Up

    Improving concentration begins with a strong foundation, and Mountain Pose offers exactly that. This simple standing posture helps align the body while gently centering the mind, making it an ideal starting point.

    How to Practice:

    – Stand upright with your feet hip-width apart and toes facing forward.

    – Spread your weight evenly across both feet, grounding through the soles as you lengthen through the crown of your head.

    – Activate your thighs, gently lift the kneecaps, and allow your shoulders to soften.

    – Rest your arms alongside your body with palms facing forward, taking a deep, steady breath.

    – Hold the pose for 30 seconds, keeping your attention on slow, even breathing.

    Benefits:

    – Supports better posture and body alignment

    – Increases awareness of the body

    – Refreshes the mind and reduces mental clutter

    – Mountain Pose encourages you to stand with confidence and clarity, preparing both body and mind for what comes next.

    Standing Forward Fold (Uttanasana): Release and Reset

    This gentle forward bend helps ease tightness in the back and neck while encouraging the body to fully relax. By improving circulation and calming the nervous system, it supports a clearer, more focused state of mind.

    How to Practice:

    – Begin in Mountain Pose and slowly fold forward from the hips.

    – Keep your knees slightly bent if your hamstrings feel tight.

    – Allow your head and neck to relax naturally toward the floor.

    – Hold opposite elbows or place your hands on the ground, based on comfort.

    – Stay here for 30 seconds to 1 minute, breathing deeply.

    Benefits:

    – Releases tension in the shoulders, neck, and back

    – Boosts blood flow and circulation to the brain

    – Promotes relaxation and nervous system balance

    – By easing physical tightness, this pose helps quiet the mind and restore focus.

    Seated Cat-Cow Flow (Seated Marjaryasana-Bitilasana): Move With Awareness

    This seated variation of Cat-Cow gently mobilizes the spine and neck while encouraging mindful breathing. Coordinating movement with breath helps clear distractions and sharpen mental clarity.

    How to Practice:

    – Sit comfortably on the floor or a cushion with legs crossed and spine upright.

    – Place your hands on your thighs or knees.

    – Inhale as you lift your chest and gently arch your back.

    – Exhale as you round the spine, tucking your chin and drawing the belly inward.

    – Continue flowing between these movements for 30 seconds to 1 minute.

    Benefits:

    – Improves flexibility and spinal mobility

    – Reduces stiffness in the upper back and neck

    – Encourages focus through breath-led movement

    – This smooth, rhythmic flow supports a calmer nervous system and a more centered mindset.

    Tree Pose (Vrksasana): Strengthen Balance and Concentration

    Tree Pose challenges balance while training the mind to stay present. It requires steady attention, making it an effective posture for enhancing focus and mental steadiness.

    How to Practice:

    – Stand tall in Mountain Pose and shift your weight onto one leg.

    – Lift the opposite foot and place it on the inner calf, ankle, or thigh, avoiding the knee.

    – Bring your hands together at your chest or raise them overhead.

    – Fix your gaze on a single point ahead to support balance.

    – Hold for 30 seconds to 1 minute, then change sides.

    Benefits:

    – Improves focus and mental clarity

    – Builds strength in the legs, core, and back

    – Enhances balance and body control

    – Tree Pose helps you stay grounded by blending physical stability with mindful attention.

    Seated Forward Fold (Paschimottanasana): Calm the Body, Clear the Mind

    The Seated Forward Fold offers a soothing stretch for the spine and legs while encouraging deep relaxation. It supports mental clarity by helping the body release stored tension.

    How to Practice:

    – Sit with your legs extended straight ahead and feet flexed.

    – Inhale to lengthen your spine, lifting your arms overhead.

    – Exhale and fold forward from the hips, moving your chest toward your thighs.

    – Hold your shins or feet, allowing your head to soften downward.

    – Remain in the pose for 30 seconds to 1 minute with slow breathing.

    Benefits:

    – Stretches the hamstrings, lower back, and spine

    – Helps calm the mind and reduce stress

    – Supports improved focus and mental clarity

    This gentle forward fold creates space for both physical relaxation and renewed concentration.

  • Balance Exercises for Seniors Strengthen Stability and Help Reduce Fall Risk

    Balance Exercises for Seniors Strengthen Stability and Help Reduce Fall Risk

    Try these 11 balance exercises created especially for older adults to help reduce the risk of falls. Falls are one of the leading causes of injury among people aged 65 and above. These movements support better balance and help develop muscle strength, both of which are vital for maintaining independence and staying safe as you grow older.

    Why Good Balance Is Important

    Having strong balance allows you to move with confidence during daily tasks. It lowers the chances of falling and supports an active lifestyle. Well-developed muscles help protect your joints and make it easier to regain stability if you begin to lose your balance.

    11 Balance Exercises to Try

    1. Controlled Weight Shifts for Body Awareness

    This exercise helps you become more aware of how your body moves and responds to changes in weight. Improving this awareness strengthens balance control and supports safer movement during everyday activities.

    2. Standing Heel Lifts for Ankle Strength and Stability

    Heel lifts improve balance while strengthening the calf muscles, which play a key role in walking and climbing stairs.

    Stand with your feet about hip-width apart. Hold onto a chair or counter if needed. Lift your heels so you are standing on the balls of your feet. Hold for one to two seconds, then slowly lower your heels back to the floor.

    To increase difficulty, try lifting one foot and performing the movement on one leg at a time.

    3. Gentle Forward and Backward Steps for Stability Control

    Once you are comfortable shifting your weight, you can progress to stepping movements. Begin by standing with your feet hip-width apart and arms relaxed at your sides. Step your right foot forward, return to center, then step it backward and return again. Repeat the same sequence with your left foot. You may complete all repetitions on one leg or alternate legs for added challenge.

    4. Feet-Together Standing to Improve Core Balance

    Standing with your feet together creates a smaller base of support, making balance more challenging. Start with your arms extended out to the sides and slowly bring your feet together until they touch. Hold this position as long as possible. As you improve, try the exercise with arms at your sides, then crossed over your chest, and eventually with your eyes closed.

    5. Walking with Head Turns to Improve Coordination

    This exercise trains your body to stay stable while your head moves. Walk forward at a slow pace and turn your head to look over your right shoulder, then return to center. Next, turn to look over your left shoulder. Continue alternating sides as you walk. This movement strengthens the connection between vision and balance, helping you feel steadier during daily tasks.

    6. Side-to-Side Stepping for Lateral Balance Support

    Stand with your feet hip-width apart and toes facing forward. Take a small step to the right, then bring your left foot to meet it. Continue stepping in the same direction, then reverse and return to your starting position. Use a counter for support if needed until you feel confident.

    7. Forward Step-Ups to Build Leg Strength and Confidence

    Forward step-ups help improve balance during activities like climbing stairs. Stand in front of a step or low platform. Step up with your right foot, bring your left foot up, then step down with the left foot followed by the right. Alternate which leg leads with each repetition. Hold a handrail if additional support is needed.

    8. Side Step-Ups for Hip Stability and Fall Prevention

    Side step-ups should be attempted only after mastering forward step-ups. Stand with your right side facing a step. Place your right foot on the step, bring your left foot up, then step back down one foot at a time. Complete 10 repetitions, then switch sides and repeat using the opposite leg.

    9. Heel-to-Toe Standing for Sharper Balance Focus

    This exercise increases difficulty by narrowing your base of support. Stand with your arms extended to the sides. Place your right foot directly in front of your left, heel touching toes. Hold the position as long as possible, then switch feet. To make it harder, lower your arms, cross them over your chest, or close your eyes.

    10. One-Leg Standing for Overall Stability

    Stand near a solid surface for safety. Shift your weight onto your left foot and lift your right foot by bending your knee. Hold your balance as long as you can, then switch legs. For added challenge, try closing your eyes or standing on a soft surface like a cushion.

    11. Cross-Step Walking for Coordination and Control

    Also known as the grapevine exercise, this advanced movement improves coordination. Stand with your feet hip-width apart. Cross your right leg over your left, step your left foot out to the side, then cross your right leg behind the left. Continue this pattern as you move sideways. Reverse the steps to return to your starting point.