Category: News

  • Easy Bodyweight Exercises Americans Can Do at Home to Build Stronger Defined Legs

    Easy Bodyweight Exercises Americans Can Do at Home to Build Stronger Defined Legs

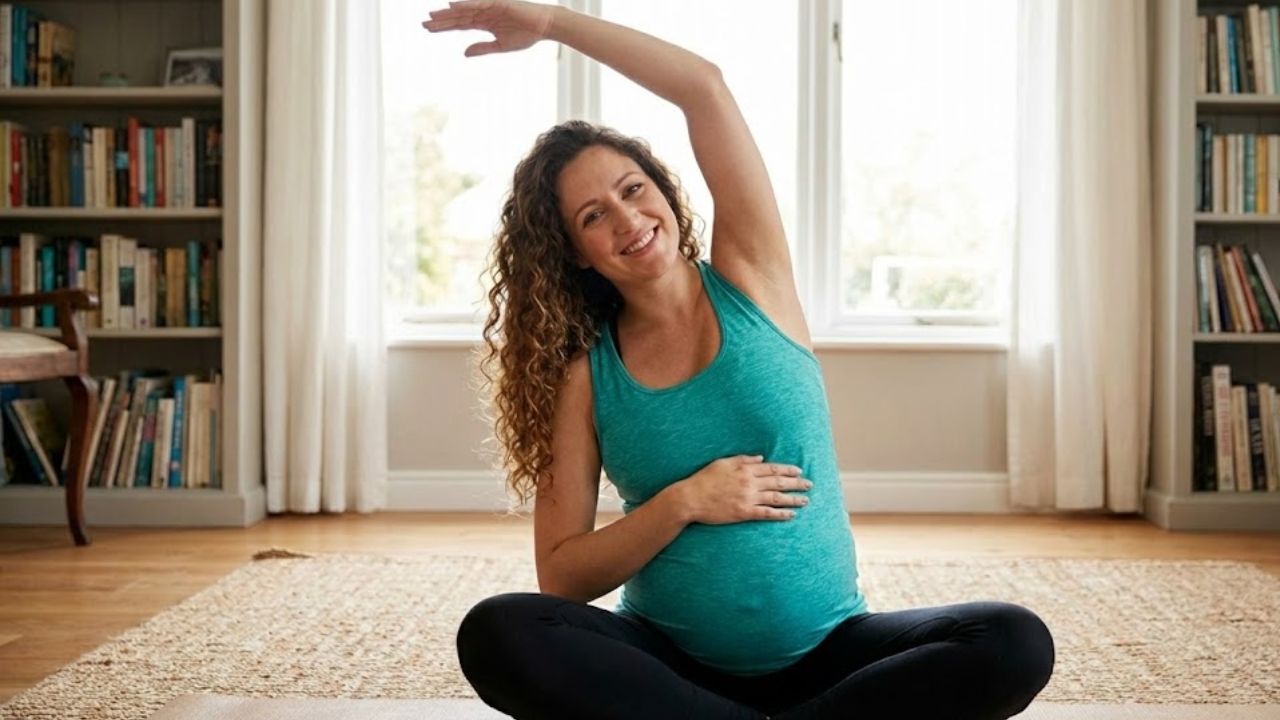
    The floor in your living room might not seem like the right place to build strong & defined legs. But it is always there beneath your coffee table and whatever else you have lying around. You do not need a gym membership or expensive equipment like a squat rack or dumbbells. All you need is some floor space and your own bodyweight along with the willingness to feel your muscles working in ways you might have forgotten.

    Finding Strength Between the Couch and the Kitchen

    Picture this: it’s early evening with a soft glow from the TV & dinner dishes drying in the rack. The day has been long and your legs feel a little stiff from sitting & maybe heavy from too many drives and not enough walks. You stand up barefoot and feel the cool surface beneath your feet. You shift your weight from heel to toe and in that simple moment you remember that your legs are not just for getting you from the car to the front door. They are your engines and shock absorbers and quiet workhorses. Americans spend frighteningly long hours sitting at desks and in cars & on couches. The result is weak glutes & tight hips and stiff knees and low-back aches that seem to appear out of nowhere. The good news is your body is remarkably forgiving. With a few simple bodyweight exercises done consistently at home you can reclaim strength and power & shape in your legs without turning your life into a boot camp or rearranging your furniture like a fitness studio. You don’t need to become a fitness person. You just need a small routine that feels like it fits naturally between brewing coffee and brushing your teeth. That routine done barefoot on your living room floor can gradually carve out stronger quads and more defined hamstrings and glutes that actually participate when you climb stairs instead of leaving all the work to your knees.

    Building a Foundation: Squats Without the Gym

    Let’s begin with the squat. Before anyone called it exercise it was simply how humans lived. People squatted to cook & gather food and rest. Your legs are built to bend and straighten under your body weight throughout the day but most of us avoid this movement and sit in chairs instead. Stand with your feet roughly shoulder-width apart and turn your toes out slightly as if you’re about to sit on a low bench. Let your arms reach forward for balance. Push your hips back first and then bend your knees. Lower yourself like you’re reaching for a seat behind you. Keep your weight spread through your heels and the middle of your feet instead of letting it shift into your toes. When you reach the bottom position pause for a moment & notice your thighs working while your glutes engage lightly and your core tightens. Then push through the floor and stand up tall. The first few repetitions might feel unstable as if you’re working with muscles that forgot what to do. This is normal. Go only as low as feels comfortable for your knees and hips even if that means just a few inches at first. With practice you’ll sink deeper until your thighs approach parallel with the floor & the movement becomes smoother while your breathing stays steady. This isn’t about doing it perfectly but about being present and noticing how your body moves so you can adjust as needed. If your knees cave inward try imagining that you’re pushing the floor apart with your feet. If your heels come off the ground reduce how far down you go and focus on keeping them planted. If you need extra support try a couch squat by standing in front of your couch and lightly touching it with your hips on each repetition to use it as a guide.

    Progressing Your Squats

    When regular squats become easy and you can complete 3 sets of 12 to 15 repetitions without much difficulty you can increase the challenge in several ways. Try tempo squats by taking 3 to 4 seconds to lower yourself down and then pausing for 1 to 2 seconds at the bottom before standing back up. Another option is pulse squats where you stay near the bottom position and perform small up and down movements for 15 to 20 seconds. You can also do squat holds by lowering yourself into a comfortable squat position and maintaining that position for 20 to 40 seconds while your muscles work hard to keep you stable.

    Lunges: The Everyday Strength Secret

    Walk up stairs. Step over the dog. Climb onto the porch. Lunges are the real-world version of these movements. They train one leg at a time & reveal imbalances you might not know about while building strength that carries over to daily activities. From a standing position step one foot forward like you’re taking a confident stride. Let your back heel lift and bend both knees. Your front knee should stack roughly over your ankle and not dramatically past your toes. Your back knee points down toward the floor. You don’t have to touch the ground but think of a gentle hover. Press through your front heel to stand back up and bring your feet together. That’s one rep. As you lower you’ll feel your front thigh working like a brake and your glute powering you back to standing. Your core stabilizes you when you wobble and most people wobble at first. It’s not a sign of weakness but your balance system waking up. If balance feels tricky keep a hand lightly on a wall or chair. You can also shorten your step and do a split squat where instead of stepping in and out you keep your feet in a staggered stance and simply lower and rise like a stationary lunge.

    Glute Bridges and Hamstring Magic on the Living Room Floor

    Not every effective leg exercise requires you to stand up. Some of the most beneficial movements happen while lying on your back on the floor when you realize your hamstrings need more work. Glute bridges are simple but effective. Lie on your back with bent knees & feet flat on the floor at hip-width distance. Rest your arms at your sides. Breathe in & then breathe out while tucking your pelvis slightly so your lower back touches the floor gently. Push through your heels & raise your hips upward. Your glutes will contract and your hamstrings will activate while your core keeps you stable and prevents excessive arching. Hold the top position briefly while forming a straight line from your shoulders to your knees and then lower your hips slowly. Glute bridges strengthen the posterior chain of your legs. This area helps you maintain better posture & walk with more power while supporting your lower back. Regular practice develops the curved muscle definition at the back of your thighs that many people try to achieve using gym equipment and heavy weights.

    From Bridge to Single-Leg Strength

    Once basic bridges feel comfortable you can increase the difficulty level. For a marching bridge you hold the bridge position and slowly lift one foot a few inches off the ground and then switch to the other foot like you are marching without moving forward. A single-leg bridge requires you to extend one leg straight out while keeping both thighs aligned and then lift and lower your hips using only the leg that stays on the ground. An elevated feet bridge involves placing your feet on a couch edge or low chair and performing the bridge from that position to engage your hamstrings more effectively. Each variation provides enough challenge to help your muscles adapt and become stronger while you remain on the same living room floor where you normally relax & check your phone.

    Calf Raises, Side Steps, and the Details That Define Your Legs

    The big muscles get most of the glory like the quads and hamstrings and glutes but the smaller ones support everything. Ignoring your calves and hip stabilizers and outer thighs is like rebuilding a house on wobbly stilts. A few simple moves can tighten up the details & make your legs feel more stable & defined from every angle. Calf raises might be the simplest exercise you will ever do. Stand with your feet hip-width apart and lightly hold the back of a chair or the wall if you like. Press into the balls of your feet and slowly lift your heels as high as you can like a slow silent tiptoe. Pause and then lower your heels under control. Feel the burn on the backside of your lower legs. Those are the calves that help you walk and climb & hold balance when the sidewalk is uneven or the hill is steep. To challenge yourself more you can try single-leg calf raises or do them standing on a step with your heels hanging slightly off the edge so you can lower deeper for a bigger range of motion. For the outer hips and thighs lateral movements are essential. We live most of our lives moving forward & backward but your body is built to move side to side as well especially at the hips. Try lateral steps with a mini-band around your thighs or just bodyweight if you don’t have one. Slightly bend your knees into a mini-squat and take small controlled steps to the right and then to the left while feeling the outer hips and glutes engage. If space is tight you can shuffle a few steps one way down the hallway and then back. Or lie on your side for side-lying leg raises where you keep your body in a straight line & lift the top leg a foot or so & pause and then lower. Slow & controlled. It is a surprisingly potent way to build the kind of hip strength that keeps your knees and lower back happier during everything else you do.

    Putting It All Together: A Simple Home Leg Routine

    One of the main obstacles is not how hard the exercise is but rather the mental exhaustion of making too many choices. You wonder what exercises to pick today and how to arrange them and how much time to spend on each one. When you simplify everything it becomes much easier to stick with the program and do it consistently until your legs feel stronger whenever you get up from a chair. This is a basic routine you can follow two or three times each week without leaving your house. You do not have to execute it exactly as written. Think of it as a general guide rather than a set of rigid rules.

    Exercise Sets Reps / Time Rest
    Bodyweight Squats 3 10–15 reps 45–60 sec
    Lunges or Split Squats 2–3 8–10 reps/leg 45–60 sec
    Glute Bridges 3 12–15 reps 45 sec
    Calf Raises 2–3 15–20 reps 30–45 sec
    Side-Lying Leg Raises or Lateral Steps 2 12–15 reps/side 30–45 sec

    The Quiet Transformation of Everyday Strength

    Training your legs at home has a grounding quality that gym workouts often lack. You move at your own pace without comparing yourself to others or fixating on machine displays. Each session becomes about understanding your body better and gradually pushing its limits. The changes show up in everyday moments. Your thighs might feel firmer when you step outside in the morning. Walking around the neighborhood becomes easier because your legs have more spring in them. You might bend down to pick something up one day and realize how naturally your body moves into a deep squat. Building leg strength goes beyond appearance even though better muscle definition is a genuine benefit. Strong legs mean you can age without worrying as much about falls. You can carry shopping bags without your knees complaining. Playing with children or grandchildren on the floor becomes possible without struggling to stand back up. You gain control over how your body moves in your own environment on your own schedule. Your living room serves its purpose without needing any special equipment. The same floor where you relax in the evening can become where you discover what your legs can really do. There is no need for a gym membership or timer or audience. You have your bodyweight & a solid surface beneath you that stays constant and ready whenever you decide to exercise.

  • Top 4 Yoga Poses That Help Reduce Anxiety and Calm the Mind

    Top 4 Yoga Poses That Help Reduce Anxiety and Calm the Mind

    Anxiety has become one of the most common mental health problems in modern life. Millions of people struggle with it because of workplace stress and personal or social pressures. Many different approaches can help manage anxiety but yoga offers a particularly straightforward and powerful way to settle the nervous system & clear the mind. When you practice certain yoga poses regularly you can trigger your parasympathetic nervous system which helps slow down your breathing & heart rate while bringing you into a calmer mental state. This article presents four effective yoga poses that can help lower anxiety and stress levels. It also includes practical guidance on how to do each pose correctly.

    Child’s Pose (Balasana): A Grounding Posture That Quickly Soothes Anxious Thoughts

    Four Yoga Poses to Help Reduce Anxiety and Stress Anxiety ranks among the most widespread mental health challenges people face today. Millions of individuals deal with it due to work-related tension and various personal or social demands. While numerous methods exist for managing anxiety, yoga provides an especially accessible & effective means to calm the nervous system and quiet the mind. Regular practice of specific yoga poses activates your parasympathetic nervous system, which reduces your breathing rate and heart rate while promoting a more peaceful mental state. This article outlines four beneficial yoga poses that can decrease anxiety and stress levels and offers practical instructions for performing each pose properly.

    Legs Up the Wall (Viparita Karani): A Restorative Pose That Signals Deep Relaxation

    Legs Up the Wall Pose is a gentle inversion that helps you relax by improving blood flow back to your heart and brain. This pose works particularly well after a tiring day or when you feel sudden anxiety. How to Do It: Sit beside a wall and lift your legs up so the backs of your legs rest against the wall. Lie down on your back & let your arms rest comfortably at your sides with your palms facing up. Close your eyes and breathe slowly and deeply while you focus on relaxing your entire body. Hold this position for 5 to 15 minutes depending on what feels comfortable for you. Why It Helps with Anxiety: This pose sends blood back to your brain and heart which helps release tension & calm anxiety. It also relieves lower back discomfort & helps your nervous system settle down. You can make this pose more comfortable by placing a folded blanket or bolster under your hips for extra support.

    Cat–Cow Flow (Marjaryasana–Bitilasana): Gentle Movement to Sync Breath and Mind

    Cat Cow Pose is a flowing movement that links breath with motion in a steady rhythm that helps you focus and move away from worried thinking. How to Do It: Begin on your hands and knees with your wrists directly under your shoulders and knees under your hips. When you breathe in, curve your back downward while lifting your tailbone and letting your belly sink toward the floor. This is Cow Pose. When you breathe out curve your spine upward while tucking your tailbone under and bringing your chin down toward your chest. This is Cat Pose. Keep moving smoothly between these two positions with each breath for one to two minutes. Why It Helps with Anxiety: This flowing sequence encourages slow and deep breathing that activates the vagus nerve. This nerve triggers your body’s natural relaxation response. When you match your breathing to your movement you interrupt the quick and shallow breathing that often comes with anxiety. The pose releases built-up tension in your neck and shoulders and spine which helps settle your nervous system.

    Standing Forward Fold (Uttanasana): Releasing Mental Tension Through Deep Stretching

    Standing Forward Fold is an effective pose that stretches the back of your body and helps relax your nervous system. It works well for quieting a busy mind and letting go of physical tension that builds up in your body. How to Do It: Start by standing with your feet placed hip-width apart. Bend forward from your hips and let your head and neck hang down toward the ground along with your arms. If you have tight hamstrings you can bend your knees slightly. You can grab opposite elbows with your hands to make the stretch deeper and let your body sink into the position. Stay in this pose for 30 seconds up to two minutes. Why It Helps with Anxiety: This forward fold activates your parasympathetic nervous system which encourages relaxation and lowers mental stress. When you pay attention to the present moment and notice how your body feels you can move your focus away from anxious thoughts. The pose also releases tension that gathers in your neck & shoulders & back.

    Breathing Techniques That Amplify the Anxiety-Relief Benefits of Yoga

    You can boost the calming effects of these poses by adding simple breathing exercises. Box breathing and alternate nostril breathing work well to quiet your mind and ease anxiety. Box Breathing involves breathing in for four seconds and holding that breath for four seconds. Then you breathe out for four seconds and wait for four seconds before starting again. This method helps regulate your breathing pattern and soothes your nervous system. Alternate Nostril Breathing requires you to block one nostril while breathing in deeply. Then you switch sides and breathe out through the other nostril. This technique creates balance between the left and right sides of your brain while encouraging clear thinking and relaxation. When you combine these breathing exercises with the yoga poses mentioned earlier you build an effective routine that helps maintain emotional stability and supports your mental health.

    Creating a Simple Daily Yoga Routine to Manage Anxiety and Calm the Nervous System

    Regular practice matters most when you use yoga for anxiety relief. Begin with a daily session of 5 to 10 minutes and work on one or two poses from the list above. When you feel ready you can extend your practice to 15 or 20 minutes. Find a calm spot where you can concentrate on breathing & movement without interruptions. You will eventually discover that these poses help you handle anxiety when it appears. Yoga cannot replace professional mental health treatment but it works well alongside other methods such as therapy and journaling and lifestyle adjustments. Many people discover that using yoga together with other anxiety management approaches brings meaningful & long-term benefits.

  • Easy Natural Hair Solutions to Control Frizz Completely in Humid Weather

    The air changes before a storm hits. You smell rain coming and feel a slight tingle on your skin while distant thunder rumbles like a far-off drum. Then your hair starts to swell. Small curls appear at your temples and the neat style you created that morning begins to expand. That perfect braid you worked so hard on slowly turns into a cloud of frizz. This is not just weather. This is a battle between you and humidity. Somehow humidity usually wins.

    The Science of Frizz — A Weather-Inspired Story

    Think of every strand of hair as a tiny, independent weather system. On cool, dry days, conditions are stable and calm. Hair strands lie flat, aligned, and predictable. But when humidity rises, the internal forecast changes. Moisture in the air clings to the outer layer of hair—the cuticle—much like fog settling on glass. This interaction shifts the balance inside the strand, setting the stage for frizz.

    Humid air contains more moisture than dry hair, especially hair that is curly, coily, or wavy. Hair naturally seeks balance, absorbing water from its surroundings. As moisture enters, the cuticle lifts slightly and the inner structure expands. The style you carefully shaped begins to distort, and the smooth surface becomes uneven. Frizz is simply vsible evidence of hair reacting to its environment.

    The real goal is not forcing hair into submission, but helping it icoexist with humidity. Natural approaches work well because they support hair’s natural structure instead of fighting it. Calm, defined hair comes from cooperation, not control.

    Moisture Comes First: Preparing Hair for Humidity

    The most important anti-frizz work begins in the shower. Humidity affects hair most when it is dry and depleted. Well-moisturized hair is less likely to pull excess water from the air. When hair already has enough hydration, it stays more stable throughout the day.

    Choosing Gentle, Hydrating Cleansers

    Strong, stripping shampoos remove protective oils and leave hair dry and reactive. That dryness encourages hair to absorb moisture aggressively from humid air. Instead, gentle, sulfate-free cleansers or conditioning washes help maintain balance. Ingredients like aloe, mild glycerin, and plant oils cleanse without leaving hair vulnerable.

    Massage the scalp gently using fingertips and allow the cleanser to rinse through the lengths naturally. Hair ends do not need intense scrubbing—just soft, indirect cleansing.

    Deep Conditioning as a Frizz Defense

    Deep conditioning acts as a protective anchor for hair. Weekly treatments replenish moisture and coat strands with emollients that slow down environmental moisture exchange. Ingredients such as shea butter, avocado oil, coconut milk, honey, and banana provide lasting softness and resilience.

    Apply conditioner to damp—not dripping—hair, focusing on mid-lengths and ends. Allow steam to enhance absorption, giving the treatment time to strengthen and seal the hair before styling.

    Leave-Ins and Oils: Light Layers, Strong Results

    Frizz control continues after the shower, during the drying phase. Heavy products can weigh hair down and attract excess moisture, while light layering allows flexibility and protection.

    Begin with a water-based leave-in conditioner that absorbs quickly. Follow with a lightweight oil such as argan, grapeseed, or jojoba to seal moisture inside. Finish with a natural styling product like flaxseed gel or aloe-based custard to hold shape without stiffness.

    Warm products between your palms and smooth gently over hair. Minimal friction helps keep the cuticle flat and calm.

    Hair Texture Type Recommended Leave-In Foundation Suggested Lightweight Oil Helpful Styling Product
    Fine & Wavy Light aloe-infused leave-in spray Grapeseed oil (use 1–2 small drops) Soft flaxseed-based gel
    Curly (Type 3A–3C) Moisturizing cream leave-in with shea butter Argan oil or jojoba oil Aloe and flaxseed styling custard
    Coily (Type 4A–4C) Deeply hydrating, thick leave-in conditioner Blend of castor and coconut oil (minimal use) Butter-rich cream for twists and styles
    Straight & Frizz-Prone Ultra-light hair milk or conditioning spray Single drop of argan oil Very light gel applied only to ends

    Drying Hair Gently to Prevent Frizz

    The drying stage is when humidity has the strongest effect. Rough handling during this time disrupts curl patterns and raises the cutbicle.

    Using Soft Towels and Gentle Techniques

    Traditional towels create friction that encourages frizz. Instead, blot hair gently with a cotton T-shirt or microfiber towel. Avoid rubbing or twisting. For curls and waves, loosely wrapping hair helps preserve definition while reducing movement.

    Air-Drying With Purpose

    If heat is necessary, use a diffuser with low heat and airflow. Otherwise, allow hair to air-dry without touching it. Hands disrupt curl formation and invite frizz. Once hair fully dries, gently scrunch with a small amount of oil to soften and define.

    Adapting to Humidity Instead of Fighting It

    Humidity is not an enemy—it is a condition. Accepting this changes the approach from frustration to strategy.

    Protective and Weather-Friendly Styles

    On especially humid days, styles that reduce exposure help maintain control. Loose braids, twists, low buns, and tucked styles limit swelling and friction. Sleeping with a satin scarf or pillowcase preserves smoothness overnight.

    Refreshing Hair Throughout the Day

    Humidity fluctuates, so refresh routines matter. A spray bottle with water and a small amount of leave-in conditioner can revive curls without fully rewetting hair. Light misting resets shape and restores balance.

    Daily Habits That Reduce Frizz Over Time

    Frizz control is cumulative. Using wide-tooth combs, clarifying occasionally to remove buildup, trimming split ends, and maintaining hydration all contribute to healthier hair. Each small habit supports long-term resilience.

    Redefining Control in Humid Weather

    True control is guidance, not restriction. Hair responds to moisture because it is alive and adaptive. A little softness or halo is not failure—it is texture interacting with the world.

    When hair is moisturized, sealed, and styled thoughtfully, it moves naturally even in humid air. Accepting this relationship creates confidence and ease. Instead of battling the weather, hair learns to move with it—calm, defined, and unmistakably itself.

  • Gentle Joint Care Yoga: 4 Easy Moves That Support Comfort and Mobility

    Gentle Joint Care Yoga: 4 Easy Moves That Support Comfort and Mobility

    Yoga offers a natural approach to reducing joint discomfort while helping you move better and feel healthier over time. Most people associate yoga with flexibility or physical fitness but it actually has a strong impact on how your joints feel each day. Practicing gentle movements on a regular basis helps ease stiffness and boosts blood flow to areas like your knees and hips and shoulders & spine. This can lower pain that comes from inflammation or daily wear and tear. The four gentle yoga poses described here were selected because they help your joints feel better & are simple to learn and can be practiced nearly anywhere. These movements work well for beginners and people getting back into yoga after some time away.

    Cat Cow Flow for Spine and Neck Ease

    Cat Cow Flow is a gentle movement sequence rather than a single posture, making it ideal for easing stiffness along the spine and neck. Long hours of sitting at a desk or driving can compress the joints between the vertebrae, leading to tightness and discomfort. This flow helps release stagnation, improves mobility, and lightly warms the muscles and connective tissues around the spine. Begin on all fours with your wrists aligned under your shoulders and knees under your hips. As you inhale, soften your belly toward the floor, lift your chest, and gently arch your back while raising your head and tailbone. On the exhale, draw your belly inward, round your spine upward, and allow your neck to relax. Continue moving slowly with your breath for about two minutes. The combination of deep breathing and rhythmic spinal movement creates space between the vertebrae and helps calm tension in the upper back and neck. This flow is often recommended by physical therapists for mild, ongoing back or neck stiffness because it is low impact yet effective.

    Child’s Pose for Lower Back and Hip Comfort

    Child’s Pose is a deeply calming posture that supports the lower back, hips, thighs, and ankles while encouraging slow, mindful breathing. Tightness in the hips often contributes to lower back discomfort, and gently opening these areas can improve joint comfort and flexibility. To enter the pose, kneel on the floor with your knees about hip-width apart and your big toes touching. Slowly sit your hips back toward your heels and fold your torso forward, resting your forehead on the mat or a cushion. You can stretch your arms out in front of you or let them relax alongside your body with palms facing upward. Stay here for one to five minutes, breathing slowly and evenly. This posture stimulates the body’s relaxation response and helps reduce overall tension. It can be especially helpful for people with joint sensitivity, arthritis, or general inflammation when practiced after light movement or at the end of the day.

    Supported Bridge Pose for Hips and Lower Back

    Supported Bridge Pose offers gentle relief for stiffness in the hips, lower back, and sacroiliac area. Using a yoga block, firm cushion, or rolled towel beneath the sacrum allows the body to open without muscular strain. Start by lying on your back with your knees bent and feet flat on the floor, positioned hip-width apart. Press gently through your feet to lift your hips, then place the support under your sacrum and lower your weight onto it. Rest your arms comfortably by your sides and breathe slowly. Hold this position for two to five minutes. This supported backbend improves circulation in the hip flexors and pelvic region while allowing the joints to open in a relaxed way. It can feel especially soothing after long periods of standing, walking, or sitting. Practicing this pose a few times each week can help maintain hip mobility and reduce lingering stiffness.

    Legs Up the Wall for Joint Relief and Circulation

    Legs Up the Wall is a restorative position that promotes circulation in the lower body and eases discomfort in the ankles, knees, and lower back. It is particularly beneficial if you spend much of the day standing or notice swelling in your legs by evening. To set up, sit sideways next to a wall, then gently lie back while swinging your legs up so they rest vertically against the wall. Adjust your position so your hips are as close to the wall as feels comfortable. Let your arms relax by your sides with palms facing upward. Close your eyes and breathe deeply for five to ten minutes. This mild inversion reduces pressure on the joints and supports venous return, helping blood flow back toward the heart. Improved circulation can reduce inflammation and support healthier joint tissues over time.

    A Note on Yoga and Everyday Living

    Adding gentle yoga movements to your regular routine can gradually improve how your joints feel. Unlike intense workouts or aggressive stretching, these practices focus on comfort, mobility, and ease rather than force. You can practice them daily or a few times per week, depending on your energy level and physical needs. Yoga also supports mental well-being by encouraging calm breathing and body awareness, which can reduce stress-related muscle tension. Lower stress levels often translate into less joint discomfort. If you are managing a specific condition such as arthritis, bursitis, or recovering from an injury, it is wise to consult a healthcare professional before beginning any new movement routine.

    Why Gentle Movements Matter

    Daily habits like prolonged sitting, repetitive motions, and ongoing stress can quietly affect joint comfort over time. Gentle yoga offers a way to counter these patterns by giving the body space to relax and reset. These movements are suitable for most adults, whether you are in your 30s, 40s, 50s, or beyond, and they require minimal equipment—just a mat or soft surface at home. Online instructors such as Adriene Mishler have helped make gentle yoga accessible worldwide. Adriene Mishler, an American yoga teacher born in 1984, has built one of the most widely followed online yoga platforms through her approachable and inclusive teaching style. Her focus on comfort and accessibility has introduced yoga to millions seeking simple ways to support joint health and overall wellness. By dedicating a few minutes each day to these practices, you invest in long-term mobility and comfort. When it comes to joint health, steady and mindful movement is far more important than intensity.

  • 5-Point Scalp Massage Method Using Essential Oils for Hair Growth and Stress Relief

    5-Point Scalp Massage Method Using Essential Oils for Hair Growth and Stress Relief

    The first time warm scented oil touched my scalp the treatment room became my entire world. Bright lights & phone alerts faded into quiet breathing and gentle circular motions. The oil had a forest smell that was both earthy and fresh while thumbs found tight spots on my head I never realized existed. I arrived concerned about my thinning temples but left with an unexpected gift: a profound stillness I had not experienced in months. This is what people rarely mention about scalp massage. It can help with healthier hair but it also works on a deeper level by releasing the mental stress we physically hold in our heads. A basic 5-point scalp massage using the right essential oils & some focus can become your personal healing practice after any regular day. You do not need a spa. You only need your hands and scalp along with a few oil drops & enough patience to notice the change.

    The Quiet Science Behind Touch, Tension & Hair Growth

    Before diving into the sensory experience, it helps to understand what truly happens during a scalp massage. Hair doesn’t grow randomly—it emerges from tiny living structures beneath the skin called hair follicles. Each follicle has its own blood supply, delivering oxygen, nutrients, and biochemical signals that determine whether hair should grow, rest, or shed.Chronic stress complicates this process. Ongoing tension, elevated cortisol levels, and poor sleep can push follicles into a resting phase earlier than normal. Over time, this may show up as extra hair in your brush or a widening part line. While massage cannot reverse genetic hair loss or replace medical treatment, it can positively influence the scalp environment where follicles live.

    When your fingertips move across the scalp, they gently stretch and compress the skin and underlying tissues. This mechanical action can:

    – Increase local blood circulation, improving nutrient delivery

    – Support lymphatic drainage, helping remove waste products

    – Relax tiny follicle muscles, releasing built-up tension

    – Activate the parasympathetic nervous system, promoting “rest and digest” mode

    When paired with carefully selected essential oils, the massage becomes more than relaxation. Plant compounds may support circulation, soothe the scalp, and help the nervous system downshift. Over weeks and months, this blend of improved blood flow, reduced tension, and calmer stress responses can create more supportive conditions for hair growth.

    Choosing Your Oils: Blending Scent, Science & Skin Comfort

    Standing before rows of essential oil bottles can feel overwhelming. For a scalp ritual, simplicity matters. You only need two elements: a gentle carrier oil and a small selection of essential oils suited to your scalp and senses.

    Carrier Oils: The Cushion Between Skin & Plant Power

    Essential oils are highly concentrated and must be diluted. Carrier oils act as a nourishing buffer, keeping the scalp comfortable while allowing active compounds to work gently.

    Carrier Oil Best For Texture & Feel
    Jojoba oil Most scalp types Light, non-greasy, fast-absorbing
    Sweet almond oil Dry or flaky scalp Smooth, slightly rich, comforting
    Argan oil Coarse or damaged hair Silky, adds shine
    Grapeseed oil Oily or fine hair Very light, weightless feel

    Beginner base: Use 1 tablespoon of jojoba or grapeseed oil.

    Essential Oils: Scent as Therapy, Not Just Perfume

    Each essential oil carries both an aromatic personality and a functional role for the scalp and mind:

    – Rosemary (cineole)  Supports circulation and mental clarity

    – Lavender  Calms the nervous system and encourages rest

    – Cedarwood  Grounding, balancing for oily roots

    – Peppermint  Cooling and invigorating (use sparingly)

    – Tea tree  Clarifying for flaky or congested scalps

    Beginner blend example:

    – 1 tablespoon jojoba oil

    – 2 drops rosemary oil

    – 2 drops lavender oil

    – 1 drop cedarwood oil

    Blend gently, inhale, and notice your body’s response. Comfort matters.

    The 5-Point Scalp Map: Where Your Fingers Will Travel

    Think of the scalp as five interconnected zones. This method focuses on intentional movement rather than rigid anatomy.

    Point 1: The Front Line (Hairline & Temples)

    This area often stores mental tension. Begin here to signal relaxation.

    – Apply oil along the hairline and temples

    – Massage using slow circular motions

    – Pause at the temples and breathe deeply

    Point 2: The Crown (Top of the Head)

    The crown carries mental load and is often a focus area for thinning.

    – Slide fingers from forehead to crown

    – Apply gentle pressure in circular motions

    – Move the skin, not the skull

    Point 3: The Sides (Above & Behind the Ears)

    This zone connects to neck and shoulder tension.

    – Massage upward in small spirals

    – Use gentle thumb pressure behind ears

    Point 4: The Back Ridge (Occipital Area)

    – This junction holds postural stress.

    – Massage along the base of the skull

    – Move outward toward the ears

    – Brush tension downward into the neck

    Point 5: The Nape & Final Sweep

    This area completes the ritual.

    – Knead gently beside the spine

    – Comb fingers upward through the hair

    – Finish with light sweeping motions

    – Rest both palms on your head and take three slow breaths.

    Turning Technique into Ritual: Making It Yours

    The power of this practice lies in consistency and presence.

    – Timing: Evening or morning, depending on oil choice

    – Duration: 5–10 minutes

    – Environment: Low light, minimal distractions

    – Breathing: In for 4 counts, out for 6

    – Frequency: 3–4 times weekly

    What You Might Notice Over Time

    Early changes are often subtle: mental calm, softer scalp sensation, improved sleep. Over weeks and months, you may observe:

    – Reduced scalp tightness or dryness

    – More comfortable brushing

    – Healthier-looking roots

    – A calmer bedtime routine

    Some notice baby hairs; others treasure the emotional ease. Both matter.Think of the 5-point scalp massage not as a cure, but as an ongoing conversation with your biology. Each breath, each circle, each drop of oil says: “I’m listening. Let’s grow from here.”

  • Wobble Board Alternatives Using Home Items to Improve Senior Balance Skills

    Wobble Board Alternatives Using Home Items to Improve Senior Balance Skills

    The first time Helen tried the wobble board at her community center it felt like standing on a boat in a storm. Her sneakers squeaked and the board tipped & she grabbed the rail with a sharp breath. The instructor smiled kindly but the plastic gym-smelling contraption under her feet felt foreign and clinical and just a little bit scary. Helen went home thinking there has to be an easier way to practice this balance thing. Something that doesn’t feel like medical equipment. Something that feels like home.

    The Quiet Strength of Everyday Balance

    When balance is mentioned for older adults, it often sounds like medical advice—something prescribed, serious, and slightly dull. But balance is far more than an exercise to tick off a list. It is confidence in motion. It’s the calm feeling that when you step into the shower, reach up for a shelf, or walk across uneven ground, your body knows how to respond without panic.

    The good news is that you don’t need expensive equipment or intimidating gym tools to build this skill. Your home already holds gentle balance trainers hiding in plain sight. A folded towel, a cushion, a sturdy book, even the soft surface of a mattress can become a safe challenge. These familiar objects gently wake up the feet, ankles, hips, and the inner sense that tells you where your body is in space.

    Think of your home as a balance-friendly space—safe, familiar, and full of small surfaces that invite gentle movement. The key is intention. Move with awareness, respect where your body is today, and let confidence grow slowly. Safety always comes first, curiosity follows, and pride arrives quietly later.

    Before You Begin: Safety, Support, and a Calm Start

    Before stepping onto anything unstable, even something as soft as a towel, it’s important to prepare your environment. This isn’t about fear—it’s about respect for balance work and its impact.

    Start by choosing a reliable support point. A kitchen counter, a heavy table, or a sturdy chair should always be within reach. These are not signs of weakness; they are smart safety anchors. Clear the surrounding area of rugs, cords, or clutter so that a small misstep doesn’t turn into a bigger problem.

    Footwear matters too. Some people feel steadier in supportive shoes, while others prefer bare feet on carpet or a yoga mat. Avoid slippery socks on hard floors. Pay attention to how your body feels—mild muscle effort is fine, but sharp pain, dizziness, or anxiety are signs to stop and rest.

    Most importantly, breathe. Slow, steady breathing helps calm the nervous system. When your breath is relaxed, your balance often follows.

    Household Helpers That Act Like Wobble Boards

    Your home contains many simple items that provide just enough instability to challenge balance safely. These everyday objects create small, controlled “wobbles” that train your body to adjust naturally.

    The Folded Towel: A Gentle First Step

    A thick bath towel folded once or twice creates a soft, forgiving surface. Place it near a counter or sturdy chair and step onto it with both feet. You’ll immediately notice your feet working harder to stay steady.

    Begin by gently shifting your weight forward and backward, then side to side. Keep the movements small and controlled. When that feels comfortable, try lifting one heel at a time, as if slowly marching in place. The towel moves just enough to encourage awareness without feeling threatening.

    This simple tool helps your brain and feet reconnect. Each tiny correction strengthens your balance instinct, quietly building confidence with every session.

    Cushions and Pillows: Soft but Challenging

    A firm couch cushion or thick pillow introduces more movement under your feet. It may feel unfamiliar at first, but with support nearby, it becomes an excellent balance trainer.

    Start by placing one foot on the cushion and one on the floor. Shift your weight back and forth slowly. When that feels steady, bring both feet onto the cushion and stand with feet hip-width apart. Hold for several breaths, focusing on calm breathing rather than tension.

    As you improve, try lifting your arms to shoulder height and lowering them again. Over time, what once felt unstable begins to feel manageable. That’s a clear sign your balance system is adapting and growing stronger.

    The Sturdy Book: Small Height, Big Benefits

    A solid hardcover book can act like a low step, helping you practice balance with uneven height. Place it against a wall or counter to prevent slipping.

    Begin with one foot on the book and one on the floor. Slowly shift your weight onto the elevated foot, then back again. As confidence builds, practice stepping fully onto the book and then stepping back down. Alternate legs so both sides work equally.

    This movement prepares your body for real-life situations like curbs and steps. Practicing these small height changes at home turns everyday obstacles into familiar experiences.

    Rolled Mats and Blankets: Gentle Rocking Balance

    A rolled-up yoga mat or blanket creates a soft, rocking surface that challenges balance without overwhelming it. Place the roll lengthwise on the floor and stand with one foot on each side, holding onto support.

    Gently shift your weight from heels to toes, feeling the roll move under your arches. Then try slow side-to-side shifts. As confidence grows, you may experiment with placing one foot directly on top of the roll for a deeper challenge.

    These small ankle movements train your body to make quick, subtle corrections—often the difference between catching yourself and falling.

    Using the Bed for Balance Practice

    The bed is a surprisingly effective balance tool. It’s familiar, soft, and forgiving. Sit near the edge with feet flat on the floor and practice slow sit-to-stand movements. Lean slightly forward, press through your feet, and stand up with control. Slowly lower yourself back down.

    As you progress, try standing with your heels close to the mattress and gently leaning back until you feel it touch your calves, then return upright. Always keep support nearby. This movement mimics balance challenges while staying in a safe, comfortable environment.

    Bringing Balance Into Daily Life

    Balance practice doesn’t need a scheduled workout time. It fits naturally into everyday moments. Stand on a folded towel while waiting for the kettle to boil. Do a few controlled sit-to-stands before settling into a chair. Use a TV commercial break to stand on a cushion and focus on slow breathing.

    These small moments add up. Balance improves through repetition, not intensity. A few mindful minutes most days are far more effective than occasional long sessions.

    Knowing Your Limits and Noticing Progress

    Everyone’s balance journey is unique. Past falls, joint stiffness, or fear can make movement feel intimidating. That doesn’t mean you shouldn’t practice—it means your approach should be gentle and gradual.

    If you have medical conditions or recent falls, consult a healthcare professional before starting. Use support without hesitation, stop before fatigue sets in, and respect your body’s signals.

    Progress often appears quietly. Standing a few seconds longer, feeling less tense, or realizing you didn’t reach for support when you normally would—all of these are meaningful wins.

    With patience and consistency, even the simplest household items can help rebuild trust in your body. Over time, balance becomes less about effort and more about ease—showing up when you least expect it, in the middle of everyday life.

  • Unblock a Stubborn Kitchen Sink Drain in Under 30 Minutes Using Baking Soda and Vinegar

    Unblock a Stubborn Kitchen Sink Drain in Under 30 Minutes Using Baking Soda and Vinegar

    The first bubble rises to the surface. You stand at the sink with your hands in lukewarm dishwater when you notice the water is not draining. It swirls and hesitates but refuses to go down like a guest who will not leave. You might sigh or poke at the drain with a spoon. You turn on the tap again and hope it will fix itself. The water rises higher & becomes cloudier with bits of food and a faint sour smell in the air. The stainless steel basin where coffee mugs & cereal bowls gather each morning has become a stagnant pool.

    When Your Sink Becomes a Swamp

    The kitchen sink can become a problem without any warning. One day it works perfectly fine and handles everything you throw at it. The next day it refuses to drain and leaves dirty water sitting in the basin like it has something against you. A clogged drain creates a specific type of stress. Your normal routine falls apart. You cannot rinse vegetables or wash the cutting board or deal with the dishes that keep stacking up on the counter. A stale odor starts to develop from old food particles and coffee grounds. Your first thought might be to buy a chemical drain cleaner with all its warning labels and hazard symbols. Or you might look through your phone wondering if the problem is serious enough to call a plumber and spend money you had planned to use for something else. But there is something satisfying about handling this problem on your own without harsh chemicals or professional help. In most situations where the blockage comes from food waste & grease buildup from regular cooking you only need two basic items that are probably already in your kitchen: baking soda & white vinegar.

    The Strange Science Happening in Your Pipes

    Before you start it makes sense to think about what happens in the hidden space under your sink. Your pipes work like a small cave system with narrow dark & damp passages that have bends and turns where things get trapped. Fats cool down & become solid there. Soap residue sticks to the pipe walls. Small pieces of rice and vegetable peels and coffee grounds act like sediment in a slow river and they settle in layers and create a blockage. This is where baking soda & vinegar become useful. One is a base and the other is an acid. When they combine they create foam and bubbles like you might remember from school experiments. Inside your drain that bubbling reaction does more than look interesting because it creates movement & pressure and mild scrubbing action. It loosens the buildup and pushes it forward and makes the inside of your pipes cleaner and less dirty. The reaction works well because it happens right inside the clog. Baking soda gets into the sticky spots and attaches to the gunk. Vinegar comes next with its bubbling action and together they shake things up & soften the blockage and break it apart. This is not about using force but about using a bubbling chemical reaction to clear things out. You only need about half an hour and some hot water from a kettle and a bit of patience.

    The 30-Minute Plan: What You’ll Need

    Before you start take a moment to stand in your kitchen. Notice the air around you. It might feel a bit damp from the backed-up sink and smell like yesterday’s dishes. This is now your workspace. You are going to fix this problem yourself using basic items that are safe to handle. Get everything you need and put it on the counter: Around 1 cup (240 ml) of baking soda Around 1 cup (240 ml) of white vinegar A kettle or pot of hot water that is almost boiling A cup or small bowl to scoop out water if the sink is full A dishcloth or drain plug You might also want: rubber gloves and an old toothbrush and a wooden spoon or chopstick & a small strainer Before you begin look closely at the drain opening. Can you see any food bits or hair or stringy material right at the surface? Many times the first part of the blockage is sitting right there where you can see it.

    Step Action Required Estimated Time
    1 Clear the area by removing standing water, visible waste, and cleaning around the drain opening. About 5 minutes
    2 Slowly pour approximately one cup of baking soda straight into the drain. 2 minutes
    3 Add one cup of vinegar into the drain and cover it to allow the fizzing action to work deeper. 10–15 minutes
    4 Flush the drain thoroughly using a full kettle of hot water. 3–5 minutes
    5 Check water flow; if drainage remains slow, repeat the process once more. 5–10 minutes

    The Ritual of Clearing: Step by Step

    Start by handling what you can see. If your sink is full of standing water right now, use a bowl or bucket to scoop it out & dump it in the toilet or another drain that works. You do not need to remove every drop. Just get enough out so you can see the drain opening clearly. Look for any metal or plastic strainer covering the drain & remove it. Sometimes the problem is surprisingly simple. You might find vegetable peelings caught together, a clump of hair, or some fibrous material that has turned the strainer into a plug. If you do not like touching this stuff, wear gloves. Pull out whatever you find there, rinse off the strainer and use an old toothbrush to scrub the visible area quickly. You have now removed the first layer of blockage. Now prepare some hot water. Heat your kettle or a pot of water until it almost boils. While it heats up pour a small amount of hot tap water down the drain if the water still drains at all. This helps soften things up. If nothing drains at all, skip this step & wait for the kettle. When the kettle is ready, do not pour all the water at once. Pour a slow and steady stream directly into the drain opening. Sometimes the heat alone can melt fat that has stuck to the pipes and loosen the clog a bit. Listen carefully as you pour. You might hear a hollow gurgle, a slow sucking sound or an air bubble rising. These sounds mean your pipes are responding. Let the hot water sit for a minute. If you notice the water level dropping even slightly you are making progress.

    The Fizz: Baking Soda Meets Vinegar

    Now it’s time for the simple part. Use a cloth to dry the area around the drain so the baking soda stays loose and doesn’t stick to the surface. Pour about one cup of baking soda slowly into the drain. If some of it tries to bounce back out, push it down gently with a spoon handle or chopstick. You want most of it going into the drain opening and not scattered around the sink. Let the baking soda rest there for a minute or two. Picture it moving into the small spaces in your pipes and sticking to the greasy buildup you cannot see. Then measure out about one cup of white vinegar. When you are ready, pour the vinegar into the drain in a slow & steady stream. The reaction begins almost right away with a soft hissing sound & fizzing foam that rises up. It may make a light crackling noise as it moves down into the curved parts of the pipe. Right after you pour the vinegar, place a drain plug or damp cloth over the opening. This step is not completely necessary but it helps keep the reaction inside the pipes instead of letting the fizz come back up into the sink. With the opening covered loosely the bubbles are pushed downward into the area where you need them to work. Now you wait for about 10 to 15 minutes. This is enough time to wash a few dishes in a basin or wipe down the counter or just stand by the sink and listen to the faint crackling sounds below. Inside those pipes, many small reactions are taking place with carbon dioxide forming and popping while pressure works its way through the stubborn gunk and the baking soda crystals scrub and soften the buildup.

    Hot Water, Clean Slate

    Once your 10 to 15 minutes are up go back to your kettle or pot. Heat another batch of water until it almost boils. This will be the big flush that carries away whatever the fizz has loosened. Uncover the drain. Take a moment to notice the smell again. Often there is already a difference. The sour heavy scent is replaced by something cleaner and less sharp. Maybe the water around the drain has gone down. Maybe it has not yet. Either way lift the kettle carefully and pour the hot water in a steady confident stream directly into the drain. This is the moment to pay attention. Watch the water. Does it pool briefly then swirl down? Does it hesitate then suddenly surrender in a quick whirlpool? Does it rush through like a stream that has finally broken free of its dam? Sometimes the change is instant & obvious. One minute you have a sluggish drain and the next the water slides away as if nothing had ever been wrong. Other times you get a partial victory. The water is moving but not as fast as you would like. That is alright. These clogs build up over time and sometimes they need a second attempt. If it is still slow repeat the process once more. Use baking soda then vinegar then wait for the quiet fizz then do the hot water flush. Most light to moderate clogs will clear within these two rounds.

    Keeping the River Flowing: Gentle Daily Habits

    The real skill is not just clearing a drain but stopping it from blocking again soon after. You cannot see inside your pipes but your everyday actions directly affect what happens in there. Once you have fixed your clog and your sink drains properly again you should follow a few simple practices. Do not pour cooking oil or bacon fat down the drain. Let it cool & harden in a container and then throw it in the garbage. Put a mesh strainer over your drain to catch rice & pasta & vegetable pieces and coffee grounds before they go into the pipes. Once a week pour a kettle of hot water down the drain to stop fats from sticking to the pipe walls. Once a month use a smaller amount of the baking soda and vinegar method with about a quarter to half cup of each to prevent buildup. When you do these things you are giving your pipes a small reset that clears away early signs of problems. Your kitchen will smell better too with more pleasant cooking smells instead of old food odors. There is something satisfying about this beyond just basic maintenance. Many products today are harsh and complicated but it feels good to know that a simple reaction between two common kitchen ingredients can keep your home working well. You already have what you need to fix the problem.

  • Refresh Grout Lines in Porcelain Tile Floors Quickly and Effectively

    Refresh Grout Lines in Porcelain Tile Floors Quickly and Effectively

    The grout was the first thing you noticed even if you didn’t have the words for it. Not the soft gleam of the porcelain tiles or the way the afternoon light poured across the kitchen floor but those thin tired lines between them. Once crisp & pale they had dulled to the color of old dishwater. You paused with your coffee mug in hand & realized the room felt more worn out than it really was simply because of those dingy seams tracing the floor like a faded map. This is the quiet power of grout. When it’s fresh it frames every tile and sharpens every edge and makes a space feel intentional and clean. When it’s stained or cracked or uneven it drags the whole floor & the whole room down with it. The good news is that refreshing grout lines on porcelain tile doesn’t require a contractor or a weekend lost in chaos or a renovation budget. With a few simple tools & some patience and a bit of technique you can transform your floor dramatically & effectively. You can watch those lines go from lifeless to luminous one careful stroke at a time.

    The Moment You Truly Notice Your Floor

    It usually begins with a small area. Perhaps it’s the patch of porcelain tile near the stove, where splashes and spills land almost daily. Or the entryway, slowly dulled by muddy shoes and fine grit ground in over time. For months, it’s easy to tell yourself the floor is “just dirty.” You mop, scrub, and even switch cleaners. The tiles shine briefly, but the grout remains dark and uneven, quietly holding onto every footprint and spill. Because grout is porous, it absorbs moisture and dirt easily. Over time, once-light grout slowly darkens—until one day, you really see it.

    Understanding What Your Grout Is Showing You

    Before jumping into cleaning, it helps to pause and look closely. Follow a single grout line across the room. Is it simply discolored, or is it cracked or missing in places? If the grout is intact but darkened, that’s good news—you’re dealing with stains, not structural damage. A deep clean and color refresh may be all it needs. If it’s crumbling or pulling away from the tile edges, repairs come first. Either way, the process follows a steady rhythm: clean thoroughly, repair if necessary, refresh the color, and protect the surface.

    Assembling a Simple, Effective Toolkit

    You don’t need complicated tools or harsh chemicals. A thoughtful setup works best: a vacuum or broom, a pH-neutral cleaner, a soft-bristle brush, microfiber cloths, and your chosen grout colorant or whitening pen. Keeping everything nearby lets you move easily across the room. This approach protects your porcelain tiles while allowing you to work carefully within the narrow grout lines where the real transformation happens.

    Tool / Material Primary Use Important Tips
    Soft-bristle or grout brush Loosens and removes dirt from grout lines Avoid wire or metal bristles to prevent tile scratches
    pH-balanced tile and grout cleaner Cleans deeply without damaging grout Safe choice for sealed, colored, and delicate grout
    Microfiber cloths & soft sponge Wipes residue and polishes tile surface Helps reduce streaks, especially on porcelain tiles
    Grout color pen or grout colorant Renews or changes grout appearance Ensure compatibility with sanded or unsanded grout
    Penetrating grout sealer Shields grout from stains and moisture Best suited for kitchens, bathrooms, and entry areas
    Optional: grout saw & mini float Repairs cracked or damaged grout sections Work slowly to avoid chipping tile edges

    Deep Cleaning: Preparing the Surface

    Begin by sweeping or vacuuming to remove loose grit that could scratch the tile. Then mix your cleaner exactly as directed—stronger solutions won’t help and may damage grout. Apply the cleaner directly to the grout and let it sit for a few minutes to loosen embedded dirt. Scrub gently along the lines, wipe away residue with a damp sponge, and dry with a microfiber cloth. As you move section by section, the grout shifts from dull to uneven to clean and uniform. This patience ensures an even result later.

    Refreshing the Look: Whitening and Recoloring Grout

    Once the floor is completely dry, reassess the color. If it still feels off, grout whitening pens or liquid colorants can make a dramatic difference. Choose a shade that complements your tile—light tones soften the look, while darker lines create contrast. Apply slowly along each grout line, wiping excess colorant from the porcelain tiles right away. The change happens in real time, sharpening the entire floor pattern and making the space feel intentional and renewed.

    Sealing for Long-Lasting Results

    Freshly cleaned or recolored grout needs protection. After the colorant cures, apply a penetrating grout sealer along each line. The sealer soaks into the grout pores, creating an invisible barrier against moisture and stains. Wipe any excess from the tile surface and allow proper curing time. This quiet final step preserves your work, helping the grout resist daily wear and keeping the floor looking bright longer.

    Enjoying a Floor That Feels New Again

    In the days that follow, the difference is noticeable. Light reflects cleanly between tiles, and the room feels sharper and more cared for. Maintenance becomes simple—regular sweeping, gentle mopping, and quick attention to spills. Over time, you’ll recognize the early signs of wear and know exactly how to respond. Refreshing grout may not be flashy, but it delivers a deeply satisfying sense of renewal, restoring clarity and comfort to a space you use every day.

  • A Simple Trick to Keep Shoes Smelling Fresh Without Using Sprays

    A Simple Trick to Keep Shoes Smelling Fresh Without Using Sprays

    The first time I noticed it was on the bus home from a long autumn hike. My feet had that tired satisfied ache and my backpack was slumped between my knees while the windows fogged up from everyone breathing. Then slowly the air around me started to change. A sour damp unmistakable smell began to appear. It was wet wool and stale sweat with something almost metallic mixed in. I looked down at my mud-streaked hiking boots & realized with embarrassment that the smell was coming from me. You probably know that quiet dread when you slip off your shoes after a long day & brace yourself for what comes next. Or when someone walks into your home and you suddenly become aware of your sneakers sitting by the door. Or when you open the shoe cabinet and get hit by that wave of smell. We don’t talk much about it but shoes hold stories and smells far longer than we want them to. We reach for sprays and perfumed powders and those neon gel inserts at the drugstore that promise twenty-four hour odor control & smell like a citrus factory explosion. But out in the quieter corners of the world on porches and in cabins and mudrooms that smell of woodsmoke and pine people are using something simpler. Something that doesn’t hiss from an aerosol can or come wrapped in glossy plastic. There is a way to keep your shoes fresh that feels less like fighting nature and more like working with it. It’s quiet and cheap and almost old-fashioned. And it starts with a small cotton bag and a handful of dark whisper-light pieces of carbon.

    The Invisible Cause Behind Shoe Odor

    Shoe odor is often blamed on sweat, but sweat itself is not the real problem. Fresh sweat is mostly water and salt and has very little smell. The issue begins once that moisture stays trapped inside shoes. Feet contain a high concentration of sweat glands, and when enclosed in warm, dark footwear, the moisture has nowhere to escape. Insoles, foam padding, synthetic fabrics, and tight seams create damp spaces where bacteria thrive. These bacteria feed on sweat and dead skin cells and release sharp, sour-smelling compounds. That familiar foot odor is not sweat—it is bacterial waste reacting inside a humid environment.

    Why Sprays Only Hide the Problem

    Most shoe sprays attempt to overpower odor rather than solve its source. They rely on strong fragrances or antibacterial chemicals that temporarily dominate the smell. For a short time, shoes may smell like citrus, mint, or “fresh linen.” But once the scent fades, the moisture remains. The damp environment allows bacteria to return quickly, often leaving behind a mix of artificial perfume and lingering odor. This creates a cycle where sprays are used repeatedly without addressing the underlying issue of trapped moisture and airborne odor compounds.

    Activated Charcoal and the Power of Absorption

    Activated charcoal offers a quieter and more effective approach. Unlike sprays, it does not mask or attack odors. Activated charcoal is processed to become extremely porous, creating millions of microscopic spaces. These pores attract and trap moisture and odor-causing molecules through adsorption. A small amount of charcoal has an enormous surface area, allowing it to absorb humidity and volatile compounds from the air inside shoes. Instead of adding scent, it removes what bacteria need to survive, slowly neutralizing the environment.

    How Many Bags, How Often, and For Which Shoes?

    You don’t have to stockpile charcoal to keep your footwear fresh. A small, well-planned rotation of charcoal bags is more than enough for everyday shoe care. When used consistently—even just a few nights a week—charcoal absorbs lingering moisture and odors before they settle in. The key isn’t quantity, but timing. By matching the right amount of charcoal to each shoe type, you can maintain freshness without extra effort or clutter.

    Type of Shoe Charcoal Bag Recommendation Helpful Tip
    Daily Sneakers 1 compact bag per shoe, overnight Best for shoes worn almost every day
    Gym or Running Shoes 1–2 bags per shoe after use Allow shoes to dry slightly before inserting
    Leather Boots 1 bag per shoe between wears Reduces trapped moisture from storage
    Formal Dress Shoes 1 slim bag per shoe Works best alongside wooden shoe trees
    Flats and Sandals 1 bag placed on insole overnight Position under straps or footbed

    There’s no need to aim for perfection. Even occasional use delivers noticeable results. With time, your shoes stop holding onto unpleasant smells and instead stay clean, dry, and neutral—ready to wear without hesitation.

    The Simple Charcoal Shoe Trick

    Using activated charcoal is remarkably simple. Small fabric pouches filled with charcoal are placed inside shoes when they are not being worn. Overnight, the charcoal absorbs moisture and odor molecules from the enclosed space. No spraying, shaking, or cleaning is required. Ready-made charcoal shoe deodorizers are widely available, but they can also be made at home using cotton or linen pouches and food-grade activated charcoal pellets. Once placed inside shoes, they work silently, leaving footwear dry and neutral by morning.

    How to Use Charcoal as a Daily Ritual

    The process can become part of a calming routine. After removing shoes at the end of the day, a charcoal pouch is placed inside each one, ideally near the toe area where moisture builds up. Shoes are left to rest overnight while the charcoal absorbs dampness and odor. In the morning, shoes feel dry and smell neutral rather than perfumed. To maintain effectiveness, the charcoal pouches should be placed in sunlight every few weeks. Sun and fresh air help release trapped moisture and refresh the charcoal for continued use.

    Why Charcoal Feels Better Than Chemical Fresheners

    Charcoal offers freshness through absence rather than fragrance. There is no artificial scent, no chemical residue, and no overpowering smell. This makes it especially appealing for people sensitive to fragrances. Unlike disposable sprays packaged in plastic or metal, charcoal deodorizers are reusable for months or even a year. When their usefulness ends, the charcoal can be added to garden soil or potted plants, where it improves drainage and supports beneficial microbes. This creates a more sustainable and gentle solution.

    Supporting Habits That Boost Freshness

    Charcoal works best when combined with simple habits. Rotating shoes allows each pair to dry fully between uses. Removing insoles after heavy wear helps release trapped moisture. Choosing breathable materials such as mesh or natural fibers reduces humidity buildup. Washing insoles occasionally removes residue that bacteria feed on. These small actions reduce the burden on charcoal and keep shoes fresher for longer without additional products or effort.

    Using Charcoal Beyond Shoes

    Once charcoal becomes part of daily life, its usefulness extends beyond footwear. Charcoal bags work well in gym bags, lockers, closets, and suitcases. They absorb musty odors in enclosed spaces and help control moisture during travel. For outdoor activities, placing charcoal bags in boots overnight helps reset footwear after long hikes. This simple habit can make mornings more comfortable and eliminate the need to brace for unpleasant smells.

    Turning a Hack Into a Personal Ritual

    What starts as a practical solution can become a meaningful ritual. Charcoal pouches can be stored in decorative bowls, handmade containers, or sewn from repurposed fabric. Placing them into shoes at the end of the day becomes a small act of care—an intentional pause that marks the transition from activity to rest. In a world filled with loud, disposable solutions, activated charcoal offers a quiet, reusable alternative that works with nature rather than against it.

    Letting Shoes Tell Their Story Without the Smell

    Shoes naturally collect memories of daily life—long walks, rain-soaked streets, dusty trails, and crowded commutes. With charcoal absorbing moisture and odors, those stories remain experiences rather than unpleasant scents. When shoes are removed, there is no sharp reminder of the day’s effort, only a sense of neutrality and comfort. It is a small change, but one that makes everyday moments feel lighter, calmer, and more intentional.

  • Turmeric Stain-Lifting Paste That Brightens Your Smile Without Enamel Damage

    Turmeric Stain-Lifting Paste That Brightens Your Smile Without Enamel Damage

    The first time I brushed my teeth with bright yellow turmeric I paused & wondered if this made any sense. My bathroom smelled warm and earthy like a kitchen instead of a place for dental care. When I looked in the mirror my smile appeared gold and foamy like I had made some kind of mistake rather than taking a step toward whiter teeth. But I decided to keep going because I was curious. I had spent several weeks learning about natural methods to remove stains without damaging the delicate enamel that protects our teeth. So I stood there holding my toothbrush in one hand & a small bowl of turmeric paste in the other while hoping this simple spice might work better than the aggressive whitening strips I had tried before.

    Why a Kitchen Staple Is Finding Its Way to the Sink

    The first time I used bright yellow turmeric to brush my teeth I stopped and questioned whether this was a good idea. My bathroom had a warm earthy smell that reminded me of cooking rather than oral hygiene. Looking in the mirror I saw my smile covered in gold foam that looked more like an error than a path to whiter teeth.

    But I continued because I wanted to see what would happen. I had spent weeks researching natural ways to remove stains without harming the protective enamel on teeth. So I stood there with my toothbrush in one hand & a small bowl of turmeric paste in the other hoping this basic spice might work better than the harsh whitening strips I had used before.

    The Subtle Science Inside a Golden Paste

    Turmeric has a warm smell but it also has real science behind it. Curcumin is the substance that gives turmeric its color and it belongs to a group called polyphenols that have antioxidant & anti-inflammatory effects. Traditional medicine has used it for hundreds of years to reduce irritation and provide relief. Most stains on teeth form on the enamel surface where they attach to plaque and leftover particles. Whitening products that contain peroxide remove stains through a chemical bleaching process but they can irritate the delicate tissue under the enamel. Turmeric works differently because it does not bleach.

    When you mix it into a paste with the right ingredients it acts more like a mild cleaning agent that breaks down the layer where stains stick. You can compare enamel to glass. The goal is not to wear it down but to clean it gently over time without causing damage. A good turmeric paste follows this approach. Fine turmeric powder mixes with very gentle scrubbing particles & calming oils to polish the surface without being harsh. Coconut oil is often included because it helps the toothbrush move smoothly and allows the turmeric to reach small spaces near the gums.

    How to Mix a Turmeric Paste That Respects Enamel

    Making a turmeric stain removal paste is surprisingly straightforward and feels similar to preparing a natural face mask. You only need a handful of ingredients but getting the proportions right matters. You want something that spreads easily and feels smooth rather than rough while being effective against stains without damaging your tooth enamel.

    Picture yourself with a small mixing bowl and a measuring spoon along with a few common household items. Each ingredient serves a specific function. Some work to brighten your teeth while others provide a gentler touch & help create the right consistency. When you mix them properly the result leaves your teeth feeling clean and polished instead of worn down.

    Ingredient Main Purpose Enamel-Safe Guidance
    Ground turmeric (good quality) Helps lift stains, antioxidant support Use sparingly; more is not better.
    Fine baking soda Mild abrasive, balances acids Add lightly; the paste should feel smooth.
    Coconut oil or similar oil Lubricates, improves mouthfeel Ensures bristles glide instead of scrape.
    Optional cosmetic clay Extra polishing support Only ultra-fine clay, used minimally.
    Optional peppermint or clove Freshness and flavor Highly diluted and oral-safe only.

    In practice, the paste might start with a teaspoon of softened coconut oil, tinted golden with a pinch of turmeric, then thickened gently with baking soda. When lifted, it should cling briefly before easing back—never gritty, never dry. If it feels sandy on your tongue, adjust or remake it. Enamel does not regenerate; every choice should protect it.

    Turning Brushing into a Careful Weekly Ritual

    Using turmeric paste for the first time takes some confidence. The bright yellow color might seem unusual at first. When you start brushing you will feel how different it is from regular toothpaste. The oil makes it glide smoothly across your teeth and it has a warm earthy taste without any foaming action. This approach works better when you stay gentle and focused. Apply light pressure and move in small circles around your gumline and anywhere stains have built up. Treat your teeth like you would treat a piece of furniture you care about rather than a dirty pan that needs hard scrubbing.

    How often you use it makes a difference. Turmeric paste should be used once or twice each week instead of every day. On the days in between stick with your normal fluoride toothpaste to keep cavities away. When you finish brushing rinse your mouth well until the water looks clear. Some people prefer to brush again quickly with their regular toothpaste to get a fresh feeling. The changes happen gradually. After some time passes you will notice that stains become lighter and your teeth look brighter. If you had any tooth sensitivity from using harsher products before it will usually get better.

    Stains as Memories and the Pace of Natural Brightening

    Every stain tells a story about coffee with friends or wine at night or summer berries. Turmeric paste does not delete these memories but helps fade their marks. Natural brightening requires patience. A healthy smile is not always the whitest one available but rather one that looks well maintained & feels strong. This slower routine helps you notice areas you might have missed before and encourages better brushing habits overall. This method proves that whitening does not need to be painful. Instead of sacrificing comfort for results turmeric only asks for your time & attention while helping you develop more consistent care habits.

    Listening Closely to Your Mouth’s Signals

    Even gentle whitening methods require careful attention. Your mouth will show you what is working and what is not. Stop using the product if you notice sensitivity or irritation. People with gum problems or dental work like crowns and veneers should talk to their dentist before trying turmeric whitening. Watch for these warning signs and stop immediately if they happen: Gums that stay irritated or feel like they are burning Teeth that hurt more when exposed to cold foods or sugar White spots that look uneven or patchy Enamel that feels rough or seems thinner The problem usually comes from scrubbing too hard or using products with harsh particles rather than from turmeric itself. Good results happen when you combine safe ingredients with a light touch.