Category: News

  • Spot the Difference Challenge: Find 3 Differences in the Family Image in 10 Seconds

    Spot the Difference Challenge: Find 3 Differences in the Family Image in 10 Seconds

    Spot the Difference puzzles offer a fun way to challenge your eyes and brain together. These puzzles show two images side by side that look almost identical but have small hidden changes. Your task is to find what differs before time runs out. This version requires you to spot three subtle differences between two family pictures in just 10 seconds. That might sound impossible but with focused attention and a sharp eye you can do it. These challenges are entertaining & they also improve visual perception and concentration skills quickly. This challenge presents two nearly identical images of a family scene. The setting looks calm and familiar. At first glance the pictures appear the same. However three small changes hide within the details. These changes might include slight shifts in object placement or minor differences in color or shape. The real test is how quickly and accurately you can spot these small changes under pressure. This type of puzzle engages both the visual and reasoning parts of your brain. Most people search for large obvious changes first. When you need to find details quickly your attention moves from broad scanning to close focus. That shift helps you notice small features others might miss. The more you practice the faster your brain becomes at comparing visual information & finding differences. Spot the Difference games work for everyone. Adults benefit just as much as kids do. Research shows that visual puzzles support mental sharpness and can help slow age related decline in thinking skills. Quick observation exercises strengthen connections between the eyes and brain. They train you to detect shapes & patterns more efficiently.

    How to Approach This 10 Second Challenge

    Finding three differences within ten seconds demands a smart approach. When time is limited, your brain must react instantly without hesitation. A clear strategy can make all the difference. Begin by dividing the image into clear sections. Focus first on the top-left area, then move downward and across in an orderly pattern. Scanning systematically reduces the chance of overlooking tiny details hidden in crowded scenes.

    Compare similar objects side by side. If two items look alike—such as chairs, toys, or decorations—check their shape, size, or position carefully. Even the smallest addition or missing detail is often the key difference. Also pay close attention to colors and patterns. Clothing designs, curtains, or wall elements frequently contain subtle changes meant to distract your eye.

    Most importantly, stay calm. Rushed eye movements can cause you to miss important clues. Taking a slow breath helps steady your focus and improves your chances of spotting all differences within the time limit.

    Why These Challenges Matter

    When you take part in a Spot the Difference puzzle, your brain performs multiple essential tasks at once. It observes details, compares visual information, remembers what it has seen, and confirms accuracy. These abilities are part of everyday cognitive processing. You use them when reading maps, recognizing faces in a crowd, or proofreading written content.

    The added pressure of a time limit makes the challenge more engaging and realistic. It mirrors real-life situations where quick thinking is required. Repeated exposure to timed puzzles can improve reaction speed and decision-making. This is why similar visual drills are often used in professional training for athletes and pilots.

    In a family-themed image challenge, you are not just playing a game. You are actively training your brain to remain accurate under pressure. Over time, your nervous system becomes more efficient at transmitting visual signals, supporting sharper focus in daily life.

    The Benefits of Visual Challenges

    Regularly engaging with visual puzzles offers long-term mental benefits. These include improved concentration, stronger memory recall, and enhanced visual awareness. As your brain practices comparing images, it becomes better at storing and retrieving visual information. This skill helps you notice changes in your surroundings more quickly.

    These abilities also translate into better academic and professional performance. Tasks such as analyzing charts, spotting errors in documents, or reviewing visual presentations rely on the same visual processing skills trained by puzzles.

    Pattern-recognition exercises can also reduce mental fatigue. When your brain learns to solve small challenges efficiently, it stays alert with less effort. Over time, you may feel less overwhelmed when dealing with visual clutter or multitasking.

    Puzzle Solution Explained

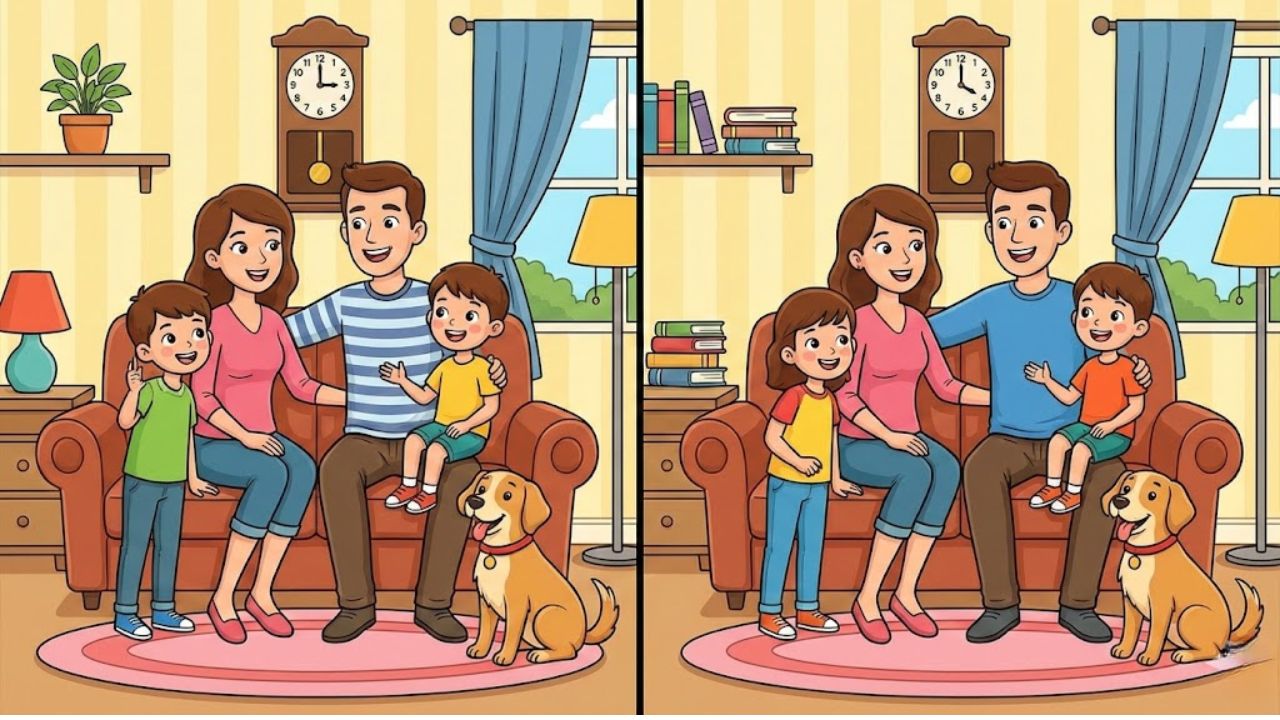
    Once you have attempted to find the three differences within ten seconds, it is time to confirm your answers. In the second image, three clear changes can be identified. The first difference appears in the curtain pattern located in the upper-left area. The floral design may show altered shapes, extra petals, or shifted colors.

    The second difference involves the woman’s hair. In one image, a specific strand or shape is visible, while in the other it is missing or modified. The third difference can be found near the upper-right section, where the boy’s hairstyle changes slightly due to a missing hair tuft.

    These differences are intentionally subtle to test your visual sharpness. Successfully identifying all three within the time limit reflects strong observation skills and focused attention. In solution images, these changes are often highlighted with red circles to make verification easier.

    Tips to Improve Your Observation Skills

    Consistent practice is the key to sharpening your observation abilities. Try solving similar puzzles daily, even if only for a few minutes. Short and regular exercises help train your brain to focus quickly.

    Reduce distractions in your surroundings so your attention stays on the task. Use a consistent scanning method, moving left to right and top to bottom instead of jumping randomly across the image. Finally, track your progress by timing yourself and aiming to improve with each new puzzle. Over time, you will notice faster recognition and improved accuracy.

  • At-Home Bodyweight Moves That Sculpt Stronger Legs Without Weights or Gym Memberships

    At-Home Bodyweight Moves That Sculpt Stronger Legs Without Weights or Gym Memberships

    The stairs you see every day are ordinary steps until you choose to turn them into an excellent leg workout. That park bench might seem like a spot to sit and relax but you can use it for squats or step-ups to make your legs stronger. The floor in your living room that you cross daily offers more value than costly gym equipment when you commit to using your own bodyweight. You don’t need a gym membership or special gear. All you need is gravity and the decision to build strength using what you already have around you.

    Strength Starts at Home: How Bodyweight Leg Training Truly Delivers Results

    Stand barefoot in the center of a room and notice the floor beneath you. It feels cool, solid, and completely indifferent. Spread your toes and gently shift your weight from heel to forefoot. Your legs, already reliable supports, perform countless silent adjustments every day to keep you upright. This is where effective leg training without equipment begins — not with heavy bars or machines, but with the connection between your feet and the ground. Removing gym tools doesn’t reduce results; it removes distractions. What remains is honest movement. Squat, lunge, hinge, push, jump, and balance. These are timeless actions, older than gyms and workouts. Bodyweight leg training becomes a way to move through life with alert muscles, stronger joints, and a body that feels like a partner rather than a burden.

    Waking Up Your Legs: Preparing Muscles Without Equipment

    Before your legs work hard, they need to wake up. Not through frantic stretching, but through controlled, purposeful motion. A proper warm-up for bodyweight leg training only requires a small space and focused attention. Begin by marching in place for about a minute, letting your arms swing naturally while your heels tap the floor. Your heart rate gradually rises. Move on to slow ankle circles, one foot at a time, drawing careful shapes in the air. Gently bend and circle your knees, keeping everything comfortable and relaxed. Never force movement — instead, invite your joints into motion. Fold forward with slightly bent knees to wake your hamstrings, then ease into a few shallow squats. This warm-up isn’t separate from the workout; it’s the opening chapter where hips, knees, ankles, and balance prepare to work together.

    Using Gravity as Resistance: Core Movements for Stronger Legs

    Bodyweight leg training works best when treated like cooking with simple ingredients. A few fundamental movements, practiced with care, offer endless progression. You don’t need dozens of exercises. Squats teach controlled sitting and standing. Lunges develop balance and single-leg coordination. These patterns already exist in daily life — training simply refines them. Over time, these movements shape legs that are not only stronger but more capable in real-world situations.

    Bodyweight Squats: Creating Strength from the Ground Up

    Stand with your feet about shoulder-width apart. Imagine sitting back into a chair placed slightly farther behind you. Your hips move back as your knees bend, while your chest stays upright. Keep your heels grounded and your toes connected to the floor like anchoring roots. At the lowest point — whether deep or partial — pause briefly and breathe. Feel your quadriceps engage, your glutes activate, and your hamstrings stretch gently. Rise with intention by pressing into the floor. As squats become easier, increase difficulty by slowing the tempo, pausing longer at the bottom, or adding small pulses. Patience and control provide all the resistance you need.

    Controlled Lunges: Building Balance, Stability, and Control

    Lunges turn simple steps into deliberate strength work. Step forward as if preparing to kneel, bending both knees together. Your front knee tracks over the center of your foot while your back knee lowers gently toward the floor. Keep your torso upright and your gaze steady. Push through your front foot to return to standing. Alternate sides and notice how each leg feels. One may feel steadier than the other — this uneven feedback is valuable, not negative. Lunges teach your hips to stabilize and your knees to move correctly. Try walking lunges or reverse lunges, which tend to be knee-friendly. True strength shows itself in control, not just force.

    Glute Bridges: Strengthening the Posterior Chain Naturally

    Lie on your back with knees bent and feet flat on the floor. Arms rest comfortably at your sides. Gently press your lower back into the ground, then lift your hips until your body forms a straight line from shoulders to knees. At the top, squeeze your glutes and hold briefly before lowering slowly, one vertebra at a time. This movement activates the entire posterior chain, supporting your lower back and stabilizing your hips. As strength improves, progress to single-leg bridges to increase the challenge. Gravity and body awareness provide all the resistance required.

    Calf Raises: Strengthening an Often Overlooked Muscle Group

    Stand with feet hip-width apart and lightly touch a wall or chair for balance if needed. Rise onto the balls of your feet, lifting your heels as high as possible. Hold briefly, then lower slowly with control. Your calves act as shock absorbers and energy springs during walking, running, and climbing. Strong calves improve daily movement efficiency. Perform this exercise on flat ground or on a step to increase range of motion by letting your heels dip slightly before lifting again.

    Step-Ups: Turning Everyday Surfaces into Training Tools

    Use a stable bench, chair, or low wall. Place one foot on the surface and press through it to stand tall. Bring your other foot up, then step down slowly with control. The working leg engages from hip to calf as it lifts and lowers your full body weight. Step-ups mimic real-life actions like climbing stairs or stepping onto uneven ground. Any wobble signals an opportunity for growth. Increase difficulty by using higher surfaces, slowing the movement, or pausing at the top to challenge balance.

    Progress Without Weights: Smarter Ways to Keep Improving

    Progress in bodyweight training doesn’t depend on added equipment. Instead, it relies on adjusting repetitions, tempo, and leverage. Early progress might mean increasing reps or sets. Later, you can add jump squats, slow eccentric movements, or single-leg variations like assisted pistol squats. Slowing down a squat to a controlled count with pauses dramatically increases intensity. Changing angles — such as elevating feet during bridges or stepping deeper into lunges — creates new challenges. These subtle changes ensure continuous adaptation without weights.

    Building a Simple, Effective Bodyweight Leg Routine

    An effective leg routine doesn’t require complex planning. Choose a small group of exercises and perform them several times a week with focus and effort. Rest approximately 45 to 75 seconds between sets. Adjust repetitions to your ability, ensuring the final reps feel challenging but maintain proper form. As strength improves, add reps, sets, slower tempos, or more advanced variations such as jump squats, Bulgarian split squats, or single-leg bridges. Consistency and intention matter more than complexity.

    Exercise Name Sets Repetitions / Duration Training Focus & Tips
    Bodyweight Squats 3 10–15 Reps Movement ko dheere aur control ke sath karein, balance maintain rakhein aur neeche jaakar thoda pause karein
    Reverse Lunges (Per Leg) 3 8–12 Reps Peeche ki taraf step lein taake knees safe rahein, chest upright aur body stable rakhein
    Glute Bridges 3 12–15 Reps Heels par pressure dein aur top position par glutes ko achi tarah squeeze karein
    Step-Ups (Per Leg) 2–3 8–10 Reps Strong aur secure surface ka use karein, neeche aate waqt movement ko control karein
    Standing Calf Raises 3 15–20 Reps Heels ko poori tarah upar uthayein aur har rep mein thodi der top par hold karein

    From Living Room to Park Bench: Training Anywhere, Anytime

    Once you notice it, everyday surroundings reveal endless training opportunities. A curb becomes a calf raise platform. A park bench turns into a step-up station. Stairs, sidewalks, and open spaces quietly invite movement. Try turning part of a walk into a workout: pause for squats at driveways, use benches for step-ups, finish with controlled calf raises on a curb. Bodyweight training blurs the line between exercise and daily life. Strong legs built this way are ready for hikes, long days on your feet, or spontaneous movement. Training without equipment isn’t a compromise — it’s a return to functional strength, grounded movement, and trust in what your body can already do.

  • Beat Chapped Lip Season With These 9 Balms and Exfoliating Treatments That Actually Work

    Beat Chapped Lip Season With These 9 Balms and Exfoliating Treatments That Actually Work

    No matter how flawless your lip liner or gloss may be, dry, cracked lips can ruin the entire look. That’s why a well-rounded lip care routine goes far beyond makeup alone. To achieve a smooth, healthy pout, proper hydration and prep are just as important as the finishing touches.

    A deeply hydrating lip balm paired with a gentle lip exfoliator plays a crucial role—especially during the colder months when lips are more prone to dryness. While finding the right formula can take some experimentation, the good news is that the search has already been done for you. We’ve narrowed down standout options that truly deliver.

    Whether you’re after a timeless everyday balm, a product that delivers intense moisture, or a multitasking formula that doubles as a lip oil and plumper while still nourishing, you’ll find a recommendation that fits your needs.

    How Our Selections Are Made

    The E! Insider Shop editorial team thoroughly researches the market to identify top-performing products. Our process includes consulting expert sources, analyzing verified customer feedback, and testing items through our own hands-on experiences to help streamline your shopping decisions.

    All content is developed independently by our editors and writers, guided by in-depth research and reporting as well as what we believe will be most useful and relevant to our readers. Our mission is to provide clear, helpful information for those searching for the latest products designed to make everyday life easier.

  • How to prevent mascara from flaking on dry winter days

    How to prevent mascara from flaking on dry winter days

    Cold weather can be brutal on your makeup, especially when it comes to eye products. On dry winter days in India, low humidity and indoor heating often cause mascara to flake, smudge, or crumble onto the under-eye area. This not only ruins your look but can also irritate sensitive eyes. Learning how to prevent mascara from flaking is all about smart prep, the right formulas, and small application tweaks that make a big difference. With a few practical changes, your lashes can stay defined, comfortable, and polished all day long.

    How to prevent mascara flaking with proper lash prep

    One of the most overlooked steps in preventing mascara flakes is prepping your lashes before application. Dry winter air can leave lashes brittle, so starting with clean bare lashes is essential. Remove any leftover makeup or oils, then gently pat the area dry to avoid moisture buildup. Applying a tiny amount of eye cream and letting it fully absorb helps prevent dry under-eyes that attract falling flakes. A lightweight lash primer can add grip and flexibility, reducing brittle lash tips. Avoid over-layering products, as buildup often leads to product fallout later in the day. Thoughtful prep creates a smooth base that helps mascara adhere evenly and last longer.

    Choosing the right mascara to prevent winter flaking

    Your mascara formula plays a huge role in how it performs during winter. To prevent mascara flaking, look for formulas labeled hydrating or conditioning, which support flexible lash coating. These textures move with your lashes instead of cracking in cold air. Avoid very dry or fast-setting mascaras that cause crumbling formulas by midday. Tubing mascaras can be a smart choice, as they form lightweight sleeves that resist powdery residue. Also, check the age of your product—old mascara thickens and flakes more easily, leading to uneven application. Choosing the right formula tailored for dry conditions can dramatically improve wear time and comfort.

    Application tricks that stop mascara from flaking

    Even the best mascara can flake if it’s applied incorrectly. Start by wiping excess product off the wand to avoid heavy lash buildup. Apply thin, even coats and let each layer dry slightly to prevent wet clumping. Wiggle the wand gently at the base and pull through to the tips for smooth lash separation. Avoid pumping the wand, which introduces air and dries out the formula faster. Once finished, resist touching your lashes, as friction can cause midday flaking. Simple technique adjustments like these help your mascara stay intact despite dry winter conditions.

    Why winter-proofing your mascara routine really matters

    Understanding how winter affects your lashes makes it easier to prevent mascara flaking long-term. Cold air outside and heated air indoors both contribute to moisture loss, weakening lashes and increasing seasonal lash dryness. When lashes lack flexibility, mascara is more likely to crack and fall. A routine that focuses on hydration, gentle application, and mindful product choices supports all-day wear without irritation. Paying attention to how your lashes feel throughout the day can also signal when adjustments are needed for eye comfort balance. Ultimately, winter-proofing your mascara routine leads to healthier-looking lashes and a more confident makeup experience.

    Winter Issue Common Cause Simple Fix
    Flaking Dry formula Use hydrating mascara
    Smudging Eye cream residue Let skincare absorb fully
    Clumping Too much product Apply thin coats
    Fallout Old mascara Replace every 3–6 months

    Frequently Asked Questions (FAQs)

    1. Why does mascara flake more in winter?

    Dry air and heating reduce moisture, making mascara crack on brittle lashes.

    2. Can eye cream cause mascara to flake?

    Yes, excess or unabsorbed eye cream can make mascara slide and crumble.

    3. Are waterproof mascaras better for winter?

    Not always, as very dry waterproof formulas can flake more on dry lashes.

    4. How often should I replace mascara in winter?

    Replace it every three to six months to avoid dryness and flaking.

  • Spot the Difference Challenge: Find 3 Changes in This Boy Drawing in 7 Seconds

    Spot the Difference Challenge: Find 3 Changes in This Boy Drawing in 7 Seconds

    Visual puzzles naturally draw people in. They appear straightforward but actually test your brain in meaningful ways. This spot the difference puzzle with a boy drawing is exactly that kind of challenge. You get two almost matching images and only 7 seconds to locate three tiny differences tucked into the scene. It seems simple until the timer begins. Most people overlook at least one detail during their first attempt. That is exactly what makes this challenge so enjoyable and hard to resist.

    Why Spot-the-Difference Challenges Confuse Even Sharp Observers

    Our brains love patterns. When we see two similar images side by side the mind assumes they are the same and fills in missing details automatically. This is helpful in daily life but not so helpful in puzzles like this. Spot the difference challenges force your brain to slow down and actually observe what is in front of you. Instead of scanning the whole picture you must train your eyes to notice small changes in shape or position or missing objects. In this boy drawing image the scene feels calm and familiar. A child is focused on drawing & is surrounded by simple objects like pencils and an ink bottle. Because the setup looks normal the differences blend in easily. That is why time pressure makes it even harder.

    Smart Ways to Crack a 7-Second Visual Observation Test

    A Smarter Way to Spot the Differences When you only have a few minutes to solve a puzzle looking randomly at the picture usually does not help much. A better method is to divide the image into smaller parts. Start by examining the boy carefully. Then move on to the items sitting on the table. Finally check the background details. This approach trains your brain to focus on one specific area at a time instead of letting your eyes wander across the entire picture without purpose. Another useful strategy is to search for things that have vanished rather than things that have changed. The human eye naturally detects missing objects faster than it notices small changes in color or shape. When you apply this technique to the puzzle, you will likely find the differences much more quickly.

    What Makes This Boy Drawing Spot-the-Difference Puzzle Stand Out

    This puzzle works differently because it uses small details instead of clear color shifts. The changes are hidden in places where you normally would not look. Nothing catches your attention right away. The boy looks normal and the tools and objects around him seem familiar so you relax without realizing it. The challenge also requires concentration & calmness. Some people move too fast and overlook a difference that sits right there. Others make it harder than it needs to be by searching for complicated changes when the answers are actually straightforward. This mix of simplicity & challenge makes these puzzles interesting for everyone regardless of age.

    How Observation Puzzles Sharpen Focus and Visual Awareness

    These puzzles serve a purpose beyond simple fun. They strengthen essential cognitive abilities through regular practice. Working on visual challenges enhances your ability to focus and helps develop better short term memory and visual processing skills. Your brain learns to take its time and examine details with greater care. Children benefit from these puzzles by building stronger attention spans & learning how to solve problems effectively. Adults find them useful as a break from digital devices and the pressures of daily life. Taking just a few minutes to work through a puzzle can leave your mind feeling clearer and more energized.

    Common Mistakes That Prevent Finding All Hidden Changes

    One common mistake is focusing only on the center of the image. Many differences appear near the edges because people naturally pay less attention to those areas. Another mistake is assuming all the differences will look similar. In reality one difference might be a missing object while another could be slightly altered and another completely reshaped. People also tend to overlook everyday objects like pencils or bottles because they seem unimportant. In this puzzle those ordinary items often hide the most important clues.

    Spot-the-Difference Solution: All Changes in the Boy Drawing Revealed

    Finding all three differences in just 7 seconds shows strong observation skills. If you did not spot them all, there is no need to feel discouraged. The puzzle was created to test your attention to detail. The first difference involves the boy’s hair. A small section of hair close to his ear is absent in the right image. This is a subtle detail that most people miss because they tend to focus on more obvious features like his facial expression or hand position.

    The second difference can be found in the ink bottle. The bottle design has been modified between the two images. While it appears nearly identical at first glance closer inspection reveals slight variations in its shape & detailing. The third difference is located in the pencil holder. One pencil that is present in the left image has been removed in the right image. Because the holder still appears reasonably full, this change often goes unnoticed by most viewers. The effectiveness of this puzzle lies in how naturally these modifications blend into the overall scene. Each alteration is subtle enough to escape immediate detection while remaining visible upon careful examination.

    Why Time-Limited Visual Puzzles Feel So Addictive

    Adding a countdown makes the challenge harder right away. Seven seconds seems like enough time until you actually attempt it. The pressure forces your brain to speed up and sometimes work too quickly. This combination of urgency and interest makes people want to keep trying. Puzzles with time limits also make people want to play again. Many users retry after learning the answer just to show they can find the differences more quickly on their next attempt.

    Final Takeaway From This 7-Second Spot-the-Difference Challenge

    Puzzles like this boy drawing are an enjoyable way to improve your observation skills. They show us how easily we overlook small details in daily life. Whether you found the answer fast or took longer your brain still gained from the exercise. If you like activities that challenge your focus and attention to detail, these puzzles make a good addition to your day. Each one helps train your eyes to notice more and keeps your mind alert through practice.

  • 14 Yoga Exercises for Daily Home Practice to Improve Overall Wellness

    14 Yoga Exercises for Daily Home Practice to Improve Overall Wellness

    Practicing yoga at home every day helps you stay active & healthy without needing a gym membership or special training. Regular practice improves your flexibility and strength while also helping with posture and mental clarity. Daily yoga supports better stress management and sleep quality while promoting long-term physical balance. Here are fourteen practical yoga exercises that work well for home practice & are suitable for both beginners & experienced practitioners.

    Mountain Foundation Pose to Build Alignment and Inner Awareness

    Mountain Pose helps fix your posture & makes you more aware of your whole body. Stand up straight with your feet next to each other and let your arms hang naturally at your sides. Keep your spine straight and focus on pressing your feet firmly into the ground while gently lifting your chest. If you practice this pose every day it will improve how your body lines up and reduce the tightness that comes from sitting too much.

    Downward Stretch Flow to Energize Muscles and Improve Mobility

    This pose stretches the spine and shoulders along with the hamstrings & calves. At the same time it strengthens both arms & legs. You start from a hands and knees position and then lift your hips upward while pressing your heels toward the floor. The position boosts blood flow throughout the body & creates a refreshing effect. These benefits make it an ideal choice for morning practice sessions.

    Gentle Cat–Cow Sequence for a Healthier and More Flexible Spine

    Move between arching and rounding your spine while you breathe slowly. This gentle movement helps improve how well your spine moves and reduces tension in your back. It also warms up your body before other activities. This exercise works especially well for people who spend most of their day sitting at a desk or in one position.

    Cobra Lift Pose to Strengthen the Back and Open the Chest

    Cobra Pose makes your lower back stronger and opens up your chest area. You start by lying face down on the floor and then push down with your hands to gently raise your upper body. This position is good for keeping your spine healthy and fixing the slouching that happens when you spend too much time looking at screens.

    Restorative Child’s Pose to Release Tension and Calm the Mind

    Child Pose helps relax your back and hips and shoulders. It also calms your nervous system. To do this pose you kneel down and sit back on your heels. Then you fold your body forward. This pose works well when you need to rest during your yoga practice or after you finish. You can use it anytime you need a break or want to recover your energy.

    Tree Balance Practice to Sharpen Focus and Body Stability

    Tree Pose: A Foundation for Balance & Strength Tree Pose serves as an excellent exercise for developing balance while simultaneously strengthening your legs and sharpening your mental focus. The technique is straightforward to learn and can be practiced almost anywhere. To perform this pose correctly you begin by standing firmly on one foot. Then you lift your opposite foot and position it against either your calf or your inner thigh depending on your flexibility level. Once you have established this leg position you bring both hands together in front of your chest or raise them overhead in a prayer position. When you make balance practice a regular part of your daily routine you will notice significant improvements in your physical coordination. Your body learns to make constant small adjustments to maintain stability which translates into better overall body control. Beyond the physical benefits this pose also cultivates mental stability as it requires sustained concentration and present-moment awareness.

    Warrior One Flow to Activate Strength and Self-Confidence

    Warrior One makes your legs hips & arms stronger while also boosting your stamina. You step one foot behind you and bend your front knee while raising your arms up. This position helps you breathe in a steady rhythm & gives you more confidence by building physical power.

    Warrior Two Stance for Endurance, Control, and Lower-Body Power

    Warrior Two builds strength in your legs and increases hip flexibility. Stretch your arms out to each side as you bend your front knee into position. When you hold this pose regularly it helps you concentrate better & makes your whole body more stable over time.

    Triangle Stretch Pose to Improve Flexibility and Side-Body Length

    Triangle Pose provides a stretch for the sides of your body along with your hips & legs. Start by placing your feet wide apart and then reach one hand down in the direction of your shin as you lift your other arm up toward the ceiling. This pose helps you develop better balance and flexibility while also lengthening your spine.

    Seated Forward Fold to Ease Stress and Stretch the Spine

    This pose stretches your spine hamstrings and lower back muscles. You sit on the floor with your legs stretched out in front of you and then bend forward slowly while taking deep breaths. The movement helps calm your thoughts and reduces tightness in your muscles.

    Plank Hold Practice to Build Core Strength and Full-Body Support

    Plank Pose for Core Strength Plank Pose builds strength throughout your core while also working your arms and shoulders and back muscles. The key is maintaining a straight body position from head to heels while actively contracting your abdominal muscles throughout the hold. When you practice plank pose every day you will notice improvements in your posture and balance. Your overall body strength increases as well because this exercise engages multiple muscle groups at the same time.

    Bridge Lift Pose to Strengthen Hips, Glutes, and Lower Back

    Bridge Pose works to build strength in your glutes and lower back along with your core muscles. You perform this exercise by lying flat on your back and then raising your hips upward while keeping your feet firmly planted on the ground. This movement helps maintain a healthy spine & makes breathing easier because it expands the chest area.

    Legs-Up Relaxation Pose to Improve Circulation and Reduce Fatigue

    This easy position helps reduce fatigue in your legs and brings a sense of calm to your body. You simply lie down on your back and place your legs straight up against a wall. The pose encourages better blood flow throughout your lower body and works wonderfully as part of your evening routine right before you go to sleep.

    Final Rest Pose to Restore Energy and Reset the Nervous System

    Corpse Pose helps your body and mind relax completely. You lie flat on your back with your arms resting at your sides while focusing on breathing slowly. When you practice this pose every day it makes your thinking clearer and lowers your stress levels.

    How a Daily Home Yoga Routine Supports Long-Term Wellness

    Yoga at home helps you stay consistent & feel comfortable. You can move at your own speed without any pressure. Modern wellness trends focus on mindful movement and managing stress. Daily yoga naturally fits these goals. Short practice sessions bring real benefits when you do them regularly.

    Easy Daily Yoga Tips to Stay Consistent and Injury-Free

    Making Yoga Work at Home Pick the same time every day for your practice & keep your sessions at a length you can actually manage. Pay attention to how you breathe throughout each pose. Finding a peaceful spot in your home and sticking to a consistent schedule will help you maintain your yoga practice over the long run. Practicing yoga at home every day creates a meaningful habit that builds physical strength while supporting emotional stability and overall health.

  • Why rinsing dishes before the dishwasher can actually make them less clean

    Why rinsing dishes before the dishwasher can actually make them less clean

    The plates seemed perfectly clean as she slid them into the dishwasher. A quick rinse under the tap, a fast sponge swipe, and that familiar moment of satisfaction before pressing “Start.” But the next morning told a different story. Glasses showed dull spots. A fork carried a faint greasy shadow. One plate somehow looked less clean than before the cycle.

    The machine had run properly. The water was hot. The detergent was fresh. So what went wrong? The surprising truth is this: by rinsing so carefully, she may have undermined the wash herself. Once you understand why, you might never see your sink the same way again.

    How a “Good Habit” Quietly Works Against You

    At the sink, rinsing feels like pure common sense. Sauce gets blasted away. Crumbs vanish down the drain. The plate looks “pre-cleaned,” and loading it feels tidy, responsible, even civilized. It’s part of a modern ritual: dirty plate, quick rinse, into the machine, and you walk away feeling virtuous.

    Yet behind the closed door, the dishwasher is waiting for something you just removed. What you washed away is exactly what the machine needs to do its job properly. In controlled tests, brands love showing plates caked with food going in and emerging spotless. In real kitchens, many people unknowingly sabotage that process.

    A US survey once found that over 70% of dishwasher owners “always” or “often” rinse dishes before loading. Old habits explain it. Memories of parents insisting on rinsing. Childhood dishwashers that left spaghetti welded on forever. So people rinse hard today, then blame the new machine when glasses come out cloudy.

    Here’s the part most people never hear. Modern dishwashers rely on sensors and smart cycles. They detect particles, dissolved food, and grime in the water. If the water stays too clean, the machine assumes the load isn’t very dirty and shortens the cycle, adjusts temperature, or reduces spray intensity.

    Detergent is designed to bind to grease and food. When plates go in nearly spotless, detergent ends up working on the dish surface itself instead of on residue, leaving films and streaks. That proud pre-rinse can quietly create a “not quite clean” result.

    The Simple Rule That Changes Everything: Scrape, Don’t Rinse

    The fix is surprisingly small: scrape, don’t rinse. Remove solid leftovers into the bin or compost, then let the dishwasher handle the rest. The goal isn’t to load plates dripping with sauce, but to leave enough of a clear signal so the machine knows real cleaning is required.

    A butter knife or spatula usually does the job. Push leftovers away, check the plate, and place it straight into the rack. No tap water. No warm rinse. No five-second guilt wash just to feel better.

    Many people fear skipping the rinse will turn the dishwasher into a nightmare of stuck-on food. That fear often comes from experience with older machines or poorly stacked loads. A modern dishwasher with a proper program, good detergent, and correct stacking can handle dried tomato sauce, cheese, and last night’s curry.

    Real life isn’t perfect. Some days a burnt gratin pan looks like a crime scene. On those days, a brief soak makes more sense than aggressively rinsing every plate. Be kind to yourself, but avoid the one habit that quietly ruins the wash.

    What Dishwasher Engineers Want You to Know

    As one dishwasher engineer put it: “If your dishes look almost clean when they go in, the machine has nothing to read.” That idea flips the script. The goal isn’t laziness; it’s working with the technology you already own. Once you understand how the machine “thinks,” everyday routines start to change.

    • Scrape instead of rinse so sensors can detect real soil.
    • Leave light residue to help detergent bind correctly.
    • Choose proper cycles rather than always using the shortest one.
    • Stack dishes carefully so water reaches every surface.
    • Clean the filter regularly to maintain full cleaning power.

    Trusting the Dishwasher to Do Its Job

    There’s a quiet relief in trusting the machine again. You finish eating, scrape plates into the bin, load them with the faint shadows of dinner still visible, close the door, and walk away. No tap ritual. No spray ballet over the sink.

    On busy weeknights, that small shift saves both time and mental energy. The dishwasher stops feeling like a fragile device you must constantly assist, and starts behaving like what it claims to be: a real appliance built to handle real dirt.

    • Rinsing can mislead sensors by making water seem too clean.
    • Food residue helps detergent work as designed.
    • A smarter routine delivers cleaner dishes with less effort and less water.
  • Senior Fitness Trainers Recommend Seated Core Exercises for Strength and Stability

    Senior Fitness Trainers Recommend Seated Core Exercises for Strength and Stability

    I regularly work with clients aged 65 and older, and many find it uncomfortable or impractical to get down onto a yoga mat for traditional floor-based core exercises. That doesn’t mean core training is skipped. Abdominal strength remains essential, even when movements need to be modified to suit comfort and mobility.

    Developing a strong, supportive core is important at every age, but it becomes especially critical for seniors. Key muscles such as the transverse abdominis and internal obliques play a vital role in breathing, posture, and balance—areas that help older adults stay active, stable, and independent.

    Why Seated Core Exercises Are Effective

    When working with individuals who have mobility limitations, I often rely on a series of seated core exercises. These movements allow for safe and effective abdominal engagement without needing to lie on the floor. Even for those who are comfortable with floor workouts, seated exercises can add variety and a fresh challenge to a core routine.

    How to Do These Seated Core Exercises Safely

    This routine requires no equipment other than a sturdy chair. Before starting any new exercise program, it’s important to consult your medical team. Working with a certified personal trainer is also recommended, especially if you are new to exercise, as they can help ensure proper form and offer suitable modifications.

    Perform each exercise for 1–3 sets of 10–15 repetitions. Beginners should start with fewer reps and sets, gradually increasing as strength and confidence improve.

    1. Seated Torso Twist

    • Sit on the edge of a chair with your feet flat on the floor.
    • Keep a neutral spine and engage your core.
    • Cross your arms, resting your hands on your shoulders.
    • Rotate your torso to the right while staying tall.
    • Return to center, then twist to the left.
    • Alternate sides for 10–15 reps per side.

    2. Seated Knee Lifts

    • Sit upright on the edge of a chair with your feet grounded.
    • Engage your core muscles and maintain a tall posture.
    • Slowly lift your right foot, keeping the knee bent.
    • Lower it back down with control.
    • Repeat on the left side.
    • Continue alternating for 10–15 reps per side.

    3. Seated Side Bends

    • Sit on the edge of a chair with your feet flat.
    • Engage your core and maintain a neutral spine.
    • Place both hands behind your head.
    • Lower your left elbow toward the floor, contracting the left side of your torso.
    • Return to center, then repeat on the right.
    • Alternate sides for 10–15 reps per side.

    4. Seated Bicycles

    • Sit tall on the edge of a chair with your core engaged.
    • Place both hands behind your head.
    • Lift your right foot and rotate your torso so your left elbow moves toward your right knee.
    • Return to the starting position.
    • Repeat on the opposite side.
    • Alternate for 10–15 reps per side.

    If bringing your elbow all the way to your knee feels difficult, perform the movement within a smaller, comfortable range of motion.

    Benefits of Seated Core Training

    This seated routine targets essential core muscles, including the rectus abdominis, internal and external obliques, and the transverse abdominis. Together, these muscles help stabilize the body, support internal organs, assist vital bodily functions, and promote proper posture.

    Many traditional abdominal exercises require lying on the floor, which may not be appropriate for individuals with mobility challenges or certain injuries. Because these movements are performed while seated, they are accessible across a wide range of fitness levels and can be safely adjusted or progressed with guidance from a qualified personal trainer or physical therapist.

  • Facial Massage Skincare Practices Help Tighten Skin and Smooth Fine Lines

    Facial Massage Skincare Practices Help Tighten Skin and Smooth Fine Lines

    The moment you notice a new line on your face often arrives quietly. It appears in the mirror as a subtle crease near the mouth or a soft line beside the eye. You lean closer, gently press the skin, and watch it fade briefly under your touch and hope. When you let go, it returns. It may not feel alarming or unwelcome, just unfamiliar. That small change serves as a reminder that your face holds more than appearance—it carries the imprint of time and experience.

    Natural Skincare as a Gentle Practice

    The Calm Ritual of Touch

    Picture a quiet evening when the day’s noise has settled into stillness. Warm water runs over your hands, a fresh towel within reach. You pick up a trusted oil or cream, familiar and soothing. Before it even touches your skin, your breath slows and your body softens. Facial massage begins not with movement, but with presence and awareness.

    There is a clear difference between rushing through skincare and touching your face with intention. One is routine; the other becomes ritual. When your fingertips meet your skin gently, your nervous system responds. Shoulders drop, the jaw unclenches, and facial muscles that have worked all day finally relax. In that moment, your face is allowed to rest.

    Understanding the Structure of Your Face

    Your face is not simply skin over bone. It is a living network of muscles, connective tissue, and expression. Beneath the surface, fine muscles lift brows, shape smiles, and support daily movement. Over time, repeated expressions, gravity, and natural collagen changes appear as lines and shifts in firmness. This is not damage—it is the visible record of living.

    Facial massage gently supports this structure. It helps improve blood circulation, encourages lymphatic flow, releases held tension, and supports healthier skin function. With regular practice, the skin may look brighter, puffiness can lessen, and lines may appear softer and more blended into your natural features.

    Preparing Your Skin for Facial Massage

    Preparation is subtle yet important. Begin with clean hands and freshly washed skin. Apply a product that allows glide, such as a facial oil, serum, or moisturizer, so the skin moves comfortably without pulling.

    Your posture matters. Sit or stand tall, relax your shoulders, soften your jaw, and allow your tongue to rest naturally. Take a slow breath in through your nose and release it through your mouth. This signals that this time is intentional, not hurried.

    • Clean skin: Helps prevent irritation and friction during massage.
    • Use slip: Protects the skin barrier and allows smooth movement.
    • Relax the body: Supports better muscle response and comfort.
    • Start gently: Keeps delicate areas safe and responsive.

    Facial Massage for Lift and Firmness

    Facial massage requires no tools—only your hands and mindful pressure. Your touch should feel supportive and comfortable, never harsh. If the skin feels tender or overly flushed, reduce pressure. Ease is key to effectiveness.

    Jawline Sculpting Movements

    Place your index and middle fingers at the center of the chin beneath the jawbone. Glide outward toward the ears using slow, upward strokes. Repeat five to ten times on each side. This motion helps release jaw tension and supports a more defined lower face over time.

    Cheek Lifting for Natural Fullness

    Begin at the corners of the mouth and sweep your fingers upward along the cheekbones toward the temples. Move slowly with both hands at the same time. Repeat ten times. This encourages circulation, supports natural volume, and adds a soft brightness to the cheeks.

    Forehead Relaxation for Expression Lines

    Place both hands at the center of the forehead and glide outward toward the temples in long, gentle strokes. Use light to medium pressure and repeat ten to fifteen times. This helps release habitual tension and gradually softens horizontal forehead lines.

    Softening Lines with Awareness

    Wrinkles reflect expression and experience. Facial massage does not remove them but helps them soften and blend naturally into your features. Gentle repetition and mindful touch are far more effective than force.

    Eye Area Massage for Brightness

    Using your ring fingers, lightly trace along the bone beneath the eyes from the inner corner outward, then move up across the brow bone to complete a slow circle. Repeat eight to ten times. This supports lymphatic drainage and reduces puffiness while protecting delicate skin.

    Softening Smile Lines

    Place your fingertips beside the nostrils and glide diagonally upward toward the cheeks. Follow with small, gentle circular motions along the smile lines for about one minute. This helps maintain skin suppleness and softens the appearance of deeper folds over time.

    Building a Daily Facial Massage Habit

    Consistency matters more than duration. Just three to seven minutes daily can create noticeable changes over time. Pair facial massage with an existing routine, such as morning skincare or evening cleansing, to make it simple and sustainable.

    A Simple 7-Minute Evening Routine

    Minute one to two: Cleanse and apply oil or cream. Minute three: Jawline strokes. Minute four: Cheek lifting movements. Minute five: Forehead smoothing. Minute six: Eye-area circles. Minute seven: Smile-line massage and gentle outward strokes. Finish by resting your palms on your cheeks and taking one slow breath.

    Respecting Your Skin’s Signals

    Facial massage should always honor your skin’s condition. Reduce pressure or pause during active breakouts, irritation, sunburn, or after cosmetic procedures unless advised otherwise. Healthy signs include warmth and a natural glow, not pain or broken capillaries.

    Facial massage works best alongside supportive habits like hydration, nourishment, sun protection, and rest. Its value extends beyond appearance—it changes your relationship with your face. Instead of judgment, there is presence. Instead of distance, there is careful touch. In those quiet minutes, you become an active and compassionate participant in your own care.

  • 9 Moisturisers That Repair Flaky Winter Skin Overnight According to Beauty Editors

    9 Moisturisers That Repair Flaky Winter Skin Overnight According to Beauty Editors

    Winter can be brutal on skin, especially in India where cold air, indoor heating, and frequent face washing team up to strip away moisture. Flaky patches, tightness, and dullness are common complaints during this season, even for people who normally have balanced skin. That’s why beauty editors consistently turn to rich, restorative formulas that work while you sleep. These moisturisers are designed to sink in deeply, strengthen the skin barrier, and visibly improve texture by morning, making them winter essentials for anyone dealing with dryness.

    Winter moisturisers that repair flaky skin overnight

    When temperatures drop, your regular lotion often isn’t enough to keep dryness at bay. Winter moisturisers that truly repair flaky skin overnight focus on intense nourishment and barrier support. Editors recommend formulas that contain deep hydration boost, barrier repair actives, and rich creamy textures that seal in moisture for hours. These products work best when applied as the final step of your nighttime routine, allowing skin to recover without daily environmental stress. By morning, skin feels calmer, softer, and more resilient, making makeup application smoother and irritation far less likely.

    Overnight moisturisers for dry winter skin recovery

    Overnight moisturisers are especially effective during winter because skin naturally repairs itself while you sleep. Beauty experts look for formulas that deliver long-lasting nourishment, soothing comfort layers, intense moisture retention, and visible texture smoothing without clogging pores. These creams are often slightly thicker but melt beautifully into the skin, making them suitable even for sensitive types. Used consistently, they help reduce flakiness, improve elasticity, and restore that healthy glow that cold weather tends to steal.

    Best winter moisturisers recommended by beauty editors

    The best winter moisturisers recommended by beauty editors strike a balance between richness and wearability. They’re packed with ingredients that support overnight skin renewal, comforting repair feel, and cold weather protection, ensuring skin stays hydrated till morning. Editors also love options that layer well over serums and don’t leave a greasy residue. Whether you have dry, combination, or stressed winter skin, these expert-approved picks are designed to visibly improve dryness and flaking within just a few nights of use.

    Why overnight moisturisers matter in winter

    Using an overnight moisturiser in winter isn’t just a luxury—it’s a practical skin-saving step. At night, skin is more receptive to care, allowing products to deliver repair focused hydration, skin barrier strengthening, calming recovery time, and next day softness. In harsh winter conditions, this nightly reset helps prevent chronic dryness and sensitivity. Over time, skin becomes less reactive, more supple, and better equipped to handle cold air and indoor heat without constant flaking.

    Moisturiser Type Best For Texture Ideal Use Time
    Barrier Repair Cream Severely dry skin Thick, rich Night
    Hydrating Gel-Cream Combination skin Lightweight Day & Night
    Overnight Mask Flaky winter skin Occlusive Night
    Nourishing Cream Normal to dry skin Creamy Night

    Frequently Asked Questions (FAQs)

    1. Can overnight moisturisers really fix flaky winter skin?

    Yes, consistent overnight use helps repair the skin barrier and reduce flaking.

    2. Should oily skin use winter night creams?

    Yes, lightweight but nourishing formulas work well even for oily skin.

    3. How often should I apply an overnight moisturiser?

    Use it every night during winter for best results.

    4. Can I layer serums under these moisturisers?

    Yes, applying a serum first can enhance hydration and repair benefits.