Category: abook

  • Boys Using Baking Soda for Teeth Whitening — Does This Household Trick Really Work?

    Boys Using Baking Soda for Teeth Whitening — Does This Household Trick Really Work?

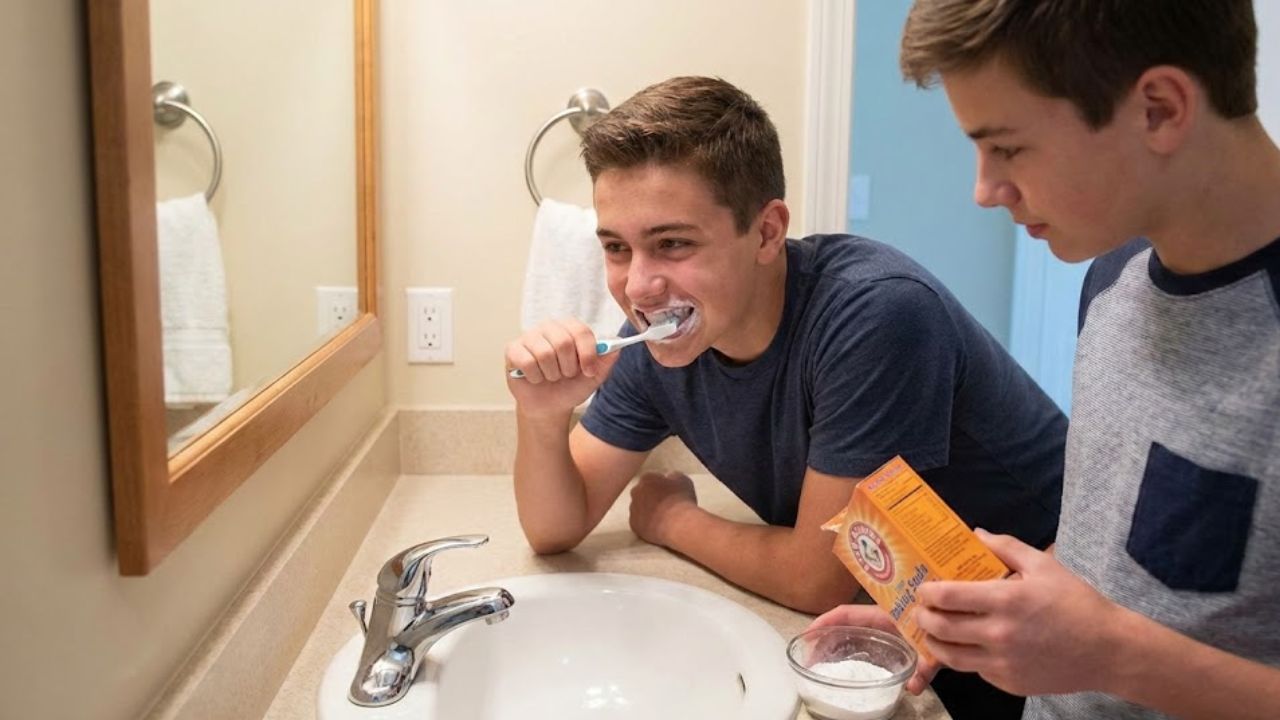
    Boys across India are increasingly curious about using baking soda as a quick, low-cost solution for brighter teeth. Social media clips, family tips, and old household advice often claim that this common kitchen ingredient can remove stains and improve smiles overnight. But does it actually work, or could it harm your teeth in the long run? Understanding how baking soda interacts with tooth enamel is important before trying any DIY whitening trick. This article breaks down the science, real benefits, possible risks, and safer ways to approach teeth whitening at home.

    Boys Using Baking Soda for Teeth Whitening at Home

    Many boys try baking soda because it feels simple and affordable, especially compared to professional whitening treatments. Baking soda is mildly abrasive, which means it can scrub away surface stains caused by tea, coffee, or sugary foods. This is why people notice surface stain removal after a few uses. It also creates an alkaline environment in the mouth, supporting acid neutralizing action that may reduce plaque buildup. However, baking soda does not change the natural color of teeth, so deep enamel whitening is not realistic. Overuse can also lead to enamel wear risk, making teeth sensitive and dull over time.

    Is Baking Soda Teeth Whitening Safe for Boys?

    Safety is where opinions differ, and boys need to be especially careful. Occasional use may be harmless, but frequent brushing with baking soda can gradually erode enamel. Dentists often warn about abrasive brushing damage, especially when combined with hard brushing habits. Once enamel is worn down, it does not grow back, leading to tooth sensitivity issues and higher cavity risk. Baking soda also lacks fluoride, so relying on it alone means losing fluoride protection loss against decay. For teenagers and young adults, whose teeth are still developing, moderation and awareness are key.

    Better Alternatives to Baking Soda Whitening Tricks

    If the goal is a brighter smile, there are safer options than daily baking soda use. Dentists recommend fluoride toothpaste designed for whitening, which balances cleaning and enamel care. Professional cleanings remove tartar and stains without causing long term enamel harm. Whitening strips or gels approved by dental associations offer controlled whitening results when used as directed. Simple habits like rinsing after tea or cola help with stain prevention habits. Most importantly, consistent oral hygiene supports overall dental health, which naturally makes teeth look cleaner and brighter.

    Summary and Practical Analysis

    Baking soda can make teeth look slightly cleaner by removing surface stains, but it is not a miracle whitening solution. Boys in India should understand that brighter teeth do not always mean healthier teeth. Short-term results may feel rewarding, yet repeated use increases enamel erosion concern and sensitivity problems. A balanced approach that combines fluoride toothpaste, proper brushing technique, and occasional professional care offers safer whitening choices. Instead of chasing instant results, focusing on daily habits delivers lasting smile confidence without risking long-term damage.

    Method Effect on Teeth Safety Level
    Baking Soda Removes surface stains Moderate with limited use
    Whitening Toothpaste Gradual brightness improvement High when used daily
    Professional Cleaning Deep stain removal Very high
    Whitening Strips Visible color change High if used correctly

    Frequently Asked Questions (FAQs)

    1. Can boys use baking soda daily for teeth whitening?

    No, daily use can damage enamel and increase tooth sensitivity.

    2. Does baking soda permanently whiten teeth?

    No, it only removes surface stains and does not change natural tooth color.

    3. Is baking soda safe for teenagers?

    Occasional use is safer, but frequent use is not recommended for developing teeth.

    4. What is a safer way to whiten teeth at home?

    Using fluoride whitening toothpaste and maintaining good oral hygiene is safer.

  • Men’s Secret Hair Hack: Onion and Garlic Oil Combo That Boosts Hair Regrowth

    Men’s Secret Hair Hack: Onion and Garlic Oil Combo That Boosts Hair Regrowth

    Hair thinning and slow regrowth are concerns many men in India quietly struggle with, especially due to stress, pollution, and changing lifestyles. Recently, a traditional remedy has resurfaced as a powerful home solution—the onion and garlic oil combination. Known for their strong nutrients and scalp-stimulating properties, these kitchen staples are now being used as a natural hair regrowth hack. When applied correctly, this oil blend supports healthier roots, stronger strands, and improved scalp circulation, making it an appealing option for men seeking visible results without expensive treatments.

    How Onion and Garlic Oil Supports Hair Regrowth

    The onion and garlic oil combo works because both ingredients are rich in sulfur, which is essential for keratin production. Onion helps improve blood flow to hair follicles, while garlic strengthens roots with its antibacterial properties. Together, they create a scalp environment that encourages regrowth and reduces breakage. Men using this oil often notice reduced hair fall within weeks. Key benefits include follicle stimulation, sulfur nourishment, root strengthening, and scalp detox support. Consistent massage allows nutrients to penetrate deeply, helping dormant follicles become active again.

    Why Men Prefer Onion Garlic Oil for Hair Care

    Many men prefer this remedy because it is affordable, natural, and easy to prepare at home. Unlike chemical products, this oil blend does not rely on artificial additives. Garlic’s antioxidants help fight scalp infections, while onion juice improves hair texture over time. Regular use promotes thicker hair growth, reduced hair fall, natural shine boost, and improved scalp health. For men dealing with early bald patches or receding hairlines, this combo offers a practical solution rooted in traditional Indian hair care wisdom.

    How to Use Onion and Garlic Oil Effectively

    To get the best results, warm the oil slightly and massage it gently into the scalp for 10 minutes. Leave it on for at least one hour or overnight before washing with a mild shampoo. Using it two to three times a week is usually enough. Proper application ensures deep oil absorption, better blood circulation, follicle revival process, and long-term regrowth support. Patience is key, as natural remedies work gradually but deliver lasting benefits when used consistently.

    Summary and Practical Insight

    The onion and garlic oil combo stands out as a simple yet effective hair regrowth method for men seeking natural solutions. While results vary depending on genetics and lifestyle, most users experience improved scalp condition and stronger hair over time. This remedy works best when combined with a balanced diet and proper hair hygiene. Its chemical-free approach, budget-friendly solution, traditional remedy value, and consistent usage benefits make it a reliable option for men aiming to restore hair health without aggressive treatments.

    Aspect Details
    Main Ingredients Onion extract and garlic-infused oil
    Recommended Use 2–3 times per week
    Suitable For Men with hair thinning or hair fall
    Visible Results Typically within 4–6 weeks
    Application Time Minimum 1 hour before washing

    Frequently Asked Questions (FAQs)

    1. Is onion and garlic oil safe for all men?

    Yes, but a patch test is recommended for sensitive skin.

    2. How long does it take to see hair regrowth?

    Most men notice changes in hair fall and texture within 4–6 weeks.

    3. Can this oil be used on a dry scalp?

    Yes, it helps moisturize and nourish dry scalp conditions.

    4. Should the oil be applied daily?

    No, applying it two or three times a week is sufficient.

  • Girls Use Papaya and Honey Face Pack for Spotless Skin — Ancient Beauty Formula

    Girls Use Papaya and Honey Face Pack for Spotless Skin — Ancient Beauty Formula

    In India, traditional beauty rituals are making a strong comeback as more girls look for safe, kitchen-based skincare solutions. One such timeless remedy is the papaya and honey face pack, often praised for delivering clear, radiant skin without harsh chemicals. Rooted in ancient beauty practices, this natural combination is easy to prepare and gentle on the skin. With rising awareness around clean beauty and natural ingredients, many women are rediscovering how this simple face pack can support a healthy glow while fitting effortlessly into modern skincare routines.

    Papaya and Honey Face Pack for Natural Skin Glow

    The papaya and honey face pack works beautifully because both ingredients complement each other. Papaya contains natural enzymes that help remove dead skin cells, revealing fresher-looking skin underneath. Honey adds moisture and locks it in, creating a gentle exfoliation effect without irritation. When used consistently, this pack supports raw honey glow and leaves the face feeling soft and refreshed. Many girls prefer it as part of their daily skin care routine because it feels nourishing rather than harsh, making it suitable for regular use at home.

    Ancient Papaya Honey Formula for Spotless Skin

    This age-old beauty formula is often recommended for improving overall complexion. Papaya helps promote even skin tone by gently clearing surface impurities, while honey supports dark spot fade over time. Together, they provide a noticeable hydration boost that keeps skin from looking dull or tired. Since both ingredients are antioxidant rich, they also help protect the skin from everyday environmental stress. Girls across India value this face pack for delivering visible results without relying on expensive cosmetic products.

    Why Girls Trust Papaya and Honey Face Pack at Home

    One reason this face pack remains popular is how easy it is to prepare and apply. It feels like a simple home ritual that doesn’t require special tools or salon visits. Many users find it sensitive skin friendly, especially when used once or twice a week. It’s perfect for weekend pampering after a long week and fits well as a budget beauty hack for students and working women alike. The comfort and familiarity of natural ingredients build long-term trust.

    Summary or Analysis

    The papaya and honey face pack continues to stand out because it blends tradition with practicality. Backed by ancient remedy wisdom, it proves that skincare doesn’t need to be complicated. Girls who use it regularly often notice consistent results when they stick to a routine. With minimal ingredients and easy preparation, it supports a more holistic skincare approach that aligns well with today’s preference for natural beauty solutions.

    Skin Benefit Main Ingredient How It Helps Recommended Use
    Brightening Papaya Removes dead skin buildup Once a week
    Moisturising Honey Locks in natural moisture Twice a week
    Spot reduction Papaya + Honey Improves overall complexion Weekly
    Skin soothing Honey Calms dryness and irritation As needed

    Frequently Asked Questions (FAQs)

    1. How often should this face pack be used?

    Using it once or twice a week is generally sufficient for most skin types.

    2. Is papaya and honey face pack suitable for oily skin?

    Yes, it can be used on oily skin when applied in moderate quantity.

    3. Can sensitive skin users try this face pack?

    A patch test is recommended before full application for sensitive skin.

    4. How long should the pack stay on the face?

    Leaving it on for 10–15 minutes is usually enough before rinsing.

  • Men Using Green Tea Rinse for Hair Loss — Science Behind This Viral Remedy

    Men Using Green Tea Rinse for Hair Loss — Science Behind This Viral Remedy

    Hair loss is a growing concern among men in India, and social media has recently spotlighted a simple, affordable solution: the green tea hair rinse. Known for its health benefits when consumed, green tea is now being used externally as a scalp treatment. Many men claim reduced hair fall and improved scalp health after regular use. This viral remedy stands out because it blends traditional habits with modern curiosity, prompting questions about whether green tea can truly support hair strength, slow thinning, and improve overall hair appearance without harsh chemicals.

    How Green Tea Rinse Helps Men Tackle Hair Loss

    The popularity of green tea rinse for men largely comes from its natural compounds that support scalp health. Green tea contains antioxidants that may help reduce scalp stress, a factor linked to excessive hair fall. When used as a rinse, it can cleanse the scalp gently without stripping natural oils. Men who use it regularly report reduced hair shedding, a calmer scalp, and less itchiness. Its mild nature makes it suitable for frequent use, supporting scalp circulation support while keeping follicles clean. Over time, this routine may encourage healthier hair roots and create conditions that favor thicker-looking hair without relying on strong chemical products.

    Science Behind Green Tea Rinse for Hair Growth

    The science angle behind green tea rinses focuses on compounds like catechins, which are studied for their role in scalp balance. Research suggests these compounds may help manage hormones linked to hair thinning. While it is not a medical cure, green tea can act as a supportive care step by offering antioxidant scalp care. It may help reduce buildup that weakens follicles and supports natural follicle strength. Men dealing with early-stage thinning often see it as a low-risk addition to their routine, especially because it promotes gentle scalp detox without causing dryness or irritation common with harsher treatments.

    How Men Are Using Green Tea Rinse Correctly

    Using a green tea rinse is simple, but consistency matters. Most men brew fresh green tea, let it cool, and pour it over the scalp after shampooing. This allows nutrients to stay in contact with the scalp for a few minutes before rinsing lightly or leaving it in. Regular users say this habit fits easily into weekly routines and supports oil balance control. Over weeks, some notice improved hair texture and less breakage. While results vary, correct usage combined with patience can make this rinse a helpful addition for men seeking chemical-free hair care.

    Is Green Tea Rinse Worth Trying for Men?

    Green tea rinse works best when viewed as a supportive habit rather than a miracle fix. For men in India facing stress, pollution, and hard water issues, it offers a simple way to improve scalp conditions naturally. It supports daily scalp hygiene and may slow visible thinning when paired with a balanced lifestyle. However, genetics and medical conditions still play a major role in hair loss. Men with advanced hair fall should see it as a complementary step alongside expert advice. As a low-cost, accessible option, it remains a sensible experiment for those prioritizing long-term hair wellness.

    Aspect Green Tea Rinse Insight
    Main Benefit Supports scalp health naturally
    Best For Early hair thinning in men
    Usage Frequency 2–3 times per week
    Cost Factor Low and affordable
    Expected Results Gradual improvement over weeks

    Frequently Asked Questions (FAQs)

    1. Can green tea rinse stop hair loss completely?

    No, it helps support scalp health but cannot fully stop genetic hair loss.

    2. How often should men use green tea rinse?

    Most men use it two to three times a week for best results.

    3. Is green tea rinse safe for all hair types?

    Yes, it is generally safe for most hair and scalp types.

    4. When can results be noticed?

    Visible changes usually appear after several weeks of consistent use.

  • Boys Massage Aloe Vera and Vitamin E Oil for Acne-Free Skin — Results in 10 Days

    Boys Massage Aloe Vera and Vitamin E Oil for Acne-Free Skin — Results in 10 Days

    In India, more boys are turning to simple, natural skincare routines to manage acne without harsh chemicals. One method gaining attention is massaging aloe vera gel mixed with vitamin E oil, a combination known for calming irritated skin and supporting healing. This routine fits well into daily life, especially for teenagers and young men dealing with breakouts caused by sweat, pollution, and hormonal changes. When used consistently and correctly, this natural blend is believed to show visible improvement within about 10 days, making it a practical option for clearer, healthier-looking skin.

    Boys Using Aloe Vera and Vitamin E Oil for Acne Control

    Aloe vera is widely valued for its soothing and antibacterial nature, while vitamin E oil supports skin repair and moisture balance. When boys massage this blend gently into clean skin, it helps reduce redness and calm active pimples without clogging pores. Regular use supports calmer skin texture, improves oil balance support, and encourages natural healing process. Unlike harsh acne products, this routine feels light and comfortable, especially in humid Indian weather. Over time, the massage action itself boosts circulation, helping nutrients absorb better and promoting a more even skin tone.

    Aloe Vera Massage Routine with Vitamin E Oil for Clear Skin

    The routine is simple but consistency matters. Most boys apply the mixture at night on a freshly washed face, allowing it to work overnight. Aloe vera hydrates without heaviness, while vitamin E seals in moisture and repairs damaged skin barriers. This balance helps reduce overnight skin recovery, supports gentle pore care, and minimizes new breakout chances. Many prefer using this routine daily for the first 10 days, then reducing frequency once acne calms, making it easy to maintain alongside school or work schedules.

    Results Boys See After 10 Days of Aloe Vera and Vitamin E Use

    Within about 10 days, boys often notice fewer active pimples and a smoother skin feel. While results vary by skin type, common changes include reduced inflammation and quicker fading of acne marks. The blend encourages visible acne reduction, promotes skin barrier strength, and enhances healthy glow signs. It is not an instant cure, but a steady improvement that feels natural and sustainable. Pairing this routine with good hygiene and a balanced diet can further improve outcomes.

    Summary and Skin Care Analysis

    This aloe vera and vitamin E oil massage works best as a supportive, long-term habit rather than a quick fix. Its strength lies in being gentle, affordable, and easy to follow. For Indian boys exposed to dust, heat, and daily stress, this routine offers simple skincare habit, supports long term clarity, and encourages confidence building results. While severe acne may need medical advice, this natural method is a smart first step toward healthier skin.

    Aspect Details
    Main Ingredients Aloe vera gel and vitamin E oil
    Application Time Night, before sleep
    Expected Results Reduction in acne and redness
    Suitable Skin Types Normal, oily, and combination skin
    Recommended Duration Daily use for 10 days

    Frequently Asked Questions (FAQs)

    1. Is this routine safe for teenage boys?

    Yes, it is generally safe when used on clean skin and patch-tested first.

    2. Can oily skin boys use aloe vera and vitamin E oil?

    Yes, using a small amount helps balance oil without clogging pores.

    3. Will this remove acne scars completely?

    It may lighten marks over time but deep scars need professional treatment.

    4. Can this routine be used daily?

    Yes, daily use for up to 10 days is commonly recommended.

  • A Calming 6 Minute Morning Green Tea Ritual That Boosts Metabolism and Focus

    A Calming 6 Minute Morning Green Tea Ritual That Boosts Metabolism and Focus

    The kettle turns on before the sun has fully risen. The house is quiet in that space between night and day. You stand barefoot in the kitchen with one hand on the cool counter and the other holding your favorite mug. Outside the world is slowly waking with a pale blue glow at the window & leaves rustling as a bird sings its first note. In this brief in-between moment you have exactly six minutes to create something simple & beautiful: your morning green tea ritual.

    The Gentle Power of Six Unhurried Minutes

    In busy mornings filled with phone alerts, six minutes might seem like nothing at all. It barely gives you enough time to check your messages. However, six minutes used with purpose becomes something more meaningful. When you spend that time with hot water & tea while paying full attention it can change how your whole day unfolds. This practice does not require extreme willpower or complicated schedules. You will not need cold showers or harsh wake-up calls. The ritual involves only you, water and tea working together to gently wake up your body and mind in a way that feels natural but powerful. The benefits do not make themselves obvious right away. They show up quietly as small improvements like a steadier pulse sharper thinking and energy that builds gradually instead of hitting you all at once. As time passes, these small changes start to influence how your days feel and flow.

    Steam, Scent, and the Science Within the Leaves

    The kettle hums and then grows louder before it settles down. You wait for the water to calm because green tea works better with warmth rather than boiling heat. Steam rises up and the sound gets softer as the temperature reaches the right level. You pour the water over the leaves. These might be flat sencha blades or curled dragonwell or fine matcha powder. The aroma comes up first. It smells green & gentle with a faint sweetness and hints of wet stone and spring leaves. You breathe it in naturally. Inside the cup the catechins like EGCG begin their work & gently support your metabolism. A small amount of caffeine starts to increase your alertness but soon gets balanced by L-theanine which eases your nervous system into calm focus. Together they create an unusual combination where you feel awake yet relaxed and focused without tension. This explains why the ritual matters. It gives space for chemistry and mindfulness to develop together.

    The Subtle Ritual of Preparing Your Cup

    Before you drink there is a moment of getting ready. You pick a cup that seems right for the moment. It might be made of thick clay or thin porcelain. Perhaps it has a small chip but you know it well. You feel how heavy it is and notice the warmth spreading into your palms. You add the tea by measuring out a teaspoon of loose leaves or picking a bag or scooping some matcha powder. The quiet sound of leaves landing in the cup feels calming and helps you focus. You pour hot water at a steady pace. The leaves move in circles and drop down before floating back up. They open slowly as if they are waking up from a long rest. You take a moment to just look at what is happening. You let it sit without feeling impatient. This small break becomes the first calm breath you take all day. You rest against the kitchen counter and pay attention to the solid floor under your feet. You sense that something about the air around you has shifted. Time keeps going but it does not feel like something working against you anymore.

    A Six-Minute Morning Flow That Fits Real Life

    This ritual doesn’t demand extra time—it transforms time that already exists.

    Time Window Your Action The Benefit You Feel
    0–1 Minute Heat the water, pick your favorite mug, prepare the tea leaves or bag. Creates intention and gently signals your body that the day has begun with care.
    1–3 Minutes Pour the hot water and allow the tea to steep. Pause, breathe, and observe the morning light. A brief mindful pause that helps your nervous system move into calm awareness.
    3–4 Minutes Remove the tea leaves or bag and cradle the warm cup in your hands. Soothing physical sensations that ground you firmly in the present moment.
    4–6 Minutes Drink slowly without distractions. Focus on flavor, breath, and stillness. Balanced energy and mental clarity, setting a steady tone for the day ahead.

    Calm Energy That Feels Different from Coffee

    Green tea delivers energy in a gentler way than coffee. Instead of hitting you all at once it builds gradually and settles in smoothly. This happens because green tea contains both caffeine and L-theanine working together. The caffeine wakes you up while the L-theanine keeps you calm. You get steady energy that lasts without the jittery feeling or the afternoon slump. Starting your morning with green tea helps you think more clearly. Your tasks seem less overwhelming. You handle situations with more control & less stress.

    Gently Waking Your Metabolism

    Green tea gives you energy in a softer way compared to coffee. The energy rises slowly and feels smooth instead of sudden. This works because green tea has caffeine and L-theanine that team up together. The caffeine makes you alert while the L-theanine keeps you relaxed. You experience consistent energy that continues without shaking or crashing later in the day. Drinking green tea in the morning helps your mind work better. Your work feels easier to manage. You deal with problems more calmly and with less tension.

    Creating a Small Personal Sanctuary

    Some mornings feel overwhelming & rushed. That is exactly when this simple routine becomes most valuable. You should wake up before checking your phone. The sound of the kettle should be the first thing you hear each day. Stand near the window and wait while your tea brews. Take that first sip slowly and actually taste it instead of gulping it down. After doing this regularly it transforms into something you look forward to each morning. It becomes your personal refuge built from hot tea & quiet moments. You will not find perfect peace but you will find yourself fully present in that moment.

    How Six Minutes Echo Through the Day

    The real effects of the ritual become clear as time passes. Your energy levels remain stable throughout the day. The urge to snack or eat impulsively becomes less intense. You find yourself able to stay calm in situations that would normally frustrate you. If you have a difficult day the ritual will be there for you the next morning. You can boil water in the kettle again. The tea leaves will release their flavor as they sit in hot water. Sunlight will come through your window once more. What the ritual offers never changes: six minutes to start fresh each day.

  • The Best Natural Method to Unclog a Kitchen Sink Drain Without Harsh Chemicals

    The Best Natural Method to Unclog a Kitchen Sink Drain Without Harsh Chemicals

    The first time it happened you were probably cooking. The windows were steamed up and garlic sat on the cutting board while your favorite song played. You turned to rinse the pan and expected the water to drain away but instead it rose slowly and stubbornly up to your wrist. Bits of parsley floated on top. The kitchen became strangely quiet the way a room does when something small but important goes wrong. You jiggled the faucet handle thinking it might help. You poked at the drain with a spoon. You flipped the garbage disposal switch on and off repeatedly. Nothing worked. The water just sat there like a murky little pond where your sink used to be.

    What’s Really Happening Beneath Your Kitchen Sink

    Most days we treat the kitchen sink like it can handle anything. It takes coffee grounds & soup leftovers & pasta water and grease without much trouble. But down in the curved part of the pipes something is happening that we don’t notice until the water stops draining. Think about what your drain looks like after you finish cooking dinner. There is a thin layer of oil coating the inside of the pipe. Tiny bits of food stick to the walls. Soap residue settles into every corner. Hot water seems like it should wash everything away but it cools down as it moves through the pipes. When hot grease cools down it turns solid.

    Layer after layer builds up on the inside of the pipe and catches more debris. Coffee grounds act like sand & vegetable peels get stuck and maybe some eggshells add to the mess. Eventually your pipes stop looking like clean tubes and start looking like blocked passages. Most people grab a bottle of chemical drain cleaner when this happens. The bottle has warning labels all over it & smells like it belongs in a laboratory instead of a home. You pour it down the drain & wait and hope it works. The water might start draining again for a little while. But those harsh chemicals do more than just remove the blockage.

    Over time they can damage your pipes and eat away at metal and irritate your skin and lungs. A simple clog can turn into a costly plumbing repair. Plumbers understand this problem well. They also know something that most homeowners don’t realize. You don’t need that chemical bottle in most cases. The best natural way to unclog a kitchen sink is surprisingly simple and uses things you probably have in your kitchen already. It doesn’t look fancy and no company spends money advertising it. But it works reliably without filling your house with toxic fumes.

    The Surprisingly Simple Fix Already Sitting in Your Kitchen

    Some secret methods sound more like folklore than practical advice. Pour cola down the drain or sacrifice a lemon at midnight or chant to the plumbing gods. This one is different. It’s the kind of common sense solution that your grandmother might have used without needing a label or a brand name. It starts with heat. Real heat. Before you reach for baking soda or vinegar or any other magic ingredient the first and most underrated hero is boiling water.

    Not hot tap water or pretty warm water but truly boiling water with big rolling bubbles that sound like a tiny storm in your saucepan. This alone can break up a surprising number of clogs that are built from grease and soap. Think of it as a reset button for the soft fatty buildup inside your pipes. But when that’s not enough & often it isn’t the most powerful natural non toxic combo is this. Baking soda and vinegar and time. Not just tossed in randomly but used in a deliberate little ritual that lets them do their very quiet work.

    A Gentle Three-Step Drain Method That Actually Works’

    The method seems too gentle to work well if you are used to thinking that unclogging requires harsh chemicals and force. Think of it more like cleaning a cast iron pan rather than using a sandblaster. You do not need aggressive action but rather the correct steps done in order.

    Step Action to Take Purpose & Benefit
    1. Initial Hot Water Pour Carefully pour 1–2 full kettles of boiling water directly into the drain. The intense heat helps liquefy built-up grease and soften soap residue stuck inside the pipes.
    2. Baking Soda and Vinegar Treatment Add ½ cup baking soda first, followed by 1 cup warm vinegar. Cover the drain opening. The bubbling reaction works to lift trapped debris and break down the sticky film coating the pipe walls.
    3. Final Hot Water Rinse Wait 15–20 minutes, then flush the drain again with boiling water. Clears away loosened buildup and helps restore a smoother, faster water flow.

    This method looks simple because it actually is simple. However that simplicity can be misleading. When you do it correctly this approach is the best option available for clearing kitchen drains that are mildly or moderately clogged. It works without damaging your pipes or creating a dangerous chemical situation in your home.

    The Correct Way to Clear a Sink

    Before you start look down into your drain. If you see a thick layer of food scraps sitting on top of the strainer or drain cover remove as much as you can by hand first. Gloves are recommended. This is not the time to be squeamish because you are about to get familiar with the underside of your own kitchen.

    Step 1: Boiling Water Twice Bring a full kettle or large pot of water to a rolling boil. Slowly pour about half of it directly down the drain. Pour it slowly so it can soak & soften the buildup. Then wait a minute or two. Listen carefully. Sometimes you can actually hear the faint gurgle of things loosening. Pour the rest of the boiling water down. If your drain was only slightly clogged this alone may solve it. Run the tap and see if the water now flows freely.If it still pools then keep going.

    Step 2: Baking Soda Measure about half a cup of baking soda and gently sprinkle it straight into the drain. If your strainer is removable take it out. Try to get as much of the powder past any visible metal grates so it falls deeper inside. Baking soda looks unimpressive but it works well. It is mildly abrasive which helps scrub the inner surfaces and it neutralizes odors which is helpful for drains that have started to smell bad.

    Step 3: Warmed Vinegar Here is the part most people rush. Instead of grabbing cold vinegar from the pantry & dumping it in take a moment to warm it slightly first. Not boiling but just pleasantly warm. You can do this by placing a cup of vinegar in a microwave safe container and heating it for 20 to 30 seconds or setting the cup in a bowl of hot water. Warm vinegar reacts more actively with the baking soda and helps maintain some heat inside the drain.Slowly pour about one cup of this warm vinegar into the drain where the baking soda is waiting. Immediately there will be a soft hiss and fizz. The reaction between the alkaline baking soda and the acidic vinegar creates carbon dioxide bubbles that help lift & break up the film clinging to the inner walls. Now cover the drain. You can use a drain plug or a small plate or even an upside down bowl that sits snugly. The goal is to keep as much of that fizzing action down in the pipes as possible.

    Step 4: Let Time Work Walk away. Give it 15 to 20 minutes of undisturbed time. This waiting can feel strange but somewhere below your feet that quiet fizz is doing its job. It is eating away at buildup and loosening stubborn films and nudging small clogs toward surrender. While you wait you might notice the absence of the usual harsh chemical smell. Instead there is just the faint clean tang of vinegar.If anything leaks a bit back into the sink it is harmless enough that you could touch it without your skin protesting.

    Step 5: The Final Flush Boil another kettle or pot of water. Remove the drain cover and slowly pour all of that boiling water down. Think of this as a river washing through a newly loosened canyon and carrying away the debris. You may hear another series of sounds from the pipes. Now test it. Turn on the tap. Watch the water. Does it swirl and disappear smoothly? Listen for the pace of the drain. It should be quick and unhurried. If there is still some hesitation you can repeat the whole process once more. Most mild clogs give up after the second round.

    When a Stubborn Clog Needs a Bit of Extra Help

    Sometimes a clog is more than just soft buildup. Maybe someone sent a lemon peel down the drain or a large chunk of potato skin wedged itself in the wrong spot. In those moments even the best natural solutions need help from simple manual pressure. If your sink has two basins you should plug one side completely with a good stopper or a damp cloth pressed firmly in place. Fill the other side until there are a few inches of warm water above the drain.

    Then use a cup plunger which is the small flat-bottomed kind meant for sinks and not toilets. Place it directly over the drain and start plunging with steady rhythmic pushes. You want firm deliberate strokes that push and pull water against the clog rather than frantic jabs. What the baking soda and vinegar loosen can be nudged free by the plunger. You are not trying to pulverize anything but rather persuade it to move. Often you will feel the moment of victory when resistance vanishes and the water suddenly rushes away as if the sink has let out a breath it was holding. In many homes this simple combination of boiling water with baking soda and vinegar followed by plunging only if needed is enough to handle most kitchen sink clogs without using any toxic chemicals.

    The Plumbing Truth Most Professionals Don’t Emphasize

    Plumbers are not villains. Many of them will tell you to avoid chemical drain cleaners if you ask them. They have seen what those products do to pipes after years of use. The PVC gets soft & the metal joints corrode. Rubber seals fall apart sooner than they should. They have also met homeowners who mixed chemical cleaners by accident and learned too late that some combinations create dangerous fumes. What plumbers do not often say out loud is that many clogs are not that serious. They are not deep in the city pipes but right there in the first curve under your sink. With a towel and a bucket and some courage you could remove the P-trap under the sink yourself & rinse out the smelly sludge and put it back. But that sounds messy and scary so most people do not try it.

    The natural method works well for this situation. It is strong enough for everyday clogs and gentle enough not to damage your plumbing. It is simple enough to do without special tools. It does not replace a professional when you truly need one. That includes times when multiple drains in your house are backing up at once or there is a deep blockage in the main line. But it does mean you do not have to panic every time the sink starts to drain slowly. The other benefit plumbers do not rush to mention is this. Every time you clear a clog yourself you learn more about your home. You notice what you have been washing down the sink. You learn that grease really does harden like candle wax. You realize that a little maintenance can prevent those Saturday morning emergency calls.

    Daily Kitchen Habits That Keep Drains Clear Long-Term

    After your sink drains properly again you might want to forget about it and move on. The problem seems solved. But right now you understand something important: the stuff you rinse away doesn’t actually disappear. A few small habits can help you avoid clogs before they happen: Don’t pour grease down the drain: Let cooking oils and fats cool down in a container & throw them in the garbage instead of washing them down the sink where they turn solid. Remove food scraps first: Scrape your plates into the trash or compost before rinsing them. Garbage disposals seem handy but they can be hard on your pipes. Get a sink strainer: A basic mesh strainer catches pasta and rice and small food bits that tend to expand and create blockages.

    Do monthly maintenance: Once each month pour boiling water & baking soda & vinegar down your drain as a preventive measure instead of waiting for a problem. Rinse with hot water after greasy dishes: When you finish washing oily pots and pans pour a kettle of very hot water down the drain to prevent grease from building up. These habits are simple & easy to follow. You don’t need to buy special products or change your routine completely. They are just basic ways to take care of your plumbing. Over time these small actions mean fewer blockages & less need for harsh chemicals and fewer expensive plumber visits.

    Clear Warning Signs It’s Time to Call a Professional Plumber

    Of course not every plumbing problem can be fixed with a kettle and baking soda. Sometimes water backs up in several places at once like the kitchen sink & bathtub or the toilet starts making strange gurgling sounds. That means you’re dealing with something more serious than a simple kitchen clog. The problem is deeper in your main line where vinegar & baking soda can’t reach. Here are the clear signs that you need to call a professional plumber: The clog remains stuck after you’ve tried the natural method & plunging two or three times. Several drains in your house are slow or backing up together. You notice strong sewage smells coming from the sink or other drains. Water comes back up into the sink when you run other appliances like the dishwasher or washing machine.

    When these things happen a plumber’s specialized equipment like a long drain snake or hydro-jetter or inspection camera becomes essential rather than optional. But you’ve still done something valuable by not adding harsh chemicals to pipes that might already be old or damaged. The next time your sink drains slowly you’ll know exactly what to do. You’ll heat up the kettle and grab the baking soda and vinegar. You’ll hear the gentle hiss of bubbles working in the drain. The best natural method for unclogging your kitchen sink isn’t some secret product you need to hunt down at the store. It’s just a simple process and some basic kitchen knowledge combined with understanding that gentle solutions can work just as well as harsh ones.

  • Optical Illusion Challenge: Find 419 Hidden Among 416 in 7 Seconds

    Optical Illusion Challenge: Find 419 Hidden Among 416 in 7 Seconds

    Optical illusion challenges are getting more popular because they test how fast and well our brain handles what we see. They might seem easy but adding a timer makes them much harder. This 7 second challenge asks you to find the number 419 hidden in a grid filled with 416s. Only people who can focus well and observe carefully tend to find it quickly enough. When you first look at the image it seems repetitive and dull. The same number appears in rows everywhere and it seems impossible that anything different could be there. But that is how this illusion works. It uses repetition to make your brain overlook a small detail that matters.

    Why Optical Illusions Easily Confuse the Brain

    Optical illusions work because the human brain is designed to save time and energy. Instead of examining every small detail, it looks for familiar patterns and fills in gaps automatically. This shortcut helps us react faster in daily life, but it can also mislead us when visual information is repetitive.

    When the same number appears over and over, the brain quickly assumes all of them are identical. After a short while, it stops checking each one carefully. That mental shortcut is exactly why the hidden number becomes difficult to notice. Even if your eyes briefly see it, your brain may not process it immediately.

    This illusion proves that perception depends not only on eyesight but also on expectations and learned mental habits.

    Understanding the 419 Among 416 Challenge

    In this visual puzzle, nearly every number in the grid is 416. Hidden somewhere in the pattern is a single 419. The difference is very small, and when you are under time pressure, tiny variations are easy to overlook.

    The digits 6 and 9 are especially tricky because of their similar shapes. Both are curved and closed, so when scanned quickly, the brain often treats them as the same. Surrounded by dozens of identical numbers, your mind assumes uniformity unless you slow down enough to notice the change.

    This is why the puzzle feels frustrating. The answer is visible, yet it seems invisible at the same time.

    Why the 7 Second Time Limit Makes It Harder

    Without a time limit, most people would eventually find the odd number. The real challenge comes from the strict 7 second rule. Time pressure forces the brain to rely on fast pattern recognition instead of careful analysis.

    When rushed, the mind tends to see what it expects to see. Since it expects 416, it continues seeing 416 even when something different appears. This perfectly demonstrates how expectations shape perception.

    The pressure of the ticking clock increases stress, and stress reduces accuracy. Together, these factors make the illusion far more difficult.

    Smart Techniques to Spot 419 More Quicklya

    Solving this puzzle is less about raw speed and more about using the right strategy. Reading each number individually takes too long. A better approach is to focus only on the shape of the last digit.

    The number 9 has a tighter loop and a longer tail compared to 6. Training your eyes to scan for that specific shape instead of reading the full number saves time and reduces mental strain.

    Scanning in a structured way also helps. Move row by row or column by column. Random eye movement causes you to skip details and miss differences.

    Remaining calm is equally important. Panic leads to rushed scanning, while a steady approach improves accuracy.

    What Finding 419 Reveals About Your Focus

    If you managed to find the hidden number within 7 seconds, it suggests strong attention to detail and quick visual processing. Your brain can break repetitive patterns and detect small changes even under pressure.

    If you did not find it in time, that does not reflect poor intelligence. Optical illusions are specifically designed to exploit normal brain behavior. With practice, most people improve rapidly as they learn better scanning techniques.

    These puzzles measure perception, not intelligence.

    Common Errors People Often Make

    One frequent mistake is concentrating only on the center of the grid. Puzzle creators often hide the answer slightly off-center to catch viewers by surprise.

    Another error is expecting the different number to stand out clearly. In most optical illusions, the difference is deliberately subtle. Waiting for something obvious makes it easier to miss.

    Some people also give up too quickly. Just one extra second of calm scanning can completely change the result.

    Clear Explanation of the Solution

    If you could not locate the hidden number, here is the solution. The number 419 appears in the second column, third row from the bottom. It is the only number where the final digit is a 9 instead of a 6.

    Once you know its position, the difference becomes obvious. This sudden clarity is common with optical illusions. What once felt impossible suddenly looks simple.

    Why Practicing Optical Illusions Is Beneficial

    Regularly solving optical illusion puzzles can improve focus, patience, and visual awareness. They train the brain to slow down automatic assumptions and pay closer attention to details.

    These challenges also serve as effective mental breaks. Spending a minute on a puzzle can refresh your mind and improve concentration when you return to other tasks.

    Over time, you may notice faster reactions and sharper attention in everyday situations.

    Final Thoughts on the Eagle Eyes Challenge

    This 7 second optical illusion demonstrates how easily repetition can trick the brain. Spotting 419 among many 416s is not just about eyesight. It requires focus, strategy, and staying calm under pressure.

    Whether you found it immediately or needed the solution, the challenge still achieved its goal. It tested your perception, sharpened your attention, and gave your brain a quick workout. With practice, puzzles like this become easier and more enjoyable.

  • Optical Illusion Eye Test: Locate 37 and 75 Among 73s in 7 Seconds

    Optical Illusion Eye Test: Locate 37 and 75 Among 73s in 7 Seconds

    Optical illusion eye tests offer more than simple entertainment online. They train your brain to handle visual data more quickly and measure your attention span along with your ability to spot patterns. This challenge appears straightforward when you first look at it but it can trick people who usually notice details well. You need to find the numbers 37 and 75 that are hiding in a field full of 73s within seven seconds. It seems manageable until you give it a shot. This illusion works because your brain prefers what it already knows. When you look at the same number over and over your mind begins to skim rather than really look. The puzzle takes advantage of this tendency on purpose. The numbers 73 37, & 75 all have similar shapes and curves so telling them apart becomes difficult when you have limited time.

    Why This Optical Illusion Confuses the Brain

    The human visual system is designed to recognize patterns quickly so the brain can understand its surroundings without effort. In this illusion, the constant repetition of the number 73 creates a steady visual rhythm. Once your brain adapts to that rhythm, it automatically assumes everything follows the same pattern. As a result, the unusual numbers stop standing out and instead blend into the background, even though they are clearly different.

    Selective attention also plays a major role. When your mind expects to see only one number, your eyes may glide over differences without fully processing them. The number 37 reverses digit order, while 75 alters spacing and shape. However, when these are hidden among many similar-looking 73s, the brain filters them out unless you deliberately slow your visual scanning.

    How to Find 37 and 75 Within the Time Limit

    Success in this visual challenge depends more on strategy than speed. Rather than scanning the image randomly, break it into smaller sections. Move your eyes systematically—either row by row or column by column. This structured approach reduces cognitive overload and helps maintain focus.

    Another effective method is to focus on shape instead of reading numbers. The curve of the digit 5 is noticeably different from the shape of a 3, while the digit 7 usually has sharper angles. Let your eyes notice these visual cues naturally. Avoid silently reading each number, as that slows reaction time and increases confusion.

    If you feel stuck, relax your gaze for a moment. A softer focus often allows hidden differences to stand out without forcing concentration.

    What Your Result Reveals About Observation Skills

    Finding both 37 and 75 within seven seconds suggests strong visual discrimination and fast mental processing. People who perform well in these challenges often have sharp attention to detail and can manage visual pressure effectively.

    Taking longer is completely normal and not a sign of low intelligence. Optical illusions do not measure overall ability; they reflect how your brain processes visual information at that moment. Factors like tiredness, stress, or distractions can affect performance. Regular practice with similar puzzles can significantly improve both speed and accuracy over time.

    Why Optical Illusion Challenges Are Popular Online

    These puzzles have gained popularity because they deliver instant engagement. They are quick, entertaining, and slightly competitive, making them perfect for sharing with friends or testing reaction times.

    Beyond fun, optical illusion tests support mental fitness. They promote focus, visual awareness, and mindfulness. Spending even a few minutes a day on such challenges can sharpen perception and improve concentration in everyday activities.

    Can You Try Again and Improve Your Speed?

    Yes, and improvement often happens quickly. Once you understand how the illusion works, your brain adapts. On a second attempt, the hidden numbers may appear almost immediately. This rapid learning highlights the brain’s flexibility and ability to adjust.

    You can increase the challenge by setting stricter time limits or trying similar puzzles using letters, symbols, or faces. Regular practice is the key to faster recognition and stronger visual awareness.

  • The 7 Habits I Stopped at 55 to Become My Strongest Self and What I Do Instead

    The 7 Habits I Stopped at 55 to Become My Strongest Self and What I Do Instead

    There are some things you probably stopped doing as you got older. Staying out until 5am & wearing sky-high heels to work every day are good examples. The same applies to exercise & nutrition habits you developed when you first started training. Not all of them should stick with you forever. Deborah Moore is a 55-year-old fitness coach from Canada who says she only became the strongest she had ever been when she quit seven things. She wrote on Instagram that she never saw herself getting this strong. She was doing all the things that many people likely do. She tried to eat as little as possible while still getting through her workouts. Her value was attached to the size of jeans she fit into and whether she was as skinny as the women she saw around her. She never seemed to be skinny enough. Food was a minefield & she never thought she would break free of the body image prison she had created for herself. Then CrossFit and the barbell entered her life & everything changed. She is not sure whether it was reaching her 50s and caring less about what others thought or being tired of the exhausting negative cycle. Either way she finally decided to trust the process and trust the food to nourish her. She also decided to trust her body to perform.

    Letting Go of Restrictive Rules Changed Everything

    “The funny thing is, I actually believe I look better now after letting go of all those unrealistic rules I once forced on myself. One thing became very clear over time: choosing strength over skinniness was the biggest mindset shift I ever made—and it didn’t happen overnight. It was a genuine learning process.”

    From Chasing Skinny to Chasing Strength

    Instead of obsessing over the number on the scale, I became obsessed with how much weight I could move on the barbell. At one point, I weighed under 120lbs (54kg), had less than 15% body fat, and wore a US size 0–2 (roughly a UK size 4–6). Today, I’m about 10lbs (4.5kg) heavier, with around 5% more body fat, and I wear a US size 4–6 (UK size 8–10). But what truly matters to me now is the fact that I can lift over 100lbs on the barbell.

    Eating to Perform, Not to Shrink

    I also stopped under-eating and started fuelling my body for performance. I now eat roughly 2,300 calories a day, aiming for around 155g of protein, and occasionally track my macros. While it’s true that training fasted can increase fat oxidation, fat loss ultimately comes down to being in an overall calorie deficit.

    Why Fasted Workouts Didn’t Work for Me

    Training fasted while eating at maintenance—or above—throughout the day doesn’t lead to fat loss and can even result in fat gain. What often happens instead is that properly fuelling before workouts allows you to train harder or longer, which increases total calorie expenditure. That added intensity is also far more effective for building muscle than pushing through a low-energy, half-hearted session.

    Discovering Strength Through CrossFit at 50

    Today, Deborah trains CrossFit several times a week and credits it with completely transforming her life. “When I turned 50 and picked up a barbell for the first time, everything changed,” she says. “My self-confidence, my relationship with my body, and my approach to nutrition had been a mess for most of my adult life—and that’s putting it lightly.”