Author: admin

  • Can You Quickly Identify the 3 Hidden Differences in This Boy and Dog Picture?

    Can You Quickly Identify the 3 Hidden Differences in This Boy and Dog Picture?

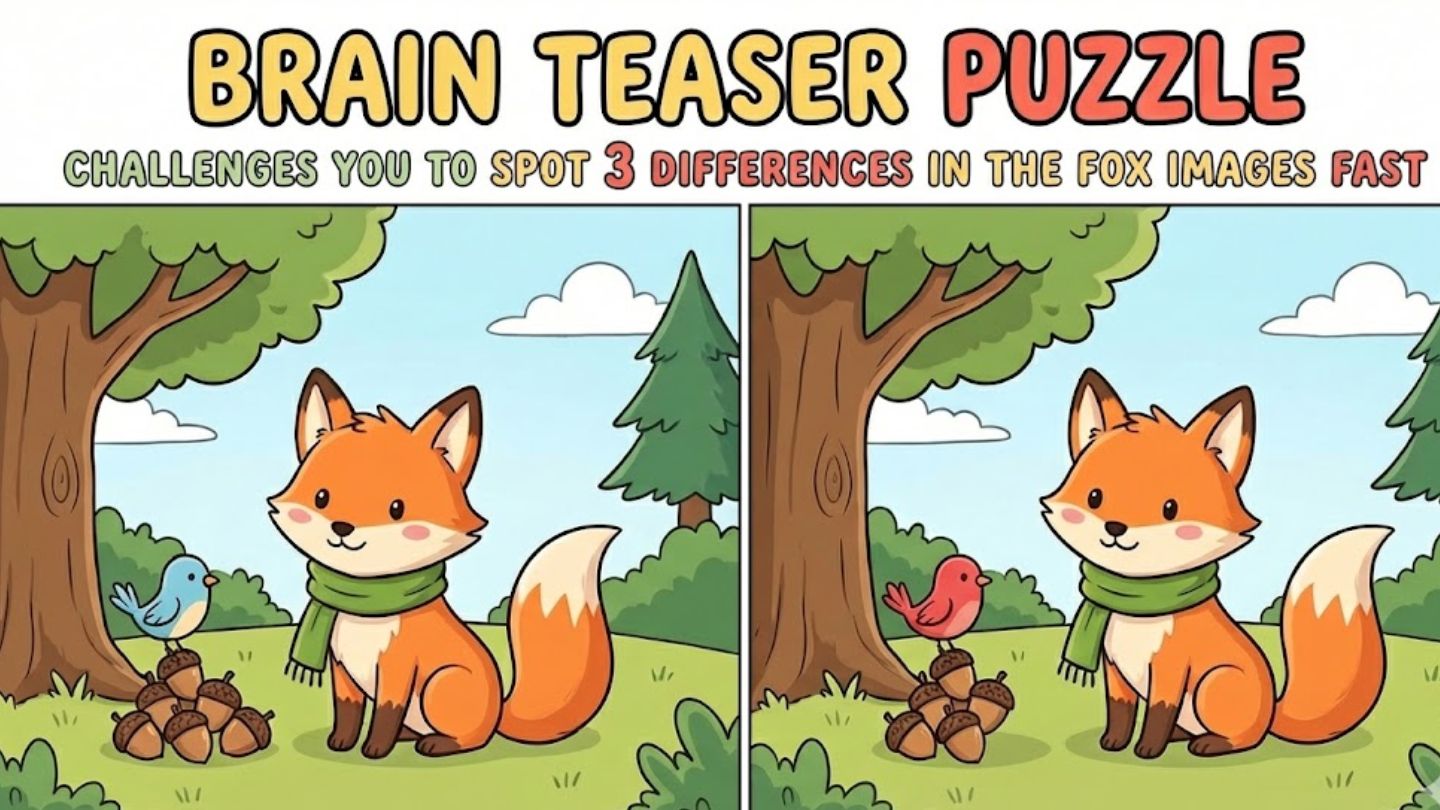
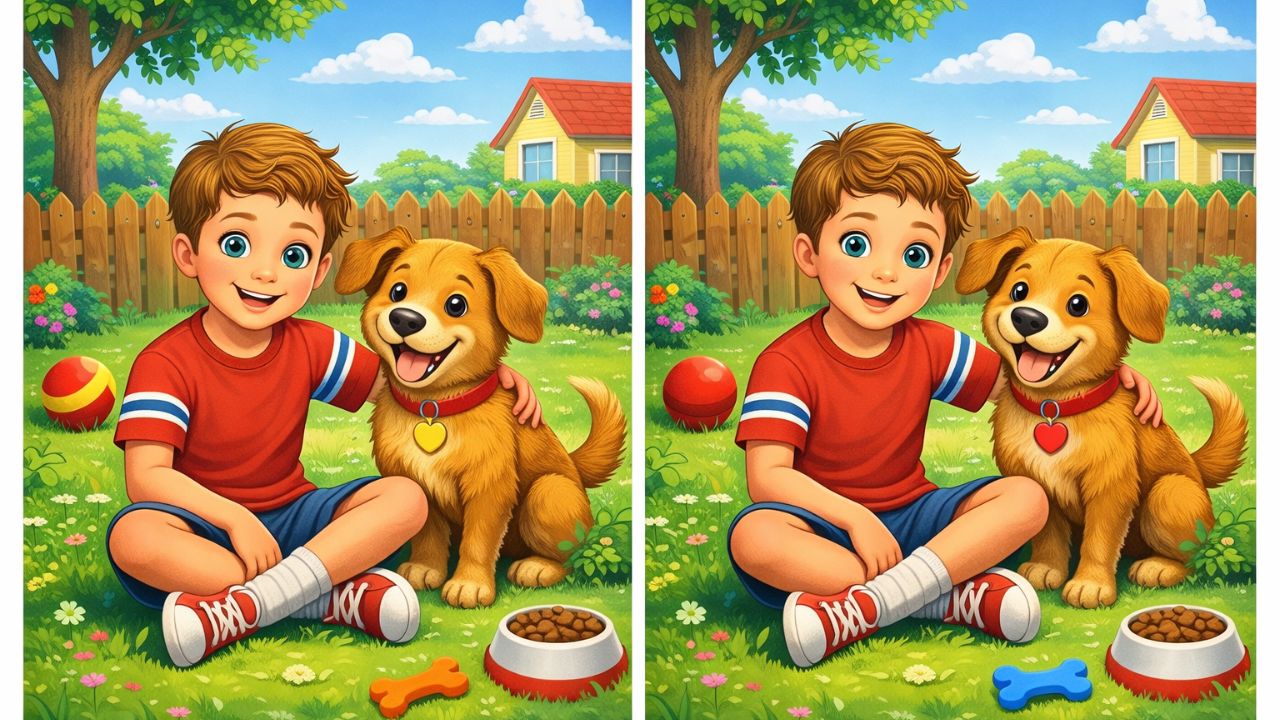
    Are you ready to put your attention to detail to the test? This engaging spot-the-difference puzzle challenges your ability to notice even the smallest visual changes. You will compare two images featuring a boy relaxing with his dog and try to uncover three hidden differences in just 12 seconds. With time ticking away, every glance matters. These puzzles are designed to sharpen your focus, strengthen concentration, and train your brain to recognize subtle changes quickly.

    The 12-Second Challenge: Can You Find the 3 Differences?

    At first look, both images appear almost identical, showing a peaceful moment with a boy and his dog sitting together. The scene includes lush greenery, a clear blue sky, and soft grass beneath them. Despite their similarities, three small differences are carefully hidden between the pictures. Spotting them within the time limit is harder than it seems. The changes are subtle and easy to miss unless you observe closely. This challenge tests how quickly you can identify visual differences while staying calm under pressure.

    Also Read

    Grow Healthier Lashes and Brows Naturally With a Simple Daily Castor Oil Routine Method

    Why Spot-the-Difference Puzzles Challenge the Brain

    If you found this puzzle tricky, you are not alone. These challenges work by tricking the brain’s natural pattern recognition. When viewing similar images, your mind tends to assume they are the same and fills in missing details automatically. This process, known as perceptual filling-in, often causes small changes to go unnoticed. Spot-the-difference puzzles force you to slow down and examine details carefully. With regular practice, they help improve focus, visual awareness, and attention skills, making your observations sharper over time.

    Also Read

    Goodbye Hair Dye for Grey Hair: The Conditioner Mix That Restores Natural Colour Gradually

    Solution Revealed: The 3 Hidden Differences Explained

    How did you do? If you missed a few details, don’t worry. The differences were designed to be subtle and easy to overlook. Here are the three hidden changes between the images:

    • The Cloud: In the second image, the cloud above the boy’s head is missing a small section that appears in the first picture.
    • The Dog’s Food: The food inside the dog’s bowl changes slightly, with a small portion missing in the second image.
    • The Tree on the Right: One leaf near the top-right tree is altered in the second image, creating a subtle visual difference.

    These changes were hidden in plain sight and become noticeable only when you focus on fine visual details.

    Why Spot-the-Difference Puzzles Remain So Popular

    Spot-the-difference puzzles have stayed popular for years because they combine entertainment with mental exercise. They help strengthen memory, improve attention, and sharpen problem-solving abilities. Found in newspapers, magazines, apps, and websites, these puzzles offer an enjoyable way to keep the mind active. Best of all, they feel more like play than practice, making brain training both relaxing and rewarding.

    Cognitive Benefits of Spot-the-Difference Puzzles

    • Improves Focus and Attention: Working against the clock trains your brain to concentrate on specific details more effectively.
    • Boosts Memory and Recall: Repeated practice strengthens visual memory and pattern recognition.
    • Enhances Visual Perception: You become better at processing visual information and spotting small changes.
    • Builds Problem-Solving Skills: These puzzles encourage structured thinking and careful analysis.
    • Reduces Stress and Promotes Relaxation: They provide a calming mental break while keeping your mind engaged.

    Also Read

    6 Eye Shadow Primers That Keep Makeup Smooth Vibrant and Crease-Free From Morning to Night

  • Brain Teaser Puzzle Challenges You to Spot 3 Differences in the Fox Images Fast

    Brain Teaser Puzzle Challenges You to Spot 3 Differences in the Fox Images Fast

    Brain teaser puzzles have become a popular way to sharpen observation skills while having fun, and this fox-themed challenge is no exception. In India, such visual puzzles are widely shared across social media as quick mental workouts that fit easily into busy routines. The goal is simple yet tricky: spot three subtle differences between two nearly identical fox images as fast as possible. This activity tests attention to detail, focus, and visual memory, making it enjoyable for all age groups while also offering a light cognitive exercise.

    Fox image brain teaser that tests observation

    This fox image brain teaser invites you to look beyond the obvious and focus on tiny visual clues that are easy to miss. At first glance, both images appear the same, but small changes are cleverly hidden. You may notice shifts in color shades, missing elements, or altered shapes that challenge your visual scanning skills. These puzzles are designed to improve attention to detail while keeping the experience playful. The limited time factor adds excitement, pushing your brain to process information faster without feeling overwhelmed.

    Spot the difference fox puzzle challenge explained

    The spot the difference fox puzzle challenge works by engaging your brain in active comparison mode. Instead of passively viewing the images, you constantly switch your gaze between them to catch inconsistencies. This back-and-forth movement strengthens focus control habits and encourages logical thinking. Many players find that practicing such puzzles enhances pattern recognition ability over time. The fox theme adds charm, making the task feel less like a test and more like a fun break from routine mental tasks.

    Fast fox brain teaser puzzle for sharp eyes

    This fast fox brain teaser puzzle is ideal for people who enjoy quick mental challenges that deliver instant satisfaction. The time pressure creates a sense of urgency, activating rapid thinking response and improving visual memory recall. Even if you miss a difference at first, revisiting the image helps train your mind to slow down and observe carefully. Regularly solving such puzzles can support daily brain stimulation, making them a simple yet effective way to stay mentally alert.

    Why fox difference puzzles keep the brain engaged

    Fox difference puzzles keep the brain engaged because they combine fun visuals with meaningful mental effort. The challenge lies not in complexity but in subtle detail spotting, which activates multiple cognitive processes at once. As you search for differences, your brain practices selective attention skills and improves visual comparison speed. Over time, this can help with everyday tasks that require careful observation. The playful nature of animal-themed puzzles also boosts mental engagement levels, making learning feel effortless.

    Feature Description
    Puzzle Type Spot the difference
    Main Focus Visual observation
    Difficulty Level Moderate
    Time Limit Short duration
    Skill Benefit Improved attention

    Frequently Asked Questions (FAQs)

    1. What is the goal of this fox brain teaser?

    The goal is to quickly identify three differences between two similar fox images.

    2. Are such puzzles suitable for all ages?

    Yes, they are generally suitable for both children and adults.

    3. Do brain teasers really improve focus?

    Regular practice can help enhance attention and observation skills.

    4. How long should one spend on this puzzle?

    Most people try to solve it within a few seconds for the best challenge.

  • Hands Reveal Age Quickly With These 12 Deeply Nourishing Creams

    Hands Reveal Age Quickly With These 12 Deeply Nourishing Creams

    I take quiet pride in being the friend with a Mary Poppins–level bag, the kind that seems to carry a solution for nearly anything. Need a quick refresh? Waterless, bite-sized toothbrushes are ready. Realized your perfume faded faster than expected? I have a small stash of travel-sized fragrance vials across multiple scent families. But what I’m most known for is my collection of luxury hand creams. Dry, cracked skin simply isn’t acceptable in my world, especially when there are countless formulas designed to prevent it.

    So where does one begin? It helps to know that aging doesn’t show up only on the face. Hands are often one of the first places to reveal it. Today’s luxury hand creams offer far more than a prestigious name or elevated price. Modern formulas are rich, nourishing, and beautifully scented, delivering lasting hydration while doubling as a subtle fragrance layer. From smoothing on the familiar elegance of Dior’s J’Adore to expanding a Dedcool scent wardrobe, these creams turn daily care into a refined ritual. Thoughtful packaging only adds to the experience, minimizing spills and ensuring not a single drop goes to waste.

    Our Top Luxury Hand Cream Picks for 2026

    As beauty experts and devoted hand cream collectors, ELLE editors know what it takes to keep hands looking polished, feeling soft, and smelling incredible. After consulting editors and reviewing glowing customer feedback, these are the 12 luxury hand creams we keep within arm’s reach.

    Theraplush “Xtra Milk”

    Best Overall

    Designed for hardworking hands, this cream earns its place as a standout. Powered by retinol for firming and colloidal oatmeal for soothing, it helps hands appear smoother, more even, and deeply hydrated.

    An ELLE editor says: “Applying hand cream is the last thing I do every night, and Soft Services’ Theraplush is my go-to. The sculptural packaging looks beautiful on my nightstand, and the blend of colloidal oatmeal and retinol leaves my hands incredibly soft by morning. The Xtra Milk version is especially addictive—it’s one of my favorite scents ever.”

    Hand & Cuticle Repairing Butter Cream

    Best for Firming

    Created by dermatologist-founded brand Remedy Skin, this formula focuses on aging concerns while delivering serious moisture. Retinol targets visible signs of aging, while shea butter and ceramides replenish dryness.

    An ELLE editor says: “The packaging alone makes this easy to love—it’s designed to squeeze effortlessly. I keep it in my bag daily, and my hands stay noticeably softer, even with constant washing.”

    Immortelle Youth Hand Cream

    Best for Mature Hands

    This L’Occitane staple focuses on slowing visible aging with a blend of shea butter, antioxidants, and essential oils. The addition of hibiscus AHA gently smooths and refines skin texture.

    A reviewer says: “I’ve tried countless hand creams, but this one truly made a difference. My hands feel softer in just a week. They’re not young again, but they feel so much better.”

    Desertland Nourishing Hand Creme

    Best Herbaceous Scent

    Oribe brings its signature nourishment to hand care with a formula built on shea butter and botanical oils. The result is soft, hydrated skin wrapped in a herbaceous, perfume-like aroma.

    An ELLE editor says: “This is perfect for a desk drawer. It feels rich but absorbs quickly, so typing isn’t an issue. Plus, the scent is complex and luxurious, like a fine fragrance.”

    Hand Triple Care Hand Cream with Niacinamide & Biotin

    Best for Cuticle Care

    Prada’s hand cream does more than soothe dryness. With niacinamide and biotin, it strengthens cuticles while shea butter comforts rough skin.

    An ELLE editor says: “This feels like owning a piece of Prada without the commitment. It’s deeply moisturizing, incredibly chic, and always gets compliments when I pull it out.”

    J’adore Les Adorables Hand, Nail and Décolleté Cream

    Best Perfume Hand Cream

    Lightweight yet softening, this multi-use cream delivers the iconic J’Adore scent while caring for hands, nails, and décolleté.

    An ELLE editor says: “This is my favorite travel lotion. It’s compact, elegant, and leaves my hands soft while adding another layer of my favorite fragrance.”

    Regenerating Anti-Aging Hand Cream

    Best for Anti-Aging

    Formulated with peptides, this cream helps improve elasticity and smoothness while delivering intense moisture and a fresh citrus scent.

    An ELLE editor says: “By the end of a dinner, this was nearly gone. Everyone kept commenting on how soft their hands felt—it’s a lifesaver during extreme dryness.”

    African Beauty Butter

    Best All-Over Balm

    This whipped blend of West African shea butter and baobab oil melts seamlessly into skin, offering versatile moisture from head to toe.

    An ELLE editor says: “No matter where I travel, this butter is always at the bottom of my bag. It keeps everything moisturized and smells incredibly calming.”

    The Hand Retinol

    Best for Crepey Skin

    This formula combines retinol with gentle exfoliating acids to refine texture while improving firmness and hydration.

    A reviewer says: “It noticeably reduced dark spots and improved moisture on my hands. I use it nightly and haven’t experienced irritation.”

    Touch Me Hand Cream

    Best for Extremely Dry Skin

    Designed for lasting relief, this cream is packed with oils, shea butter, vitamin E, and niacinamide to deeply nourish even the driest hands.

    An ELLE editor says: “I loved the foot cream, but the hand version exceeded expectations. It softens like nothing else I’ve tried.”

    Sisleÿa L’Integral Anti-Age Hand Care Concentrate

    Best for Deep Hydration

    This advanced formula targets dark spots, fine lines, dryness, and loss of elasticity in one concentrated cream.

    Best for Strengthening

    Best for Manicures

    This cream prioritizes both hand and nail care, strengthening cuticles while nourishing skin with antioxidants and plant oils.

    Why Trust ELLE Beauty

    Every product featured on ELLE.com is independently researched, tested, or editor-approved. Recommendations are guided by editorial integrity and product performance, never by advertising influence. Any sponsored content is clearly labeled.

  • Lip Liner Placement Trick Creates Fuller Looking Lips Without Overlining

    Lip Liner Placement Trick Creates Fuller Looking Lips Without Overlining

    In the quiet of a café restroom, a young woman refreshes her lips, unaware of any attention. The routine is simple: two gentle strokes of lip liner, a soft press of the lips, and a light layer of gloss. There is no exaggerated overlining or sharp edges. Yet when she looks up, her lips appear smooth, rested, and naturally full, as if she has just taken a peaceful pause. Nothing looks obvious, but the difference is unmistakable.

    The Detail You Notice Only Later

    Later, in front of your own mirror, you try to recreate the same effect. You reach for the same pencil and the same gloss, even copying her relaxed expression. Still, something feels missing. Your lips look fine, but they seem flat. That is when it becomes clear the change was never about the product. It was where the product was applied. A barely visible shift completely changes the result.

    Moving Away From the Idea of Bigger Lips

    This method is not about making lips look dramatically larger. Instead, it subtly directs where the eye naturally settles. Traditional liner habits often involve tracing outside the lip line and filling everything in. While that approach once worked, it can feel disconnected in everyday lighting. Heavy overlining may photograph well, but up close it often clashes with natural features.

    A Modern Shift in Lip Application

    Today, makeup artists are stepping away from obvious enhancement. Rather than forcing the illusion of size, they focus on structure, balance, and restraint. The fullness that stands out is not created aggressively; it appears naturally through thoughtful placement. This is why the technique works equally well in selfies, video calls, and real-life moments. The finish stays soft yet refined.

    Why Precision Beats Heavy Definition

    The real transformation happens in millimetres, not bold outlines. Once you understand the true placement of liner, the process feels completely different. The goal is not to redraw your lips, but to emphasize their existing shape. This level of precision keeps the result believable, gently enhanced, and free from harsh lines.

    Where Professionals Actually Place Lip Liner

    A closer look at professional methods reveals a consistent approach. Artists avoid strongly defining the corners. Instead, they concentrate on three key zones: the peak of the cupid’s bow, the center of the lower lip, and the soft pads just off-center. The outer edges remain blurred, creating an outline that feels more like a suggestion than a strict border.

    Why the Finish Feels Effortless

    A London-based makeup artist once shared that she relies on the same affordable lip pencil for every client. The difference comes from how she adjusts placement based on light and individual lip structure. Clients often assume cosmetic treatments are involved. Her explanation is always the same: precise liner placement. The feedback she hears most is that clients look well-rested and naturally balanced.

    The Visual Logic Behind the Illusion

    The human eye does not scan faces evenly. It is drawn to contrast and subtle shifts in shape. The dip of the cupid’s bow, the curve at the center of the lower lip, and areas where gloss catches light naturally pull attention. Enhancing these points while keeping the corners soft allows lips to appear fuller without revealing a strong outline.

    A Simple Method for Soft, Natural Fullness

    Begin with dry lips and a relaxed mouth. Choose a sharpened nude liner close to your natural shade. Lightly connect the peaks of the cupid’s bow with a short line just above the natural dip. Move to the center of the lower lip and draw a small arc slightly outside the line, no wider than your iris. Leave the outer areas mostly untouched. Blend gently with a fingertip and apply gloss only at the center. Restraint is what keeps the look real.

    Why This Technique Fits Everyday Life

    This soft-focus approach feels less like armor and more like enhancement. Small imperfections blend into the overall look, making it forgiving on busy mornings or uncertain days. Under different lighting, lips stay defined at the center and soft at the edges, moving naturally with expression. It is makeup designed for real, unfiltered faces, not frozen images.

  • Homemade Eyebrow Gel Blending Aloe and Cocoa Keeps Brows Neat Yet Naturally Flexible

    Homemade Eyebrow Gel Blending Aloe and Cocoa Keeps Brows Neat Yet Naturally Flexible

    The radiator started with its usual metallic ticking that normally meant warmth was coming. Outside the wind moved through empty branches and shook the window frames like a quiet signal that colder weather was ahead. Inside the air was warm enough but felt thin and dry. Your throat felt scratchy and your skin felt tight on your hands while your nose seemed ready to sneeze at any moment. Then you remembered something you heard before from maybe an older family member or somewhere online about putting a glass of water near the radiator to make the room feel better. You look toward the kitchen & think about how strange it seems that an ordinary glass of water could actually help with the dryness. It sounds like some kind of old myth or superstition. But as the evening goes on and the air gets even drier you fill a glass completely & carry it back to set it down next to the radiator. As the water slowly heats up something small begins to change. It happens in a quiet way that you can barely notice at first but winter always reveals its secrets like this.

    The Quiet Science Behind an Ordinary Glass of Water

    At first glance, the idea that a simple glass of water could make a room feel warmer—without increasing energy use—sounds unlikely. After all, water doesn’t create heat. It isn’t a hidden heat source quietly working from your windowsill. The reality is more nuanced. This effect isn’t about producing warmth, but about helping your body sense the heat already present in the space.

    Why Warm Rooms Feel Cooler When the Air Is Dry

    When a radiator is switched on, it does more than raise the temperature. It also removes moisture from the air. At first, this dryness may go unnoticed, showing up only as a scratchy throat, tight skin, static cling in clothing, or small shocks from metal surfaces. What often goes unrecognized is how dry air subtly alters temperature perception.Your body is constantly exchanging heat with its surroundings. In dry air, moisture evaporates faster from your skin and with every breath you take. This evaporation draws heat away from the body, creating a gentle cooling effect—even when the thermostat indicates warmth. The room may technically be warm, but your body doesn’t fully feel it.

    How a Glass of Water Improves Thermal Comfort

    This is where a glass of water plays its quiet role. When placed near a heat source, it absorbs warmth and slowly releases moisture into the air through evaporation. While the change in humidity may be subtle, it can be enough to slow moisture loss from your skin and lungs. The temperature stays the same, yet the space feels softer, warmer, and more comfortable.

    Aloe Vera: A Soft and Natural Brow Shaping Base

    Aloe vera has been valued for centuries as a calming skin remedy, long before it became a packaged product. Pure aloe gel is cool, lightweight, and gently slippery—never stiff or sticky. When used on eyebrows, it works as a quiet styling aid, offering hold without harshness.In a homemade brow gel, aloe vera forms the base. Its natural consistency delivers light-to-medium control, keeping brow hairs in place while allowing flexibility. A high-quality gel with minimal additives also hydrates the brows, turning a daily routine into a small act of care rather than a quick cosmetic fix.

    Cocoa Powder: A Kitchen Ingredient That Adds Natural Color

    Cocoa powder contributes warmth, depth, and natural pigment. Its rich brown tone works well as a brow tint, particularly for light to medium-dark shades. When blended with aloe, cocoa creates a soft, stain-like finish instead of a bold, painted look.The appeal of this method lies in its flexibility. A small amount gives gentle definition, while a slightly heavier hand deepens the shade. The color blends naturally with existing brow hairs, avoiding harsh edges. There’s a quiet satisfaction in using an ingredient known for comfort and nourishment to frame the face naturally.

    Putting Together Your Minimal Brow Gel Setup

    Making your own brow gel becomes more than a task—it turns into a simple ritual. Clean jars, a spoon, and a spoolie brush all play their part. The process feels calm, hands-on, and unrushed.At its simplest, this recipe requires only aloe vera gel and cocoa powder. Optional additions, such as a drop of jojoba oil for smoother texture or a pinch of coffee or charcoal for deeper tones, can be introduced later. The beauty of this formula is its intentional simplicity.

    Blending the Gel: A Slow and Simple Process

    Add two teaspoons of aloe vera gel to a clean jar. Sprinkle in about a quarter teaspoon of cocoa powder, stirring slowly to break up any clumps. The clear gel will gradually shift into a smooth, earthy brown.Test the color on the back of your hand and allow it to dry briefly. Adjust as needed—more cocoa for depth or more aloe for softness. The texture should be creamy, easy to spread, and thick enough to cling to a brush. Once mixed, seal the jar and let it rest for an hour so the blend settles evenly.

    Applying the Gel With Care and Intention

    Using your homemade brow gel encourages a slower, more thoughtful routine. Begin with clean, dry brows. Lightly dip a spoolie into the jar and remove excess product. Brush through the brows using short, feathered strokes that follow the natural hair direction.Start at the inner brow and move outward, focusing on shaping rather than drawing. For added definition, allow the first layer to dry before applying another, concentrating on sparse areas. An angled brush can help mimic individual hairs if needed. The finish stays soft, flexible, and natural.

    When Simplicity Meets Natural Care

    Choosing to make something at home carries a quiet significance. It reduces waste, limits unnecessary ingredients, and reconnects you with the act of creation. Each refill of a small jar replaces another disposable tube, while each application reinforces the idea that beauty doesn’t need complexity.Natural solutions are not universal, and listening to your skin is essential. Patch testing matters, and adjusting the formula is part of the journey. Still, there is value in slowing down, mixing something by hand, and shaping your brows with care instead of haste.In that small moment—brush in hand, cocoa-scented gel nearby—you’re reminded that beauty can be gentle, practical, and deeply personal. Sometimes, it begins with the simplest things.

  • Observation Game: Spot Differences in Elephant Pictures

    Observation Game: Spot Differences in Elephant Pictures

    If you enjoy puzzles that test your thinking skills & sharpen your observation abilities, the Spot the Difference game might be exactly what you need. This entertaining game challenges your visual skills by requiring you to identify small differences between two images that look almost identical. It serves as both an enjoyable pastime and a practical method for improving your focus & attention span. In this particular brain teaser, you will work with a set of adorable elephant images where your task is to locate three differences in only 10 seconds. This fast-paced activity combines entertainment with mental exercise in an engaging format. The game works by presenting two pictures side by side that appear to be the same at first glance. However careful examination reveals subtle variations in details such as colors shapes, positions or missing elements. Your goal is to identify these discrepancies as quickly as possible within the given time limit. This type of puzzle offers several benefits beyond simple entertainment.

    How “Spot the Difference” Puzzles Actually Work

    “Spot the Difference” games are easy to understand but surprisingly engaging. Players are shown two images that look almost the same at first glance. With careful observation, small variations begin to appear—such as an item missing, a color change, or an object placed slightly differently. The objective is simple: identify all the differences before the timer runs out, adding a sense of excitement and urgency.

    Most puzzles include a short time limit, sometimes as little as 10 seconds, pushing players to think quickly and stay alert. As you play, you’ll notice that these games naturally improve attention to detail while offering a light yet stimulating mental challenge. They’re enjoyable for all age groups and work just as well for solo play as they do for group fun.

    The Elephant-Themed Picture Difference Challenge

    This particular “Spot the Difference” puzzle features two images of a charming elephant. Although the pictures appear nearly identical, three small differences are cleverly hidden. Your challenge is to find all three within just 10 seconds.

    The enjoyment comes from examining the finer details. The differences may be subtle, but they require focused scanning of each part of the image. Follow these simple steps to play:

    – Observe both images side by side.

    – Carefully compare details, including the elephant and the surrounding background.

    – Pay attention to small objects that may be missing, altered, or moved.

    – Identify all three differences before time runs out.

    This type of puzzle is an excellent way to strengthen visual awareness and concentration. With repeated play, it can also help improve memory and overall focus.

    The Three Differences You’re Looking For

    Ready to see the solution? Below are the three subtle differences hidden between the two elephant images. Don’t be discouraged if you missed one or two—the smallest details are often the hardest to notice.

    – Flower Missing from the Tree Stump: In the first image, a small flower sits on the left side of the tree stump. In the second image, that flower is no longer there.

    – Butterfly No Longer Present: The left image shows a butterfly resting on a leaf near the elephant. This butterfly is absent in the right image.

    – Detail Removed from the Elephant’s Right Foot: A small mark or feature is visible on the elephant’s right foot in the first image, but it does not appear in the second one.

    Each difference is minor on its own, yet together they test your observation skills. Identifying them requires patience, focus, and a sharp eye.

    Why “Spot the Difference” Games Benefit Your Brain

    Beyond entertainment, “Spot the Difference” puzzles offer valuable mental benefits. They provide a gentle brain workout that helps keep your mind active and alert.

    – Strengthens Attention to Detail: Regularly scanning for small changes trains your brain to notice details that might otherwise be overlooked.

    – Improves Visual Processing: Closely examining images enhances your ability to interpret visual information accurately.

    – Enhances Focus and Concentration: Time limits encourage sustained attention and quick decision-making.

    – Builds Cognitive Flexibility: Switching between two images helps improve your ability to shift focus smoothly.

    – Supports Stress Relief: Solving puzzles offers a mental break, helping you relax and unwind.

    Tips to Spot Differences More Quickly

    If you want to get better at these puzzles, a few simple strategies can help:

    – Scan the Overall Image First: Look for obvious changes before focusing on smaller details.

    – Examine Tiny Elements Closely: Pay attention to colors, patterns, and small objects.

    – Check for Symmetry Changes: Differences often involve slight shifts or missing elements on one side.

    – Rely on Visual Memory: Remember details from one image as you compare it to the other.

    Final Thoughts

    “Spot the Difference” puzzles, like the elephant-themed challenge, are a simple yet effective way to sharpen observation skills and improve focus. They’re quick to play, enjoyable, and mentally rewarding. Whether you’re looking for a short brain break or a fun challenge, these puzzles offer an engaging way to test your attention to detail anytime.

  • 7 Yoga Exercises You Can Easily Practice at Home Without Stress

    7 Yoga Exercises You Can Easily Practice at Home Without Stress

    Seven Simple Yoga Exercises You Can Do at Home Practicing yoga at home has grown in popularity because it adapts well to hectic schedules without demanding expensive gear or spacious rooms. A mat and a peaceful spot are enough to develop physical strength & mental clarity while improving your flexibility. Home yoga lets you progress according to your own rhythm & pay attention to what your body tells you. The following seven exercises are straightforward and beneficial for newcomers and people getting back into a consistent routine. These positions are useful and appropriate for maintaining daily health.

    Mountain Pose Tadasana for Full Body Awareness

    Mountain Pose: A Simple Foundation for Better Posture Mountain Pose might appear basic at first glance but it serves as the foundation for countless yoga positions. To perform it correctly you should stand upright with your feet placed together and your arms hanging naturally at your sides while keeping your spine extended. The key is to concentrate on pressing your feet firmly into the ground while simultaneously reaching the top of your head toward the ceiling.

    Downward Facing Dog for Strength and Flexibility

    Downward Facing Dog is one of the most recognized yoga poses. Start from your hands and knees & lift your hips back to form an inverted V shape. This pose stretches your spine and hamstrings along with your shoulders and calves. It strengthens your arms & legs at the same time. The pose boosts blood circulation throughout your body and helps fight fatigue. You can practice this pose at home to energize yourself in the morning or to loosen up your muscles in the evening.

    Cobra Pose Bhujangasana for a Stronger Back

    Downward Facing Dog is a well-known yoga pose that many people recognize. You begin on your hands and knees and then lift your hips upward and backward until your body creates an inverted V shape. This position stretches multiple areas including your spine & hamstrings as well as your shoulders and calves. It also builds strength in both your arms and legs while you hold the pose. The position improves blood flow through your entire body and reduces feelings of tiredness. You can do this pose at home when you wake up to feel more energized or later in the day when you need to relax tight muscles.

    Tree Pose Vrikshasana for Balance and Focus

    Tree Pose helps you work on balance while making your mind feel calm. You stand on one leg & put the bottom of your other foot against your calf or the inside of your thigh. You can bring your hands together at your chest or lift them above your head. This pose makes your legs stronger and helps you coordinate better while improving your ability to focus. When you practice balance poses at home you develop more patience and mental stability that helps you in everyday situations.

    Child Pose Balasana for Deep Relaxation

    Tree Pose helps you work on balance while calming your mind. You stand on one leg and place the sole of your other foot against your calf or inner thigh. You can press your hands together at your chest or raise them overhead. This pose strengthens your legs and improves your coordination while sharpening your focus. When you practice balance poses at home you build patience and mental stability that benefits you in daily life.

    Bridge Pose Setu Bandhasana for Core and Glute Strength

    Bridge Pose Benefits and Instructions Bridge Pose works well for building strength in your core muscles and lower back area while also targeting your glutes. Start by lying flat on your back and bending both knees so your feet rest on the ground about hip width apart. Push your feet firmly into the floor as you raise your hips toward the ceiling. This position helps maintain a healthy spine & may ease tension or mild pain in your lower back region. The pose creates an opening across your chest area which can enhance your ability to breathe more deeply and efficiently.

    Seated Forward Bend for Flexibility and Calm

    The seated forward bend stretches your spine and hamstrings while helping your lower back relax. It also calms your mind. Start by sitting down with your legs stretched out in front of you. Take a breath in to make your spine longer. Then breathe out as you slowly bend forward. This position helps your body become more flexible. It can also release tension after you have had a busy day. When you practice this pose at home in a peaceful space it works even better to help you feel calm.

    Why Practicing Yoga at Home Works So Well

    Home yoga gives you the chance to practice regularly without feeling rushed. You can set your own schedule and modify poses to match your comfort level while paying close attention to your breathing technique. Given today’s focus on mental health and managing stress, yoga provides a natural approach that works well with contemporary living. These poses need no special equipment and fit easily into your everyday routine making them practical for maintaining wellness over time.

    Tips to Stay Consistent with Home Yoga

    Begin with brief fifteen to twenty minute sessions and slowly increase the duration over time. Make sure your practice area stays tidy and free from interruptions. Pay attention to your breathing and never force your body beyond comfortable limits. Regular practice is more valuable than pushing yourself too hard. Even a mild routine performed every day produces meaningful long-term results. Practicing yoga at home does not require you to be perfect. The goal is simply to commit to the practice while staying aware of how your body feels and moving with purpose. These seven yoga exercises provide a well-rounded way to develop strength and flexibility while promoting relaxation. They can help you build a healthier & more conscious lifestyle without leaving your house.

  • Homemade Eyebrow Gel Using Aloe and Cocoa Keeps Brows Shaped Flexible and Naturally Defined

    Homemade Eyebrow Gel Using Aloe and Cocoa Keeps Brows Shaped Flexible and Naturally Defined

    The radiator began its familiar metallic ticking, the small signal that heat was on its way. Outside, the wind slid through bare branches and gently rattled the window frames, quietly announcing that colder days had settled in. Indoors, the room was warm enough, yet the air felt dry and weightless. Your throat felt irritated, your hands tight and uncomfortable, and your nose hovered on the edge of a sneeze.

    Somewhere in your memory—perhaps from an older relative or something read online—you recalled a suggestion about placing a glass of water near a radiator. The idea seemed oddly simple, almost like folklore. Still, as the evening wore on and the dryness deepened, you filled a glass to the brim and set it beside the heater. As the water slowly warmed, a quiet shift began. It was subtle, nearly invisible, but winter often reveals its truths this way.

    The Quiet Science Behind a Simple Glass of Water

    At first, the thought that a single glass of water could make a room feel more comfortable—without adding heat—seems unlikely. Water doesn’t generate warmth or act as a hidden heat source. The effect is more delicate. It’s not about raising the temperature, but about helping your body experience the warmth that already exists in the room.

    Why Heated Rooms Can Still Feel Uncomfortable

    When a radiator runs, it doesn’t only increase temperature—it also reduces moisture in the air. This dryness often appears as scratchy skin, static in clothing, or mild irritation in the throat and nose. What’s less obvious is how low humidity affects the way warmth is felt.

    Your body constantly exchanges heat with its environment. In dry air, moisture evaporates more quickly from your skin and with each breath you take. This evaporation draws heat away, creating a gentle cooling sensation. Even if the thermostat shows a comfortable number, your body may not register the room as truly warm.

    How a Glass of Water Supports Comfort Indoors

    This is where the glass of water quietly helps. Placed near a heat source, it absorbs warmth and gradually releases moisture into the air through evaporation. The increase in humidity is modest, but often enough to reduce moisture loss from your skin and airways. The temperature remains unchanged, yet the space begins to feel softer and more balanced.

    Aloe Vera as a Gentle Base for Brow Shaping

    Aloe vera has long been used as a soothing skin remedy, well before it appeared in modern packaging. Pure aloe gel feels cool, light, and smooth, offering slip without stiffness. When applied to eyebrows, it acts as a subtle styling aid that holds hairs in place without making them feel rigid.

    In a homemade brow gel, aloe serves as the foundation. Its natural texture provides light to medium hold, keeping brows neat while still flexible. A clean, additive-free gel also supports hydration, turning a daily routine into a moment of care rather than a rushed cosmetic step.

    Cocoa Powder for Soft, Natural Brow Color

    Cocoa powder brings warmth and depth with its naturally rich brown tone. It works especially well for light to medium-dark brows, blending seamlessly with existing hair. When mixed with aloe, it creates a soft, stain-like finish instead of a sharp or painted effect.

    This approach allows for easy adjustment. A small amount offers gentle definition, while adding slightly more deepens the shade. The result looks natural and even, avoiding harsh lines. Using a familiar kitchen ingredient adds a sense of comfort while shaping the face in a subtle way.

    Creating a Simple Brow Gel Routine

    Preparing your own brow gel becomes a calm, hands-on process. Clean jars, a spoon, and a spoolie brush are all you need. The act feels slow and intentional, turning a simple task into a quiet ritual.

    The basic formula uses just aloe vera gel and cocoa powder. Optional additions—such as a drop of jojoba oil for smoother texture or a pinch of coffee or charcoal for deeper tones—can be explored later. The strength of this recipe lies in its deliberate simplicity.

    Mixing the Gel Gently

    Place two teaspoons of aloe vera gel into a clean jar. Add about a quarter teaspoon of cocoa powder, stirring slowly to remove any clumps. As you mix, the clear gel will gradually transform into a smooth, earthy brown.

    Test the color on the back of your hand and let it dry briefly. Adjust the balance as needed—more cocoa for depth, more aloe for softness. The finished texture should be creamy and spreadable, thick enough to coat a brush without dripping. Seal the jar and allow it to rest for an hour so the mixture settles evenly.

    Applying the Gel With Care

    Using a homemade brow gel encourages a more mindful routine. Start with clean, dry brows. Lightly dip a spoolie into the product and remove any excess. Brush through the brows using short, feathered strokes that follow the natural direction of hair growth.

    Begin at the inner brow and move outward, focusing on shaping rather than filling heavily. For extra definition, let the first layer dry before adding another, concentrating on sparse areas. An angled brush can help create hair-like strokes if needed. The final look remains soft, flexible, and natural.

    When Simple Choices Feel Meaningful

    Making something at home carries quiet meaning. It reduces waste, limits unnecessary ingredients, and reconnects you with the process of creating. Each refill of a small jar replaces another disposable tube, and each use reinforces the idea that beauty doesn’t require complexity.

    Natural solutions aren’t universal, and paying attention to your skin is essential. Patch testing and adjusting the formula are part of the process. Still, there is value in slowing down, mixing something by hand, and shaping your brows with intention. In that small moment—brush in hand, cocoa-scented gel nearby—you’re reminded that care can be gentle, practical, and personal.

  • This 72-year-old trainer recommends 4 seated exercises for mobility and flexibility

    This 72-year-old trainer recommends 4 seated exercises for mobility and flexibility

    Moving with ease is something many people don’t think twice about in their younger years. However, as time goes on, preserving mobility and strength becomes vital for maintaining independence, confidence, and overall quality of life.

    This is something 72-year-old certified personal trainer Mitch Kahn understands deeply. The creator of Forever Fit With Mitch, Kahn designs workouts specifically for older adults, focusing on improving balance, strength, flexibility, and self-assurance.

    Why Mitch Kahn Recommends Chair Workouts

    One form of exercise Kahn strongly advocates is chair-based workouts. Explaining his approach, he says that chair exercises are highly effective at building real strength, coordination, and confidence. To help people get started, Kahn has shared four seated exercises he believes every older adult can benefit from. All you need is a stable, comfortable chair and, optionally, one of the best resistance bands.

    As always, if you are new to exercise or returning after a break, it’s important to check with your doctor first and move at a pace that feels right for you.

    The Four Chair-Based Moves Explained

    Created by Kahn, these four seated exercises are suitable for beginners and seniors alike. The routine targets full-body strength, coordination, and functional fitness, helping you feel steadier and more capable during everyday activities.

    You can watch Kahn demonstrate the exercises in his video, or read on for a breakdown of each move, including benefits and focus areas:

    • Cross-body punches: This bodyweight movement supports core rotation and helps improve overall coordination.
    • Seated leg press (with or without a band): Designed to strengthen the legs and lower body, this exercise supports daily movements like walking and climbing stairs. Kahn shows both banded and unweighted versions, recommending beginners start without resistance.
    • Overhead arm circles: Modern habits, such as long periods of sitting or looking down at phones, can affect posture. This movement helps increase flexibility, improve alignment, and enhance shoulder strength.
    • Seated row with side taps: This multi-tasking move works the arms, legs, and core together, supporting upper-body strength, posture correction, and better coordination.

    Kahn suggests completing 12 repetitions of each exercise, taking a short rest, and repeating the full circuit three times.

    The Benefits of Chair-Based Workouts

    Chair workouts, like this four-move routine, offer an accessible way for beginners and older adults to build strength, flexibility, and balance. They are especially useful for those who find floor exercises challenging.

    For instance, chair yoga provides a welcoming introduction to mind-body movement, while seated strength routines allow people to continue improving posture and muscle strength without getting down on the ground—all while enjoying that important endorphin boost.

    These exercises also support functional fitness, which refers to the strength needed for everyday tasks such as using the stairs, getting in and out of bed, or sitting down and standing up.

    Research supports this approach. A 2021 study published in the International Journal of Environmental Research and Public Health found that chair-based exercises are not only effective but should be encouraged as simple, easy-to-implement activities to help older adults maintain and develop strength.

    About the Author

    Becks is a lifestyle journalist covering wellness and home products, from mattresses to weighted blankets and cooling comforters. She regularly tests products for Tom’s Guide, evaluating how well they perform and offering guidance on which types of sleepers they are best suited for.

  • You can build muscle with kettlebells using this 3-move routine beginners learn first

    You can build muscle with kettlebells using this 3-move routine beginners learn first

    I don’t set the rules, but no matter how many complex strength routines circulate online, the fundamentals always come out on top: functional movement, progressive overload, and consistent training—along with a protein-rich diet to support recovery and muscle growth.

    As long as your muscles are challenged regularly and with enough intensity, you can build strength from head to toe. While this kettlebell workout isn’t designed to cover every training need on its own, it is highly effective and will help you develop a stronger, more powerful, and more resilient body over time.

    As a trainer who has relied on kettlebells more than any other piece of gym equipment in recent years, they remain my go-to tool. They’re versatile, demanding, and engaging, and they can quickly turn a moderate exercise into a serious challenge—especially when movements like snatches are involved.

    A Simple Three-Move Kettlebell Workout

    Below is a straightforward three-exercise kettlebell routine designed to build strength, power, and endurance.

    Staggered Stance Kettlebell Deadlift

    Deadlifts target the posterior chain, strengthening muscles along the back of the body such as the glutes, hamstrings, and lower back. The hip hinge also engages the hip flexors while reinforcing core stability. This movement is highly functional, as it mirrors everyday lifting patterns and helps make them safer.

    Using a staggered stance increases the demand on balance and stability, while placing extra emphasis on the hamstrings and glutes of the lead leg. Keep a slight bend in the rear leg, maintain a neutral, flat spine, lower the kettlebells toward the floor, then drive through the hips to stand tall.

    Kettlebell Gorilla Row

    The gorilla row primarily works the upper back and biceps as you pull the weights upward. The wide stance and hip hinge also place added stress on the hips and hamstrings, making it more demanding than a traditional row.

    Maintain a steady knee bend and keep your feet firmly planted to create a strong base. Pull your elbow toward your back pocket and pause briefly, squeezing the shoulder blades together. You can perform the movement one side at a time for unilateral focus or row both kettlebells together to increase overall intensity.

    Kettlebell Squat Clean and Press

    The press challenges the shoulders, triceps, and upper chest through a vertical overhead push. The clean portion of the movement ties everything together, emphasizing coordinated, full-body effort using a controlled technique.

    This exercise relies on total-body engagement. As you drive upward, the hips, legs, and core—particularly the abdominals, obliques, and spinal muscles—work together to stabilize and transfer force. The movement also targets the traps, lats, deltoids, and arms, helping develop explosive strength and efficient load transfer.

    Workout Structure

    This routine follows an EMOM format (Every Minute On the Minute) for a total of 7 rounds, lasting 21 minutes.

    • Minute 1: 6–8 staggered stance deadlifts per leg
    • Minute 2: 12 gorilla rows (6 per side or 12 together)
    • Minute 3: 6–8 clean and presses per arm

    The repetition ranges are guidelines. Adjust as needed based on your ability, and rest for the remainder of each minute before moving to the next exercise. Ideally, aim to leave 10–15 seconds of rest per minute. Beginners may benefit from 15–20 seconds, while more advanced exercisers can target closer to 10 seconds.