Author: admin

  • Optical Illusion Challenge: Find the Word YET Hidden Among VET in 7 Seconds

    Optical Illusion Challenge: Find the Word YET Hidden Among VET in 7 Seconds

    Optical illusion challenges have become a popular way to test focus, attention, and visual sharpness, especially among readers in India who enjoy quick mental workouts. These puzzles look simple at first glance but often hide clever twists that trick the brain. In this challenge, the task is to find the word YET hidden among multiple VET words within just seven seconds. It’s not about eyesight alone; it’s about how fast your brain processes subtle differences. Such illusions are fun, engaging, and surprisingly effective at revealing how perception really works.

    Optical illusion challenge that hides YET among VET

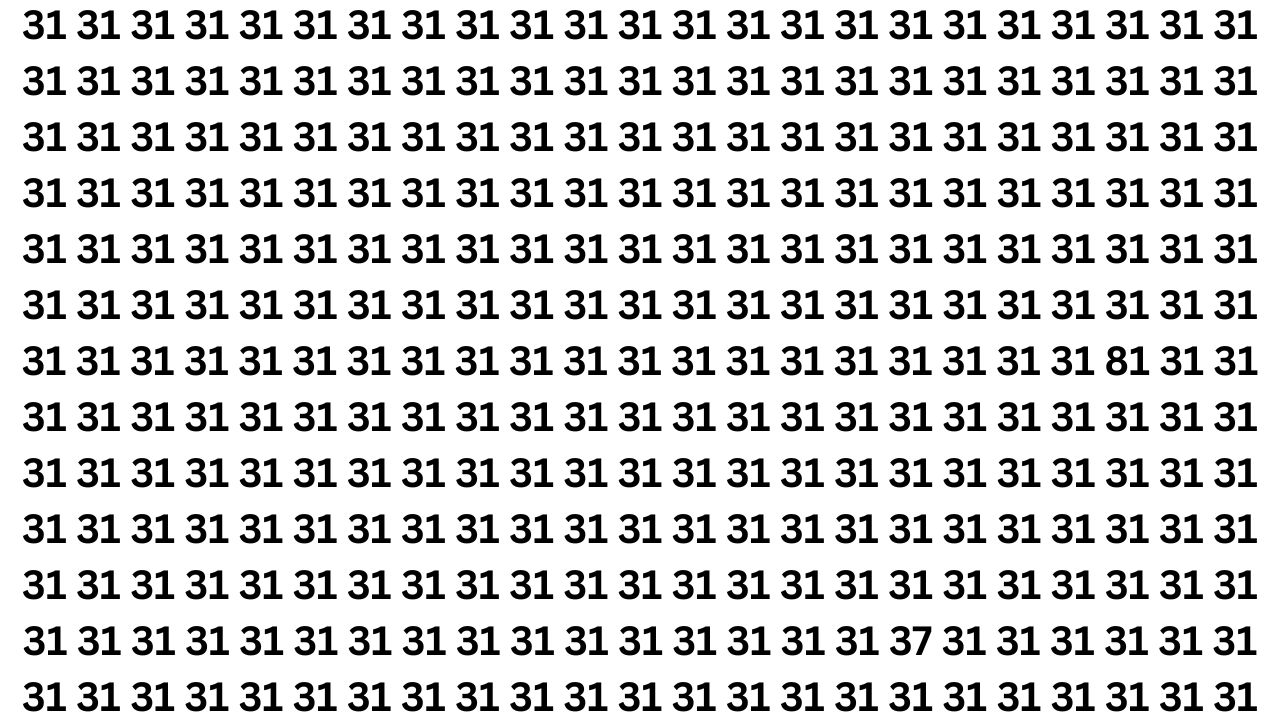
    This optical illusion challenge looks straightforward until the timer starts ticking. Rows of the word VET appear uniform, creating a visual pattern that encourages your brain to skim rather than inspect. That’s where the trick lies. Your mind relies on pattern recognition bias, which can cause it to overlook small changes. To succeed, you need focused visual scanning instead of rushing. Many people fail because of mental auto-fill habits that assume all words are identical. Slowing down slightly and using left-right eye movement can make the hidden YET suddenly pop out.

    Find the word YET illusion and how your brain reacts

    When attempting to find the word YET, your brain is fighting against its own efficiency. Humans are wired for rapid information filtering, which helps in daily life but hurts during puzzles like this. The similarity between YET and VET triggers letter shape confusion, especially under time pressure. Add a countdown, and stress-based distraction increases mistakes. These illusions exploit visual shortcut processing, forcing the brain to slow down and recheck assumptions. That moment of realization, when you finally see YET, is your brain switching from automatic to conscious analysis.

    Seven-second optical illusion test for attention skills

    A seven-second limit turns this illusion into a real attention test. Short timers activate time pressure focus, which can either sharpen awareness or cause panic. Those who succeed often use systematic word scanning rather than random searching. The challenge also highlights selective attention limits, showing how easily details slip by. Repeating such puzzles can improve micro-detail awareness over time. That’s why optical illusions aren’t just entertainment; they quietly train your brain to notice differences faster and more accurately.

    Why this YET vs VET illusion is so effective

    This illusion works because it balances simplicity with deception. There’s no complex artwork, just text—yet it still fools most people. The brain expects uniformity, creating expectation-driven perception that hides anomalies. Combined with visual fatigue effect, repeated words blur together. The seven-second rule adds decision-making urgency, reducing careful inspection. What makes it satisfying is the sudden clarity when YET is spotted, reinforcing cognitive pattern breaking. That small victory explains why such puzzles are shared widely and enjoyed across all age groups.

    Aspect Details
    Challenge Type Word-based optical illusion
    Target Word YET hidden among VET
    Time Limit 7 seconds
    Skill Tested Attention and visual focus
    Difficulty Level Moderate

    Frequently Asked Questions (FAQs)

    1. What is the goal of this optical illusion challenge?

    The goal is to spot the word YET hidden among repeated VET words within seven seconds.

    2. Why is this puzzle difficult despite being simple?

    Because the brain automatically assumes repeated patterns and overlooks small differences.

    3. Does solving such illusions improve brain skills?

    Yes, they can sharpen attention, focus, and detail recognition over time.

    4. Is this challenge suitable for all age groups?

    Yes, it’s safe, fun, and suitable for both kids and adults.

  • Optical Illusion Test: Spot the Numbers 37 and 81 Among 31 in 5 Seconds

    Optical Illusion Test: Spot the Numbers 37 and 81 Among 31 in 5 Seconds

    Optical illusion challenges have become a popular way to test attention, focus, and quick-thinking skills, especially among puzzle lovers in India. This optical illusion test asks readers to spot the numbers 37 and 81 hidden among repeated 31s within just five seconds. At first glance, the grid may look simple, but the visual similarity between the numbers makes it surprisingly tricky. Such brain games are not just entertaining; they also help sharpen observation skills, improve concentration, and offer a refreshing mental break from daily routines.

    Optical Illusion Test to Spot Hidden Numbers Quickly

    This optical illusion test is designed to challenge how fast your eyes and brain can work together under pressure. When dozens of similar numbers are placed close together, your brain tends to follow patterns instead of details. That is where the challenge begins. To succeed, you need sharp visual focus, pattern-breaking attention, and rapid mental scanning. Many people find that slowing down slightly actually helps them identify the odd numbers faster. The trick is not to read each number but to look for shape differences, spacing changes, or unusual curves that don’t match the surrounding 31s.

    Why Finding 37 and 81 Among 31 Is So Challenging

    The difficulty of this illusion lies in how the human brain processes repetitive information. When the same number appears repeatedly, the brain switches to autopilot, making it easier to miss subtle changes. Spotting 37 and 81 requires detail-oriented vision, cognitive alertness, visual discrimination skill, and mental flexibility. The shapes of the digits are intentionally similar, especially when viewed quickly. This is why time pressure increases the challenge and makes the test more exciting for participants of all ages.

    How Optical Illusion Challenges Improve Brain Performance

    Regularly attempting optical illusion tests can offer surprising cognitive benefits. These puzzles encourage focused eye movement, faster decision making, and attention control training. Over time, such challenges can improve your ability to notice small details in everyday tasks. Many people use these puzzles as a fun mental warm-up before work or study. Since they are short and engaging, they help reduce stress while still providing a productive mental exercise that keeps the brain active and responsive.

    Summary and Final Analysis

    This optical illusion test is more than just a quick visual game; it is a reflection of how perception and focus work together. Successfully spotting 37 and 81 among 31s depends on visual awareness growth, pattern interruption ability, mental speed balance, and concentration under pressure. Whether you solve it in seconds or take a bit longer, the experience itself strengthens observation skills. Such puzzles remain popular because they are simple, engaging, and surprisingly effective at keeping the mind sharp.

    Feature Description
    Challenge Type Optical illusion number puzzle
    Target Numbers 37 and 81
    Distractor Number 31
    Time Limit 5 seconds
    Primary Skill Tested Visual focus and attention

    Frequently Asked Questions (FAQs)

    1. What is the goal of this optical illusion test?

    The goal is to quickly identify the numbers 37 and 81 hidden among multiple 31s.

    2. How much time is given to solve the puzzle?

    You are given only five seconds to spot both hidden numbers.

    3. Are optical illusion tests good for the brain?

    Yes, they help improve focus, attention, and visual processing skills.

    4. Can anyone try this optical illusion challenge?

    Yes, it is suitable for all ages and does not require special skills.

  • Bodyweight Exercises That Build Stronger Legs Without Any Gym Equipment

    Bodyweight Exercises That Build Stronger Legs Without Any Gym Equipment

    The stairs in front of you are just stairs until you decide to use them for the best leg workout you’ve ever had. That park bench looks like a place to rest but it can become your squat station or step-up platform for building stronger legs. The living room floor you walk across every day holds more potential than any expensive gym machine if you’re ready to work with your own body. You don’t need a membership or fancy equipment. All it takes is gravity and the simple choice to get stronger with what’s already around you.

    Strength Begins at Home: Why Bodyweight Leg Training Actually Works

    Stand barefoot in the middle of a room. Feel the floor under your feet. It is cool and steady and indifferent. Spread your toes a little. Rock your weight from heel to forefoot. Your legs are familiar pillars that carry you from bed to coffee maker to bus stop. They are already doing a thousand quiet calculations to keep you from tipping over. This is where leg training without equipment really begins. It does not start with numbers on a barbell but with the conversation between your feet and the ground. When you strip away machines and heavy weights you don’t lose effectiveness. You lose excuses.

    The work becomes simpler & more honest. Squat & lunge & hinge and push and jump and balance. These are movements older than gyms and older than sports and older than the word workout itself. Think of bodyweight leg training less like a gym routine and more like learning to move through the world with sharp awake muscles. The hills you walk and the stairs you climb & even the way you stand in line at the store can all become part of the practice. The reward isn’t just strong quads or defined calves. It’s knees that feel more stable on a rocky trail & hips that don’t complain when you squat down to pick something up. It’s a sense that your body is not an obstacle you drag through the day but a partner in everything you do.

    Switching On Your Legs: Preparing Muscles Without Machines

    Before your legs push and pull & burn they need to wake up. Not with frantic bouncy stretches but with small intentional movements that tell your body we’re about to do something important. A good warm-up for bodyweight leg training doesn’t require more than a few square feet & a willingness to pay attention. Start by marching in place for a minute and swing your arms while letting your heels touch the floor with a soft thud. Feel your heart rate drift up. Then circle your ankles slowly one at a time as if you’re drawing careful invisible moons in the air. Your knees get a turn next with soft bends and gentle circles.

    Never force anything but just coax them into fuller ranges of motion. Walk your hands down your thighs into a light forward fold with knees slightly bent and hamstrings waking up like someone opening one eye after a long sleep. Sink into a few shallow bodyweight squats not to impress anyone but just to feel how your hips & knees move today. Some days they’ll glide and other days they’ll complain. Both are fine. You’re not trying to dominate your body but trying to cooperate with it. This warm-up isn’t separate from your workout. It’s the opening chapter where the characters step onto the stage and introduce themselves. Your hips & knees and ankles and balance all need this moment. Skip it and the story never quite makes sense.

    Gravity as Resistance: The Foundational Movements That Shape Strong Legs

    Bodyweight training for your legs works like cooking with basic ingredients. When you approach it with care it becomes simple and satisfying while offering endless ways to adapt. You do not need twelve different exercises. You need a small set of movements that you can develop over time and build upon gradually. The foundation starts with movements you already know. Squats teach you how to sit back and stand up with control. Lunges show you how to balance and move through space with one leg leading.

    Bodyweight Squats: Building Power from the Ground Up

    Stand with your feet positioned at shoulder width. Picture yourself sitting back into a chair that sits slightly farther away than usual. Your hips move backward while your knees bend and your chest remains upright. The weight transfers to your heels while your toes maintain contact with the ground like roots extending into the floor. When you reach the lowest point of the squat whether it is a full depth position or a partial bend stop briefly and take a breath.

    Pay attention to the sensations in your quadriceps and glutes and perhaps a mild stretch in your hamstrings. When you stand back up push against the floor deliberately & avoid rushing through the movement. The exercise should feel like a balance between strength and control. Once regular bodyweight squats become too simple you can modify them by reducing the speed or extending the time spent in the bottom position or adding small pulses at the lowest point to increase the challenge. You do not require additional equipment like weight plates or barbells to make squats more difficult because adjusting the tempo and practicing patience can provide sufficient resistance on their own.

    Controlled Lunges: Mastering Balance, Stability, and Strength

    Lunges transform regular walking into a focused movement. You step one foot forward like you’re preparing to kneel before something unseen. Both knees bend at the same time. Your front knee stays positioned over the center of your foot while your back knee lowers toward the floor without touching it hard. Keep your upper body straight and look ahead calmly. Press through your front leg to return to a standing position. The front leg does most of the work here. Then repeat the movement on the other side. After a few repetitions you start noticing differences between your left and right sides.

    One leg might feel steadier while the other feels less secure. These differences aren’t problems but rather useful feedback about which areas need more attention. Lunges work as a stepping stone between basic squats & harder exercises that use only one leg at a time. They train your hips to stay stable and teach your knees to move in the right direction. Your feet learn to make small adjustments that protect your joints from injury. You can try walking lunges where you move forward across a room or reverse lunges where you step backward instead. Reverse lunges tend to be easier on the knees. Each repetition reinforces an important lesson about leg strength. Real strength isn’t only about how much force you can generate but also about how well you can control your movements.

    Glute Bridges: Activating the Posterior Chain Without Weights

    Lie on your back with your knees bent and your feet flat on the floor. Rest your arms by your sides. Press your lower back gently toward the floor and then push your hips up until your body forms a straight line from your shoulders to your knees. When you reach the top position squeeze your glutes hard. Hold this position for a moment or two & then slowly lower yourself back down one vertebra at a time. This exercise does more than just work your glutes. It activates the entire posterior chain that supports your lower back and stabilizes your hips. It helps you walk and run and climb more efficiently so your legs don’t have to do everything on their own. When you get stronger you can progress to single-leg bridges by lifting one leg at a time. This variation makes each hamstring & glute work much harder. You don’t need any weights for this exercise. All you need is yourself and the floor & gravity.

    Calf Raises: Unlocking Strength in the Most Neglected Muscles

    Stand with your feet hip-width apart and rest a fingertip on a wall or chair if you need balance. Push up onto the balls of your feet and lift your heels as high as possible. Hold that position for a moment. The muscles at the back of your lower legs will tighten as they support your entire body weight on two small areas. Then lower yourself slowly and pay attention to the movement. Your calves work as shock absorbers and springs that help you with every step. When your calves are strong they make climbing stairs easier and improve your hiking and running. You can do this exercise on flat ground or stand on a step to increase the range of motion. If you use a step let your heels drop slightly below the edge before pushing back up.

    Step-Ups: Turning Everyday Heights into Strength Tools

    Find a stable surface like a bench or sturdy chair or low wall. Put one foot on it & press through that foot to rise until you stand tall on top. Bring your other foot up gently and then step back down with control. The movement is simple but the feeling is clear because your working leg engages from hip to calf as it learns to lift and lower your entire body with power. Step-ups mirror real-world moments like climbing into vans or onto rocks or up uneven staircases. If your leg wobbles then your body is asking for more of this work rather than less. Over time you can try higher surfaces or slower tempos or pause at the top to test your balance in that elevated position.

    Beyond Reps: Smart Ways to Progress Without Adding Weights

    One of the most common doubts about bodyweight training is whether you will plateau without adding weight. But the human body adapts remarkably well. You can manipulate three variables that work just as effectively as adding more plates to a barbell: repetitions leverage and tempo. At first your progress might look like this: you go from 8 to 12 good squats and then from 2 sets to 3. Later you turn regular squats into jump squats by exploding upward & landing softly like a cat. Or you shift into pistol squat progressions by using a chair or doorframe to guide you as you learn to squat on one leg at a time.

    This turns your own bodyweight into a heavy challenge. Tempo is another quiet weapon. Try lowering into a squat for a count of three and pausing at the bottom for another three before rising for three. Those nine seconds will set your quads on fire faster than you might believe. The same goes for lunges and bridges. Move slowly enough that every inch of movement feels deliberate rather than rushed. And then there is leverage: adjusting the angles so your muscles work harder. Elevate your feet for glute bridges or place your front foot on a small step during lunges so your quads and glutes have to drive you up from a deeper position. None of this requires equipment beyond what is around you but each tweak nudges your body further along the path of adaptation.

    Designing a Simple, Effective Leg Routine Using Only Your Body

    You do not need a spreadsheet to create an effective leg routine. All you require is a small selection of exercises and a commitment to perform them several times each week with genuine effort. What follows is an example of how you can organize a bodyweight leg workout that works at home or outdoors or in any location where you have some space.

    Exercise Name Sets Repetitions / Duration Training Focus & Tips
    Bodyweight Squats 3 10–15 reps Move slowly, maintain balance, and pause briefly at the lowest point
    Reverse Lunges (Per Leg) 3 8–12 reps Step backward to protect knees; keep chest tall and stable
    Glute Bridges 3 12–15 reps Press through heels and contract glutes firmly at the top
    Step-Ups (Per Leg) 2–3 8–10 reps Use a secure surface; control the movement while stepping down
    Standing Calf Raises 3 15–20 reps Lift heels fully and hold the top position briefly each rep

    Rest for around 45 to 75 seconds after you finish each set. Change the number of reps based on what works for you. The final few reps in every set should feel hard but you should still be able to do them properly with correct form. As you get stronger you can increase the number of reps or add more sets. You can also slow down your movements or try harder versions of the exercises. Some examples include jump squats or Bulgarian split squats where your back foot is raised on something. You could also do single-leg bridges instead of regular ones.

    From Living Room to Park Bench: Transforming Any Space into a Leg Gym

    Once you notice it you cannot unsee it. The world is quietly full of training equipment. A curb becomes a platform for calf raises. A low wall becomes a box for step-ups. A tree branch becomes something to hang from while you stretch your hips and swing your legs gently. The landscape of your daily life can all be woven into your leg training. The park on your commute & the steps to your apartment and the sidewalk outside your door all become part of it. Try this on a walk. Turn the last block into a moving workout. Every second driveway stop for 10 squats. Use the park bench for 10 step-ups on each leg.

    Finish with 20 calf raises on the curb with your heels dropping slightly below the edge & rising again to meet the day just a little stronger than you were when you left the house. The beauty of bodyweight training is not only that it is free and convenient. It blurs the line between workout time and life time. Strong legs built without equipment are legs ready for anything. An impromptu hike or a long day on your feet or a spontaneous decision to sprint across a field just because it feels good. In the end stronger legs without gym equipment are not a compromise or a second-best option. They are a return to something basic and honest. It is a way of connecting back with your own body and the ground that holds you up. Your training becomes less about numbers on a machine and more about trust. Step by step & rep by rep you rediscover what your legs were always capable of when you finally decided to ask.

  • Natural Henna Hair Dye Recipes That Deliver Vibrant Long-Lasting Colour Without Chemical Damage

    Natural Henna Hair Dye Recipes That Deliver Vibrant Long-Lasting Colour Without Chemical Damage

    Natural henna hair dye has become a trusted beauty ritual across India for those seeking rich colour without long-term hair damage. Unlike chemical dyes that weaken strands over time, henna-based recipes work gently with the scalp while improving texture and shine. When prepared correctly, henna can deliver vibrant, long-lasting tones that deepen with each use. From covering greys to enhancing natural hues, these time-tested methods blend tradition with modern hair care needs, offering a safer, more nourishing alternative for individuals who want healthy colour results.

    Natural Henna Hair Dye Recipes for Deep, Vibrant Colour

    Creating effective natural henna hair dye recipes starts with high-quality henna powder and mindful preparation. The paste should be mixed slowly to activate the dye molecules, allowing the colour to release fully before application. Adding natural ingredients can enhance results while keeping hair healthy. People often notice rich colour payoff, smooth strand texture, and natural shine boost when henna is prepared properly. These recipes also help with scalp comfort and balanced moisture, making them ideal for regular use. Patience is key, as natural dyes develop gradually but reward consistency with depth and durability.

    Herbal Henna Hair Dye Methods That Avoid Chemical Damage

    Herbal henna hair dye methods focus on strengthening hair while colouring it gently. Unlike synthetic dyes, henna binds naturally to the hair shaft, forming a protective layer rather than stripping oils. This approach supports cuticle protection, reduced breakage, and lasting tone depth. Many users also experience improved hair strength and less scalp irritation over time. These methods are especially beneficial for individuals with sensitive skin or previously damaged hair, as the colouring process doubles as a conditioning treatment that improves overall hair health.

    Long-Lasting Henna Hair Dye Results Using Simple Kitchen Additions

    Achieving long-lasting henna hair dye results often involves simple kitchen additions that enhance pigment release. Natural acidic and nourishing elements help the dye penetrate evenly, leading to deeper colour layers, even coverage results, and fade-resistant tones. These additions also support soft hair feel and healthy scalp balance. Over repeated applications, colour becomes more intense and uniform without causing dryness. This makes henna a sustainable choice for those who want predictable, gradual colour improvement without exposing hair to harsh substances.

    Why Natural Henna Hair Dye Remains a Trusted Choice

    Natural henna hair dye continues to stand out because it colours and cares for hair at the same time. Instead of weakening strands, it builds resilience, making hair appear fuller and healthier. Regular users often notice consistent colour growth, improved hair density, long-term scalp health, and natural conditioning effect. The absence of harsh chemicals reduces cumulative damage, making henna suitable for long-term use. For those committed to maintaining hair health while enjoying vibrant colour, henna remains a reliable and culturally rooted solution.

    Henna Type Colour Outcome Best For Longevity
    Pure Henna Red to Copper Grey Coverage 4–6 Weeks
    Henna + Indigo Brown to Black Darker Shades 5–7 Weeks
    Henna + Herbs Warm Brown Dry Hair 4–5 Weeks
    Henna Gloss Soft Tint Colour Refresh 2–3 Weeks

    Frequently Asked Questions (FAQs)

    1. Does henna damage hair over time?

    No, pure henna strengthens hair and protects it from environmental stress.

    2. How long does natural henna colour last?

    Henna colour typically lasts between four to six weeks depending on care.

    3. Can henna fully cover grey hair?

    Yes, henna effectively covers greys with repeated and proper application.

    4. Is henna suitable for chemically treated hair?

    Henna can be used, but a strand test is strongly recommended first.

  • Collagen-Rich Broth Rituals That Gradually Improve Skin Hydration Firmness and Elasticity Naturally

    Collagen-Rich Broth Rituals That Gradually Improve Skin Hydration Firmness and Elasticity Naturally

    In India, traditional food wisdom is making a quiet comeback as people look for natural ways to support skin health from within. Collagen-rich broth rituals, once common in home kitchens, are now being rediscovered for their ability to improve hydration, firmness, and elasticity over time. Unlike quick cosmetic fixes, these slow, nourishing practices work gently with the body, supporting skin through daily nutrition. When prepared and consumed mindfully, collagen-rich broths become a simple yet powerful habit that fits easily into modern lifestyles while staying rooted in age-old wellness traditions.

    Collagen-rich broth rituals for deeper skin hydration

    One of the most noticeable benefits of collagen-rich broth rituals is how they support skin hydration from the inside out. Slowly simmered bones release amino acids and minerals that help the body retain moisture more effectively. When enjoyed regularly, this ritual encourages internal moisture balance, which reflects on the skin as a softer, smoother texture. Warm broths also aid digestion, improving nutrient absorption support that helps skin cells function better. Over time, this gentle practice promotes natural water retention and reduces the dull, tight feeling caused by dehydration. Rather than relying on topical products alone, these rituals nurture cell-level hydration through consistent nourishment.

    Collagen broth habits that improve skin firmness naturally

    Skin firmness depends largely on the strength of its underlying structure, and collagen-rich broths play a quiet but meaningful role here. The collagen peptides formed during slow cooking contribute to structural protein intake, which supports skin density over time. Making broth a routine habit encourages gradual tissue support rather than sudden changes. Many people notice improved resilience as the skin feels less saggy and more supported. Combined with a balanced diet, these broths help maintain healthy skin matrix and encourage long-term firmness gains without stressing the body or relying on aggressive treatments.

    Broth-based collagen routines for skin elasticity support

    Elasticity allows skin to stretch and return smoothly, and collagen-rich broth routines help preserve this quality naturally. Regular intake supports elastic fiber nourishment, which is essential as skin ages. The gelatin formed in broth contributes to flexible skin response, helping skin adapt to daily movement and expression. Over time, this ritual supports youthful rebound feel and reduces the appearance of stiffness. When paired with hydration and rest, collagen broths encourage adaptive skin strength, making elasticity improvements feel gradual, sustainable, and in harmony with the body’s natural rhythms.

    Why slow collagen rituals work better over time

    The real strength of collagen-rich broth rituals lies in their slow, consistent nature. Instead of forcing quick changes, they align with the body’s natural renewal cycles. Regular consumption supports steady skin renewal while avoiding nutritional overload. These rituals also promote mindfulness, turning nourishment into a calming habit rather than a rushed task. Over weeks and months, this approach encourages balanced internal support, helping skin respond more evenly to aging and environmental stress. By focusing on sustainable nourishment habits and long-term skin harmony, collagen broths become a reliable foundation for healthy, resilient skin.

    Broth Ritual Main Skin Benefit Recommended Frequency
    Bone broth sipping Improved hydration 3–4 times weekly
    Slow-cooked stock Better firmness 2–3 times weekly
    Morning warm broth Elasticity support Daily
    Vegetable-collagen blend Overall skin balance 2 times weekly

    Frequently Asked Questions (FAQs)

    1. How long does it take to see skin results from collagen broth?

    Most people notice subtle skin improvements within four to eight weeks of regular use.

    2. Can collagen-rich broth replace skincare products?

    No, it works best as internal support alongside a simple external skincare routine.

    3. Is collagen broth suitable for daily consumption?

    Yes, moderate daily intake is generally safe for most healthy adults.

    4. Do vegetarian options provide similar benefits?

    Plant-based broths support skin health but do not provide true collagen.

  • Shoulder Mobility Yoga: 6 Poses That Improve Flexibility and Reduce Stiffness

    Shoulder Mobility Yoga: 6 Poses That Improve Flexibility and Reduce Stiffness

    Shoulder flexibility plays a vital role in supporting proper posture, enhancing mobility, and reducing the risk of injuries. Yoga includes a range of poses designed to both stretch and strengthen the muscles around the shoulder joints. Whether you are physically active, spend long hours at a desk, or simply want smoother, pain-free movement, practicing yoga for shoulder mobility can offer noticeable improvements. Below are six highly effective yoga poses that specifically focus on increasing shoulder range of motion.

    Top Yoga Poses to Improve Shoulder Mobility

    1. Downward-Facing Dog (Adho Mukha Svanasana)

    Downward-Facing Dog is a foundational yoga posture that helps open the shoulders while lengthening the spine and legs. Begin in a tabletop position with hands beneath shoulders and knees under hips. Tuck your toes, lift your hips upward, and form an inverted “V” shape. Press firmly through your palms and allow your chest to move toward your thighs, creating space in the shoulders. Keep your head relaxed between your arms and breathe steadily for 30 seconds to one minute.

    This pose strengthens the arms and back while enhancing shoulder flexibility. To deepen the stretch, actively rotate your shoulders outward and ground your palms into the mat.

    2. Thread the Needle Pose (Urdhva Mukha Pasasana)

    Thread the Needle is an effective posture for releasing shoulder tightness and increasing upper-back mobility. Start in a tabletop position, then slide your right arm underneath your chest toward the left side. Lower your right shoulder and ear to the mat while keeping your hips lifted. The left arm can extend forward or support your balance. Hold for 30 seconds before switching sides.

    This pose gently stretches the shoulders, arms, and upper back, making it especially beneficial for individuals who experience tension from prolonged sitting or daily stress.

    3. Eagle Arms (Garudasana Arms)

    Eagle Arms is a simple yet powerful pose for improving shoulder and upper-back flexibility. Sit or stand tall and extend both arms forward. Cross your right arm over your left, bend the elbows, and attempt to bring your palms together. If that’s not accessible, press the backs of your hands together. Hold the position for 20 to 30 seconds, then switch sides.

    This posture helps relieve stiffness in the shoulders and arms. For a deeper stretch, gently lower the elbows while lifting the forearms upward.

    4. Cow Face Pose (Gomukhasana)

    Cow Face Pose offers a deep stretch for the shoulders, chest, and upper back. Sit comfortably and lift your left arm overhead, bending the elbow so the hand drops down your back. Extend your right arm behind you and try to clasp the hands together, or use a strap if needed. Hold the stretch for 30 seconds to one minute, then switch sides.

    This pose is particularly effective for improving shoulder mobility and counteracting tightness caused by poor posture or repetitive movements.

    5. Reverse Prayer Pose (Paschim Namaskarasana)

    Reverse Prayer Pose deeply opens the shoulders and chest while stretching the wrists and arms. Stand or sit upright, bring your hands behind your back, and press the palms together with fingers pointing downward. Lift your chest and gently draw your shoulder blades down, keeping the elbows angled outward.

    This pose supports better posture and enhances front shoulder flexibility, making it ideal for those who spend extended time sitting or working at a desk.

    6. Puppy Pose (Uttana Shishosana)

    Puppy Pose provides a gentle yet deep stretch for the shoulders, chest, and spine. Begin on all fours, then walk your hands forward while lowering your chest toward the floor. Keep your hips stacked above your knees and rest your forehead or chin on the mat if comfortable.

    This posture opens the shoulders without excessive strain and encourages relaxation, making it suitable for all experience levels.

    Key Benefits of Improving Shoulder Flexibility

    • Better posture by reducing upper-back and neck tension
    • Lower injury risk through improved range of motion
    • Reduced muscle tightness in the shoulders and upper body
    • Enhanced performance in physical activities and daily tasks

    How Often to Practice Shoulder-Focused Yoga Poses

    For noticeable improvements, practice shoulder flexibility poses at least three to four times per week. Beginners should start with shorter holds of 20 to 30 seconds and gradually increase duration as mobility improves. Consistent practice is essential for achieving lasting results.

    Final Thoughts on Yoga for Shoulder Flexibility

    Yoga provides a balanced and effective approach to enhancing shoulder flexibility while supporting overall physical and mental well-being. By regularly incorporating these six poses into your routine, you can promote better mobility, strength, and posture. Whether your goal is easing tension, improving movement, or maintaining joint health, yoga offers a sustainable path toward healthier shoulders.

  • Japanese Hair-Washing Method for Stronger Shinier Hair Without Salon Treatments or Harsh Chemicals

    Japanese Hair-Washing Method for Stronger Shinier Hair Without Salon Treatments or Harsh Chemicals

    The Japanese hair-washing method has gained global attention for its gentle yet effective approach to achieving healthier, shinier hair without relying on salon treatments or harsh chemicals. Rooted in traditional beauty practices from Japan, this method focuses on scalp care, mindful cleansing, and long-term hair health rather than quick cosmetic fixes. In Japan, hair is seen as an extension of overall well-being, which is why daily routines prioritize balance and prevention. By adopting these simple techniques at home, many people are discovering smoother texture, improved strength, and a natural shine that lasts.

    Japanese hair-washing method for healthier scalp care

    At the heart of the Japanese hair-washing method is the belief that a clean, balanced scalp leads to beautiful hair. Instead of aggressively scrubbing, the focus is on scalp-first cleansing using fingertips to gently lift dirt and oil. This encourages better blood flow and supports natural oil balance, which many modern routines disrupt. In Japan, washing frequency is adjusted to lifestyle and climate, avoiding over-washing that causes dryness. Lukewarm water is preferred to protect delicate scalp skin, while slow, mindful movements reduce stress and tension. Over time, this approach helps reduce irritation, flakiness, and excess oil production.

    Japanese hair-washing technique using gentle products

    Another key aspect of the Japanese hair-washing technique is choosing products that respect hair’s natural structure. Traditional routines emphasize low-foam shampoos that cleanse without stripping moisture. Ingredients are often plant-based, supporting chemical-free care and minimizing buildup. Shampoo is diluted with water before application, allowing even product spread and reducing friction. Instead of piling hair on the head, lengths are cleansed indirectly as the rinse flows through. This method protects weak hair strands and helps maintain softness and shine without conditioners overloaded with silicone.

    Japanese hair-washing routine for stronger, shinier hair

    Consistency is what makes the Japanese hair-washing routine so effective. Hair is gently towel-dried without twisting, preventing breakage prevention habits from being ignored. Many people in Japan allow partial air drying to reduce heat tool damage, using dryers only when necessary. Scalp massage before washing is also common, encouraging nutrient delivery roots and relaxation. Over time, this routine supports long-term hair strength rather than temporary smoothness. The result is hair that feels lighter, looks shinier, and grows healthier without expensive treatments.

    Why the Japanese hair-washing method works long term

    The success of this method lies in its simplicity and respect for the body’s natural systems. By avoiding aggressive techniques and harsh formulas, it promotes sustainable hair health and reduces dependency on styling products. The focus on routine over results encourages patience, while small daily habits create visible change. This approach aligns hair care with self-care, making it easier to maintain consistency. For those tired of quick fixes, the Japanese method offers balanced beauty philosophy that supports shine, strength, and comfort over time.

    Routine Step Japanese Method Common Alternative
    Scalp Cleaning Gentle fingertip massage Aggressive scrubbing
    Shampoo Type Low-foam, mild formulas High-foam, strong cleansers
    Water Temperature Lukewarm Very hot
    Drying Method Pat dry, air dry Rough towel drying

    Frequently Asked Questions (FAQs)

    1. Is the Japanese hair-washing method suitable for all hair types?

    Yes, it can be adapted easily for straight, wavy, curly, or fine hair.

    2. How often should hair be washed using this method?

    Washing frequency depends on scalp condition, usually two to four times weekly.

    3. Do I need special Japanese products to follow this routine?

    No, mild and gentle products available locally work well.

    4. How long before results become noticeable?

    Most people notice improved texture and shine within a few weeks.

  • Core Strength Yoga: 7 Poses That Build Stability and Improve Balance

    Core Strength Yoga: 7 Poses That Build Stability and Improve Balance

    Core strength forms the base of balance, posture, and everyday movement. A well-developed core supports the spine, enhances physical performance, and helps lower the risk of injury. While core workouts are often associated with repetitive crunches and sit-ups, yoga provides a more complete method by activating deep core muscles such as the transverse abdominis, pelvic floor, and obliques. The following seven yoga poses can be practiced regularly to create a core that feels stable, resilient, and strong.

    1. Boat Pose for Powerful Core Engagement

    Boat Pose activates the entire core, including the deep stabilizing muscles. Sit with your knees bent and feet on the mat, then lean back slightly while lifting your feet off the floor. Keep the spine long, chest open, and arms extended forward at shoulder height. If possible, straighten your legs. Hold for 30 to 60 seconds while breathing steadily. This pose improves balance, coordination, and endurance while targeting the lower abdomen and hip flexors.

    Regular practice leads to stronger abdominal muscles, better posture, and improved balance. Beginners can support themselves by holding the backs of the thighs. With time, aim to increase the hold duration while maintaining smooth breathing.

    2. Plank Pose for Core Endurance and Control

    Plank Pose is a highly effective posture for building core endurance. Begin in a high push-up position with hands under the shoulders and feet set hip-width apart. Draw the belly inward and press firmly through the hands, keeping the body aligned from head to heels. Hold for 30 seconds, gradually working up to two minutes.

    This pose strengthens the rectus abdominis, obliques, and deep stabilizers while also working the arms, shoulders, and back. If the hips drop, pause and reset. To intensify the pose, briefly lift one leg or transition into a side plank.

    3. Dolphin Pose for Abdominal and Shoulder Strength

    Dolphin Pose is a forearm-based variation that increases core activation. Start on hands and knees, place the forearms on the mat shoulder-width apart, tuck the toes, and lift the hips upward. Keep the head relaxed between the arms and press firmly through the forearms. Engage the belly and lengthen the spine while holding for 30 to 60 seconds.

    This posture builds core strength, shoulder stability, and upper-back endurance. It also stretches the hamstrings, calves, and feet. Beginners can step the feet closer to the elbows to ease intensity.

    4. Forearm Side Plank for Oblique Stability

    Forearm Side Plank effectively targets the obliques and side body. From forearm plank, shift weight onto the left forearm and stack the feet. Extend the right arm upward and lift the hips while keeping the core engaged. Hold for 20 to 45 seconds, then change sides.

    This pose enhances balance and strengthens muscles used for twisting and side-bending movements. For extra stability, place the top foot slightly forward instead of stacking.

    5. Bridge Pose for Lower Core Support

    Although often viewed as a backbend, Bridge Pose also activates the lower abdominals and glutes, which are essential for core stability. Lie on your back with knees bent and feet hip-width apart. Press through the feet to lift the hips upward. Keep arms alongside the body or clasp hands beneath you. Hold for 30 seconds while gently drawing the belly inward.

    This pose improves pelvic stability, strengthens the back body, and engages the deep muscles around the lower spine. It also opens the chest and hip flexors. For added challenge, lift one leg while maintaining level hips.

    6. Warrior III for Balance and Core Control

    Warrior III demands strong core activation to maintain balance. Begin standing, shift weight onto the left foot, and hinge forward while lifting the right leg behind you. Extend the arms forward and align the body from fingertips to toes. Keep hips square and the core firm. Hold for 20 to 40 seconds, then switch sides.

    This balancing posture strengthens the entire core, particularly muscles responsible for stabilization. It also tones the legs, back, and shoulders. Beginners can use a wall or chair for added support.

    7. Twisting Boat Pose for Oblique Strength

    Once comfortable in Boat Pose, add gentle twists to increase oblique engagement. From the pose, place hands behind the head and rotate the torso slowly to the right and left. Keep the spine tall and movement controlled. Perform 5 to 10 twists per side while holding the pose.

    This variation strengthens the waist muscles and builds rotational power useful for daily activities and sports. Focus on controlled motion and steady breathing rather than speed.

    How Often to Practice for Best Results

    Consistency is more important than long sessions. Aim to practice these poses three to five times per week. Beginners should start with shorter holds and gradually increase duration as strength develops. Warming up with Cat-Cow movements and gentle hip openers helps prepare the body and protects the lower back.

    Nutrition and Rest to Support Core Development

    Core strength improves faster when exercise is supported by proper recovery. Eating nutrient-rich foods such as lean proteins, vegetables, fruits, whole grains, and healthy fats aids muscle repair and energy levels. Staying hydrated supports muscle function, while seven to nine hours of sleep each night allows the body to rebuild and strengthen.

    Safety Guidelines to Avoid Injury

    Yoga-based core training is generally safe, but individuals with conditions like lower back pain or herniated discs should proceed carefully. Stop immediately if sharp pain occurs and seek guidance from a qualified instructor or healthcare professional. Move slowly, stay aware of body signals, and use supportive props such as blocks or straps when needed.

    Final Thoughts on Strengthening the Core With Yoga

    A strong core transforms how the body moves throughout the day. It improves posture, reduces strain during lifting, and enhances balance for walking, running, and sports. Practicing these seven yoga poses regularly creates a solid foundation of strength and stability that benefits the entire body. Begin at a comfortable level, progress gradually, and stay consistent. With patience and proper technique, you will experience improved core strength, better posture, and greater confidence in every movement.

  • Stress Relief Yoga: 8 Poses That Help the Body Relax and Recover

    Stress Relief Yoga: 8 Poses That Help the Body Relax and Recover

    In today’s fast-moving lifestyle, stress has become a constant companion for many people. While stress is a natural reaction to everyday challenges, ongoing stress can negatively affect both mental clarity and physical well-being. Yoga provides a powerful path to relaxation by combining controlled breathing, mindful movement, and deep relaxation. These practices help release built-up tension and support emotional balance. Below are eight effective yoga poses designed to reduce stress and encourage a lasting sense of inner peace.

    1. Child’s Pose (Balasana)

    Child’s Pose is a deeply soothing posture that helps release tension in the back, neck, and shoulders. This gentle forward fold allows the body to slow down and reset, making it especially effective for stress relief.

    How to Do It:

    • Begin on your hands and knees in a tabletop position.
    • Bring your big toes together, widen your knees, and gently lower your hips toward your heels.
    • Extend your arms forward or rest them alongside your body, whichever feels more comfortable.
    • Place your forehead on the mat and focus on steady breathing.

    Benefits:

    • Helps ease tension in the back, neck, and shoulders.
    • Encourages relaxation and calms the mind.

    2. Downward-Facing Dog (Adho Mukha Svanasana)

    Downward-Facing Dog is a full-body stretch that helps relieve physical tension while also calming the mind. It lengthens the hamstrings and calves, eases back and shoulder tightness, and improves circulation to support mental clarity.

    How to Do It:

    • Start in a tabletop position with wrists under shoulders and knees under hips.
    • Tuck your toes and lift your hips upward, forming an inverted “V” shape.
    • Press your heels toward the floor and keep your hands shoulder-width apart.
    • Hold the pose for 30 seconds to 1 minute while breathing deeply.

    Benefits:

    • Stretches the legs, spine, and shoulders.
    • Improves circulation and reduces mental fatigue.

    3. Legs Up the Wall (Viparita Karani)

    Legs Up the Wall is a restorative pose that gently calms the nervous system. It supports deep relaxation, improves circulation, and helps relieve fatigue in the legs and lower back.

    How to Do It:

    • Sit beside a wall and slowly lie on your back while extending your legs upward.
    • Keep your body aligned and rest your arms by your sides with palms facing up.
    • Close your eyes and breathe slowly, allowing full relaxation.
    • Remain in the pose for 5 to 10 minutes.

    Benefits:

    • Reduces tension in the legs and lower back.
    • Promotes deep relaxation and stress relief.

    4. Cat-Cow Flow (Marjaryasana–Bitilasana)

    Cat-Cow is a gentle, flowing movement that helps release tension along the spine and neck. The rhythmic motion encourages relaxation while supporting flexibility and stress reduction.

    How to Do It:

    • Begin in a tabletop position with proper wrist and knee alignment.
    • Inhale as you drop your belly and lift your chest and tailbone into Cow Pose.
    • Exhale as you round your spine, tucking your chin and drawing the belly inward for Cat Pose.
    • Continue flowing between the two poses for 1 to 2 minutes.

    Benefits:

    • Releases tightness in the spine, shoulders, and neck.
    • Helps calm the nervous system and improve mobility.

    5. Corpse Pose (Savasana)

    Savasana is the most restorative pose in yoga and is typically practiced at the end of a session. It allows the body to fully relax and absorb the benefits of the practice, making it highly effective for stress relief.

    How to Do It:

    • Lie flat on your back with legs extended and arms relaxed by your sides.
    • Turn your palms upward and gently close your eyes.
    • Focus on natural breathing and allow your body to release tension.
    • Remain in the pose for 5 to 10 minutes.

    Benefits:

    • Encourages deep relaxation and stress reduction.
    • Calms the mind and relaxes the entire body.

    6. Seated Forward Fold (Paschimottanasana)

    Seated Forward Fold is a calming posture that gently stretches the hamstrings and spine while encouraging mental stillness and emotional balance.

    How to Do It:

    • Sit upright with your legs extended in front of you.
    • Inhale to lengthen the spine, then exhale as you fold forward from the hips.
    • Reach for your feet or shins while keeping the spine long.
    • Hold for 30 seconds to 1 minute.

    Benefits:

    • Relieves tension in the back, shoulders, and hamstrings.
    • Supports mental calm and stress reduction.

    7. Cobra Pose (Bhujangasana)

    Cobra Pose is a gentle backbend that opens the chest and lengthens the spine. It helps release stored tension in the upper body and encourages emotional relaxation.

    How to Do It:

    • Lie on your stomach with legs extended and hands beneath the shoulders.
    • Press into your palms and lift your chest while keeping elbows slightly bent.
    • Engage the lower back and gently open the chest.
    • Hold the pose for 15 to 30 seconds.

    Benefits:

    • Stretches the chest, spine, and shoulders.
    • Encourages emotional balance and relaxation.

    8. Wide-Legged Forward Fold (Prasarita Padottanasana)

    Wide-Legged Forward Fold provides a deep stretch for the hamstrings, hips, and lower back. This pose helps calm the nervous system and release physical stress.

    How to Do It:

    • Stand with your feet set wide apart.
    • Inhale to lengthen your spine, then exhale as you fold forward from the hips.
    • Allow your head and neck to relax toward the floor.
    • Hold the position for 30 seconds to 1 minute.

    Benefits:

    • Reduces tension in the hips, hamstrings, and lower back.
    • Promotes calmness and stress relief.
  • 5 Targeted Yoga Poses That Improve Posture and Reinforce Proper Spine Alignment

    5 Targeted Yoga Poses That Improve Posture and Reinforce Proper Spine Alignment

    A healthy spine matters for your overall health and yoga offers an effective way to improve it. Bad posture & sitting too much along with everyday stress can harm your spine and cause pain or alignment problems. The good news is that practicing specific yoga poses regularly can fix your posture and make the muscles around your spine stronger while bringing back balance. If you want to work on your spine alignment these five important yoga poses are an excellent starting point.

    1. Mountain Pose (Tadasana)

    Mountain Pose may look basic, but it plays a powerful role in improving spinal alignment. This foundational posture builds awareness of body positioning by aligning the feet, legs, torso, and head. It also activates the core muscles, which are essential for maintaining a strong and healthy spine.

    How to Do It:

    • Stand upright with your feet placed hip-width apart, firmly grounding them into the floor.
    • Engage your thigh muscles, lift the kneecaps, and gently draw your navel toward the spine.
    • Broaden your chest, relax the shoulders, and let your arms rest by your sides with palms facing forward.
    • Hold the position for 30 seconds to 1 minute while breathing slowly and deeply.

    2. Cat-Cow Pose (Marjaryasana–Bitilasana)

    The Cat-Cow sequence is a flowing movement that increases spinal mobility and flexibility. By alternating between rounding and arching the back, this pose stretches the spine and neck while strengthening surrounding muscles. It helps ease stiffness, release tension, and support proper spinal alignment.

    How to Do It:

    • Begin in a tabletop position with hands under shoulders and knees aligned under hips.
    • Inhale, drop your belly toward the mat, lift your chest, and tilt your tailbone upward (Cow Pose).
    • Exhale, round your spine toward the ceiling, tuck the chin in, and draw the belly inward (Cat Pose).
    • Continue flowing between the two poses for 5–10 rounds, matching movement with breath.

    3. Child’s Pose (Balasana)

    Child’s Pose is a soothing resting posture that gently stretches the spine, hips, and lower back. It helps release built-up tension and restores alignment after more intense movements. This pose also calms the nervous system, making it ideal for stress relief and relaxation.

    How to Do It:

    • Start by kneeling with big toes touching and knees spread comfortably apart.
    • Lower your hips back toward your heels and extend your arms forward on the mat.
    • Rest your forehead on the floor and actively reach through the arms to lengthen the spine.
    • Remain in the pose for 1–3 minutes, breathing deeply and allowing the body to relax.

    4. Cobra Pose (Bhujangasana)

    Cobra Pose strengthens the muscles along the spine while opening the chest and shoulders. This gentle backbend promotes an upright posture and helps counteract stiffness caused by prolonged sitting. It also supports spinal extension and relieves lower back tension.

    How to Do It:

    • Lie face down with legs extended back and the tops of your feet pressing into the mat.
    • Place your hands beneath the shoulders, elbows close to the ribs, fingers spread wide.
    • Inhale and lift your chest by pressing into the hands, keeping a slight bend in the elbows.
    • Hold for 15–30 seconds with an open chest and forward gaze.
    • Exhale to lower down and repeat the pose 2–3 times.

    5. Bridge Pose (Setu Bandhasana)

    Bridge Pose activates the lower back, glutes, and thighs while stretching the spine and chest. By lifting the hips and opening the front body, this posture encourages better alignment and posture. It is especially effective for easing back tension and improving spinal stability.

    How to Do It:

    – Lie on your back with knees bent and feet flat on the floor, positioned hip-width apart.

    – Rest your arms alongside the body with palms facing downward.

    – Inhale and lift your hips upward, pressing firmly through the feet.

    – Interlace your fingers beneath your back and roll the shoulders inward to expand the chest.

    – Hold for 30 seconds to 1 minute, then gently lower the hips down on an exhale.