Author: admin

  • 6 Yoga Exercises Designed to Help Relax the Mind and Manage Stress

    6 Yoga Exercises Designed to Help Relax the Mind and Manage Stress

    Yoga works wonderfully for reducing stress & helping you relax. Modern life moves fast and stress builds up easily. This affects your body and mind in negative ways. When you add yoga to your daily schedule you can let go of tension and refresh yourself mentally and physically. These six easy yoga exercises will help you handle stress better while boosting relaxation and improving how you feel overall.

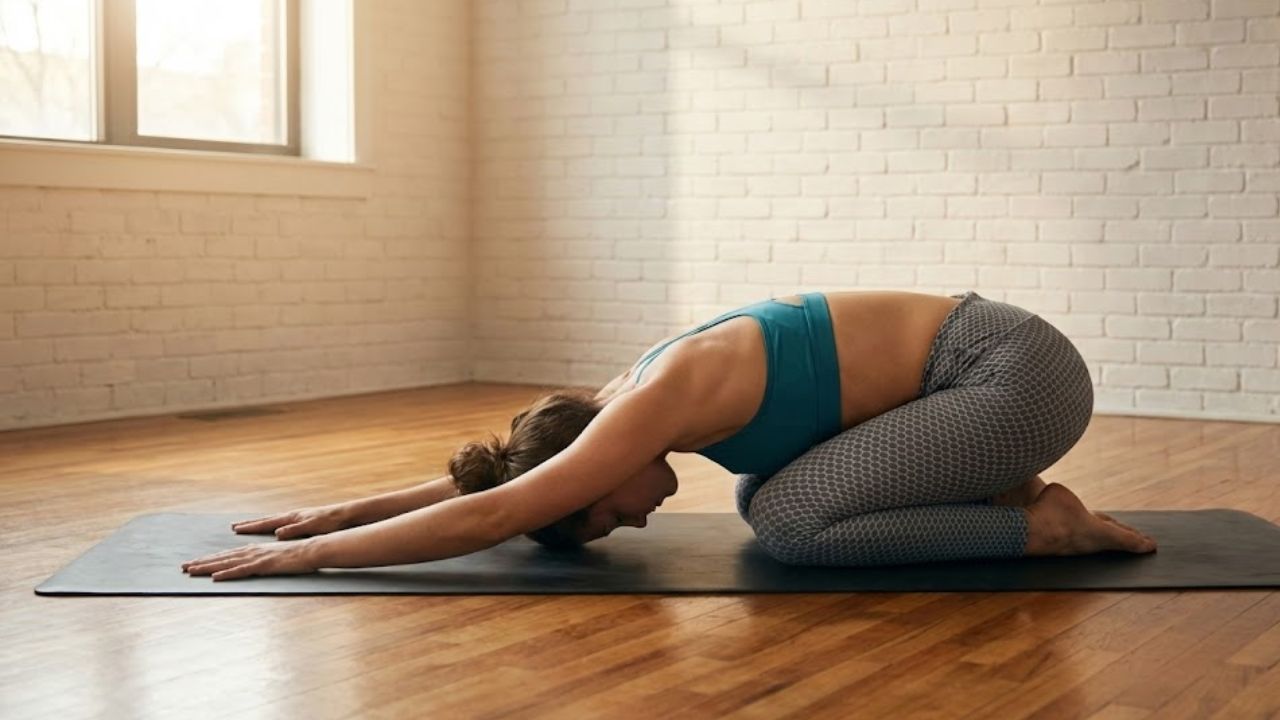
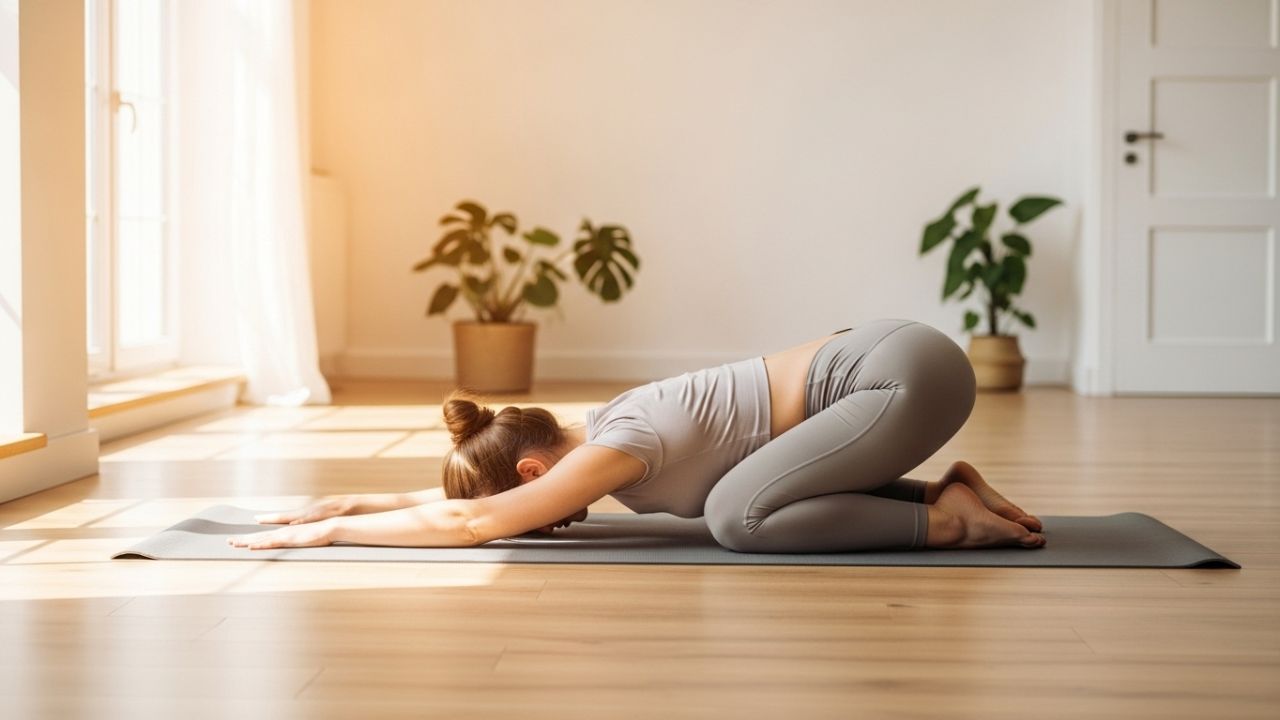
    1. Child’s Pose (Balasana) — A Grounding Posture for Mental Calm

    Child’s Pose works well for relaxation & managing stress because it creates a deeply peaceful state. The position relaxes your mind and gently stretches your back along with your hips and thighs. It also helps you focus on breathing mindfully which brings a feeling of calm and peace. To perform this pose you begin on your hands and knees. Spread your knees apart widely & move your hips back so they rest near your heels. Stretch your arms forward along the mat and place your forehead down on the ground. Take deep breaths and let your body relax deeper into the stretch each time you breathe out. This pose offers several benefits. It releases tension from your back and shoulders and neck. It calms your mind & encourages relaxation while supporting deep breathing patterns.

    2. Cat–Cow Flow (Marjaryasana–Bitilasana) — Gentle Movement to Release Tension

    Why it helps you relax and manage stress: Moving smoothly between Cat and Cow Pose releases tightness in your spine and the muscles around your shoulders and neck. The steady breathing pattern that goes with these movements calms your nervous system & creates a peaceful feeling. How to do it: Start on your hands and knees in a tabletop position. Breathe in as you let your belly sink toward the floor while lifting your chest and tailbone upward for Cow Pose. Breathe out as you arch your back upward and bring your chin toward your chest for Cat Pose. Keep moving back and forth between these positions while matching your breathing to each movement. Benefits: Eases tension in your back & neck. Improves how well your spine can move. Calms your mind and body by focusing on your breathing.

    3. Legs Up the Wall Pose (Viparita Karani) — Restorative Inversion for Nervous System Relief

    Why this pose helps you unwind: Legs Up the Wall is a gentle resting position that calms your body & eases mental tension. It releases tightness in your lower body while boosting blood flow and settling your nervous system. How to practice it: Position yourself sideways next to a wall while sitting. Slowly lower your back to the floor as you lift your legs up against the wall. Let your arms rest naturally at your sides with your palms turned upward. Close your eyes and take slow breaths as you sink deeper into relaxation. Hold this position for 5 to 10 minutes. What you gain: Eases tightness in your legs & lower back. Improves blood circulation throughout your body. Decreases feelings of worry and tension. Brings mental clarity and peace.

    4. Standing Forward Fold (Uttanasana) — Deep Stretch to Quiet Racing Thoughts

    Why it helps with relaxation and stress relief: Forward Fold is a soothing pose that releases tightness in your back and neck & shoulders. This inverted position also promotes calmness and relaxation by boosting blood circulation to your brain. How to perform it: Stand upright with your feet positioned at hip width. Take a breath in to extend your spine and then breathe out while bending forward from your hips. Allow your head to drop naturally and let your chest move closer to your thighs. When you can manage it you should put your hands on the ground or grip your legs. Maintain a slight bend in your knees to prevent strain on your lower back. Benefits: Reduces tightness in your back and neck and shoulders and promotes deeper breathing and calms your nervous system.

    5. Reclining Bound Angle Pose (Supta Baddha Konasana) — Opening the Body to Emotional Ease

    Why it helps with relaxation & stress management: Reclining Bound Angle Pose provides a deeply soothing stretch that opens your hips and chest while releasing tension from your lower body and creating a peaceful feeling. This gentle pose helps you focus on slow and mindful breathing that naturally reduces stress. How to do it: Start by lying flat on your back with both knees bent and your feet resting on the floor. Press the bottoms of your feet together and let your knees drop open toward each side. Rest your arms alongside your body with your palms turned upward. Take slow deep breaths and let your body sink into the stretch for several minutes. Benefits: This pose opens your hips and chest while encouraging complete relaxation. It calms both your mind & body and helps reduce stress and physical tension.

    6. Savasana (Corpse Pose) — Complete Relaxation for Mind–Body Reset

    Why it helps with relaxation and stress management: Savasana is the most relaxing pose in yoga. It gives your body and mind time to take in all the benefits from your practice while helping you feel completely relaxed & less stressed. This pose is important for clearing your mind and finding emotional balance. How to do it: Lie flat on your back with your legs stretched out and your arms resting at your sides with palms facing upward. Close your eyes and pay attention to your breathing. Let your entire body relax & release any tightness in your muscles. Remain in this position for 5 to 10 minutes while letting go of all thoughts and distractions. Benefits: Creates deep relaxation; lowers stress & anxiety; enhances mental clarity; brings back energy & balance.

  • Why Mixing Aloe Vera, Honey, and Turmeric Is Called the Ultimate Home Beauty Remedy

    Why Mixing Aloe Vera, Honey, and Turmeric Is Called the Ultimate Home Beauty Remedy

    Across India, home beauty remedies are gaining renewed attention as people look for natural ways to care for their skin without harsh chemicals. One blend that keeps trending is the mix of aloe vera, honey, and turmeric, often described as the ultimate home beauty remedy. Rooted in traditional practices and modern self-care habits, this combination is praised for addressing common skin concerns gently. From dullness to uneven texture, many believe this simple mix delivers visible results using ingredients already found in Indian kitchens.

    Why Aloe Vera, Honey, and Turmeric Work Together for Skin

    The real magic of this remedy lies in how the ingredients complement each other when combined. Aloe vera provides deep skin hydration, helping calm dryness and irritation, while honey acts as a natural moisture seal that keeps the skin soft and supple. Turmeric adds its well-known anti-inflammatory support, which many people rely on to soothe troubled skin. Together, the blend creates a balanced skin barrier that feels gentle yet effective. This synergy is why the mixture is often seen as more powerful than using each ingredient alone, especially for everyday skin care routines.

    How This Natural Beauty Remedy Supports Clearer Skin

    People often turn to this mix when dealing with uneven tone or occasional breakouts. Aloe vera helps maintain cooling skin relief, which can be especially comforting in warmer Indian climates. Honey contributes mild antibacterial care, supporting cleaner-looking skin without stripping natural oils. Turmeric is valued for promoting visible brightness boost over time when used consistently. The combination works gently, encouraging healthy skin renewal rather than forcing quick changes, making it suitable for those who prefer slow, natural improvements.

    Using the Aloe, Honey, and Turmeric Mix Safely at Home

    Applying this remedy correctly matters just as much as the ingredients themselves. Always start with a clean face to allow better ingredient absorption. Using small amounts helps avoid temporary yellow stains from turmeric, a common concern. Many users apply the mask briefly to enjoy short contact benefits without irritation. Following up with a gentle rinse supports skin comfort afterward. With mindful use, this routine fits easily into weekly self-care without overwhelming the skin.

    Summary and Practical Takeaway

    The popularity of aloe vera, honey, and turmeric as a home beauty remedy is not just about tradition but also about simplicity. This blend offers ingredient harmony effect that feels approachable for everyday care. It encourages consistent natural routines rather than quick fixes, which many find more sustainable. While results vary, users often appreciate the gentle skin approach and the comfort of familiar ingredients. When used thoughtfully, this mix reflects how old practices still hold value in modern beauty habits.

    Ingredient Primary Skin Benefit Common Use
    Aloe Vera Soothing hydration Calming base
    Honey Moisture retention Natural binder
    Turmeric Skin clarity support Active booster
    Combined Mix Balanced nourishment Weekly face mask

    Frequently Asked Questions (FAQs)

    1. Is this remedy suitable for all skin types?

    Most people can use it, but a patch test is always recommended.

    2. How often should the mix be applied?

    Using it once or twice a week is generally considered sufficient.

    3. Can turmeric stain the skin permanently?

    No, any yellow tint is temporary and washes off easily.

    4. Should fresh aloe vera be used?

    Fresh aloe vera gel is preferred, but pure store-bought gel also works.

  • Goodbye Kitchen Islands: their 2026 Replacement Is A More Practical And Elegant Trend

    Goodbye Kitchen Islands: their 2026 Replacement Is A More Practical And Elegant Trend

    It happens on an ordinary evening, around 7:23 p.m., when you are rushing to get dinner ready and hit your hip for the third time on that once-coveted kitchen island. The stools are buried under unopened mail, the sides are scuffed by school backpacks, and cooking somehow means turning your back on everyone else. What once felt like a symbol of a gourmet lifestyle now feels more like a four-legged traffic jam planted in the middle of the room.

    Across design studios, Instagram feeds, and new-build showrooms, a quiet shift is underway. Architects are drawing fewer islands and replacing them with something lighter, more fluid, and closer to a piece of furniture than a fixed monument. Once you notice it, the traditional island suddenly looks strangely outdated.

    Why kitchen islands are slowly losing their status

    Step into a high-end kitchen showroom in late 2025 and the change is subtle but unmistakable. The space feels more open, with clear sightlines from window to dining area. Instead of being guided toward a massive central block, you are shown a slender element that resembles a modern table, often freestanding, sometimes on legs, with open space underneath.

    The era of the oversized, built-in island is fading quietly. Designers now talk about flow, flexible living, and mixed-use spaces where cooking, working, helping with homework, and serving drinks happen without being boxed in by cabinetry. What was once a sign of success can start to feel like a visual wall dividing the room.

    Homeowners notice it too. Many admit they rarely sit at their island, as stools get in the way and counters collect crumbs and clutter. A 2025 US survey found that while islands are still requested, nearly 40% of respondents now prefer table-style workstations or peninsula and table combinations over a full central block.

    What is replacing the island is the kitchen worktable and the refined kitchen peninsula. These options are slimmer, more furniture-like, and often lighter on storage but richer in comfort. They allow people to face each other again, instead of lining up along a sink.

    The 2026 alternative: worktables and peninsulas that actually work

    The rising solution is not one fixed product but a family of ideas. Think of long, narrow worktables aligned with the main kitchen run, or peninsulas extending from a wall with just enough depth for casual meals and quick laptop use. These designs leave generous walkways and keep the room feeling balanced and breathable.

    The key shift is thinking like a furniture maker rather than a cabinet installer. Instead of a heavy box down to the floor, you get legs, visible light underneath, and chairs that pull in comfortably. Appliances stay on the main run, freeing the center of the room for everyday life, not plumbing.

    Simply shrinking the old island idea rarely works. A narrow block in the middle can still clutter the space. Smarter layouts push the new element toward a wall or window, acting as a bridge rather than a barrier. A peninsula preserves counter space without slicing the room in two, while a movable worktable offers occasional flexibility that changes how the room feels.

    Designers working on 2026 projects are direct about this evolution. Many now draw a traditional island in only a small fraction of plans, favoring solutions that feel kinder and more adaptable in real homes.

    How to rethink your kitchen before it feels dated

    A practical first step is simple: tape the island shape on your floor at full scale. Live with it for a few days. Then tape an alternative—a slimmer worktable or a peninsula off the main cabinets. Walk around it, open imaginary doors, and notice which option feels easier in your body. That experience reveals more than any moodboard.

    Sketch multiple layouts and keep storage honest. Losing deep island cabinets might mean adding a taller pantry or smarter drawers elsewhere. Avoid designing for rare occasions instead of daily routines. Most kitchens serve a handful of people on an ordinary weekday, not a ten-person brunch.

    There is also a quiet emotional layer. Many feel they should want an island because it has long been the aspirational image. Letting go of that expectation can feel like relief. A lighter peninsula or table often supports real life better than a kitchen designed to perform for photos.

    • Keep plumbing off the center: Placing sinks and hobs on the main wall frees the central surface to function as a true table or peninsula.
    • Vary surface heights: Mixing counter-height prep space with a slightly lower area improves comfort for seated work or children.
    • Add softness: Lighting, simple objects, or textiles can turn a work surface into a warm, lived-in focal point.

    A kitchen that feels current in 2026 and timeless later

    The deeper trend is not about removing islands but about recognizing kitchens as living spaces first. Islands rose with open-plan living, acting as control towers between cooking and social life. As that idea matures, many are choosing centers that feel less dominant and more inviting.

    The island is not disappearing overnight; it is simply losing its automatic place. Some will refine it into something smaller and lighter. Others will adopt worktables and peninsulas that feel calmer on a weekday and more generous on a weekend. The kitchens that stand out now are those that allow movement, clarity, and comfort.

    If you are planning a renovation or just imagining one, the real question is not whether to have an island. It is where you want to stand, sit, and talk at the end of the day. Once that moment is pictured honestly, the shape at the center of the kitchen often redesigns itself.

    Key ideas to take away

    • Islands losing ground: Designers and homeowners are moving away from bulky central blocks that can quickly feel dated.
    • Worktables and peninsulas: Slimmer, furniture-like surfaces offer practical and elegant alternatives for real life.
    • Designing for daily rhythm: Planning around everyday use creates kitchens that remain comfortable and relevant over time.
  • 6 Yoga Moves for Better Posture: Natural Alignment Support and an Instant Height Lift Effect

    6 Yoga Moves for Better Posture: Natural Alignment Support and an Instant Height Lift Effect

    Standing upright with confidence is closely linked to maintaining good posture. Unfortunately, many people develop habits like slouching or hunching, which can negatively affect both their appearance and physical health. Yoga provides a natural and effective solution to correct posture and help you appear taller almost instantly. With regular practice of specific poses, you can elongate the spine, strengthen supportive muscles, and fix postural imbalances. Below are six powerful yoga poses that can help you stand taller, feel stronger, and instantly improve your posture.

    1. Mountain Pose (Tadasana)

    Mountain Pose is one of the most basic yet powerful yoga postures and forms the foundation for many other poses. It plays a key role in posture correction by teaching proper body alignment and balance.

    To practice Mountain Pose, stand upright with your feet together or slightly apart, toes facing forward. Press your feet firmly into the ground and activate your thigh muscles. Lift your chest, roll your shoulders back, and lengthen your spine. Raise your arms overhead with palms facing each other, and visualize your body being pulled upward from the top of your head. This pose promotes awareness of alignment, helping reduce slouching and creating a taller, more confident posture.

    2. Cobra Pose (Bhujangasana)

    Cobra Pose is excellent for strengthening the muscles of the back while opening the chest and shoulders. These benefits are essential for maintaining an upright posture and relieving spinal stiffness.

    Begin by lying face down on your mat with your palms placed beside your shoulders. Keep your elbows close to your ribs. Press gently into your hands and lift your chest off the floor, extending your spine upward. Keep a slight bend in your elbows and engage your back muscles rather than forcing the lift. Ensure your legs remain grounded. This pose opens the chest, strengthens the spine, and helps counteract rounded shoulders, giving you a more upright and lifted posture.

    3. Downward-Facing Dog (Adho Mukha Svanasana)

    Downward-Facing Dog is a full-body pose that both stretches and strengthens, making it highly effective for posture improvement. It targets the spine, hamstrings, calves, and shoulders, all of which support proper alignment.

    Start on all fours with your hands under your shoulders and knees under your hips. Lift your hips upward, straightening your legs as much as comfortable. Press your heels toward the floor and extend your arms forward, spreading your fingers wide. Allow your head to relax between your arms while keeping your spine long. This pose encourages spinal length, improves alignment, and helps your body feel elongated from head to toe.

    4. Warrior I (Virabhadrasana I)

    Warrior I is a strong, empowering pose that builds stability in the legs while opening the hips and chest. It supports good posture by reinforcing a tall spine and open upper body.

    Stand with your feet wide apart and turn one foot outward. Bend the front knee so it stays aligned above the ankle, while keeping the back leg straight. Raise your arms overhead and open your chest, keeping your gaze forward. Distribute your weight evenly and maintain a strong, upright spine. This pose strengthens posture-supporting muscles and encourages a lifted, confident stance.

    5. Extended Triangle Pose (Utthita Trikonasana)

    Extended Triangle Pose provides a deep stretch to the spine, hips, and legs while promoting balance and alignment. It helps lengthen the torso and open the chest, which supports better posture.

    Stand with your legs wide apart and turn one foot outward. Extend your arms out to the sides at shoulder height. Reach forward with your front arm and lower it to your shin, ankle, or the floor, keeping your torso open. Extend the opposite arm upward, forming a straight line through your body. Focus on lengthening your spine and keeping your chest open. This pose improves flexibility, posture, and creates a feeling of added height.

    6. Seated Forward Fold (Paschimottanasana)

    Seated Forward Fold is a gentle yet effective pose that stretches the hamstrings and lower back while promoting spinal length. It also helps release built-up tension that can contribute to poor posture.

    Sit on the floor with your legs extended straight ahead. Inhale deeply to lengthen your spine, then exhale as you hinge forward from the hips. Reach toward your feet, ankles, or shins without rounding your back. Keep your spine long and your shoulders relaxed. This pose encourages proper spinal alignment, improves flexibility, and contributes to a more elongated and upright posture.

  • Girls Apply Sandalwood Powder and Rose Water for Bright Skin — Traditional Beauty Hack

    Girls Apply Sandalwood Powder and Rose Water for Bright Skin — Traditional Beauty Hack

    Across India, traditional beauty rituals continue to shape everyday skincare choices, especially among young women seeking natural glow without harsh products. One such timeless practice involves applying sandalwood powder mixed with rose water, a combination trusted for generations. This simple remedy fits easily into modern routines while staying rooted in cultural wisdom. Known for its calming and skin-enhancing qualities, the mixture is often used before festivals, weddings, or daily self-care moments. As clean beauty gains attention, this age-old approach feels more relevant than ever.

    Sandalwood powder and rose water for glowing skin

    Sandalwood powder blended with rose water is valued for how gently it works on the skin while delivering visible brightness. Many girls prefer this mix because it feels cooling and soothing after long days outdoors. The natural texture helps cleanse pores and leaves the face looking refreshed. Regular use is often linked with natural skin glow, cooling face mask, gentle herbal care, and daily beauty ritual. What makes it appealing is its simplicity—no complex steps, just two trusted ingredients working together to support healthier-looking skin.

    Traditional beauty hack using sandalwood and rose water

    This traditional beauty hack has survived generations because it adapts well to different skin needs. Grandmothers often recommended it for special occasions, while today’s users apply it as part of weekly self-care. The mix is especially popular during warmer months when skin feels tired or dull. Its reputation comes from ancient skincare wisdom, calming herbal blend, home beauty remedy, and simple face care. Instead of masking the skin, it supports a clean, balanced appearance that feels authentic rather than artificial.

    Why girls apply sandalwood powder for bright skin

    Girls often turn to sandalwood powder and rose water because the results feel gradual yet dependable. Unlike instant cosmetic fixes, this approach focuses on consistency and care. The mild fragrance also adds a relaxing touch, making the routine feel enjoyable rather than forced. Many users associate it with even skin tone, refreshing face pack, traditional glow method, and natural self-care. Over time, the habit becomes less about quick beauty and more about nurturing skin with patience and balance.

    Understanding the lasting appeal of this natural skincare practice

    The lasting popularity of sandalwood powder and rose water lies in how effortlessly it fits into everyday life. It does not demand expensive products or complicated techniques, making it accessible to many households. This routine reflects a mindset where beauty is connected to care and tradition rather than trends. Its appeal is often described through heritage beauty practice, skin-friendly routine, minimal ingredient care, and timeless skincare habit. In a fast-changing beauty world, such practices continue to feel grounded and reassuring.

    Ingredient Primary Benefit Best For
    Sandalwood Powder Brightening and cooling Dull or tired skin
    Rose Water Hydration and freshness All skin types
    Combined Paste Balanced skin feel Weekly face pack
    Regular Use Improved appearance Long-term care

    Frequently Asked Questions (FAQs)

    1. How often can this face pack be used?

    It is commonly used one to two times a week for gentle care.

    2. Is this suitable for sensitive skin?

    Many people with sensitive skin use it, but a patch test is advised.

    3. Can it be used by teenagers?

    Yes, it is often chosen as a mild option for young skin.

    4. Does it replace regular skincare products?

    No, it works best as a supportive addition to basic skincare.

  • Optical Illusion Challenge: Can You Find 594 Hidden Among 564s?

    Optical Illusion Challenge: Can You Find 594 Hidden Among 564s?

    Optical illusions offer a fun way to test your brain and improve how well you think. We have an 8-second challenge for you that will check how sharp your vision really is. In this puzzle you need to find the number 594 hidden in a grid full of 564s. This sounds simple but the number blends in with all the repeated patterns around it. Only people with very sharp eyes will find it in time. This illusion checks how well you notice details and recognize patterns. It also tests how fast you can focus on something specific. The challenge is tricky because your eyes naturally want to see the repeated numbers as one big group instead of looking at each number separately. When you scan the grid your brain tries to process everything at once which makes the hidden number easy to miss. Taking on puzzles like this one helps train your mind to spot small differences quickly. It strengthens the connection between what you see and how your brain understands it. These exercises can improve your concentration and make you better at finding important information when you need it. The time limit adds pressure that makes your brain work faster and more efficiently.

    Understanding the Puzzle: Can You Spot 594 in Just 8 Seconds?

    This optical illusion challenge is simple in concept but tricky in execution. You’re presented with a grid filled with repeating numbers and given only 8 seconds to find the number 594. At first glance, the image appears packed with identical numbers—mostly 564—which makes spotting any difference surprisingly difficult. Hidden within this uniform pattern is a single instance of 594, cleverly camouflaged among the others.

    The key distinction lies in the middle digit. While most numbers display a 6, the target number replaces it with a 9. Because the surrounding numbers look nearly identical, your eyes are naturally drawn to the repetition rather than the subtle variation.

    Why This Optical Illusion Feels So Difficult

    The difficulty comes from repetitive visual patterns. When the brain encounters repeated shapes or numbers, it relies on pattern recognition to process information quickly. While this helps us navigate everyday tasks efficiently, it also causes the brain to overlook minor inconsistencies.

    In this illusion, your attention locks onto the repeating 564 pattern, making it harder to notice the single altered digit. The added pressure of the 8-second time limit increases the challenge, requiring sharper focus and faster visual processing.

    Mental Advantages of Solving Optical Illusion Puzzles

    Beyond entertainment, optical illusions provide meaningful cognitive benefits. Regularly engaging with puzzles like this can strengthen mental skills and improve how your brain handles visual information.

    Strengthening Attention to Detail

    Finding the hidden number demands careful observation. By training yourself to spot tiny visual differences, you enhance your ability to notice details that might otherwise be missed. This skill translates well into daily tasks at work, school, and home.

    Enhancing Pattern Recognition Skills

    Pattern recognition allows the brain to process visuals efficiently. These challenges help refine that ability by teaching you to identify both consistent patterns and small deviations. This skill is valuable in areas such as design, analysis, and problem-solving.

    Increasing Cognitive Processing Speed

    The short time frame pushes your brain to work faster. Solving time-based puzzles can improve reaction time and mental agility, which are useful in fast-paced environments where quick decisions matter.

    Developing Visual-Spatial Awareness

    Visual-spatial intelligence involves understanding how objects relate to one another in space. Optical illusions improve this ability by encouraging your brain to detect positional and visual differences within complex layouts.

    Improving Focus and Concentration

    Successfully completing this challenge requires blocking out distractions and maintaining focus. Practicing optical illusions regularly can help build sustained concentration, benefiting both personal and professional tasks.

    The Answer Revealed: Where to Find 594

    If you haven’t spotted it yet, here’s the solution. The number 594 stands out only by its middle digit. Instead of a 6, it contains a 9, setting it apart from the surrounding 564s.

    By scanning each number individually rather than viewing the grid as a whole, the difference becomes clearer. The hidden 594 is located in the middle-right area of the image. Once found, it becomes obvious how easily repetition can trick the brain.

    Practical Tips to Spot Differences Faster

    If this illusion felt challenging, that’s completely normal. With the right approach and regular practice, your observation skills can improve.

    Focus on one element at a time instead of scanning the entire pattern.

    – Break the repetition by examining each number individually.

    – Practice similar puzzles to train faster visual detection.

    – Stay calm under pressure to avoid missing subtle details.

    Final Thoughts

    Optical illusion challenges like this one are a powerful way to engage and sharpen the mind. They test visual perception, attention to detail, and mental speed while remaining fun and accessible. The “Spot 594” puzzle highlights how easily repetition can mislead the brain—and how focused attention can overcome it. The more you practice, the better your ability to detect subtle differences will become.

  • Optical Illusion Brain Challenge: Can You Spot YET Among VET in 7 Seconds?

    Optical Illusion Brain Challenge: Can You Spot YET Among VET in 7 Seconds?

    Optical illusions have interested people for a very long time because they show us how complex our perception really is. They demonstrate how our brain processes what we see and sometimes tricks us into perceiving things that are not actually present. These visual puzzles provide entertainment while also helping us improve our thinking skills. The challenge presented here uses an optical illusion to test how well you can concentrate and notice small differences. Your goal is straightforward: locate the word “Yet” hidden within a collection of “Vet” words in just 7 seconds. While this might sound simple at first the subtle nature of the task makes it harder than most people anticipate. Understanding why this optical illusion proves so challenging and how it activates our mental processes reveals interesting aspects of human cognition.

    The Fascinating World of Optical Illusions

    Optical illusions are visual experiences that cause the brain to see something that doesn’t fully align with reality. They happen when the mind interprets shapes, colors, light, and angles in a way that slightly alters the true image. These illusions can appear in many forms, including images that seem to move, objects that change depending on perspective, or hidden details that are not immediately noticeable.

    What makes optical illusions so compelling is how they challenge everyday perception. They expose the brain’s reliance on familiar visual patterns to make sense of the world. When those patterns are disrupted, the brain can momentarily misjudge what it’s seeing, leading to surprising and intriguing results.

    Understanding the Puzzle: Finding “Yet” Among “Vet”

    In this visual challenge, the goal is to locate the word “Yet” hidden within a grid filled almost entirely with the word “Vet”. At first glance, the arrangement appears uniform, with each word blending seamlessly into the next. The hidden word is difficult to detect because it differs by only one letter.

    The distinction lies in a single character: the letter “Y” replaces the “V”. Because this variation is subtle and placed strategically within the grid, it’s easy for the eyes to glide past it. The brain quickly recognizes the repeated word pattern, making the odd one out harder to notice, especially with the added 7-second time limit increasing pressure.

    Why the Brain Struggles With This Optical Illusion

    The challenge works because the human brain is designed to process familiar patterns rapidly. Once the mind identifies a repeating word like “Vet,” it tends to assume consistency and stops examining each instance carefully. This efficiency is useful in daily life but becomes a disadvantage in puzzles like this one.

    Under time constraints, the brain is even more likely to overlook minor differences. The visual similarity between “V” and “Y” further complicates detection. This illusion forces the mind to slow down and become more deliberate, highlighting how easily perception can be influenced by expectations.

    How Optical Illusions Strengthen Focus and Mental Flexibility

    Beyond entertainment, optical illusions provide meaningful cognitive benefits. They encourage deeper concentration and train the brain to avoid making assumptions based on first impressions. By requiring closer inspection, these challenges help sharpen attention to detail.

    Regular exposure to optical illusions can enhance visual scanning, pattern recognition, and problem-solving skills. These abilities are essential in everyday activities such as reading, analyzing information, and navigating complex environments. Over time, practicing such puzzles can improve mental agility and accuracy.

    Where the Hidden Word “Yet” Appears

    If the word proved difficult to spot, the solution reveals its clever placement. The word “Yet” is located in the eighth row from the top and the third column from the left. Once the letter “Y” is noticed, the difference becomes obvious.

    This illusion highlights how small visual changes can significantly impact perception. It demonstrates the importance of balancing pattern recognition with careful observation, reminding us that details matter even when they seem insignificant at first glance.

    Why Optical Illusions Are Powerful Brain Exercises

    Optical illusions are more than simple puzzles; they offer valuable insight into how the brain processes visual information. By challenging perception and encouraging closer analysis, they support improvements in focus, concentration, and problem-solving ability.

    Whether used as a mental workout or a source of enjoyment, optical illusions provide an engaging way to keep the mind sharp. With continued practice, spotting subtle differences becomes easier, strengthening cognitive skills that carry over into everyday life.

  • Optical Illusion Vision Test: Find the Word STOP Hidden Among SHOP in 6 Seconds

    Optical Illusion Vision Test: Find the Word STOP Hidden Among SHOP in 6 Seconds

    Optical illusions are more than just pictures that trick your eyes. They challenge your brain and test how well you notice details and process what you see. This eye test is a perfect example. The task looks simple but it has a twist that makes it harder than expected. You need to find the word “Stop” hidden among many “Shopwords in just 6 seconds. Can you do it fast enough to prove your observation skills are strong? This optical illusion works because the words “Shop” and “Stop” look very similar. They differ by only one letter. When many “Shop” words appear close together your brain tends to skim over them without checking each one carefully. Your mind creates patterns to understand what it sees and fills in gaps based on what it expects. That is why your brain might miss the single “Stop” hidden among all the “Shop” words. If you want to know how your brain handles information in moments like this then this challenge is a fun way to find out. Quick visual puzzles do more than test your eyesight. They train your brain to focus when under pressure and help you scan faster and compare visual patterns better. When you try this eye test it feels like racing against time. But that race also gives your brain a workout that strengthens your thinking and improves concentration.

    Why This Eye Test Is So Challenging

    At first look, the image appears repetitive and predictable. When the eyes encounter repeating patterns, the brain quickly shifts into an energy-saving mode. Instead of examining every detail, it starts anticipating repetition. In this puzzle, the word “Shop” appears again and again in a grid, encouraging the mind to assume all entries are identical. This automatic assumption makes it easy to overlook the single word that breaks the pattern, even when it is right in front of you.

    Three key factors work together to make this test especially difficult:

    – Visual similarity: The words are nearly identical. The small structural difference between the letters “p” and “t” is subtle, especially in peripheral vision, making the odd word hard to detect.

    – Pattern expectation: Once the brain recognizes a pattern, it scans faster instead of verifying each item, which increases the chance of missing a small anomaly.

    – Time pressure: With only six seconds, the brain relies more on assumptions than careful inspection, reducing accuracy.

    Combined, these elements turn a simple-looking puzzle into a true attention test. It feels nearly impossible until focus replaces speed.

    Smarter Ways to Spot the Hidden Word

    Because time is limited, how you scan matters. Instead of letting your eyes bounce across the image, use a structured scanning approach. Focus on one small section at a time and examine it carefully before moving on. This method prevents your brain from skipping details and filling in gaps automatically.

    Another effective strategy is to stop reading words as wholes. Instead, inspect each letter individually. In a grid full of identical words, a single altered letter becomes easier to notice when you slow your focus. This technique makes the changed character stand out more clearly.

    Staying calm also improves performance. Time pressure often causes rushed eye movements and frustration. Taking one slow breath before starting can steady your attention and improve clarity, even within a few seconds.

    How Visual Challenges Benefit the Brain

    These types of visual puzzles offer more than quick entertainment. They actively train several cognitive skills. By searching for tiny differences, you strengthen attention to detail, a skill useful in everyday tasks.

    They also improve visual scanning efficiency, teaching your eyes to move methodically while still covering an entire scene. Breaking repeated patterns sharpens pattern recognition skills, which are valuable when reviewing data, reading closely, or noticing changes in familiar environments.

    Working under a time limit enhances processing speed, encouraging faster information handling without losing accuracy. These benefits extend to activities like reading, driving, problem-solving, and decision-making.

    Where the Hidden Word Appears

    After attempting the six-second challenge, the solution reveals itself. The word “Stop” is located near the bottom-left area of the grid. Although this is an area the eyes often scan early, the similarity between words and the time constraint make it easy to miss.

    The difference becomes clear once attention is focused. Instead of ending with a “p”, the word ends with a “t”, subtly altering the final letter’s shape. In solution images, this word is typically marked with a glowing circle to highlight its exact position.

    Spotting it within the time limit delivers a strong sense of satisfaction. It confirms that your visual focus and mental processing are working together effectively.

    Practice and Strengthen Your Observation Skills

    If you enjoyed this challenge, repeating similar puzzles can further sharpen your skills. Different layouts, letters, and time limits push your brain in new ways. Turning it into a friendly competition with others can make the experience even more engaging.

    Optical illusions highlight how the brain relies on shortcuts. They reveal what those shortcuts miss and encourage more mindful observation. The next time you face a crowded pattern or complex visual scene, remember this puzzle. A small difference can hide in plain sight, waiting for a careful eye to notice it.

  • Optical Illusion Eye Test: Spot the Number 982 Within 7 Seconds

    Optical Illusion Eye Test: Spot the Number 982 Within 7 Seconds

    Are you ready for a challenge that will test your eyesight & mental sharpness? The Optical Illusion 7 Seconds Challenge is here to push the boundaries of your visual perception. In this exciting puzzle you have just 7 seconds to find the hidden number 982 that is cleverly concealed among many numbers and patterns. It sounds easy but don’t be fooled because this test is designed to trick your eyes and challenge your brain while pushing your observation skills to the limit.

    The Visual Puzzle: Can You Detect the Hidden 982?

    This optical illusion challenge has one clear mission: locate the number 982 concealed inside a busy pattern filled with numbers that look almost identical—992. At first sight, everything blends together, making it hard for your eyes to separate one number from another. But somewhere within this visual maze, 982 is carefully hidden. The twist is the time limit—you have only 7 seconds to find it. This test pushes your ability to filter distractions, sharpen focus, and react quickly under pressure.

    How Optical Illusions Trick the Brain

    Optical illusions are not just entertaining—they reveal how the brain interprets visual information. These puzzles work by manipulating perception, causing the mind to misread shapes, numbers, or patterns. In this challenge, the repeated use of 992 creates visual uniformity, making the different number difficult to detect. Since the brain naturally groups similar visuals together, it may ignore the subtle variation, even when it is directly in view.

    The Power of a 7-Second Time Limit

    The countdown is what makes this challenge especially exciting. With just 7 seconds on the clock, your brain is forced to process information faster and more efficiently. This sense of urgency increases concentration and pushes your visual reaction speed. Under time pressure, the brain can actually become more alert, making this challenge a valuable exercise for improving focus and quick decision-making.

    Where the Number 982 Is Hidden

    If you are struggling to find the answer, staying calm is essential. The number 982 is positioned near the top-right area of the image. While it blends in with the surrounding numbers, a close look reveals the difference. The digits read 9, then 8, then 2, unlike the repeated 992 pattern. Once your eyes catch this slight variation, the illusion suddenly becomes much clearer.

    Why Optical Illusions Benefit Mental Performance

    Solving visual puzzles like this one offers more than just fun. These challenges help strengthen the brain in several important ways by encouraging active observation and mental engagement.

    Sharper Focus and Better Attention

    Searching for subtle differences trains the brain to concentrate deeply. This improves attention to detail, a skill that carries over into daily tasks such as reading, working, and problem-solving.

    Stronger Pattern Recognition

    Optical illusions enhance your ability to recognize patterns and spot irregularities. Developing this skill supports logical thinking and visual awareness in many real-world situations.

    Faster Mental Processing

    By requiring quick visual analysis, these puzzles boost cognitive flexibility. This helps the brain adapt faster and respond more efficiently when faced with new information.

    Long-Term Brain Stimulation

    Regularly engaging with visual challenges keeps the brain active and stimulated. Even short sessions can support overall brain health and help maintain mental sharpness over time.

    Tips to Get Better at Optical Illusion Challenges

    If you want to improve your performance in challenges like the 7-second puzzle, a few simple techniques can make a big difference.

    – Practice often to train your brain to process visuals faster.

    – Scan the image systematically, section by section, instead of viewing it all at once.

    – Stay calm under time pressure to avoid overlooking details.

    – Look for disruptions in patterns, as hidden elements often break visual consistency.

    Final Thoughts: Can You Beat the 7-Second Challenge?

    The Optical Illusion 7 Seconds Challenge is an engaging way to test visual sharpness, concentration, and mental speed. While finding the hidden 982 can feel difficult at first, the process strengthens observation skills and cognitive agility. Whether you are challenging yourself or simply enjoying a quick brain workout, puzzles like this offer a fun and rewarding way to push your limits.

  • Time-Saving Yoga Moves: 10 Gentle Exercises for Busy Schedules

    Time-Saving Yoga Moves: 10 Gentle Exercises for Busy Schedules

    Finding time for yourself feels impossible when work and commuting and family duties take up the entire day. The good news is that yoga does not need a full hour to help. A short mindful sequence done with steady breathing and gentle focus can loosen tight muscles & reset your posture & calm a busy mind during a hectic schedule. This routine works for short breaks. You can do parts of it at your desk or in a quiet corner at home or even in a hotel room while traveling. The goal is not perfect form or deep stretching. It is about creating space in the body and slowing down your breath and leaving the session feeling more comfortable than when you started.

    How to Fit This Fast Yoga Flow Into a Packed Daily Routine

    Think of this as a menu rather than a fixed workout. Choose 3 to 5 moves when you only have a few minutes or complete the full sequence when you can spare 8 to 12 minutes. Move slowly & breathe through your nose while avoiding pain. If a stretch feels intense then back off until you can breathe smoothly. A simple breath guide that works well is to inhale for 4 counts & exhale for 6 counts. Longer exhales tell your nervous system it is safe to relax. This is why even a short session can feel surprisingly restorative.

    Gentle Neck and Shoulder Loosening to Melt Desk Tension

    Neck and Shoulder Release Long hours at a desk or staring at screens usually create tension in your neck & upper back first. This simple stretch helps blood flow better and gets rid of that stiff feeling around your collar after a full day of work. **How to do it:** Sit up straight or stand with good posture. Let your shoulders drop down naturally away from your ears. Tilt your right ear slowly toward your right shoulder while keeping your chin level and not pointing up. Stay in this position for several breaths and then repeat on the left side. For a stronger stretch you can roll your shoulders gently or look down slightly toward your armpit.

    Standing Forward Fold for Instant Calm and Mental Reset

    A forward fold helps decompress your spine while stretching your hamstrings hips, calves & the entire back of your body. This position naturally calms your mind by promoting slower breathing and turning your attention inward. How to perform it: Stand with your feet positioned at hip width and bend forward from your hips. Feel free to bend your knees as much as necessary since this actually protects your lower back and improves the stretch rather than diminishing it. Allow your head to hang freely and keep your jaw relaxed. Stay in this position for 55 to 88 slow breaths before rising gradually to standing.

    Seated Spinal Twist to Ease Tightness and Support Digestion

    Seated Spinal Twist Sitting for extended periods can make your lower & middle back feel stiff & tight. A simple twisting movement helps restore movement to your spine and often feels relaxing after you have been sitting still for a long time. Some people also notice that twists help their digestion work better after eating a large meal. Instructions:Sit up straight either on a chair or on the floor. Put your right hand on the surface behind you and place your left hand on your right thigh. Breathe in while making your spine longer & breathe out as you slowly turn your body to the right. Make sure you twist gradually and do not push your neck too hard. After taking several breaths hold the position and then repeat the same movement on the other side.

    Cat–Cow Flow to Wake Up the Spine Safely

    Cat-Cow is one of the best quick movements for posture because it takes the spine through flexion & extension while matching movement with breath. It works well if your back feels achy from sitting or if you feel compressed after a long day. How to do it: get on all fours. Breathe in to arch your back and lift your chest for Cow pose. Breathe out to round your spine and pull your belly in for Cat pose. Move through 6 to 10 rounds and keep it smooth rather than fast.

    Low Lunge Stretch to Reverse Long Hours of Sitting

    Sitting at a desk all day and traveling in cars often leads to tight hip flexors. The low lunge pose helps open up the front of your hips and stretches your thighs. This makes it easier to stand up straight and move around without feeling stiff. Here’s how to perform this stretch: Place one foot in front of you and lower your other knee down to the ground. Slowly push your hips forward until you notice a stretch in the front of your back hip. Make sure to keep your upper body upright. Stay in this position for 30 to 45 seconds on each side. If your knee feels uncomfortable you can put a folded towel underneath it for cushioning.

    Seated Forward Fold for Deep Relaxation and Inner Stillness

    This pose releases tension in your lower back and hips and helps calm an overstimulated mind. The goal is not to touch your toes but to relax and breathe while allowing your nervous system to settle. How to do it: Sit with your legs extended or bend your knees if needed. Breathe in to lengthen your spine & breathe out as you fold forward slightly. Place your hands wherever feels comfortable and keep your chest relaxed. Hold this position for several slow breaths.

    Child’s Pose for Stress Relief and Grounded Breathing

    Child’s Pose works like a reset button for your body. This position creates a gentle stretch through your back and hips while naturally slowing down your breathing pattern. You can use it whenever you need to relax without putting in much physical effort. Here’s how to get into the pose: Start by kneeling on the floor and touch your big toes together behind you. Spread your knees apart or keep them touching based on what feels comfortable. Lean your upper body forward and lower yourself down until your forehead rests on the ground. Focus on breathing deeply into the sides & back of your ribcage. Hold this position for forty-five to ninety seconds.

    Bridge Pose to Restore Energy and Improve Posture

    Bridge strengthens the glutes and opens the chest to help fix the hunched posture that develops from sitting too much. It can also boost your energy when your mind feels unclear. How to do it: lie on your back with your knees bent and feet flat on the floor. Push through your feet and raise your hips upward. Keep your ribs from sticking out by lightly tightening your core muscles. Hold this position for 20 to 40 seconds and then lower your hips back down. Repeat this movement 2 times.

    Final Resting Pose to Recharge the Body and Mind Fully

    Even sixty seconds of stillness helps your body absorb the benefits of movement. You can lie down or sit in a comfortable position and then close your eyes while breathing slowly. Allow your shoulders to relax and release any tension in your hands. This simple finishing practice often creates the reset feeling that people typically associate with longer yoga sessions. The brief moment of rest gives your nervous system time to process the physical work you just completed. Your heart rate gradually returns to its normal rhythm during this period. Many people find that this short pause helps them transition back into their regular activities with a calmer mindset. Taking even this minimal amount of time for stillness can make a noticeable difference in how you feel afterward. The practice does not require any special equipment or extensive training. You simply need to give yourself permission to pause and let your body settle into a state of rest before moving on with your day.