Blog

  • The Ordinary New Serum Nicknamed Filler in a Bottle Gave My Skin a Youthful Look in My 40s

    The Ordinary New Serum Nicknamed Filler in a Bottle Gave My Skin a Youthful Look in My 40s

    In India, skincare conversations in your 40s often revolve around firmness, fine lines, and finding products that actually deliver visible results. That’s why The Ordinary’s new serum, often nicknamed a “filler in a bottle,” has been creating so much buzz among women looking for subtle yet noticeable skin improvements. Rather than promising overnight miracles, this serum focuses on hydration-driven plumping and smoother texture, making skin look refreshed and youthful without invasive treatments. For many Indian users balancing work, family, and self-care, this kind of simple, effective skincare feels both practical and empowering.

    The Ordinary serum that works like a filler alternative

    What sets this Ordinary serum apart is how it mimics the effects of professional fillers using hydration science instead of needles. The formula focuses on attracting and retaining moisture deep within the skin, creating a naturally plump appearance. With consistent use, skin begins to show visible plumping effect, especially around areas prone to lines like the cheeks and smile zones. Users in their 40s often notice smoother skin texture and a soft bounce that makes makeup sit better. Rather than feeling heavy, it delivers lightweight hydration boost, making it suitable for India’s varied climates. Over time, many report improved facial fullness without irritation.

    Why this filler-like serum suits skin in your 40s

    Skin in your 40s tends to lose moisture faster, which can exaggerate fine lines and dullness. This serum targets that exact concern by reinforcing the skin’s hydration reserves. Regular application supports deep moisture binding, helping skin appear more resilient throughout the day. Many users appreciate the non-greasy finish, especially in humid Indian weather. The formula also encourages softened fine lines by keeping skin supple rather than tight. Over weeks of use, there’s often a noticeable refreshed youthful look, making the face appear well-rested even on busy days.

    How to use the serum for best youthful results

    Using this serum correctly can make a real difference in the results you see. It works best when applied to slightly damp skin, allowing better absorption and performance. A few drops are enough to deliver intense hydration layers without overwhelming the skin. Follow with a moisturiser to lock in the benefits and enhance the plump skin appearance. Many users prefer it both morning and night for consistent results. Over time, this routine supports daily skin resilience and maintains long-lasting smoothness that feels natural, not overdone.

    Summary and real-world results

    For women in their 40s across India, this Ordinary serum offers a realistic approach to youthful-looking skin. It doesn’t replace cosmetic procedures, but it delivers visible improvements that feel achievable at home. With continued use, skin often shows healthier skin bounce, a more even surface, and a subtle glow. The appeal lies in its simplicity and affordability compared to in-clinic treatments. When paired with good skincare habits, it supports naturally fuller skin and enhances confidence without drastic changes. For many, it’s a smart addition to a mature skincare routine.

    Feature What It Offers
    Main Benefit Hydration-based plumping effect
    Ideal Age Group 40s and above
    Texture Lightweight, fast-absorbing
    Usage Frequency Once or twice daily
    Skin Types Normal, dry, combination

    Frequently Asked Questions (FAQs)

    1. Is this serum suitable for sensitive skin?

    Yes, it is generally well-tolerated, but a patch test is recommended.

    2. Can it replace professional fillers?

    No, it offers a temporary plumping effect, not permanent filler results.

    3. How long before results are visible?

    Many users notice improved hydration and smoothness within one to two weeks.

    4. Can it be used under makeup?

    Yes, its lightweight texture works well as a makeup-friendly base.

  • 8-Second Challenge: Spot 3 Differences in the Grandma and Dog Image

    8-Second Challenge: Spot 3 Differences in the Grandma and Dog Image

    Spot the Difference” puzzles have remained a favorite activity for anyone who enjoys testing their attention to detail. These challenges are both entertaining and mentally stimulating, making them a great way to sharpen your mind. In this puzzle, your goal is to find three differences between two nearly identical images of a grandma and her dog. The twist? You have just 8 seconds to identify all the changes. This fast-paced task pushes your visual awareness, focus, and quick-thinking abilities under pressure.

    Why “Spot the Difference” Puzzles Are So Popular

    For decades, “Spot the Difference” puzzles have appeared in books, magazines, and online platforms. People of all ages enjoy them as a light mental workout or a relaxing way to pass the time. Although they often look easy at first, these puzzles can be deceptively challenging. The objective is to carefully compare two similar images and detect small variations, which may include altered colors, missing items, or subtle background changes.

    Beyond entertainment, these puzzles offer meaningful mental benefits. Regularly solving them can strengthen focus, concentration, visual memory, and pattern recognition. They also train the brain to process visual information more quickly and accurately, skills that are useful in everyday situations like multitasking and problem-solving.

    What Makes This Puzzle Especially Difficult?

    Finding differences within a limited time frame requires fast and accurate visual processing. In this challenge, the images of the grandma and her dog look almost identical at first glance, but small differences are hidden within fine details. These changes are carefully placed to test your ability to separate tiny variations from the overall image.

    When time is limited, the brain often focuses on larger, more noticeable elements, causing smaller details to be overlooked. Some differences are so subtle that they only become visible when each part of the image is examined closely.

    The 8-second countdown adds another layer of difficulty. Working against the clock increases pressure, forcing your brain to stay alert while processing information quickly. This tests not just your visual memory, but also your speed and mental flexibility.

    Smart Ways to Spot the Differences Faster

    Success in any “Spot the Difference” puzzle depends on careful observation. These tips can help improve your chances of finding all three differences in time:

    Pay Attention to Small Details: Major elements like the grandma and the dog usually stay the same. Look closely at minor details such as clothing, accessories, or background items where changes are more likely.

    Scan the Image Systematically: Avoid jumping around the picture. Start from one corner and move section by section. This organized approach helps prevent missed details.

    Watch for Color and Shape Variations: Many differences involve slight changes in color, size, or shape. Carefully examine areas like clothing, objects, and the dog’s posture.

    Stay Calm Under Time Pressure: The short time limit can feel stressful, but rushing often leads to mistakes. Stay focused and look for one difference at a time.

    Practice Regularly: The more puzzles you solve, the faster your brain becomes at spotting differences. With practice, your visual processing and observation skills naturally improve.

    Mental Benefits of Playing Spot-the-Difference Games

    These puzzles are more than just fun challenges. They help improve attention span by requiring sustained focus on visual details. Over time, this can support better concentration in daily tasks.

    They also strengthen pattern recognition skills. By repeatedly comparing similar images, your brain becomes better at identifying small inconsistencies, a useful ability in many real-world situations.

    Another key benefit is enhanced visual memory. As you analyze and compare images, your brain quickly stores and recalls visual details. This skill is essential for everyday activities such as reading, driving, and recognizing faces.

    Three Key Differences in the Grandma and Dog Puzzle

    This puzzle includes three carefully hidden changes between the two images. Here’s a clear breakdown of what to look for:

    Grandma’s Collar: In the second image, the grandma’s collar differs in both shape and color. This subtle alteration stands out once you focus on her clothing.

    Dog Treat Bowl: A banana appears next to the treats in the bowl in the second image. This item is missing in the first image.

    Dog’s Chest Patch: The shape of the patch on the dog’s chest changes slightly in the second image, making it a small but important detail.

    Each difference is designed to test your memory and attention. None are instantly obvious, which makes careful inspection essential for success.

    Final Thoughts: Can You Beat the Clock?

    “Spot the Difference” puzzles like this one offer a fun and effective way to challenge your visual skills and keep your mind active. Whether you aim to finish before the timer runs out or simply enjoy the process, these puzzles help sharpen focus and improve attention to detail. The next time you try one, stay calm, observe closely, and see how quickly you can uncover every difference.

  • Naturally Enhance Lashes and Brows With Daily Castor Oil Care

    Naturally Enhance Lashes and Brows With Daily Castor Oil Care

    The first time you notice the sound of your own eyelashes, it almost feels like a quiet magic trick. Lean close to a window on a windy evening, or rub your eyes after a long, tiring day, and there it is—a soft brush of sound, tiny bristles whispering against skin. Lashes and brows are so small, so subtle, we usually forget they exist. Until one day, they don’t look the same. They seem less full less dark, less bold than before. Under harsh bathroom lighting, you pause and think, When did my lashes get this sparse? or My brows used to be thicker. And suddenly, you’re searchingserums, pencils, gels anything that promises dramatic growth by next week.

    The Slow Beauty of Ritual

    There is another path—slower, quieter, and strangely satisfying. It sits in a small amber bottle, thick and golden, carrying a faint earthy scent: castor oil. Not the glossy, silver-packaged “miracle serum,” but something that looks like it belongs in a grandmother’s medicine cabinet. A simple plant oil, pressed from castor bean seeds, its story with lashes and brows isn’t flashy. It’s built on consistency, patience, and small daily rituals that feel almost like a form of self-prayer.

    Creating a Nightly Rhythm

    Imagine the rhythm. The day has softened, the house is quiet, screens finally dim. You stand at the sink and move through familiar motions—warm water, cleanser, towel. Makeup dissolves like watercolor on paper. Then comes the extra minute you’ve promised yourself. You reach for the bottle, roll the glass between your fingers, and watch the oil catch the light.

    It doesn’t promise overnight miracles, and that’s the point. Instead, it invites a gentler relationship with your face and your sense of time. Night after night, your hands learn the path—dip, dab, smooth. You’re not forcing your body with harsh chemicals. You’re supporting what wants to grow, gently and steadily, on its own terms.

    The Soft Science Behind Castor Oil

    Castor oil’s texture surprises many people. It’s thick, almost syrup-like, but when warmed between fingers, it loosens and glides smoothly. This richness comes from ricinoleic acid, the fatty acid that gives castor oil its weight and staying power. While research on lash- and brow-specific growth is limited, what is known is practical: this oil helps by locking in moisture and protecting fragile hairs from dryness, rubbing, and makeup stress.

    Think of each lash and brow hair as a thread in delicate fabric. Daily mascara, eye rubbing, makeup wipes, and harsh cleansers slowly fray those threads. Castor oil doesn’t create new hair out of nowhere—it helps protect what you already have from snapping and shedding too soon.

    The Power of Gentle Massage

    There’s another quiet benefit: touch. Applying oil encourages you to handle your lashes and brows with more care than usual. That gentle massage can support local circulation and help follicles stay comfortable and nourished, especially when paired with an overall soft routine.

    How to Begin a Lash and Brow Ritual

    Picture the bathroom mirror, the low hum of a fan, water draining from the sink. This is where the ritual begins.

    Step 1: Remove Everything Gently

    No mascara residue, no brow gel, no eyeliner clinging to the lash line. Use a gentle cleanser and warm water. Press a towel softly against your face—don’t drag—until lashes and brows are clean and dry.

    Step 2: Choose Simple Tools

    A clean mascara wand or cotton swab is enough. If you reuse a wand, wash it with mild soap every few days and let it dry completely. Keep tools clean to avoid irritation.

    Step 3: Decant, Don’t Dunk

    Instead of dipping tools into the bottle, place a small drop of castor oil on the back of your hand or a tiny dish. This keeps the oil cleaner and reduces contamination.

    Step 4: Apply to Lashes Sparingly

    Dip the wand lightly, then wipe away excess. Close one eye and gently brush oil from mid-length to the tips of your lashes. Avoid soaking the roots or waterline. Repeat on the other eye. If lashes feel heavy, you’ve used too much.

    Step 5: Nourish the Brows

    With what remains, softly comb oil through brows, following the natural direction of growth. You’re not styling—just whispering nourishment into each hair.

    Noticing Change Over Time

    The hardest part is waiting. Natural routines don’t shout results. In the first few weeks, you may notice softness before length. Lashes feel less brittle, brows smoother, makeup easier to apply. There’s no dramatic reveal—just a quiet realization one day: these feel healthier.After one to two months of gentle care, you may notice subtle fullness. Not exaggerated drama, but fewer gaps, softer edges, and baby hairs lasting longer in their growth cycle.

    Supporting the Ritual with Daily Habits

    Castor oil works best as part of a larger system of care. Small changes matter:

    – Use lash curlers sparingly and only on clean lashes.

    – Take mascara-free days to reduce stress.

    – Over-tweeze less and let brows rest.

    – Remove makeup gently with balm or oil cleansers.

    – Nourish from within with healthy fats, protein, and hydration.

    Making It Feel Like a Treat

    Habits last when they feel like something you enjoy. Let this ritual be a pause, not a chore. Dim the lights, enjoy the quiet, feel the oil’s weight between your fingers. This isn’t about perfection—it’s about care and relationship.

    Listening to Your Skin

    Even natural oils deserve respect. If you notice redness, itching, or small bumps, pause. Rinse gently and reduce frequency. Some people thrive using castor oil every other night. Choose a pure, fragrance-free oil, and if you have eye sensitivities, consult a professional.

    Letting Your Natural Frame Return

    When lashes and brows grow stronger, your face feels more like you. You may use less makeup, rely on lighter touches, or skip products entirely some days. The change feels earned—like tending a small, private garden over time.

  • Awake Look Hack: The Eyebrow Trick Makeup Artists Use for Instant Freshness

    Awake Look Hack: The Eyebrow Trick Makeup Artists Use for Instant Freshness

    The woman in the café looked tired. She had her laptop open and held a triple espresso while dark circles showed faintly beneath her concealer. But when she raised her head she appeared awake. It wasn’t the kind of awake that comes from a spa day but rather the look of someone who had actually gotten sleep. The reason was subtle and sat just above her eyes. Her eyebrows were gently lifted & lightly highlighted in a way that made her eyes seem bright and alert even under harsh café lighting with terrible Wi-Fi. Makeup artists working at fashion weeks & posting on social media keep saying the same thing. If you only have one minute in the morning then focus on your eyebrows. A small adjustment creates a simple illusion. It’s the type of change that makes coworkers wonder if you started using new skincare products when really you just drew your eyebrow pencil two millimeters higher than usual. One small eyebrow adjustment can make a noticeable difference in how your face looks.

    Why a Brighter, More Awake Look Begins With Brows

    Look at backstage photos from any fashion show & you will notice something. Models might have half-finished makeup and foundation still being applied but their eyebrows are already done. The tails are slightly lifted and the arches are shaped and the area under the brow bone looks cleaner. This small detail makes the upper face look instantly more awake. Makeup artists understand that people notice eyebrows before most other facial features. The angle and starting point and how they frame the eyes all matter. Small adjustments send different messages about whether someone looks tired or stern or surprised or relaxed. When eyebrows tilt down or sit too low the whole face looks sleepy. When they are gently lifted and opened up the eyes look rested even after a bad night of sleep. You can spot this on any morning commute. A woman wearing gym clothes and a hoodie might skip foundation but if her brows are brushed up and the inner corners are brightened she looks alert and ready. A man in a suit with puffy eyes from working late can look meeting-ready just by tidying his brows & lifting the arch slightly. Social media users love this trick too. Some post before and after videos where only the eyebrows & a bit of highlighter under the arch change. The before photo looks fine but the after looks awake and alert and sometimes younger. A 2023 TikTok trend called “eyebrow lift hack” got tens of millions of views because everyone wanted to know how to look less tired without wearing heavy makeup. These tricks work because they solve a basic human worry about looking worn out when we need to appear present and professional. Not glamorous necessarily but awake enough to be taken seriously in the morning. The reason this works comes down to simple face structure. Eyebrows work like curtains for the eyes. When they sit low or straight or heavy they visually press down on the eyelid. This makes under-eye shadows and puffiness more noticeable. It also reduces the space between the brow and lash line which makes people look tired or sad. Lifting the tail slightly and cleaning up the area under the arch opens up that vertical space. The whites of the eyes look brighter because they are not competing with shadows from above. Even though nothing physically moves the illusion of lift changes how people read your face instantly. Light also plays an important part. Brightening certain points around the eyebrow catches & reflects light where faces naturally look awake. This includes the brow bone and inner corner and top of the arch. This small play of shadow and highlight is what makeup artists use when they refresh a tired face in just two minutes backstage.

    The Subtle Eyebrow Adjustment Makeup Artists Always Rely On

    The method is surprisingly straightforward. You create a gentle invisible brow lift using three small steps. First you fill and lift. Begin by lightly filling the top edge of your brow instead of just the bottom. Focus on the outer third and use hairlike strokes that subtly raise the tail by a millimeter or two. This single change alters how your face looks. Next you clean and brighten. Use a small brush or fingertip to tap a skin-tone concealer or brightening pen right under the highest point of your arch and then blend downward onto the lid. You are not drawing a stripe but removing heaviness. Finally you highlight strategically. Add a tiny amount of satin highlighter right under the arch and in the inner corner of the eye. Tap instead of dragging. In real life this takes about 45 seconds per eye once you have practiced it a few times. It does not look like an obvious brow trend. It just makes you appear more awake than you actually feel. Here is where it often goes wrong. Many people overfill the bottom of the brow and make it thicker & heavier right above the eyelid. That weight pulls the whole gaze down particularly if the tail extends too far toward the temple. The result is sharper and darker brows that somehow make you look more tired instead of less. There is also the temptation to use too much concealer under the brow with a shade that is too light. Halo brows might work under studio lighting but in daylight they can look chalky & harsh. The lift should feel like a whisper instead of a neon sign. Choose a concealer as close as possible to your skin tone with just a touch more brightness & blend it so it melts into your lid rather than sitting as a hard line. And honestly nobody has the patience to carve their brows like a YouTube tutorial at 7 a.m. This trick only works if it is simple enough to become muscle memory. Two strokes to raise the tail & a tiny swipe to clean under the arch and a dot of light. Done. No extra 20 minutes and no seven products.

    One Minimal Brow Shift That Instantly Elevates Your Face

    Once you start using this technique something gradually changes. You will see yourself in your phone screen during the afternoon and notice you appear less tired than you actually feel. You might decide to skip foundation on a warm day and only apply eyebrow makeup and mascara while realizing that is sufficient to look presentable during an unexpected video call. There is also something reassuring about these small routines. Those ninety seconds standing in front of the mirror are frequently the only time in the morning when you actually look at your face with purpose instead of criticism. Fixing an eyebrow or covering a small dark circle is not about being vain but rather a simple way of preparing yourself for the day ahead. It sends a message that you are tired but ready to face whatever comes next. When nothing seems to work right and your schedule feels overwhelming & you barely slept the night before that subtle eyebrow enhancement becomes a small gesture of determination. When things are going well it simply helps your appearance reflect how you feel inside. Whether you are on a video screen or in a meeting or waiting in line for coffee your eyes will look alert even when your mind is still waking up.

    Astuce clé Comment l’appliquer Bénéfice visible
    Rehausser subtilement la queue du sourcil Remplir légèrement la partie haute et raccourcir la fin du sourcil Apporte immédiatement un effet réveillé et lifté, sans retouche ni intervention
    Illuminer sous l’arche Appliquer un correcteur léger sous le point le plus haut, puis bien fondre Élargit le regard et réduit visuellement l’aspect des paupières tombantes
    Travailler les points de lumière Ajouter une touche lumineuse sous l’arc et au coin interne de l’œil Donne l’illusion d’un regard frais et éclatant en moins de deux minutes
  • Lip Definition Trick: Liner Placement That Makes Lips Look Fuller Without Overlining

    Lip Definition Trick: Liner Placement That Makes Lips Look Fuller Without Overlining

    The girl in the cafe bathroom has no idea anyone is watching but several people in line are quietly fascinated by what she does with her lips. She runs a pencil along her lips with two fast strokes and presses them together before adding some gloss. She skips the exaggerated overlining and the complicated contouring routine. When she faces the mirror her lips look like she just came back from vacation and got plenty of rest. The effect is so natural that you cannot identify exactly what she did. There is no obvious outline or dramatic Instagram border. Her lips just appear soft and full and somehow more dimensional than other people’s lips. Later when you stand in front of your own mirror you attempt to recreate the look. You use the same pencil and the same gloss and the same expression. The result still looks flat though. Something about where she placed the pencil is different. It seems like a minor detail but it makes all the difference.

    This Isn’t About Bigger Lips — It’s About Guiding Where the Eye Lands

    Why the Classic Lip-Liner Rule Starts to Fail

    You know the traditional lip-liner advice: trace slightly outside your natural lip line, blur it, fill everything in, and you’re done. It’s a technique many of us learned early on, and for a long time, it worked well enough. But on real faces, in real daylight, heavy overlining can start to feel disconnected. Instead of enhancing your features, it can look like your lips and the rest of your face aren’t quite in sync, especially when seen up close or in natural light.

    The Subtle Shift Modern Lip Artists Are Making

    Today’s top lip artists are taking a more refined approach. Rather than trying to create the illusion of a dramatically bigger mouth, they focus on directing attention to very specific areas. The fullness you notice isn’t the goal—it’s a side effect. That’s why this method photographs so well, whether it’s a selfie, a Zoom call, or a casual conversation across a table. The change is subtle, but the impact is surprisingly strong.

    Millimetres Matter More Than Bold Lines

    The real trick happens in tiny adjustments, not thicker outlines. Once you notice where the pencil is actually placed, it completely reframes how you see lip lining. It’s not about reshaping your lips into something new; it’s about highlighting the natural structure that’s already there. This micro-precision approach keeps everything looking believable and softly enhanced rather than obviously drawn on.

    Where Makeup Artists Really Place the Liner

    If you scroll through TikTok or Instagram, you’ll start spotting the same pattern. Artists barely define the corners of the mouth. Instead, they concentrate pigment on three key zones: the peak of the Cupid’s bow, the center of the lower lip, and the small “pillows” just off-center. Around the edges, the liner is diffused and whisper-light, creating an outline that’s more suggestion than statement.

    Why the Results Look Effortlessly Natural

    A London-based makeup artist once explained that she uses the same lip pencil on every client, but changes the placement based on how light naturally hits their lips. People constantly ask her which filler clinic she recommends. She just laughs and replies with the name of a £7 lip liner and a grainy, low-light video of her technique. The most common reaction? “I don’t know what you did, but I look rested.” Fuller lips read as healthier, but the real effect is balance—the mouth suddenly feels in harmony with the rest of the face.

    The Science Behind Why This Technique Works

    There’s a simple reason this approach is so convincing. Our eyes don’t scan faces evenly; they jump to areas of contrast and shape changes. The dip of the Cupid’s bow, the soft curve at the center of the lower lip, and the light-catching areas where gloss naturally sits all pull attention. By enhancing these points and softening the corners, your brain quietly interprets the lips as fuller—without needing a bold or obvious outline.

    The Precise Liner Placement That Creates Fullness Without Crossing Your Natural Lip Line

    Start with dry lips and keep your mouth relaxed. No posing or duck face. Take a sharpened nude liner that matches your lip tone. Draw a tiny bridge straight across the cupid’s bow and connect the two peaks just slightly above your natural dip. Not a full M shape but a softened plateau. Next move to the center of your lower lip. Place the pencil about a millimeter outside your natural line at the fullest point only and sketch a short arc no wider than your iris when you look straight ahead. Leave the outer thirds of your lower lip almost untouched. Now join these central sections to your natural corners with feathery upward strokes that fade as they reach the edges. You’re almost losing the line as you move outwards. Smudge lightly with a fingertip and then tap a hint of gloss or balm just in the center. That’s it. The corners stay softer and the middle looks pillowy and nobody can quite see why. This trick sounds simple but the temptation is to overdo it. You add a little more on the sides and a bit more height and suddenly you’re in full overline territory again. On a phone screen it might look fine but in a lift with harsh lighting not so much. The restraint is what keeps it believable. We’ve all had that moment where we catch ourselves in daylight and think was my bathroom lying to me this morning. That’s usually the corners giving you away. When the liner hugs those outer edges too tightly any mismatch between skin & pencil becomes obvious. So work in stages. Line the center and check in a mirror from a step back and then gently connect to the corners only where you truly need it. Let’s be honest because nobody really does this every day. But learning this on a slow Sunday means you can swipe it on almost from muscle memory when you’re half awake before work.

    Why This Soft-Blur Lip Liner Technique Looks Natural on Real, Unfiltered Faces

    Rewritten Text Part of what makes this placement appealing goes beyond just how it looks. On a difficult Tuesday morning applying a sharp line around your lips can feel like putting on protective gear. This gentler approach feels more like enhancing what you already have. People will notice you look refreshed rather than obviously made up. From a practical standpoint it also reduces pressure. If your hand trembles slightly or the line comes out a bit uneven the effect still works because people see the overall impression rather than tiny imperfections. On days when your skin isn’t cooperating or your confidence is low that small margin for error means more than most people acknowledge. During an evening out this technique holds up well under different lighting conditions from bright bar lights to soft restaurant ambiance. Your lips maintain definition in the middle while staying soft on the edges & they move naturally with your facial expressions instead of looking stiff. It’s makeup that recognizes you’re a living person rather than a frozen image.

    Principe clé Nouvelle approche Bénéfice visible
    Mise au point centrale Le liner est appliqué principalement sur l’arc de Cupidon et le centre de la lèvre du bas Crée une impression de volume instantanée sans contours trop marqués
    Coins de la bouche allégés Application minimale ou absente du liner sur les commissures, avec un léger flou Aspect doux et équilibré, naturel même en plein jour
    Accent lumineux ciblé Gloss ou baume appliqué uniquement au centre des lèvres Amplifie le relief et donne des lèvres plus charnues en photo comme en réalité
  • Plank Hold Timing Explained: How Long to Hold a Plank for Maximum Core Benefits by Age

    Plank Hold Timing Explained: How Long to Hold a Plank for Maximum Core Benefits by Age

    The floor feels cool against your forearms. Your toes push into the mat and your legs work hard. Your breathing settles into a steady pattern. Between the tension in your stomach and the focus in your mind a question appears: “How long should I hold this position?” Is it ten seconds? Thirty seconds? Two minutes that seem endless? People treat planks like they are a basic exercise that works the same for everyone but they are really an interaction between your body and gravity that shifts throughout your life. What feels strong & easy at 18 becomes a different kind of challenge at 48 or requires more care at 68. At any age your core remains your foundation. It is the hidden structure that supports your spine and protects your back and allows you to move comfortably. So how long should you hold a plank to get the best core results without pushing into strain or pain or letting your pride take over? The answer depends on understanding your body exactly as it is right now.

    The Quiet Storm in Your Core

    Most workouts announce themselves with noise—feet pounding on treadmills, iron plates clashing, sharp exhales filling the room. Planks are different. They arrive quietly. You line your body up in one long shape: shoulders stacked over elbows or wrists, heels reaching back, head floating easily between them. Nothing appears to move. From the outside, it looks almost effortless.

    Inside, however, a quiet storm unfolds. Deep stabilizers wake up and coordinate: the transverse abdominis cinches your midsection like a supportive belt, the multifidus offers subtle protection to the spine, the diaphragm links breath to effort, and the pelvic floor provides steady support from below. These muscles don’t crave intensity or drama—they respond best to calm, precise effort repeated consistently.

    This is why “how long” matters far less than “how well” and “how often.” A tense, collapsing one-minute plank does less good—and carries more risk—than a clean twenty-second hold where your body feels strong, aligned, and calm. Time still plays a role, but it should match the moment your form begins to fade, not push beyond it.

    The Myth of the 2-Minute Plank

    Fitness culture has long celebrated extremes. Two-minute planks. Five-minute challenges. Viral clips of shaking bodies holding on by sheer willpower. Somewhere along the way, longer became synonymous with better.

    The quieter truth is less flashy: past a certain point, extending a plank builds tolerance for discomfort more than it builds useful strength. Research and experienced coaching tend to agree—short, high-quality holds performed multiple times offer greater benefits for core strength and spinal health than occasional marathon efforts.

    This doesn’t mean long planks are inherently harmful. It means the return on investment diminishes while the risk of fatigue-related misalignment quietly rises. As the years go by, the question naturally shifts from “How long can I survive?” to “How well can I support my body right now?”

    Age, Gravity, and the Plank Equation

    As decades pass, the body’s calculations change. Recovery slows slightly. Tissues become less forgiving. Balance and coordination demand more attention. A plank that once felt effortless may now feel more intentional—and that’s not a weakness, but an honest reflection of biology.

    Rather than one universal rule, it helps to think in flexible ranges. The goal is to match your hold time to the moment just before your form starts to unravel. Below are general, realistic guidelines for healthy adults, assuming no major injuries or medical concerns.

    Age Range Suggested Hold Time (per set) Sets Weekly Frequency
    Teens (13–19) 20–40 seconds 2–4 2–4 days/week
    20s–30s 30–60 seconds 2–4 3–5 days/week
    40s 20–45 seconds 2–4 3–4 days/week
    50s 15–40 seconds 2–3 2–4 days/week
    60s–70s+ 10–30 seconds 2–3 2–4 days/week

    These are guideposts, not judgments. You may fall above or below them, and that’s completely fine. What matters most is the quality of each second you choose to hold.

    Your 20s and 30s: Capability Without Restraint

    In your 20s and 30s, your body often feels generous. Recovery is quick, tissues are resilient, and strength comes easily. This is when many people chase longer plank times—and with good form, thirty to sixty seconds can be an excellent working range.

    The hidden risk isn’t lack of strength; it’s ignoring subtle breakdowns. Hips dip slightly. Shoulders creep upward. The lower back whispers warnings that go unheard. If this is your age range, consider dividing your effort: several shorter, high-quality holds can deliver more benefit than one long, punishing attempt.

    Your 40s: Strength With Awareness

    By your 40s, the body starts offering clearer feedback. Old injuries speak up. Stiffness appears more quickly. Strength is still very much present, but it demands respect.

    For many people, the most productive plank range now sits between twenty and forty-five seconds, repeated a few times. Some days you’ll feel solid for longer; other days, stopping earlier will feel wiser. The goal becomes sustainability—supporting your spine, posture, and daily movement for years to come.

    Your 50s, 60s, and Beyond: Resilient, Not Reckless

    Later decades invite a redefinition of strength. Muscle mass may decline gradually, balance may shift, and recovery may take longer—but adaptation is still possible. Planks remain valuable, even if they look different.

    Shorter holds—ten to thirty seconds—performed with excellent alignment can be deeply effective. Modified versions, such as knee planks or incline planks, are not compromises; they are intelligent adjustments. Each well-supported second helps preserve posture, stability, and confidence in movement.

    Knowing When to Stop

    Your body always signals when a plank has crossed from productive to risky. Common signs include sagging or aching in the lower back, shoulders tightening toward the ears, breath holding, or facial tension taking over. The moment you notice these, that’s your cue to stop.

    Stopping at the first sign of form loss isn’t quitting—it’s skillful training. Over time, this approach teaches your nervous system efficiency rather than collapse.

    Turning Planks Into a Practice

    Planks don’t need to be dramatic. They can be woven into daily life: a brief hold before coffee, another after work, one more before bed. Over time, these small efforts accumulate into meaningful strength.

    The real benefit isn’t a personal record—it’s the quiet ease of standing taller, moving more confidently, and supporting your body through everyday tasks. Hold as long as your form feels honest. Rest. Repeat. That’s where lasting core strength lives.

  • Short Haircuts for Fine Hair That Create Volume and Make Strands Look Thicker

    Short Haircuts for Fine Hair That Create Volume and Make Strands Look Thicker

    At the salon right after the lunch crowd leaves you can see her right away. She twists the ends of her bob with her fingers while looking at her reflection that seems flatter with each second under the bright mirror lights. Her hair is clean and shiny but it lies completely flat against her cheeks. The stylist picks up a section and drops it and the whole style falls apart like a cake that didn’t rise properly. They both laugh but her eyes show a hint of sadness. She takes out her phone and shows a photo of short bouncy full hair that clearly belongs to someone who has more hair than she does. She says she just wants it to look thicker like she has said the same thing at every appointment for the past five years. The stylist smiles and picks up the scissors and suggests a different cut. After three quick cuts the hair suddenly looks alive. Something changed even though it’s hard to explain what happened. The secret is not about having more hair. It’s about getting the right short haircut for fine hair.

    Short fine hair explained: why some cuts flatten volume while others enhance it

    Fine hair behaves a bit like silk thread: soft to the touch, lightweight, and quick to slip out of shape. When the cut is wrong, strands cling to the scalp, especially around the crown and jawline. That’s how the unwanted “helmet” look appears — flat roots, no movement, and hair that feels thinner than it really is.

    With short styles, placement is everything. When length lands in the wrong spot, fine strands can look even more limp. A blunt jaw-length bob with no layering, for example, tends to stick to the face. The real secret lies in strategic length, smart layering, and careful weight removal. That’s where volume starts to show up naturally.

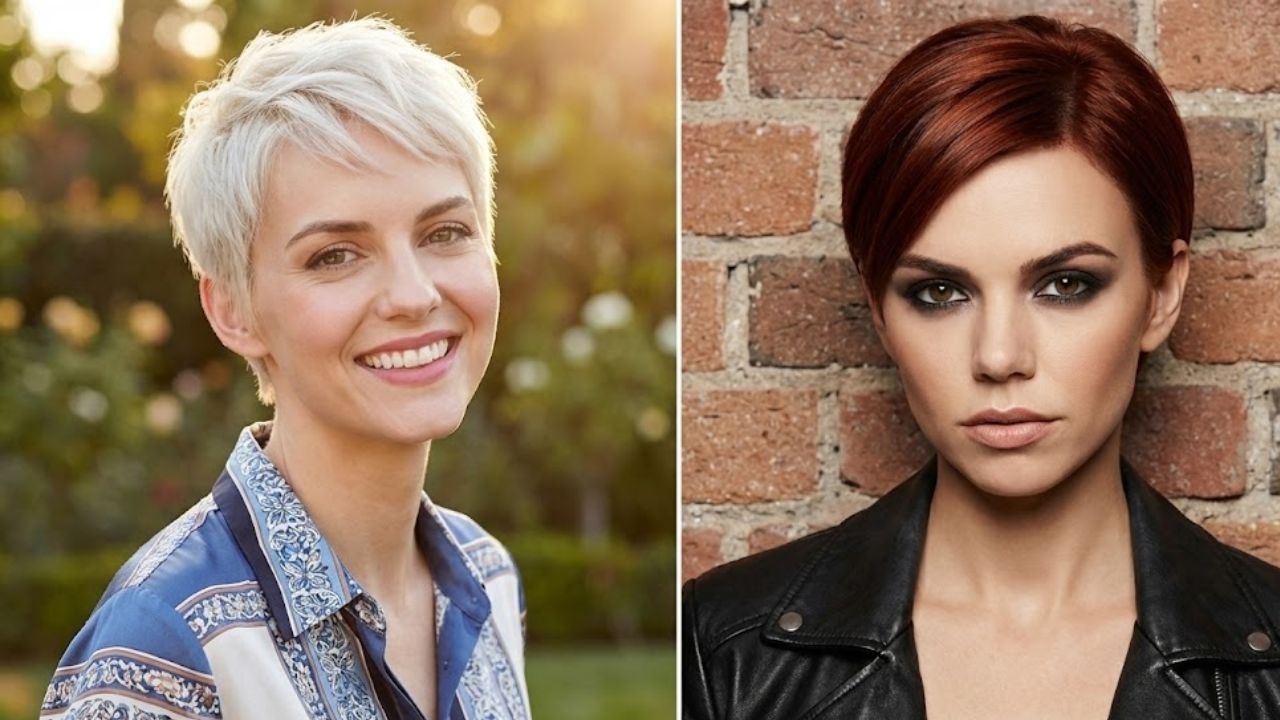
    One Tuesday afternoon in London, stylist Maya R. demonstrated this perfectly. A client arrived with an overgrown long bob that hadn’t been trimmed in nine months. The ends looked uneven, and the roots appeared oily just hours after washing. The hair wasn’t damaged — it was simply extremely fine.

    Maya recommended a softly layered bixie cut, blending elements of a bob and a pixie. She cropped the back, kept length at the front, and exposed the neck. Fifteen minutes later, the same hair appeared nearly 30% fuller. The client’s reaction wasn’t excitement at first, but surprise: “Wait… that’s all my hair?” That’s the power of a well-designed cut.

    From a technical perspective, fine hair struggles with two things: misplaced weight and heavy blunt lines. When too much bulk sits at the bottom, everything gets dragged downward. The roots never have a chance to lift.

    Volume-enhancing short cuts work by redistributing that weight. Excess bulk is removed where it flattens the shape, while soft structure is added to encourage lift at the crown and face. Airy layers, undercut napes, and slightly uneven edges prevent strands from clumping together. The result: hair that looks thicker without actually growing.

    The four best short haircuts that make fine hair appear fuller

    The first standout option is the bixie haircut. This pixie-bob hybrid is ideal for fine hair because it keeps gentle length around the face while shaping the back and sides closer to the head.

    This contrast instantly creates visual dimension. Subtle crown layers prevent the hair from lying flat in one sheet. With a touch of texturizing cream, individual strands separate and reflect light, creating the illusion of density. It also grows out gracefully, making it practical for anyone who doesn’t visit the salon often.

    The second favorite is the modern French bob. Not the heavy, perfectly blunt version, but a softened, slightly broken cut that falls between the lip and jaw. The ends are diffused, while internal layers stay invisible.

    On low-effort days, it tucks neatly behind the ears. On better days, a quick upside-down rough-dry delivers that effortless Parisian feel. For many with fine hair, this is the first style where flat roots finally stop being a daily frustration.

    Third comes the soft layered pixie. This isn’t an ultra-short, sharp style, but a feathered shape with movement. The sides and back are tapered for a clean outline, while the top remains longer for flexibility.

    Fine hair benefits here because there’s less weight pulling downward. A small amount of mousse at the roots and a quick blast from the dryer often does all the styling work. It’s especially freeing for anyone who’s spent years hiding behind longer, lifeless lengths.

    The fourth reliable option is the stacked nape bob. Shorter and graduated at the back, with longer front sections that angle toward the chin. From the side, it forms a soft diagonal. From the back, the stacked layers create a gentle curve.

    This structure builds volume directly into the shape. The stacking lifts hair at the occipital bone, keeping the silhouette full. Worn straight, it looks sleek. Styled with waves and a touch of sea salt spray, it can look like twice the hair.

    Key point Details Why it matters to readers
    Best cut for ultra-fine, flat hair A soft layered pixie or bixie with extra length on top and lighter sides. Avoid razor-thin ends; ask for scissors and subtle texturizing instead. Gives instant volume at the roots and makes morning styling faster, especially if your hair collapses within hours.
    Ideal styling products Lightweight mousse at the roots, sea salt or texturizing spray on mid-lengths, and a dry shampoo for day two. Skip heavy serums and oils near the scalp. Helps keep hair lifted and full without that greasy, weighed-down effect that fine hair gets too easily.
    How often to trim Every 6–8 weeks for a bob or stacked bob, 4–6 weeks for a pixie or bixie. Ask for micro-adjustments instead of dramatic reshapes each time. Keeps the shape sharp so your hair doesn’t collapse into a flat, triangular mass that

    How to style short fine hair so volume actually lasts

    The right haircut solves only half the problem; drying technique finishes the job. Fine hair needs to be lifted while it’s still damp. Once it dries flat against the scalp, regaining volume becomes difficult.

    Start by rough-drying with your head upside down until hair is about 80% dry. Use your fingers instead of a brush to lift at the crown. Once upright, a round brush can be used lightly to smooth ends or add a bend. A golf-ball-sized amount of lightweight mousse at the roots can significantly boost lift.

    In real life, styling is often rushed. In a busy coworking bathroom one Monday morning, a woman with a fresh French bob had only five minutes and a travel straightener. What worked wasn’t perfection.

    She dampened the front pieces slightly, lifted the roots with her fingers, and used warm air to set them. The back stayed imperfect, but the style looked intentional. Practical styling beats flawless routines.

    The biggest mistake with fine hair is overusing products. More product usually means heavier roots, not more volume. Thick creams, rich serums, and layered sprays quickly weigh strands down.

    Realistically, nobody styles perfectly every day. That’s why day-two habits matter. Applying a light layer of dry shampoo at night helps absorb oil before it builds up. Sleeping with your part flipped to the opposite side keeps roots lifted by morning.

    • Blot hair gently using a microfiber towel or cotton T-shirt — never rub
    • Apply styling products only to mid-lengths and ends
    • Use mousse or root spray sparingly at the scalp

    Living with short fine hair: confidence, experimentation, and ease

    Choosing short hair with fine strands is often more than a style decision. It can feel like a quiet rebellion against years of ponytails that never looked full enough. Cutting it short often means letting go of comparisons.

    On one evening train ride, a woman in her forties ran her fingers through her stacked bob and said, “I finally stopped waiting for my hair to be something it isn’t.” That moment said more than any product recommendation ever could.

    There’s a unique feeling when a cut reveals your neck, jawline, and cheekbones. Short hair on fine texture often brings that sense of freedom — familiar, yet new.

    The experience isn’t always smooth. Some weeks the fringe won’t cooperate, or humidity takes over. Some mornings you air-dry and accept the softness; other days you refine every bend. Both approaches are valid.

    Between the bixie, the French bob, the soft pixie, and the stacked bob, most people eventually discover a shape family that suits them. From there, it’s just small adjustments — a shorter fringe, a lifted crown, a different part.

    The real shift happens when the question changes from “How do I hide fine hair?” to “How do I let this texture shine?” On the page, it sounds subtle. In the mirror, it changes everything.

  • Optical Illusion Test: Spot the Numbers 37 and 81 Among 31 in 5 Seconds

    Optical Illusion Test: Spot the Numbers 37 and 81 Among 31 in 5 Seconds

    Optical illusion challenges have become a popular way to test attention, focus, and quick-thinking skills, especially among puzzle lovers in India. This optical illusion test asks readers to spot the numbers 37 and 81 hidden among repeated 31s within just five seconds. At first glance, the grid may look simple, but the visual similarity between the numbers makes it surprisingly tricky. Such brain games are not just entertaining; they also help sharpen observation skills, improve concentration, and offer a refreshing mental break from daily routines.

    Optical Illusion Test to Spot Hidden Numbers Quickly

    This optical illusion test is designed to challenge how fast your eyes and brain can work together under pressure. When dozens of similar numbers are placed close together, your brain tends to follow patterns instead of details. That is where the challenge begins. To succeed, you need sharp visual focus, pattern-breaking attention, and rapid mental scanning. Many people find that slowing down slightly actually helps them identify the odd numbers faster. The trick is not to read each number but to look for shape differences, spacing changes, or unusual curves that don’t match the surrounding 31s.

    Why Finding 37 and 81 Among 31 Is So Challenging

    The difficulty of this illusion lies in how the human brain processes repetitive information. When the same number appears repeatedly, the brain switches to autopilot, making it easier to miss subtle changes. Spotting 37 and 81 requires detail-oriented vision, cognitive alertness, visual discrimination skill, and mental flexibility. The shapes of the digits are intentionally similar, especially when viewed quickly. This is why time pressure increases the challenge and makes the test more exciting for participants of all ages.

    How Optical Illusion Challenges Improve Brain Performance

    Regularly attempting optical illusion tests can offer surprising cognitive benefits. These puzzles encourage focused eye movement, faster decision making, and attention control training. Over time, such challenges can improve your ability to notice small details in everyday tasks. Many people use these puzzles as a fun mental warm-up before work or study. Since they are short and engaging, they help reduce stress while still providing a productive mental exercise that keeps the brain active and responsive.

    Summary and Final Analysis

    This optical illusion test is more than just a quick visual game; it is a reflection of how perception and focus work together. Successfully spotting 37 and 81 among 31s depends on visual awareness growth, pattern interruption ability, mental speed balance, and concentration under pressure. Whether you solve it in seconds or take a bit longer, the experience itself strengthens observation skills. Such puzzles remain popular because they are simple, engaging, and surprisingly effective at keeping the mind sharp.

    Feature Description
    Challenge Type Optical illusion number puzzle
    Target Numbers 37 and 81
    Distractor Number 31
    Time Limit 5 seconds
    Primary Skill Tested Visual focus and attention

    Frequently Asked Questions (FAQs)

    1. What is the goal of this optical illusion test?

    The goal is to quickly identify the numbers 37 and 81 hidden among multiple 31s.

    2. How much time is given to solve the puzzle?

    You are given only five seconds to spot both hidden numbers.

    3. Are optical illusion tests good for the brain?

    Yes, they help improve focus, attention, and visual processing skills.

    4. Can anyone try this optical illusion challenge?

    Yes, it is suitable for all ages and does not require special skills.

  • Stop Washing Your Hair This Often, Dermatologists Warn – You’re Training Your Scalp to Misbehave

    Stop Washing Your Hair This Often, Dermatologists Warn – You’re Training Your Scalp to Misbehave

    We’ve all grown up thinking squeaky-clean hair is the ultimate goal, reaching for foam and fragrant shampoos as a daily ritual. Yet, dermatologists are raising alarms: washing hair too frequently can damage the scalp and hair shafts, leaving lengths dull, greasy, or fragile. What once felt like a reassuring hygiene habit may actually be contributing to long-term hair issues. The real concern isn’t just frequency, but how your scalp responds when over-stripped, triggering a cycle of oil overproduction and irritation that affects both scalp health and hair appearance.

    Why Daily Washing Can Backfire: Insights from Experts

    Weekday showers often involve steam, hot water, and vigorous scrubbing with familiar shampoos. While it feels productive, this routine can lead to over-washing and scalp imbalance. By late afternoon, roots may already appear greasy, prompting another wash, training sebaceous glands to produce more oil. Dr Emma Wedgeworth, consultant dermatologist in London, cites a 2021 UK survey where women washed hair an average of 4.3 times weekly, with daily washing common in major cities. Constant exposure to surfactants and hot water strips the natural lipid barrier, resulting in rebound oil, frizz, dull color, and weakened hair texture, creating a loop of cleaning and irritation rather than genuine scalp health.

    Recommended Hair Washing Frequency by Dermatologists

    There isn’t a one-size-fits-all rule, but dermatologists suggest that daily washing is rarely necessary unless you have a scalp condition, very fine hair, or exercise heavily. For most people, washing two to three times per week strikes a balance between cleanliness and maintaining the scalp’s natural barrier. Oily, acne-prone scalps may tolerate three washes weekly, while dry or curly hair may benefit from one weekly wash combined with midweek co-washes or water rinses. Transitioning gradually helps the scalp adapt over three to six weeks, reducing oil production and irritation while supporting healthier hair growth.

    Key Point Details Why it Matters
    Recommended wash frequency by scalp type Oily or acne-prone: 3–4 times/week with gentle shampoo. Normal: 2–3 times/week. Dry, curly, coily: 1–2 times/week with hydration in between. Provides realistic targets tailored to scalp type instead of copying influencer routines.
    Signs of over-washing Tight, itchy, or burning scalp; flakes with redness; rough ends; greasy roots within 12–24 hours. Helps recognize over-stripped scalp rather than “dirty hair,” guiding smarter routine changes.
    Stretching washes effectively Gradually reduce frequency (daily → every other day → every third day), use simple hairstyles, swap heavy dry shampoo for light mist, shampoo only scalp. Ensures manageable transition without reverting to daily over-washing.
    Scalp-focused washing technique Use lukewarm water, apply shampoo only to roots, massage gently with fingertips, allow foam to cleanse lengths briefly, condition mid-lengths to ends. Protects hair shafts, maintains softness, and preserves scalp barrier while ensuring cleanliness.
    Between-wash care Occasional dry shampoo, light fragrance-free scalp serum 1–2 times/week, loose braids or pineapple at night to reduce friction. Supports barrier recovery, reduces tangles, and minimizes the temptation for unnecessary washing.

    Practical Tips for a Calmer, Healthier Scalp

    Focus on scalp health first, lengths second. Avoid the squeaky-clean trap: it signals over-stripping. Observe your scalp—tightness, itchiness, or burning indicates the need for gentler care. Gradual adjustment of wash frequency, gentle cleansing, and mindful styling allow the scalp to recover, hair shafts to strengthen, and natural oils to normalize. Over time, this approach reduces flakes, itch, and dryness while promoting healthier, more manageable hair.

    Embracing Realistic Hair Care

    Letting go of daily washes fosters a quieter, less stressful hair routine. Hair becomes part of your lifestyle, not a project to constantly fix. While this won’t reverse hormonal shedding or genetic thinning, it establishes a baseline of scalp comfort and healthier hair ends. With a calmer scalp, decisions around haircuts, color, or treatments are made from a place of control rather than panic. Ultimately, healthy hair begins with a resilient scalp, not endless scrubbing.

  • Why Warmer Hair Color Tones After 50 Can Instantly Brighten Skin Compared With Cool Ashy Shades

    Why Warmer Hair Color Tones After 50 Can Instantly Brighten Skin Compared With Cool Ashy Shades

    Her hair was a polished, high-end ash blonde, the kind usually saved to inspiration boards. On the stylist’s phone screen, though, her skin appeared dull. Slightly tired. A faint grey tone lingered around her mouth. The stylist paused, tilted her head, and quietly mixed a new formula—this time with a subtle touch of copper and gold. Twenty minutes later, the transformation was undeniable. The same face, the same lines, but her skin looked brighter, as if she’d just returned from a sunny weekend away. Nothing about her features had changed. Only the warmth in her hair. And yet, the shift felt far more significant.

    Why Hair Warmth Becomes More Important After 50

    Step into a busy salon on a Saturday morning and pay close attention. Clients under 40 still gravitate toward icy blondes and cool-toned browns, while chairs filled by women over 50 increasingly reflect shades of honey, caramel, and soft copper. This isn’t coincidence. As we age, natural pigment fades, facial contrast softens, and cool, ashy tones can begin to work against the complexion rather than enhance it.

    A smoky balayage that looks elegant at 30 can, by 58, make skin appear sallow or slightly bluish under certain lighting. Warm hair tones act like a gentle filter. They reflect light back onto the face, soften shadows, and subtly lift the look of cheeks and lips. Nothing is erased. The skin simply appears more alive.

    A London colorist recalls a 62-year-old client who insisted on being “as blonde and as ashy as possible.” Technically flawless, the color photographed beautifully—but in daily life, her daughter kept asking if she was exhausted. When they shifted the shade just two levels warmer, into a soft golden beige, the change was immediate. She didn’t look artificially younger. She simply looked well-rested.

    There’s no mystery ingredient in warm hair dye. It’s basic optics. Cool pigments absorb light and can cast grey or green tones on skin that already carries less natural color after menopause. Warm pigments—gold, caramel, copper, strawberry—bounce light back, creating a subtle glow. Hair frames the face, and after 50, a warmer frame often flatters the picture far better than a sharp, icy one.

    Adding Warmth Without Going “Too Orange”

    The safest way to introduce warmth isn’t a dramatic color overhaul. It’s a small adjustment. Ask for a half-shade warmer gloss or toner over your usual color. Think neutral-gold or soft caramel, not vivid copper. On grey or salt-and-pepper hair, a translucent beige or champagne glaze can brighten without hiding natural silver.

    For at-home coloring, look for box descriptions like “golden beige,” “warm neutral,” or “honey”. Avoid labels such as ash, cool, or pearlescent platinum if your skin already looks washed out in daylight or photos. You’re not aiming for a dramatic reinvention. You’re simply restoring a hint of warmth that time has quietly taken away.

    Soyons honnêtes : personne ne fait vraiment ça tous les jours. Most people don’t want complex routines or constant touch-ups. That’s why small, strategic changes matter more than bold hair moments. Swapping icy highlights for soft, diffused gold. Choosing a warmer brown that reads sun-kissed rather than red. These subtle shifts can dramatically change how skin appears—healthy or tired, fresh or faded.

    “After 50, I’m not chasing ‘younger’,” says a French stylist who works mainly with women over 45. “I’m aiming for rested, alive, softly lit. Warmth is often the quickest way to achieve that without looking like you’re trying too hard.”

    Common Hair Color Mistakes and Smarter Adjustments

    Colorists often see the same missteps repeat. Choosing overly cool shades because they sound sophisticated, then wondering why makeup suddenly looks wrong. Fighting natural warmth instead of working with it. Or swinging too far toward flat, overpowering reds. A more balanced approach usually works best.

    • Shift gradually: move from ash to neutral, then toward soft warmth.
    • Match depth: stay close to your natural level, just slightly warmer.
    • Use warmth selectively: around the face, in fine highlights, or through a gloss.

    What Your Skin Really Needs From Your Hair Color

    After 50, skin naturally loses some of its pink, gold, and brown undertones. That’s biology. Cool, ashy hair can exaggerate this change, deepening under-eye shadows and sharpening fine lines. Warm tones counteract it by casting a soft reflection onto the skin—a touch of gold near the temples, warmth along the jawline, light around the mouth.

    A makeup artist working with older TV presenters relies on a simple trick. When icy hair makes skin look flat on camera, she doesn’t just add bronzer. She calls the hair team. A warmer toner often makes a bigger difference on screen than extra foundation. Cameras respond to harmony, not youth. Viewers see someone who looks present and healthy.

    Warm hair color also pairs more easily with everyday makeup. Peach blush, rose lipstick, soft brown eyeliner all sit more naturally alongside honey or caramel highlights than with blue-toned ash. The entire look becomes easier to balance, with fewer moments of wondering why a familiar shade suddenly looks wrong. It’s not about rules. It’s about creating a color environment where your skin can breathe and glow.

    Finding Your Next Step

    The next time harsh lighting catches you off guard, pause before blaming the mirror. Look at how your hair and skin interact. Does your hair echo warmth from your complexion, or does it compete with it? Does your face appear illuminated, or slightly dimmed?

    You don’t need to abandon cool tones entirely. Some women keep ash at the back and add warmth only around the face. Others embrace silver and refresh it with a beige or champagne gloss once or twice a year. On a tous vécu ce moment où l’on se demande si “c’est moi ou la lumière”. Often, it’s simply that your hair color hasn’t evolved alongside your skin.

    Warm hair after 50 isn’t a rule—it’s a tool. A way to support your skin instead of working against it. A way to honor lines, texture, and life experience without letting them dominate the first impression. Best of all, it’s easy to test slowly. Strand by strand, gloss by gloss. Until one day, you see a candid photo and think: I look like myself again—just better lit.

    Key Takeaways at a Glance

    • Warm tones brighten skin: Gold, honey, and copper reflect light, helping the complexion appear fresher in real life and photos.
    • Ash shades can dull features: Cool pigments highlight shadows and color loss, explaining why “perfect” blondes can look tiring after 50.
    • Small changes go far: Glosses, neutral-warm shades, and face-framing highlights allow safe testing without dramatic change.