Category: News

  • Metallic Nails Become Winter’s Chic Neutral With Eight Styles to Try

    Metallic Nails Become Winter’s Chic Neutral With Eight Styles to Try

    From statement jewelry to eye-catching home decor, metallic finishes are shining everywhere right now—and manicures are no exception.

    Metallic manicures are easily one of the biggest nail trends at the moment,” says Christina Kao, manicurist and co-founder of Le Mini Macaron. “What once felt daring or reserved for special events has evolved into a modern option that works as an everyday neutral.”

    According to Kao, metallic nail finishes act like jewelry for your hands, adding a touch of glamour without feeling overdone. Ahead, discover standout metallic manicure ideas inspired by expert nail artists.

    Metallic Stud Accents

    This metallic manicure keeps things minimal yet undeniably stylish. “Tiny metallic dots layered over nail art—such as a deep cherry French tip—blend the chrome trend with the ongoing polka-dot moment,” Kao explains. “The finished look feels graphic, intentional, and very current.”

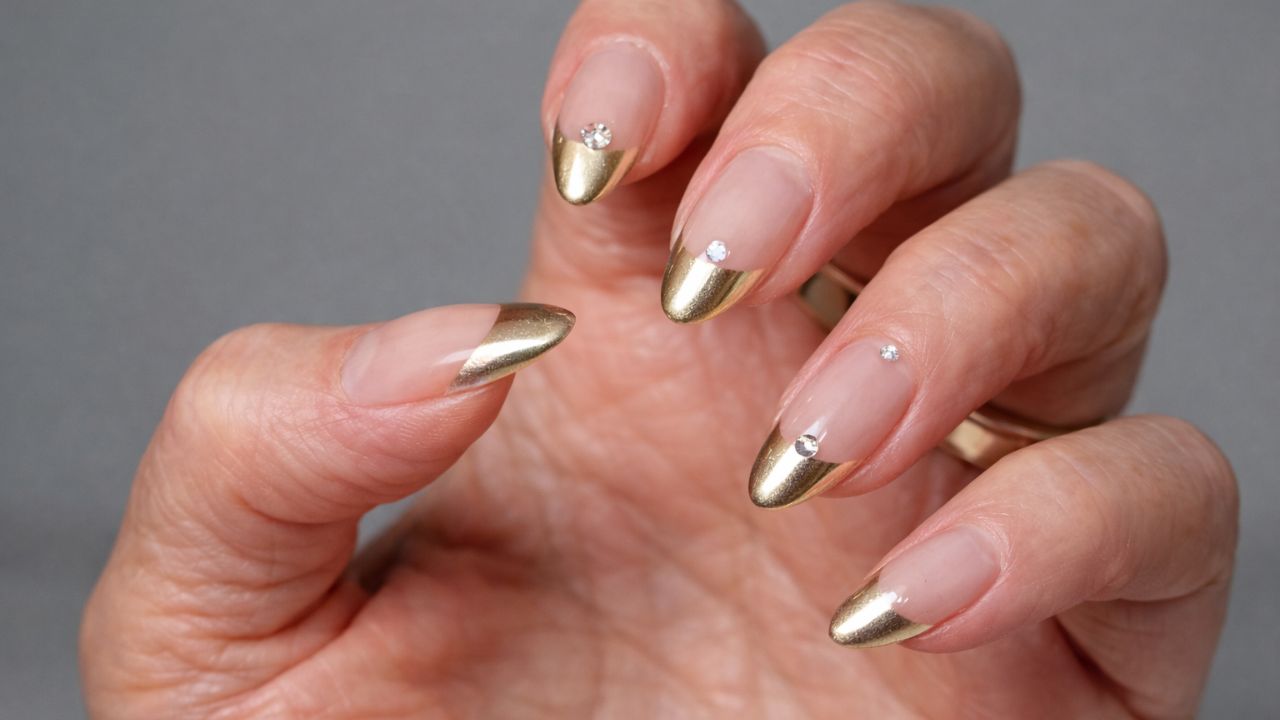
    Metallic French Tips

    When you’re unsure, a French manicure is always a safe choice—especially with a metallic update. “This is a soft reinvention of the classic French tip, particularly when paired with gentle, unexpected shades like chamomile,” Kao says. “It elevates neutral nail designs while staying wearable, especially on almond or softly rounded nails.”

    Refined Champagne Shine

    Neither fully gold nor silver, champagne stands out as the most versatile metallic neutral. “This shade functions like a refined neutral and works beautifully with both casual and formal outfits,” says Olha Shtanhei, professional international nail artist. “Opt for a smooth, fine shimmer instead of chunky glitter to keep the look timeless and elegant.”

    Molten Silver Chrome

    For a futuristic feel, molten silver chrome delivers major impact. “Everyone is embracing a ‘new era, new energy’ mindset, and chrome nails fit perfectly,” says Braelinn Frank, manicurist and founder of Rave Nailz. “Silver pairs effortlessly with everything—from puffer jackets to denim—and reflects even the faintest winter sunlight, making it feel uplifting during colder months.”

    3D Metallic Details

    The 3D nail trend continues to thrive, and metallic elements make it even more striking. “Raised chrome layered over sheer or milky bases creates a jewelry-like effect without feeling heavy,” Frank says. “That was the inspiration behind Pink Noise in our Cyber Siren collection—organic metallic shapes that catch light and add depth.”

    Soft Pewter Tones

    Pewter may be unexpected, but it reads as a surprisingly wearable metallic neutral. “People are looking for polish that feels elevated yet practical, especially in winter when fashion leans toward rich textures like leather, knits, and wool,” Shtanhei notes. This finish delivers subtle shine while maintaining a polished appearance.

    Iridescent Metal With Star Details

    When winter feels dull, a touch of iridescence can instantly lift the mood. “Try a full chrome or metallic base with delicate accents,” Kao suggests. “Micro stars or subtle motifs add personality while keeping the shine feeling controlled and editorial.”

    Pastel Chrome Finishes

    For a softer take on metallics, pastel chrome offers a balanced approach. “Mixing metallic finishes with matte or translucent layers creates contrast and depth,” says Shtanhei. “The key is balance—when the metallic is bold, keep the nail shape clean and the overall design minimal.”

  • Maintaining Fitness During Injury or Illness Without Returning to Cycling

    Maintaining Fitness During Injury or Illness Without Returning to Cycling

    Every cyclist eventually faces a break from riding, whether it’s for a few days, several weeks, or even months. It might be due to illness, injury, travel, or life simply getting in the way. When that happens, there’s no reason to stress. Your fitness doesn’t vanish overnight, and with the right approach, you can preserve much of your cycling conditioning until you’re able to ride again.

    In most cases, time off the bike falls into three broad situations: you’re sick or injured and shouldn’t train at all, you’re unable to cycle but can still stay active in other ways, or you’re temporarily separated from your bike because of work or travel.

    Below are expert-backed strategies for each scenario, along with guidance on what to prioritize and what to avoid, so you can maintain your cycling fitness no matter the circumstances.

    Maintaining Cycling Fitness When Riding Isn’t Possible

    Take a Proper Break

    Before worrying about lost fitness, honestly evaluate your condition. If illness or injury is involved, stepping back from training is often the smartest move. Former professional cyclist and certified coach Jakub Novak of Pro Cycling Coaching explains that a few days of rest usually delivers better results than forcing minimal workouts.

    Redirect that time toward extra sleep, better nutrition, and light mobility work. According to Novak, many riders try to push through sickness or injury, only to set themselves back for weeks. Taking short, intentional rest early often leads to a much faster recovery.

    Seek Professional Guidance

    Not all injuries are the same, and recovery timelines vary. If you’re dealing with more than a mild cold or minor soreness, consult a qualified medical professional before continuing any form of training.

    Both Novak and physiotherapist and mountain biker Amanda Sin emphasize that expert advice helps you maintain fitness safely while avoiding setbacks. Each injury comes with specific limitations, and professional input ensures you’re training—or resting—in the most effective way.

    Turn Downtime Into a Positive

    A pause in riding creates space to focus on sleep quality, mental recovery, and relaxation practices, which Sin describes as part of the complete healing ecosystem.

    This is also an ideal moment to handle neglected tasks like servicing your bike, organizing gear, practicing flat repairs, or clearing out old equipment. These small efforts help you feel prepared and motivated when it’s time to ride again.

    Follow Medical Advice Exactly

    The quickest route back to strong riding is to follow your doctor’s and physical therapist’s instructions precisely. Sin stresses the importance of starting therapy early and completing prescribed exercises consistently—without adding extra work or skipping steps.

    Addressing issues promptly often shortens recovery time. Ignoring pain or hoping it resolves on its own can prolong the problem significantly.

    Staying Fit When You Can Train—Just Not on the Bike

    Prioritize Quality Rest

    When cycling is off the table, you can still improve overall fitness by addressing fundamentals. Sleep is one of the most overlooked performance tools, especially among endurance athletes.

    Physiotherapist Kelly Starrett, co-author of Built to Move, notes that many cyclists sacrifice sleep for training volume. Using this period to consistently achieve seven to nine hours of sleep can dramatically enhance recovery and speed your return to riding.

    Focus on Strength Development

    Even with movement restrictions, many injuries allow you to strengthen other areas. Sin explains that lower-body injuries are an opportunity to build core and upper-body strength.

    Targeted strength and mobility work helps preserve fitness and can significantly improve cycling performance later. Instead of dwelling on limitations, concentrate on what you can safely train right now.

    Make Walking a Habit

    Starrett points out that many cyclists don’t walk enough for long-term health. If walking is permitted during recovery, aiming for 8,000 to 12,000 steps per day is an effective way to maintain aerobic fitness.

    This consistent, low-impact movement helps ensure you return to cycling without a major drop in endurance.

    Use the Indoor Trainer With Care

    For certain injuries—such as those involving the wrist, collarbone, or head—an indoor trainer may be suitable when used carefully. Sin describes it as a controlled environment for maintaining bike fitness when outdoor riding isn’t advisable.

    Start slowly, focus on easy spinning, and monitor balance closely. If you notice compensation patterns or discomfort, it’s better to stop and choose alternatives like walking or bodyweight strength exercises.

    Keeping Fit When Travel or Life Interrupts Riding

    Plan Breaks Into Your Schedule

    Structured training plans should include regular rest weeks. Novak advises aligning vacations or busy work periods with these lighter weeks so you’re not missing key training phases.

    By adjusting your schedule in advance, you can enjoy time away without worrying about lost progress.

    Increase Strength Training Efforts

    Strength training remains one of the most effective tools for cyclists on the go. Novak encourages simple routines—planks, wall sits, squats, and mobility work—that can be done almost anywhere.

    Even without gym access, these exercises support power, stability, and injury prevention when you return to the bike.

    Use Hiking or Running Strategically

    If your only limitation is access to a bike, hiking or running can temporarily replace cycling. Novak recommends starting conservatively, especially if running isn’t part of your regular routine.

    Brisk walks, run-walk intervals, or uphill hiking provide effective cardiovascular benefits without unnecessary injury risk.

  • Six-Minute Chair Routine Rebuilds Core Strength More Effectively Than Planks After 60

    Six-Minute Chair Routine Rebuilds Core Strength More Effectively Than Planks After 60

    If you want to strengthen your core, here’s an important truth: planks are not the only solution. In fact, a simple six-minute chair-based routine can be even more effective, especially after the age of 60.

    For years, planks have been seen as the fast track to core strength, so this may come as a surprise. However, a well-designed chair exercise routine offers powerful benefits. These movements help build strength and endurance, enhance mobility and flexibility, improve posture and balance, and support better circulation and cardiovascular health.

    According to Eric North, also known as The Happiness Warrior, chair-based core workouts can outperform traditional planks for older adults. He explains that these routines are better suited to the physiological and safety needs of aging bodies. While floor planks work well for younger individuals, they often place excessive strain on the wrists, shoulders, and lower back in seniors, making them less ideal.

    This workout is designed to be done using a sturdy, armless chair. Perform each movement for 45 seconds, followed by a 15-second rest before moving to the next exercise.

    Minute 1: Seated Cat-Cow Stretch (Warm-Up)

    The seated cat-cow gently activates your spinal stabilizers and prepares your body for movement.

    • Sit near the edge of the chair with your feet flat on the floor.
    • Rest your hands on your knees.
    • Inhale as you arch your back and lift your gaze upward.
    • Exhale while rounding your spine, tucking your chin and pulling your navel inward.
    • Continue for 45 seconds.

    Minute 2: Seated March

    The seated march activates the hip flexors and engages the lower abdominal muscles.

    • Sit upright with your feet hip-width apart.
    • Lift your left knee to hip height, then lower it.
    • Lift your right knee to the same height and lower.
    • Maintain strong posture as you continue alternating.
    • Perform for 45 seconds.

    Minute 3: Seated Torso Twist

    This movement targets the obliques, helping develop rotational strength and core control.

    • Sit tall with your feet firmly planted on the floor.
    • Engage your core muscles.
    • Place your hands behind your head or cross them over your chest.
    • Slowly rotate your torso to the left, keeping your hips forward.
    • Return to center, then twist to the right.
    • Continue for 45 seconds.

    Minute 4: Seated Side Bends

    The seated side bend strengthens and lengthens the side core muscles.

    • Sit upright on the chair.
    • Place one hand behind your head.
    • Reach the opposite arm toward the floor as you bend sideways.
    • Keep your body in a straight line without leaning forward.
    • Switch sides and continue for 45 seconds.

    Minute 5: Seated Cross-Body Knee-to-Elbow

    This exercise encourages full abdominal engagement while improving coordination.

    • Sit with your hands behind your head and feet on the floor.
    • Lift your left knee while rotating your right elbow toward it.
    • Alternate sides in a controlled motion.
    • Continue for 45 seconds.

    Minute 6: Seated V-Sit Hold

    The V-sit hold challenges the deep core muscles and builds endurance.

    • Grip the sides of the chair for stability.
    • Lean back slightly while keeping your spine straight.
    • Lift both feet a few inches off the floor.
    • Hold the position and breathe steadily.
    • Maintain for 45 seconds.
  • No Mat Needed: 10-Minute Standing Mobility Routine That Secretly Builds a Stronger Back

    No Mat Needed: 10-Minute Standing Mobility Routine That Secretly Builds a Stronger Back

    Back mobility doesn’t always require floor work. One of the easiest ways to improve spinal movement and ease built-up tension is through a fully standing routine. That’s exactly what certified fitness instructor Caroline Jordan demonstrates in her 10-minute Standing Back Mobility workout, designed to gently mobilize the spine while keeping you upright.

    After trying the routine firsthand, it becomes clear that slow, controlled movements can effectively open up the back and build strength when practiced regularly. A standing flow like this can help improve posture, release stiffness, and support a stronger, more resilient spine without needing to get down on the floor.

    This approach is especially useful for anyone who finds floor-based exercises uncomfortable or inconvenient. It also works well for those needing a short, efficient mobility session on busy days — whether used as a morning warm-up, a quick reset between long sitting periods, or a gentle routine before bed.

    What Does The Standing Back Mobility Routine Include?

    Jordan’s 10-minute standing back mobility routine is a short, easy-to-follow sequence created to loosen tight muscles, activate the spine, and enhance overall mobility. The workout includes 10 exercises performed for one minute each, making it simple and structured.

    The routine focuses heavily on dynamic stretching, using smooth, flowing movements that guide the joints through their full range of motion. You’ll move through standing variations of familiar mobility exercises such as cat-cow motions, side bends, spinal twists, forward folds, and gentle back extensions, all aimed at easing back discomfort and promoting healthier movement.

    While the emphasis is on back mobility, the session also delivers a full-body stretch. Exercises like plié squats and lateral lunges engage the lower body, helping activate the glutes and inner thighs while also improving balance and hip mobility. The result is a well-rounded mobility flow completed in just 10 minutes.

    Whether you spend long hours sitting, avoid floor routines, or prefer a low-impact way to mobilize your back, this standing sequence offers a practical option that can be repeated regularly.

    How Often Should You Practice Mobility For A Healthy Back?

    Mobility work isn’t something that delivers results overnight. Consistency plays a key role in supporting long-term spinal health. Research supports this approach, with a 12-month randomized trial showing that participants who performed lumbar stability exercises twice per week experienced an average 39% reduction in lower back pain.

    The study focused on improving control of the lumbar neutral zone, which involves strengthening the muscles responsible for keeping the lower spine stable during movement. These findings suggest that regular mobility training can act as a preventative and sustainable form of back care.

    For Jordan’s standing routine, completing it two to three times per week is a strong starting point. If time allows, it can also be practiced daily, particularly as a gentle warm-up or movement reset. The most important factor is staying consistent, as regular practice supports better spinal health over time.

  • I thought I had a strong core until I tried the 1-second ‘paper test’.

    I thought I had a strong core until I tried the 1-second ‘paper test’.

    You probably already know that dead bugs are far more effective at strengthening the muscles of your midsection than traditional sit-ups or crunches. That said, this benefit only applies when the movement is performed with proper technique and control.

    A simple way to check your form is the one-second dead bug paper test. As a fitness editor and Pilates fan, I assumed I’d ace it easily. Instead, I quickly realized that even two years postpartum, my core strength wasn’t as solid as I believed. Consider this your warning — it’s a humbling experience.

    If you’re new to exercise, pregnant, or returning after pregnancy or injury, it’s always wise to consult a qualified professional before adding new movements to your routine.

    How To Perform A Dead Bug With Proper Form

    Before starting, you may want to use a comfortable yoga mat, as this exercise is performed lying on your back. As your strength improves, you can increase the challenge by adding a resistance band or holding adjustable dumbbells.

    • Lie on your back with your lower back pressed firmly into the mat, drawing your belly button toward your spine
    • Extend your arms straight up toward the ceiling and lift your knees into a tabletop position
    • Slowly lower your right arm behind your head while extending your left leg, keeping both just above the floor
    • Pause briefly, then return to the starting position and repeat on the opposite side
    • Continue alternating sides, aiming for three sets of 10 reps per side

    Understanding The Dead Bug Paper Test

    The paper test is a quick way to confirm whether you’re actively engaging your core. Place a sheet of paper underneath your lower back before starting the exercise. If someone can slide the paper out while you’re moving, it means your abs aren’t fully engaged.

    Your goal is to keep your lower back pressed into the floor throughout each rep. Focus on squeezing your core and drawing your belly button inward. Performing the movement slowly and with control is essential — rushing increases the risk of losing proper alignment.

    Breathing also plays a key role. Avoid holding your breath, as this can cause your lower back to lift off the floor. Exhale as you extend your arm and leg, then inhale as you return to the starting position.

    Key Benefits Of Dead Bugs

    Dead bugs are one of the most effective exercises for activating the transverse abdominis, the deepest layer of core muscles. As a stabilization movement, they also strengthen the erector spinae, which support spinal stability and protect the lower back.

    For those who spend long hours sitting, dead bugs can help address anterior pelvic tilt, a common issue among desk workers. Regularly including this exercise can reduce lower back discomfort while strengthening the deep core, obliques, and pelvic floor muscles.

  • ‘These exercises work! Two weeks in and I see a noticeable difference in my hip tightness and discomfort’ — people are going wild for these 3 stretches to unlock tight hips

    ‘These exercises work! Two weeks in and I see a noticeable difference in my hip tightness and discomfort’ — people are going wild for these 3 stretches to unlock tight hips

    The comments section has been buzzing over these three easy stretches for tight hips, and it’s easy to see why. They may look unusual at first glance, but they deliver real results. As a personal trainer, I use these movements almost every week and can confidently say they work.

    These targeted hip exercises help release tension around the pelvis and lower back while delivering a quick mobility boost. One viewer wrote, “Helped immediately with my low back and hip pain”, while another praised the routine as a game changer for pelvic tightness. Those reactions speak for themselves.

    If you’re curious, this routine comes from Rehab Fix, a widely followed YouTube channel run by Dr. Grant Elliott. Once you try these stretches, your hips will thank you.

    Why These Hip Stretches Are Worth Trying

    The next time your hips feel stiff, roll out a yoga mat and give these movements a go. You may prefer to practice them at home if they feel awkward in a gym setting, but these exercises are far from gimmicks. They’ve been a consistent part of my mobility routine for years and continue to deliver noticeable results.

    Many people report feeling changes quickly. After two weeks of regular practice, it’s common to notice reduced hip tightness and less discomfort.

    Three Effective Stretches To Unlock Tight Hips

    1. Frog Mobility (3 x 60 seconds)

    The frog position is a favorite for improving hip and inner thigh mobility. This stretch opens the adductors, increases hip range of motion, and can help ease lower back tension. You’ll often feel relief right away, but consistent practice is key for long-term improvement.

    In this routine, the frog is performed dynamically rather than statically. You gently rock your hips forward and backward, pushing your hips toward your heels and then forward while lightly engaging the glutes. It may feel awkward, but the payoff is worth it.

    2. Frog Cat-Cow (3 x 60 seconds)

    This variation combines the frog position with the classic cat-cow movement to improve spinal mobility and abdominal flexibility. It’s especially helpful if you carry tension in your lower back, offering a deep yet controlled stretch through the hips and spine.

    Start slowly, especially if your back feels tight. Begin with small, gentle movements and gradually increase the range as your body adapts. If needed, bring your heels closer together to reduce pressure on the hips. Stop immediately if you feel sharp or persistent pain.

    3. Tactical Frog (3 x 60 seconds)

    The tactical frog adds internal hip rotation to the moving frog exercise. Internal and external rotation are essential for proper hip mechanics, helping support better alignment and smoother movement patterns.

    There’s no need to lift your foot high off the mat. Focus on keeping the inner knee grounded while gently lifting the heel, even if it’s only a few inches. Controlled movement matters more than height.

    How To Get The Most From These Stretches

    Spend 60 seconds on each stretch and complete three rounds. For an added challenge, you can place a loop band above your knees, though this is entirely optional.

    Move carefully into each position and avoid forcing your hips beyond their natural range. This helps prevent injury and allows your body to gradually adapt. If your muscles feel especially tight at first, stay patient. It often takes around 30 seconds for muscles to relax, which is when deeper mobility gains begin to happen.

  • I tried this “simple” 20-minute workout for total beginners — here’s why it surprised me.

    I tried this “simple” 20-minute workout for total beginners — here’s why it surprised me.

    With over 15 years of experience as a certified personal trainer—and even longer spent training in gyms—I never thought I would fall into the “beginner” category. However, after nine months of pregnancy followed by a demanding postpartum recovery, I found myself intentionally easing away from my usual heavy training routine.

    Getting to the gym regularly has been difficult, so I’ve been relying on YouTube workouts to stay active at home. During one search, I came across trainer Maddie Lymburner, also known as MadFit, and her recently released routine designed specifically for total beginners. She described it as simple and requiring no equipment, which aligned perfectly with where I am right now. I unrolled my yoga mat and decided to give it a go.

    How to Follow Maddie Lymburner’s 20-Minute Beginner Routine

    As Lymburner explains, no equipment is needed aside from a yoga mat.

    The session starts with a four-move cardio warm-up, followed by a sequence of exercises performed for 40 seconds each. Most movements include 20 seconds of rest, with a few 30-second breaks between workout sections.

    Exercises Included in the Workout

    • Squats
    • Good mornings
    • Lunges
    • Sumo squats with heel raises
    • Sumo squats with “W” arm raises
    • Arm circles
    • Birddogs
    • Planks
    • Crunches
    • Glute bridges

    The workout concludes with a repeat of the cardio warm-up.

    Although I was familiar with every movement, this routine reinforced the value of revisiting foundational exercises. Here are my key takeaways.

    1. Simple Movements Are Essential to Get Right

    When working with beginners, I always prioritize exercises like glute bridges and birddogs. Once strength improves, I gradually introduce squats, lunges, and good mornings.

    I appreciated that Lymburner included all of these movements in one routine. Even better, she offered clear modifications and easy-to-follow form cues, making the workout accessible and effective.

    Spending time focused on these fundamentals paid off. When I returned to a heavier lower-body session the following day, my form felt cleaner and my movements were more controlled. I can easily see myself using this workout as a longer warm-up moving forward.

    2. Clear Verbal Guidance Made a Difference

    Many fitness influencers keep talking to a minimum, which I usually don’t mind. That said, strong verbal cues are crucial for beginners, as basic movements can easily be performed incorrectly, increasing the risk of poor movement patterns or injury.

    Lymburner delivers excellent verbal instruction throughout the workout. Her explanations of proper positioning are clear and descriptive, and they even helped me fine-tune my own form.

    For anyone new to consistent exercise, these cues make the workout a solid and safe at-home option.

    3. Slowing Down Increased the Challenge

    I often encourage beginners to slow their movements so they can control each phase of an exercise. Moving too fast is a habit I’ve struggled with myself, especially during timed interval workouts.

    Since returning to training postpartum, I’ve intentionally worked at a slower tempo to rebuild strength properly. I took my time with each movement in this routine, which made the muscle burn noticeably stronger.

    This was a useful reminder that slower, well-controlled reps can be just as challenging as lifting heavier weights. Even experienced exercisers can benefit from reducing speed to ensure the right muscles are doing the work.

    4. The Cardio Finish Was More Intense Than Expected

    I liked that Lymburner returned to the cardio section at the end of the workout. She encourages participants to increase intensity by adding jumps or picking up the pace if they feel capable.

    Since the initial cardio round felt manageable, I followed her guidance. By the final movement, I was far more winded than anticipated, with my Apple Watch recording a heart rate of 148 beats per minute.

    This flexibility is why timed interval workouts are so effective. They allow you to adjust intensity based on your ability. Beginners can modify as needed, while more advanced individuals can increase difficulty through speed or plyometric options. Overall, this is a highly adaptable routine suitable for a wide range of fitness levels.

  • A personal trainer says: ‘This is the one move women over 40 should do

    A personal trainer says: ‘This is the one move women over 40 should do

    At any stage of life, workouts should be simple, efficient, and progressive rather than focused on doing more for the sake of it. However, as we get older, muscle mass and bone density naturally decline, making it even more important to prioritize strength, lean muscle, and bone health.

    While I often recommend the five classic compound lifts, there are no strict rules about which exercises you must follow. What matters most is choosing movements that work well for your body. That said, if I had to select one exercise for women looking to build leg strength and support healthy aging, it would be a compound movement that engages multiple joints and major muscle groups to improve strength, balance, and muscle mass.

    Below is the exercise I consistently recommend as a personal trainer.

    Why the Foot-Elevated Sumo Squat Stands Out

    The foot-elevated sumo squat may sound complex, but it is highly effective for building strength, improving joint mobility, and enhancing balance.

    This movement targets the entire lower body, with emphasis on the glutes—particularly the gluteus medius—as well as the quads, adductors, hamstrings, hips, calves, and core. Your shoulders and arms also contribute by supporting the weight. When performed with heavier loads, it can even improve grip strength and forearm endurance, both of which are linked to longevity.

    Elevating the feet increases the range of motion and extends time under tension, meaning the muscles remain engaged for longer. This deeper movement pattern also helps improve mobility as you lower the weight beyond the level of your feet.

    How to Perform the Foot-Elevated Sumo Squat

    The movement can be practiced with bodyweight at first, but once proper form is established, adding resistance will increase its benefits.

    • Place yoga blocks or weight plates wider than shoulder-width apart and stand on them with toes slightly turned outward. Higher elevation increases difficulty.
    • Hold a weight between your legs with arms fully extended, gripping it securely with both hands.
    • Engage your core and keep your gaze forward.
    • Push your hips back and lower into a deep squat, keeping your chest lifted and spine neutral.
    • Descend until your thighs are at least parallel to the floor or until the weight touches the ground.
    • Pause briefly at the bottom, then drive upward, squeezing your glutes as you extend your hips and knees.

    Benefits of Sumo Squats for Women Over 40

    As women move through their 40s, 50s, and beyond, sarcopenia—the gradual loss of muscle mass—can accelerate. Strength and bone density may also decline, though the rate varies from person to person. Some women continue training with minimal adjustments, while others need to modify their routines.

    One area that commonly changes is balance. As muscle and strength decrease, mobility and stability can suffer, which directly affects independence and long-term health.

    Prioritizing lower-body strength, balance, mobility, bone density, and lean muscle mass is essential, and the foot-elevated sumo squat addresses all of these. It also engages the core, and a strong core plays a critical role in healthy aging, especially for those who want to remain active well into later decades.

    Understanding Relative Strength

    I often encourage clients to focus on relative strength rather than absolute strength. Absolute strength is the maximum weight you can lift, while relative strength compares your strength to your body size and weight.

    This perspective helps women progress safely and effectively. Many can lift loads close to or even exceeding their bodyweight by gradually increasing resistance and maintaining consistent training.

    In short, progress is not about lifting the heaviest weight possible. It’s about steady improvement over time.

    How to Progress the Exercise

    As strength improves, you can increase the load, adjust sets and repetitions, or elevate your feet further to expand the range of motion.

    Starting with a kettlebell is often recommended because it is easier to grip with an overhand hold. A dumbbell can also be used, though it becomes more challenging to control as the weight increases.

    Why This Exercise Deserves a Place in Your Routine

    Training every muscle group supports healthy aging, but leg strength is especially important because it reflects overall health and is linked to a lower mortality risk. Strong legs support walking, climbing, running, and everyday movement, helping you stay mobile and confident.

    The lower body also contains some of the body’s largest and most powerful muscles, including the glutes and quads. Lean muscle is more metabolically active than fat, meaning a higher muscle-to-fat ratio supports a healthier metabolism and improved calorie burn. This is why the belief that cardio always burns more calories than strength training is a misconception.

    Elevating the feet during sumo squats allows the weight to move below foot level, encouraging a deeper squat and fuller range of motion. Greater stretch and load improve muscle activation and hypertrophy.

    Strength training also places healthy stress on bones. Applying sufficient load is what signals bones to maintain and rebuild density, supporting long-term skeletal health.

    Why Women Over 40 Benefit Even More

    This exercise is beneficial for everyone, but it is especially relevant for women over 40. During perimenopause and menopause, hormonal changes—including reduced estrogen—can significantly affect musculoskeletal health.

    Estrogen plays a direct role in the health of muscles, tendons, ligaments, and bones. Adequate levels support muscle strength, lean mass, and collagen production in connective tissue. Estrogen also helps reduce stiffness and aids muscle repair.

    Even if building additional muscle is not your goal, preserving existing muscle is vital for staying strong, mobile, and injury-free as you age.

    Recommended Sets, Reps, and Tempo

    To begin, aim for 3–4 sets of 8–12 repetitions. Over time, increase the weight or adjust rest periods, repetitions, or foot elevation.

    Placing extra focus on the eccentric phase—slowing the descent into the squat—can significantly increase muscle tension and enhance overall results.

  • Yoga Poses That Release Hip Stiffness Faster Than Stretching

    Yoga Poses That Release Hip Stiffness Faster Than Stretching

    Hip stiffness is often addressed with stretching, yet many people find that stretching by itself doesn’t deliver lasting relief. In some cases, rushed or aggressive stretches can even make the hips feel tighter. This happens because stiffness isn’t just muscular—it’s also linked to the nervous system’s protective response. Yoga tends to work faster than traditional stretching because it helps the body relax first, allowing the hips to release naturally instead of resisting. These yoga poses emphasize calm breathing, relaxation, and joint-friendly movement, helping stiffness dissolve more comfortably and efficiently.

    Why Stretching Often Falls Short for Tight Hips

    When the hips feel tight, the body is usually trying to protect the joint. Prolonged sitting, repetitive motions, stress, and fatigue can all trigger this guarding response. Stretching attempts to force length into tight muscles, which the body may resist. Yoga uses a gentler approach by slowing the breath and soothing the nervous system, signaling that it’s safe for the hips to let go.

    How Yoga Helps Hips Release Faster

    Yoga blends gentle movement, deep breathing, and mindful stillness. This combination boosts circulation, improves joint lubrication, and reduces muscle guarding. Once the nervous system settles, muscles soften more quickly, which is why many people notice relief in minutes rather than weeks.

    Standing Forward Fold for Quick Softening

    A relaxed forward fold allows the hips and lower back to release without effort. Slightly bending the knees reduces strain and helps the pelvis relax. This pose often brings fast relief after long periods of sitting or standing.

    Low Lunge to Counter Sitting Tightness

    The low lunge opens the front of the hips, especially the hip flexors that tighten with extended sitting. Entering the pose slowly and breathing deeply encourages faster release than static stretching.

    Butterfly Pose for Inner Hip Ease

    Sitting with the soles of the feet together gently opens the inner hips and groin. Supporting the knees with cushions allows gravity to do the work without forcing depth, leading to a quicker and more comfortable release.

    Seated Figure Four for Outer Hip Relief

    Outer hip and glute tightness often restricts movement. This pose targets those areas directly and can quickly ease the locked or heavy feeling around the hips and lower back.

    Cat–Cow to Refresh and Rehydrate Joints

    Gentle spinal movement increases blood flow and joint lubrication around the pelvis. This rhythmic motion helps stiffness fade more effectively than holding long, static stretches.

    Wide-Knee Child’s Pose for Deep Calm

    A wide-knee version of child’s pose lets the hips open softly while the body fully relaxes. This position is especially helpful when stiffness is connected to stress or fatigue.

    Supine Knee-to-Chest for Gentle Decompression

    Lying on the back and hugging the knees reduces pressure on the hips and lower spine. With the body fully supported, the hips can relax almost instantly.

    Supine Spinal Twist to Restore Natural Rotation

    Gentle twists help restore natural rotation in the hips and spine, which is often lost through repetitive movement. This improves mobility without adding strain.

    Why Breathing Changes Everything

    Slow nasal breathing speeds up the release process. Inhaling for four counts and exhaling for six helps calm the nervous system. Longer exhales signal the body to relax, allowing the hips to soften faster than stretching alone.

    How Long to Practice for Quick Results

    Just 5–10 minutes of these poses can bring noticeable relief. Short, regular sessions are more effective than long, forced stretches done infrequently.

    Common Habits That Slow Progress

    Forcing depth, holding the breath, or pushing through pain keeps the hips guarded. Yoga works best when comfort and ease guide the practice.

    Signs the Practice Is Working

    The hips feel lighter, walking becomes smoother, posture improves, and the lower back feels less strained. Many people also experience better sleep and reduced restlessness.

    Conclusion

    If stretching hasn’t eased your hip stiffness, yoga may be the missing link. These poses help release hip tension faster because they work with the body rather than against it. By calming the nervous system and gently restoring movement, yoga allows the hips to let go naturally—often in minutes instead of weeks.

  • Hairstyles After 70 Featuring the Most Rejuvenating Short Grey Haircuts

    Hairstyles After 70 Featuring the Most Rejuvenating Short Grey Haircuts

    Your jawline feels softer, your cheeks slightly more hollow, and the silver strands that once felt temporary are clearly here to stay. By 70, the goal quietly shifts. It’s no longer about hiding age, but about looking awake, lifted, and fully yourself.

    This is often the moment when a hairstylist becomes something more. One afternoon in a bright, quiet salon, a 72-year-old woman settled into the chair holding a photo of herself at 40. Half-joking, half-hopeful, she asked if her old face could come back. The answer didn’t come in words, but through careful scissors.

    The transformation didn’t erase time. Instead, it created something subtler. Her face appeared more open, her eyes brighter, her skin softer. The change came from one specific choice: a short haircut designed for gray hair.

    The Short Gray Haircut That Lifts the Face After 70

    Ask stylists who regularly work with women over 70, and the response is remarkably consistent. A soft, layered crop around the face delivers the most flattering result. Not a sharp pixie. Not a rigid bob. But a feathered, airy cut that falls between the cheekbone and jawline, shaped with gentle movement.

    This style reveals the neck, frees the ears, and draws attention to the eyes. It opens the face rather than weighing it down. On gray or white hair, the lightness prevents that heavy “helmet” look that can make features appear tired.

    The silhouette works like a lifted curtain. Slightly longer sides, volume at the crown, and soft edges at the nape guide the eye upward. That upward pull is where the refreshed appearance truly begins.

    What Stylists See Again and Again

    A London-based stylist with clients aged 65 to 80 says most consultations start the same way. Women arrive with long gray hair pulled back or a flat, chin-length bob. They describe feeling dragged down when they see themselves in photos.

    He recalls Margaret, 74, who kept her hair at shoulder length because it suited someone else’s preference. Her hair was fine, gray, and lifeless. The length emphasized a softer jawline and a creased neck, highlighting exactly what she wanted to soften.

    He reshaped it into a layered crop that skimmed the middle of the ears, slightly longer at the sides, finished with a wispy fringe. When she looked up again, she didn’t appear artificially younger. She looked alert, present, and familiar to herself. Her quiet response said it all: she recognized herself again.

    Why This Cut Works So Well on Gray Hair

    After 70, the structure of the face changes. Skin loses volume, cheeks hollow subtly, and the lower face may sag. Long, straight hair lines pull attention downward. A blunt bob at the jaw can widen the lower face, while flat, one-length styles create a blocky outline.

    A softly layered crop does the opposite. Height at the crown gives the illusion of lift. Feathered strands around the temples soften angles. Slightly longer pieces near the cheekbones create vertical lines that slim and refine.

    Texture becomes more important than color. Gray hair often feels coarser or frizzier, but when shaped with movement, the natural mix of silver and white becomes an asset. In this case, the haircut itself acts as the filter, not hair dye.

    How to Ask for the Most Flattering Short Gray Cut

    Skip old photos of your younger self. Instead, bring current images of women your age whose short gray hair you genuinely admire. Then focus the conversation on three essentials: length, layering, and fringe.

    Length: Ask for the back to sit above the collar, with the shortest point between mid-ear and just below it.
    Layering: Request soft, blended layers at the crown so the hair lifts naturally.
    Fringe: Choose a wispy, side-swept fringe instead of a straight, heavy one.

    Ask your stylist to refine the shape once the hair is dry. Aging hair stretches when wet, and a cut done only at that stage can end up shorter and less forgiving than expected.

    Keeping the Look Effortless

    Short gray hair after 70 should not demand an hour of daily styling. A realistic routine takes five to ten minutes and still delivers a subtle lift.

    Use a lightweight volumizing spray at the roots, focusing on the crown. Rough-dry with your fingers or use a small round brush only at the front. Let the back stay relaxed and slightly tousled for a more youthful feel.

    If frizz is an issue, apply a pea-sized amount of smoothing cream to the ends and temples only. On non-wash days, a quick mist of dry shampoo at the crown and a brief finger lift usually restores shape.

    Common Mistakes to Avoid

    Stylists often see women trying to hold onto styles from earlier decades. Long layers that once felt romantic can look stringy. Heavy bangs may darken the eyes. A well-chosen short gray cut isn’t a downgrade; it’s a recalibration.

    Another mistake is cutting too sharply. Harsh, squared pixies can appear severe, especially on pale skin. The aim is always softness, movement, and light, particularly around the eyes and cheekbones.

    Many women fear looking older if they go short with gray hair. That hesitation is normal. Skilled stylists often suggest shortening the cut gradually over several visits, allowing confidence to grow alongside the change.

    Why This Haircut Is About More Than Age

    When a woman over 70 leaves the salon with a short gray cut that truly suits her, comments rarely focus on the hair. People say she looks rested, radiant, or simply herself. The conversation shifts from age to presence.

    The haircut works like a frame around a painting. A heavy frame can dull the image, while a light, balanced one allows it to shine. Your face is the artwork. A soft, layered gray cut is the frame that lets others see you, not outdated style choices.

    Emotionally, the choice can be powerful. It signals acceptance of the present rather than pursuit of the past. For some, it means finally letting natural silver take center stage. For others, it means revealing the neck, ears, and jewelry again with confidence.

    Stylists aren’t promising miracles when they call this cut rejuvenating. They’re describing harmony between bone structure, skin tone, lifestyle, and hair texture. Often, the real transformation shows up not in the mirror, but in posture and presence.

    That may be why so many women who make this change say the same thing afterward: they don’t look younger — they feel lighter. And that shift alone changes everything.

    Key Takeaways at a Glance

    • Soft layered crop: A short cut between ear and jaw with movement that lifts and brightens the face.
    • Volume at the crown: Gentle height on top creates a natural facelift effect.
    • Low-effort routine: Simple styling and regular trims offer a sustainable, polished look.