Category: News

  • Salon-Style Eyebrows at Home: 7 Easy Steps for Clean Colour and Sharp Defined Results

    Salon-Style Eyebrows at Home: 7 Easy Steps for Clean Colour and Sharp Defined Results

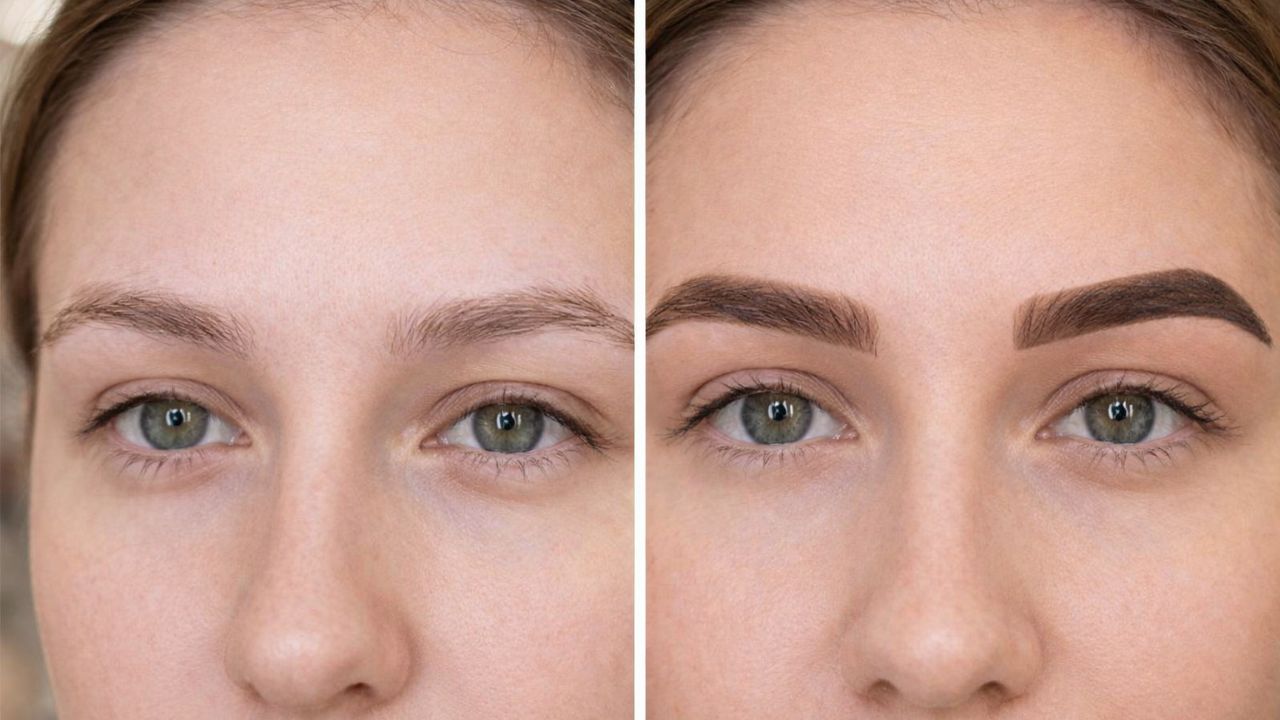
    Waking up with full and well-shaped brows without needing a pencil feels like the perfect beauty shortcut. When you tint your eyebrows correctly at home the color can last between three and six weeks. The important part is being careful and controlled so your brows look natural and enhance your face instead of looking too dark or messy. This guide will show you how to tint your eyebrows safely & neatly at home without making a mess in your bathroom.

    Why Tinting Your Brows at Home Is Worth Trying

    Doing your own brow tinting at home offers more than just convenience or skipping salon visits. A single tint kit usually contains enough product for multiple applications, while a professional service covers only one session. When you tint your brows yourself, you control how deep the color appears, how soft the front looks, and how the final shape turns out. The pigment in brow hairs generally lasts between three and six weeks, while any light skin staining fades within five to seven days. This results in a softer, more gradual fade rather than a sudden change.

    Another major benefit is flexibility. You can adjust the shade or processing time whenever your hair color changes or your makeup preferences shift with the seasons. Managing this small detail often helps your entire face look more polished and balanced, even on days when you skip makeup.

    How Long Brow Tint Results Really Last

    The longevity of brow tint depends on your skin type, daily habits, and the products you use. Brow hairs hold pigment much longer than skin, which is why the color fades slowly instead of disappearing overnight. Being gentle with freshly tinted brows makes a difference. Avoid excessive heat, harsh cleansers, and frequent rubbing, and the color will maintain its depth for a longer period.

    What to Prepare Before Tinting Your Brows

    You do not need professional tools, but having the right essentials ensures even color and safer results. Gather a brow-specific tint or gel without ammonia, the developer recommended by the brand, a glass or plastic mixing bowl, and a spatula. You will also need an angled or precision brow brush, cotton pads, cotton swabs, thick cream or petroleum jelly, gloves, a clean spoolie, micellar water or gentle toner, and a timer or phone stopwatch.

    Safety should always come first. Never apply regular hair dye to your brows. Certain dyes can cause serious eye injuries, and ingredients such as PPD (p-phenylenediamine) are known to trigger allergic reactions, especially on sensitive facial skin.

    Why Patch Testing Is Essential

    Before applying any brow tint, place a small amount of the mixed product behind your ear or on the inside of your elbow. Leave the area untouched for 48 to 72 hours. If you experience redness, itching, swelling, or blistering, the tint is not safe to use. This simple precaution helps prevent uncomfortable and visible reactions near the eyes.

    Seven Steps to Achieve Natural, Salon-Like Brows at Home

    Prepare and Shape Brows Ahead of Time

    Tweeze only the stray hairs located above, below, and between your brows. Avoid thinning the main brow shape. Lightly outline your desired shape with a pencil, then cleanse the area with micellar water to remove oil and residue so the tint applies evenly.

    Protect the Skin Around the Brows

    Apply a thin layer of thick cream or petroleum jelly along the penciled outline, keeping it off the brow hairs. This barrier prevents unwanted staining and helps create cleaner, more defined edges.

    Mix the Tint Until Smooth

    Combine approximately 0.5 to 0.75 inch of tint with the developer according to the instructions. Most formulas require equal parts. Mix until the texture is creamy and lump-free. Choose a shade one or two tones darker than your natural brow color and avoid shades that appear too dark for your hair.

    Apply More Product Where Brows Are Densest

    Begin at the inner brow near the nose, using short strokes that follow the natural hair direction. Ensure each hair is fully coated. As you move toward the tail, use less product. Pay special attention to lighter or gray hairs so the result looks even.

    Monitor Processing Time Carefully

    Set a timer based on the brand’s recommendation, typically seven to fifteen minutes. Around the three to five minute mark, gently comb through the inner brow with a clean spoolie to soften the front and avoid a harsh, blocky effect.

    Remove the Tint Gently

    Once the processing time is complete, remove the tint carefully using gentle wiping motions. Avoid scrubbing, as this can irritate the skin and weaken brow hairs.

    Check Results and Start Aftercare

    Allow the color to settle for about one hour before checking symmetry in natural daylight. Minor differences between brows are normal and can be balanced with makeup. Keep brows dry for the first 24 hours and avoid oil-based products and exfoliation for several days.

    Common Brow Tinting Errors to Avoid

    Skipping the patch test increases the risk of irritation. Choosing a shade that is too dark or too warm can make brows look unnatural. Scrubbing during removal may damage hair follicles and irritate the skin. Ignoring proper aftercare causes the tint to fade faster due to heat, sun exposure, and harsh cleansers.

    A Subtle Upgrade With Noticeable Impact

    A well-done brow tint can significantly enhance your appearance. Your complexion looks fresher, and your eyes stand out more, even without makeup. With proper preparation, safe products, and consistent aftercare, at-home brow tinting delivers weeks of effortless definition. Once you find the routine that suits your brows, it often becomes a beauty essential you rely on regularly.

  • 3 New Makeup Launches Beauty Insiders Say Are Actually Worth Trying

    3 New Makeup Launches Beauty Insiders Say Are Actually Worth Trying

    Beauty launches come and go quickly, but every so often a few products truly stand out from the crowd. In the United States, beauty insiders and makeup artists are constantly testing new releases to separate short-lived hype from formulas that actually perform. This year, several new makeup launches have earned genuine praise for their wear, finish, and everyday practicality. Rather than overwhelming you with endless options, this guide focuses on three standout releases that professionals and experienced users say are genuinely worth your time, money, and space in your makeup bag.

    New makeup launches redefining everyday glam

    One of the most talked-about new makeup launches right now is a next-generation skin tint that blurs the line between skincare and foundation. Insiders love how it delivers sheer buildable coverage while still letting real skin show through. The formula includes hydrating skin oils that prevent dryness without feeling greasy, making it ideal for long days. Users also praise its natural satin finish, which looks polished but never flat. What really wins people over is the all-day comfort wear, allowing touch-ups to be minimal. For anyone tired of heavy base products, this launch proves that lightweight makeup can still look refined and camera-ready.

    Viral new makeup launches beauty pros approve

    Another standout among recent new makeup launches is a creamy blush stick that beauty professionals keep reaching for. The texture offers effortless blendability, melting seamlessly into the skin with fingers or a brush. Shades were designed with universally flattering tones in mind, making it easier to find a match without overthinking. Makeup artists appreciate the layer-friendly pigment, which allows soft daytime color or bolder evening looks. Perhaps most impressive is the fresh skin glow it leaves behind, mimicking a natural flush rather than obvious makeup. It’s a modern update on blush that feels intuitive and forgiving.

    Editor-loved new makeup launches for bold looks

    Rounding out the list of worthwhile new makeup launches is a richly pigmented liquid lipstick that has surprised even longtime editors. Unlike older formulas, this one delivers intense color payoff without cracking or flaking. Testers highlight its weightless matte feel, which remains comfortable for hours. The applicator allows precise lip definition, making liner almost unnecessary. Another major plus is the transfer-resistant formula, ideal for busy schedules and social events. For anyone who loves statement lips but hates constant reapplication, this launch finally balances drama with practicality.

    Why these launches stand out this year

    What connects these three products is not trendiness, but thoughtful formulation and real-world usability. Each launch focuses on solving common complaints like dryness, fading, or heaviness while still delivering style. Beauty insiders note that performance over hype is the main reason these products keep showing up in kits. They also reflect a shift toward skin-first makeup that enhances rather than masks. With inclusive shade thinking and textures that adapt to different routines, these launches feel intentional. Ultimately, they represent a move toward makeup that fits modern lifestyles, offering results that feel both polished and effortless.

    Product Type Key Benefit Finish Best For
    Skin Tint Light coverage Satin Daily wear
    Cream Blush Easy blending Natural glow Quick routines
    Liquid Lipstick Long-lasting Matte Bold looks
    Overall Trend Comfort focus Skin-like All users

    Frequently Asked Questions (FAQs)

    1. Are these new makeup launches beginner-friendly?

    Yes, each product is designed for easy application with minimal technique required.

    2. Do these products suit different skin types?

    They are formulated to work well across dry, normal, and combination skin.

    3. Are these launches suitable for everyday use?

    All three products were praised for comfort and wear during long, regular days.

    4. Are these products worth the price?

    Beauty insiders say the quality and performance justify the cost for most users.

  • Simple Morning Hydration Habits That Support Clearer Skin and Higher Energy Throughout the Day

    Simple Morning Hydration Habits That Support Clearer Skin and Higher Energy Throughout the Day

    The first glass of water you drink after waking up can quietly shape how your entire day unfolds. In India, where warm mornings, long commutes, and busy schedules are common, many people begin their day already running on low hydration. A simple morning hydration routine helps your body recover from overnight fluid loss and prepares your mind and skin for the hours ahead. This four-minute habit doesn’t require supplements or complicated steps—just intention, timing, and awareness—making it easy to follow even on the most hectic mornings.

    Why a Simple Morning Hydration Routine Matters

    Most people wake up experiencing morning dehydration without realizing it. While you sleep, your body continues breathing, repairing tissues, and regulating temperature, all of which use water. Starting your day with a slow, deliberate glass supports cellular rehydration and helps your system shift gently from rest to activity. Unlike rushing straight to coffee, this approach creates a gentle wake-up that feels calmer and more grounded. Over time, this habit supports internal balance, helping digestion, circulation, and mental clarity work together more smoothly as your day begins.

    How the Four-Minute Morning Water Routine Works

    This routine is effective because it focuses on quality, not quantity. The first glass reintroduces fluid, while the second can include light electrolyte support from lemon or a pinch of salt. This helps your body hold onto water instead of flushing it out too quickly. Consistent hydration improves skin hydration, making your complexion look fresher over time. Many people also notice steady energy levels, with fewer mid-morning crashes. Think of it as a mineral water boost that prepares your body before caffeine or food enters the picture.

    Building a Simple Morning Hydration Routine Daily

    The key to success is awareness, not perfection. Slow, mindful sipping allows your body to absorb water efficiently while keeping your stomach comfortable. This practice supports circulation benefits, helping oxygen and nutrients move more freely through your system. Over time, this routine becomes a reliable hydration habit that feels natural rather than forced. When repeated with daily consistency, the body adapts, making mornings feel more stable, focused, and physically comfortable without drastic lifestyle changes.

    Why This Small Habit Creates Lasting Results

    What makes this routine powerful is how gently it supports long-term wellness. Instead of relying on quick fixes, you’re practicing simple self-care that fits into real life. As hydration improves, you naturally develop better body awareness, noticing how your skin, energy, and focus respond. These changes don’t appear overnight, but they accumulate quietly. Over weeks, this small ritual can reshape how your mornings feel, helping you start each day more centered, hydrated, and ready to respond rather than rush.

    Routine Step Time Spent Purpose
    First glass of water 1 minute Rehydrate after sleep
    Mineral-enhanced water 1 minute Support hydration retention
    Slow sipping 1 minute Improve absorption
    Breathing and posture 1 minute Calm nervous system

    Frequently Asked Questions (FAQs)

    1. How much water should I drink in the morning?

    About 400–500 ml is enough to start rehydration gently.

    2. Can I add lemon or salt every day?

    Yes, small amounts are safe for most people and support hydration.

    3. Should I drink water before coffee?

    Yes, water first helps prevent dehydration and caffeine jitters.

    4. How long before results are noticeable?

    Most people notice better energy and skin within a few weeks.

  • Goodbye Hair Dyes: The Viral Grey Hair Trend Making Natural Coverage Look Youthful Again

    Goodbye Hair Dyes: The Viral Grey Hair Trend Making Natural Coverage Look Youthful Again

    The woman staring back from the mirror doesn’t look “old.” Her skin still has a healthy glow after a short walk, her eyes are clear and bright. Yet her focus drops to the fine silver line emerging at her roots. She lifts a strand, tilts her head, zooms in with her phone. The reaction is almost audible. Grey again. Too soon.

    Bottles on the shelf whisper promises: “10 years younger”, “salon results at home”. They all sell time, but none offer calm. Her hand hesitates, then moves past them to a soft brown hair gloss she bought on a whim.

    She applies it quickly, without ceremony. Twenty minutes later, the greys aren’t erased. They’re softened, diffused, woven into her natural colour. She looks closer. She looks rested. Her shoulders drop, just a little.

    Goodbye full-coverage dye. Something else is taking its place.

    A quiet shift away from full grey coverage

    This emerging movement isn’t about eliminating grey hair. It’s about letting it exist without dominating the look. In salons from London to Los Angeles, conversations are changing. Stylists talk more about blending, glazing, toning, and glossing, and less about heavy coverage, flat colour, and monthly root anxiety.

    Clients aren’t asking to rewind time. They’re saying, “I’m exhausted from chasing my roots.” They want shine, softness, and dimension. Above all, they want hair that doesn’t announce how long they spent trying to hide age. The difference may look subtle online, but in real life, it’s transformative.

    A Paris-based colourist followed her regular clients over twelve months. Out of 120 women who once booked full coverage every four to six weeks, more than half extended appointments to eight or even twelve weeks after switching to lower-maintenance techniques. Many chose to keep some grey visible, deliberately.

    One woman in her early fifties moved from dark box dye to a semi-permanent blend that allowed silver to show at the temples. She didn’t appear dramatically younger. She looked softer and more refreshed. Friends didn’t comment on her colour; they asked if she’d been resting more.

    That’s the understated strength of this approach. When every grey strand isn’t treated as an enemy, facial features relax. Heavy, opaque colour on ageing skin can sharpen lines and flatten texture. Softer tones and blended greys create depth and light, similar to a subtle filter that doesn’t draw attention to itself. Modern hair formulas now prioritise this balance, using demi-permanent colours, tinted masks, and clear glosses that respect the hair fibre instead of stressing it month after month.

    How grey-blending techniques actually work

    The principle is simple: stop aiming for zero grey and aim for better-looking grey. Hair glosses, tinted conditioners, and demi-permanent colours don’t mask silver strands completely. They gently stain them, soften their brightness, and often turn them into natural highlights. The result is familiar, just calmer—less contrast, fewer harsh root lines, and more light reflecting off the hair.

    One widely used salon method is the root smudge. Instead of applying a solid colour from scalp to ends, the stylist uses a slightly deeper, softer shade at the roots and blends it seamlessly into the existing colour. Grey hairs are toned rather than buried. As the hair grows, the transition remains blurred, turning natural regrowth into part of a gradient rather than a stark divide.

    Another technique flips traditional highlighting on its head. Rather than placing bright streaks on untouched hair, colourists add fine babylights and lowlights around areas where grey concentrates, such as the temples and parting. This disperses dense silver patches and spreads light evenly. A clear or tinted gloss finishes the look, allowing grey to read as intentional shimmer. The visual logic is straightforward: high contrast signals ageing, while harmony suggests youthfulness.

    Covering grey without fully hiding it

    If a salon visit feels like too big a step, begin with small changes at home. Replacing your regular conditioner once or twice a week with a tinted mask close to your natural shade can make a noticeable difference. Leave it on for five to ten minutes before rinsing. The greys won’t disappear, but they’ll soften, reducing the sharp white line that shows up under bright lighting.

    The next option is a demi-permanent gloss, either applied at home or professionally. Unlike permanent dye, these formulas fade gradually and don’t create a rigid regrowth line. Shades labelled “sheer,” “translucent,” or “grey-blending” are designed for this purpose. Choosing a slightly warmer tone can help revive a dull complexion by reflecting more light. If the result isn’t right, it washes away over time.

    In the salon, describe the outcome you want rather than focusing only on colour names. Saying “I want to look rested” opens the door to techniques like root smudging, low-contrast balayage, and glossing. Many stylists welcome clients who are comfortable keeping some grey, as it allows for a more tailored and creative approach. What begins as a simple cover-up request often ends with a result that feels natural, lived-in, and easy to maintain.

    Building a routine that fits real life

    Let’s be honest: few people maintain elaborate routines every day. What looks impressive on social media often falls apart on a rushed morning. The goal is a low-effort rhythm you can realistically sustain, focusing on consistency rather than intensity.

    One effective habit is prioritising scalp health. A healthier scalp supports shinier hair and reduces frizz around coarse silver strands. Gentle massage with a light oil or serum once or twice a week before washing can improve circulation and encourage smoother growth. Keep heat styling minimal and controlled, as excessive heat can make grey hair feel rough and more noticeable.

    Common missteps include going too dark or too opaque too quickly. Jumping from a medium shade with greys to very dark colour often has the opposite of the intended effect, drawing attention to facial lines. Another frequent issue is layering box dye repeatedly, which leads to dull, flat hair where new greys stand out even more.

    “I used to believe youthful hair meant no grey at all,” says Anna, 49, who transitioned from permanent dye to grey-blending glosses. “Now I feel younger with some silver showing, because I’m no longer playing a part that doesn’t fit me.”

    This mindset reflects a broader, quieter change. Many recognise that the discomfort they feel isn’t about ageing itself, but about a hair colour that no longer matches who they are. That realisation is guiding them toward a softer, more cohesive version of looking younger—less about numbers, more about alignment.

    • Start small with one tinted product or gloss instead of a full colour change.
    • Describe feelings at the salon, not just shades.
    • Protect shine with gentle shampoo, cooler water, and heat protection.
    • View silver as texture, not failure.
    • Give changes time, allowing at least two growth cycles before judging.

    Redefining what “younger hair” means

    Beneath these techniques lies a deeper shift. Looking younger no longer means pretending grey hair doesn’t exist. It now means appearing energised, cohesive, and natural, as if hair and face belong to the same moment in life. When colour is rigid, facial features carry the emotional weight. When it’s softened, they’re free to relax.

    There’s also a psychological ease in stepping off the root-chasing treadmill. Missing an appointment isn’t catastrophic. Travel plans don’t revolve around colour schedules. Swimming no longer comes with calculations about damage. That freedom shows on the face as clearly as any cosmetic change.

    Full-coverage dye will always be the right choice for some, and that remains valid. This shift isn’t about limiting options, but expanding them. Grey-blending techniques, tinted masks, and glosses offer a middle ground between embracing full silver and hiding every strand. For many, that middle space is where true youthfulness lives—not as a miracle solution, but as a gentler conversation with time.

    Key Point Updated Explanation Why It Matters for You
    Grey Blending over Full Coverage Soft techniques like demi-permanent colour, gloss treatments, and subtle highlights are used to blend greys naturally instead of completely hiding them. Prevents harsh regrowth lines and creates a smoother, more youthful appearance.
    Low-Maintenance Hair Care Root smudging, tinted conditioning masks, and extended gaps between salon visits reduce daily upkeep. Saves time, lowers salon dependency, and gives more freedom in everyday routines.
    Shine & Tone Focus, Not Grey Elimination Emphasis is placed on hair shine, balanced tones, warmth, and overall scalp health rather than removing every grey strand. Brightens the face naturally and refreshes your look without drastic colour changes.
  • Breakage-Protecting Shampoos Kept Bleached Hair Bouncy and Lustrous

    Breakage-Protecting Shampoos Kept Bleached Hair Bouncy and Lustrous

    I’ve been blonde for as long as I can remember, but as the years passed, my natural roots gradually deepened in color. I missed the bright, shimmering tones, which led me to keep up with highlights several times a year. Over time, I transitioned to a more soft, old-money blonde that’s easier to maintain, though my hair care routine has remained consistent and effective.

    When it comes to hair care, I prefer to keep things simple, but I do rotate a few shampoos depending on what my hair and scalp need on wash day. For added lift, Pantene Sheer Volume never lets me down. If my blonde starts to look dull or brassy, I reach for one of my trusted purple shampoos from Pureology to restore brightness. And whenever my hair needs a true reset, Paul Mitchell’s clarifying shampoo is my first choice.

    Shampoo may not be a one-size-fits-all solution, and it’s only one part of overall hair health, but choosing the right one can make a noticeable difference in recovery and upkeep. Below is my complete list of blonde shampoos I rely on to care for my bleached hair.

    My Favorite Shampoos for Blonde Hair

    • Everyday Volume: Pantene Sheer Volume Shampoo, $10 (Originally $12)
    • Brass-Neutralizing Care: Paul Mitchell Platinum Blonde Violet Shampoo, $20
    • Deep Clarifying: Paul Mitchell Shampoo Two, $14
    • Intense Hydration: Pureology Strength Cure Blonde Shampoo, $38

    Pantene Sheer Volume Shampoo

    Volume is always my top priority, and this lightweight, root-lifting formula keeps me coming back bottle after bottle. Infused with pro-vitamin B5 and antioxidants, it leaves my ends feeling strong and my hair noticeably fluffy after blow-drying. Many volume shampoos weigh my roots down, but this one delivers lift without heaviness. Unless I’m toning or clarifying, this is the shampoo I reach for most often.

    Paul Mitchell Platinum Blonde Violet Shampoo

    Back when my hair was fully highlighted, this bold purple shampoo was my fix whenever my blonde looked dull or brassy. Since it’s designed mainly for brightening and toning, I don’t use it for deep cleansing. I prefer to shampoo first with a regular formula, then follow with this one. The toning power is impressive, leaving my hair glossy, luminous, and refreshed.

    Paul Mitchell Shampoo Two

    If you’re skipping a clarifying shampoo, you may be missing out. These formulas work deeper to remove product buildup, excess oil, and dead skin, creating a clean base so other products can perform better. This one is a longtime favorite because it leaves my oily scalp feeling truly clean. Whenever I run out, I notice my other products don’t work as well. My mom is a hairstylist and once stocked Paul Mitchell in her salon, which makes this a trusted staple I always return to.

    Pureology Strength Cure Blonde Shampoo

    After seeing countless positive reviews, I swapped my usual blonde shampoo for this Pureology formula and was impressed by the results. With ceramides, astaxanthin, and arginine, it helps strengthen strands, improve elasticity, and repair weakened hair. I saw a clear change in texture, especially during postpartum regrowth—my hair went from dull and frizzy to strong and shiny. When I don’t need intense toning, I sometimes mix it with my Pantene shampoo for extra reinforcement. It’s also vegan and sulfate-free.

    If you’re searching for something new, there are plenty of other blonde-approved shampoos worth exploring next.

  • Natural Hair Care Treatments That Strengthen Roots and Reduce Hair Fall With Consistent Use

    Natural Hair Care Treatments That Strengthen Roots and Reduce Hair Fall With Consistent Use

    The moment you spot extra strands on your pillow or gathered in the shower drain, something quietly changes. With damp fingers pressed to your scalp, you try to recall when your hair began to feel thinner. A gentle sense of panic appears, rarely shared with others, yet impossible to ignore. It feels easier to blame stress, weather shifts, a new shampoo, or tight hairstyles than to accept that a deeper imbalance may be developing.

    Understanding the Signals Your Hair Sends

    Hair communicates in subtle ways. It reflects late nights, missed meals, harsh products, and prolonged periods of pressure. Hormonal changes, seasonal transitions, and time itself leave quiet marks long before hair fall feels alarming. The body often asks for rest, nutrition, and gentler care, but modern routines make these cues easy to overlook. When shedding increases, many seek fast solutions, though slower home remedies can support the body more naturally.

    Oil Rituals That Nourish the Roots

    Hair oiling is a traditional practice built on patience. Warming oil between the palms and working it into the scalp does more than soften strands; it encourages circulation and relaxation. Coconut oil helps reduce protein loss, while castor oil, used sparingly, supports scalp moisture. Almond, sesame, and olive oils each contribute unique benefits. There is no universal choice, and custom blends often work best. Consistent oiling with gentle massage strengthens the roots over time.

    Why Scalp Massage Deserves Attention

    The massage itself is as important as the oil used. Slow, circular movements with the fingertips stimulate blood flow, allowing oxygen and nutrients to reach the follicles. Beginning at the hairline and moving backward gradually awakens the scalp. Just five to ten minutes several times a week can show results. Beyond physical effects, this practice helps ease tension, which quietly contributes to long-term shedding.

    Herbal Oils and Thoughtful Infusions

    Those who prefer a more mindful approach often infuse oils with herbs at home. Common choices include rosemary, curry leaves, hibiscus, and fenugreek. Slowly warming these herbs in oil allows their natural compounds to transfer. Rosemary is linked with circulation support, while hibiscus and fenugreek aid conditioning and strength. The process encourages intention and results in a deeply nourishing oil.

    Kitchen-Based Remedies for Gentle Nourishment

    Many supportive hair treatments already exist at home. Ingredients such as seeds, yogurt, eggs, and aloe help maintain scalp health and limit breakage. These remedies focus on consistency rather than instant change, reconnecting hair care with everyday self-care through simple preparation.

    Fenugreek: Small Seeds with Lasting Support

    Fenugreek seeds are often soaked overnight and blended into a paste for scalp use. Rich in proteins and natural compounds, they are traditionally applied to reduce shedding and improve texture. Used once or twice weekly for short periods, fenugreek can help hair feel thicker and stronger, provided scalp sensitivity is respected.

    Aloe Vera: Cooling Care for the Scalp

    Aloe vera provides relief for irritated or oily scalps. Its gel calms inflammation, balances oil levels, and clears buildup that may block follicles. When applied for twenty to thirty minutes, aloe supports a healthier scalp environment and can be combined with oils or yogurt for added nourishment.

    Protein Masks from Everyday Foods

    Hair exposed to heat or sunlight often benefits from protein support. Masks using egg and plain yogurt temporarily reinforce the hair shaft, improving smoothness and reducing breakage. Applied to damp hair and rinsed with cool water, these masks work best when used occasionally.

    The Role of Food, Stress, and Overall Balance

    Hair condition often mirrors overall health. Nutrient gaps, ongoing stress, hormonal shifts, and poor sleep frequently show up as thinning or increased shedding. While topical care supports the scalp, internal balance is just as important. Diets rich in protein, iron, zinc, and healthy fats, along with proper hydration, quietly support long-term strength.

    How Stress Influences Hair Fall

    Stress or illness can trigger delayed shedding, where hair enters a resting phase and falls months later. Gentle movement, breathing practices, adequate rest, and reduced screen time help regulate stress hormones. As balance returns, hair growth cycles can gradually stabilize.

    Daily Choices That Preserve Hair Strength

    Everyday habits shape hair health. Using mild shampoos, avoiding excessive washing, and cleansing mainly at the scalp help preserve natural oils. Conditioning the lengths reduces friction, while limiting heat styling and choosing loose hairstyles protect fragile strands.

    Key Nutrients That Support Healthy Hair

    • Protein: Forms keratin for strength and structure; found in lentils, eggs, fish, paneer, tofu, nuts, and seeds.
    • Iron: Supports oxygen delivery to roots; sourced from spinach, beetroot, lentils, kidney beans, and pumpkin seeds.
    • Biotin and B Vitamins: Aid energy production and follicle renewal; present in whole grains, eggs, almonds, and leafy greens.
    • Omega-3: Maintains scalp moisture and reduces inflammation; found in flaxseeds, chia seeds, walnuts, and oily fish.
    • Zinc and Selenium: Assist tissue repair and follicle protection; available in nuts, seeds, legumes, whole grains, and dairy.

    Gentle Detangling as a Daily Practice

    The way hair is handled makes a difference. Detangling slowly from the ends upward with a wide-toothed comb reduces unnecessary shedding. Adding a small amount of oil or leave-in conditioner minimizes friction. This habit turns routine grooming into a moment of awareness, helping catch early signs of dryness or weakness.

    Building a Simple, Sustainable Routine

    Hair care does not need to feel complicated. A manageable rhythm of regular oil massage, weekly nourishing masks, gentle daily handling, balanced meals, and stress relief can be effective. Over time, reduced shedding, better texture, and new growth begin to appear.

    Reconnecting with Your Body Through Care

    Home remedies are not instant solutions. They encourage patience, observation, and adaptation. What suits one person may not suit another, making attentiveness essential. Using familiar ingredients and gentle rituals supports more than hair health, fostering a kinder connection with your body from root to tip.

  • Bodyweight Leg Exercises Build Strength Effectively Without Gym Equipment

    Bodyweight Leg Exercises Build Strength Effectively Without Gym Equipment

    The stairs you see every day are ordinary steps until you turn them into a powerful leg training tool. That park bench might seem like a spot to sit down but you can use it for squats or step-ups to build leg strength. The floor in your living room offers more workout possibilities than costly gym equipment when you learn to use your body weight effectively. You don’t need a gym membership or special gear. All you need is gravity and the decision to get stronger using what you already have around you.

    Strength Starts at Home: The Power of Bodyweight Leg Workouts

    Stand barefoot in an open space and feel the floor beneath your feet. It is steady, cool, and indifferent. Spread your toes slightly and shift your weight from heel to forefoot. Your legs are the quiet pillars that carry you from bed to coffee maker to bus stop, constantly calculating to keep you balanced. Bodyweight leg training begins here, in the simple dialogue between your feet and the ground. Removing machines and heavy weights doesn’t reduce effectiveness—it removes excuses. The work becomes simpler and more honest. Squat, lunge, hinge, push, jump, and balance. These movements predate gyms, sports, and even the word “workout.” Think of bodyweight leg training not as a gym routine but as sharpening your ability to move through the world with strong, aware muscles. Hills, stairs, and even standing in line can become part of the practice. The benefit extends beyond quads and calves—it’s knees that feel stable on rocky trails, hips that move without pain, and a body that acts as a partner, not a burden.

    Waking Up Your Legs: Preparing Muscles for Action

    Before your legs push, pull, and burn, they need to wake up. This isn’t about bouncing stretches but small, intentional movements signaling that something important is coming. A bodyweight leg warm-up requires only a few square feet and focused attention. Start by marching in place for a minute, swinging your arms, letting your heels softly touch the floor. Slowly circle each ankle, drawing invisible moons in the air. Gently bend and circle your knees, coaxing them into a full range of motion. Walk your hands down your thighs into a light forward fold with knees slightly bent, letting your hamstrings awaken. Finish with a few shallow bodyweight squats, noticing how your hips and knees move today. Some days they glide, some days they complain—both are fine. This warm-up is part of your workout’s story, where hips, knees, ankles, and balance introduce themselves. Skip it, and the story never makes sense.

    Using Gravity as Resistance: Core Movements for Strong Legs

    Bodyweight leg training is like cooking with simple ingredients: when approached carefully, it’s effective, adaptable, and satisfying. You don’t need dozens of exercises—just a small set of foundational movements to refine over time. Begin with exercises you already know. Squats teach controlled sitting and standing, while lunges improve balance and one-legged movement.

    Bodyweight Squats: Building Strength from the Ground Up

    Stand with feet shoulder-width apart. Imagine sitting back into a chair slightly farther than usual. Hips move backward, knees bend, chest stays upright. Weight rests on your heels while toes maintain contact with the floor like roots. Pause briefly at the bottom and breathe. Feel your quadriceps, glutes, and hamstrings. Rising up, press deliberately against the floor. Once squats feel easy, increase difficulty by slowing down, holding the bottom position, or adding pulses. Equipment isn’t necessary—tempo and control create enough challenge.

    Controlled Lunges: Developing Balance and Stability

    Lunges turn everyday walking into focused strength work. Step one foot forward, bend both knees while keeping your front knee over the foot, and lower the back knee gently toward the floor. Maintain a straight upper body and look ahead. Press through the front leg to return upright, then switch sides. Notice differences between your legs—they provide feedback on areas needing attention. Variations like walking lunges or reverse lunges change the challenge and protect your knees. Lunges teach your hips to stabilize and your feet to adjust, strengthening movement control over raw force.

    Glute Bridges: Engaging the Posterior Chain

    Lie on your back with knees bent and feet flat. Press your lower back lightly toward the floor, then lift your hips until your body forms a straight line from shoulders to knees. Squeeze your glutes at the top, hold briefly, and lower slowly, vertebra by vertebra. This works your glutes and activates the posterior chain supporting hips and lower back. Progress to single-leg bridges to increase intensity without weights, relying on your body and gravity alone.

    Calf Raises: Strengthening Often-Neglected Muscles

    Stand with feet hip-width apart, resting a fingertip on a wall or chair for balance. Rise onto the balls of your feet, lifting heels as high as possible. Hold, then lower slowly. Your calves act as shock absorbers and springs, improving climbing, hiking, and running. Elevate your feet on a step to expand range of motion for added challenge.

    Step-Ups: Turning Everyday Objects into Strength Tools

    Use a stable surface like a bench, chair, or low wall. Step up with one foot, press through it to stand tall, bring the other foot up, then step down carefully. Step-ups engage the leg fully from hip to calf, mirroring real-world movements like climbing vans or stairs. Increase difficulty by using higher surfaces, slower tempos, or pausing at the top to test balance.

    Progressing Without Weights: Smart Ways to Challenge Your Legs

    Bodyweight training can still plateau without added resistance, but reps, leverage, and tempo can provide continuous growth. Increase reps, sets, or transform squats into jump squats. Explore one-leg pistol squat progressions with support. Tempo challenges muscles by slowing movements, e.g., a nine-second squat with pauses at the bottom. Leverage adjustments, such as elevated feet for glute bridges or steps during lunges, intensify effort. None of these require equipment beyond your surroundings, yet each tweak drives adaptation.

    Exercise Sets Reps / Duration Focus & Tips
    Bodyweight Squats 3 10–15 reps Perform each rep slowly, keep feet shoulder-width apart, and pause briefly at the bottom.
    Reverse Lunges (Each Leg) 3 8–12 reps Step backward carefully to protect the knees; maintain an upright torso and steady core.
    Glute Bridges 3 12–15 reps Press firmly through your heels, squeeze glutes at the top, and lower slowly.
    Step-Ups (Each Leg) 2–3 8–10 reps Use a stable platform; focus on controlled movement while stepping down.
    Standing Calf Raises 3 15–20 reps Raise heels fully, hold at the top for a second, then lower slowly for better activation.

    Simple Bodyweight Leg Routine

    No complex plan is needed. Choose a few exercises, commit to performing them several times a week, and focus on quality over quantity. Rest 45–75 seconds between sets. Adjust reps to ensure the last few are challenging but maintain perfect form. Progress by increasing reps, sets, slowing movement, or trying advanced variations like jump squats, Bulgarian split squats, or single-leg bridges.

    Transforming Everyday Spaces into a Leg Gym

    Look around—the world is filled with training tools. Curbs become platforms for calf raises, low walls for step-ups, tree branches for gentle leg swings. Sidewalks, park benches, and apartment steps can all integrate into training. On a walk, convert the last block into a mini workout: stop for 10 squats, step-ups, or calf raises. Bodyweight training is free, convenient, and versatile. It blends workouts with daily life. Legs trained this way are ready for hikes, long days on foot, or spontaneous sprints. Strength without equipment isn’t a compromise—it reconnects you to your body and the ground beneath you, building trust and capability step by step.

  • The Ordinary New Serum Nicknamed Filler in a Bottle Gave My Skin a Youthful Look in My 40s

    The Ordinary New Serum Nicknamed Filler in a Bottle Gave My Skin a Youthful Look in My 40s

    In India, skincare conversations in your 40s often revolve around firmness, fine lines, and finding products that actually deliver visible results. That’s why The Ordinary’s new serum, often nicknamed a “filler in a bottle,” has been creating so much buzz among women looking for subtle yet noticeable skin improvements. Rather than promising overnight miracles, this serum focuses on hydration-driven plumping and smoother texture, making skin look refreshed and youthful without invasive treatments. For many Indian users balancing work, family, and self-care, this kind of simple, effective skincare feels both practical and empowering.

    The Ordinary serum that works like a filler alternative

    What sets this Ordinary serum apart is how it mimics the effects of professional fillers using hydration science instead of needles. The formula focuses on attracting and retaining moisture deep within the skin, creating a naturally plump appearance. With consistent use, skin begins to show visible plumping effect, especially around areas prone to lines like the cheeks and smile zones. Users in their 40s often notice smoother skin texture and a soft bounce that makes makeup sit better. Rather than feeling heavy, it delivers lightweight hydration boost, making it suitable for India’s varied climates. Over time, many report improved facial fullness without irritation.

    Why this filler-like serum suits skin in your 40s

    Skin in your 40s tends to lose moisture faster, which can exaggerate fine lines and dullness. This serum targets that exact concern by reinforcing the skin’s hydration reserves. Regular application supports deep moisture binding, helping skin appear more resilient throughout the day. Many users appreciate the non-greasy finish, especially in humid Indian weather. The formula also encourages softened fine lines by keeping skin supple rather than tight. Over weeks of use, there’s often a noticeable refreshed youthful look, making the face appear well-rested even on busy days.

    How to use the serum for best youthful results

    Using this serum correctly can make a real difference in the results you see. It works best when applied to slightly damp skin, allowing better absorption and performance. A few drops are enough to deliver intense hydration layers without overwhelming the skin. Follow with a moisturiser to lock in the benefits and enhance the plump skin appearance. Many users prefer it both morning and night for consistent results. Over time, this routine supports daily skin resilience and maintains long-lasting smoothness that feels natural, not overdone.

    Summary and real-world results

    For women in their 40s across India, this Ordinary serum offers a realistic approach to youthful-looking skin. It doesn’t replace cosmetic procedures, but it delivers visible improvements that feel achievable at home. With continued use, skin often shows healthier skin bounce, a more even surface, and a subtle glow. The appeal lies in its simplicity and affordability compared to in-clinic treatments. When paired with good skincare habits, it supports naturally fuller skin and enhances confidence without drastic changes. For many, it’s a smart addition to a mature skincare routine.

    Feature What It Offers
    Main Benefit Hydration-based plumping effect
    Ideal Age Group 40s and above
    Texture Lightweight, fast-absorbing
    Usage Frequency Once or twice daily
    Skin Types Normal, dry, combination

    Frequently Asked Questions (FAQs)

    1. Is this serum suitable for sensitive skin?

    Yes, it is generally well-tolerated, but a patch test is recommended.

    2. Can it replace professional fillers?

    No, it offers a temporary plumping effect, not permanent filler results.

    3. How long before results are visible?

    Many users notice improved hydration and smoothness within one to two weeks.

    4. Can it be used under makeup?

    Yes, its lightweight texture works well as a makeup-friendly base.

  • Seven K-Beauty Makeup Trends Expected to Shape Routines in 2026

    Seven K-Beauty Makeup Trends Expected to Shape Routines in 2026

    K-beauty is globally known for its innovative skincare, but Korean makeup stands out just as much. A quick glance at K-pop idols like Jennie, IVE, and BabyMonster reveals an array of soft hues, delicate textures, and ethereal finishes. After spending a full year immersed in Seoul’s beauty scene—and gathering insights from local insiders and industry professionals—this curated roundup highlights the top Korean makeup trends expected to be everywhere in 2026.

    Skin-Like Makeup With Barely-There Definition

    Just as the best lingerie feels invisible, this refined makeup approach is designed to blend seamlessly with your skin rather than mask it. The focus is on muted beige shades and soft matte textures that subtly enhance and contour your natural features without looking heavy or overdone.

    Inner-Corner Shimmer for Instant Brightness

    A signature detail in K-pop idol makeup is a touch of shimmer at the inner corners of the eyes, a look famously worn by Blackpink’s Jennie. Whether achieved with a sparkling eyeshadow or an iridescent highlighter, this precise placement delivers an immediate brightening effect that opens up the eyes.

    Lower-Lash Focus for Soft Eye Definition

    An even more understated way to highlight the eyes is by emphasizing the lower lashes, as seen on Eunchae from Le Sserafim. Applying a generous coat of mascara and gently clumping the lashes together with tweezers creates definition without the need for eyeliner, resulting in a clean and natural finish.

    Bold Yet Blended Blush Placement

    One makeup trend that’s impossible to miss across Seoul is noticeable but expertly diffused blush. Swept across the bridge of the nose and softly connecting the area between the undereyes and upper cheeks, this technique relies on careful placement and a light hand. The goal is a fresh, flushed glow rather than an overpowering burst of color.

    Pink Tones From Eyes to Lips

    A stroll through Olive Young, Korea’s largest beauty retailer, reveals an endless selection of products in every shade of pink. Loved for its instant brightening effect, pink is commonly worn from eyelids to lips. To maintain balance, mixing textures—such as a matte pink blush with a glossy pink lip—creates a harmonious, radiant look.

    Glazed Lavender Lips Take Center Stage

    The standout nude lip color for 2026 is glazed lavender. Popular among fifth-generation K-pop idols like Illit, this unexpected neutral is gaining momentum as spring approaches. While lavender can lean cool-toned, newer formulas combine pink and purple pigments with high-shine finishes to ensure lips look luminous and alive.

    Warm Caramel Makeup With a Sultry Glow

    Korean makeup trends extend beyond soft pinks and shimmering accents. Singer Dayoung has sparked interest with a contrasting style built around caramel brown tones. This warmer palette offers a more intense take on the skin-enhancing lingerie makeup look, delivering a richer glow with added depth and allure.

    A Legacy of Beauty Expertise

    For over 150 years, Harper’s Bazaar has remained a leading authority in fashion and beauty for women of all ages. The publication covers both emerging and future trends by collaborating with top experts in dermatology, plastic surgery, cosmetics, skincare, hair, and fragrance. Every feature is carefully researched and reviewed by experienced beauty editors and industry specialists.

  • ‘This dead bug variation engages your upper abs and builds core stability and endurance,’ says a personal trainer, and believe us when we say it’ll torch your core

    ‘This dead bug variation engages your upper abs and builds core stability and endurance,’ says a personal trainer, and believe us when we say it’ll torch your core

    If dead bugs are already part of your ab routine, you’ll know how powerful they are for firing up the core muscles. But if you want to dial up the challenge or try a variation that places extra emphasis on the upper abdominals while improving anterior core stability, the wall press dead bug is a smart upgrade.

    According to Tom’s Guide personal trainer Sam Hopes, this variation activates the upper abs while building long-lasting core strength and endurance. When performed correctly, it also reinforces a neutral spine position, which is essential not just for dead bugs, but for all effective strength training.

    Below, you’ll learn how to perform the movement correctly, along with key form cues to keep in mind. If you’re new to exercise, pregnant or postpartum, or returning after an injury or long break, it’s always wise to consult a qualified professional before adding a new exercise to your routine.

    How To Perform The Wall Press Dead Bug Correctly

    To begin the wall press dead bug, place a yoga mat close to a wall and lie on your back so your head is near the base of the wall.

    • Brace your core by gently drawing your belly button toward your spine.
    • Bend your elbows and press both hands firmly into the wall, instead of reaching your arms upward.
    • Lift your legs into a tabletop position, keeping your knees bent at 90 degrees and stacked over your hips.
    • Slowly extend one leg toward the floor, keeping the foot flexed while maintaining pressure through your hands.
    • Return to the starting position with control, then repeat on the opposite side.

    You should feel consistent tension through the front of your core. Move slowly and deliberately—the slower the tempo, the harder your abdominal muscles have to work.

    Key Form Tips For Better Results

    Maintain steady pressure against the wall, but avoid pushing excessively. Pressing too hard can cause your lower back to lift off the mat, which increases the risk of strain. Focus on drawing your ribcage down and keeping your spine neutral.

    As with traditional dead bugs, rushing through the reps is a common mistake. Controlled movement delivers far better core engagement and results.

    Breathing is just as important. Exhale as you extend your leg away from your body, and inhale as you return to the tabletop position.

    Benefits Of The Wall Press Dead Bug

    The wall press dead bug significantly increases the core challenge by forcing every abdominal muscle to stay engaged. Your deep core muscles and upper abs work harder than they do in the standard version due to the added intra-abdominal pressure created by pressing into the wall.

    This bracing action also prepares your body for compound lifts like squats and deadlifts, where maintaining a stable torso is essential, making it an excellent warm-up exercise.

    Additionally, your upper body plays a greater role in this variation. As you press into the wall, your lats activate, adding another layer of engagement. The wall contact also encourages proper alignment, helping you avoid common dead bug mistakes like arching the lower back.

    Add the wall press dead bug to your next ab workout and be ready to feel a deeper, stronger core connection from head to toe.