Category: News

  • From February 15, hedges exceeding 2 meters in height and located less than 50 cm from a neighbor’s property will have to be trimmed or face penalties

    From February 15, hedges exceeding 2 meters in height and located less than 50 cm from a neighbor’s property will have to be trimmed or face penalties

    On a calm Sunday morning in February, birdsong is abruptly drowned out by the whirr of electric trimmers. On one small suburban street, the noise rises from three gardens at once. Neighbours glance over fences, pretending not to stare, yet everyone is watching the same thing: the hedge next door. Since February 15, those familiar green barriers have turned into a legal pressure point. Any hedge taller than 2 meters and planted within 50 centimeters of a property line must now be cut back.

    No one wants to be the neighbour who gets reported to the town hall.

    Still, many homeowners are about to realise their hedge is not just “slightly tall,” but officially non-compliant.

    From Privacy Shield to Legal Headache Overnight

    At first glance, the rule seems straightforward: from February 15, hedges over 2 meters high and less than 50 cm from a neighbour’s boundary must be trimmed. On paper, it feels harmless. In reality, it strikes at the heart of suburban life: privacy.

    For many households, a hedge is far more than decoration. It conceals the terrace, the children’s pool, the untidy washing line. Losing even half a meter of height can feel like exposing daily life to the street and nearby windows.

    Take Claire, 47, living in a semi-detached home with a classic photinia hedge running along the fence. When she moved in ten years ago, the shrubs barely reached shoulder height. Today, they form a dense three-meter-tall red-and-green wall.

    Her neighbour on the right accepted the shade, quietly pleased to avoid installing a fence. The neighbour on the left was less forgiving, complaining each spring about branches leaning over. After the February 15 enforcement, he printed the regulation and slipped it into her mailbox with a note reading, “We need to talk.”

    Behind these everyday moments lies a simple reality. A tall hedge planted too close to a boundary can cause shade, dampness, root pressure, and frequent disputes. Town halls and mediation services see the same issues repeatedly: gardens deprived of sunlight, gutters clogged with leaves, and cracks appearing in low walls.

    The 2-meter height and 50-centimeter distance limits are designed to balance the right to plant with the right to enjoy one’s property. A kind of green peace agreement that is now being enforced more seriously than before.

    Measuring Correctly, Trimming Smartly, and Avoiding Trouble

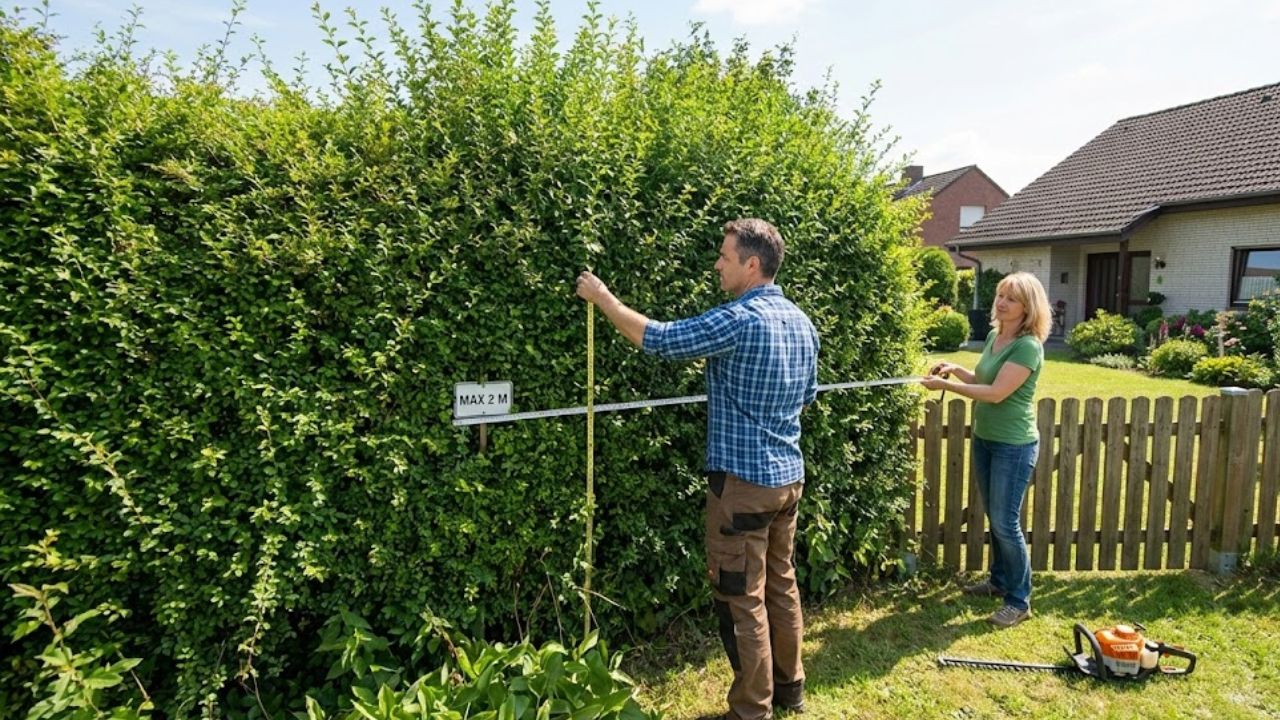
    Before worrying, start with a simple step: measure your hedge. Check the height from ground level to the tallest branch. If it exceeds 2 meters, then measure the distance from the hedge base to the official boundary, whether that’s a fence, wall, or cadastral line. If it’s under 50 centimeters, the hedge falls into the risk zone.

    • This simple phrase helps you say no to almost any offer while still looking good, according to psychologists
    • An exceptionally large African python officially confirmed by herpetologists during a certified expedition
    • 9 things you should still be doing at 70 to inspire others
    • How to remove moss from your lawn naturally and effectively
    • The steam-clean oven trick that removes baked-on grime without scrubbing
    • Lidl set to release a gadget approved by Martin Lewis to help households this winter
    • 10 phrases deeply unhappy people often use in daily conversations
    • 135 fine warning for gardeners using rainwater without authorisation from January 18

    Once you have accurate measurements, planning becomes easier. In many cases, trimming the hedge down to 1.80–1.90 meters offers both visual comfort and legal safety.

    A common mistake is waiting until a neighbour complains or a registered letter arrives from the town hall. By then, tensions are already high. In small communities, a simple hedge issue can quickly escalate into a years-long standoff.

    It’s far better to talk early. A brief conversation explaining that you’ve noticed the new rule and plan to trim can change everything. Asking whether they prefer more light or more privacy often helps. Fifteen minutes of awkward discussion can prevent months of resentment.

    Concerns about penalties are often exaggerated online. While sanctions do exist and authorities can require work or issue fines in cases of refusal, most town halls still prioritise dialogue over punishment.

    As one municipal mediator puts it, “People imagine garden police with rulers. In reality, we’re called in when neighbour relations have already collapsed. The hedge is just the visible symptom.”

    • Measure before trimming, not after
    • Keep before-and-after photos
    • Note the date and type of work carried out
    • Offer to show the result to your neighbour
    • Check with the town hall if local rules are unclear

    Living With the Rule: Law, Privacy, and Everyday Reality

    After the first cut, the garden often feels different. More open. Sometimes even exposed. Some homeowners rediscover a sunset hidden for years, while others suddenly feel watched from the neighbour’s kitchen. This is where regulation meets something personal: how we protect our private space.

    Let’s be realistic. Few people pull out a tape measure and legal text every time they start the lawnmower.

    The renewed focus around February 15 forces a long-avoided question. Are we willing to share a bit more light and space, or do we cling to a tall wall of greenery even when it breaks the rules? Between official regulations and daily life, there is room for compromise: a slightly lower hedge combined with a light screen, or trimming more aggressively where windows are closest.

    Everyone knows that moment of pretending not to notice the branch clearly stretching into the neighbour’s garden.

    The coming months will likely bring measuring tapes, gardener quotes, and quiet negotiations over coffee by the fence. Some will realise too late that their three-meter cedar hedge planted 20 cm from the line is no longer just a hedge, but a shared problem. Others will use the moment to rethink their garden boundaries with lighter, more suitable plants.

    Between the letter of the law and how people actually live, there is always a messy, human middle ground. That’s where most solutions are found.

    Key Takeaways at a Glance

    Legal limits: Hedges taller than 2 meters and planted less than 50 cm from a neighbour may face formal demands and penalties, helping you identify risks early.

    Practical steps: Measure accurately, trim to a safe height, document the work, and speak with neighbours to reduce conflict and demonstrate good faith.

    Conflict prevention: Use the regulation as a reason to reopen dialogue instead of escalating tensions, protecting both garden privacy and neighbourly relationships.

  • Bad news a 135 fine will apply to gardeners using rainwater without authorization starting January 28

    Bad news a 135 fine will apply to gardeners using rainwater without authorization starting January 28

    On a dull January morning, just before sunrise, the soft clatter of watering cans still echoes across backyards. A neighbor, still in his slippers, walks across the grass, lifts the lid of his rain barrel, and fills his can with that faintly metallic water that has kept his roses alive through countless heatwaves. It feels like a responsible, almost virtuous habit. No one imagines a fine hanging over such a peaceful routine.

    Yet starting January 28, that everyday gesture can suddenly carry consequences for many gardeners. 135 euros for a single can of rainwater. The kind of rule that feels surreal when your boots are already muddy.

    The question is no longer “Will it rain?” but “Am I even allowed to use it?”

    Something has changed. And most people were never clearly warned.

    Why Using Rainwater Is Suddenly Under Scrutiny

    Across the country, small notices are appearing on town hall boards and buried deep in municipal newsletters that few people read. A new regulation now links rainwater use to specific authorizations, especially during periods of water restriction. Officially, the rules focus on systems connected to household plumbing or large storage setups that may affect public infrastructure. In practice, it feels like a wide net cast over everyone, from casual gardeners to small urban growers.

    And from January 28, that net comes with a 135 euro fine.

    Luc, a 54-year-old teacher, knows this feeling well. He spends his evenings tending a modest allotment outside town. For years, two blue plastic barrels connected to his shed gutter have supplied his plants. During last summer’s drought, when tap water was banned for gardens, he relied exclusively on stored rainwater. He even shared his setup proudly in his gardening group online.

    Last week, that same group shared a short notice: from now on, any rainwater system beyond a simple open barrel may require a declaration or approval, depending on the municipality. Overnight, Luc’s once-innocent setup felt questionable. And he is far from alone.

    From the authorities’ perspective, the reasoning is straightforward. They aim to monitor and regulate installations that could interact with public networks or alter local water flows. Large tanks, buried cisterns, diverted gutters, or semi-professional irrigation systems are under particular attention. Concerns include bacterial risks, backflow issues, and untracked consumption during shortages. On paper, the rules are neat and logical. In the garden, hose in hand, they feel like distant regulations colliding with everyday life.

    How to Use Rainwater Without Facing a 135 Euro Fine

    The first step is simple and practical: take a close look at your installation. If you use an open barrel placed under a gutter, with no pump and no connection to toilets, washing machines, or buried irrigation systems, you fall into the lowest-risk category in most municipalities. Local water restrictions still apply, but inspections are less likely to target you.

    Once you add a pump, underground tank, filtration system, or indoor use, the situation changes. At that stage, a quick call or visit to your town hall’s technical department can save you far more than 135 euros.

    The biggest mistake is assuming that “everyone does it, so it must be allowed.” Gardening forums are full of DIY advice, but legal reminders are rare. That’s where many well-meaning gardeners will get caught. A small pump added for a greenhouse. A hose extended toward a shared path, creating runoff. An overflow draining into the street sewer. Each action feels minor. Together, they are exactly what authorities now want to oversee.

    Let’s be honest: almost no one reads municipal bylaws before installing a tap on a rain barrel.

    To reduce confusion, environmental groups have begun sharing clear checklists. One volunteer from a water-protection organization summed it up simply:

    “Collecting rainwater is great. But without clear explanations, eco-conscious gardeners risk becoming offenders without realizing it.”

    She repeats three essential rules at every workshop:

    • Check your town’s water regulations before installing anything beyond a basic barrel.
    • Keep rainwater systems completely separate from the drinking-water network.
    • Use rainwater outdoors only, unless your installation is declared and fully compliant.

    These are not abstract guidelines. Each one can mean the difference between a peaceful spring and an expensive official letter.

    A Growing Divide Between Practical Sense and Regulation

    This 135 euro penalty arrives at a sensitive time. Citizens are encouraged to conserve water, plant trees, and cool cities with greenery. At the same time, they are told that even collecting rainfall is governed by increasingly complex rules. The result is a quiet frustration, a sense that common sense is being monitored while larger sources of waste persist elsewhere.

    Many people share the same thought when they hear about the rule: “Is this really the priority right now?”

    Behind the awkward communication lies a deeper shift. Water is no longer treated as limitless, but as a tightly managed shared resource. The era when every roof and gutter could be diverted freely is ending. Municipalities want control over flows, pollution risks, and infrastructure strain. Gardeners simply want their tomatoes to survive July.

    Between these realities, a conversation is missing. That space, between regulation and soil-stained hands, is where future debates will unfold. And where everyone will eventually have to choose whether to adapt, challenge the rules, or engage locally.

    Key Points to Remember

    • Understand the 135 euro fine: It applies from January 28 to unauthorized rainwater use, especially with complex or connected systems.
    • Review your setup: Open barrels carry less risk, while pumps and indoor connections usually require approval.
    • Contact local authorities: Town halls can clarify what is allowed for garden use in your area.
  • The Nail Color Every Trendsetter Is Choosing Right Now Is Navy and Here’s Why

    The Nail Color Every Trendsetter Is Choosing Right Now Is Navy and Here’s Why

    Every winter, there are a few wardrobe pieces I rely on without fail: a sharply tailored coat, a soft cashmere sweater, and a pair of beautifully crafted leather boots. They instantly make an outfit feel polished and refined. That same sense of effortless sophistication is exactly what navy nails bring. Much like the little black dress of manicures, a navy polish is a true cold-season classic.

    Deep yet cozy, understated yet elevated, navy delivers a sense of quiet elegance that many clients are drawn to right now. Nail artist and educator Sofiia Mazur explains that navy offers a polished, put-together luxury feel. She notes that it pairs seamlessly with winter textures like wool, velvet, and subtle sparkle, and looks striking alongside silver, gold, or even neutral shades.

    Among endless winter nail ideas, navy stands out for balancing timeless appeal with modern edge. Celebrity nail artist Julia Nadtoka describes it as a shade that belongs in the same category as red or classic French tips. Its rich depth and layered dimension make it universally flattering across nail lengths, shapes, and skin tones.

    A Celebrity-Approved Navy Moment

    Hailey Bieber remains a constant source of nail inspiration. While glazed donut finishes and playful patterns continue to trend, one standout look stays memorable—a sleek, glossy navy manicure created by pro nail artist Zola Ganzorigt using OPI’s Inteligel shade Midnight Mantra. It’s a refined take that feels modern yet enduring.

    For a fully opaque navy, nail artist and Gelcare founder Émilie Sanscartier prefers a clean, high-gloss finish. She explains that many dark blues lean too close to black or rely on shimmer, while her vision of navy is pure, classic, and deeply refined—the kind of shade she always wanted to wear as a nail professional.

    Subtle Ways to Wear Navy

    Embracing navy doesn’t require a full solid manicure. Even a small touch can deliver serious style. Nadtoka suggests using navy as an accent color over sheer nude or milky white bases. Abstract swirls or geometric details add interest while keeping the look soft and understated.

    Minimal navy accents can instantly elevate a simple manicure. Mazur points out that navy appears beautifully in micro French tips, fine abstract lines, or tiny dots. Paired with metallic or shimmer elements—especially gold or chrome—the result feels editorial and modern. Mixing reflective finishes with a French tip design creates a particularly striking effect.

    Replacing Black with Midnight Blue

    For those craving dark, moody winter nails, deep blue shades are stepping in for traditional black. Mazur notes that the current clean aesthetic favors solid colors without elaborate designs. A midnight navy that nearly appears black in certain lighting offers drama without harshness. To finish, a glossy top coat is essential, adding a mirror-like shine that enhances the depth of the color.

    Inspired by the look of well-worn denim, this softer version of navy feels relaxed yet stylish. Christian David, founder of Kure Bazaar, highlights navy’s versatility—it works just as well with casual jeans and knits as it does with an elegant black dress and bold red lipstick. Its adaptability makes it a go-with-everything shade.

    Textured and Artistic Navy Designs

    Cat eye nails continue to dominate, and in a deep blue tone, they feel even more captivating. Nadtoka recommends starting with a navy jelly base to achieve a glass-like, dimensional effect. The result evokes a cosmic depth that feels both dramatic and refined.

    For a celestial finish, metallic details in gold or silver add intrigue. Nadtoka describes navy as having a magnetic, crisp energy, reminiscent of dark winter skies or deep ocean waters.

    Plaid patterns offer another stylish way to embrace navy without committing to a solid look. Sanscartier loves using jewel tones and muted whites to create layered, dimensional designs inspired by classic Ralph Lauren aesthetics.

    Another standout technique is the airbrushed aura manicure. Nadtoka favors a black base with a soft navy glow at the center, creating a diffused, luminous effect that feels subtle yet breathtaking.

  • The 8 Best Self-Help Books for 2026 Covering Mindset Money Career and Personal Growth

    The 8 Best Self-Help Books for 2026 Covering Mindset Money Career and Personal Growth

    As a fitness professional and doctor of physical therapy, movement has always been part of my life. Throughout my twenties, I chased the idea of looking “toned” — a term that, in reality, is more marketing language than physiology. I followed the workouts that promised results: high reps, light weights, endless cardio, and I felt proud walking out of classes completely exhausted. I also restricted my food, believing that eating less was the key to changing my body.

    Like many women, I stayed lean by undereating and overtraining, but I never felt truly strong. I dealt with chronic pain, constant fatigue, and a cycle of pushing harder while fueling less.

    Everything shifted when I began prioritising muscle building and body recomposition. What most people call “getting toned” is actually recomp — losing fat while gaining muscle at the same time.

    The challenge is that achieving body recomposition looks nothing like what many of us were taught, especially women. It’s the opposite of quick fixes and extreme approaches. Consistency, not intensity, is what makes it work.

    Once I learned how to train for hypertrophy, eat to support recovery, and truly rest, the results came faster than I expected. Within a year, I gained eight pounds of muscle and lost about five pounds of fat — with fewer workouts, more food, no joint pain, and far less effort.

    My Personal Experience With Body Recomposition

    I’ve successfully gone through body recomposition twice and plan to do it again soon after having my second baby.

    The first time, over the course of a year, I gained eight pounds of muscle while losing five pounds of fat. The second time, postpartum, I gained 4.2 pounds of muscle and reduced fat within just a few months.

    Muscle tends to return more quickly after the first build. This is because muscle fibres retain additional myonuclei — essentially the control centres of muscle cells — even when muscle mass decreases. When training resumes, these nuclei allow muscle growth to happen faster.

    That’s why building muscle now is one of the best investments you can make for your future body.

    How Long Does Body Recomposition Take?

    Body recomposition is a gradual process, and that’s exactly what makes it effective. It encourages sustainable habits across training, nutrition, and recovery.

    Trying to rush toward an ideal body composition often backfires. Overtraining can lead to injury and time away from workouts, while undereating can stall muscle growth or even cause muscle loss. Although strength training is central to recomp, proper fueling is just as critical. Large calorie deficits increase the risk of losing muscle along with fat.

    What Body Recomposition Looks Like Month by Month

    Month 1

    You may notice early fat loss if you’re in a calorie deficit. Muscle growth usually takes longer, though beginners may see small changes sooner.

    Month 2

    You’ll start feeling stronger and more coordinated as your nervous system adapts. Subtle muscle definition may appear toward the end of the month, as muscle growth often takes 8–12 weeks.

    Month 3

    Visible muscle definition becomes more noticeable, alongside continued fat loss.

    Month 4 and Beyond

    Progress continues, though plateaus are normal. Early gains happen faster due to rapid neuromuscular adaptation, but improvements can slow as your body adjusts. This phase requires refined habits, training close to failure, and a focus on consistency.

    You can’t force this process. With a 200–400 calorie deficit, expect around 0.5–1 pound of fat loss per week and visible muscle growth within 8–12 weeks, with meaningful progress by the three-month mark.

    The Four Foundations of Body Recomposition

    Successful body recomposition depends on focusing on the right priorities. These four pillars matter most.

    Nutrition: Supports Fat Loss and Muscle Growth

    While I’m not formally trained in nutrition, here’s what I’ve learned from registered dietitians and real-world experience:

    • Maintain a small calorie deficit of about 200–400 calories below maintenance
    • Consume 0.7–1 gram of protein per pound of body weight daily

    Tracking food intake, especially early on, can be extremely revealing. I discovered I was eating more calories than I realised and far less protein than needed. While tracking isn’t for everyone, it can build valuable nutritional awareness.

    Strength Training: Drives Muscle Growth

    There’s no such thing as a true “toning” workout. Fat loss primarily comes from nutrition, and you can’t spot-reduce fat. Exercise builds muscle only when it provides enough mechanical tension.

    Research consistently shows:

    • Intensity: Train to failure or within 1–3 reps of failure, usually under 30 reps
    • Frequency: Train each muscle group about twice per week
    • Volume: Aim for at least 4 sets per muscle group weekly

    The muscle “burn” from high-rep workouts isn’t what causes growth. Mechanical tension does. That’s why many traditional toning workouts fail to deliver lasting results.

    Cardio and Daily Activity: Supports Energy Expenditure

    Cardio and movement still matter, but not necessarily for burning fat directly. Calories burned during exercise may not be fully additive during recomp, especially in a calorie deficit.

    Excessive cardio can interfere with recovery and strength performance. Staying active is important — around 150 minutes of light-to-moderate cardio per week works well — but trying to “burn off” food often backfires.

    Cardio is valuable for heart health, but lasting body composition changes are driven primarily by strength training and nutrition.

    Recovery: Enables Growth and Consistency

    Muscle isn’t built during workouts — it’s built during recovery. Rest allows muscles to repair, adapt, and grow stronger.

    I recommend taking about two rest days from lifting each week. Rest prevents overuse injuries, reduces burnout, and supports long-term consistency. Reframing rest as a productive part of the process makes it easier to embrace.

    The Biggest Mistake That Slows Progress

    The most common issue I see is not training close enough to failure. If muscles aren’t sufficiently challenged, they won’t grow.

    This often happens because people:

    • Stop at a preset rep count even when the weight isn’t challenging
    • Quit due to the discomfort of the burn rather than true muscle fatigue
    • Stop from general fatigue or boredom instead of mechanical failure

    Signs you’re close to true mechanical failure include:

    • Noticeably slower rep speed near the end
    • A spike in heart rate during the final reps
    • The “Rest Test”: after resting 5 seconds, if you can do 3 or more reps, you weren’t close enough

    Training to failure means you can’t complete another rep without help. Training close to failure — about 1–3 reps away — is all that’s needed.

    Why Body Recomposition Matters

    I recommend body recomposition for nearly everyone. While it may sound purely aesthetic, it goes far deeper. Building muscle improves metabolic health, bone density, longevity, and even mental well-being.

    Importantly, body recomposition can occur without weight loss. When fat decreases and muscle increases, body composition improves even if the scale doesn’t change.

    Traditional weight loss often leads to muscle loss along with fat, especially in aggressive calorie deficits.

    Recomposition requires time, precision, and consistency. You’ll need to experiment with calories, balance training and recovery, and commit for the long term. But over the course of a year, you won’t just change your body — you’ll develop skills and awareness that benefit you for life.

  • 45 Blunt Bob Hairstyles Ranging From Classic to Choppy That Are Trending Everywhere Right Now

    45 Blunt Bob Hairstyles Ranging From Classic to Choppy That Are Trending Everywhere Right Now

    The short, blunt bob never truly disappeared, but its current revival feels fresher and more versatile than ever. This modern take works beautifully across all hair textures and types. The defining features are simple: a chin-skimming, face-framing length, absolutely no layers, and a cut that falls squarely between the jaw and chin. Whether styled pin-straight, softly waved, or gently curled, the look remains sharp and intentional. Shoulder-length hair need not apply—this is a true short, blunt bob.

    To maintain the crisp length and shape, regular upkeep is essential. Celebrity hairstylist Cody Renegar advises committing to trims every four to six weeks. Cutting with ultra-sharp scissors enhances the blunt finish and helps the shape last longer—a sentiment echoed by hairstylists Katelyn Ellsworth and Samantha Denis.

    Blunt bobs have long been favored by A-list celebrities and fashion insiders. Icons like Ciara and Dua Lipa have embraced the cut, alongside style leaders such as Hailey Bieber and Kourtney Kardashian. The result is a hairstyle that feels timeless, chic, and universally flattering, working across a wide range of face shapes and features.

    Simply put, anyone can wear this bob—and wear it well. Below are 45 celebrity-inspired variations that prove its versatility.

    Meet the Experts

    • Cody Renegar: Celebrity hairstylist with clients including Gwyneth Paltrow and Marie Osmond.
    • Katelyn Ellsworth: Hairstylist and founder of The Roslyn salon in San Diego, California.
    • Samantha Denis: Hairstylist, colorist, and founder of haircare brand Allyoos.

    The Wet-Look Bob

    A slick, wet finish elevates a blunt bob, whether worn casually or on the red carpet. The high-shine texture enhances the graphic nature of the cut, while subtle flips—outward on one side and inward on the other—add body and dimension.

    Boxy Bob With Locs

    This striking look blends a classic blunt bob with traditional locs, honoring cultural roots while embracing modern styling. Protective styles like locs have long held significance, and pairing them with a blunt silhouette creates a powerful, fashion-forward statement.

    Classic and Polished Bob

    A timeless blunt bob should feature clean, sharp ends that rest just below the chin. For those without naturally straight hair, smoothing tools like flat irons or straightening brushes help achieve a sleek, refined finish.

    Chin-Length Essential

    The most traditional blunt bob length hits right at the chin. Whether worn straight or with a gentle bend, the hallmark traits remain the same: minimal texture, little to no layering, and crisp lines.

    Dramatic Side Bang

    This asymmetrical bob blends Old Hollywood glamour with modern intrigue. A sweeping fringe adds mystery, while varied lengths amplify volume and visual interest.

    Rounded Blunt Bob

    For naturally wavy or thick hair, flyaways can disrupt a precision cut. Lightweight mousse or texture spray helps maintain smoothness with bounce, keeping the bob sleek yet full-bodied.

    Flipped and Playful Ends

    A short, blunt bob doesn’t have to feel severe. Subtle flipped-out ends introduce movement and personality. Use hot tools to customize the bend—from polished curves to edgy flicks.

    Asymmetrical Blunt Lob

    This fresh variation extends just above the collarbone, with longer front pieces creating the illusion of asymmetry. A deep side part enhances the modern, sculpted effect.

    Micro Bob With Bangs

    Ultra-short and unapologetically bold, this bob sits near the earlobes with blunt bangs hovering above the brows. Precision cutting techniques ensure sharp, exact lines.

    Soft Waves on a Blunt Base

    Oval face shapes pair beautifully with blunt bobs. Straight to fine-medium textures hold the shape best, offering a balanced, effortless look without excess volume.

    Rock-Inspired Blunt Crop

    This edgy bob adapts seamlessly to multiple styles—from sleek side parts to vintage waves. Its versatility allows for playful variations, including middle parts or pinned-back looks.

    Glamorous Wavy Bob

    Healthy hair is key to pulling off glamorous waves. Short blunt bobs often look their best because the hair is newer and less damaged. Regular trims and conditioning treatments help maintain shine and softness.

    Blunt bobs are not low-maintenance. To preserve the shape, trims every four to eight weeks are recommended.

    Bold, Statement Bob

    This look checks every classic box: one-length hair, no layers, and a chin-skimming cut. While striking, it does require more styling effort than longer lengths.

    Effortless Yet Powerful Bob

    A straight-across cut paired with slightly longer front sections adds dimension. A subtle graduation toward the back prevents the style from appearing heavy.

    Deep Side-Part Bob

    Sometimes, a new part is all it takes. A dramatic side part instantly refreshes the bob, while proper blow-drying and a touch of oil ensure a smooth, polished finish.

    Jagged Fringe Bob

    Wispy, uneven bangs soften the bluntness of the cut while drawing attention to the eyes. Straight ends keep the look sleek without sacrificing softness.

    Shoulder-Grazing Blunt Bob

    With added length and a clean center part, this bob highlights its blunt ends while allowing for subtle upward flips that add charm.

    Boho-Inspired Wavy Bob

    Natural waves shine in a blunt bob when styled with a side part and defined curls. A small curling wand helps create a distinct, effortless wave pattern.

    19 of 45: Light Beach Waves

    Gentle waves paired with a deep side part balance the weight of the cut, giving the illusion of softness while maintaining a blunt foundation.

    Precision-Cut Ends

    Uniform length and regular trimming highlight the razor-sharp finish of a blunt bob, allowing hair health to take center stage.

    Baby Blunt Bob

    Fine hair benefits greatly from a short, one-length bob. Reduced bulk enhances density, creating a clean, flattering silhouette.

    Root Volume Boost

    This adaptable cut transitions easily between sleek and textured styles. Strategic shaping around the face adds lift and prevents flatness.

    Structured Power Bob

    Sharp facial features are softened by a blunt bob with balanced length. Proper blow-drying techniques and finishing products help maintain shine and frizz control.

    Retro-Inspired Bounce

    Thicker hair shines in a one-length bob styled with rounded curls. Smooth blow-drying is essential to prevent frizz and maintain bounce.

    Choppy, Textured Waves

    Volumizing mist and gentle bends from a curling wand create movement without compromising bluntness. A light finishing spray completes the look.

    Crinkled Chin-Length Bob

    Blunt-cut layers combined with subtle curls introduce flexibility and volume, giving the bob a lively, modern feel.

    Soft Fringe Enhancement

    A longer fringe adds movement and frames the face beautifully. Maintaining blunt ends ensures the cut remains structured without appearing harsh.

    Vintage Stacked Bob

    This bottom-heavy style channels retro glamour. Hot rollers enhance volume, while gentle brushing preserves defined, lasting curls.

    Sleek, Smoothed Chop

    Medium-weight straight hair requires precise styling to lay perfectly. A large round brush and finishing spray help secure the shape.

    30 of 45: Ballerina-Inspired Bob

    Softly rolled ends lend elegance to a blunt bob, elongating the neck and creating a delicate, refined appearance.

    French Bob With Bangs

    Wispy bangs breathe life into fine hair, adding texture and movement. Balanced styling ensures the fringe blends seamlessly with the rest of the cut.

    Elevated French Bob

    Rounded ends dress up the blunt shape. Mousse and a vent brush build volume, while curling tools lock in a polished bend.

    Ultra-Precise Jawline Bob

    This sharply defined bob accentuates cheekbones and jaw structure. A sleek finish is easily achieved with a quality flat iron.

    Curly French Bob

    Even with a blunt cut, natural curls add individuality. Styling curls with a wet finish and soft bangs creates a personalized, modern twist.

    Tucked-Back Blunt Bob

    A completely layer-free cut sharpens facial features, placing emphasis on the eyes and cheekbones while enhancing a strong chin.

    Sleek, Pushed-Back Style

    Lightweight gel and careful parting create a polished bob that stays in place, highlighting facial structure.

    Modern Glam Bob

    Contrasting directional styling at the ends adds dimension, transforming the classic blunt bob into a fresh, contemporary look.

    Ultra-Mini Bob

    Shorter bobs offer a playful softness. Pairing them with bold hair colors elevates the style’s impact.

    Bouncy Center-Part Bob

    Movement at the ends frames the face and neck beautifully. Curling ends inward enhances the bob’s feminine flow.

    Loose, Deconstructed Waves

    Soft waves add body and texture, while subtle color variations introduce depth to a classic center-part bob.

    Bowl-Inspired Blunt Bob

    This daring interpretation blends structure with edge. Regular trims and heat styling tools help maintain its unique shape.

    Kiss Curl Detail

    A single, sculpted front curl nods to 1920s glamour while keeping the bob sleek and modern.

    Helmet-Style Bob

    Defined separation between bangs and length creates a bold, statement-making silhouette that pushes boundaries.

    Flicked-Out Finish

    Flipped ends inject energy into a blunt bob. A deep side part boosts volume and delivers a playful, nostalgic vibe.

    Old Hollywood Bixie

    This pixie-bob hybrid pairs blunt ends with sculpted elegance. Inspired by classic Hollywood, it offers surprising versatility and requires less upkeep than trend-driven cuts.

  • WishCare Tinted Ceramide Lip Balm Delivers Soft Hydrated Lips With a Natural Finish

    WishCare Tinted Ceramide Lip Balm Delivers Soft Hydrated Lips With a Natural Finish

    Dealing with dry, cracked lips that never seem to get both moisture and color right can be frustrating. Many lip products fall short—some hydrate without adding tint, others look good but leave lips feeling uncomfortable, and a few completely ignore the need for sun protection. Finding a single product that balances care, coverage, and comfort often feels impossible, especially for lips that need daily nourishment and protection.

    WishCare Tinted Ceramide Lip Balm with SPF 50 for Everyday Use

    This lip balm is designed to offer daily lip protection without sacrificing appearance. The WishCare Tinted Ceramide Lip Balm combines broad spectrum SPF 50 PA+++ protection with a soft natural pink tint suitable for everyday wear. Ceramides help support the lip barrier repair, locking in moisture for lasting hydration. The formula also includes niacinamide and kojic acid, which work together to improve lip tone appearance and reduce visible pigmentation. Its lightweight non-greasy texture ensures comfortable wear throughout the day. The balm is cruelty-free, paraben-free, and completely vegan.

    Does it offer enough sun protection for daily outdoor exposure?

    Yes, this lip balm provides SPF 50 PA+++ coverage developed specifically for delicate lip skin. It helps protect against harmful UV rays while maintaining moisture and comfort. Whether used during short outdoor trips or longer sun exposure, it supports consistent lip sun defense without affecting hydration or tint.

    WishCare Tinted Ceramide Lip Balm Duo for Long-Term Care

    The WishCare Tinted Ceramide Lip Balm Pack of 2 offers a practical option for extended lip care. With the same trusted formula, this combo ensures you always have access to hydration and SPF protection. Ceramides continue to support moisture retention, while niacinamide and kojic acid contribute to brighter-looking lips. The smooth, non-sticky formula allows easy daily application, making it ideal for consistent use. This pack provides added convenience and value while maintaining the same performance for soft, protected lips.

    Why is the pack of two a better option?

    Choosing the duo offers greater convenience and ensures uninterrupted lip care. Keeping one balm at home and another on the go supports regular application wherever needed. The pack also delivers better value while maintaining the same SPF 50 protection and nourishing ceramide-based formula for ongoing lip comfort and care.

    A Complete Solution for Hydrated and Protected Lips

    WishCare tinted ceramide lip balms bring together hydration, protection, and color in one easy step. With advanced ceramide support, high sun protection, and a natural-looking tint, they offer reliable care for everyday use. This range eliminates the need to compromise between comfort and appearance, making it a dependable choice for maintaining healthy-looking lips with lasting protection.

  • Yoga Poses That Release Full Body Stiffness and Improve Overall Flexibility

    Yoga Poses That Release Full Body Stiffness and Improve Overall Flexibility

    Body stiffness is a common issue caused by prolonged sitting, limited movement, stress, aging, or intense physical activity. Tightness often builds up in the neck, shoulders, lower back, hips, and legs, making everyday movement uncomfortable. Yoga provides a gentle and effective way to release this stiffness through controlled breathing and slow, mindful stretching. These movements allow muscles to relax without strain, helping restore natural mobility and improve overall flexibility with regular practice.

    12 Yoga Poses to Release Body Tightness

    Mountain Pose (Tadasana)

    Mountain Pose may look simple, but it plays an important role in improving posture and body awareness. This standing pose helps align the spine, engage the core, and create a stable foundation for better balance and full-body mobility.

    Gentle Neck Rolls

    This slow movement helps maintain neck and spinal flexibility. Gently rolling the neck releases tension, improves circulation, and supports relaxation in the shoulders and upper back while warming up the body.

    Cat–Cow Pose

    Cat–Cow Pose promotes spinal mobility by alternating between rounding and arching the back. This flowing motion stretches the spine while easing tension in the hips, shoulders, and neck, all while warming up the entire body.

    Downward-Facing Dog

    This pose stretches the spine, shoulders, hamstrings, and calves while strengthening the arms and core. It is especially helpful for relieving stiffness caused by long hours of sitting.

    Standing Forward Bend

    Standing Forward Bend lengthens the back of the body from the spine down to the calves. It also encourages mental relaxation by calming the nervous system and easing built-up stress.

    Low Lunge

    This pose targets tight hips and thighs that often become stiff from sitting. Low Lunge improves hip mobility and supports better posture by opening the front of the body.

    Butterfly Pose

    Butterfly Pose gently opens the hips and inner thighs, areas commonly affected by stiffness. With regular practice, it improves lower-body flexibility and releases tension caused by limited daily movement.

    Seated Spinal Twist

    Seated twists encourage healthy spinal movement and reduce tightness in the back and waist. These twisting actions also support digestive function and enhance overall flexibility.

    Cobra Pose

    Cobra Pose helps extend the spine and relieve tension in the lower back. This gentle backbend supports spinal mobility while opening the chest and shoulders.

    Child’s Pose

    This deeply restorative pose stretches the back, hips, and shoulders. Child’s Pose promotes relaxation, allowing both the body and mind to release accumulated tension.

    Supine Figure Four Pose

    Performed while lying on your back, this pose targets tight hips and glutes while keeping the spine supported. It offers a safe and effective way to ease lower-body stiffness.

    Legs Up the Wall

    Legs Up the Wall improves circulation, reduces leg fatigue, and eases lower-back tension. Its calming effect helps the body recover from daily stress and encourages deep relaxation.

    How Yoga Helps Reduce Body Stiffness

    Yoga works by gently stretching muscles, improving joint mobility, and enhancing blood circulation. When slow movements are paired with steady breathing, tight muscles relax and the nervous system becomes calmer. With consistent practice, flexibility improves, posture becomes better, and everyday movement feels easier. Yoga achieves these benefits while remaining low-impact and stress-free for the body.

  • This abs exercise targets the core deeply without stressing your back

    This abs exercise targets the core deeply without stressing your back

    Want to skip the sit-ups? Here’s an alternative that I find much easier on my lower back and it doesn’t require heavy weights or standing.

     This move might look simple but it focuses on building stability & control while keeping your muscles under tension. It comes from Pilates and you only need a Pilates ball and your mat.

    Instead of the repetitive up and down motion of sit-ups that can hurt some people’s backs you’ll rest your back on a ball at about shoulder blade height. I recommend using one of the best yoga mats for your butt and feet. This exercise will challenge those deeper stabilizer muscles and activate your abs so consider yourself warned.

    Learning to engage your core properly does not guarantee that every exercise will feel comfortable or right for your body. Sit-ups are not necessarily bad, but you should think about whether other exercises might work better for your specific needs and goals.

    Pilates offers a gentle workout approach that focuses on building core strength and improving posture. When you practice Pilates regularly for about an hour at a time the positive changes in your body can be remarkable.

    This particular crunch variation using a Pilates ball has some unique advantages. Between repetitions you can extend your head and upper back down toward the floor behind you. This movement allows you to stretch your spine and chest muscles at the same time as working your core.

    Focus on breathing out strongly as you reach forward and lift your chest upward. Keep your hands resting gently against your head while pulling your elbows back & opening your chest wide.

    Notice in the video above that Savanna keeps her back straight as she lifts with her core and then presses lightly back down into the ball. Her knees stay bent and her feet stay pressed into the floor. You could consider slowing this down to control the movement even more and focus on crunching your abdominals as you lift. Think about curling yourself up & peeling your back away from the ball that will be positioned at your shoulder blades and then slowly unfurling down into the ball. As mentioned I have been taught this exercise with a fuller range of motion that involves lowering your upper back & head fully to the floor behind you for a deep stretch & increased intensity. This is totally optional but if you do it imagine uncurling your spine slowly into the ball as you open your chest.

    –  Start seated with a Pilates ball behind you with your knees bent and your feet planted on the mat in front of you.

    –  Lower your back onto the ball and rest along the shoulder blades.

    – Place your hands behind your head and gaze forward.

    – Engage your core & then as you exhale lift your chest and upper back away & drive up while thinking about pulling your ribcage down.

    – Pause and then lower your back onto the ball again with light pressure without arching your lower back.

    – Keep it controlled. Repeat for 10 to 15 reps and several rounds and the option to lower fully to the ground each rep is there to release the spine.

     If you watch the demonstration carefully you will notice not much is happening. There is not a huge amount of movement and nowhere near as much work on the back as regular sit-ups. This is about stability and control and contraction in the abs and deep abdominal muscles. A little bit of trembling is pretty much mandatory but if you experience pain stop immediately and do not push your body further than it wants to go.

    Sam Hopes works as a level 3 qualified trainer and holds a level 2 Reiki practitioner certification. She serves as the fitness editor at Tom’s Guide & is currently studying to complete her Yoga For Athletes training course. Throughout her career Sam has contributed to numerous fitness brands and websites. She has worked with several Future brands including Live Science, Fit&Well, Coach and T3. Her background includes coaching experience at fitness studios such as F45 and Virgin Active where she worked as a personal trainer. These days Sam focuses mainly on teaching outdoor bootcamps & specializes in bodyweight training calisthenics and kettlebell workouts. She teaches mobility and flexibility classes multiple times each week. Sam believes that genuine strength develops through a comprehensive approach to physical training that addresses the whole body. Sam has participated in two mixed doubles Hyrox competitions held in London and the Netherlands. She completed her first doubles event with a finishing time of 1:11.

  • Blush After Powder Method: Why This Technique Can Look More Natural When Done Correctly

    Blush After Powder Method: Why This Technique Can Look More Natural When Done Correctly

    We all know that split second of doubt: should I really put blush on top of this and risk ruining everything? Between tutorials that insist on blush before powder & friends who swear by the opposite order we often end up dabbing randomly and hoping it doesn’t look cakey. Yet on TikTok & photo shoots and backstage at fashion shows a quiet technique is gaining ground: blush applied after powder as a final touch like warming up a room that feels too stark. This small shift in routine changes more than just the color on your cheeks. It changes how your face tells the story of your day. What if the secret to natural-looking blush was simply saving it for last?

    Why Applying Blush After Powder Creates a Softer, More Realistic Flush

    The first time you watch a professional makeup artist apply blush as the final step you blink twice. The complexion is already perfectly powdered with concealed dark circles and a matte forehead. You think the color will slide around and settle into every pore and cling to dry patches. Then the brush barely touches the cheekbone. The color grabs hold and melts into the matte finish as if the skin is warming up from within. Nothing like those bright pink streaks from our teenage years. Here the pink comes after everything else like an emotion rising up. Soft. Believable. A young woman backstage in Paris explained it while laughing that she showed up with flawless skin but completely flat. The makeup artist finished her look by applying powder blush over a layer of loose powder that had been sitting there for twenty minutes. Two or three touches on the upper cheeks plus a hint on the bridge of the nose & a bit on the forehead. The face lit up in five seconds. No harsh lines and no sticky spots. Just that shy flush you get after climbing two flights of stairs a little too fast. We have all experienced that moment when the mirror shows perfect skin but no life. That day it was the blush applied after the powder that brought the person back behind the makeup. Technically the logic is surprising yet simple. Powder sets the foundation & blurs texture while evening everything out. When you add blush afterward you are not mixing it with everything else. You are not breaking down the coverage of the concealer. You are just adding a thin layer of color over an already stable surface. The blush slides around less and stays where the brush puts it. The result is more precise placement with edges that blend into the existing powder veil & intensity that is easier to control. The complexion becomes a calm base and the blush becomes the living note. And it is often that note that makes a face look real in a photo.

    How to Use Blush Over Powder Without Patchiness or Harsh Lines

    # Rewritten Text The key is using minimal movements. Choose a clean brush that is fairly wide but not oversized with soft bristles. Lightly touch the powder blush & tap off any excess on the back of your hand before applying it to already powdered skin with the same gentle touch you would use for highlighter. Avoid rubbing harshly. Use short circular motions or small arcs that deposit color without disturbing the base underneath. Always start away from the nose toward the upper cheekbone and then move up toward the temple. A touch of whatever remains on the brush can go on the nose or chin to tie everything together. The goal is not to apply blush but to create a flush that looks like a natural glow. We often make the same mistake of wanting to see the color immediately. So we dip the brush again and press harder. This is exactly when the texture starts to look patchy on a powdered base. It works better to think in terms of building up thin layers. Apply a light first layer and check it in natural light before adding a second more targeted layer only where the cheek naturally catches light. Let’s be honest: nobody actually does this every morning before work. But on evenings when you look in the mirror wanting to appear rested rather than made up this extra patience makes all the difference. The color stays subtle and the texture does not look heavy so the blush reads as a healthy appearance rather than an obvious product.

    The Subtle Impact of Blush as the Final Makeup Layer

    What makes applying blush after powder so fascinating is its almost psychological effect. You finish your complexion with a touch of color & suddenly your self-image shifts slightly. You no longer see the corrective work but rather the reflection of a moment. The effect is so subtle that others cannot pinpoint what has changed. They only notice that your face looks more alive & less filtered. When color comes last it stops being a technical detail. It becomes a signal that says you are here and awake & present in your body. This sense of alignment between what you feel inside & what your face shows outward is worth those few extra seconds with a brush.

    Élément clé Nouvelle explication Bénéfice beauté
    Blush appliqué après la poudre Le blush est posé sur un teint déjà matifié et stabilisé Rendu plus doux, couleur mieux maîtrisée et plus harmonieuse
    Application légère en superposition Utilisation de fines touches progressives plutôt qu’un dépôt unique Évite les excès de matière et garantit un fini uniforme
    Positionnement ciblé Application sur le haut des joues avec une extension vers les tempes Illusion de visage rehaussé et effet bonne mine réaliste
  • 7 Minute Hip Mobility Routine That Loosens Tight Hips and Reduces Long Term Stiffness

    7 Minute Hip Mobility Routine That Loosens Tight Hips and Reduces Long Term Stiffness

    My hips have always been tight but they feel worse this time of year. I work long hours at my desk & the stiffness builds up quickly. I take shorter steps when I walk and feel twinges when I run. Standing up after sitting too long brings that familiar ache. I know mobility work helps but it has to fit my schedule. When I’m busy I stick with routines under 10 minutes because they’re easier to do consistently. That’s why I tried a seven-minute hip mobility routine from Lindsey Bomgren who is a NASM-certified personal trainer. She posts as @nourishmovelove & promised the routine would loosen tight hips fast without equipment or taking much time. I did it regularly for three weeks and noticed three important things that changed how my hips feel every day.

    Lindsey’s hip mobility routine includes seven exercises that each last one minute. Lindsey mentions in the video that you can pause at any point and spend extra time on exercises that feel especially useful. The routine features these exercises: 90/90 internal rotation knee drops and 90/90 pigeon pose and 90/90 rear knee and heel lifts and tabletop hip circles and frog rocks & v-sit leg lifts and cossack squats. This routine works well because it moves your hips through many different positions and patterns in a short time. The sequence works on both internal & external hip rotation. These movements often get ignored but they matter for comfortable walking and running & sitting. Exercises like the 90/90 variations reach deep into the hip capsule. The frog rocks and tabletop hip circles help improve your range of motion in multiple directions. The routine balances mobility work with strength training. The V-sit leg lifts and Cossack squats do more than just stretch your hips. They make your muscles control those extended positions and this helps your mobility improvements last longer. Here are three changes I have noticed since trying this routine.

    My hips felt looser without forcing deep stretches

    What caught me off guard was how fast my hips loosened up without that unpleasant feeling of forcing a stretch. The routine shifts between positions slowly & uses movements like 90/90 poses & hip circles that helped my flexibility improve in a way that seemed easy and not harsh. After the first week I could tell that regular activities like getting up from my chair or taking longer steps while walking felt smoother. Three weeks in I realized that stiff locked feeling I normally get after sitting all day had gotten much better and that felt like a real achievement.

    It improved my hip mobility in more ways than one

    This routine went beyond simple flexibility work. Movements like V-sit leg lifts and Cossack squats worked my hips through various ranges while requiring my muscles to stay active as I shifted into deeper positions. This meant I was building control rather than just stretching. During the three weeks I saw clear progress in exercises involving internal and external rotation which had always felt very restricted for me. My hips no longer felt temporarily loose for just an hour after the routine before tightening up again. Instead they began to feel more balanced and supported all day long.

    The short length made it easy to stay consistent

    Seven minutes might not seem like a lot of time but that is precisely why this routine was so effective. When my days were busy it felt doable instead of something I could skip. I managed to fit it in during work breaks or even before going to sleep at times when I would normally convince myself not to exercise at all. The regular practice made the most significant impact. Rather than completing longer mobility workouts occasionally I maintained this routine almost daily & the combined results after three weeks were much more apparent than I had anticipated.

    My verdict

    After three weeks this routine has become a regular part of my mobility practice. The length makes it easy to stick with while still being complete enough to create real results. This is especially true if you sit for most of the day. If you want a new method to loosen up tight hips this is an easy & accessible routine that deserves your attention.