Category: News

  • Optical Illusion Challenge: Spot the Inverted 91 Among Inverted 19s in 9 Seconds

    Optical Illusion Challenge: Spot the Inverted 91 Among Inverted 19s in 9 Seconds

    An Optical Illusion IQ Test offers an enjoyable method to exercise your brain and measure your visual thinking skills. These tests use images or patterns that trick your eyes to push your mental capabilities. In this challenge you will work on a puzzle that examines how well you notice details and how quickly you can process what you see. The task is to identify the small difference between the inverted numbers 91 & 19 within a time limit of 9 seconds. This exercise will reveal how sharp your observation skills are and whether you can make quick visual judgments under pressure.

    Understanding Optical Illusion IQ Tests

    Optical illusion IQ tests use visual puzzles that can be interpreted in multiple ways, often relying on subtle tricks that challenge the brain. These tests usually contain hidden details, complex patterns, or nearly identical objects that require strong observation skills to decode. By identifying small differences quickly, these challenges assess how efficiently your brain processes visual information and reacts under pressure.

    The idea behind optical illusion IQ tests comes from cognitive psychology. They are designed to evaluate abilities such as focus, attention to detail, pattern recognition, and spatial awareness. Together, these skills contribute to mental sharpness and quick decision-making, which play an important role in everyday problem-solving.

    Why Optical Illusion IQ Tests Matter

    Optical illusions are more than simple visual games. They actively engage multiple cognitive functions, helping improve how the brain focuses and interprets information. Practicing these challenges regularly can sharpen your ability to notice details that are often overlooked, strengthening critical thinking and visual processing skills over time.

    These tests are also known to stimulate the right side of the brain, which controls creativity and visual-spatial understanding. Such skills are essential in areas like design, architecture, and analytical problem-solving. At the same time, optical illusion IQ tests offer a fun and engaging way to assess mental agility without feeling overwhelming.

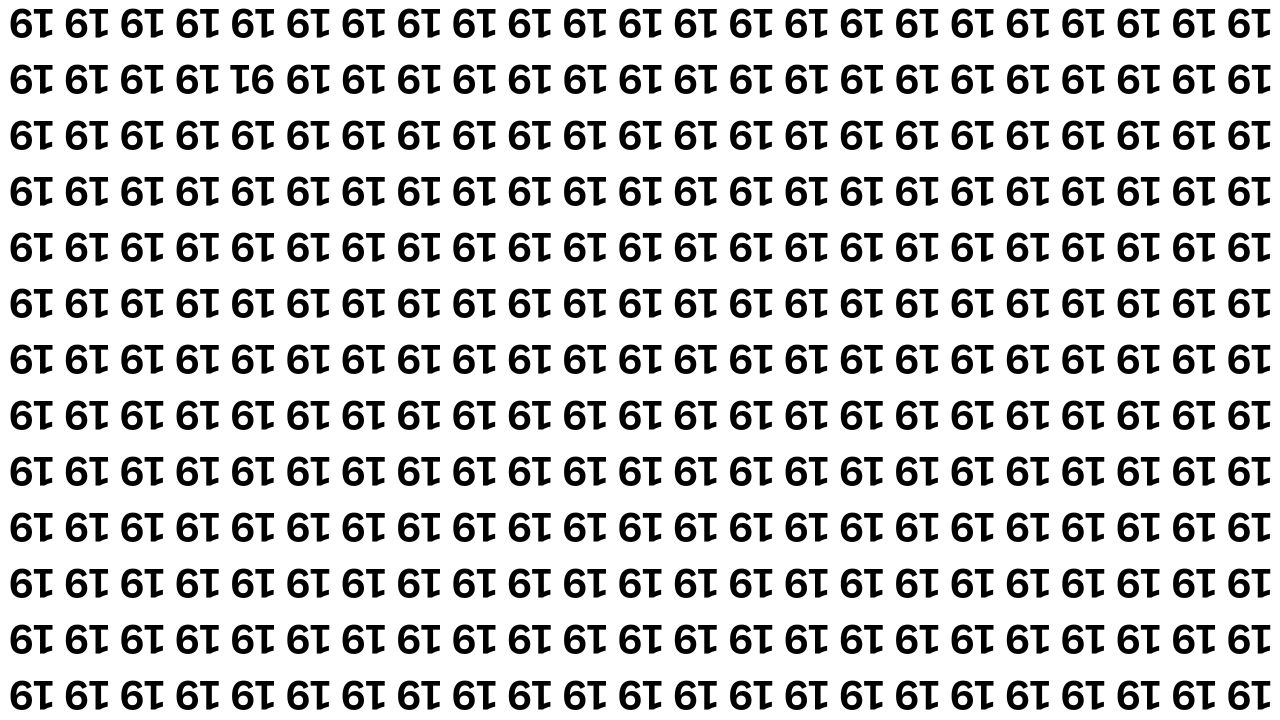
    The Visual Challenge: Find the Inverted 91

    In this optical illusion IQ test, the challenge is to identify an inverted “91” hidden among several inverted “19s” within just 9 seconds. At first glance, all the numbers appear nearly identical since both 19 and 91 use the same digits. The difficulty increases because every number in the grid is flipped upside down.

    Most of the grid is filled with inverted “19s,” but one number is different. That number forms “91” when inverted. Your task is to spot the odd number quickly by closely examining how the digits are arranged compared to the others.

    How to Approach the Puzzle Effectively

    To solve this illusion, it’s important to carefully observe the sequence and structure of the numbers. While inverted “19” and inverted “91” may look very similar, there is a subtle visual difference in how the digits align. This slight variation is the key to identifying the correct number.

    When you step back and scan the grid methodically, the inverted “91” stands out because it does not follow the same pattern as the rest. Its placement and digit orientation make it visually distinct once your focus shifts from guessing to careful observation.

    What Makes This Optical Illusion Difficult

    The main challenge of this test lies in the extreme similarity between the numbers 19 and 91. The brain naturally seeks familiar patterns, which can cause it to overlook small inconsistencies. Under a tight time limit, this tendency becomes even stronger.

    The added pressure of completing the task in just 9 seconds forces the brain to process information rapidly. This combination of visual similarity and time constraint makes the illusion an effective way to test mental speed, focus, and accuracy.

    Cognitive Abilities Measured by This Test

    This optical illusion IQ test evaluates several important mental skills that are essential in daily life and professional settings.

    – Attention to Detail: Identifying tiny differences between similar objects.

    – Pattern Recognition: Quickly noticing deviations within repeating visuals.

    – Visual-Spatial Awareness: Understanding how objects change when flipped or rotated.

    – Quick Thinking: Making accurate decisions under time pressure.

    – Mental Flexibility: Adjusting focus and perspective efficiently.

    Final Answer: Where the Inverted 91 Is Located

    If you examine the grid closely, the inverted “91” is located in the bottom-left corner. It differs from the surrounding inverted “19s” because its digit arrangement breaks the established pattern. Once identified, the difference becomes clear, especially when compared side by side with the other numbers.

    This solution highlights how careful observation and focused attention can quickly uncover details that initially seem hidden, reinforcing why optical illusion IQ tests are both challenging and effective.

  • 8 Simple Yoga Poses to Improve Flexibility and Reduce Tightness

    8 Simple Yoga Poses to Improve Flexibility and Reduce Tightness

    Flexibility is essential for maintaining a healthy body and reducing the risk of injuries. Yoga, known for its slow, mindful movements and controlled breathing, is one of the most effective ways to improve flexibility. Whether your goal is to loosen tight muscles, enhance joint mobility, or improve overall body movement, yoga can support long-term physical wellness. Below are eight simple yet highly effective yoga poses designed to stretch and lengthen the body, helping improve flexibility and range of motion naturally.

    Why Flexibility Matters

    Flexibility goes beyond touching your toes. It plays a vital role in improving joint range of motion, reducing muscle stiffness, and supporting smoother daily movement. Better flexibility contributes to improved posture, lowers the risk of strains or injuries, and enhances blood circulation. Yoga offers a gentle and balanced approach by combining stretching with muscle engagement, making it a safe and effective method for people of all fitness levels.

    Downward Facing Dog (Adho Mukha Svanasana)

    Downward Facing Dog is a foundational yoga pose that stretches the hamstrings, calves, shoulders, and spine. Start on your hands and knees, align wrists under shoulders and knees under hips. Press into your palms, lift your hips upward, and form an inverted “V” shape. Keep your arms long and heels gently reaching toward the floor. Hold the pose for 30 seconds to one minute while breathing deeply to encourage muscle lengthening.

    Child’s Pose (Balasana)

    Child’s Pose is a calming posture that gently stretches the lower back, hips, and thighs. Begin by kneeling with big toes together and knees slightly apart. Sit back onto your heels, extend your arms forward, and rest your forehead on the mat. Stay in the pose for one to two minutes. This position releases built-up tension and promotes relaxation while enhancing flexibility.

    Cat-Cow Pose (Marjaryasana-Bitilasana)

    Cat-Cow Pose is a dynamic flow that improves spinal flexibility and mobility. Start in a tabletop position. Inhale as you drop your belly and lift your chest and tailbone. Exhale as you round your spine, drawing your chin toward your chest. Continue flowing between the two movements for one to two minutes. This sequence loosens the spine, neck, and hips.

    Forward Fold (Uttanasana)

    Forward Fold provides a deep stretch for the hamstrings and lower back. Stand tall, hinge from your hips, and fold your torso forward toward your legs. Allow your head and neck to relax completely. Bend your knees slightly if needed. Hold the stretch for 30 seconds to one minute to lengthen the spine and release lower-body tension.

    Cobra Pose (Bhujangasana)

    Cobra Pose is a gentle backbend that opens the chest and stretches the spine. Lie face down, place your palms under your shoulders, and press lightly into the floor as you lift your chest. Keep elbows close to your body and avoid overextending your lower back. Hold for 15 to 30 seconds. This pose increases spinal flexibility and improves posture.

    Seated Forward Fold (Paschimottanasana)

    Seated Forward Fold targets the hamstrings and spine. Sit with legs extended, inhale to lengthen the spine, then exhale as you fold forward from the hips. Reach for your feet, ankles, or shins without forcing the stretch. Hold for 30 seconds to one minute. This posture calms the mind while enhancing lower-body flexibility.

    Butterfly Pose (Baddha Konasana)

    Butterfly Pose is ideal for opening the hips and stretching the inner thighs. Sit upright, bring the soles of your feet together, and gently press your knees toward the floor. Hold your feet and keep your spine tall. You may lean forward slightly for a deeper stretch. Stay in the pose for up to one minute.

    Pigeon Pose (Eka Pada Rajakapotasana)

    Pigeon Pose is a deep hip-opening posture that stretches the glutes and hip flexors. From a tabletop position, bring one knee forward and extend the opposite leg back. Keep hips squared and either stay upright or fold forward. Hold for 30 seconds to one minute on each side to release deep-seated tension.

    Tips for Improving Flexibility with Yoga

    Consistency is key to seeing results—practice regularly. Focus on deep breathing to help muscles relax into stretches. Always warm up before holding poses, and never force your body beyond its limits. Flexibility develops gradually, so move with patience and awareness.

  • Quick Ways to Heal Dry Cracked Heels at Home Using Safe and Effective Kitchen Ingredients

    Quick Ways to Heal Dry Cracked Heels at Home Using Safe and Effective Kitchen Ingredients

    The first signs of cracked heels often appear quietly. Fine white lines form across the heel, resembling a dry riverbed. At first, they seem harmless and easy to ignore. You may blame walking barefoot indoors or wearing those favorite sandals every day. But then one morning, as you step out of bed, the floor feels rough beneath your feet. There’s a sharp sting and pulling sensation. The cracks have deepened, becoming sore, and sometimes they even catch on your socks.

    A Simple and Effective Way to Heal Dry Heels

    At some point, a quiet realization sets in that it’s time to act. Dry, cracked heels tend to creep up unnoticed until discomfort becomes unavoidable. Every step becomes a reminder that your feet have been needing care for some time. They support you through long hours and busy days. The encouraging part is that relief doesn’t require costly products or complicated routines. Many effective solutions are already sitting in your kitchen, stored in familiar jars and bottles you use daily.

    This approach is about reconnecting with your heels and turning the end of your day into a calming self-care moment. Simple ingredients like oil, honey, milk, and salt can gently soften neglected skin. With regular use, these natural remedies help cracks heal steadily and comfortably.

    The Quiet Message Your Heels Reveal

    Your heels work harder than you might realize. They absorb the first impact with every step and bear constant pressure when you stand or walk for long periods. Because they’re usually covered and out of sight, they’re easy to overlook. You might notice roughness during a shower and promise yourself you’ll deal with it later, only to forget again.

    Over time, your skin reflects what it endures. Dry, cracked heels often signal prolonged pressure, friction, and lack of moisture. Walking barefoot on hard floors, wearing open-backed shoes, or using footwear with thin soles can all contribute. Long hot showers, cold weather, and indoor heating further dry out the skin.

    The skin on your heels is naturally thick to protect you, but when it loses flexibility, it can’t bend as you walk. Instead, it splits and forms painful cracks. The good news is that your skin constantly repairs itself. When you provide moisture, gentle care, and protection, healing can happen faster than expected.

    Your Kitchen as a Gentle Healing Corner

    Your kitchen offers more than meals—it holds simple, effective skin remedies. Olive oil or coconut oil deeply moisturizes rough, dry heels. Honey helps draw moisture into the skin while soothing irritated areas. Milk and yogurt naturally soften flaky skin. When sugar or salt is mixed with oil, it creates a gentle scrub that removes dead skin cells.

    Using everyday ingredients feels reassuring because they’re familiar and easy to trust. There’s no need for complex labels or specialty products. These are basic items with textures and scents you already know. Understanding how each ingredient helps makes your care routine even more effective.

    • Olive Oil / Coconut Oil: Deeply hydrates cracked heels and softens hardened skin; ideal for night massages and DIY scrubs.
    • Honey: Seals in moisture, calms irritation, and supports skin repair; works well as a healing mask.
    • Milk / Yogurt: Gently loosens dead skin through natural lactic acid; suitable for foot soaks or softening packs.
    • Sugar / Salt: Exfoliates rough layers and smooths uneven skin; best used after soaking feet.
    • Banana / Avocado: Nourishes skin with vitamins and healthy fats; helpful for deeply cracked heels.

    A Calm Evening Routine for Cracked Heels

    Think of this routine as a peaceful pause at the end of the day. The house grows quieter, and you set aside just fifteen minutes to care for your feet.

    Step 1: Warm Milk and Salt Foot Soak

    Fill a basin with warm water that feels soothing on your skin. Add half a cup of milk, one or two spoons of salt, and a small amount of olive oil. Soak your feet for ten to fifteen minutes. The warmth relaxes the skin, the milk softens dry areas, and the oil begins restoring moisture.

    Step 2: Gentle Exfoliation for Smoothness

    Combine sugar or fine salt with olive oil or coconut oil to form a thick paste. Gently massage it onto your heels using slow, circular motions, focusing on rough patches. Avoid scrubbing too hard, as gentle care works better than harsh rubbing. Rinse with warm water when finished.

    Step 3: Honey and Yogurt Repair Mask

    Mix one tablespoon of honey with one tablespoon of thick yogurt and add a few drops of oil. Apply the mixture generously to cracked areas and leave it on for ten to fifteen minutes. This mask delivers deep hydration and soothing relief. Rinse gently and pat your feet dry.

    Overnight Oil Therapy for Lasting Softness

    Before bedtime, warm a small amount of olive oil or coconut oil and massage it into your heels for several minutes. Put on clean cotton socks to lock in moisture while you sleep. By morning, your heels often feel noticeably softer, smoother, and far less tender.

    Daily Habits to Keep Heels Healthy

    Once your heels heal, simple habits help prevent cracks from returning. Apply moisturizer after showers, avoid overly hot water, rotate your shoes, and stay well hydrated throughout the day. At the first sign of dryness, take action. These small steps can prevent more serious discomfort later.

    When Home Care Isn’t Enough

    If heel cracks become very deep, start bleeding, or fail to improve with consistent care, professional guidance may be necessary. Certain health conditions can slow healing, and a doctor or podiatrist can suggest appropriate treatment. While home remedies offer comfort and support, medical advice ensures proper recovery.

    In most cases, cracked heels are simply a sign of dry skin needing attention. With warmth, oils, patience, and everyday household ingredients, your feet can become comfortable again—ready to support you through daily life.

  • 5 Slow Yoga Moves That Improve Flexibility and Body Control

    5 Slow Yoga Moves That Improve Flexibility and Body Control

    Five Slow Yoga Moves to Improve Flexibility Flexibility develops through patience and steady breathing rather than forcing your body into deep stretches. The key is allowing your muscles to lengthen gradually over time. Slow yoga offers one of the safest & most effective approaches to improving flexibility for people who feel stiff or sit for extended periods during the day. It also works well for anyone returning to physical activity after taking time off. The five slow yoga moves described here emphasize gentle stretching and mindful control to help your body open up naturally without causing strain.

    Why Slow Yoga Works for Flexibility

    Slow yoga allows your muscles enough time to properly relax. When you move too quickly through poses, your body naturally tenses up as a protective response. By holding positions gently and deliberately, you give your nervous system a chance to calm down. This helps your muscles let go of tension in a more natural way. The slower approach lowers your chance of getting injured while building flexibility that actually lasts. Beyond flexibility slow yoga brings other benefits to your body. It helps your joints move more freely & improves blood flow throughout your system. You also develop better awareness of how your body feels and functions. If you practice regularly, even short sessions of just a few minutes each day can make a real difference. You’ll notice improvements in both how your body feels during daily activities and how easily it moves.

    Seated Side Stretch for Spine and Waist

    The seated side stretch is a gentle exercise that opens up your spine and the muscles around your ribs & waist. It helps make your upper body more flexible & encourages you to breathe deeply. Start by sitting on the floor in a comfortable position with your legs either crossed or stretched out in front of you. Put your right hand on the floor next to your body. Breathe in & raise your left arm above your head. As you breathe out lean slowly toward the right side while making sure both hips stay flat on the ground. Stay in this position for six to ten slow breaths. You should feel a stretch along the entire left side of your body. Then switch to the other side and do the same thing. This exercise is useful for reducing the stiffness that comes from sitting for long periods and it helps your spine move more easily.

    Butterfly Pose for Inner Thighs and Hips

    Butterfly Pose Butterfly Pose works well for loosening tight hips and inner thighs. This pose helps people who sit for most of their day. Start by sitting up straight and placing the bottoms of your feet together. Allow your knees to drop naturally toward the ground. Use your hands to hold onto your feet or ankles. Keep your back straight and breathe slowly. When you feel ready you can lean forward from your hips while maintaining a straight spine. Avoid pushing your knees down with force. Hold this position for one to three minutes. Regular practice of this pose improves hip flexibility and helps you maintain better posture.

    Low Lunge for Hip Flexors and Legs

    Tight hip flexors happen often in people who spend a lot of time sitting. The low lunge provides a gentle and steady stretch that opens up these muscles without risk. Place one foot ahead of you in a lunge stance while your back knee touches the ground. Your front knee should align directly above your ankle. Move your hips forward gradually as you maintain an upright upper body position. Rest your hands on either your hips or thighs. Stay in this position for eight to twelve breaths before switching to the other side and doing it again. This exercise increases flexibility throughout your hips and thighs as well as your lower back.

    Reclined Hamstring Stretch for Gentle Lengthening

    This pose provides a gentle method to stretch your hamstrings while keeping your lower back safe from strain. Start by lying flat on your back with one leg stretched out along the floor. Bend your other knee & place your hands behind your thigh or calf. Gradually straighten the raised leg upward toward the ceiling and stop when you notice a comfortable stretch. Make sure your shoulders stay loose and maintain even breathing throughout. Stay in this position for one to two minutes before switching to the other leg. This exercise enhances hamstring flexibility and reduces tightness in your lower body.

    Child’s Pose for Full Body Release

    Child’s Pose is a resting position that helps your whole body relax. It stretches your spine and hips and shoulders in a gentle way while helping your mind feel calm. Get down on your knees and sit back so your bottom rests on your heels. Lean forward and place your forehead on the floor or a cushion. You can reach your arms out in front of you or let them rest alongside your body. Hold this position for two to three minutes. Breathe slowly & let your body relax more with each breath out. This pose helps improve your flexibility because it lets your muscles relax deeply.

    How to Practice These Moves Safely

    Always move into each stretch at a slow pace. You should experience gentle tension rather than actual pain. If you notice your breathing becoming difficult you need to back off a little. Props such as yoga blocks or cushions help make the poses easier and more comfortable to hold. Evening sessions of slow yoga work particularly well because your muscles have warmed up throughout the day and respond better to stretching. Morning practice can also work if you approach it with care and gentleness.

    How Often to Practice for Best Results

    Regular practice beats intense effort every time. If you do these five exercises three to five times each week you will see real improvements in your flexibility within just a few weeks. Short practice sessions work well as long as you stick with them. Your flexibility will get better slowly over time. Give your body the time it needs to adjust and change. Checking your progress every single day can make you feel discouraged so pay attention to how your body feels when you look back over longer periods instead.

    Who Can Benefit from Slow Yoga

    Slow Yoga: Who Should Practice It? Slow yoga works well for people who are just starting their yoga journey. It also suits older adults who want a gentle way to stay active without putting too much strain on their bodies. If you are recovering from an injury or dealing with stiffness in your muscles and joints slow yoga can help you heal gradually. The gentle movements allow your body to release tension without forcing anything. People who experience high levels of stress also find this practice helpful because it calms the nervous system and promotes relaxation. Athletes often benefit from slow yoga even though they already have strong bodies. Their training usually focuses on building strength and endurance, but they sometimes neglect flexibility. Slow yoga helps them stretch tight muscles and prevent injuries that come from repetitive movements. It creates a better balance between power & mobility. However you should take some precautions if you have existing injuries or health conditions. Always modify the poses to match your current abilities rather than trying to achieve the perfect form. Listen to your body and stop if something feels painful or uncomfortable.

    Creating a Relaxing Yoga Space

    Choose a quiet space where you have enough room to move around freely. Soft lighting helps create the right atmosphere and keeping distractions to a minimum makes it easier to concentrate. Wear clothes that allow you to move without restriction and consider using a mat that provides good support to make your practice more comfortable.

    Ending Your Practice

    After you finish the stretches take a moment to lie down or sit quietly for about a minute. Pay attention to how your body feels and notice your breathing pattern. This quiet pause helps your body absorb all the good effects from the practice. Slow yoga helps your body become more flexible in a gradual and safe way. These five gentle movements can make you more flexible and reduce stiffness. You will also feel more comfortable when you move around during your daily activities.

  • 12 Yoga Poses: Improve Flexibility, Mobility and Daily Movement Ease

    12 Yoga Poses: Improve Flexibility, Mobility and Daily Movement Ease

    Flexibility & mobility matter for everyone in daily life. They help prevent injuries & keep joints healthy as you age. Modern habits like sitting all day and dealing with stress make the body tight and stiff over time. Yoga offers an effective yet gentle approach to regain flexibility while building better mobility and balance. Yoga differs from basic stretching because it engages muscles and joints & connective tissues all at once. When you practice regularly these poses allow your body to move with greater ease and comfort. The following 12 yoga poses can make a real difference in your flexibility and mobility when you do them consistently.

    Downward Facing Dog

    Downward Facing Dog stretches your spine and shoulders along with your hamstrings & calves and ankles. This pose also makes your shoulders more mobile and builds strength in your arms. Begin on your hands and knees and then lift your hips up while pushing your heels down toward the ground. Make sure your spine stays long and let your neck stay relaxed. This position makes your whole body more flexible and helps get rid of tightness that comes from sitting too much.

    Cat Cow Pose

    Cat Cow is great for keeping your spine mobile and flexible. It warms up your back gently & helps you stand straighter. Start by getting on your hands and knees. Breathe in while you arch your back and raise your chest upward. Breathe out while you curve your spine the other way & bring your chin down toward your chest. Move back and forth between these positions at a steady pace to make your spine more flexible and improve how your body moves together.

    Standing Forward Fold

    Standing Forward Fold Standing Forward Fold provides a deep stretch for your hamstrings and calves while also working your hips and lower back. Start by standing upright with your feet positioned comfortably. Bend forward from your hips and allow your upper body to hang down naturally. Your head should drop toward the ground without any tension in your neck. If you feel too much strain in your legs you can bend your knees a little bit to make the pose more comfortable. This position helps make the back of your body more flexible over time. It also promotes better blood flow throughout your system. The gentle inversion allows fresh blood to reach your brain while the stretch releases tightness that builds up from sitting or standing throughout the day.

    Low Lunge

    Low Lunge stretches the hips and makes the hip flexors & thighs more flexible. Place one foot forward in a lunge position and lower your back knee to the ground. Push your hips slightly forward and raise your chest upward. This position works well for anyone who spends most of their day sitting down.

    Butterfly Pose

    Butterfly Pose works on your inner thighs and hips while also stretching your lower back. Start by sitting up straight and pressing the bottoms of your feet together. Allow your knees to fall naturally toward the ground. You can move your knees up and down slowly or bend forward from your hips if you want a stronger stretch. This position helps make your hips more flexible and increases how well they move.

    Cobra Pose

    Cobra Pose Cobra Pose stretches your chest & shoulders and spine. It also makes your lower back stronger. Start by lying face down on the floor. Put your hands flat on the ground directly under your shoulders. Push down gently through your palms and raise your chest up off the floor. Your elbows should stay a little bent rather than locked straight. Let your shoulders drop down and stay loose instead of hunching them up toward your ears. This pose works well if you spend a lot of time slouching or sitting at a desk. It opens up the front of your body and helps reverse the rounded position that comes from poor posture. Regular practice can make your spine more flexible and help it move more easily through its full range of motion.

    Seated Forward Bend

    Seated Forward Bend Seated Forward Bend helps make your spine more flexible while also stretching your hamstrings and hips. Start by sitting down with your legs stretched out in front of you. Take a breath in and make your spine longer. Then bend forward from your hips. Try not to curve your back into a rounded position. This position helps you breathe calmly & gives your muscles a good stretch.

    Pigeon Pose

    Pigeon Pose works really well for making your hips more mobile & flexible. Start from a forward fold or downward dog position and bring one knee toward the front while you stretch the other leg behind you. Lower your hips down toward the mat and take some deep breaths. This pose helps release tension that builds up deep in your hips & makes your lower body move better overall.

    Triangle Pose

    Triangle Pose stretches your legs & hips along with your spine and chest. It also helps improve your balance and makes your joints more mobile. Stand with your feet positioned far apart from each other. Reach one arm down toward your front foot & place your hand on your shin or ankle. At the same time lift your other arm straight up toward the ceiling. This pose helps you build both strength and flexibility together.

    Garland Pose

    Garland Pose helps make your ankles hips and lower back more flexible. Stand with your feet a bit wider than your hips and squat down. Lower your hips toward the ground & press your hands together at your chest. Keep your back straight and long. This position helps your body move naturally and keeps your joints healthy.

    Bridge Pose

    Bridge Pose Bridge Pose stretches your hips and chest and spine. It also makes your back & legs stronger. Start by lying flat on your back. Bend your knees and place your feet on the floor about hip width apart. Push down through your feet and raise your hips up toward the ceiling. This pose helps your spine become more flexible. It also reduces stiffness in your lower body.

    Child’s Pose

    Child’s Pose provides a gentle stretch for your spine along with your hips and shoulders. You start by sitting back on your heels and then fold your body forward. Your arms can either extend out in front of you or rest comfortably alongside your body. This position helps increase your flexibility & also works to calm your nervous system while letting go of built-up tension.

    How to Practice Safely

    To improve flexibility and mobility you need to focus on consistency rather than pushing yourself too hard. Take your time with each pose and remember to breathe deeply throughout the movement. Never force your body into positions that cause discomfort or pain. Always warm up properly before attempting deeper stretches & feel free to use props such as blocks or cushions when necessary. If you practice these poses three to five times each week you will see clear improvements as time goes on. Even brief daily sessions can make your body feel lighter and help you move more easily.

  • Homemade Eyebrow Gel Using Aloe and Cocoa Creates Soft Hold Without Crunchiness

    Homemade Eyebrow Gel Using Aloe and Cocoa Creates Soft Hold Without Crunchiness

    The radiator ticked on with its familiar metallic cadence, a sound that usually signals relief from the cold. Beyond the glass, wind threaded through bare branches and tapped the window frames, quietly confirming that winter had arrived. Inside, the temperature felt adequate, yet the air carried a dry edge. Your throat turned rough, your skin felt tight, and your nose hinted at an oncoming sneeze. You remembered a long-held tip—perhaps shared by a family member or read somewhere—about setting a glass of water near the radiator to make a room feel warmer. It sounded like folklore, almost too simple. Still, as the evening wore on and the dryness lingered, you filled a glass and placed it beside the heat. Gradually, something subtle changed—the way winter often reveals its truths, softly.

    The Quiet Science Behind a Simple Glass of Water

    The idea that a single glass of water could enhance comfort without increasing heating costs can feel surprisingly reassuring. Water doesn’t produce heat, nor does it function as a hidden heater. The effect is more delicate. The glass doesn’t raise the temperature; it helps your body perceive warmth more effectively. Comfort isn’t just about degrees—it’s about how the air interacts with your skin and breath. When a radiator runs, it warms the air while drawing moisture out of it. This dryness often goes unnoticed at first, showing up as a scratchy throat, tight skin, static in clothing, or tiny shocks from metal surfaces. What’s less obvious is how dry air subtly changes the way warmth is felt.

    Why Dry Indoor Air Often Feels Colder

    Your body is constantly exchanging heat with the air around it. In very dry spaces, moisture evaporates more quickly from your skin and with each breath you release. That evaporation pulls heat away, creating a cooling sensation even when the room is warm on paper. The heating system may be doing its job, yet your body registers something else. This is where the glass of water plays a quiet role. Set near a heat source, it slowly warms and releases moisture through gentle evaporation. Even a modest increase in humidity can reduce moisture loss from your skin and lungs. The temperature remains unchanged, but the room feels calmer and warmer because your body isn’t losing heat as rapidly.

    Aloe Vera as a Soft, Natural Brow Base

    Aloe vera has been used to soothe skin for generations, long before it appeared in modern containers. Pure aloe gel feels cool and light, never stiff or sticky. When applied to eyebrows, it works as a gentle styling aid, offering flexible hold without harshness. In a homemade brow gel, aloe forms the foundation. Its natural consistency provides light-to-medium control, guiding brow hairs while keeping them soft. Selecting a clean, high-quality gel with minimal additives also brings subtle hydration, turning a daily routine into care rather than correction.

    Cocoa Powder for a Soft, Natural Brow Tint

    Cocoa powder brings warmth, depth, and a naturally rich pigment. Its soft brown tone suits brows surprisingly well, especially for light to medium-dark shades. When blended with aloe, cocoa creates a sheer, stain-like color instead of a heavy or painted look. The appeal lies in its adjustability. A small amount offers gentle definition, while adding more deepens the shade. The result blends smoothly with natural brows, avoiding sharp lines. There’s a quiet satisfaction in using the same ingredient that enriches warm drinks to subtly frame your face—simplicity and beauty sharing a common source.

    Preparing a Simple, Thoughtful Brow Kit

    Making your own brow gel feels less like a cosmetic task and more like a small ritual. Clean jars, a simple spoon, a spoolie brush—each item has purpose. The process is calm and unhurried, encouraging focus. At its core, the recipe needs only aloe vera gel and cocoa powder. Optional additions, such as a drop of jojoba oil for smoothness or a pinch of coffee or charcoal for deeper tones, can be explored later. The charm of this formula is its restraint: two humble ingredients, combined with care.

    Essential Items and Their Purpose

    • Pure aloe vera gel – Serves as the base, offering hold, smooth application, and moisture
    • Unsweetened cocoa powder – Provides a natural tint to enhance brow color
    • Small clean jar – Keeps the mixture safe and fresh
    • Spoolie or angled brush – Helps apply and shape brows evenly
    • Mini spoon or stick – Used to blend ingredients smoothly

    Blending the Gel with Care

    Add about two teaspoons of aloe vera gel to a clean jar. Sprinkle in roughly a quarter teaspoon of cocoa powder and stir slowly, pressing out any lumps. The clear gel gradually becomes a smooth, earthy brown. Test the shade on the back of your hand and let it dry briefly. Adjust as needed—more cocoa for depth, more aloe for softness. The texture should feel creamy and light, yet thick enough to cling to a brush. Once blended, close the jar and let it rest for an hour so the mixture settles evenly.

    Applying with Intention and Ease

    This homemade gel encourages a gentle touch. Start with clean, dry brows. Lightly dip a spoolie into the jar and wipe away excess. Brush through using short, feathered strokes, following the natural direction of hair growth. Begin at the inner brow and move outward, shaping rather than drawing. For added definition, allow the first layer to dry before applying another, focusing on sparse areas. An angled brush can help mimic individual hairs if needed. The finish stays soft and flexible, never stiff or heavy.

    Embracing Simplicity in Everyday Beauty

    Creating a simple product at home carries quiet meaning. It reduces waste, limits unnecessary additives, and reconnects you with the act of making. Each refill replaces another disposable tube, and each use reinforces that beauty doesn’t need complexity. Natural solutions aren’t universal, and listening to your skin remains essential. Patch testing and small adjustments matter. Still, there’s something grounding about slowing down, stirring by hand, and shaping your brows with care. In that small moment—brush in hand, cocoa-scented gel nearby—you’re reminded that beauty can be gentle, practical, and personal, often beginning with the simplest things.

  • Upgrade Your Treadmill Walking Workout Using This Trainer Approved Technique for Faster Results

    Upgrade Your Treadmill Walking Workout Using This Trainer Approved Technique for Faster Results

    Exercise does not need to feel complicated to be effective. Walking up and down a hill is enough to challenge your fitness, and this is exactly what certified personal trainer Jordan Langhough does during her treadmill sessions. She uses a pyramid-style workout that gradually increases intensity before tapering back down, closely mimicking the feeling of climbing and descending a hill.

    Langhough enjoys treadmills for their consistency, safety, and controlled environment, especially when outdoor conditions are not ideal. While outdoor walks offer benefits like fresh air and time in nature, she emphasizes that the most effective option is the one that helps you stay active consistently.

    Treadmill Pyramid Hill Walk Overview

    If a treadmill makes walking more accessible, this workout is worth trying. The full session lasts 34 minutes from warm-up to cool-down and follows a hill-walking pyramid. The incline gradually rises to a peak and then slowly returns to flat. Although designed for a treadmill, this routine can also be adapted to an exercise bike or elliptical by adjusting resistance instead of incline.

    Choose a brisk, steady pace that raises your heart rate and breathing while still allowing you to speak one or two words between breaths. The goal is to feel challenged without feeling overwhelmed.

    Uphill Pyramid Phase (14 Minutes)

    • 2 minutes at 3% incline
    • 1 minute at 2% incline
    • 2 minutes at 4% incline
    • 1 minute at 3% incline
    • 2 minutes at 5% incline
    • 1 minute at 4% incline
    • 2 minutes at 6% incline
    • 1 minute at 5% incline
    • 2 minutes at 7% incline
    • 2 minutes at 8–10% incline

    At the peak, maintain your pace or increase to a light jog if you want an added challenge.

    Downhill Pyramid and Cool Down (12 Minutes)

    • 2 minutes at 7% incline
    • 1 minute at 5% incline
    • 2 minutes at 6% incline
    • 1 minute at 4% incline
    • 2 minutes at 5% incline
    • 1 minute at 3% incline
    • 2 minutes at 4% incline
    • 1 minute at 2% incline
    • 3 minutes at 0–1% incline

    As the incline lowers, gradually reduce your speed and bring the treadmill back to flat. This allows your heart rate to recover smoothly and completes the workout.

  • Stop guessing: A massive 50-year study finally reveals when our bodies really start to age

    Stop guessing: A massive 50-year study finally reveals when our bodies really start to age

    A 47-year Swedish study set out to uncover when the human body truly starts to age by examining changes in fitness, strength, and muscle endurance throughout adulthood. The findings were eye-opening: physical decline can begin as early as age 35. However, there’s encouraging news — staying physically active can help slow this decline.

    How the Study Tracked Fitness Over Decades

    Conducted at the Karolinska Institutet and published as part of the Swedish Physical Activity and Fitness (SPAF) study, the research followed several hundred randomly selected men and women born in 1958. Participants underwent detailed testing to measure maximal aerobic capacity, muscular endurance, muscle power, and overall physical performance through a range of athletic assessments.

    Peak Physical Performance Comes Earlier Than Expected

    Researchers discovered that the general population experiences physical changes similar to those seen in elite athletes. In both groups, peak physical performance is typically reached before the age of 35, after which gradual declines become noticeable.

    Physical Activity Can Slow Performance Loss

    Importantly, the study also highlighted positive outcomes for those who increased their activity levels. Adults who became more physically active showed performance improvements of 5–10%, proving that regular movement can significantly slow down the loss of physical capacity.

    Expert Insight on Staying Active

    Maria Westerståhl, lecturer at the Department of Laboratory Medicine and lead author of the study, emphasized the importance of movement, stating that it is never too late to start being active. The findings show that while physical activity may not completely stop decline, it can meaningfully reduce its pace. Researchers are now working to understand why peak performance occurs around age 35 and how activity helps delay deterioration.

    What Comes Next in the Study

    The research is ongoing, and participants will be re-evaluated as they turn 68 years old. Scientists aim to connect changes in physical capacity with lifestyle choices, health factors, and underlying biological mechanisms.

  • Winter Nail Polish Shades Everyone Is Choosing for a Fresh Seasonal Update

    Winter Nail Polish Shades Everyone Is Choosing for a Fresh Seasonal Update

    Royal purple and ruby red remain standout choices for True Winter color palettes, while those who prefer neutral aesthetics still have a wide range of refined options. Cool-toned tastes now include an unexpectedly broad selection of crisp whites, reminiscent of sunlit snow. This same richness carries into layered gray variations and deep burgundy families such as cranberry, deep berry, and merlot. World champion nail artist and beauty educator Valeriia Telemaniuk shared with Byrdie that winter consistently brings renewed attention to timeless nail styles, including French manicures, cool grays, soft blues, and deep reds in both bold and softened finishes.

    Refined Chocolate Ganache Brown

    Once-trending brownie pudding nails are giving way to a more polished winter favorite: ganache brown. Nail artist and educator Sofiia Mazur describes this shade as a deep, indulgent color inspired by melted dark chocolate. Similar to tones like Red Iguana’s Ganache gel or Dazzle Dry’s Fringe, it feels warm, luxurious, and elevated. Ganache brown projects quiet confidence and pairs effortlessly with gold accessories, neutral wardrobes, and streamlined black ensembles.

    Soft and Muted Berry Shades

    This winter signals a shift toward grounded, deeper nail tones. Juanita Huber-Millet, founder and creative director of Townhouse Salons, notes increasing interest in espresso browns, soft mauves, and muted berry hues. These shades balance warmth with refinement, making them suitable for everyday wear. Subdued berry tones provide a softer alternative to classic bright reds, delivering depth and richness without overwhelming the overall look.

    Light Ocean Blue With Pearlescent Shine

    A light ocean blue finished with a gentle pearly sheen is emerging as a seasonal highlight. Nail professional Amy Ling Lin describes these tones as calming, luminous, and uplifting. Shades like Sundays Studio’s L09 introduce a refreshing contrast to darker winter palettes, while the pearl finish subtly reflects light, creating added dimension and elegance.

    Modern Cool Gray Neutrals

    Cool gray nails are becoming a winter staple for those seeking a refined neutral. According to OPI Global Ambassador Coca Michelle, this shade feels effortless, chic, and sophisticated, blending seamlessly with seasonal wardrobes. Cool gray also works well with mixed-metal jewelry. Notable options include OPI Peace of Mined, Case of Glamnesia, and Suzi Talks with Her Hands, each offering a sleek, adaptable finish.

    Timeless Deep Navy Blue

    Deep navy is widely viewed as an ideal post-holiday transition shade. This calming color carries smoothly through winter and into the New Year while remaining easy to wear. A true classic, navy suits both special occasions and everyday office looks. Popular choices include OPI Less is Norse, Havin’ a Candy Ol’ Time, and Suzi & the Arctic Fox.

    The Shift Toward Barely-There Nails

    As winter deepens, many are choosing nail colors that convey calmness and clarity. Huber-Millet highlights growing interest in soft milky shades, cool neutrals, and subtle pastels. Colors such as Coconut Milk, Glazed Marshmallow, and Milkshake from Townhouse’s Flawless Collection feel clean, restorative, and fresh, offering a gentle departure from autumn’s darker tones.

    Warm and Deep Red Essentials

    A warm, deep red continues to be a winter must-have. Amy Ling Lin describes this shade as cozy, polished, and quietly powerful. It delivers instant warmth during colder months while maintaining a refined, festive feel. This versatile color transitions effortlessly from everyday elegance to holiday-ready styles.

    Earth-Inspired Metallic Accents

    Earth-toned metallic finishes are gaining momentum this winter. Sofiia Mazur points to shades like bronze, clay gold, and olive chrome, often paired with matte or stone-inspired textures. These finishes catch light gently, creating a refined glow that feels luxurious without appearing flashy, whether worn alone or as understated accents.

    Elegant Black Cherry Tones

    Black cherry nails bring subtle drama by combining deep darkness with a hint of red warmth. Mazur explains that this balance keeps the shade elegant and wearable. Long favored by fashion icons, black cherry works equally well with eveningwear and relaxed outfits like oversized blazers or vintage denim.

    Clean and Crisp Winter Whites

    Crisp white nails are making a noticeable return this season. Following Pantone’s introduction of Cloud Dancer, pure white shades such as Mineral Fusion Ice Breaker are seeing renewed attention. This clean, modern color echoes snowy landscapes and frosty mornings, reinforcing white as a defining element of winter minimalism.

    Soft Gray-Lavender Blends

    Gray-lavender shades combine cool gray foundations with a subtle touch of purple, making them especially suited to winter. Telemaniuk notes that shorter days and cooler moods are drawing interest toward muted, soothing tones like this. Gray-lavender feels modern, minimal, and refined, offering a versatile option for the colder season.

  • Dermatologists Depend on These Underrated Skincare Products Despite Their Plain Packaging

    Dermatologists Depend on These Underrated Skincare Products Despite Their Plain Packaging

    Let’s be realistic: a skincare product’s success often depends as much on its presentation as on its performance. In today’s crowded beauty market, visibility matters, and products with sleek packaging and heavy marketing budgets are far more likely to go viral and reach mass sales.

    That said, while brands like Rhode and Tatcha deserve their praise, they are far from the only formulas delivering results. Many low-profile brands and no-frills formulations perform just as well—sometimes even better—despite lacking aesthetic appeal or social media hype. A product not looking chic on your shelf doesn’t mean it isn’t among the best skincare solutions available.

    With this perspective, I consulted respected industry experts to identify nine so-called “unsexy” skincare essentials that dermatologists consistently recommend. From multi-tasking barrier creams to ultra-gentle cleansers, these are reliable formulas worth your money, regardless of packaging trends or online popularity.

    Dermatologist-Approved Skincare Staples That Truly Perform

    Aestura Atobarrier 365 Cream

    A cult favourite in South Korea, Aestura’s Atobarrier 365 Cream is designed to repair the skin barrier without clogging pores or feeling heavy. While the packaging may seem underwhelming, the formula delivers deep hydration, barrier reinforcement, and overnight recovery support. Multiple dermatologists recommend it for stressed or compromised skin, especially when irritation or inflammation is present.

    La Roche-Posay Toleriane Dermo-Cleanser for Sensitive Skin

    This cleanser proves that simple formulas work best. Free from harsh actives, it gently removes impurities while maintaining skin comfort and barrier integrity. Its milky texture cleanses effectively without stripping, making it ideal for daily use and suitable for sensitive or acne-prone skin, especially as part of a double-cleansing routine.

    Environ Youth+ Serience Night Serum

    Quietly effective and science-backed, this night serum targets skin fatigue and early signs of ageing. Enriched with antioxidants and a Malachite-Neuropeptide Complex, it helps soften fine lines while restoring vitality. It’s particularly beneficial when skin appears dull, tired, or depleted.

    Epaderm Cream

    This pharmacy staple may lack glamour, but it’s highly effective for chronic dryness and skin conditions. Frequently recommended for concerns like keratosis pilaris and eczema-prone skin, it offers reliable moisture support without unnecessary ingredients—all at a very accessible price point.

    Cetaphil Gentle Skin Cleanser

    A longstanding favourite in dermatology, this cleanser is fragrance-free, non-stripping, and suitable for sensitive or eczema-prone skin. While understated in appearance, it delivers consistent results and pairs perfectly with drying acne treatments by maintaining long-term skin balance.

    Clinisoothe Skin Purifier

    Powered by hypochlorous technology, this spray helps protect against impurities while calming inflamed or acne-prone skin. Applied after cleansing, it supports breakout prevention and skin recovery. Though far from flashy, its soothing benefits make it a trusted staple in sensitive skincare routines.

    Eucerin Aquaphor Soothing Skin Balm

    A true dermatology classic, this occlusive balm creates a protective barrier that locks in moisture and supports skin healing. It’s widely used for cracked lips, dry cuticles, post-procedure care, and areas of severe irritation, making it one of the most versatile products available.

    Vanicream Moisturizing Cream

    Ideal for skin that’s post-procedure or highly reactive, Vanicream is known for its gentle formulation and dependable hydration. Free from unnecessary additives, it’s frequently recommended for sensitive skin and recovery periods following treatments like injectables or microneedling.

    Advanced Nutrition Programme Skin Accumax

    While not a topical product, these supplements play a valuable role in supporting acne-prone skin. Formulated with vitamins A, C, and E alongside phytonutrients, they help enhance the results of topical routines. Often overlooked in favour of trend-driven alternatives, their low-key formulation delivers meaningful internal support.