Category: News

  • Blush After Powder Method: Why This Technique Can Look More Natural When Done Correctly

    Blush After Powder Method: Why This Technique Can Look More Natural When Done Correctly

    We all know that split second of doubt: should I really put blush on top of this and risk ruining everything? Between tutorials that insist on blush before powder & friends who swear by the opposite order we often end up dabbing randomly and hoping it doesn’t look cakey. Yet on TikTok & photo shoots and backstage at fashion shows a quiet technique is gaining ground: blush applied after powder as a final touch like warming up a room that feels too stark. This small shift in routine changes more than just the color on your cheeks. It changes how your face tells the story of your day. What if the secret to natural-looking blush was simply saving it for last?

    Why Applying Blush After Powder Creates a Softer, More Realistic Flush

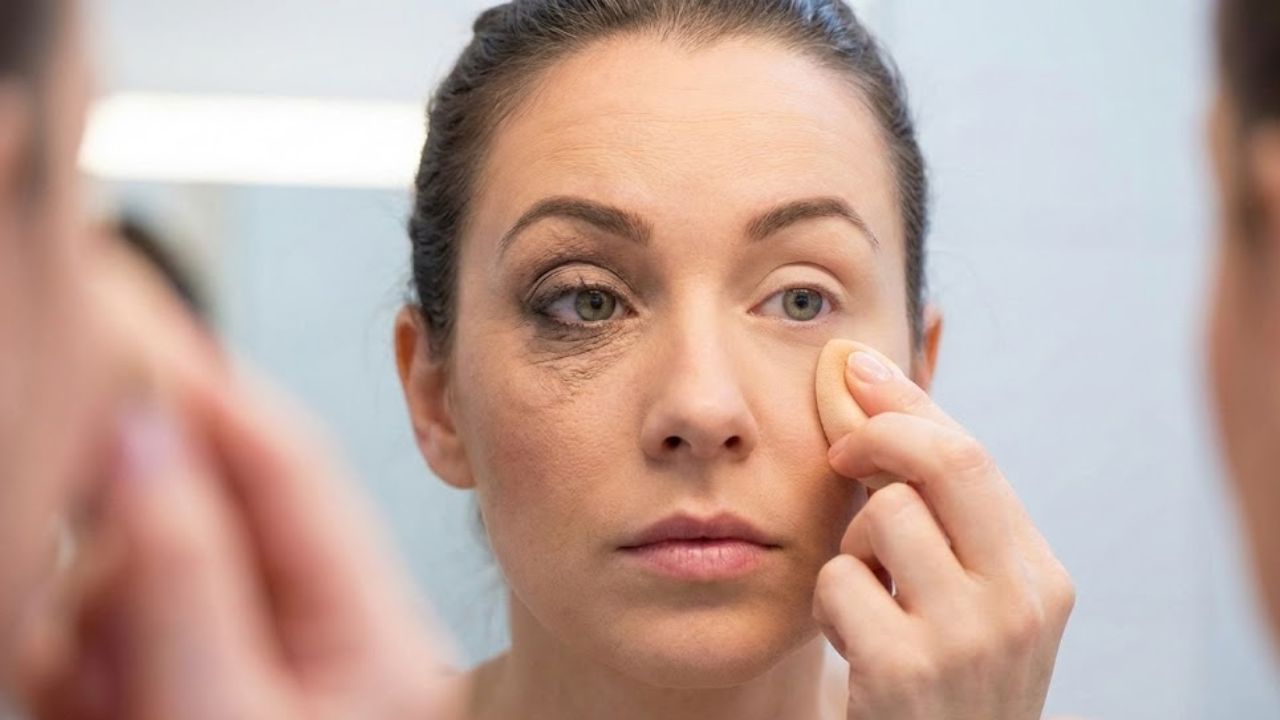
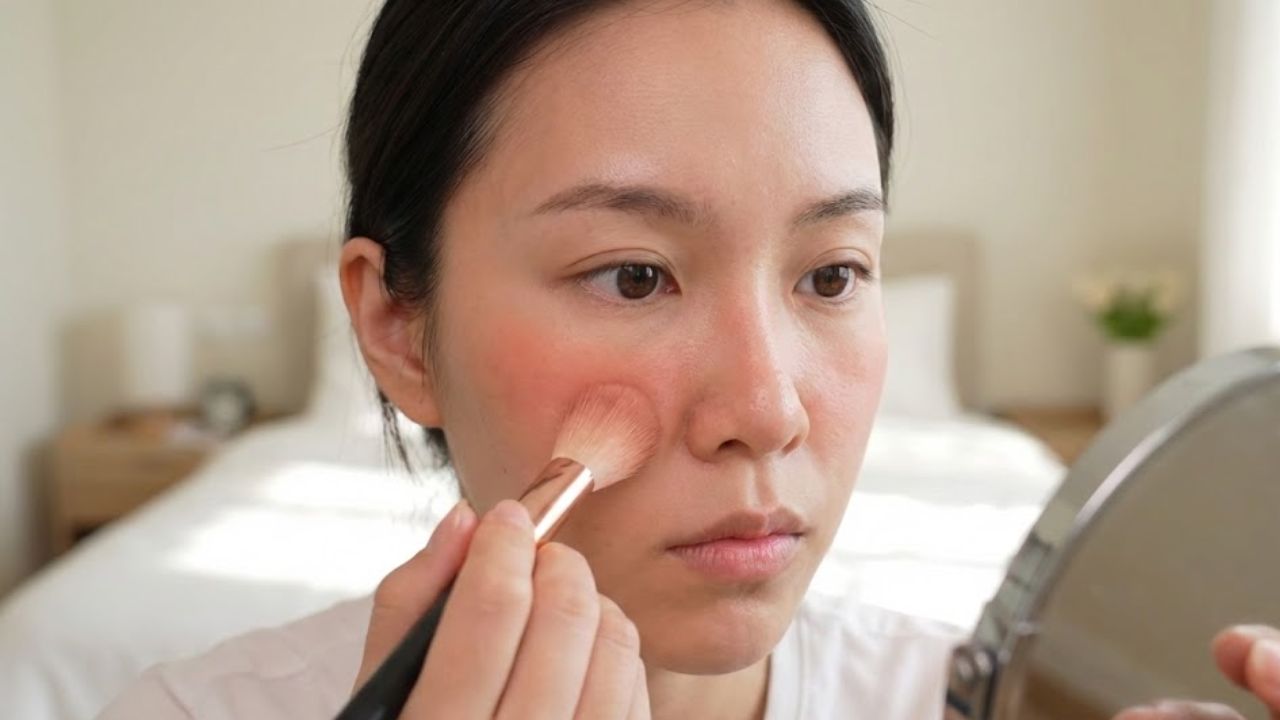
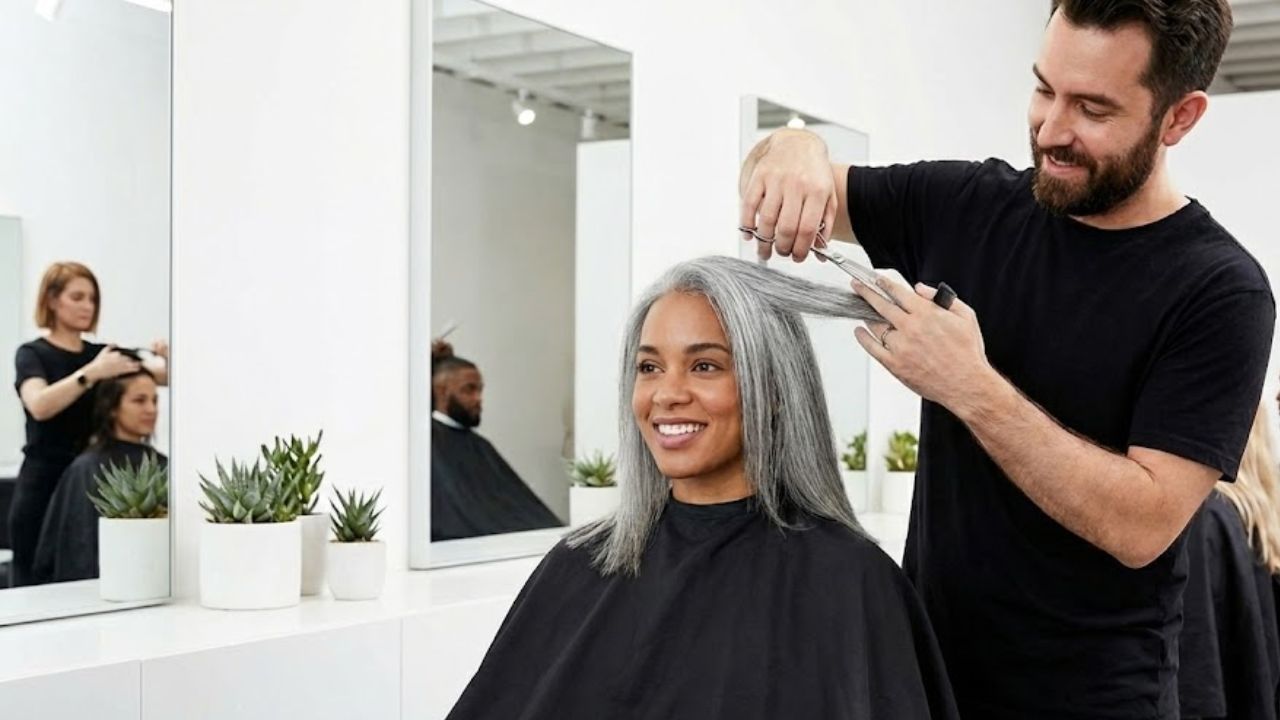
    The first time you watch a professional makeup artist apply blush as the final step you blink twice. The complexion is already perfectly powdered with concealed dark circles and a matte forehead. You think the color will slide around and settle into every pore and cling to dry patches. Then the brush barely touches the cheekbone. The color grabs hold and melts into the matte finish as if the skin is warming up from within. Nothing like those bright pink streaks from our teenage years. Here the pink comes after everything else like an emotion rising up. Soft. Believable. A young woman backstage in Paris explained it while laughing that she showed up with flawless skin but completely flat. The makeup artist finished her look by applying powder blush over a layer of loose powder that had been sitting there for twenty minutes. Two or three touches on the upper cheeks plus a hint on the bridge of the nose & a bit on the forehead. The face lit up in five seconds. No harsh lines and no sticky spots. Just that shy flush you get after climbing two flights of stairs a little too fast. We have all experienced that moment when the mirror shows perfect skin but no life. That day it was the blush applied after the powder that brought the person back behind the makeup. Technically the logic is surprising yet simple. Powder sets the foundation & blurs texture while evening everything out. When you add blush afterward you are not mixing it with everything else. You are not breaking down the coverage of the concealer. You are just adding a thin layer of color over an already stable surface. The blush slides around less and stays where the brush puts it. The result is more precise placement with edges that blend into the existing powder veil & intensity that is easier to control. The complexion becomes a calm base and the blush becomes the living note. And it is often that note that makes a face look real in a photo.

    How to Use Blush Over Powder Without Patchiness or Harsh Lines

    # Rewritten Text The key is using minimal movements. Choose a clean brush that is fairly wide but not oversized with soft bristles. Lightly touch the powder blush & tap off any excess on the back of your hand before applying it to already powdered skin with the same gentle touch you would use for highlighter. Avoid rubbing harshly. Use short circular motions or small arcs that deposit color without disturbing the base underneath. Always start away from the nose toward the upper cheekbone and then move up toward the temple. A touch of whatever remains on the brush can go on the nose or chin to tie everything together. The goal is not to apply blush but to create a flush that looks like a natural glow. We often make the same mistake of wanting to see the color immediately. So we dip the brush again and press harder. This is exactly when the texture starts to look patchy on a powdered base. It works better to think in terms of building up thin layers. Apply a light first layer and check it in natural light before adding a second more targeted layer only where the cheek naturally catches light. Let’s be honest: nobody actually does this every morning before work. But on evenings when you look in the mirror wanting to appear rested rather than made up this extra patience makes all the difference. The color stays subtle and the texture does not look heavy so the blush reads as a healthy appearance rather than an obvious product.

    The Subtle Impact of Blush as the Final Makeup Layer

    What makes applying blush after powder so fascinating is its almost psychological effect. You finish your complexion with a touch of color & suddenly your self-image shifts slightly. You no longer see the corrective work but rather the reflection of a moment. The effect is so subtle that others cannot pinpoint what has changed. They only notice that your face looks more alive & less filtered. When color comes last it stops being a technical detail. It becomes a signal that says you are here and awake & present in your body. This sense of alignment between what you feel inside & what your face shows outward is worth those few extra seconds with a brush.

    Élément clé Nouvelle explication Bénéfice beauté
    Blush appliqué après la poudre Le blush est posé sur un teint déjà matifié et stabilisé Rendu plus doux, couleur mieux maîtrisée et plus harmonieuse
    Application légère en superposition Utilisation de fines touches progressives plutôt qu’un dépôt unique Évite les excès de matière et garantit un fini uniforme
    Positionnement ciblé Application sur le haut des joues avec une extension vers les tempes Illusion de visage rehaussé et effet bonne mine réaliste
  • Goodbye to Hair Dyes: New Methods Gaining Attention for Covering Grey Hair Naturally

    Goodbye to Hair Dyes: New Methods Gaining Attention for Covering Grey Hair Naturally

    The Gentle Shift in Hair Coloring Gray hairs bring a decision point. You can either show them off or cover them up in a way that feels natural. People everywhere are looking for something different now. They want to reduce the appearance of gray hair & look more vibrant without using strong chemical dyes. A gentler method of coloring hair is becoming popular in homes around the world. This shift reflects a broader change in how we think about aging and beauty.

    The science behind grey hair – and why it changes your whole look

    Hair does not suddenly “turn” grey. Each strand grows from a follicle in the scalp, where specialised pigment-producing cells called melanocytes inject colour into the hair shaft during growth. This pigment, mainly melanin, determines your natural hair shade. Over time, factors such as ageing, genetic makeup, long-term stress, and lifestyle habits cause these melanocytes to slow down or stop working completely. When this happens, new hair grows with reduced pigment or none at all, appearing grey or white. Grey hair is therefore not old hair losing colour, but entirely new hair forming without melanin.

    Keratin, the protein structure of hair, naturally carries a pale yellow tone. When melanin disappears, this underlying shade becomes visible, especially under bright lighting. At the same time, ageing scalps often produce less sebum, the oil that keeps hair smooth and shiny. Reduced oil levels make grey hair feel rougher, look duller, and frizz more easily. Changes in texture can also alter how hair bends and sits, which explains why greys often feel wiry or unruly.

    Visually, even a small number of bright white strands against darker hair can create sharp contrast around the face. This contrast may emphasise shadows, under-eye circles, and fine lines, making features appear more tired. For many people, this shift in texture and reflection has more impact on appearance than the colour change itself.

    Why classic hair dye is losing ground

    For years, permanent hair dye was the default solution for greys. These formulas work by opening the hair cuticle with ammonia or similar agents, allowing pigment to penetrate deep into the shaft through an oxidising process. While results can look polished initially, repeated treatments often weaken hair structure, especially already-fragile grey strands. Roughened cuticles lead to tangling, dryness, and brittleness, while sensitive scalps may react with itching or irritation.

    Another drawback is maintenance. Permanent dye creates a stark line of regrowth every few weeks, forcing regular salon visits. As beauty preferences evolve, many people now seek softer, lower-commitment options that reduce chemical exposure while preserving natural dimension. The shift is not about abandoning colour entirely, but about choosing gentler methods that allow for subtle change rather than perfection.

    The rise of natural darkening: from the kitchen to the bathroom shelf

    Plant-based and food-based colour boosters have gained popularity as part of this softer approach. These methods do not bleach or permanently alter the hair’s internal structure. Instead, they sit on the surface, gradually building a translucent layer of colour while adding shine. Among these ingredients, cocoa powder has drawn particular attention.

    Cocoa contains natural pigments and polyphenols that can gently deepen light to medium brown hair tones over time. On grey strands, it helps soften stark whiteness, allowing them to blend more seamlessly with surrounding hair. Rather than acting like a permanent dye, cocoa behaves as a tinted conditioning treatment that enhances colour gradually while improving texture.

    How cocoa helps darken grey hair

    Cocoa-based treatments coat the hair shaft, creating a soft brown veil that washes out slowly. When mixed with conditioners or oils, cocoa also supports moisture retention, helping to smooth the cuticle. Many users notice that their grey hair appears shinier, less coarse, and easier to manage after consistent use. The result is not dramatic coverage, but a more harmonious overall tone.

    A simple at-home cocoa mix

    A minimal recipe suits sensitive scalps and low-maintenance routines. For short to medium hair, combine one tablespoon of pure, unsweetened cocoa powder with a generous amount of a lightweight, oil-free conditioner. Mix thoroughly until the paste is smooth and evenly coloured.

    Apply to freshly washed, towel-dried hair, concentrating on areas with the most visible greys such as the temples, parting, and hairline. Use a wide-tooth comb to distribute evenly. Leave the mixture on for 15 to 20 minutes, then rinse with lukewarm water. Avoid shampooing immediately afterward, as this would remove most of the surface pigment.

    Natural Hair Colour Result After Cocoa Application Recommended Usage Frequency
    Light Brown Visible warm tone boost, grey strands blend faster Apply 1–2 times weekly
    Medium Brown Enhances richness, greys appear naturally mixed Once per week
    Dark Brown / Black Adds shine with mild warmth, minimal colour shift Every 7–10 days for gloss effect
    Blonde May turn patchy or dull in tone Patch test advised or avoid use

    Can this really make you look younger?

    Grey hair alone does not determine age. Haircut, skin quality, posture, and clothing all influence appearance. However, strong contrast between dark hair and bright white strands can accentuate facial shadows and fine lines. By softening this contrast, cocoa-based treatments can help create a more rested, balanced look.

    Younger-looking hair is often less about eliminating greys and more about maintaining shine, hydration, and shape. Smooth, reflective hair frames the face more gently, brightening the eye area and subtly lifting overall features. Even reduced frizz around the face can noticeably change how skin appears both in real life and on camera.

    Where natural methods work – and where they do not

    Natural colour adjusters such as cocoa, coffee, black tea, or sage are best suited for people with up to 40–50% grey who want blending rather than full coverage. They appeal to those who prefer gradual change, warmer tones, and minimal maintenance. Individuals expecting dramatic colour shifts in one session may feel disappointed, as these methods rely on repeated use and patience.

    Despite being natural, these treatments are not entirely risk-free. Cocoa can cause reactions in people with sensitivities or allergies, making a patch test essential before full application. Build-up may also occur over time, so using a mild clarifying shampoo every few weeks helps maintain shine and lightness.

    How this trend is changing the beauty conversation

    The popularity of cocoa and similar methods reflects a broader shift in beauty standards. Fully uniform hair colour is no longer the sole marker of youth. Blended greys, transparent coverage, and soft tints now appear in fashion and social media, encouraging individuality rather than strict correction.

    Many people choose to soften greys without erasing them completely, pairing natural tints with strategic cuts, scalp care, and nutrition. While supplements cannot reverse greying, nutrients such as omega-3s, iron, zinc, and B vitamins support the strength and quality of new hair growth.

    Going further: other gentle options to pair with cocoa

    Some users combine cocoa treatments with other mild options such as black tea or coffee rinses to deepen tone, or sage and rosemary infusions to add subtle shading and scalp freshness. Rotating these treatments prevents colour from becoming too warm or flat.

    Professional guidance can also play a role. Many colourists now specialise in grey blending, using low-impact dyes alongside plant-based glosses. Maintaining results at home with cocoa or tea masks allows longer gaps between salon visits and reduces chemical stress on the hair. Testing on a small hidden section first remains the best way to understand how your hair responds.

  • Optical Illusion Test: Spot the Number 982 in 7 Seconds

    Optical Illusion Test: Spot the Number 982 in 7 Seconds

    Optical illusion challenges have become a popular way to test attention and mental speed, especially across India where brain games are widely shared on social media. This optical illusion test invites readers to spot the number 982 within just seven seconds, pushing both focus and patience to the limit. At first glance, the numbers may appear identical, but subtle differences are hidden in plain sight. These visual puzzles are not only entertaining but also encourage sharper observation skills, making them a fun mental exercise for people of all ages.

    Optical Illusion Test to Spot 982 Quickly

    This optical illusion test is designed to challenge how quickly your eyes and brain work together. When surrounded by similar-looking numbers, your mind tends to assume repetition, which slows detection. Success depends on pattern recognition, steady visual scanning, and resisting time pressure. Instead of rushing, allowing your eyes to glide naturally can improve mental agility. Many people fail on the first attempt not due to poor vision, but because the brain jumps to conclusions too fast. Slowing your breathing and keeping a relaxed focus often leads to spotting the correct number sooner than expected.

    Why the Number 982 Is Hard to Find

    The difficulty of this puzzle lies in clever visual design. The surrounding digits create number camouflage, making 982 blend seamlessly into the grid. Your eyes may focus too narrowly, missing clues that appear just outside direct vision. Using peripheral focus helps detect micro differences between shapes. The brain also relies on brain shortcuts, assuming repeated patterns instead of checking each digit. These natural habits save time in daily life but become obstacles during illusion tests, where careful observation is the real advantage.

    Optical Illusion Challenges and Brain Benefits

    Regularly attempting optical illusion tests can sharpen more than eyesight. Over time, practice improves speed while strengthening attention control. Holding focus for several seconds builds visual endurance, which is useful for reading, driving, and screen-based work. Many participants also notice a confidence boost after solving tricky puzzles, reinforcing positive problem-solving habits. These challenges train the brain to stay alert under mild pressure, turning a simple game into a powerful mental workout that feels rewarding rather than exhausting.

    Summary and Final Analysis

    This seven-second optical illusion test may look simple, but it delivers a meaningful cognitive workout. By engaging with puzzles like this, readers can build a daily brain habit that supports sharper thinking. The act of searching improves focus training while keeping the experience light through a playful challenge. Whether solved quickly or after multiple tries, the value lies in exercising attention and patience. Over time, these small efforts can make visual processing faster and more accurate in everyday situations.

    Feature Description
    Target Number 982 hidden among similar digits
    Time Limit 7 seconds
    Skill Tested Focus and visual perception
    Difficulty Level Moderate to challenging

    Frequently Asked Questions (FAQs)

    1. What is the goal of this optical illusion test?

    The goal is to spot the number 982 within seven seconds.

    2. Is this puzzle suitable for all ages?

    Yes, it is safe and enjoyable for both kids and adults.

    3. Does failing the test mean weak eyesight?

    No, it usually reflects how the brain processes visual patterns.

    4. Can practicing such puzzles improve focus?

    Yes, regular practice can enhance attention and visual speed.

  • Optical Illusion Test: Spot the Number 594 Among 564s

    Optical Illusion Test: Spot the Number 594 Among 564s

    Optical illusion tests have become a popular way to challenge focus, logic, and visual sharpness, especially among puzzle lovers in India. These mind-bending visuals appear simple at first glance but quickly test how well your brain processes small differences. In this optical illusion test, the challenge is to spot the number 594 hidden among repeated 564s. While the numbers look almost identical, the illusion relies on pattern overload and distraction. Such puzzles are not only entertaining but also help sharpen observation skills and improve attention to detail. the full page

    Optical Illusion Challenge to Spot 594 Quickly

    This optical illusion challenge pushes your eyes to work faster than your brain expects. When surrounded by repeated numbers, the mind tends to assume uniformity, making it harder to notice subtle changes. The task of finding 594 among dozens of 564s tests visual focus speed, pattern recognition skill, mental filtering ability, and attention under pressure. Many people scan too quickly and miss the difference, while others overthink the layout. The trick is to slow your gaze slightly and let your eyes move line by line instead of jumping randomly across the image.

    Why This Optical Illusion Test Tricks the Brain

    The brain is designed to save energy by grouping similar objects together, which is why optical illusions are so effective. In this test, repeated 564s create a visual rhythm that masks the odd number. This effect highlights cognitive shortcut behavior, visual overload response, automatic pattern scanning, and detail suppression effect. Once the brain assumes all numbers are the same, it stops actively checking each one. Optical illusion tests like this reveal how perception can differ from reality, even when the information is right in front of us.

    How Optical Illusion Puzzles Improve Observation Skills

    Regularly attempting optical illusion puzzles can improve everyday observation and concentration. These challenges train your eyes to slow down and your brain to question assumptions. Over time, this enhances selective attention control, visual discrimination accuracy, mental patience building, and focus consistency growth. Many educators and psychologists recommend such puzzles because they engage both logic and perception. Whether used for fun or mental exercise, optical illusion tests offer a simple way to sharpen awareness without complex tools or lengthy practice.

    Summary and Visual Analysis

    This optical illusion test demonstrates how easily the brain can be misled by repetition and similarity. Spotting 594 among 564s requires calm observation rather than speed. The illusion works by exploiting habit-based perception, visual expectation bias, number similarity trap, and focus fatigue tendency. By understanding why the illusion works, viewers can improve how they approach similar challenges. These puzzles remind us that seeing is not always the same as noticing, and small details often hold the real answers.

    Aspect Description
    Primary Goal Find the number 594 hidden among 564s
    Skill Tested Visual attention and detail recognition
    Difficulty Level Moderate
    Time Required 5–15 seconds on average
    Best For Brain training and focus improvement

    Frequently Asked Questions (FAQs)

    1. What is the goal of this optical illusion test?

    The goal is to identify the number 594 hidden among multiple 564s.

    2. Why is it hard to spot the different number?

    The brain groups similar patterns and overlooks small differences.

    3. Do optical illusion tests improve brain function?

    They help enhance focus, observation, and attention to detail.

    4. How long should it take to find 594?

    Most people find it within 5 to 15 seconds.

  • Cakey Concealer Fix: The Hidden Cause Behind Creasing and a 10-Second Pro Makeup Solution

    Cakey Concealer Fix: The Hidden Cause Behind Creasing and a 10-Second Pro Makeup Solution

    Cakey concealer is a common makeup frustration that many people in India face, especially in humid weather and long workdays. What starts as a smooth under-eye finish can quickly turn into visible creases, patchy texture, and an aged look. The real issue often isn’t the concealer itself but hidden prep and application mistakes that disrupt skin balance. Understanding why concealer cakes and how professionals fix it in seconds can completely change your makeup routine and help you achieve a natural, skin-like finish every time.

    Cakey concealer causes that trigger creasing

    The most overlooked reason behind cakey concealer is improper skin prep, not product quality. When the under-eye area lacks hydration, concealer clings to dry patches and settles into fine lines. Overusing powder is another culprit, as it removes necessary moisture and creates a heavy surface. Applying too much product at once also leads to buildup instead of coverage. Factors like dry under-eyes, product overload, uneven texture, and powder excess quietly work together to ruin the finish. Addressing these root issues creates a smoother base and prevents creasing before it starts.

    Hidden reasons your concealer looks cakey

    Even with good products, technique matters more than people realize. Using the wrong applicator can press concealer into lines instead of diffusing it evenly. Warm skin helps product melt naturally, but rushing application prevents this process. Skipping primer around the eyes can also reduce grip and longevity. Small habits like wrong applicator, cold skin, no eye primer, and fast blending quietly sabotage results. Slowing down and letting the product settle makes a noticeable difference in how smooth and natural concealer appears throughout the day.

    10-second pro makeup solution for creasing

    Professional makeup artists rely on a quick fix that takes less than ten seconds but delivers dramatic improvement. After applying concealer, they gently press it into the skin using warmth from their fingers or a damp sponge. This melts excess product while keeping coverage intact. A light tap of finely milled powder only where needed locks everything in place. This method focuses on controlled tapping, skin warmth, minimal powder, and targeted setting to prevent creases without heaviness or dryness.

    Why technique matters more than product

    Many people keep switching concealers, hoping for better results, but technique is the true game changer. When skin is properly prepped and products are layered lightly, even affordable concealers perform well. The goal is balance, not coverage overload. Paying attention to skin preparation, light layering, natural finish, and lasting smoothness helps concealer look fresh for hours. Once these habits are in place, cakey under-eyes become far less common and makeup feels more effortless.

    Common Issue Main Cause Quick Fix
    Creasing Dry under-eye area Hydrating eye cream
    Cakey texture Too much product Use thin layers
    Patchy finish Wrong applicator Damp sponge tap
    Heavy look Excess powder Light targeted setting

    Frequently Asked Questions (FAQs)

    1. Why does my concealer crease so fast?

    Creasing usually happens due to dryness, excess product, or too much powder.

    2. Can I fix cakey concealer without removing it?

    Yes, gently tapping with a damp sponge can smooth it instantly.

    3. Is powder necessary for under-eye concealer?

    Only a minimal amount is needed to set specific crease-prone areas.

    4. Does expensive concealer prevent caking?

    Good technique matters more than price when it comes to smooth results.

  • Facial Balance Tip: How Incorrect Blush Placement Near the Nose Can Distort Natural Face Proportions

    Facial Balance Tip: How Incorrect Blush Placement Near the Nose Can Distort Natural Face Proportions

    Achieving facial balance is a key goal in makeup, yet small mistakes can quietly alter how your features appear. One common issue is placing blush too close to the nose, which can disrupt natural proportions and draw attention away from your best angles. In India, where diverse face shapes and skin tones inspire unique makeup styles, understanding correct blush placement is especially important. When applied thoughtfully, blush enhances harmony and warmth, but when misplaced, it can visually widen the nose or shorten the face. Knowing what to avoid helps maintain a balanced, confident look.

    Incorrect blush placement and facial balance concerns

    Placing blush too close to the nose often affects how facial balance is perceived. This area naturally draws the eye, so excess color here can make the nose appear wider and the cheeks flatter. Many people unknowingly apply blush while smiling, which pushes product inward and disturbs natural face harmony. Over time, this habit can create visual width illusion that feels hard to correct. Instead, understanding your bone structure helps maintain balanced cheek focus and prevents unwanted central emphasis. A subtle shift outward can instantly restore proportion and give the face a more lifted appearance.

    How blush near the nose alters face proportions

    Blush placed near the nose can unintentionally change the way proportions read on the face. Because the center of the face is already prominent, adding color there increases attention and reduces definition on the outer cheeks. This may result in a shortened face effect or even a broader midface look. In everyday makeup routines, people often rush this step, forgetting how placement impacts shape. By keeping blush slightly higher and outward, you encourage vertical lift illusion and preserve cheekbone definition, helping the face appear more sculpted and naturally balanced.

    Correct blush placement for natural-looking balance

    To maintain facial balance, blush should complement your structure rather than compete with it. Start by identifying the highest point of your cheekbones and blend outward toward the temples. This technique avoids nose area overload and creates soft lifted contours. Light, buildable layers also prevent harsh lines and allow better control. When done correctly, blush enhances overall face symmetry and supports natural proportion flow. With practice, small placement adjustments can make a noticeable difference, ensuring your makeup looks polished, flattering, and effortless.

    Understanding the impact of subtle makeup choices

    Makeup works best when it respects the natural architecture of the face. Small choices, like where blush is placed, can significantly influence how features are perceived. Awareness helps you avoid habits that disrupt balance and instead build techniques that highlight strengths. Paying attention to blending direction, product intensity, and face shape leads to more consistent results. Over time, these mindful adjustments create a routine that feels intuitive and reliable. By focusing on proportion rather than trends, you achieve a look that feels authentic, refined, and adaptable to different occasions.

    Blush Placement Area Visual Effect Common Mistake
    Too close to nose Wider midface Over-blending inward
    Center of cheeks Flat appearance Applying while smiling
    High cheekbones Lifted look Using too much product
    Toward temples Balanced proportions Skipping blending

    Frequently Asked Questions (FAQs)

    1. Why does blush near the nose look unbalanced?

    It draws attention to the center of the face, making features appear wider.

    2. Where should blush ideally be applied?

    On the outer cheekbones, blended upward toward the temples.

    3. Does face shape affect blush placement?

    Yes, different face shapes benefit from slightly adjusted placement.

    4. Can incorrect blush placement be fixed easily?

    Yes, blending outward or softening with powder can quickly correct it.

  • Brain Teaser Challenge: Can You Spot the Word Red Hidden Among Fed in 5 Seconds

    Brain Teaser Challenge: Can You Spot the Word Red Hidden Among Fed in 5 Seconds

    Brain teasers based on word recognition are among the trickiest puzzles you can encounter. They appear straightforward and almost too simple but they regularly confuse even the smartest people. One challenge that has been getting popular lately poses a basic question. Can you find the word “Red” concealed among many copies of the word “Fed” in only 5 seconds? The difficulty comes from how similar these words look when you scan them rapidly. When you first look at the grid every word seems the same. Your eyes move across lines of “Fed” without detecting anything different. However one word that disrupts the pattern is hiding somewhere in there. Just one word starts with the letter “R” rather than “F” & you need to locate it before time expires.

    Why This Simple Word Puzzle Is So Tricky

    The challenge of this brain teaser comes from how familiar the words look rather than how hard they are. The words Fed & Red have almost identical shapes and only one letter sets them apart. When your brain processes repeated text it tends to assume everything matches & stops examining each word closely. This effect is called pattern blindness. After the brain spots a repeating pattern it prioritizes speed over careful checking. In this puzzle that natural tendency becomes a problem. Since most words say Fed your mind categorizes them all as identical and the hidden Red disappears into the background. The 5 second deadline creates additional stress. When people face time pressure they usually scan rapidly instead of reading methodically. That hurried approach makes it simple to miss the single letter variation that reveals the answer.

    What This Brain Teaser Reveals About Your Mind

    This challenge tests more than your ability to see clearly. It checks how well you notice small details & stay focused while resisting the urge to take mental shortcuts. Your brain naturally tries to save energy by assuming that repeated information looks the same. This puzzle makes you fight against that automatic response. The challenge also examines selective attention. Your brain usually recognizes words by their overall shape rather than reading each letter carefully. Because “Fed” & “Red” look quite similar, your brain might treat them as identical shapes unless you deliberately check the first letter. People who solve this puzzle quickly usually have strong concentration abilities and can stay alert when under pressure. If you find it difficult that doesn’t mean you lack intelligence. It simply demonstrates how powerful automatic thinking really is.

    The Best Way to Spot the Hidden Word Fast

    The solution to this puzzle requires adjusting your approach to the words. Rather than examining each word in full, concentrate exclusively on the opening letter of each word. This basic adjustment significantly increases your likelihood of finding the answer. Review the grid one line at a time while observing only the starting character. When you spot an “R” where an “F” should be you have located the solution. This method stops your mind from becoming confused by the recurring letters “e” & “d.” An additional useful strategy is to soften your gaze somewhat. When you avoid staring too hard, the different letter can become more visible. Maintaining composure is essential because anxiety frequently causes rushed examination and overlooked information.

    Why Letter Based Brain Teasers Are So Popular

    Word and letter puzzles have gained massive popularity on the internet because they are simple to grasp and fast to solve. There is no need for specialized skills or detailed guidelines. Everyone can participate and that quality makes them easy to share across platforms. These challenges generate immediate interest among users. The countdown clock adds a competitive element and participants enjoy testing their friends by asking questions such as “Could you solve it within 5 seconds?” The basic nature of the task paired with its challenging aspect builds strong curiosity. Their widespread appeal also stems from the quick satisfaction they provide. Discovering the concealed word delivers a pleasant feeling of accomplishment. This minor victory activates reward centers in the brain and motivates people to attempt additional puzzles.

    Common Mistakes People Make in This Challenge

    A frequent error people make is reading complete words rather than examining individual letters. When your brain sees “Fed” multiple times it switches to automatic mode and quits verifying each character. This causes you to overlook the hidden “Red” quite easily. Another common problem is searching the grid without any pattern. This random method usually results in skipping rows or looking at the same spots repeatedly. Using a structured scanning technique works much better. Many people also prioritize going fast instead of being careful. Surprisingly enough taking a bit more time and using a methodical approach typically helps you find the answer quicker.

  • Strong Body Yoga: 10 Poses That Build Strength and Improve Overall Fitness

    Strong Body Yoga: 10 Poses That Build Strength and Improve Overall Fitness

    Yoga goes far beyond flexibility. It is a powerful full-body practice that helps build strength, sculpt muscles, and support overall fitness. While often linked with stretching and relaxation, yoga includes many poses designed to activate major muscle groups, improve endurance, and create physical balance. Below are ten effective yoga poses that support a strong, toned, and stable body.

    1. Plank Pose (Phalakasana)

    Plank Pose is a foundational posture known for developing core strength and total-body stability. Holding this pose activates the arms, shoulders, back, and abdominal muscles, creating a solid base for advanced movements.

    How to Do It:

    • Begin in a tabletop position with wrists under shoulders and knees under hips.
    • Step both feet back, forming a straight line from head to heels.
    • Engage your core and hold for 30 seconds to 1 minute.

    Benefits:

    • Builds strength in the core, arms, and shoulders.
    • Enhances posture and alignment.

    2. Warrior I (Virabhadrasana I)

    Warrior I is a strong standing posture that develops lower-body power and core stability while opening the chest and shoulders.

    How to Do It:

    • Stand tall and step one foot back, bending the front knee to 90 degrees.
    • Keep the back leg straight with the heel grounded.
    • Lift your arms overhead and open your chest.
    • Hold for 30 seconds to 1 minute on each side.

    Benefits:

    • Strengthens legs, hips, and core.
    • Stretches the shoulders and arms.

    3. Warrior II (Virabhadrasana II)

    Warrior II focuses on leg endurance, balance, and core engagement, making it ideal for improving stamina.

    How to Do It:

    • From Warrior I, open your hips and torso to the side.
    • Extend arms parallel to the floor.
    • Keep the front knee bent and back leg straight.
    • Hold for 30 seconds to 1 minute on each side.

    Benefits:

    • Strengthens thighs, hips, and core.
    • Improves balance and stability.

    4. Four-Limbed Staff Pose (Chaturanga Dandasana)

    Chaturanga is a demanding pose that builds upper-body and core strength while promoting control and stability.

    How to Do It:

    • Start in plank position.
    • Lower down slowly, elbows close to your sides.
    • Maintain a straight line from head to heels.
    • Hold briefly, then return to plank.

    Benefits:

    • Strengthens arms, chest, shoulders, and core.
    • Boosts endurance and control.

    5. Boat Pose (Navasana)

    Boat Pose is a core-focused posture that improves abdominal strength and balance.

    How to Do It:

    • Sit with knees bent and feet on the mat.
    • Lean back slightly and lift your legs.
    • Extend arms forward, forming a V shape.
    • Hold for 30 seconds to 1 minute.

    Benefits:

    • Strengthens the core and hip flexors.
    • Improves coordination and stability.

    6. Downward-Facing Dog (Adho Mukha Svanasana)

    This foundational pose works the entire body, combining strength with flexibility.

    How to Do It:

    • Begin on hands and knees.
    • Tuck toes and lift hips upward.
    • Press hands firmly and lengthen the spine.
    • Hold for 30 seconds to 1 minute.

    Benefits:

    • Strengthens arms, shoulders, and legs.
    • Improves alignment and flexibility.

    7. Cobra Pose (Bhujangasana)

    Cobra Pose gently strengthens the spine while opening the chest and shoulders, supporting better posture.

    How to Do It:

    • Lie face down with hands under shoulders.
    • Press into palms and lift the chest.
    • Keep shoulders relaxed and elbows soft.
    • Hold for 15 to 30 seconds.

    Benefits:

    • Strengthens back and arms.
    • Opens the chest and improves posture.

    8. Chair Pose (Utkatasana)

    Chair Pose targets the lower body while engaging the core, building strength and endurance.

    How to Do It:

    • Stand with feet together.
    • Bend knees as if sitting back.
    • Raise arms overhead and keep chest lifted.
    • Hold for 30 seconds to 1 minute.

    Benefits:

    • Strengthens thighs, glutes, and core.
    • Enhances balance and stamina.

    9. Bridge Pose (Setu Bandhasana)

    Bridge Pose strengthens the lower body while stretching the spine and chest.

    How to Do It:

    • Lie on your back with knees bent.
    • Press feet into the mat and lift hips.
    • Engage glutes and core.
    • Hold for 20 to 30 seconds.

    Benefits:

    • Strengthens glutes, lower back, and core.
    • Supports spinal mobility and posture.

    10. Crow Pose (Bakasana)

    Crow Pose is an arm balance that challenges strength, focus, and coordination.

    How to Do It:

    • Begin in a squat with feet close together.
    • Place hands shoulder-width apart on the mat.
    • Lean forward and lift feet off the floor.
    • Hold for 10 to 20 seconds.

    Benefits:

    • Builds arm, shoulder, and core strength.
    • Improves balance and concentration.
  • 5 Yoga Poses to Quiet a Busy Mind and Prepare the Body for Better Sleep

    5 Yoga Poses to Quiet a Busy Mind and Prepare the Body for Better Sleep

    In today’s busy world falling asleep has become more difficult than before. The body might feel exhausted but the mind often stays active. Worries about work or school or family or social media or plans for the next day keep running through your head without stopping. This constant mental activity is a major reason why many people cannot sleep well. Yoga provides a gentle and natural way to help with this problem. Unlike hard exercise routines bedtime yoga works to calm your nervous system & release physical tension while bringing your mind to a peaceful place. When you practice a few simple yoga poses before bed on a regular basis you can move more easily from being awake to falling asleep.

    Understanding Why the Mind Races at Night

    Before trying these poses you should know why your mind gets noisier when you go to bed. 1. Fewer Distractions Your mind stays busy with work and conversations during the day. When night comes and everything gets quiet your unresolved thoughts start appearing. 2. Built-Up Stress Stress hormones stay high in your body even when the day is over. This makes relaxing harder than it should be. 3. Too Much Screen Time Using phones & looking at screens keeps your brain too active. This pushes back your natural sleep rhythm. 4. No Physical Outlet When you feel mentally stressed it often shows up as tension in your shoulders & hips and back. This tension keeps your nervous system on alert. Yoga helps with all of these problems. It uses movement and breathing & focused attention to tell your body it can safely rest now.

    The Science Behind Yoga’s Calming Effect on Sleep

    Yoga helps improve sleep through several mechanisms. It slows down your heart rate and breathing patterns. The practice activates your parasympathetic nervous system which controls relaxation responses. Yoga releases tension that accumulates in your muscles throughout the day. It enhances oxygen circulation to your brain. The practice also promotes mindfulness and helps clear your mind. When you do yoga before going to bed it creates a transition period between your active day & restful sleep. This makes it easier for your body & mind to shift into a state that supports deep sleep.

    Choosing the Right Time and Setting for Bedtime Yoga Practice

    To get the maximum benefit practice for 20 to 30 minutes before you go to sleep. Keep the lights dim in your room. Avoid looking at mirrors or anything that might distract you. Wear loose & comfortable clothing that does not restrict your movement. Breathe slowly and take deep breaths throughout your practice. Focus on how you feel inside rather than worrying about whether your posture looks perfect.

    Sleep-Focused Yoga Poses: Quick Overview Table

    Yoga Asana Main Fayda Hold Karne Ka Samay Kis Ke Liye Behtar
    Balasana (Child’s Pose) Man ko shant karna, grounding 1–3 minute Anxiety, zyada sochna
    Paschimottanasana (Seated Forward Bend) Nervous system ko relax karta hai 1–2 minute Dimagi thakaan, stress
    Viparita Karani (Legs Up the Wall) Stress kam karta hai, blood circulation sudhaarta hai 2–5 minute Neend ki problem, pairon ki thakaan
    Supta Baddha Konasana Emotional tension release 3–5 minute Bechaini, mental stress
    Savasana (Saans par dhyaan ke saath) Gehri mansik shanti 5–10 minute Sone se pehle relaxation

    1. Child’s Pose (Balasana) – Grounding the Nervous System

    Why This Pose Calms the Mind Child’s Pose provides a sense of grounding & comfort. It promotes introspection while gently stretching the back and hips and shoulders. These are areas where stress often builds up. The forward-folding position signals safety to the brain & helps quiet mental chatter. How to Practice Kneel on the floor or mat and sit back on your heels. Fold forward and rest your chest on your thighs. Extend your arms forward or place them alongside your body. Rest your forehead on the mat or a cushion. Breathing Technique Inhale slowly through the nose & exhale longer than the inhale. Feel the breath expand your back ribs. Mental Focus Let go of expectations and imagine each exhale washing away thoughts from the day. How Long to Hold Stay in the pose for 1 to 3 minutes while breathing slowly.

    2. Seated Forward Bend (Paschimottanasana) – Releasing Mental and Physical Tension

    Why This Pose Works Before Bed This pose applies gentle pressure to your abdomen and signals your nervous system to relax. Forward bends naturally calm the mind and help reduce anxiety and racing thoughts. How to Do It Sit on the floor with your legs stretched out in front of you. Breathe in & sit up tall. Breathe out and bend forward from your hips. Let your hands rest on your shins or ankles or feet. Keep your back soft and don’t force the stretch. How to Breathe Take slow deep breaths into your belly. With each breath out let yourself fold a little deeper without pushing. What to Think About Let your thoughts come and go without holding onto them. Pay attention only to your breathing & how your body feels. How Long to Stay Stay in this position for one to two minutes in a comfortable and relaxed way.

    3. Legs Up the Wall (Viparita Karani) – Restoring Calm and Circulation

    Why This Pose Reduces Mental Chatter Legs Up the Wall stands out as an exceptionally effective pose for achieving deep relaxation. The position works by reversing your normal blood flow patterns and engaging your parasympathetic nervous system while simultaneously addressing physical tiredness. People who struggle with racing thoughts during nighttime hours often find this pose particularly beneficial. Steps for Proper Practice Begin by sitting with one side of your body against a wall. Smoothly rotate your body as you recline backward and bring both legs upward along the wall surface. Position your hips near the wall base without forcing them to touch it. Let your arms rest naturally alongside your torso in whatever position feels most comfortable.

    Gently close both eyes to minimize visual distractions. Recommended Breathing Pattern Focus on establishing a slow and steady breathing rhythm throughout the pose. Draw air into your lungs over a span of four seconds & then release that breath over six seconds. This extended exhale activates your relaxation response more effectively than equal breathing counts. Where to Direct Your Attention Create a mental image of your swirling thoughts becoming liquid and flowing downward through your elevated legs. Picture this mental energy draining completely out of your body and absorbing into the floor beneath you. This visualization technique helps externalize anxious thinking patterns. Duration Guidelines Stay in this position for a minimum of two minutes to gain basic benefits. You can extend the practice to five minutes or even longer if your body feels at ease. Listen to your physical comfort level rather than watching the clock rigidly.

    4. Reclining Bound Angle Pose (Supta Baddha Konasana) – Encouraging Deep Relaxation

    Why This Pose Helps Reduce Emotional Stress This position gently stretches the hips and chest. These body areas often hold emotional tension. The pose creates a sense of openness and allows for deep relaxation. It works well for quieting an overactive mind. How to Do It Start by lying flat on your back. Bring the bottoms of your feet together so they touch. Allow your knees to drop outward to each side. If this feels uncomfortable you can place pillows under your knees for support. Rest one hand on your chest & the other on your stomach. How to Breathe Focus your breath toward your heart and belly area. Keep your breathing slow and gentle. Maintain a steady rhythm throughout. What to Think About Allow any feelings that come up to simply be there. Let them fade naturally without trying to control or judge them. How Long to Stay in This Position Remain in the pose for three to five minutes.

    5. Corpse Pose with Mindful Breathing (Savasana) – Preparing the Body for Sleep

    Why This Pose Helps You Sleep Better Savasana is the final relaxation pose that brings together all the benefits from your practice. When you combine it with mindful breathing it gets your body and mind ready for sleep. How to Do It Lie flat on your back with your legs slightly apart & your arms relaxed at your sides. Turn your palms upward and gently close your eyes. Breathing Method Breathe in slowly through your nose. Breathe out fully & deeply through your mouth or nose. If your mind starts to wander you can count each breath to stay focused. What to Think About Move your attention slowly through your body starting from your head and going down to your toes. As you notice each body part let go of any tightness or tension you find there. How Long to Stay in This Position Stay in this pose for 5 to 10 minutes or longer if needed. You can come out of it once you feel completely relaxed and calm.

    Designing a Simple Nightly Yoga Wind-Down Routine

    You don’t need to do all five poses each night. Just 10 to 15 minutes can help. Simple 20-Minute Routine Child’s Pose for 2 minutes Seated Forward Bend for 2 minutes Legs Up the Wall for 5 minutes Reclining Bound Angle for 4 minutes Corpse Pose for 7 minutes Doing it regularly matters more than how long you practice.

    Bedtime Yoga Mistakes That Can Disrupt Relaxation

    Common Mistakes to Avoid Exercising too hard right before you go to bed can keep you awake instead of helping you relax. Your body needs time to wind down naturally. Holding your breath during poses creates tension in your body. Remember to breathe steadily and smoothly throughout your practice. Pushing yourself too far in stretches can cause discomfort or injury. Move slowly and only go as far as feels comfortable for your body. Keeping bright lights on during your evening routine signals your brain to stay alert. Dim lighting helps prepare your mind for rest. Looking at your phone right after finishing your practice exposes you to blue light and stimulating content. This can undo the calming effects you just created. Your bedtime yoga routine should feel easy and relaxing. The movements should be slow & deliberate. The goal is to nourish your body and prepare it for deep sleep. Think of this practice as a gentle transition from your active day to peaceful rest.

    Who Should Practice These Sleep-Friendly Yoga Poses

    These poses are suitable for:

    • Beginners
    • Students
    • Working professionals
    • Seniors
    • Anyone experiencing mental fatigue

    Always move within your comfort range.

  • Goodbye to Hair Dyes New Natural Grey Hair Coverage Techniques Suddenly Going Viral

    Goodbye to Hair Dyes New Natural Grey Hair Coverage Techniques Suddenly Going Viral

    Grey strands often signal a personal choice. You may embrace them openly or soften their appearance in a way that still feels authentic. Across the world, people are searching for alternatives that help reduce the look of grey hair and restore a more vibrant appearance without relying on harsh chemical dyes. As a result, gentle hair colouring methods are gaining attention in everyday routines. This movement reflects a wider shift in how aging and beauty are now viewed.

    Understanding Grey Hair and Its Impact on Appearance

    Hair does not suddenly lose colour. Each strand grows from a follicle where specialised pigment cells, known as melanocytes, release colour into the hair during growth. This pigment, mainly melanin, defines natural hair shade. Over time, factors like aging, genetics, prolonged stress, and lifestyle patterns cause these cells to slow down or stop functioning. When that happens, new strands grow with little or no pigment, appearing grey or white. Grey hair is therefore new growth without melanin, not old hair fading.

    The protein structure of hair, keratin, has a naturally pale yellow tone. When melanin disappears, this underlying colour becomes more noticeable, especially in strong light. Aging scalps also tend to produce less natural oil, which affects softness and shine. As a result, grey hair may feel coarser, appear duller, and frizz more easily. Texture changes can also alter how hair sits, making grey strands feel wiry or uneven.

    Even a few bright white strands among darker hair can create sharp contrast around the face. This contrast may highlight shadows, fine lines, or under-eye areas, making features seem more tired. For many, the change in texture and light reflection influences appearance more than the colour itself.

    Why Traditional Hair Dye Is Falling Out of Favour

    For decades, permanent hair dye was the standard solution for covering greys. These products work by opening the hair cuticle with ammonia or similar agents, allowing colour to penetrate through an oxidising process. While the initial results may look smooth, repeated applications often weaken the hair, particularly already-fragile grey strands. Damaged cuticles can lead to dryness, brittleness, and tangling, while sensitive scalps may experience irritation.

    Maintenance is another concern. Permanent dye creates a noticeable regrowth line within weeks, requiring frequent touch-ups. As beauty preferences evolve, many people now favour softer, low-commitment approaches that limit chemical exposure while keeping natural depth. The focus has shifted from flawless coverage to subtle, manageable colour.

    The Growing Interest in Natural Darkening Solutions

    Plant-based and food-inspired colour boosters are becoming popular as part of this gentler approach. These options do not bleach or permanently change the internal hair structure. Instead, they coat the surface, slowly building a sheer layer of colour while enhancing shine. Among these, cocoa powder has attracted particular attention.

    Cocoa contains natural pigments and polyphenols that can gradually deepen light to medium brown shades. On grey strands, it helps reduce stark whiteness, allowing hair to blend more naturally. Rather than acting as a permanent dye, cocoa works like a tinted conditioning treatment, offering gradual colour enhancement while improving texture.

    How Cocoa Supports Grey Hair Darkening

    Cocoa-based applications coat the hair shaft, forming a soft brown layer that fades slowly over time. When combined with conditioners or oils, cocoa also helps lock in moisture, smoothing the cuticle. With consistent use, many notice grey hair looks shinier, less coarse, and easier to manage. The effect is not bold coverage, but a more balanced overall tone.

    An Easy Cocoa Treatment for Home Use

    This simple mixture suits sensitive scalps and low-effort routines. For short to medium-length hair, mix one tablespoon of pure, unsweetened cocoa powder with a generous amount of a lightweight, oil-free conditioner. Stir well until the blend is smooth and evenly coloured.

    Apply to clean, towel-dried hair, focusing on areas where greys are most visible, such as the temples, parting, and hairline. Use a wide-tooth comb for even distribution. Leave on for 15–20 minutes, then rinse with lukewarm water. Avoid shampooing right away, as this removes most of the surface colour.

    Expected Results by Hair Colour

    • Light Brown: Adds warm tones and helps greys blend faster; use 1–2 times weekly
    • Medium Brown: Deepens richness and softens greys; apply once per week
    • Dark Brown / Black: Boosts shine with slight warmth; use every 7–10 days
    • Blonde: May appear uneven or dull; patch testing advised or avoid use

    Can Softer Colour Make You Look Younger?

    Grey hair alone does not define age. Haircut, skin condition, posture, and clothing all influence appearance. However, strong contrast between dark hair and bright white strands can emphasise facial shadows and fine lines. By reducing this contrast, cocoa-based treatments may create a more rested and balanced look.

    Younger-looking hair often depends more on shine, hydration, and shape than on removing greys completely. Smooth, light-reflective hair frames the face more softly, brightening the eye area and subtly lifting overall features. Even less frizz around the face can noticeably affect how skin appears both in person and on camera.

    Where Natural Methods Are Effective – and Their Limits

    Natural colour enhancers like cocoa, coffee, black tea, or sage work best for those with up to 40–50% grey who prefer blending rather than full coverage. They suit individuals who value gradual change, warmer tones, and low maintenance. Those expecting dramatic results in one application may feel underwhelmed, as these methods rely on consistency and time.

    Although natural, these treatments still require caution. Cocoa may trigger reactions in people with sensitivities, making a patch test essential. Product build-up can also occur, so using a gentle clarifying shampoo every few weeks helps preserve shine and lightness.

    How This Shift Is Reshaping Beauty Standards

    The rise of cocoa-based colouring reflects a broader change in beauty culture. Perfectly uniform hair colour is no longer the only symbol of youth. Blended greys, soft coverage, and translucent tones are increasingly visible in fashion and social media, encouraging individuality rather than strict correction.

    Many now choose to soften greys without removing them entirely, pairing gentle colour methods with thoughtful haircuts, scalp care, and balanced nutrition. While supplements cannot reverse greying, nutrients like omega-3s, iron, zinc, and B vitamins support overall hair strength and quality.

    Additional Gentle Options to Use Alongside Cocoa

    Some people combine cocoa treatments with mild alternatives such as black tea or coffee rinses for deeper tone, or sage and rosemary infusions for subtle shading and scalp freshness. Rotating these natural treatments helps prevent colour from appearing overly warm or flat.

    Professional advice can also be helpful. Many colourists now focus on grey blending, using low-impact dyes with plant-based glosses. Maintaining colour at home with cocoa or tea masks allows longer gaps between salon visits and reduces chemical stress. Testing on a small, hidden section remains the best way to understand how your hair will respond.