Category: News

  • Newcomers Can Ease Into Yoga With Simple Poses That Support Comfort and Movement Why is Flexibility Important in Yoga?

    Newcomers Can Ease Into Yoga With Simple Poses That Support Comfort and Movement Why is Flexibility Important in Yoga?

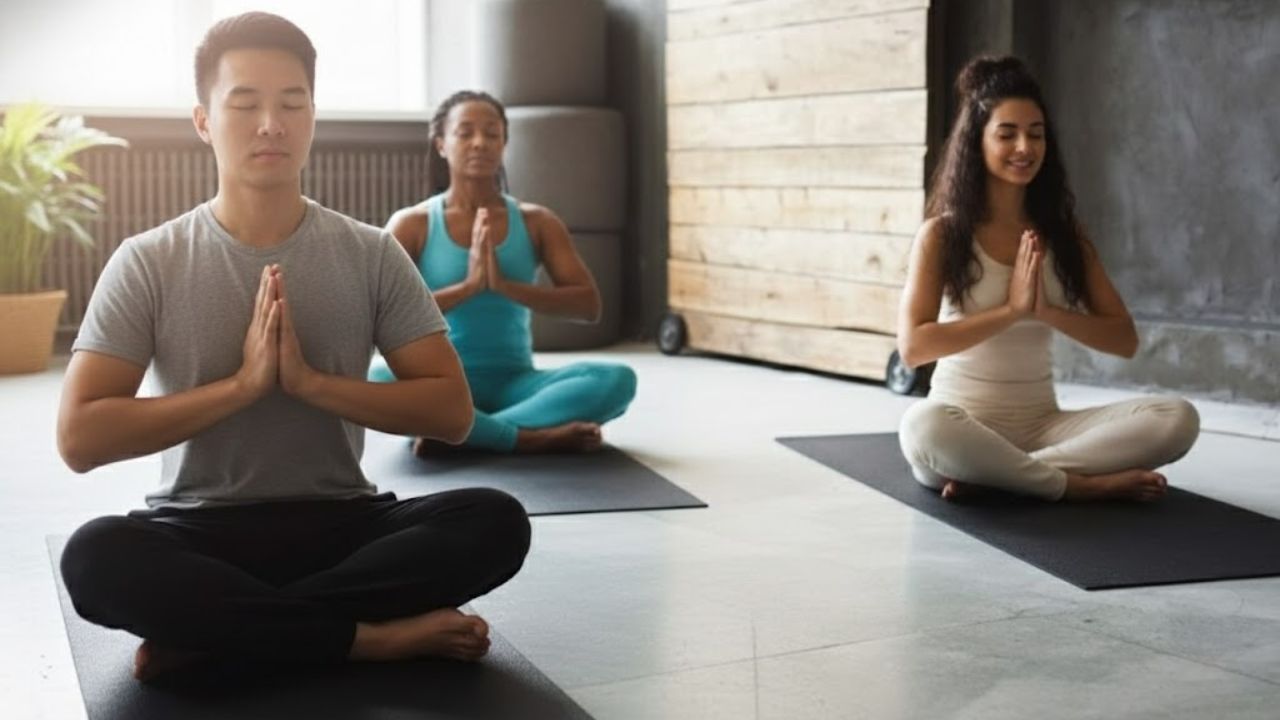
    Simple Yoga Poses to Boost Your Flexibility Yoga provides excellent benefits for both flexibility and strength while improving your overall wellbeing. If you are new to yoga or looking to enhance your flexibility then starting with fundamental poses will establish a strong foundation. These positions gently stretch your muscles and decrease stress while enabling your body to move more freely through its complete range of motion. This guide presents straightforward yoga poses that are ideal for beginners seeking to develop better flexibility.

    Why is Flexibility Important in Yoga?

    Flexibility plays a key role in how well you practice yoga. When you have better flexibility you can perform poses with proper form and lower your risk of injury. This improvement allows you to progress steadily in your practice over time. Flexible muscles enable your body to relax more naturally and let go of accumulated tension. Regular yoga sessions maintain joint health and enhance circulation through your entire body. The practice also cultivates a sense of calm and brings greater peace to your mental state.

    Easy Yoga Poses to Improve Flexibility

    Downward-Facing Dog (Adho Mukha Svanasana)

    This traditional yoga position provides an effective stretch for your hamstrings and calves & back. Start by getting down on your hands & knees. Push your hips up toward the ceiling. Extend your legs as much as feels comfortable. Place your hands shoulder-width apart and keep your feet hip-width apart. Hold this pose for a few breaths while feeling the stretch through your whole body.

    Child’s Pose (Balasana)

    Child’s Pose is a gentle resting position that stretches the hips and thighs along with the back muscles. Begin by kneeling on the mat & then sit back onto the heels. Lower the forehead down until it makes contact with the ground. The arms can be extended straight out in front or placed alongside the body for additional comfort. Maintain this position for as long as necessary to release tension and achieve relaxation.

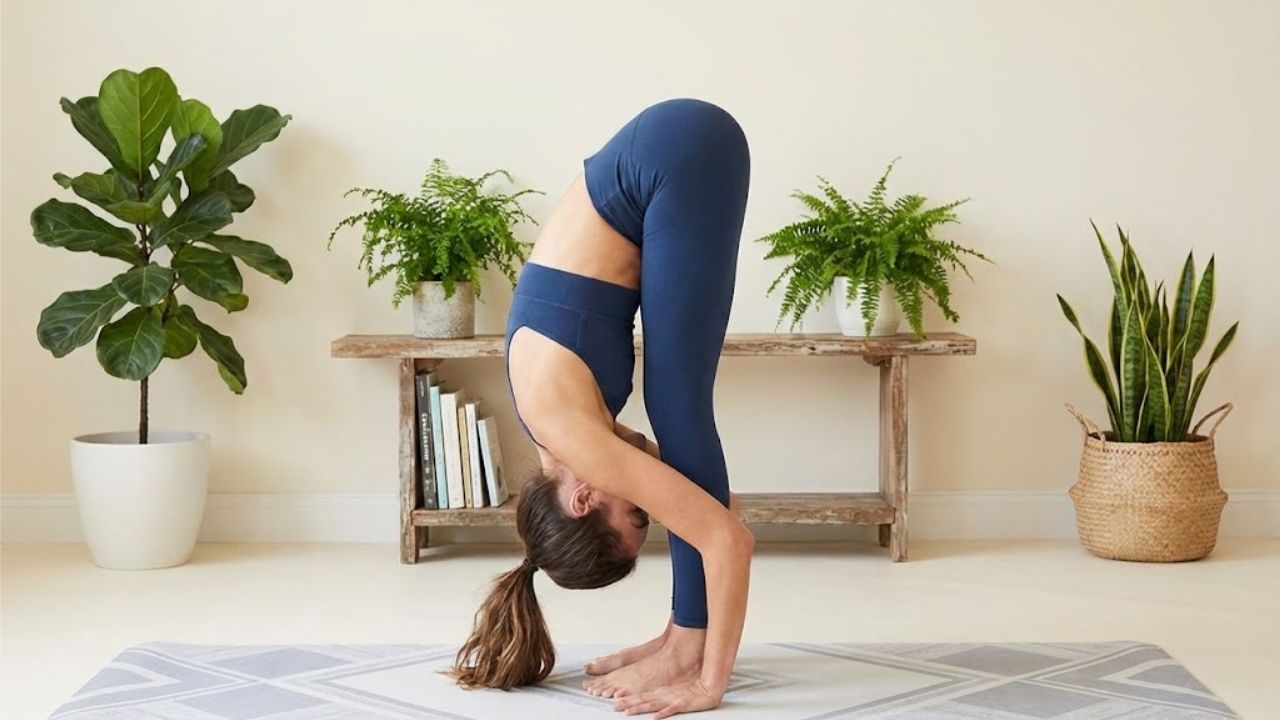
    Forward Fold (Uttanasana)

    Stand with your feet hip-width apart & slowly bend forward as you reach down toward your toes or the floor. Let your head hang naturally and keep your neck loose. This pose stretches your hamstrings and calves & back muscles while helping you relax mentally. If you feel too much tightness you can bend your knees slightly.

    Cat-Cow Stretch (Marjaryasana-Bitilasana)

    This flowing movement stretches & strengthens your spine by moving between two positions. Start on your hands and knees with your wrists under your shoulders and your knees under your hips. As you inhale let your back sink down while lifting your chest and tailbone up for Cow Pose. As you exhale round your back up while tucking your chin toward your chest for Cat Pose. Continue repeating this motion to improve your spine flexibility.

    Seated Forward Fold (Paschimottanasana)

    This seated stretch improves flexibility in your hamstrings and lower back. Start by sitting on the floor & straightening your legs in front of you while pointing your toes upward. Slowly lean forward from your hips as you reach toward your feet or ankles. Make sure to keep your back straight and prevent your chest from collapsing inward. Breathe deeply as you maintain this position.

    Butterfly Pose (Baddha Konasana)

    Butterfly Stretch Sit down on the floor & put the bottoms of your feet together. Allow your knees to fall outward to each side. Hold your feet with your hands and keep your back straight. Gently press your knees down toward the floor to stretch your inner thighs & groin area. This position helps open up your hips and improves leg flexibility.

    Tips for a Safe Yoga Practice

    Start slowly if you are new to yoga or stretching exercises. Listen to your body & ease into each pose carefully. Keep your breathing steady and deep while you practice. Breathe in when you lengthen your body and breathe out when you sink deeper into stretches. Use props like yoga blocks or straps if you struggle to reach your feet or the ground in certain poses. These tools help you keep the right form. Practice yoga consistently because regular sessions improve your flexibility over time. Try to do yoga several times per week to see the best results.

  • Research Shows People Who Choose to Stay Single Share These Consistent Personality Traits

    Research Shows People Who Choose to Stay Single Share These Consistent Personality Traits

    The café buzzed with quiet intimacy. Couples moved through familiar rituals—sharing sugar packets, checking phones, laughing at the same small joke. It was the unspoken choreography of shared routines.

    At a corner table, a woman in her late thirties sat alone. A thick novel rested beside her laptop, earbuds in place, shoes tucked beneath the chair. She wasn’t scrolling dating apps or watching the door. She looked entirely intentional, as if this moment was chosen, not accidental.

    Behavioral scientists have started to focus on people like her. Not those recovering from breakups or waiting for “the right time,” but individuals who consistently say, year after year, “I’m single by choice.” Their decisions show up across data sets—personality assessments, long-term surveys, and follow-up studies that span decades.

    And within that data, one quiet pattern keeps surfacing.

    The overlooked personality profile of people who choose long-term singlehood

    Ask someone who has stayed single by choice why they aren’t partnered, and the answer is often simple: “I like my life this way.” Researchers wanted to know more. They tracked thousands of adults over time, comparing those who eventually partnered with those who intentionally did not. The results showed that long-term singles weren’t simply unlucky or undecided.

    Across countries and age groups, they shared a consistent cluster of traits: strong autonomy, low fear of being alone, deep curiosity, a firm attachment to personal values, and a belief that intimacy doesn’t require shared homes or finances.

    They weren’t avoiding commitment. They were prioritizing something else.

    One European longitudinal study followed participants from their twenties into midlife. Regular personality tests and relationship surveys revealed a clear profile among those who never entered long-term partnerships and expressed no desire to do so.

    These individuals scored high in self-determination—a sense of steering life by personal choice rather than social expectation. Many also showed elevated openness to experience, enjoying novelty, learning, and flexible routines. They were statistically less concerned with how others judged their relationship status.

    In interviews, they described rich friendships, immersive hobbies, and work or creative pursuits that gave their days structure and meaning. Their lives weren’t paused. They were full.

    Researchers noticed another important detail: these traits often appeared long before any conscious decision to remain single. As teenagers, many were already comfortable spending time alone and less invested in romantic norms. Over time, that temperament solidified into a lifestyle.

    As one researcher summarized, these traits don’t make someone anti-relationship. They simply make people less willing to sacrifice autonomy for companionship. The result is a very high bar—casual or mismatched relationships fade quickly, while solo life feels stable and coherent.

    Applying the habits of “single by choice” individuals—without labels

    One practical behavior stands out across studies: intentional solo time. Not accidental solitude, but time actively scheduled and protected. Treated like an appointment.

    This might look like a long walk without distractions, a solo movie night, or early-morning hours devoted to a personal project. Participants often described this time as an anchor. When protected, they felt grounded. When neglected, life felt noisy and misaligned.

    It’s how autonomy becomes more than a value—it becomes a practice.

    There’s an easy misunderstanding here. Many assume chosen singlehood means enjoying solitude every moment. That’s not reflected in the data. Even the most self-directed individuals reported loneliness, doubt, and moments of wanting the social ease of being “in a relationship.”

    Another common misstep is using independence as armor against vulnerability. Research suggests the opposite: those who thrive while single often cultivate deep connection across friendships, family, communities, and sometimes unconventional partnerships. They value closeness—they just don’t confine it to romance.

    Soyons honnêtes : personne ne fait vraiment ça tous les jours.

    One researcher shared a line that captures the pattern clearly:

    “People who stay single by choice aren’t rejecting love. They’re refusing to outsource meaning to one type of relationship.”

    This distinction matters. You don’t need to commit to lifelong singlehood to develop the same strengths. You might simply start treating your preferences as real information, not temporary noise before something else begins.

    • Notice how you feel spending a full day alone without distractions.
    • Observe when you say yes out of fear rather than desire.
    • Protect one block of solo time each week.
    • Identify sources of emotional intimacy outside romance.
    • Ask how you’d live if no one judged your status.

    What long-term singlehood research reveals about choice, love, and adulthood

    At the edges of these studies sits a larger question: what if romantic partnership isn’t the default, but simply one option among many? When decades of data show a consistent personality pattern among those who stay single by choice, it’s not labeling an anomaly—it’s recording a shift.

    Suddenly, the person who never “settled down” doesn’t appear lost or delayed. They appear consistent. Their inner wiring and outer choices align more closely than average.

    It’s a comforting idea—and a slightly unsettling one.

    Because it quietly asks: how much of my life is chosen, and how much is inherited expectation I never paused to question?

    Point clé Détail Intérêt pour le lecteur
    Autonomy as a core trait Long-term single-by-choice adults score high on self-determination Helps you see if your own choices align with your temperament
    Comfort with solitude They regularly seek structured, enjoyable solo time Offers a blueprint for turning “alone time” into a source of strength
    Non-traditional intimacy Deep bonds often exist outside romantic partnership Invites you to value friendships and community as central, not secondary
  • As a Busy Working Mum These 3 Strategies Transformed My Body Recomposition Results

    As a Busy Working Mum These 3 Strategies Transformed My Body Recomposition Results

    As a physician, I always valued health and wellness, yet my own well-being often took a backseat. Between a hectic hospital schedule and caring for two young children, my time was stretched thin. My diet mainly consisted of processed foods and quick snacks, and while I occasionally attended cardio or bootcamp classes, consistency was nonexistent. I was constantly exhausted, lacked muscle tone, and struggled to shed postpartum weight. The wake-up call came in 2024, when my one-year-old daughter broke her leg—I found I barely had the strength to carry her or play with my three-year-old son while managing my demanding career.

    Finding Structure with a Personal Coach

    Recognizing the need for guidance, a friend introduced me to KMAK Fitness, an online program specializing in body recomposition through muscle growth, fat loss, strength training, and macro-based nutrition. Inspired by her transformation, I booked a consultation and connected with my coach, George Pearce. I committed to three virtual training sessions per week, starting with home workouts using dumbbells and free weights. Each 30- to 45-minute session focused on full-body compound movements, and I learned the importance of proper form. To boost daily activity, I also aimed for 10,000 steps each day.

    Overcoming Challenges and Building Momentum

    The first few weeks were tough—I felt sore, fatigued, and pressed for time. Yet George kept me accountable, teaching me that discipline trumps motivation. After three months, my muscle definition improved, my scale numbers dropped, and my energy and focus soared. Nutrition became a priority: I learned to count macros, increase protein intake, and swap processed foods for nutrient-rich options. Balancing macros took three months of practice, but the results were clear—I felt stronger, energized, and mentally sharper.

    Progressing to Advanced Strength Training

    Now, at 39, I maintain a routine of three weekly strength sessions and aim for 12,000 steps daily. George still programs my workouts, now at LifeTime, where I work with heavier weights and machines. Partnering with Cory McCue, a functional movement specialist, improved my mobility, balance, and functional strength. My sessions typically include six exercises per workout, three sets of 8–12 reps, and focus on progressive overload. Movements include squats, hip thrusts, Romanian deadlifts, dumbbell rows, pull-ups, and accessory exercises for balanced strength development.

    Consistency, Discipline, and Self-Care as Keys to Success

    My transformation rests on three pillars. First, I follow a structured training plan, scheduling workouts like appointments to ensure consistency. Second, I prioritize discipline over fleeting motivation, understanding that even smaller efforts—like walking 10,000 steps or meal prepping—advance my goals. Third, I recognize the importance of self-care, committing to my well-being after years of neglect. Strength training has unlocked a new version of myself, allowing me to show up fully energized and present for work and family.

    Life Transformation Beyond Fitness

    Over the last two years, my strength journey has supported not only my fitness but my career and family life. As Medical Director at Moffitt Cancer Center, a research leader in immunotherapy, and founder of Tampa Female Physicians, I balance a demanding career with a fulfilling personal life. With a husband in critical care and two young children, structured movement and training have become the foundation for being strong, grounded, and fully present. My 30s were a decade of transformation, and as I enter my 40s, I look forward to continuing this journey of strength and growth.

  • How Long Body Recomposition Takes A Realistic Month by Month Breakdown Backed by Experts

    How Long Body Recomposition Takes A Realistic Month by Month Breakdown Backed by Experts

    As a fitness professional and doctor of physical therapy, staying active has always been part of my life. Throughout my 20s, I chased the elusive “toned” look—a term that’s mostly marketing hype. I tried every standard workout: high reps, low weights, endless cardio, and left each session drenched in sweat. I also restricted my eating, believing it would sculpt the body I wanted. Despite being lean from undereating and overtraining, I never felt strong or healthy. Chronic pain, constant fatigue, and a relentless cycle of workouts and calorie restriction left me exhausted and unfulfilled.

    Discovering Body Recomposition

    Everything shifted when I focused on building muscle and pursuing body recomposition—losing fat while gaining muscle simultaneously. Contrary to popular belief, achieving a “toned” look is less about endless cardio or low-calorie diets and more about structured muscle growth and recovery. I learned to train for hypertrophy, eat to support recovery, and allow proper rest. Within a year, I gained eight pounds of muscle and lost around five pounds of fat, all while exercising less, eating more, and eliminating joint pain.

    My Experience with Body Recomposition

    I’ve successfully undergone body recomposition twice and plan to do it again postpartum. The first time, I gained eight pounds of muscle and lost five pounds of fat over a year. After my second baby, I gained 4.2 pounds of muscle and lost fat in just a few months. Muscle tends to return faster the second time because previously built muscle fibers retain extra myonuclei—the “brains” of muscle—that accelerate growth. Building muscle now is an investment in your future strength and resilience.

    How Long Body Recomposition Takes

    Body recomposition is a gradual process, which is what makes it sustainable. Quick fixes often backfire—overtraining can lead to injury, while undereating can hinder muscle growth. While strength training is key, nutrition plays a vital role. A moderate calorie deficit is necessary; extreme restriction can cause loss of both fat and muscle. Patience, consistency, and balanced nutrition are essential for long-term results.

    Month-by-Month Changes

    • Month 1: Initial fat loss may appear if in a calorie deficit. Muscle growth is slower, but beginners might notice early gains.
    • Month 2: Strength improves as your nervous system adapts. Muscle definition may start to emerge by the end of this month.
    • Month 3: Visible muscle tone becomes more apparent, accompanied by continued fat loss.
    • Month 4+ Progress continues but may slow or plateau. Early gains are rapid, while later improvements require refining habits, training near failure, and maintaining consistency.

    Building muscle and losing fat simultaneously requires balance, not extremes. Expect 0.5–1 pound of fat loss per week in a 200-400 calorie deficit and noticeable muscle development within 8-12 weeks, with measurable progress in three months.

    The Four Pillars of Body Recomposition

    1. Nutrition: Fuel for Growth

    Nutrition supports both fat loss and muscle gain. Practical tips include:

    • Maintain a slight calorie deficit of 200-400 calories below maintenance.
    • Consume 0.7-1 gram of protein per pound of body weight daily.
    • Track your food intake initially to understand your habits. Tools like MyFitnessPal or simple logging can increase awareness and ensure adequate protein.

    2. Strength Training: Stimulate Muscle

    “Toning” workouts don’t exist—muscle growth requires mechanical tension and intensity. Effective strategies include:

    • Intensity: Train to failure or 1-3 reps shy of it in sets under 30 reps.
    • Frequency: Target each muscle group twice per week on nonconsecutive days.
    • Volume: Aim for at least 4 sets per muscle group weekly.

    The burn from high-rep workouts doesn’t equal growth. Real hypertrophy comes from tension, not just fatigue.

    3. Cardio and Daily Movement: Support Energy Use

    Cardio is useful for overall activity, heart health, and energy expenditure, but not a primary driver of fat loss. Stick to moderate activity—about 150 minutes weekly—without overdoing it. Strength training and proper nutrition remain the main contributors to body recomposition.

    4. Recovery: Build Muscle Efficiently

    Muscle grows after workouts, not during them. Recovery prevents overuse, reduces burnout, and promotes consistency. Take approximately two rest days per week, viewing them as productive muscle-building days rather than downtime.

    Common Pitfalls That Slow Progress

    The biggest mistake is not training close enough to failure. Signs you’re approaching true mechanical failure include:

    • Significant slowdown in rep velocity.
    • Heart rate spikes in final reps.
    • The “Rest Test”: pause for 5 seconds post-final rep; if you could do three or more additional reps, increase weight or reps next time.

    Training close to failure—1-3 reps shy—is sufficient for optimal muscle growth.

    Why Body Recomposition Matters

    Body recomposition benefits more than appearance. Building muscle enhances metabolic health, bone density, longevity, and mental well-being. It can improve body composition even if your weight doesn’t change, unlike pure weight loss, which often reduces both fat and muscle. Recomposition requires precision, experimentation, and consistency over months, but it leads to lasting improvements in strength, habits, and body awareness.

  • Gentle Muscle Relief Yoga: 5 Poses That Release Tightness Naturally

    Gentle Muscle Relief Yoga: 5 Poses That Release Tightness Naturally

    Tight muscles are a common issue in today’s lifestyle. Prolonged sitting, stress, poor posture, and limited movement often leave the body feeling stiff and uncomfortable. Gentle yoga provides a natural method to release this tension without straining the body. Slow, mindful movements combined with controlled breathing and supported poses help muscles relax while enhancing circulation and flexibility. Here are five gentle yoga poses that are simple to practice and highly effective for naturally relieving tight muscles.

    Why gentle yoga eases muscle tension

    Gentle yoga emphasizes slow stretches and mindful breathing. This approach signals the nervous system that it is safe to relax. When the body feels calm, muscles release more easily. Additionally, gentle poses improve blood flow, delivering oxygen and nutrients to tight areas. Over time, this helps reduce soreness, eases stiffness, and supports long-term muscle health.

    Child’s Pose (Balasana)

    Child’s Pose is a deeply calming posture ideal for relieving tension in the back, hips, shoulders, and neck. It gently stretches the spine while allowing complete relaxation.

    To practice, kneel on the mat with your big toes touching and knees slightly apart. Sit back on your heels and slowly fold forward, bringing your chest toward your thighs. Extend your arms forward or rest them alongside your body. Rest your forehead on the mat or a cushion. Remain in this pose for one to three minutes, breathing slowly and deeply. With each exhale, let your back and shoulders soften.

    Cat Cow Pose (Marjaryasana Bitilasana)

    Cat Cow is a gentle flowing movement that releases tight muscles along the spine and neck. It also increases mobility and warms up the back.

    Start on all fours with wrists under shoulders and knees under hips. Inhale, dropping your belly toward the floor, lifting your chest, and looking slightly upward for Cow Pose. Exhale, rounding the spine, tucking the chin, and drawing the belly in for Cat Pose. Move slowly between these two positions for one to two minutes. Focus on syncing your breath with each movement to deepen relaxation.

    Seated Forward Fold (Paschimottanasana)

    This pose gently stretches the hamstrings, lower back, and calves, which often hold tension from prolonged sitting or standing.

    Sit on the floor with legs extended straight in front of you. Inhale to lengthen your spine. Exhale, hinge forward from your hips, reaching toward your shins, ankles, or feet. Do not force the stretch; allow gravity to do the work. Keep knees slightly bent if necessary. Hold the pose for one to two minutes, breathing calmly and evenly.

    Supine Spinal Twist (Supta Matsyendrasana)

    Supine Spinal Twist releases tension in the lower back, hips, and spine. It also supports digestion and promotes relaxation.

    Lie on your back with arms stretched out to the sides. Bend your right knee, bringing it toward your chest. Slowly guide the knee across your body to the left while keeping both shoulders relaxed on the mat. Turn your head gently to the right if comfortable. Hold for one minute, then switch sides. This twist allows spinal muscles to release naturally.

    Legs Up the Wall (Viparita Karani)

    Legs Up the Wall is a restorative pose that relaxes the legs, lower back, and nervous system. It is particularly beneficial for tired muscles after a long day.

    Sit close to a wall and gently swing your legs up as you lie back. Position your hips near the wall or slightly away for comfort. Rest your arms by your sides with palms facing upward. Close your eyes and breathe slowly. Stay in this pose for three to five minutes. Gravity aids in reducing muscle tension and improving circulation.

  • The 8 Best Self Help Books for 2026 That Reshape Mindset Habits Finances and Career Direction

    The 8 Best Self Help Books for 2026 That Reshape Mindset Habits Finances and Career Direction

    Self-help books have become a vital resource for individuals in Canada seeking to improve their personal growth, financial management, and career direction. As 2026 unfolds, readers are exploring new titles that promise to reshape mindset habits, boost financial knowledge, and inspire career growth strategies. From understanding daily routines to mastering emotional intelligence, these books offer practical guidance for those aiming to take control of their lives. Whether you’re a young professional or a senior looking to refresh your outlook, the latest self-help books provide tools that are both accessible and transformational.

    Top Self Help Books for Mindset Transformation

    The best self-help books in 2026 focus on cultivating a resilient growth mindset and breaking free from limiting beliefs. Titles that guide readers through daily reflection exercises and offer practical goal-setting techniques are leading the way. Canadian readers are particularly drawn to works that combine psychological insights with actionable advice, allowing individuals to tackle stress management and enhance overall wellbeing. By incorporating habit-building strategies, these books empower readers to make lasting changes in their personal and professional lives, reshaping how they approach challenges and opportunities.

    Essential Self Help Books for Financial Mastery

    Financial literacy remains a top priority in 2026, and self-help books targeting this area are in high demand. Readers can discover methods for budget optimization, smart investing, and debt reduction techniques that align with Canadian economic realities. Many books also provide retirement planning tips and strategies for generating multiple income streams, helping individuals secure long-term stability. By translating complex concepts into approachable steps, these books make managing finances less intimidating while encouraging readers to take charge of their monetary future confidently.

    Leading Self Help Books for Career Development

    Career-focused self-help books are transforming how Canadians navigate professional growth in 2026. They emphasize leadership skills, effective communication, and strategic networking to accelerate career advancement. Many guides offer insights into job transition strategies and techniques for enhancing productivity at work. These books cater to professionals aiming to pivot roles, climb the corporate ladder, or launch entrepreneurial ventures. By integrating both mindset and skill development, they help readers unlock potential and align their career trajectory with long-term personal goals.

    Summary of 2026 Self Help Trends

    Overall, the self-help landscape in Canada for 2026 emphasizes a holistic approach to personal growth. The most impactful books combine mindset reshaping, financial empowerment, and career guidance in ways that are practical and inspiring. Readers benefit from structured habit formation, actionable insights, and motivational techniques that encourage consistent improvement. By choosing titles tailored to their unique goals, Canadians can embrace lasting transformation in multiple areas of life, making self-help literature a cornerstone for success in the coming year.

    Book Title Focus Area Recommended Audience Key Takeaway
    Mindset Reset 2026 Mindset Adults & Young Professionals Break limiting beliefs
    Financial Freedom Guide Finance Individuals & Seniors Smart money management
    Career Compass Career Professionals & Entrepreneurs Strategic career planning
    Habits for Success Mindset & Habits All Adults Build consistent routines
    Invest Smart Canada Finance Young Adults & Retirees Grow wealth safely

    Frequently Asked Questions (FAQs)

    1. What is the best self-help book for mindset?

    “Mindset Reset 2026” is highly recommended for reshaping personal beliefs.

    2. Which books help improve financial skills?

    “Financial Freedom Guide” and “Invest Smart Canada” offer practical tips.

    3. Are these books suitable for seniors?

    Yes, most titles include strategies for adults of all ages.

    4. Can these books boost career growth?

    Yes, “Career Compass” provides actionable strategies for professional advancement.

  • Natural Cleaning Methods Restore Shine to Dull Tiles and Grout Quickly

    Natural Cleaning Methods Restore Shine to Dull Tiles and Grout Quickly

    The tiles underfoot quietly collect years of everyday life. They absorb wet footprints, muddy paw marks, hurried meal spills, and layers of settled dust. One day, you glance down and realize the once-bright floor now looks tired. The grout lines that were once pale have turned into dark outlines, draining life from the room. Running a finger along the grout leaves a gray streak behind. It’s not dramatic, but it dulls the warmth of your home. The idea of harsh chemicals, rubber gloves, and sharp fumes feels exhausting. Thankfully, restoring brightness can be done with simple natural ingredients and a little care.

    Bringing Life Back to Dull Tiles

    The First Sign Your Floor Has Lost Its Glow

    It often begins with a single beam of light. Afternoon sun cuts across the kitchen, revealing every streak and smudge. Where tiles once reflected light, they now appear flat. The grout seems darker, almost absorbing brightness instead of reflecting it. Looking closer, you notice faint rings from old spills near the stove and gritty tracks by the door from rainy shoes. The change happened gradually, unnoticed day by day. Now the room feels slightly lifeless. You feel the urge to scrub immediately but pause, remembering the strong chemical odors of store cleaners. You imagine stinging eyes and scratchy throats. Instead, you crave something gentler—ingredients mixed easily on your own counter.

    The Gentle Strength of Natural Cleaning Ingredients

    Natural cleaning methods can match the effectiveness of chemical products when used correctly. Warm water, the right ingredients, and a soft brush—paired with patience—can lift dirt effectively. Most of these items are already in your home, waiting in the pantry or under the sink. Their power lies in how they interact with grime. While they may work more slowly than harsh cleaners, they clean thoroughly without toxic fumes or residue. This makes them safer for both your household and pets, while still keeping floors beautifully clean.

    Baking Soda: A Mild Scrub That Works Gently

    Baking soda feels soft and fine to the touch, almost silky with a light grit. On tiles and grout, it acts as a gentle abrasive. It scrubs away buildup without scratching or damaging surfaces. Instead of wearing down material, it carefully lifts dirt, making it ideal for restoring grout and tile without harm.

    Vinegar: A Simple Solution for Restoring Clarity

    Vinegar’s sharp scent is unmistakable. Mixed with warm water, it cuts through soap scum, water spots, and the film that dulls tiles over time. It works especially well on ceramic and porcelain surfaces that develop a cloudy appearance. When paired with baking soda on grout, a fizzing reaction occurs. The bubbles loosen grime trapped in tiny spaces, pulling it free. It may look impressive, but it’s simply basic chemistry doing effective work with everyday items.

    Lemon, Soap, and Salt: Helpful Additions

    Sometimes cleaning should refresh the air as well as the floor. Lemon juice fills the room with a bright scent while its natural acids help dissolve stains and mineral deposits. Rubbing a cut lemon along tile edges leaves behind both cleanliness and freshness. Adding a small amount of castile soap or mild dish soap allows the mixture to spread easily and break down grease. For stubborn marks, a pinch of fine salt adds extra scrubbing power. These tiny grains gently wear away buildup left from daily use.

    A Simple Natural Method to Restore Tile Shine

    Step 1: Clear the Space and Sweep Thoroughly

    Start by opening up the area. Move chairs, rugs, baskets, and bins aside. With the floor exposed, every tile and grout line becomes visible. Sweep slowly, gathering dust and crumbs into neat piles. The soft sound of bristles signals progress. Once sweeping or dry mopping is done, the room already feels lighter and more orderly.

    Step 2: Prepare an Easy Everyday Cleaning Mix

    • Warm water: 2 liters (about 8 cups) to loosen dirt and spread cleaner evenly
    • White vinegar: 1/2 cup to cut residue and restore shine
    • Liquid castile or mild dish soap: 1–2 teaspoons to lift grease
    • Optional essential oil: 3–5 drops for a light, pleasant scent

    Step 3: Revive Grout with Baking Soda and Vinegar

    Fast results do not require harsh action. Natural methods can refresh tiles and grout within a single afternoon. The key is knowing what materials need and what they cannot tolerate. Many assume aggressive chemicals are the only option, but understanding your surfaces leads to better outcomes.

    Choosing the Right Care for Each Tile Type

    Different tiles require different approaches. Ceramic and porcelain tiles handle vinegar solutions, baking soda paste, and mild soap well. Natural stone surfaces—such as marble, slate, limestone, or travertine—need extra caution. Acidic ingredients like vinegar or lemon can cause permanent dullness. For stone, use warm water with a gentle, pH-neutral soap and clean with microfiber tools. Glazed tiles have a protective coating, while unglazed tiles are more porous and need softer handling. When uncertain, always test in a hidden area first.

    Maintaining Shine Through Simple Daily Habits

    Easy Routines That Keep Floors Looking Fresh

    Once tiles gleam again and grout looks clean, the entire room changes. Light reflects more easily, colors appear clearer, and the space feels more welcoming. This isn’t only about cleanliness—it’s about atmosphere. A bright floor lifts the room’s energy and creates a sense of calm order.

    Daily care doesn’t require heavy effort. Place doormats on both sides of entryways to trap dirt before it spreads. Sweep or dry mop regularly to prevent dust from settling into grout. Wipe spills as soon as they happen to avoid stains. A light weekly mop with warm water and mild soap is usually enough. Reserve vinegar for visible buildup rather than constant use. Opening windows while cleaning helps floors dry faster and keeps the space comfortable.

    The Final Touch: Gentle Hand Buffing

    After cleaning and once the floor has mostly air-dried, take a clean, dry microfiber cloth or flat mop and lightly buff the tiles. This removes lingering moisture and faint streaks. The surface shifts from simply clean to softly glowing. Light travels across tiles more freely, reflecting small details like chair legs or plant pots. These subtle changes quietly transform how the room feels.

    When Cleaning Feels Like Caring for Your Home

    Restoring shine to tiles and grout is more than surface cleaning. It reconnects you with the spaces that support daily life. Each scrub and rinse recalls meals, muddy seasons, and shared moments. Natural cleaning methods fit gently into that story—no harsh fumes, no discomfort, just warm water, baking soda, citrus, and vinegar working together. The air stays fresh, pets remain safe, and results appear quickly. In a short time, grout looks renewed and tiles reflect light again. When sunlight crosses the floor, it meets a surface ready to shine back, reminding you that you didn’t just clean—you gave your home its brightness back.

  • Lip Definition Trick: A Precise Liner Technique That Creates Fuller Looking Lips Without Heavy Overlining

    Lip Definition Trick: A Precise Liner Technique That Creates Fuller Looking Lips Without Heavy Overlining

    Inside a calm café bathroom, a young woman refreshes her lips without realizing others are watching. The process is quick and unremarkable: two light strokes of a lip pencil, a gentle press of the lips, and a swipe of gloss. There is no heavy overlining or sharp contouring. Yet when she looks up, her lips appear soft, rested, and naturally full, as though she has just returned from a peaceful break. Nothing about the finish looks obvious, but the change is noticeable.

    The Difference You Realize Later

    Later on, standing before your own mirror, you attempt to recreate the same effect. You use the same pencil, the same gloss, even mimicking her expression. Still, the result feels flat. Your lips look fine, but they lack depth. That is when it becomes clear the difference was never the product itself. It was where the product was placed. A nearly invisible adjustment completely shifts the outcome.

    Shifting Focus Away From Size

    This approach is not about making lips appear dramatically larger. Instead, it guides where the eye naturally focuses. Traditional lip-liner habits often encourage tracing outside the natural line and filling everything in. While this once worked, in everyday lighting it can feel disconnected. Heavy overlining may look effective in photos, but up close it often clashes with natural facial features.

    A Modern Change in Lip Techniques

    Today’s makeup artists are moving away from obvious enhancement. Rather than trying to fake a bigger mouth, they emphasize subtle structure and balance. The fullness that stands out is not forced; it emerges naturally from careful placement. This is why the technique translates well across selfies, video calls, and real-life interactions. The effect remains gentle but polished.

    Precision Matters More Than Bold Lines

    The transformation happens in millimetres, not thick outlines. Once you understand where liner is truly applied, the entire process feels different. The goal is not to redraw your lips, but to highlight their existing shape. This micro-precision keeps the finish believable, softly enhanced, and free from harsh definition.

    Where Makeup Artists Actually Apply Liner

    A closer look at professional techniques reveals a clear pattern. Artists avoid strongly defining the corners. Instead, they focus on three key areas: the peak of the cupid’s bow, the center of the lower lip, and the soft pads just off-center. The outer edges stay diffused, creating an outline that feels more like a suggestion than a firm boundary.

    Why the Result Looks So Natural

    A London-based makeup artist once explained that she uses the same affordable lip pencil on every client. The difference lies in how she adjusts placement based on light and lip structure. Clients often assume cosmetic treatments were involved. Her response is always simple: careful liner placement. The most common feedback she hears is that clients look well-rested and balanced.

    The Visual Science Behind the Effect

    Human eyes do not scan faces evenly. They are drawn to contrast and subtle shape changes. The dip of the cupid’s bow, the curve at the center of the lower lip, and areas where gloss catches light naturally attract attention. Enhancing these points while keeping corners soft allows the brain to interpret lips as fuller without noticing a strong outline.

    A Simple Technique for Soft Fullness

    Start with dry lips and a relaxed mouth. Choose a sharpened nude liner close to your natural tone. Lightly connect the peaks of the cupid’s bow with a short line just above the natural dip. Move to the center of the lower lip and draw a small arc slightly outside the line, no wider than your iris. Leave the outer sections nearly untouched. Blend softly with your fingertip and apply gloss only at the center. Restraint is what keeps the look realistic.

    Why This Method Works in Everyday Life

    This soft-blur approach feels less like armor and more like enhancement. Minor imperfections fade into the overall look, making it forgiving on rushed mornings or low-confidence days. Under different lighting, lips remain defined in the center and soft at the edges, moving naturally with expression. It is makeup designed for real, unfiltered faces, not frozen images.

  • At-Home Tinting Methods Help Shape and Define Brows While Keeping a Natural Look

    At-Home Tinting Methods Help Shape and Define Brows While Keeping a Natural Look

    At-home eyebrow tinting has become a popular beauty practice for people who want neat & defined brows without regular salon appointments. This trend is growing in India as more people embrace DIY grooming routines. With the right technique you can enhance your natural brows safely and affordably at home. The aim is to create subtle definition instead of an overly bold or dark look. By using simple products and following an easy process even beginners can achieve clean and well-groomed brows with confidence.

    Beginner-friendly essentials for eyebrow tinting

    Understanding the core basics is key to achieving successful eyebrow tinting results. Choosing a shade that closely matches your natural brow color helps maintain a soft, realistic appearance. A patch test should always be completed in advance to support skin safety and lower the chance of irritation. Before application, brows must be thoroughly cleansed to remove oil and makeup, allowing the tint to apply evenly and deliver smooth color payoff. Using a small amount of product and following the recommended timing helps avoid overly dark results, making everyday brows look subtle and balanced.

    A simple step-by-step eyebrow tinting method at home

    Following a structured routine makes at-home eyebrow tinting easier and more manageable. Start by applying petroleum jelly around the brow area to protect the surrounding skin and create clean, defined edges. Mix and prepare the tint according to the instructions, then apply it with a small angled brush for better control. Begin at the tail of the brow and work inward, keeping the front lighter for natural-looking depth. Set a timer and monitor the color as it develops to prevent staining. Once the time is complete, gently remove the tint using a damp cotton pad to reveal evenly tinted brows.

    How to keep brows soft and defined after tinting

    Proper aftercare plays an important role in how long the tint lasts and how evenly it fades. Avoid washing your face for at least 12 hours to allow the pigment to settle properly. Cleanse the brow area with mild, sulfate-free products to help preserve color. Applying a lightweight brow oil or serum helps nourish the hair and supports healthy growth. Allowing enough time between touch-ups prevents dryness and damage, making eyebrow tinting suitable for low-maintenance grooming routines.

    Key takeaways for consistent at-home eyebrow tinting

    At-home eyebrow tinting offers a practical alternative to salon visits for achieving defined brows. When performed correctly, it provides a cost-effective way to control shade and intensity. Careful preparation, patience, and following instructions are essential to avoid common mistakes. Focusing on subtle enhancement supports polished, everyday brows that complement your features. With consistent care and mindful maintenance, eyebrow tinting can become a reliable part of your personal grooming routine.

    Recommended eyebrow tinting practices and benefits

    • Shade selection: Choose a tone close to your natural brow color for a soft, realistic finish
    • Patch testing: Perform at least 24 hours before use to reduce irritation risk
    • Application time: Keep within 5–10 minutes to maintain controlled color depth
    • Aftercare: Avoid water for 12 hours to support longer-lasting results
    • Maintenance: Retint every 3–4 weeks to keep brows looking consistent

    Frequently asked questions about at-home eyebrow tinting

    Is at-home eyebrow tinting safe?

    Yes, it is considered safe when instructions are followed carefully and a patch test is completed beforehand.

    How long does eyebrow tint usually last?

    Most eyebrow tints last between two and four weeks, depending on skin type and aftercare.

    Can beginners try eyebrow tinting at home?

    Yes, beginner-friendly kits and simple application techniques make it suitable for first-time users.

    What should I do if my brows turn too dark?

    Gently cleanse the area and allow a few days for the color to fade naturally.

  • Lip Liner Placement Trick Creates Fuller Looking Lips Without Overlining

    Lip Liner Placement Trick Creates Fuller Looking Lips Without Overlining

    In the quiet of a café restroom, a young woman refreshes her lips, unaware of any attention. The routine is simple: two gentle strokes of lip liner, a soft press of the lips, and a light layer of gloss. There is no exaggerated overlining or sharp edges. Yet when she looks up, her lips appear smooth, rested, and naturally full, as if she has just taken a peaceful pause. Nothing looks obvious, but the difference is unmistakable.

    The Detail You Notice Only Later

    Later, in front of your own mirror, you try to recreate the same effect. You reach for the same pencil and the same gloss, even copying her relaxed expression. Still, something feels missing. Your lips look fine, but they seem flat. That is when it becomes clear the change was never about the product. It was where the product was applied. A barely visible shift completely changes the result.

    Moving Away From the Idea of Bigger Lips

    This method is not about making lips look dramatically larger. Instead, it subtly directs where the eye naturally settles. Traditional liner habits often involve tracing outside the lip line and filling everything in. While that approach once worked, it can feel disconnected in everyday lighting. Heavy overlining may photograph well, but up close it often clashes with natural features.

    A Modern Shift in Lip Application

    Today, makeup artists are stepping away from obvious enhancement. Rather than forcing the illusion of size, they focus on structure, balance, and restraint. The fullness that stands out is not created aggressively; it appears naturally through thoughtful placement. This is why the technique works equally well in selfies, video calls, and real-life moments. The finish stays soft yet refined.

    Why Precision Beats Heavy Definition

    The real transformation happens in millimetres, not bold outlines. Once you understand the true placement of liner, the process feels completely different. The goal is not to redraw your lips, but to emphasize their existing shape. This level of precision keeps the result believable, gently enhanced, and free from harsh lines.

    Where Professionals Actually Place Lip Liner

    A closer look at professional methods reveals a consistent approach. Artists avoid strongly defining the corners. Instead, they concentrate on three key zones: the peak of the cupid’s bow, the center of the lower lip, and the soft pads just off-center. The outer edges remain blurred, creating an outline that feels more like a suggestion than a strict border.

    Why the Finish Feels Effortless

    A London-based makeup artist once shared that she relies on the same affordable lip pencil for every client. The difference comes from how she adjusts placement based on light and individual lip structure. Clients often assume cosmetic treatments are involved. Her explanation is always the same: precise liner placement. The feedback she hears most is that clients look well-rested and naturally balanced.

    The Visual Logic Behind the Illusion

    The human eye does not scan faces evenly. It is drawn to contrast and subtle shifts in shape. The dip of the cupid’s bow, the curve at the center of the lower lip, and areas where gloss catches light naturally pull attention. Enhancing these points while keeping the corners soft allows lips to appear fuller without revealing a strong outline.

    A Simple Method for Soft, Natural Fullness

    Begin with dry lips and a relaxed mouth. Choose a sharpened nude liner close to your natural shade. Lightly connect the peaks of the cupid’s bow with a short line just above the natural dip. Move to the center of the lower lip and draw a small arc slightly outside the line, no wider than your iris. Leave the outer areas mostly untouched. Blend gently with a fingertip and apply gloss only at the center. Restraint is what keeps the look real.

    Why This Technique Fits Everyday Life

    This soft-focus approach feels less like armor and more like enhancement. Small imperfections blend into the overall look, making it forgiving on busy mornings or uncertain days. Under different lighting, lips stay defined at the center and soft at the edges, moving naturally with expression. It is makeup designed for real, unfiltered faces, not frozen images.