Author: admin

  • Some Grey Hair Ages You Gracefully While Other Types Don’t Here’s Why

    Some Grey Hair Ages You Gracefully While Other Types Don’t Here’s Why

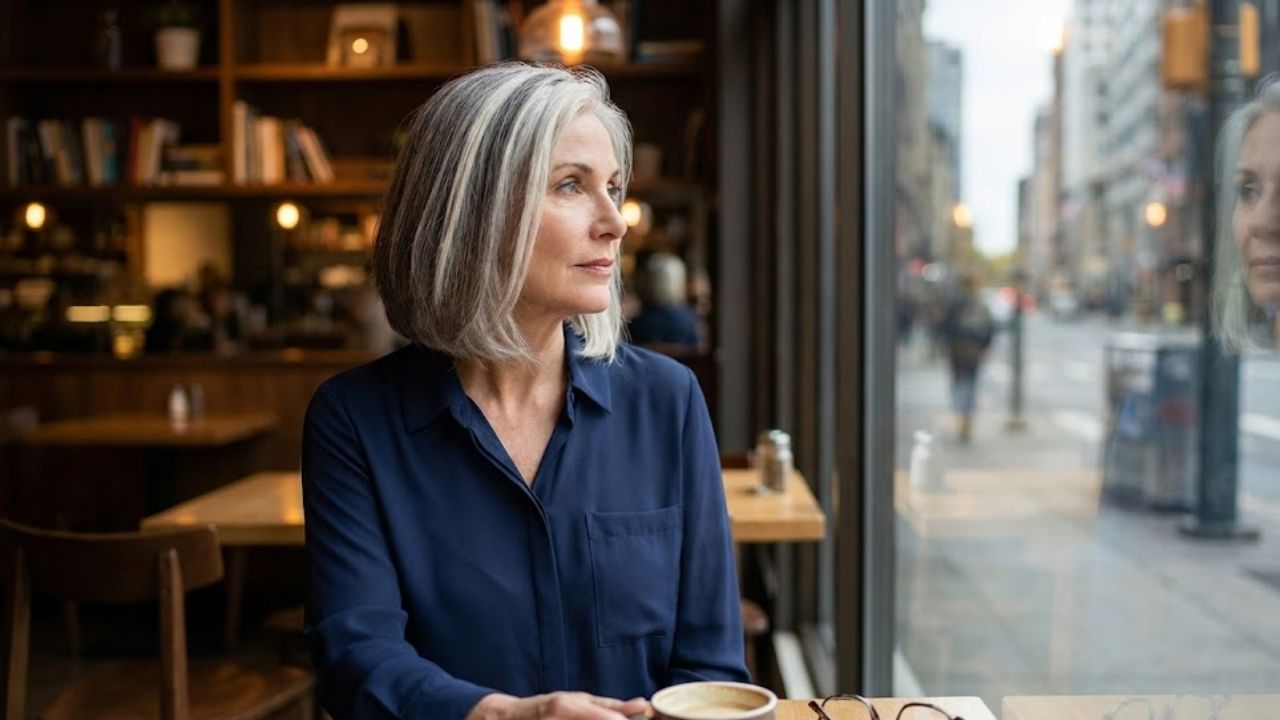
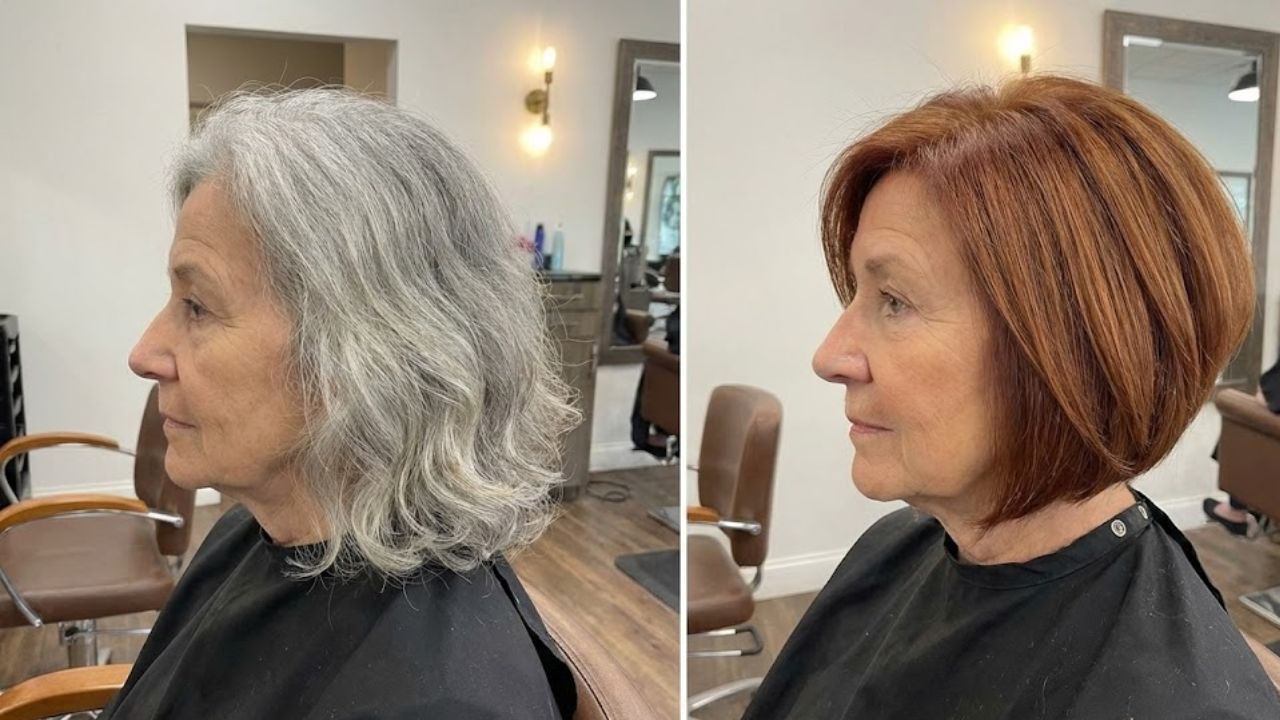
    Grey hair is often seen as a natural marker of aging, but not all grey hair creates the same impression. In the United States, where personal style and self-expression are closely tied to confidence, some people find their grey strands make them look refined, while others feel instantly older. The difference isn’t just about age—it’s about tone, texture, placement, and how well grey blends with your overall look. Understanding why certain grey hair looks graceful while other types don’t can help you embrace it with confidence instead of frustration.

    Why Some Grey Hair Looks Elegant and Youthful

    Grey hair that appears graceful usually has balance and intention behind it. When silver strands blend smoothly with natural tones, they create soft color contrast rather than harsh lines. Hair that reflects light well often gives off a natural silver shine, which reads as healthy and polished. Even distribution matters too, as even grey placement avoids the patchy look many people dislike. Finally, confident styling enhances overall facial harmony, making grey hair feel like a feature, not a flaw. When these elements come together, grey hair can elevate your appearance instead of aging it.

    Types of Grey Hair That Can Instantly Age Your Look

    Some grey hair feels aging because it clashes with the rest of your appearance. Dull strands lacking moisture often create a flat matte finish that looks tired rather than chic. When grey appears in isolated sections, it causes uneven color patches that draw attention for the wrong reasons. Coarse texture can exaggerate lines, leading to a rough hair texture that feels older. Paired with outdated cuts, this results in a dated overall appearance. These factors combined make grey hair seem accidental instead of intentional.

    How Hair Texture and Styling Shape Grey Hair Aging

    Texture and styling play a huge role in how grey hair is perceived. Fine hair with volume creates light reflective strands that soften facial features. On the other hand, limp styles highlight visible scalp contrast, which can feel aging. Modern cuts add movement, offering intentional modern styling that reframes grey as stylish. Regular care routines support healthy hair movement, ensuring grey looks lively rather than dull. With the right texture and style, grey hair becomes a statement instead of a concern.

    Understanding the Real Difference Grey Hair Makes

    The real distinction between graceful and aging grey hair lies in care, confidence, and context. Grey hair paired with thoughtful grooming sends confident aging signals instead of decline. When people stop fighting it, they often experience personal style clarity that reshapes how others perceive them. Grey works best when it supports balanced facial features and aligns with lifestyle choices. Ultimately, embracing grey intentionally creates authentic mature beauty that feels natural and empowering.

    Grey Hair Factor Graceful Effect Aging Effect
    Color Tone Soft silver blend Harsh white contrast
    Texture Smooth and shiny Dry and coarse
    Distribution Evenly spread Patchy sections
    Styling Modern haircut Outdated style
    Maintenance Regular care routine Neglected upkeep

    Frequently Asked Questions (FAQs)

    1. Does grey hair always make you look older?

    No, well-maintained grey hair can look elegant and youthful.

    2. Why does my grey hair look dull?

    Dullness usually comes from dryness or lack of proper hair care.

    3. Can styling really change how grey hair looks?

    Yes, modern cuts and volume can dramatically improve its appearance.

    4. Is it better to blend grey hair or leave it natural?

    Both work, as long as the choice looks intentional and suits you.

  • This Is the One Exercise Everyone Over 65 Should Prioritise According to a Certified Trainer

    This Is the One Exercise Everyone Over 65 Should Prioritise According to a Certified Trainer

    I’ve spent 15 years as a certified personal trainer, working closely with many older adults. One of the very first movements I introduce to clients aged 65 and above is the chair squat.

    This simple exercise helps build strength in the legs, hips, and core, while also supporting better balance and coordination. It’s easy to adjust, making it suitable for beginners and adaptable as strength improves.

    Who Can Do Chair Squats?

    If you have a chair nearby, you can perform chair squats too. They are safe and effective for beginners of all ages, not just seniors.

    Before starting any new exercise routine, it’s important to check with your healthcare provider, especially if you have existing medical conditions.

    What You’ll Need

    You won’t need any special equipment beyond a sturdy chair. Depending on your mobility or injury history, you may also benefit from a clear wall or a second chair for added stability.

    Recommended Reps and Progression

    If you’re new to chair squats, start with 1 set of 5 repetitions. As your strength improves, gradually increase to 12 reps per set. From there, build up slowly until you can comfortably complete 3 sets of 10–12 reps.

    How to Perform a Chair Squat

    • Stand with your feet hip-width apart, positioning a chair directly behind you.
    • Lift your arms forward until they reach shoulder height.
    • Push your hips back and bend your knees, slowly lowering yourself toward the chair.
    • Lightly tap your hips on the seat, then press through your feet to return to standing.
    • Repeat for your chosen number of repetitions.

    Trainer Tips for Better Form

    • Initiate the movement from your hips, not your knees.
    • Imagine pushing your hips back as if you’re closing a car door behind you.
    • If you’re just starting out, feel free to sit fully on the chair before standing again.
    • Use a wall or a second chair in front of you for extra balance support if needed.
    • Once the movement feels easy, increase difficulty by holding a dumbbell, using a lower chair, or removing the chair altogether.

    Benefits of Chair Squats

    Like traditional bodyweight squats, chair squats strengthen key lower-body muscles such as the quadriceps, hamstrings, glutes, and hip muscles. The chair limits range of motion and acts as a safety guide, reducing the risk of poor form or injury.

    This movement also supports everyday functional strength, making daily tasks like standing up from a couch, getting out of a car, or rising from the toilet much easier.

    In addition, chair squats can help enhance balance, bone density, and overall confidence, making them an accessible and effective form of resistance training for nearly all ability levels.

  • You Just Bought a Slow Cooker Here Are 13 Nutritious Recipes to Start Making Right Away

    You Just Bought a Slow Cooker Here Are 13 Nutritious Recipes to Start Making Right Away

    Not sure what to cook in your brand-new slow cooker? These easy, beginner-friendly slow cooker and crockpot recipes are the perfect place to start. From filling dinners to party-ready dips, each recipe is designed to help you enjoy delicious meals with minimal effort. When you’re craving something comforting and hands-off, try the Slow-Cooker Sweet Potato & Black Bean Chili or the Barbecue Pulled Chicken to put your slow cooker to good use.

    Slow-Cooker Sweet Potato & Black Bean Chili

    This hearty sweet potato and black bean chili delivers a satisfying balance of sweet and spicy flavors. For a smoky kick, swap standard chili powder for chipotle and ancho chile powder, or use reduced-sodium taco or fajita seasoning for a flavorful twist.

    Slow-Cooker Vegetable Soup

    This comforting vegetable soup is filling, nourishing, and an easy way to enjoy more vegetables. It’s a simple, wholesome option that keeps you satisfied.

    Barbecue Pulled Chicken

    This BBQ pulled chicken puts a fresh spin on traditional pulled pork by slow-cooking chicken in a tangy tomato-based sauce. Top it with sliced jalapeños, red onions, and sour cream for a bold finish. Serve it as a sandwich, over mashed potatoes, or even on whole-grain spaghetti. Pair it with shredded napa cabbage tossed with low-fat mayonnaise, cider vinegar, celery seed, and honey for a complete meal.

    White Chicken Chili

    This healthy white chicken chili delivers an impressive 22 grams of protein per serving and fits well into a diabetes-friendly eating plan. For a lighter option, top it with Greek yogurt instead of sour cream to keep it creamy while reducing fat and calories.

    Slow-Cooker Oatmeal

    This is an easy way to serve a crowd a warm, hearty breakfast. Assemble everything in the slow cooker the night before and wake up to perfectly creamy oatmeal. The slow cooker removes the need for constant stirring and ensures a smooth texture.

    Slow-Cooker Curried Butternut Squash Soup

    Skip roasting and let your slow cooker do all the work in this curried butternut squash soup. Simply add the ingredients to the crock pot, set it, and enjoy an easy, healthy dinner or packable lunches.

    Slow-Cooker Chicken & Orzo with Tomatoes & Olives

    This load-and-go meal transforms basic chicken breast and whole-wheat orzo with Mediterranean flavors like lemon and olives. It’s a complete, satisfying dish—just add a green salad.

    Slow-Cooker Vegan Chili

    This easy vegan chili is packed with wholesome ingredients like pinto and black beans, red pepper, tomatoes, and butternut squash. After a bit of chopping, everything goes straight into the slow cooker, making it an ideal weeknight dinner. Finish with fresh avocado and chopped cilantro for extra flavor.

    Slow-Cooker Spinach Artichoke Dip

    This creamy, crowd-pleasing dip comes together effortlessly in the crock pot. Keep it warm throughout your gathering so every bite has perfectly melted cheese.

    Slow-Cooker Potato Soup

    This easy slow-cooker potato soup includes all the classic toppings you love—bacon, cheese, and scallions. Pair it with a salad for a comforting dinner with just 15 minutes of active prep time. It’s also great for casual parties—serve it straight from the slow cooker and let guests customize their bowls. For a vegetarian version, use vegetable broth and skip the bacon.

    Slow-Cooked Sweet and Sour Cabbage

    This dish gets its signature sweet-and-sour flavor from a blend of cloves, cabbage, and cider vinegar. Don’t leave out the apples—their natural sweetness adds a worthwhile finishing touch.

    Slow-Cooker Buffalo Chicken Dip

    This healthier take on classic Buffalo chicken dip cooks entirely in the slow cooker, making it an easy, hands-off appetizer. Keep it warm for games, parties, or casual gatherings, and serve with carrot sticks, celery sticks, and tortilla chips for dipping.

  • A Beginners Guide to Starting Yoga for Runners Looking to Improve Mobility Strength and Recovery

    A Beginners Guide to Starting Yoga for Runners Looking to Improve Mobility Strength and Recovery

    Many runners dabble in yoga, especially during certain seasons, only to abandon their mats beside forgotten toe spreaders and rolled-up compression socks. Sometimes yoga feels too slow, sometimes uncomfortable, or it may seem like it’s doing nothing to improve your running. Most often, the problem isn’t yoga itself—it’s not knowing where to place your focus. These four poses offer a smart, practical starting point.

    Why Yoga Matters for Runners

    For runners new to yoga, the goal isn’t stretching just to become more flexible. It’s about giving overworked muscles a gentle break, improving mobility, and easing tension where it tends to build. When practiced with intention, yoga becomes less about stretching deeply and more about supporting a strong, steady stride.

    Low Lunge for Hip Balance

    Low lunge softly opens the front of the hips while encouraging the glutes to stabilize. This balance is especially valuable for runners who spend long hours with hips slightly flexed—both while running and sitting.

    • Step one foot forward into a lunge and lower the back knee to the floor.
    • Stack the front knee over the ankle and lift the torso so shoulders align over hips.
    • Rest hands on the thighs or floor and hold for 20–30 seconds per side.

    Beginner tip: Avoid forcing depth. A shorter stance still delivers benefits without stressing the lower back.

    Half Split for Controlled Hamstring Stretching

    Half split targets the hamstrings in a controlled way, which is ideal when those muscles already feel taxed from running. It allows a stretch without placing strain on the lower back.

    • From low lunge, shift hips back and gently straighten the front leg.
    • Keep the foot lightly flexed and hinge from the hips instead of rounding the spine.
    • Hold for 20–30 seconds per side using the floor, blocks, or thigh for support.

    Beginner tip: A small bend in the knee is perfectly fine. The stretch should stay in the muscle, not behind the knee.

    Bridge Pose to Reinforce Strength

    Bridge pose builds strength in the glutes and supports the hamstrings while opening the front of the hips. For runners, this reinforces good posture when fatigue starts to creep in.

    • Lie on your back with knees bent and feet hip-width apart.
    • Press through the heels and lift the hips, keeping ribs down and hips level.
    • Hold for 20–30 seconds and repeat once or twice.

    Beginner tip: Lift only to a height you can control. Think steady and strong, not maximum height.

    Reclined Figure Four for Deep Hip Relief

    This pose focuses on the glutes and deep hip muscles that help guide knee alignment and stride control. It’s especially useful after a run when standing poses feel like too much.

    • Lie on your back and cross one ankle over the opposite knee.
    • Let the top knee open naturally, staying there or drawing the legs toward the chest.
    • Relax the head and shoulders and breathe slowly for about 30 seconds per side.

    Beginner tip: If the stretch feels intense, keep the bottom foot grounded for less intensity.

    Be Kind to Your Body

    Yoga should feel supportive, not like another hard workout to push through. If a pose causes sharp pain, numbness, or simply feels wrong, ease back or skip it. There’s no benefit in forcing positions and no single “perfect” way to practice. The aim is to meet your body where it is and step off the mat feeling better than when you started.

    Why You Don’t Need a Long Run Every Weekend

    The weekly long run has become deeply ingrained in running culture, but it may not be as essential as many believe. Performance coach and author Steve Magness recently summed it up simply: long runs are valuable, but they don’t need to happen every single week. Spacing them out can sometimes lead to better results.

    Your Calendar Isn’t a Training Plan

    The traditional seven-day training week is a human-made structure, not a biological requirement. While it fits neatly into work schedules, the body doesn’t respond based on calendar days. Many coaches now plan training in longer blocks. Luke Humphrey of Hanson’s Coaching Services notes that a microcycle—typically seven days—can extend to 10 to 14 days. The Hanson’s Brooks Distance Project, for example, uses a 10-day cycle with a long run every tenth day.

    Recovery Is What Makes Training Work

    Training only delivers results when the body has time to recover. Without planned recovery, fatigue can shift from productive to harmful. Research published in Frontiers in Sports and Active Living shows that extended periods of high-demand training without sufficient recovery increase the risk of non-functional overreaching and overtraining syndrome.

    Running resource site Run161 suggests building load for two to three microcycles, then following with a reduced-load cycle. If easy runs constantly feel hard, scheduled recovery may be the missing piece.

    How a 14-Day Cycle Can Work

    A longer training cycle often means giving each weekend a different purpose. One includes a longer, more demanding run, while the other features a shorter, more comfortable option. Hard workouts can then be placed when you’re best prepared, rather than when the calendar dictates.

    The Simplest Training Boost You’re Probably Missing

    Many runners nail their workouts but remain largely inactive the rest of the day—sitting at desks, on couches, or in front of screens. This is where NEAT, or non-exercise activity thermogenesis, comes in. These everyday movements don’t count as workouts and won’t show up on Strava, but they play a meaningful role in overall health and running performance.

    What NEAT Really Means

    NEAT includes calories burned through everyday actions that aren’t structured exercise. Walking around the house, carrying groceries, climbing stairs, standing while cooking, or doing laundry all count. These movements may seem small, but together they add up.

    Why NEAT Matters for Runners

    Even runners with consistent training schedules can spend most of the day sitting. NEAT helps fill in those gaps, keeping the body active outside workouts. A large study following more than 45,000 women over 20 years found that more sedentary time was linked to lower odds of healthy aging, while light activity improved those odds. Simply replacing an hour of TV with light movement made a measurable difference.

    How to Add More NEAT Today

    Start small and weave movement into your routine. Take a short walk after meals, stand during low-focus work, pace while on phone calls, choose stairs when possible, or do a quick lap around the block in the evening. Light movement is the goal—it doesn’t need to be intense or impressive to be effective.

  • This New Grey Hair Covering Trend Helps You Look Younger Without Using Traditional Hair Dye

    This New Grey Hair Covering Trend Helps You Look Younger Without Using Traditional Hair Dye

    Grey hair is no longer something people feel pressured to hide, especially in India where beauty trends are shifting toward healthier, low-maintenance routines. A new grey hair covering trend is helping people look younger without relying on traditional hair dye. Instead of harsh chemicals, this approach focuses on gentle colour blending, nourishing treatments, and smart styling techniques that soften the appearance of greys. The result is a more natural, refreshed look that aligns with modern lifestyles, busy schedules, and growing awareness about scalp and hair health.

    A modern grey hair covering trend gaining popularity

    This modern grey hair covering trend is built around subtle enhancement rather than complete colour change. Many people are choosing tinted conditioners, colour-depositing masks, or herbal blends that gradually tone grey strands. These methods work with your natural shade, creating depth and shine instead of flat colour. Users love the soft colour blend, the gradual visible change, and the natural hair finish it delivers. Because the process is gentle, hair feels healthier over time. The approach fits perfectly with people who want flexibility, minimal upkeep, and a look that still feels authentic rather than overly styled.

    Why this grey hair trend helps you look younger

    Looking younger often comes down to how fresh and balanced your hair appears. This grey hair trend reduces harsh contrasts between grey and dark strands, which can age the face. By smoothing tone variations, it creates a softer frame around facial features. Many notice a brighter overall tone, a less harsh contrast, and a more polished appearance after regular use. Because these products also condition the hair, strands look shinier and fuller, which naturally signals youth and vitality without drastic changes.

    How this trend replaces traditional hair dye routines

    Traditional hair dye often requires frequent touch-ups and exposure to strong chemicals. This new grey hair covering trend offers an alternative that fits modern routines. Instead of long salon sessions, people integrate these products into regular washing or weekly care. The benefits include low maintenance routine, scalp friendly formula, flexible colour control, and reduced chemical exposure. Over time, users appreciate the freedom to adjust intensity or stop anytime, making it ideal for those seeking control without long-term commitment.

    Summary or Analysis

    This new grey hair covering trend reflects a broader shift toward mindful beauty choices. Rather than hiding greys completely, it enhances natural hair in a way that feels effortless and healthy. The combination of care and colour delivers confidence through simplicity, healthier looking strands, and age positive styling. For many in India, it strikes the right balance between looking youthful and staying true to oneself, proving that modern beauty is more about smart choices than dramatic transformations.

    Feature New Grey Hair Trend Traditional Hair Dye
    Application style Gradual and flexible Full colour coverage
    Maintenance level Low and adjustable High with frequent touch-ups
    Hair health impact Nourishing and gentle Can be drying
    Commitment required Short-term, optional Long-term colour commitment

    Frequently Asked Questions (FAQs)

    1. What is this new grey hair covering trend?

    It uses gentle toning products to blend greys naturally without harsh dyes.

    2. Is this trend suitable for all hair types?

    Yes, most formulas are designed to work on different hair textures.

    3. How long does it take to see results?

    Most people notice visible improvement within a few uses.

    4. Can I stop using it anytime?

    Yes, the colour fades gradually without leaving harsh regrowth lines.

  • Master These 4 Standing Exercises at 60 and Prove You’re Fitter Than Most People in Their 50s

    Master These 4 Standing Exercises at 60 and Prove You’re Fitter Than Most People in Their 50s

    Staying fit after 60 is less about lifting heavier weights or exercising longer and more about functional strength, balance, and movement quality. Research consistently shows that exercise programs built around real-life movement patterns—such as standing, walking, stepping, and balance challenges—lead to meaningful improvements in adults over 60. These programs enhance gait speed, mobility, balance, and overall ability to perform daily activities more effectively than traditional training methods.

    This matters because every routine task, from standing up from a chair to climbing stairs, depends on strong and stable movement systems. When these systems function well, the body becomes more resilient. Standing-based exercises encourage muscles and the nervous system to work together, supporting joint stability, postural control, and muscular endurance without placing unnecessary strain on the joints. The result is a style of fitness that feels more natural and practical.

    The four standing movements below test more than raw strength—they assess real-world capability. Performing them with confidence at 60 suggests greater stability, coordination, and overall fitness than many people years younger. Each exercise integrates the shoulders, core, hips, and legs so the body moves as one unit, which is essential for long-term health and performance.

    4 Daily Standing Drills That Reduce Belly Overhang Better Than Ab Workouts After 45

    Single-Leg Balance With Reach

    Balance is not only about avoiding falls; it reflects how well muscles, joints, and sensory systems work together. Standing on one leg while reaching engages the glutes, core, ankles, and proprioceptive systems at the same time. This challenges the body to stay centered and controlled. As balance improves, confidence during walking, turning, and stair use also increases—abilities that often decline early with age. Performed with focus, this movement builds functional strength far beyond basic balance holds.

    How to Do It

    • Stand upright near a chair or counter for support
    • Lift one foot slightly off the floor
    • Reach the opposite arm forward, then extend it overhead
    • Keep hips level and spine tall
    • Hold with control, then switch sides

    4 Daily Chair Drills That Strengthen Your Core Better Than Floor Work After 55

    Hip Hinge to Stand Walk

    This movement trains the body to generate power from the hips rather than overloading the lower back or knees. The hinge combined with a deliberate walk requires coordination between the shoulders, core, and hips, reinforcing full-body movement patterns. With regular practice, walking becomes smoother, posture improves, and strength transfers more easily to everyday tasks like lifting groceries or rising from low seating.

    How to Do It

    • Stand tall with feet hip-width apart
    • Push hips back while maintaining a neutral spine
    • Pause briefly, then drive hips forward to stand
    • Take a slow, controlled step forward
    • Repeat the hinge and step sequence for several reps

    6 Daily Exercises That Build Strength Better Than Machines After 50

    Standing Half-Squat With Arm Raise

    While squats strengthen the legs, adding an arm raise transforms this into a total-body exercise. The combination strengthens the shoulders, upper back, and core while the legs generate force. Coordinating the squat with arm movement raises the heart rate without impact, reinforces posture, and creates tension through the midsection. After 60, this pattern better prepares the body for lifting, reaching, and everyday power demands than isolated machine exercises.

    How to Do It

    • Stand with feet set wide in a squat stance
    • Lower into a partial squat with knees tracking forward
    • As you rise, lift arms out to shoulder height
    • Keep chest open and core engaged
    • Move smoothly through each repetition

    The 12-Minute Standing Fat-Burner for Women Over 50

    Side Step With Knee Lift

    Side-to-side strength is often overlooked, yet it plays a major role in stability when changing direction. This movement activates the hip abductors, adductors, and deep core muscles while also challenging balance and coordination. Raising the knee adds a rotational stability demand, making this a powerful indicator of functional fitness. Mastery of this exercise strongly supports confidence and control during daily movement.

    How to Do It

    • Stand tall with feet together
    • Step sideways into a wider stance
    • Lift the trailing knee toward waist height
    • Land softly and switch sides
    • Maintain core engagement throughout
  • Seven Minute Hip Mobility Routine Reduces Tightness and Improves Daily Movement

    Seven Minute Hip Mobility Routine Reduces Tightness and Improves Daily Movement

    My hips have always been tight but they feel worse during this season. I work long hours at my desk and the stiffness builds up quickly. I take shorter steps when I walk and feel twinges when I run. Standing up after sitting too long brings that familiar ache. I know mobility work helps but it has to fit my schedule. When I’m busy I stick with routines under 10 minutes because they’re easier to do consistently. That’s why I tried a seven-minute hip mobility routine from Lindsey Bomgren who is a NASM-certified personal trainer. She posts as @nourishmovelove & promised the routine would loosen tight hips fast without equipment or taking much time. I did it regularly for three weeks & noticed three important things that changed how my hips feel every day.

    Lindsey’s 7-Minute Hip Mobility Routine

    Lindsey’s hip mobility routine features seven exercises, each lasting one minute. She highlights in the video that you can pause at any time to spend extra moments on exercises that feel especially beneficial. The routine includes:

    90/90 internal rotation knee drops

    90/90 pigeon pose

    90/90 rear knee and heel lifts

    tabletop hip circles

    frog rocks

    V-sit leg lifts

    Cossack squats

    This sequence is effective because it moves your hips through multiple positions and patterns in a short time. It targets both internal and external hip rotation, movements often overlooked but essential for comfortable walking, running, and sitting. The 90/90 exercises penetrate deep into the hip capsule, while frog rocks and tabletop hip circles enhance range of motion in various directions. This routine balances mobility and strength work, as the V-sit leg lifts and Cossack squats engage muscles to maintain extended positions, ensuring long-lasting mobility improvements.

    Three Changes Noticed After Trying the Routine

    Hips Felt Looser Without Forcing Stretches

    What surprised me was how quickly my hips became looser without the uncomfortable strain of deep stretching. The routine progresses slowly between positions, using 90/90 variations and hip circles to improve flexibility in a gentle, effective way. After just one week, everyday movements like rising from a chair or taking longer steps felt smoother. By week three, the usual stiffness after sitting all day had noticeably decreased, which felt like a real win.

    Improved Hip Mobility in Multiple Dimensions

    This routine goes beyond basic flexibility. Exercises like V-sit leg lifts and Cossack squats challenge your hips through various ranges while keeping muscles active in deeper positions. Over three weeks, I noticed progress in movements involving internal and external rotation that had previously felt restricted. My hips now feel balanced and supported all day, rather than temporarily loose after a single session.

    Short Duration Encourages Consistency

    Although seven minutes seems brief, that compact duration makes the routine easy to stick with. On busy days, it felt manageable to fit in during work breaks or even before bed, when I might otherwise skip exercise. Maintaining this routine almost daily created more noticeable results than occasional longer workouts ever did.

    Final Verdict

    After three weeks, this routine has become a regular part of my mobility practice. Its short length makes it easy to maintain, yet it delivers real results. For anyone who sits for most of the day, this is an accessible and effective method to loosen tight hips and improve overall mobility.

  • 6 Best Lip Tints for Achieving a Soft Natural Makeup Look Loved by Beauty Editors

    6 Best Lip Tints for Achieving a Soft Natural Makeup Look Loved by Beauty Editors

    Achieving a soft, natural makeup look has become a major beauty goal for many makeup lovers across India, and lip tints are playing a starring role. Unlike heavy lipsticks, lip tints offer sheer colour, a lightweight feel, and a “your lips but better” finish that beauty editors genuinely swear by. From barely-there pinks to muted berry hues, the right formula can instantly brighten your face without looking overdone. Whether you prefer dewy, matte, or balmy textures, these editor-loved lip tints help create an effortless, fresh-faced look perfect for everyday wear.

    Best lip tints for soft natural makeup looks

    Beauty editors often reach for lip tints because they deliver colour without effort, making them ideal for relaxed, everyday makeup. The best formulas melt into the lips, offering sheer buildable colour that enhances rather than hides your natural tone. Many modern tints also focus on comfort, featuring lightweight water texture that feels almost invisible after application. What truly sets editor favourites apart is their ability to leave a skin-like lip finish, meaning no harsh edges or obvious lines. These qualities make them perfect for minimal makeup days when you want to look polished but not overly made up.

    Natural-looking lip tints beauty editors love

    What makes a lip tint editor-approved is how seamlessly it fits into real life. Shades inspired by natural lip colours are especially popular, creating effortless everyday makeup that works for office hours, quick errands, or casual outings. Many editors also look for formulas that provide comfortable long wear without drying out the lips as the day goes on. A major plus is a hydrating stain effect, which keeps lips soft while leaving behind a subtle flush even after the glossiness fades. These thoughtful details help lip tints stand out in crowded beauty routines.

    Soft makeup lip tints for a fresh finish

    For a truly soft makeup look, application matters just as much as the product itself. Editors recommend patting lip tints with fingertips to achieve a blurred lip look that mimics naturally flushed lips. Many also love formulas that double as cheek colour, creating a multi-use makeup product that saves time and space. The best options offer a natural tint payoff, allowing you to control intensity with ease. This flexibility makes lip tints ideal for beginners and makeup minimalists alike.

    Why lip tints remain a beauty-editor favourite

    Lip tints continue to dominate beauty editor recommendations because they align perfectly with modern makeup trends. Their ability to enhance rather than mask lips supports no-makeup makeup trend, which remains popular across India. Editors also appreciate formulas that suit different skin tones, offering universally flattering shades that work with minimal base makeup. Above all, lip tints deliver low effort beauty, making them a reliable choice for busy mornings and quick touch-ups. This balance of ease, comfort, and natural finish keeps them firmly in editor-approved lists.

    Lip Tint Type Finish Best For Wear Time
    Water-based tint Natural stain Daily minimal makeup 4–6 hours
    Gel lip tint Soft glossy Fresh dewy looks 5–7 hours
    Balm tint Hydrating sheen Dry lips 3–5 hours
    Matte lip tint Velvet matte Oilier lips 6–8 hours

    Frequently Asked Questions (FAQs)

    1. Are lip tints suitable for everyday wear?

    Yes, lip tints are lightweight and subtle, making them ideal for daily use.

    2. Can lip tints dry out the lips?

    Hydrating formulas are comfortable, but very matte tints may feel drying without balm.

    3. Do lip tints work for all skin tones?

    Most modern lip tints come in universally flattering shades suitable for diverse skin tones.

    4. How do I make lip tint last longer?

    Applying on exfoliated lips and blotting lightly helps extend wear time.

  • The Best Peptide Skincare Products for Plumper Healthier Skin According to Beauty Experts

    The Best Peptide Skincare Products for Plumper Healthier Skin According to Beauty Experts

    Peptide-powered skincare has quickly become a favourite among dermatologists and beauty experts for its ability to support firmer, smootherlooking skin. In India, where climate stress, pollution, and daily sun exposure can accelerate visible ageing, peptides offer a gentle yet effective way to maintain a healthy glow. These skin-loving ingredients work behind the scenes to encourage resilience and hydration without harsh actives. From serums to moisturisers, peptide formulas are now widely recommended for anyone seeking plumper, healthier skin with long-term benefits.

    Why peptide skincare products are essential for plumper skin

    Peptides are often described as skin messengers, and for good reason. When applied topically, they signal the skin to look smoother and more resilient over time. What makes them especially appealing is their suitability for most skin types, including sensitive skin. Regular use can support collagen support signals, improve skin elasticity feel, and enhance surface smoothness without irritation. Unlike aggressive actives, peptides work gradually, making them ideal for daily routines. Beauty experts in India often suggest pairing peptide products with sunscreen to protect results and maintain a naturally fuller-looking complexion.

    Top peptide skincare formulas beauty experts recommend

    Not all peptide products are created equal, which is why experts focus on formulas that combine peptides with hydrating and barrier-friendly ingredients. Serums with lightweight textures allow for better absorption, while creams help seal in moisture. Many recommendations highlight multi peptide blends, barrier repair focus, and lightweight daily textures that layer well under makeup. For Indian weather conditions, non-greasy formulas are particularly popular. Consistent use, rather than product hopping, is key to seeing visible improvement in skin bounce and overall comfort.

    How peptide skincare fits into a healthy skin routine

    Incorporating peptides into your routine doesn’t require a complete overhaul. Most experts advise applying them after cleansing and before heavier creams. Morning or night use depends on the formula, but many enjoy the flexibility of both. Peptides complement actives like niacinamide and ceramides, offering gentle daily repair, hydration boosting layers, and long term skin comfort. For beginners, starting with one peptide product helps the skin adjust. Over time, this consistent approach can support a visibly plumper and healthier skin appearance.

    Are peptides worth the hype for healthier skin?

    While peptides won’t deliver overnight miracles, their strength lies in steady, skin-friendly performance. Beauty experts often describe them as a smart investment for anyone focused on skin longevity rather than quick fixes. With continued use, many notice gradual firmness improvement, improved skin resilience, and balanced moisture levels. In the Indian skincare market, peptides stand out for working well across age groups and skin concerns. When combined with sun protection and a simple routine, peptide skincare can play a meaningful role in maintaining a naturally healthy glow.

    Product Type Main Benefit Best For
    Peptide Serum Targeted skin repair All skin types
    Peptide Moisturiser Daily hydration support Dry to normal skin
    Peptide Eye Cream Smoother under-eyes Fine lines concern
    Peptide Mask Instant plumping feel Occasional use

    Frequently Asked Questions (FAQs)

    1. What are peptides in skincare?

    Peptides are amino acid chains that help signal the skin to look firmer and healthier.

    2. Can peptide products be used daily?

    Yes, most peptide skincare products are gentle enough for everyday use.

    3. Are peptides suitable for sensitive skin?

    Peptides are generally well tolerated and often recommended for sensitive skin.

    4. How long before results are visible?

    Most users notice gradual improvements after a few weeks of consistent use.

  • 4 Daily Yoga Exercises to Improve Flexibility and Reduce Body Stiffness

    4 Daily Yoga Exercises to Improve Flexibility and Reduce Body Stiffness

    Four Simple Yoga Exercises to Improve Your Flexibility Flexibility is important for staying fit and healthy but most people avoid stretching because they think it takes too much time or effort. Yoga offers an easy way to increase flexibility naturally. Just a few minutes each day helps you loosen tight muscles and improve joint movement while reducing daily stiffness. These four yoga exercises are perfect for home practice and help you build flexibility gradually without straining your body.

    Cat and Cow Pose for a Flexible Spine

    Cat and Cow Pose for Daily Spinal Health Cat and Cow Pose ranks among the most effective daily exercises for maintaining spinal flexibility. Begin by positioning yourself on your hands and knees while keeping your spine in a neutral alignment. As you breathe in gently create an arch in your back while lifting both your head and chest upward. When you breathe out, curve your spine in the opposite direction and bring your chin down toward your chest. This flowing exercise enhances the mobility of your spine & promotes better blood circulation throughout your back. It also helps decrease stiffness that commonly develops in both the neck and lower back regions.

    Making this pose part of your daily routine supports long-term spinal health and maintains flexibility as you age. The beauty of this movement lies in its simplicity and accessibility. You don’t need any special equipment or extensive training to perform it correctly. The gentle rocking motion between the two positions creates a massage-like effect on the vertebrae & surrounding muscles. Regular practice can lead to improved posture and reduced back pain over time.

    Downward Facing Dog for Full Body Stretch

    Downward Facing Dog stretches multiple major muscle groups at the same time. Start from a hands and knees position & lift your hips upward to create an inverted V shape with your body. Press your palms firmly against the floor and let your heels sink toward the ground naturally without pushing too hard. This position stretches your hamstrings & calves along with your shoulders & arms and spine. Practicing this pose regularly improves your overall flexibility and strengthens your body at the same time. This combination supports better movement patterns in your daily activities.

    Seated Forward Bend for Hamstring and Back Flexibility

    Seated Forward Bend The seated forward bend offers a straightforward way to increase flexibility in your hamstrings & lower back. Start by sitting on the floor with your legs stretched out in front of you. Take a breath in to make your spine longer. Then breathe out as you slowly bend forward from your hips. Try to reach toward your shins or ankles but only go as far as feels comfortable. This position helps release the tightness that builds up from sitting too much during the day. It also works to calm your nervous system and bring a sense of relaxation to your body.

    Cobra Pose for Chest and Spine Opening

    Cobra Pose works on making your spine chest and abdomen more flexible. Start by lying face down with your hands positioned under your shoulders. Lift your chest up slowly while your hips stay flat on the ground & keep a slight bend in your elbows. This position stretches the entire front side of your body & helps your spine extend better. When you do this pose every day it fights against poor posture from slouching and maintains a flexible and strong spine.

    Why Daily Flexibility Practice Matters

    Flexibility and Daily Movement Flexibility helps improve your posture while reducing muscle tension & supporting healthy joints. Modern wellness approaches focus on gentle daily movement rather than intense stretching sessions. Yoga works well with this method because it combines slow stretches with controlled breathing. When you practice these poses every day your body adapts slowly and this lowers your chance of getting injured. Regular flexibility work creates lasting benefits for your physical health.

    Simple Tips for Better Results

    Practice these exercises when your stomach is light or empty & move at a slow pace without pushing yourself too hard. Breathe deeply and maintain a steady rhythm throughout. Begin by holding each position for fifteen to thirty seconds and extend the duration as you progress. Regular practice matters more than how deep you can stretch. You don’t need complex workout plans to become more flexible. These four yoga exercises you can do every day provide a straightforward and practical approach to maintaining flexibility and mobility at home. When you practice regularly your body will feel less tense and more prepared to handle everyday tasks.