Blog

  • No More Hair Dye The Rising Grey Hair Coverage Trend That Softens Appearance and Creates a Younger Looking Finish

    No More Hair Dye The Rising Grey Hair Coverage Trend That Softens Appearance and Creates a Younger Looking Finish

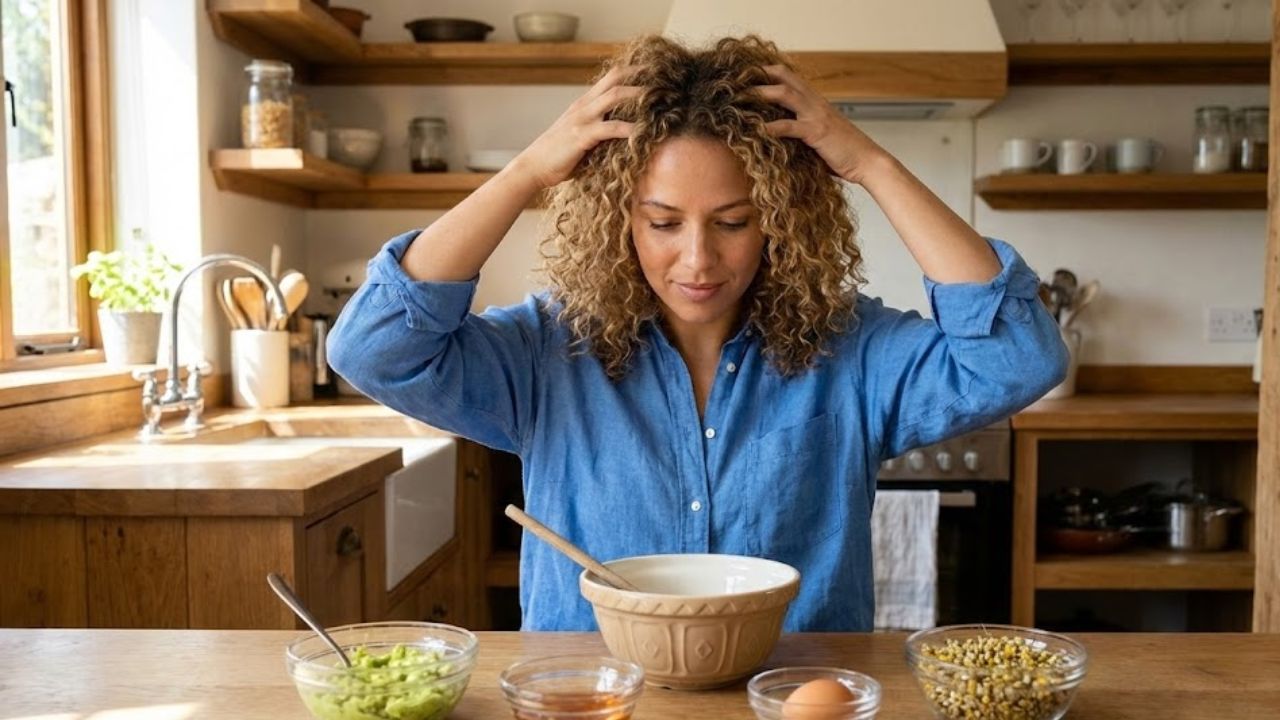
    She looks worn out. A sharp line of silver cuts through last month’s chestnut dye, louder than the faint lines around her eyes. She lifts a strand, twists it, tries to tuck it behind her ear. It slips back out, bright and defiant. Grey hair rarely stays subtle. It refuses to fade into the background.

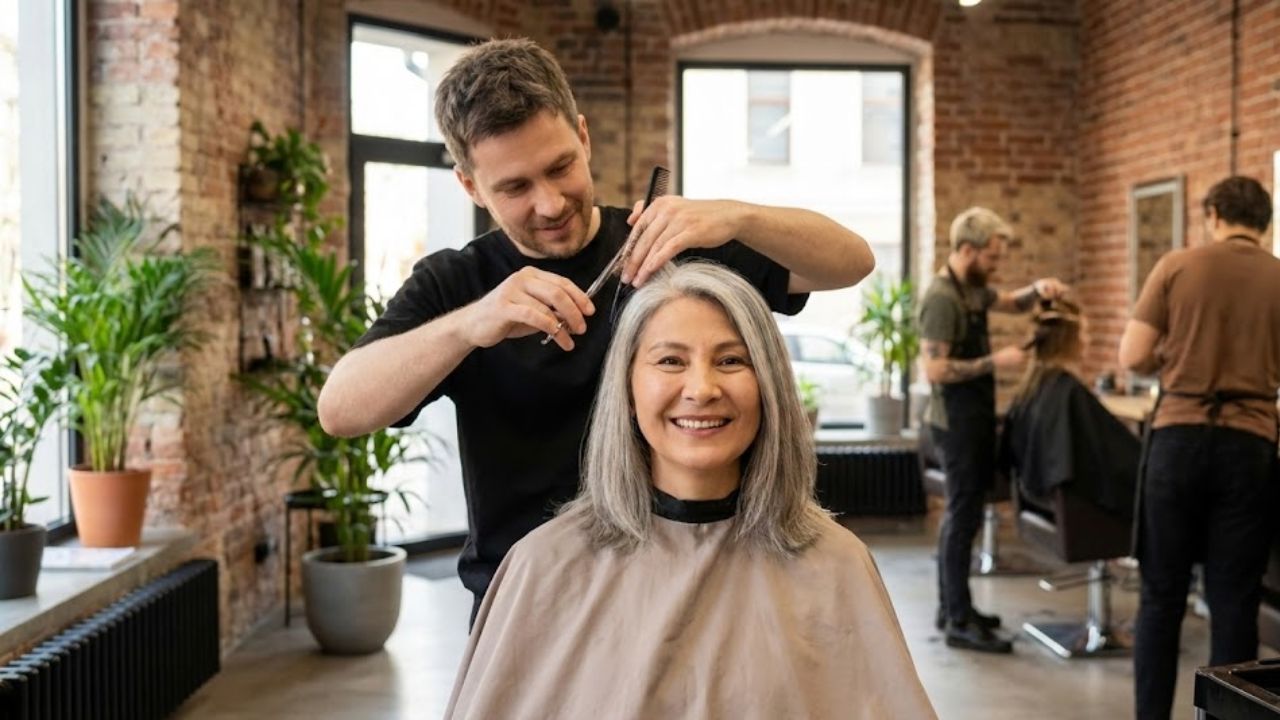
    In the salon waiting area, three people scroll silently on their phones, all here for the same ritual: erase the greys and reset the clock. A stylist passes by with a client whose hair looks alive—glossy, dimensional, and effortless—yet not “coloured” in the old way. There’s no chemical smell, no harsh root line. The client smiles easily at her reflection.

    Why Full Hair Dye Fell Out of Favour

    For decades, grey hair was treated as a flaw to eliminate, not a texture to explore. Full-coverage dye became the default, a standing appointment to look “acceptable.” Then perceptions shifted. People noticed that flat, solid colour often hardened features, while softer blends made faces appear gentler and fresher.

    Colourists began focusing less on hiding grey and more on working with it. Instead of coating everything, they weave colour around existing silver. The result isn’t a rigid block of pigment, but hair that looks naturally grown—just better.

    The surprise for many is simple: strategically blended grey can look younger than forcing a dark, uniform shade.

    Step into a busy city salon on a weekend and you’ll hear phrases like “soft blend,” “glow,” and “veil of colour” far more than “full coverage.” In London, one stylist joked that root touch-up clients had “gone extinct,” replaced by people asking for low-maintenance hair that doesn’t age them.

    A 52-year-old lawyer shared that she’d dyed her hair jet black every three weeks since 38. Then her teenage daughter remarked, “Mum, your hair looks like a Lego piece when it grows out.” Brutal, but effective. She booked a grey-blending session. Three hours later, her hair became a smoky, dimensional brown, with her natural silver woven in like subtle highlights.

    A week later, colleagues asked if she’d had a facial. No one guessed that less colour made her look fresher.

    This is the quiet shift: replacing a battle against grey with a truce. Opaque dye can flatten the face and exaggerate lines. Translucent, lighter techniques reflect light, soften angles, and restore a sense of ease—without pretending you’re decades younger.

    There’s a psychological win, too. When you stop chasing a sharp root line, you stop feeling like you’re failing as your hair grows. You’re no longer “overdue for colour.” Your hair is simply evolving, and the colour evolves with it.

    The Trend That Softens Grey Without Hiding It

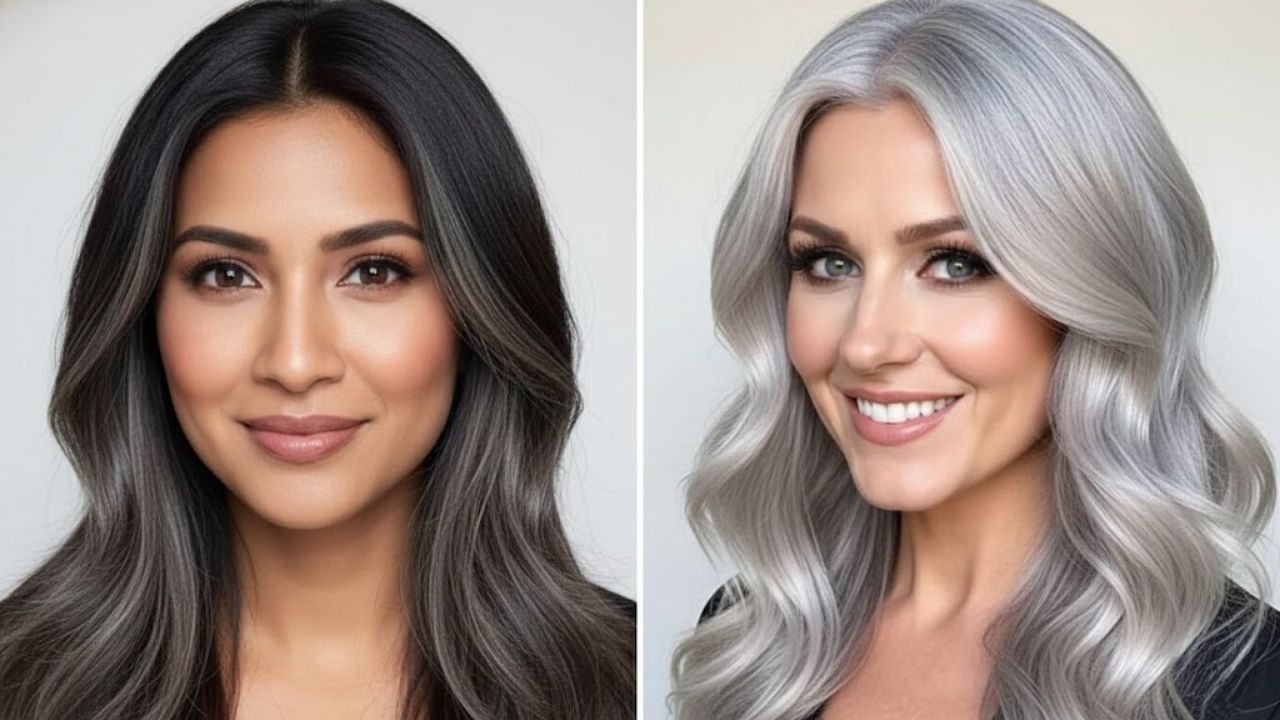
    Today’s most sought-after techniques don’t promise “100% grey coverage.” They promise to blur, veil, and soften. Think of it as choosing a skin tint over full-coverage foundation. Your natural colour still shows—just refined.

    The three phrases dominating salon conversations are grey blending, translucent gloss, and low-contrast highlights.

    Grey blending does exactly what it sounds like. Instead of applying one flat shade, colourists add lowlights close to your natural tone and a few brighter pieces. Existing silver becomes part of the design, not an interruption.

    A sheer gloss or toner follows. Unlike traditional dye, it’s lightweight and luminous, fading gently over time. The grey remains visible but looks satin-soft, not coarse or dull.

    In a small Paris salon, a 60-year-old client sat nervously in the chair. Her hair was nearly 70% grey, but she’d been maintaining a harsh chocolate brown for years. The root line caused monthly anxiety. She admitted she felt stuck between two ages, neither of which felt real.

    The stylist suggested abandoning full coverage. He lifted select strands, added cool beige lowlights, and finished with a pearly gloss suited to her skin. Some natural grey—especially around the temples—was left untouched, acting like built-in highlights.

    When she returned to the mirror, she paused and said quietly, “That looks like me, ten years ago.” It wasn’t transformation—it was restraint.

    Industry data supports this shift. Major colour brands report a sharp rise in grey-blending services and a decline in single-tone permanent dye, especially among those aged 40 to 60. Once people switch, they rarely return. The constant stress of emergency root fixes disappears, along with the shame of visible silver.

    Socially, the effect is subtle but powerful. When hair doesn’t scream “obviously dyed,” attention moves to eyes, expressions, and energy. Hair becomes a soft frame, not the headline.

    How to Transition Away From Dye Without Regret

    If you’re tempted to step back from dye, don’t rush into extremes. This trend isn’t about rebellion—it’s about intentional easing off. One stylist-approved strategy is to stretch appointments and change the purpose of each visit.

    Instead of “cover everything,” aim to reduce contrast. Request a semi-permanent gloss one or two shades lighter than your usual colour, paired with fine highlights around the face. That subtle brightness near the eyes works like a light reflector, making you look rested even when you’re not.

    Another smart move is improving the feel of grey hair. Often, what people dislike isn’t the colour but the texture. Richer conditioners, occasional purple shampoo, and gentler care can turn wiry strands into something smooth and refined.

    The fear of an endless awkward phase is common. Yes, the transition can look uneven for a few months. That’s why a plan matters. A thoughtful stylist will break it into stages: first soften the root line, then lighten the overall base, then refine the tone.

    The biggest mistake is going too dark. Deep black or heavy brown on mature skin can spotlight every line. Softer, slightly lighter shades blur edges and calm the face. Even minimal styling around the front can enhance the effect without adding colour.

    Emotionally, many worry about suddenly looking “old.” The new approach doesn’t demand instant acceptance of every silver strand. It offers control, gradually and on your terms.

    One reader shared, “I realised I didn’t hate my grey hair—I hated what I’d been told it meant. Once we softened it, I felt like myself again.”

    Questions to Ask Before Booking a Grey-Blending Appointment

    • How strong is the contrast between your natural hair and your dyed colour?
    • Do you prefer cool tones like ashy or pearly, or warm tones like honey and caramel?
    • Would you rather visit the salon less often, even if the transition is slower?
    • Are you comfortable seeing some grey if it looks intentional and polished?
    • Does your stylist discuss texture and shine, not just coverage?

    Rewriting the Story of Age, One Strand at a Time

    Moving away from harsh dye isn’t just a beauty trend—it’s a shift in how we view ageing. When grey hair is treated like a flaw, every millimetre of regrowth feels like failure. When it’s treated as raw material to refine, it becomes a feature.

    What people really seek isn’t the absence of grey. It’s the feeling of catching your reflection and thinking, “That looks like me”, instead of “I need an appointment.” Sometimes that means embracing silver. Sometimes it means a soft veil of beige or smoky blonde that enhances your eyes.

    This quiet movement grows in everyday moments—bathrooms, salon chairs, late-night searches for “how to grow out grey gracefully.” It spreads when a colleague looks brighter and admits she stopped dyeing, opting instead to blend.

    You might inspire a friend to stop stressing over roots. You might try it, dislike the first attempt, and adjust. You might keep colour forever—just lighter, softer, with silver woven in like a signature. This trend isn’t a rule. It’s an invitation to rewrite the script, strand by strand.

  • Remove Scratches From Glass Cooktops at Home Using Smart Techniques That Avoid Replacement

    Remove Scratches From Glass Cooktops at Home Using Smart Techniques That Avoid Replacement

    The moment you notice a thin line across your glossy cooking surface, panic can set in. Glass cooktops are popular in modern Indian kitchens for their sleek look and easy cleaning, yet they are more delicate than they appear. A small scratch can feel like a permanent flaw, even if it doesn’t affect performance. The good news is that many marks can be reduced with the right approach. Understanding why scratches form, how serious they are, and what you can safely do at home helps you protect your investment without rushing into costly replacement.

    Fix Scratches on Glass Cooktops Caused by Daily Use

    Scratches often appear quietly, even when you think you are being careful. Small particles like salt or sand act as microscopic grit when trapped under a pan. Sliding vessels instead of lifting them creates heavy cookware drag that slowly wears the surface. Over time, these everyday kitchen habits leave faint lines that only become visible under bright light. The glass itself is tough but not immune to friction. Knowing that these marks are usually superficial helps reduce anxiety and encourages a calm, practical response rather than assuming the cooktop is ruined.

    Fix Scratches on Glass Cooktops by Checking Damage Level

    Before attempting any repair, take a moment to judge the scratch honestly. A simple scratch depth check can save time and prevent mistakes. Run a nail lightly across the mark; this fingernail test helps reveal whether the damage is shallow or deep. If it looks like a light surface haze that disappears at certain angles, it is usually manageable at home. Deeper grooves that clearly catch your nail are harder to fix and may only be softened, not erased. Setting realistic expectations avoids frustration and protects the glass from aggressive treatment.

    Fix Scratches on Glass Cooktops Using Safe Home Techniques

    Successful repair relies on restraint rather than force. Choose a gentle polishing method such as baking soda paste, non-gel toothpaste, or a cooktop-safe cream. Apply with a microfiber cloth only, moving in small circles and wiping clean between attempts. The key is patience over pressure; let mild abrasives slowly smooth the surface instead of grinding it down. While deep scratches may remain faintly visible, careful polishing often reduces their contrast so they blend into the reflective finish, restoring confidence in how your cooktop looks.

    Summary and Practical Takeaway

    Not every scratch is a reason to worry or replace your appliance. Understanding the difference between cosmetic versus structural damage keeps decisions sensible and stress-free. Most everyday marks are visual issues that respond well to gentle care. Adopting a smart maintenance mindset—lifting cookware, cleaning debris promptly, and avoiding rough bases—prevents repeat damage. Over time, these small habits support a longer appliance life and help your glass cooktop remain a functional, attractive part of your kitchen rather than a source of constant concern.

    Method Used Best For Main Benefit
    Baking soda paste Very light scratches Affordable and gentle
    Non-gel toothpaste Minor visible marks Easy home application
    Cooktop polishing cream Light to moderate damage Designed for glass surfaces
    Glass polishing compound Stubborn scratch clusters Stronger smoothing effect

    Frequently Asked Questions (FAQs)

    1. Can all scratches be completely removed?

    No, deep scratches usually can’t be fully removed but can often be softened.

    2. Is it safe to use abrasive pads?

    No, abrasive pads can worsen damage and should be avoided.

    3. How often should polishing be done?

    Only when needed, as frequent polishing can thin the glass surface.

    4. When should I consider professional help?

    If a scratch looks like a crack or spreads, consult a professional immediately.

  • Neither Swimming Nor Pilates Experts Say This Is the Best Low Impact Activity for Ongoing Knee Pain Relief

    Neither Swimming Nor Pilates Experts Say This Is the Best Low Impact Activity for Ongoing Knee Pain Relief

    She stopped mid-step, hand resting on her knee, watching a group of joggers glide past as if their joints had never known stiffness. A water bottle hung loosely from her fingers. Her expression said it all: she missed moving without thinking about pain.

    Across the path, a trainer was laying down an unusual strip of tape. People slowly gathered nearby — some with silver hair, others still in work clothes — all sharing the same careful hesitation. No warm-ups. No running. And yet, ten minutes later, they were breathing harder, smiling, and not a single person was clutching their knee.

    The movement didn’t resemble swimming. It wasn’t Pilates either. In fact, it looked almost too simple to matter. And that simplicity is exactly what makes it effective.

    The Overlooked “Third Choice” for Aching Knees

    Right now, the most effective activity for people with knee pain isn’t found in a luxury studio or a swimming pool. It’s accessible, inexpensive, and already woven into daily life: intentional, brisk walking on flat, forgiving ground.

    This isn’t the rushed walk between appointments. It’s not the distracted shuffle while scrolling on your phone. It’s a focused, slightly challenging pace that wakes up your muscles without punishing your joints.

    For many doctors and physiotherapists, this has become the quiet advice repeated all day long. Walking activates the large muscles around the knee, improves circulation, and gently trains balance. There’s no membership to buy, no complex routine to remember. Just a familiar route, comfortable shoes, and ten spare minutes that usually disappear online.

    A 2022 study on older adults with knee osteoarthritis found that regular walkers had a 40% lower risk of new episodes of severe knee pain compared with those who didn’t walk. That number matters. Yet many people still imagine “real exercise” as something intense — burpees, spin classes, or Pilates sessions with candles and mats.

    Walking doesn’t look like rehabilitation. It doesn’t feel technical enough to be a solution. That’s precisely why it’s often ignored until a physiotherapist calmly repeats, for the third time, “Let’s focus on walking properly, three times a week.” Slowly, that habit starts to change everything.

    Why Walking Works When Other Options Don’t

    The reasoning is simple. Knees struggle with sudden, high-impact forces when the surrounding muscles aren’t prepared. What they respond to best is steady, rhythmic movement that allows muscles to absorb shock naturally.

    Swimming removes almost all load, which is helpful during flare-ups but less effective for training your legs to support you on land. Pilates builds control and mobility, both valuable, but often in positions far removed from everyday movement.

    Brisk walking sits right in the middle. It’s weight-bearing enough to keep bones and muscles responsive, yet gentle enough for sore joints to tolerate. When done well, it trains the exact movements that matter in daily life — standing up, walking to the bus stop, handling a slight incline. No choreography. Just moving better, one step at a time.

    Turning a Simple Walk into Knee Support

    The key is to treat walking as a dedicated session, not background activity. Choose a flat, familiar route — a park loop, a wide pavement, or even a quiet indoor corridor. Start with two minutes at an easy pace, then gradually move into a speed where your arms swing naturally and your breathing deepens, while still allowing you to talk comfortably.

    • Senior workers redefining retirement to make ends meet
    • HMRC highlights a Cash ISA gap that could trigger new penalties
    • Heating guidance shifts as experts move away from the 19 °C rule
    • Kitchen islands give way to a more practical 2026 design trend
    • The psychological meaning behind a stranger’s smile
    • Short hairstyles that add visible volume to fine hair
    • How wolves transformed Yellowstone’s ecosystems
    • A simple drain-clearing trick that works without chemicals

    Keep your steps short rather than long. Overreaching pulls on the front of the knee and often causes sharp discomfort. Aim to roll smoothly from heel to toe, as if you’re gently polishing the ground beneath you. Keep your gaze forward — your posture naturally improves when you stop watching your feet.

    Ten to fifteen minutes like this, three or four times a week, is far more effective than waiting for the perfect workout that never begins.

    Avoiding the Most Common Setbacks

    One frequent mistake is waiting for a completely pain-free day. That day rarely arrives. With ongoing knee issues, mild background discomfort is often part of the process. What matters is learning the difference between manageable pain and a clear stop signal.

    Background discomfort tends to stay the same or ease slightly as you move. Warning pain, on the other hand, spikes suddenly, alters your walking pattern, or lingers intensely afterward.

    Another trap is doing too much, too soon. Weeks of rest followed by a sudden 45-minute march often leads to swelling and frustration. Starting with 10 minutes and adding just 2 minutes per week makes a remarkable difference, even if progress isn’t perfectly measured.

    There’s also an emotional hurdle. On difficult days, walking can feel like a step down from your younger, more athletic self. Yet that short loop around the block is what keeps you moving forward. You’re not giving up — you’re adapting.

    A Simple Walking Checklist

    • Flat or gently sloping route, avoiding stairs at first
    • Comfortable shoes with flexible soles
    • Short steps, natural arm swing, eyes forward
    • Pain stays low and feels the same or better afterward
    • Three to four sessions per week, lasting 10–20 minutes

    No gadgets. No targets to crush. Just a rhythm your knees can begin to trust again.

    Why This Habit Improves More Than Just Your Knees

    As walking becomes routine, conversations in physiotherapy rooms quietly change. At first, it’s all about scans and joint structures. A few weeks later, people mention sleeping better, feeling calmer, and trusting their bodies more.

    Physically, brisk walking helps the muscles at the front and back of the thigh share the workload, reducing stress on the kneecap. Circulation improves within the joint, delivering nutrients to areas with limited blood supply. Even the synovial fluid begins to move more freely, lubricating the joint instead of stagnating.

    The mental shift is just as powerful. Walking breaks the cycle of fear and replaces it with small, visible progress. One day, you realise you carried groceries home without analysing every step. On a map, it’s a short distance. Mentally, it feels like a different world.

    There’s also a social benefit. Walking easily becomes shared time with a friend, a partner, or a teenager briefly away from their screen. For twenty minutes, you move, talk, and forget the long list of physical limitations. For many people with long-term knee pain, that sense of normality is the real therapy.

    So when you hear about miracle joint workouts, think back to the woman in the park, watching others run while holding her knee. What helps her most isn’t a perfect swim stroke or an Instagram-worthy machine. It begins with a flat path, a steady pace, and the quiet choice to keep walking anyway.

    Key Takeaways

    • Brisk walking beats total rest: regular, low-impact movement supports the knee and nourishes joint tissue
    • Short steps on flat routes: reducing stride length and avoiding hills lowers stress on the kneecap
    • Progress matters more than perfection: starting small and building gradually creates a routine that lasts
  • Lip Definition Trick: Strategic Liner Placement That Visually Plumps Lips Without Overdrawing

    Lip Definition Trick: Strategic Liner Placement That Visually Plumps Lips Without Overdrawing

    A girl in the cafe bathroom doesn’t realize anyone is watching but a few people waiting in line notice what she does with her lips. She draws a pencil along her lips with two quick strokes and presses them together before putting on some gloss. She doesn’t overline them or follow any complicated contouring steps. When she looks in the mirror her lips look like she just returned from a relaxing vacation. The effect looks so natural that you can’t tell exactly what she did. There’s no visible outline or dramatic Instagram-style border. Her lips just look soft and full and somehow more three-dimensional than most people’s lips. Later when you stand in front of your own mirror you try to copy the look. You use the same pencil and the same gloss & make the same expression. The result looks flat though. Something about where she placed the pencil is different. It seems like a small detail but it changes everything.

    This Isn’t About Bigger Lips — It’s About Controlling Visual Focus

    The goal of modern lip lining isn’t exaggerated volume. It’s about subtly guiding where the eye naturally settles. For years, the standard advice was to trace just outside the lip line, blur the edges, and fill everything in. While this approach worked in controlled lighting, it often falls apart on real faces in daylight. Heavy overlining can appear disconnected, making the lips feel separate from the rest of the face rather than integrated into it.

    Also read: Scratched Glass Cooktops Can Look New Again Without Costly Replacement

    Why the Traditional Lip-Liner Method No Longer Holds Up

    Classic overlining techniques tend to show their flaws up close. In natural light, the mismatch between skin tone and liner becomes more visible, especially around the corners of the mouth. Instead of enhancing facial balance, the lips can appear artificially drawn on. What once felt like a reliable trick now often creates the opposite effect, pulling attention for the wrong reasons and disrupting facial harmony.

    Also read: Collagen Rich Broth Rituals Support Skin Hydration and Elasticity Naturally

    The Quiet Shift Professional Lip Artists Are Making

    Today’s leading makeup artists are moving away from dramatic outlines. Their focus has shifted toward precision placement rather than overall size. The illusion of fullness still exists, but it’s no longer the main objective. Instead, the emphasis is on balance and light reflection, which is why this method translates so well in photos, video calls, and everyday interactions. The change is subtle, yet the result feels noticeably refined.

    Why Tiny Adjustments Matter More Than Heavy Lines

    This approach relies on millimetres, not bold strokes. By placing liner with intention, artists enhance the natural structure of the lips instead of reshaping them entirely. The result is a soft, believable finish that looks gently enhanced rather than obviously outlined. Once you recognize how minimal the placement really is, it changes how lip lining is perceived altogether.

    Where Makeup Artists Actually Apply the Liner

    Across social media, the same technique appears again and again. Instead of defining the entire mouth, artists concentrate on three key areas: the peak of the Cupid’s bow, the center of the lower lip, and the subtle pillows just off-center. The corners are barely touched, with pigment fading outward until the line becomes more of a suggestion than a boundary.

    Why the Finish Looks Effortlessly Natural

    A London-based makeup artist once shared that she uses the same inexpensive lip pencil on every client, adjusting only the placement based on how light hits their lips. People often assume fillers are involved. Her response is always the same: a modest lip liner and a simple demonstration of technique. The most common reaction she hears is, “I look rested.” The effect reads as health and balance, not obvious enhancement.

    The Visual Science Behind the Illusion of Fullness

    Our eyes don’t take in faces evenly. They move toward areas of contrast and curvature. The dip of the Cupid’s bow, the curve at the center of the lower lip, and the points where light naturally reflects draw attention first. By enhancing these zones and softening the edges, the brain interprets the lips as fuller without needing a strong outline.

    Exact Liner Placement for Natural-Looking Volume

    Begin with dry lips and a relaxed mouth. Use a sharpened nude liner that closely matches your natural lip tone. Draw a small, straight bridge across the Cupid’s bow, connecting the peaks just above the natural dip. Keep it soft, not sharply defined. Move to the center of the lower lip and place the liner about a millimetre outside the natural line only at the fullest point. Sketch a short arc no wider than your iris. Leave the outer thirds mostly untouched.

    Connect the center sections to the corners using light, upward strokes that fade as they move outward. The line should almost disappear near the edges. Gently smudge with a fingertip and tap a small amount of gloss or balm at the center. The restraint is what keeps the effect believable. Overdoing the sides quickly turns subtle enhancement into obvious overlining, especially in harsh lighting.

    Why This Soft-Blur Technique Works on Real, Unfiltered Faces

    This method succeeds because it allows room for imperfection. Slightly uneven lines still blend into the overall effect, reducing pressure during application. On difficult mornings, it feels less like armor and more like a quiet enhancement. Under different lighting conditions, the lips maintain definition at the center while staying soft at the edges, moving naturally with your expressions. It’s makeup designed for real life, not frozen images.

  • Get Soft Supple Lips This Winter With 8 Top-Rated Lip Scrubs That Actually Work

    Get Soft Supple Lips This Winter With 8 Top-Rated Lip Scrubs That Actually Work

    Winter weather can be especially harsh on lips, making dryness, flaking, and cracking a common concern across India during the colder months. Low humidity, chilly winds, and frequent dehydration all contribute to rough lips that no balm alone can fix. This is where lip scrubs step in as a game-changer. By gently removing dead skin and boosting circulation, the right lip scrub helps restore softness and natural color. Choosing a well-formulated option ensures you exfoliate effectively without irritation, even if your lips are already sensitive.

    Why Lip Scrubs Matter for Soft Winter Lips

    Lip scrubs play a crucial role in maintaining healthy lips when temperatures drop. Unlike facial skin, lips lack oil glands, which makes them more prone to dryness and peeling. A good scrub removes buildup while encouraging better absorption of balms and masks. When used correctly, it supports gentle exfoliation without causing micro-tears. Many top-rated formulas also include nourishing oils that offer hydration boost alongside exfoliation. Regular use improves texture, enhances lip color, and prevents lipstick from settling into cracks, delivering smoother application and visibly healthier lips all season.

    Best Lip Scrubs for Dry, Chapped Lips

    The best lip scrubs balance exfoliating particles with soothing ingredients. Sugar-based scrubs remain popular because they dissolve easily, reducing the risk of over-scrubbing. Coffee, walnut, or rice powder options provide a deeper polish for severely chapped lips when used sparingly. Look for formulas enriched with shea butter or oils that support deep nourishment and minimize irritation. Avoid products with harsh artificial fragrances, as lips are delicate and can react quickly. When used two to three times a week, the right scrub encourages healthy renewal and helps maintain softness even in extreme winter conditions.

    How to Use Lip Scrubs for Best Results

    Using a lip scrub correctly is just as important as choosing the right one. Start with clean, slightly damp lips, then massage a small amount in circular motions for under a minute. This method promotes safe exfoliation without damaging the skin barrier. Rinse gently with lukewarm water and immediately apply a nourishing balm to lock in moisture. Overuse can cause sensitivity, so moderation is key. When paired with proper hydration and sun protection, lip scrubs help maintain lasting softness and prevent recurring dryness throughout winter.

    Choosing the Right Lip Scrub This Winter

    Not every lip scrub suits every lip type, which is why understanding your needs matters. Sensitive lips benefit from finer granules and calming oils, while severely dry lips may need richer textures for intense care. Reading ingredient lists helps you avoid irritants and focus on nourishing components. Consistency also plays a role—sporadic use delivers limited results, while a steady routine supports visible improvement over time. Combined with adequate water intake and protective lip balms, the right scrub becomes a simple yet powerful step toward maintaining comfortable, supple lips during winter.

    Scrub Type Main Exfoliant Best For Recommended Use
    Sugar-Based Natural Sugar Sensitive Lips 2–3 times weekly
    Coffee Scrub Coffee Grounds Dull Lips 1–2 times weekly
    Nut-Based Walnut Powder Severely Chapped Once weekly
    Gel Scrub Micro Beads Daily Maintenance As needed

    Frequently Asked Questions (FAQs)

    1. How often should I use a lip scrub in winter?

    Two to three times a week is enough to maintain smooth lips without irritation.

    2. Can lip scrubs cause damage to sensitive lips?

    When used gently and in moderation, mild scrubs are safe even for sensitive lips.

    3. Should I apply lip balm after using a scrub?

    Yes, applying balm afterward helps seal moisture and soothe freshly exfoliated lips.

    4. Are homemade lip scrubs effective?

    Homemade scrubs can work well if made with fine ingredients and used carefully.

  • Blush After Powder Technique Creates a Softer More Natural Makeup Finish

    Blush After Powder Technique Creates a Softer More Natural Makeup Finish

    We all know that moment of uncertainty when you wonder if adding blush will mess up your makeup. Makeup tutorials tell you to apply blush before powder while your friends do it the other way around. Most of us end up guessing and hoping our cheeks don’t look heavy or artificial. But on TikTok & at fashion shows a simple method is becoming popular. Makeup artists are applying blush after powder as the finishing step. This approach works like adding warmth to a cold room. The technique does more than just add color to your face. It affects how fresh and natural your makeup looks throughout the day. Maybe the trick to realistic blush is just putting it on last.

    Why Applying Blush After Powder Creates a Naturally Lived-In Look

    The first time you watch a professional apply blush as the last step, it feels almost magical. The skin is already perfectly powdered, dark circles concealed, and the forehead matte. You might expect the color to slip around, settle into pores, or cling to dry patches. Yet, when the brush barely grazes the cheekbone, the blush melts seamlessly into the matte finish, creating the appearance of a natural, internal warmth. Unlike the streaky pinks of our teenage years, this color emerges subtly, like an emotion rising from within.

    A young woman backstage in Paris laughed as she described her experience: she arrived with flawless but flat skin. The makeup artist finished her look by applying powder blush over a layer of loose powder that had set for twenty minutes. Just a few gentle touches on the upper cheeks, a hint on the nose bridge, and a soft sweep on the forehead instantly brought the face to life. No harsh lines, no sticky patches—just the shy, natural flush you feel after climbing a couple of flights of stairs. That day, it was the blush applied after powder that made her complexion feel alive again.

    Technically, it’s a simple yet surprising logic. Powder sets the foundation and blurs skin texture while evening out the tone. Adding blush afterward means you aren’t mixing it with everything else or breaking down your concealer coverage. Instead, you’re laying a thin, controlled layer of color over a stable surface. The result is precise placement, softly blended edges, and intensity that’s easy to manage, transforming the base into a calm canvas while the blush becomes the living detail that makes a face appear real—even in photos.

    How to Apply Blush Over Powder Without Patchiness

    The key to success is minimal, delicate movements. Use a clean, soft-bristled brush that is wide enough to cover the cheek but not oversized. Lightly dip into the powder blush and tap off any excess before applying it to already powdered skin. Approach it as gently as you would with a highlighter—avoid harsh rubbing.

    Use short circular motions or small arcs to deposit color without disturbing the base. Start away from the nose, sweeping toward the upper cheekbone, then lightly move up toward the temple. Any leftover color on the brush can be added to the nose or chin to harmonize the look. The goal is not to make the blush obvious, but to create a subtle, natural glow.

    Resist the urge to press harder for immediate color, which is a common mistake that leads to patchiness. Instead, build up thin layers gradually. Apply a light first layer, check in natural light, and only add a second layer where the cheek naturally catches light. While this method may feel indulgent for everyday mornings, it’s perfect for evenings when you want to appear rested and naturally radiant. The result is a healthy, subtle flush that enhances your complexion without looking heavy or artificial.

    The Transformative Power of Blush as the Final Step

    What makes blush applied after powder so captivating is its almost psychological effect. A gentle touch of color as the final step subtly shifts your reflection. You no longer focus on the corrective work of makeup; instead, you see a reflection that feels alive. Others may not pinpoint the change, but they notice a more vibrant, awake appearance.

    When color comes last, it moves beyond technical application. It becomes a signal of presence and vitality, aligning how you feel internally with how your face appears externally. Those few extra seconds with a brush can transform your makeup from flawless to genuinely luminous.

    Technique Beauté Explication Optimisée Avantage pour le Teint
    Blush après fixation du teint Appliquer le blush sur une base déjà poudrée permet de stabiliser la couleur. Résultat plus doux, harmonieux et tenue prolongée de la couleur.
    Application progressive Ajouter le blush en fines touches successives plutôt qu’en un seul geste. Évite les excès, assure un fini naturel et uniforme.
    Placement stratégique Appliquer le blush sur le haut des joues et estomper vers les tempes. Illusion de relief, visage plus lumineux et effet bonne mine immédiat.
  • Makeup Artists Swear by This Eyebrow Placement Trick for a Brighter More Awake Looking Face

    Makeup Artists Swear by This Eyebrow Placement Trick for a Brighter More Awake Looking Face

    The woman at the café table looked tired when you first saw her. She had her laptop open and held a triple espresso while faint dark circles showed through her makeup. But when she looked up her face seemed surprisingly awake. She didn’t look like she’d been to a spa but she definitely looked alert. The secret was small and easy to miss. Her eyebrows sat a bit higher than usual & had a soft highlight that made her eyes look bright & focused even in the harsh café lights with spotty internet connection.

    How Brows Create an Instantly More Awake Look

    Scan any backstage photo from a fashion show and one detail consistently stands out. Models may still have unfinished base makeup, yet their eyebrows are already shaped. The tails are softly lifted, the arches subtly defined, and the brow bone appears clean and open. This small adjustment makes the upper face look noticeably more alert almost instantly.

    Makeup artists understand that eyebrows are noticed before most other facial features. Their angle, height, and framing strongly affect whether someone appears tired, relaxed, stern, or refreshed. Brows that sit too low can weigh down the face and create a sleepy look. When they are gently raised and opened, the eyes appear rested even after a short night of sleep.

    This effect is easy to observe during a morning commute. Someone in gym clothes might skip foundation, but if their brows are brushed upward and the inner corners are brightened, they look ready for the day. Another person with puffy eyes from a late night can appear meeting-ready simply by tidying the brows and slightly lifting the arch.

    Social media has embraced this idea as well. Before-and-after clips often show only a minor brow adjustment and a touch of highlight. The transformation looks more awake and sometimes younger. In 2023, the eyebrow lift hack gained millions of views as people searched for ways to look less tired without heavy makeup.

    The reason this works lies in facial structure. Eyebrows act like curtains for the eyes. When they sit low or feel heavy, they visually press down on the eyelid, emphasizing under-eye shadows and puffiness. Lifting the tail slightly and cleaning beneath the arch opens vertical space, making the whites of the eyes look brighter. Nothing physically moves, yet the illusion changes how the face is perceived.

    Light also plays a role. Brightening the brow bone, inner corner, and peak of the arch reflects light where faces naturally appear alert. This balance of shadow and highlight is how makeup artists refresh tired faces in minutes backstage.

    The Subtle Brow Technique Makeup Artists Rely On

    The method itself is straightforward and relies on three small steps to create an invisible lift. The first is fill and lift. Lightly fill the top edge of the brow rather than focusing only on the bottom. Concentrate on the outer third, using hair-like strokes to raise the tail by one or two millimeters. This alone can change how the face looks.

    The second step is clean and brighten. With a small brush or fingertip, tap a skin-tone concealer or brightening pen just under the highest point of the arch. Blend it downward onto the lid to remove heaviness instead of creating a sharp line.

    The final step is highlighting with intention. Apply a tiny amount of satin-finish highlighter under the arch and at the inner corner of the eye. Tap gently rather than dragging. Once practiced, the entire process takes about 45 seconds per eye.

    The result does not look trendy or overdone. It simply makes you appear more awake than you feel. Issues arise when the brow is overfilled from underneath, adding thickness and weight above the eyelid. This can pull the gaze downward, especially when the tail extends too far.

    Using a concealer that is too light can also backfire. Harsh halo brows may work under studio lighting but often look chalky in daylight. The lift should feel soft and natural. Choosing a shade close to your skin tone with slight brightness and blending thoroughly helps it melt seamlessly into the lid.

    This technique works because it is easy enough to repeat daily. Two strokes to lift the tail, one swipe to clean the arch, and a small dot of light. No extra products and no extra time.

    A Small Brow Adjustment That Lifts the Entire Face

    Once this approach becomes part of your routine, subtle changes start to appear. Catching your reflection on a phone screen later in the day, you may look less tired than expected. On warmer days, brows and mascara alone can feel sufficient for a video call.

    There is also comfort in these small rituals. Those brief moments in front of the mirror are often the only time you look at your face with intention rather than criticism. Adjusting a brow or softening a shadow is not about vanity. It is a quiet way of preparing for the day.

    When exhaustion sets in but you still need to show up, that gentle brow lift becomes a subtle signal of readiness. When things are going well, it simply helps your appearance reflect how you feel. Whether on a screen, in a meeting, or waiting for coffee, your eyes look alert even as your mind catches up.

  • Heal Dry Cracked Heels Faster at Home Using Everyday Kitchen Ingredients That Actually Work

    Heal Dry Cracked Heels Faster at Home Using Everyday Kitchen Ingredients That Actually Work

    Your heels carry far more responsibility than most people realize. With every step, they strike the ground first and absorb constant impact from walking, standing, or running for long periods. Because they’re often out of sight and usually covered, they tend to be ignored. You may notice rough or dry skin in the shower and plan to deal with it later, only to forget. Over time, your skin reflects daily wear. Dry, cracked heels often signal repeated pressure and friction without enough moisture. Walking barefoot on hard floors, wearing shoes with thin soles or open backs, taking long hot showers, cold weather, and indoor heating can all strip moisture away. Heel skin is naturally thick for protection, but when it loses flexibility, it stops bending properly and begins to crack, sometimes painfully. The encouraging part is that skin repairs itself when given hydration, softness, and protection.

    Turning Your Kitchen Into a Gentle Skin Care Zone

    Your kitchen isn’t just for meals—it also holds simple items that support skin comfort. Olive oil works as an effective moisturizer for dry areas. Honey helps attract moisture and calm irritated skin. Milk and yogurt naturally soften flakes, while mixing sugar or salt with oil creates a basic exfoliating scrub to lift dead skin. Using familiar household ingredients feels reassuring because you know exactly what you’re applying. There’s no need for complicated labels or special purchases. Understanding how each ingredient works helps you use them more effectively.

    A Calm Nighttime Routine to Restore Cracked Heels

    Think of this routine as a short moment of calm at the end of the day. In about fifteen minutes, you can give your feet focused care.

    Step 1: Soothing Warm Milk and Salt Foot Soak

    Fill a basin with comfortably warm water. Add half a cup of milk, one or two spoons of salt, and a small splash of olive oil. Soak your feet for 10 to 15 minutes. The warmth relaxes the skin, milk helps soften dry patches, and oil begins restoring lost moisture.

    Step 2: Mild Exfoliation for Rough Areas

    Combine sugar or fine salt with olive oil or coconut oil to form a thick paste. Gently massage it onto your heels in circular motions, focusing on rough spots. Avoid harsh scrubbing, as fragile skin responds better to gentle exfoliation. Rinse with warm water when finished.

    Step 3: Nourishing Honey and Yogurt Mask

    Mix one tablespoon of honey with one tablespoon of thick yogurt and a few drops of oil. Apply generously to cracked areas and leave on for 10 to 15 minutes. This blend delivers deep moisture and soothing comfort. Rinse lightly and pat dry with a towel.

    Overnight Oil Care for Lasting Softness

    Before bed, warm a small amount of olive oil or coconut oil and massage it into your heels for several minutes. Put on clean cotton socks to lock in moisture overnight. By morning, your heels often feel softer, smoother, and less tender.

    Simple Daily Habits to Keep Cracks Away

    Once your heels improve, consistent habits help maintain results. Apply moisturizer after showering and avoid excessively hot water. Rotate your shoes, stay hydrated throughout the day, and address dryness as soon as it appears. These small actions help prevent deep cracks and discomfort from returning.

    Knowing When Home Care Isn’t Enough

    If heel cracks become deep, start bleeding, or don’t improve with regular care, professional advice may be needed. Certain health conditions can slow healing, and a doctor or podiatrist can guide proper treatment. While home remedies offer comfort, medical support ensures full recovery when required. Most cracked heels come from untreated dryness, and with consistent warmth, oils, patience, and basic ingredients, your feet can return to feeling comfortable and well cared for as they support you every day.

    Natural Ingredient Heel Care Benefits Recommended Use
    Olive Oil / Coconut Oil Penetrates deeply to hydrate cracked heels and soften hardened skin Night-time massage, nourishing base for DIY scrubs
    Honey Locks in moisture, calms irritation, and encourages skin repair Healing mask mixed with warm milk or natural oil
    Milk / Yogurt Gently loosens dead skin cells using natural lactic acid Soothing foot soak or creamy softening pack
    Sugar / Salt Exfoliates rough layers and smooths uneven heel texture Foot scrub applied after soaking feet in warm water
    Banana / Avocado Feeds skin with vitamins and healthy fats for deep nourishment Thick hydrating mask for very dry or cracked heels
  • Natural At-Home Treatments That Strengthen Hair Roots and Reduce Ongoing Hair Loss Over Time

    Natural At-Home Treatments That Strengthen Hair Roots and Reduce Ongoing Hair Loss Over Time

    Hair carries a quiet record of daily life. It reflects late nights, skipped meals, hurried showers, tight styles, harsh products, and prolonged stress. Hormonal changes, shifting seasons, and the steady passage of time all leave their mark. Often, long before hair fall becomes noticeable, the body sends gentle signals asking for rest, nourishment, and softer care. Modern routines make these signs easy to overlook. With frequent coloring, heat styling, and over-washing, hair is pushed to keep pace. When shedding increases, quick fixes are tempting. Yet a slower, more supportive approach exists—home remedies that work alongside the body instead of forcing change.

    Oil Rituals: Nourishing Hair from Root to Tip

    Hair oiling is a time-honored practice rooted in tradition. Warming oil between the hands and gently massaging it into the scalp does more than soften strands—it encourages circulation and relaxation. Coconut oil helps limit protein loss and shields dry, fragile hair. Castor oil, thicker in texture, is often used sparingly to support scalp moisture. Almond, sesame, and olive oils each offer their own strengths. There is no universal choice; custom blends often work best. Consistent oiling paired with a gentle massage nourishes the scalp, supports stronger roots, and adds a calming pause to busy routines.

    Scalp Massage: A Simple Step with Lasting Impact

    The massage itself matters as much as the oil. Using fingertips in slow, circular movements helps increase blood flow, supporting the delivery of oxygen and nutrients to hair follicles. Beginning at the hairline and working backward awakens the skin beneath the hair. Just five to ten minutes, a few times a week, can lead to visible changes. Beyond physical benefits, scalp massage encourages relaxation, easing tension and stress that can quietly contribute to ongoing hair shedding.

    Herbal Oils and Thoughtful Natural Infusions

    For those drawn to a more hands-on approach, oils can be infused with herbs at home. Ingredients like rosemary, curry leaves, hibiscus, and fenugreek are commonly used. Slowly warming these herbs with oil and allowing them to steep transfers their natural compounds into the blend. Rosemary is often linked with improved circulation, while hibiscus and fenugreek support conditioning and strength. The process is unhurried and intentional, creating a personalized oil that feels both nourishing and grounding.

    The Gentle Power of Everyday Kitchen Remedies

    Many effective hair treatments are already found at home. Simple ingredients such as seeds, yogurt, eggs, and aloe can support scalp health and reduce breakage. These remedies may not deliver instant change, but they encourage consistency and mindful care. Preparing them by hand reconnects hair care with self-care, reminding us that nourishment does not always come from packaged products.

    Fenugreek: Small Seeds with Steady Benefits

    Fenugreek seeds are traditionally soaked overnight and blended into a paste for scalp use. Rich in proteins and natural compounds, fenugreek is often used to help reduce shedding and improve hair texture. Applied once or twice a week for short durations, it can leave hair feeling thicker and more resilient. As with all natural treatments, moderation and awareness of scalp sensitivity remain important.

    Aloe Vera: Cooling Care for a Balanced Scalp

    Aloe vera provides soothing support for irritated or oily scalps. Its gel helps calm inflammation, balance oil levels, and gently clear buildup that may block follicles. Applied directly to the scalp for twenty to thirty minutes, aloe helps maintain a healthier scalp environment. It can also be blended with oils or yogurt for added nourishment.

    Protein-Rich Masks from Simple Foods

    Hair exposed to heat or sunlight often benefits from added protein. Masks made with egg and plain yogurt help temporarily strengthen the hair shaft, improving smoothness and limiting breakage. Applied to damp hair and rinsed with cool water, these treatments are best used occasionally, offering reinforcement without overwhelming the hair.

    Nutrition, Stress, and the Deeper Foundations of Hair Health

    Hair condition closely mirrors overall well-being. Nutrient deficiencies, ongoing stress, hormonal changes, and poor sleep patterns often show up first as increased shedding or thinning. While topical care supports the scalp, internal balance is just as vital. Diets that include adequate protein, iron, zinc, and healthy fats provide essential building blocks. Proper hydration and mindful eating quietly contribute to long-term strength and growth.

    The Hidden Role of Stress in Hair Shedding

    Stressful periods or illness can trigger delayed hair fall, a response where strands enter a resting phase before shedding months later. Managing stress through gentle movement, breathing practices, rest, and reduced screen time supports the body’s natural repair cycles. As stress hormones ease, hair growth patterns can gradually return to balance.

    Everyday Habits That Preserve Hair Strength

    Daily routines shape hair health over time. Choosing mild shampoos, avoiding excessive washing, and focusing cleansing on the scalp help protect natural oils. Conditioning the lengths minimizes friction and breakage. Limiting heat styling, opting for loose hairstyles, and using smooth pillowcases all help shield delicate strands from unnecessary damage.

    Nutrient Role in Hair Health Common Daily Food Options
    Protein Essential for forming keratin, which gives hair its strength and structure. Lentils, pulses, eggs, fish, paneer, tofu, mixed nuts, seeds
    Iron Helps carry oxygen to hair roots, supporting healthy growth cycles. Spinach, beetroot, kidney beans, lentils, pumpkin seeds
    Biotin & B-Complex Vitamins Promote energy production and cell renewal in hair follicles. Whole grains, eggs, almonds, seeds, green leafy vegetables
    Omega-3 Fatty Acids Maintain scalp moisture and help calm inflammation around follicles. Flaxseeds, chia seeds, walnuts, oily fish
    Zinc & Selenium Assist in repairing hair tissue and protecting follicles from damage. Seeds, nuts, whole grains, milk products, legumes

    Gentle Detangling as a Meaningful Care Ritual

    The way hair is handled makes a real difference. Slow, careful detangling starting from the ends and working upward with a wide-toothed comb helps prevent unnecessary shedding. Using a small amount of oil or leave-in conditioner minimizes friction and breakage. This mindful approach transforms everyday grooming into a moment of awareness, making it easier to notice early signs of dryness or weakness before damage progresses.

    Building a Simple and Sustainable Weekly Routine

    Hair care does not have to feel complicated or exhausting. A balanced rhythm—oil massage a few times a week, one nourishing mask weekly, gentle daily handling, balanced meals, and regular stress relief—can be both realistic and effective. Improvements often emerge gradually over several months, showing up as less shedding, better texture, and new growth. These signs reflect not only healthier hair, but a body that feels supported enough to grow again.

    Deepening Connection and Trust with Your Body

    Home remedies are rooted in patience rather than quick results. They invite listening, observation, and adjustment, recognizing that what suits one person may not suit another. Using familiar ingredients and gentle rituals to care for hair helps build trust with the body. Ultimately, these practices nourish more than hair—they encourage a calmer, kinder relationship with oneself, from root to tip.

  • Grey Hair Coverage Shifts Toward New Natural Methods Gaining Rapid Attention

    Grey Hair Coverage Shifts Toward New Natural Methods Gaining Rapid Attention

    The Gentle Shift in Hair Coloring Gray hairs bring a decision point. You can either show them off or cover them up in a way that feels natural. People everywhere are looking for something different now. They want to reduce the appearance of gray hair and look more vibrant without using strong chemical dyes. A gentler method of coloring hair is becoming popular in homes around the world. This shift reflects a broader change in how we think about aging and beauty. Many individuals are moving away from harsh treatments that damage their hair over time. Traditional dyes often contain ammonia & other aggressive ingredients that strip hair of its natural moisture. These products can leave hair feeling dry and brittle after repeated use. The new approach focuses on nourishing the hair while gradually blending away the gray. This method respects the natural texture and health of your hair rather than fighting against it. The appeal of gentler coloring options extends beyond just avoiding chemicals.

    The Science Behind Grey Hair and Its Impact on Appearance

    Hair does not suddenly turn grey. Each strand emerges from a follicle in the scalp, where specialized pigment-producing cells called melanocytes inject colour into the hair shaft during growth. This pigment, primarily melanin, defines your natural hair shade. Over time, factors like ageing, genetics, long-term stress, and lifestyle habits can slow down or stop melanocyte activity. When this occurs, new hair grows with reduced or no pigment, appearing grey or white. Grey hair is therefore not discoloured old hair, but entirely new hair forming without melanin.

    The protein structure of hair, keratin, naturally has a pale yellow hue. As melanin disappears, this tone becomes visible, especially under bright lighting. Ageing also reduces scalp sebum, which keeps hair smooth and shiny. Lower oil production makes grey hair feel rougher, look dull, and frizz more easily. Changes in texture affect how hair bends and sits, explaining why grey strands often feel wiry or unruly.

    Visually, even a few white hairs against darker hair create a sharp contrast around the face. This contrast can highlight shadows, under-eye circles, and fine lines, making features appear more tired. For many, changes in texture and light reflection influence appearance more than the colour shift itself.

    Why Traditional Hair Dye Is Losing Popularity

    Permanent hair dye has long been the go-to solution for greys. These products open the hair cuticle with ammonia or similar agents, allowing pigment to penetrate deeply through an oxidising process. While the initial results can look polished, repeated applications often weaken hair, especially fragile grey strands. Damaged cuticles lead to tangling, dryness, and brittleness, and sensitive scalps may experience itching or irritation.

    Maintenance is another challenge. Permanent dye produces visible regrowth lines every few weeks, requiring regular salon visits. As beauty trends shift, many prefer gentler, lower-maintenance options that preserve natural dimension rather than demanding perfection. The focus is now on subtle changes rather than full coverage.

    Natural Darkening: From Kitchen Remedies to Hair Treatments

    Plant- and food-based colour boosters are gaining traction as part of a softer approach. These methods do not bleach or permanently alter hair structure. Instead, they sit on the surface, gradually creating a translucent layer of colour while enhancing shine. Among these, cocoa powder has emerged as particularly effective.

    Cocoa contains natural pigments and polyphenols that gently deepen light to medium brown hair over time. On grey strands, it softens stark whiteness, allowing hair to blend more naturally. Rather than acting like permanent dye, cocoa functions as a tinted conditioning treatment that gradually enhances colour while improving texture.

    How Cocoa Works to Darken Grey Hair

    Cocoa-based treatments coat the hair shaft, forming a soft brown veil that washes out gradually. Mixed with conditioners or oils, cocoa helps retain moisture and smooth the cuticle. Many notice that grey hair becomes shinier, less coarse, and easier to manage with regular use. The effect is subtle, creating a more harmonious overall tone rather than full coverage.

    A Simple At-Home Cocoa Treatment

    For short to medium hair, mix one tablespoon of pure, unsweetened cocoa powder with a generous amount of lightweight, oil-free conditioner. Stir until smooth and evenly coloured.

    Apply to freshly washed, towel-dried hair, focusing on visible grey areas such as temples, partings, and hairline. Use a wide-tooth comb for even distribution. Leave on for 15–20 minutes, then rinse with lukewarm water. Avoid shampooing immediately afterward, as this removes most surface pigment.

    Natural Hair Colour Result After Cocoa Application Recommended Usage Frequency
    Light Brown Visible warm tone boost, grey strands blend faster Apply 1–2 times weekly
    Medium Brown Enhances richness, greys appear naturally mixed Once per week
    Dark Brown / Black Adds shine with mild warmth, minimal colour shift Every 7–10 days for gloss effect
    Blonde May turn patchy or dull in tone Patch test advised or avoid use

    Can Cocoa Treatments Make You Look Younger?

    Grey hair alone does not define age. Haircut, skin quality, posture, and clothing all play a role. However, high contrast between dark hair and white strands can accentuate facial shadows and fine lines. By softening this contrast, cocoa treatments help create a more balanced and rested appearance.

    Younger-looking hair focuses on shine, hydration, and shape rather than complete grey coverage. Smooth, reflective hair frames the face, brightening the eyes and subtly lifting features. Reduced frizz around the face also enhances how skin looks both in person and on camera.

    Where Natural Methods Are Effective—and Where They Are Not

    Natural colour adjusters like cocoa, coffee, black tea, or sage work best for individuals with up to 40–50% grey who want blending rather than full coverage. These methods appeal to those who favour gradual change, warmer tones, and minimal upkeep. Dramatic shifts in one session are unlikely, as these treatments require repeated use and patience.

    Even natural methods carry some risk. Cocoa may trigger reactions in sensitive individuals, making a patch test essential. Over time, build-up may occur, so occasional use of a mild clarifying shampoo helps maintain shine and lightness.

    How This Trend Is Shaping Modern Beauty

    The rise of cocoa and similar treatments reflects changing beauty ideals. Uniform hair colour is no longer the sole marker of youth. Blended greys, soft tints, and translucent coverage now appear in fashion and social media, promoting individuality over strict correction.

    Many people now choose to soften greys without fully erasing them, combining natural tints with strategic cuts, scalp care, and nutrition. While supplements cannot reverse greying, nutrients such as omega-3s, iron, zinc, and B vitamins support healthy new hair growth.

    Complementary Gentle Options

    Cocoa treatments can be paired with mild methods like black tea or coffee rinses to deepen tone, or sage and rosemary infusions for subtle shading and scalp freshness. Rotating treatments prevents hair from appearing too warm or flat.

    Professional guidance can help too. Colourists now specialize in grey blending using low-impact dyes alongside plant-based glosses. Maintaining results at home with cocoa or tea masks extends time between salon visits and reduces chemical stress. Testing on a small hidden section first ensures the hair responds well.