Blog

  • 12 New Year Nail Designs for 2026 Inspired by Instagram and TikTok

    12 New Year Nail Designs for 2026 Inspired by Instagram and TikTok

    The new year feels like a fresh start & if you want 2026 to be your year then your nails should reflect that mindset. With all the holiday activities & celebrations happening it makes sense to update your look. Nails have become more than just an accessory because they represent how you want to present yourself and can influence your confidence for the months ahead. Whether you prefer simple polished styles or dramatic eye-catching designs your New Year manicure should express your personality and help you feel ready to take on whatever comes next. The right nail design can actually boost your mood and give you that extra push to tackle your goals. When you look down at your hands and see a manicure that makes you happy it creates a small moment of satisfaction throughout your day.

    As 2025 comes to an end we’ve watched countless nail trends emerge and choosing the right style to begin 2026 can feel overwhelming. But there’s no need to worry because we have plenty of options for you. Whether you want something understated or eye-catching or a design that lasts through the holidays or one that captures the spirit of New Year’s Eve you’ll find what you need here. Expect to see delicate bows and gemstone details along with glitter and metallic finishes that will make you shine like a disco ball as you celebrate the arrival of 2026. I’ve gathered 12 nail designs that are currently popular on social media to help you create your New Year’s look so you can start the year with a manicure that matches the excitement of what 2026 will bring.

    Elegant Gold Bow Accents for a Luxe New Year Look

    Delicate Gold Bows for an Elegant New Year Manicure A simple manicure can be transformed with the addition of delicate gold bows. This festive design offers a subtle and elegant appearance that works perfectly for New Year celebrations without being overly flashy or attention-grabbing.

    Crystal Gemstone Nails That Sparkle on Social Media

    Gemstone Nails for New Year 2026 Gemstones add immediate shine to any nail design. These nails are playful and eye-catching while bringing the perfect amount of glamour for celebrating the arrival of 2026.

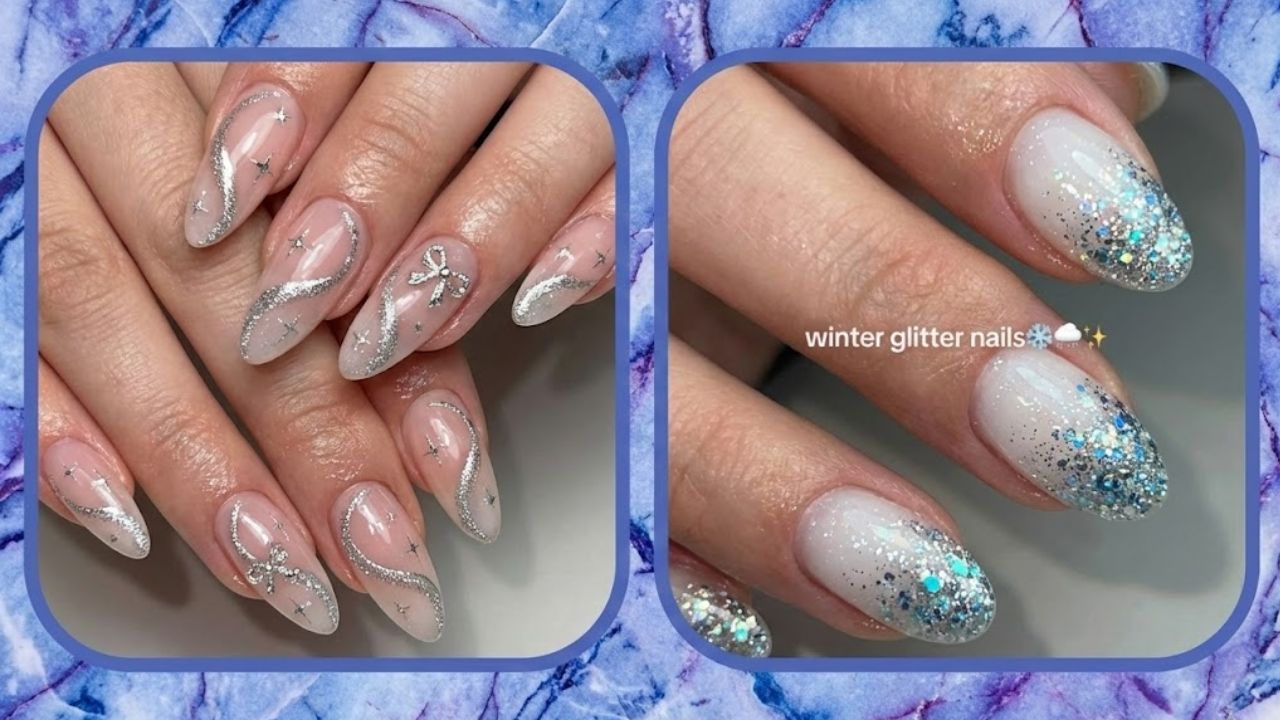
    High-Shine Disco Nails Perfect for New Year Parties

    Sparkling Nails for New Year’s Eve These nails have a shiny and shimmery finish that works well for parties. This nail trend helps you sparkle when you watch the ball drop on New Year’s Eve. The glittery design catches light nicely and adds glamour to your celebration look.

    Mysterious Black Cat-Eye Nails with Magnetic Glow

    Cat Eye Nails for a Dramatic New Year Look Cat eye nails offer a moody and sleek appearance that works perfectly when you want to embrace a darker and more dramatic style for New Year celebrations.

    Deep Dark-Green Nails Inspired by Winter Aesthetics

    If you want something more simple to help you through the holidays this year then these dark green nails are perfect for you.

    Minimal Sheer Nails with Soft Polka-Dot Details

    A transparent foundation featuring polka dots produces an easily stylish appearance. This combination brings together playful elements and neat design that works well for the new year.

    Bold Pink and Red Stripe Nails Trending Online

    Looking for something a little more playful? These pink and red striped nails are totally eye-catching and perfect for standing out.

    All-Over Glitter Nails for a Statement New Year Style

    Sparkle and Shine This look never goes out of style and works perfectly for New Year’s Eve celebrations. You can keep it subtle with just a touch of shimmer or go all out with full sparkle coverage.

    Glam Red Nails with Studded Embellishment Details

    The studded detailing adds an edgy twist to a simple nail design that works perfectly for anyone wanting a cool girl aesthetic.

    Modern Reverse French Tips with a 2026 Twist

    Modern French Tip Manicure This style gives the traditional french tip a fresh update. You can customize it with different colors to match your outfit for the new year.

    Gold Star Nail Designs for a Celestial New Year Vibe

    This look is perfect for New Year’s Eve celebrations. The gold stars add a cute & whimsical touch while bringing just the right amount of festive spirit to your style.

    Dreamy Pink Aura Nails Taking Over Instagram

    Pink Aura Nails: A Fresh Look for 2026 Pink aura nails create a gentle glowing appearance that looks modern & stylish. This nail design brings a sense of freshness that perfectly captures current beauty trends.

  • 8 Yoga Poses That Support Mental Well Being

    8 Yoga Poses That Support Mental Well Being

    Yoga offers more than just physical benefits as it serves as an effective method for supporting mental health. Through attention to breathing patterns and mindful movement yoga works to lower stress levels and improve emotional balance while creating feelings of calmness and mental clarity. When you want to strengthen your psychological wellness these eight yoga poses can help decrease anxious feelings and sharpen concentration while building inner tranquility.

    Grounding Calm Through Child’s Pose (Balasana)

    Why it helps your mental health: Child’s Pose is a gentle resting position that gives you a peaceful moment to unwind. It reduces stress & helps quiet your thoughts while creating a feeling of calm from within. How to practice it: Begin on your hands and knees and sit your hips back toward your heels. Stretch your arms out in front of you on the floor. Place your forehead down and let your whole body soften as you breathe slowly. Benefits: Reduces stress and body tension. Soothes your nervous system. Encourages deep relaxation.

    Release Mental Tension With Downward-Facing Dog (Adho Mukha Svanasana)

    Why it helps your mental health: Downward-Facing Dog counters stress by stretching your entire body and calming your mind at the same time. This pose works your whole body and helps blood flow better while lifting your mood & easing physical tension. How to perform it: Begin on your hands and knees and then raise your hips up toward the ceiling to create an upside-down V shape with your body. Push your palms firmly into the mat and straighten your legs as far as you comfortably can while maintaining a straight back. Benefits: Reduces stress and physical tension; enhances blood circulation; increases energy levels and improves mood.

    Build Inner Confidence Using Warrior II (Virabhadrasana II)

    Why it helps your mind: Warrior II builds your inner strength & helps you stay focused and steady. This pose teaches you to find your center & keep your balance. It works well for building mental toughness and boosting your confidence. How to practice it: Stand with your feet far apart and point one foot to the side. Bend your front knee until it makes a right angle. Stretch both arms out to your sides while keeping your shoulders loose. Look straight ahead over your front hand. What it does for you: This pose makes you physically stronger & sharpens your focus. It clears your mind and builds confidence. You will feel more powerful and capable after holding this position.

    Improve Focus and Emotional Balance With Tree Pose (Vrksasana)

    Why it helps your mental health: Tree Pose strengthens your balance and sharpens your focus while promoting a mindful state. Standing upright with intention creates a connection between your body & breathing that settles your thoughts and eases anxious feelings. How to practice it: Begin by standing with both feet touching. Gradually raise one foot and place it against the inner thigh or calf of your standing leg but keep it away from your knee joint. Press your hands together at chest level or raise your arms above your head. Choose a fixed spot to look at for maintaining your balance. What you gain: Better concentration and mental clarity; lower stress and anxiety levels; enhanced feelings of stability & being grounded.

    Soothe the Nervous System Through Seated Forward Bend (Paschimottanasana)

    Why it helps your mental health: Tree Pose builds your balance & improves your focus while creating a calm mindset. Standing tall with purpose forms a link between your body and breath that calms your mind and reduces anxious thoughts. How to practice it: Start by standing with your feet together. Slowly lift one foot and rest it on the inner thigh or calf of your other leg but avoid placing it on your knee. Bring your palms together at your chest or extend your arms overhead. Find a single point to stare at to help you stay balanced. What you gain: Improved focus and clearer thinking along with reduced stress & anxiety. You will also feel more stable and connected to the ground beneath you.

    Lift Mood and Energy Levels With Cobra Pose (Bhujangasana)

    Why it’s great for mental well-being: Cobra Pose is a gentle backbend that opens your chest and heart area. It helps improve your mood by activating energy centers throughout your body & creates feelings of openness & self-confidence. How to do it: Start by lying face down on the floor with your legs stretched out behind you. Place your palms flat on the ground directly under your shoulders. Take a breath in and slowly lift your chest upward using your back muscles instead of pushing with your hands. Make sure your elbows stay slightly bent & look straight ahead. Benefits: This pose opens your chest and heart region while promoting feelings of openness and confidence. It also helps improve mental clarity and focus.

    Deep Relaxation and Mental Reset Using Savasana (Corpse Pose)

    Why it helps your mental health: Savasana is the best relaxation pose in yoga. It lets your body & mind absorb all the good things from your practice while easing stress and helping you relax deeply. This pose is key for quieting your thoughts and lowering anxiety levels. How to practice it: Lay flat on your back and stretch your legs out straight. Place your arms at your sides with your palms turned upward. Close your eyes and pay attention to your breathing while releasing any thoughts or tightness in your body. Hold this position for 5 to 10 minutes. What it does for you: It lowers stress and anxiety levels. It creates deep relaxation throughout your body. It brings back your energy & helps you feel balanced again.

    Reduce Stress and Anxiety With Legs Up the Wall (Viparita Karani)

    Why it helps your mind: Legs Up the Wall is a gentle pose that helps you relax and feel less stressed. It soothes your nervous system and helps you breathe more deeply while easing tightness in your legs and lower back. How to practice it: Sit sideways next to a wall & then lie back while lifting your legs up against it. Let your arms rest comfortably at your sides and pay attention to your breathing. Hold this position for 5 to 10 minutes. What you gain: Less stress & worry; a calmer nervous system; better blood flow throughout your body.

  • Grow Aloe Vera at Home for Treating Sunburns and Skin Irritation

    Grow Aloe Vera at Home for Treating Sunburns and Skin Irritation

    The first time you put cool aloe gel on a sunburn feels amazing. The heat fades away. Your tight skin relaxes. It feels like your skin can finally breathe again. Now picture this: instead of searching through drugstore shelves for a plastic bottle filled with strange chemicals you simply walk to your windowsill or balcony. You break off a thick green leaf from your own aloe vera plant and squeeze the clear gel right onto your skin. It’s fresh and natural and you grew it yourself.

    The Plant That Patiently Awaits Your Sunny Mistakes

    Aloe vera is the kind of plant that never holds a grudge. Forget to water it for days—or even weeks—and it stays calm. Move it from one window to another and it doesn’t protest. It simply waits, quietly storing water inside its thick, pointed leaves, ready for the moment you stay too long in the sun, underestimate a midday hike, or irritate your skin without meaning to.

    When that moment comes, you’ll be thankful this desert survivor has been sitting in your home all along. Aloe vera may be famous for soothing burns and skin trouble, but as a houseplant it’s refreshingly simple. It doesn’t need special treatment or constant attention—just light, warmth, and time to dry out between waterings. Give it that, and it rewards you with healing gel and a calm, natural presence that makes any room feel grounded.

    If you can manage a sunny window and remember not to overwater, aloe vera will do the rest.

    Choosing Your First Aloe: Plump Leaves and Healthy Roots

    Before aloe can help your skin, you need to choose a strong plant. Not every aloe on a store shelf is in good shape, and starting with a healthy one makes care much easier.

    Look for an aloe with upright, firm leaves that feel thick and full. The color may range from soft gray-green to deeper green, sometimes with natural spotting. Avoid plants with mushy areas, yellowing leaves, or a sour smell coming from the soil. Leaves that droop or fold often signal trouble below the surface.

    A healthy aloe feels solid, like it’s holding water without being soft. Since this plant evolved in dry climates, anything that looks waterlogged is best left behind.

    The Right Pot and Soil for a Desert Plant

    Aloe vera needs air around its roots. That means good drainage is non-negotiable. Always choose a pot with drainage holes, and never let the plant sit in standing water.

    Use a fast-draining soil mix designed for succulents or cacti. You can also make your own by mixing regular potting soil with coarse sand or perlite. The goal is simple: water should pass through easily, leaving the roots moist but never soaked.

    Watering the Aloe Way: Infrequent but Thorough

    Most aloe problems come from too much water. It’s easy to feel guilty and water often, but aloe prefers restraint. Constant moisture suffocates its roots and leads to soft, collapsing leaves.

    Instead of following a schedule, check the soil. Push your finger a couple of inches down. If there’s any moisture, wait. Only water when the soil is completely dry.

    When you do water, soak the soil thoroughly until water drains out the bottom. Then leave it alone. In warm months, this might be every 10–14 days. In winter, once a month is often enough.

    Soft, translucent leaves usually mean overwatering. Thin, wrinkled leaves mean the plant is using up its stored water. Aloe thrives when it’s slightly ignored.

    Aloe Care Element Best Conditions Warning Signs of Problems
    Sunlight Plenty of bright light, with mild direct sunlight preferred Long, weak leaves, faded color, or brown burn marks on tips
    Watering Water thoroughly only when the soil is completely dry Soft or mushy leaves, root decay, or deeply wrinkled foliage
    Soil Type Loose, fast-draining cactus or succulent soil mix Water-logged, dense soil causing poor root health
    Temperature Range Warm conditions between 65–85°F (18–29°C) Cold damage, slowed growth, or leaf injury from frost
    Fertilizing Minimal feeding once or twice during spring or summer Excessively soft growth or white salt buildup on soil surface

    Light and Temperature: Creating a Comfortable Home

    Aloe vera loves bright light. A south- or west-facing window works best, where it can enjoy several hours of sun. However, sudden exposure to intense sunlight can scorch the leaves, causing brown or bronze patches.

    If your plant has been in low light, introduce stronger sun gradually. Leaves stretching toward the window mean it needs more light. Pale or crispy areas mean it needs protection from harsh rays.

    Aloe prefers temperatures between 65–85°F (18–29°C). It tolerates brief cool spells but cannot survive frost. During warm months, aloe can enjoy time outdoors if it’s slowly acclimated and brought inside before cold nights arrive.

    Harvesting Aloe Gel Without Stressing the Plant

    Cutting into a mature aloe leaf reveals its clear, cooling gel—nature’s instant relief for mild burns and irritation. Harvesting correctly keeps both you and the plant happy.

    Choose large, outer leaves near the base. Cut them cleanly close to the stem, avoiding the central new growth. Let the leaf stand upright for a few minutes so the yellow sap can drain away.

    Trim off the spiny edges, peel back the green skin, and use the clear gel inside. Apply it directly to clean skin. The cooling effect is immediate and soothing, helping calm inflammation and restore moisture.

    Extra gel can be stored in the refrigerator for a few days, as long as it stays clear and fresh.

    Growing More Aloe: From One Plant to Many

    With proper care, aloe vera produces small offshoots called pups. These baby plants grow at the base and can be separated to create new aloe plants.

    Wait until the pups are a few inches tall. When the soil is dry, gently remove the plant from its pot and separate the pups, making sure each has roots. Plant them in small pots with well-draining soil.

    Keep new plants in bright, indirect light for the first week and water lightly. Soon, they’ll establish themselves and grow independently, ready to become gifts or new additions around your home.

    Understanding Aloe’s Quiet Signals

    Aloe vera communicates through its leaves. Soft, drooping leaves usually mean too much water. Brown, crispy tips can signal too much sun or sudden exposure. Pale, stretched leaves indicate a need for more light.

    Occasionally, pests like spider mites or mealybugs may appear. Gently wiping the leaves with a damp cloth and mild soap usually solves the problem.

    What makes aloe special is its resilience. Even a neglected plant often recovers once conditions improve. It doesn’t ask for perfection—just attention to its simple needs.

    Over time, aloe becomes more than decoration. It’s a quiet reminder that healing doesn’t have to be complicated, and that sometimes the best medicine sits patiently on a sunny windowsill.

  • Shape Perfect Eyebrows at Home Without Professional Salon Appointments

    Shape Perfect Eyebrows at Home Without Professional Salon Appointments

    The first time you notice your own eyebrows is rarely a gentle moment. It might happen in the harsh lighting of a school bathroom when a friend leans toward the mirror and says you should get your brows done. It could be in one of those magnifying hotel mirrors that shows every single hair. Or maybe it happens on an ordinary morning when you’re brushing your teeth & the light comes through the curtain just right and you suddenly see that your left eyebrow looks completely different from your right one. However it happens you have this quiet realization that your eyebrows are not just background details. They tell a story about your face and shape how you express yourself and your moods.

    The Ritual of Eyebrows and Why Home Is the Best Studio

    There is something personal about shaping your own eyebrows at home. It becomes a quiet moment that feels more like refining something you know well than just another beauty task. Salons treat brows like quick transactions: apply wax and strip it off and smooth the skin and collect payment and move to the next client. At home you take your time. You notice each individual hair & lean in close to the mirror & see the soft fuzz near your temples and observe how your brow lifts slightly when you focus. Without the time pressure of salon bookings or someone else deciding what looks perfect you can pay attention to what your face actually needs. You can decide to keep the dramatic arch that makes you look interested in everything or maintain the fuller front section that makes your neutral expression seem gentler. Doing your own brows is not just about saving time and money. It gives you control over one of the most expressive features on your face. The beauty industry wants you to believe otherwise but you do not need professional training or special lighting or a collection of fancy tools to do this properly. You need some patience and basic supplies & the willingness to work slowly enough to really look at yourself.

    Know Your Landscape: Mapping the Brows You Already Have

    Before you remove any hair you need to do something simple but important called mapping. This is like studying the area before you begin working on it. Stand near a window if possible because natural light shows things most accurately. Get an eyebrow pencil that you like using. It does not need to be expensive or special. The goal is not to copy someone else’s eyebrow style. You want to find the best version of your own natural shape. Here is an easy method to discover your natural eyebrow shape:

    Start of the brow: Hold the pencil straight up against the side of your nose. The spot where it touches your brow marks the natural starting point. Any stray hairs growing past that line toward your nose can be removed later. Arch: Keep the pencil against your nose & tilt it until it lines up with the outer edge of your iris. The point where it meets your brow shows where your arch should naturally peak. End of the brow: Angle the pencil from your nose to the outer corner of your eye. Where it crosses your brow marks where your brow should end. When you do this you will notice small differences between your brows. One might sit slightly higher or one tail might extend a bit longer. This is completely normal. Brows are siblings and not twins. Your goal should be creating balance rather than making them look exactly the same. You can use your pencil to lightly sketch your ideal shape while staying close to your natural brow line. During this mapping process something interesting happens. You begin to see how expressive your brows really are. A slight lift can make you look more awake than you actually feel. A flatter shape can give off a calm & serious impression. You are not simply grooming hair. You are adjusting how your face communicates emotion.

    Tools of the Quiet Artist

    Your At-Home Brow Studio Essentials You can easily transform your bathroom into a personal brow studio without much effort. However having the proper tools determines whether your grooming session feels rewarding or becomes an annoying struggle. This straightforward guide works perfectly on your phone so you can save it for quick reference

    Tool Purpose Helpful Tips
    Slant-tip tweezers Helps remove individual unwanted hairs accurately Pick tweezers with a firm grip and pull hair in the natural growth direction
    Spoolie brush Neatly combs brows and shows their natural shape Brush brows upward and outward before starting any grooming step
    Small brow scissors Used to trim extra-long brow hairs Cut only the ends of hairs; avoid trimming too close to the skin
    Eyebrow pencil or powder Fills gaps and enhances brow definition Apply with soft, hair-like strokes using a shade close to your hair color
    Optional: small razor or wax strips Removes fine hair around the brow area Use carefully and stay away from the main brow line until experienced

    The Slow Art of Tweezing: Less, Always Less

    Every overplucked brow starts with good intentions. You think you will just clean up a little and twenty minutes later you are searching online for how fast eyebrows grow back. The key to doing this at home is simple: always do less than you think you should. Start with clean skin. Wash your face with warm water and dry it gently. Take your spoolie brush and comb the hairs upward and then outward in the direction they naturally grow. Now you can see clearly which hairs need to go: the strays under the arch and a few random ones between the brows and maybe some fine hairs along the top. Begin with the obvious strays that sit far outside your natural shape. Hold the skin steady with one hand and use your tweezers with the other hand. Pluck in the direction the hair grows. Each small pull is a choice you make. This one stays and that one goes. You are editing your brows and not erasing them. Stop every few hairs and step back from the mirror. This distance of a step or two is where you actually live your life & not pressed up against the glass. From here you can see if you still look like yourself but slightly better or if you are starting to look like someone else entirely. If you have sensitive skin you can prepare it first. Press a warm washcloth over your brows for a minute or tweeze right after a shower when your pores are relaxed. There is still a small sharp feeling with each pluck that reminds you that you are changing something on your face. Breathe slowly and take your time with it.

    Trimming the Rebels Without Flattening the Whole Story

    Eyebrow trimming requires a careful approach. When done properly it makes messy brows look neat while maintaining their natural thickness and shape. When rushed it creates harsh and unnatural edges that look artificial. Use a spoolie brush to comb your brows straight upward so the longest hairs stick out above the natural brow line. Then take small sharp scissors and cut only the tips that clearly extend past that upper edge. Think of it like trimming the tallest blades of grass rather than cutting everything down. Brush the hairs back into their normal position. The shape will immediately look better with more defined arches and reduced bulk that makes your face appear more awake. Avoid the urge to keep trimming more. Trimming works like adding salt to food where you can always do more later but you cannot reverse excessive cutting.

    Color, Gaps, and the Illusion of Fullness

    Most eyebrows are not naturally even. There are small gaps where hair grows less densely or maybe a scar cutting through the arch or ends that fade into thin wisps. This is where tint or pencil or powder comes in to gently enhance what is already there rather than create something new. Think of it like sketching with a soft pencil on delicate paper. The goal is to be subtle rather than obvious. Use small light strokes that follow the direction of hair growth especially in areas where the brow line looks incomplete. Near the front go even lighter because too much product there can make eyebrows look harsh or artificial. At the tail you can add a bit more definition and taper the end into a soft point instead of a blunt edge. The color choice is important. As a general rule pick one shade lighter than your natural brow hair if you have very dark hair & one shade darker if you have very light hair. This small adjustment prevents the result from looking too harsh or too faded. The aim is to create the appearance of fuller and healthier eyebrows rather than painting solid blocks of color on your face. After you finish brush through again with the spoolie brush. This blends the product into the hairs & softens any obvious lines while showing whether anything looks too heavy. If it does lightly run a clean fingertip or cotton swab over that area. Eyebrows look better when they are not overdone.

    Aftercare: Soothing the Canvas You Just Touched

    When you finish your skin might tell the story before your brows do. You will see a flush of pink and tiny dots where follicles protested briefly. This is normal but what you do next matters especially if you are prone to irritation or breakouts. Press a cool damp cloth over the area for a moment. The contrast of the chill against warm freshly plucked skin feels almost indulgent. Then pat dry and apply something gentle & simple like aloe gel or fragrance-free moisturizer or maybe a light soothing serum formulated for sensitive skin. Avoid harsh active ingredients immediately afterward. No retinoids & no strong acids & nothing that would add another layer of aggression to already tender skin. For the next few hours resist touching your brows. Your fingers carry oils and bacteria that newly opened follicles do not especially enjoy. If redness lingers it usually retreats within the day. By tomorrow your brows will have settled into themselves and you will catch their new shape in passing reflections like shop windows or your phone camera or that accidental selfie & feel a quiet satisfaction. Think of this as a cycle and not a one-off crisis. Instead of going weeks between rushed salon appointments you can now tend your brows in small gentle intervals. A couple of hairs here and a tiny trim there. Like any living thing they respond best to consistent kind attention rather than sudden drastic interventions.

    Making It a Ritual, Not a Chore

    There is a special kind of peace that comes with this routine if you allow it. Rather than rushing under bright bathroom lights moments before you need to leave you can make brow shaping a regular quiet moment for yourself. It might happen on Sunday evenings when the weekend winds down and the coming week still feels fresh. Or it could be early in the morning when the house is silent and you can sense the world slowly starting its day. You arrange your tools and look at your reflection. This is not about finding flaws but about knowing your face better. You notice the curves that rise when you smile and the faint lines that show when you concentrate. You remove a stray hair that disrupts the shape you want and keep another that fits. Slowly & through these personal sessions you become skilled at understanding your own features. Professional salons serve a purpose for major changes or special occasions or for people who like being cared for by experts. But you do not need a salon to have well-shaped expressive eyebrows. In front of your own mirror with good lighting you can learn what works for your face. With each careful removal and adjustment you are doing more than grooming. You are learning to see yourself honestly and choosing thoughtfully what stays.

  • 8 Morning Yoga Routines That Help You Start the Day Energized

    8 Morning Yoga Routines That Help You Start the Day Energized

    Starting your day with yoga helps create a positive and productive mindset. A good morning yoga routine wakes up your body & clears your mind while boosting your energy levels. It also improves flexibility and balance while sharpening mental clarity. Adding a quick yoga session to your morning works for beginners & experienced practitioners alike. This simple practice can significantly improve your physical and mental health over time.

    Sun Salutations (Surya Namaskar)

    Duration: 5–10 minutes
    Benefits: Improves flexibility, builds muscle strength, and enhances blood circulation

    Sun Salutations are an effective way to energize the body and gently awaken stiff muscles. This flowing sequence of movements warms up the entire body while combining forward bends, backbends, and smooth transitions. Practicing it regularly helps release tension, improve mobility, and sharpen mental focus at the start of the day.

    How to Do It:
    Begin in Mountain Pose (Tadasana), standing upright with feet hip-width apart.
    Inhale and lift your arms overhead, then exhale and fold forward into Standing Forward Bend (Uttanasana).
    Step back into Plank Pose, lower down through Chaturanga, and transition into Cobra or Upward Dog (Bhujangasana).
    Exhale into Downward Dog (Adho Mukha Svanasana) and hold for a few breaths.
    Step forward, return to a forward fold, and slowly rise back to Mountain Pose.
    Repeat 3–5 rounds, coordinating each movement with your breath.

    Cat-Cow Pose (Marjaryasana–Bitilasana)

    Duration: 2–3 minutes
    Benefits: Enhances spinal flexibility, stretches the back and neck, and activates abdominal organs

    Cat-Cow is a gentle spinal warm-up that improves mobility and eases morning stiffness. The rhythmic movement between arching and rounding the spine helps relieve tension in the neck and lower back while encouraging mindful breathing.

    How to Do It:
    Start in a Tabletop Position with wrists under shoulders and knees under hips.
    Inhale to arch the spine into Cow Pose, lifting the chest and tailbone upward.
    Exhale to round the spine into Cat Pose, drawing the chin toward the chest and engaging the core.
    Continue flowing between these poses for several rounds, matching movement with breath.

    Child’s Pose (Balasana)

    Duration: 2–3 minutes
    Benefits: Releases tension in the back, hips, and shoulders while calming the mind

    Child’s Pose is a deeply restorative posture that encourages relaxation and gentle stretching. It allows the body to slow down, making it ideal for moments of rest or recovery during a yoga session.

    How to Do It:
    Kneel on the mat with knees slightly apart and big toes touching.
    Sit back on your heels and stretch your arms forward along the floor.
    Lower your forehead toward the mat and breathe deeply.
    Hold the pose for several breaths, allowing the body to soften and relax.

    Warrior II (Virabhadrasana II)

    Duration: 1–2 minutes per side
    Benefits: Strengthens legs, hips, and core while improving balance and focus

    Warrior II is a strong standing pose that builds endurance and stability. It opens the hips and chest, promotes body awareness, and enhances mental concentration.

    How to Do It:
    Stand tall and step your feet wide apart.
    Turn the right foot out and bend the right knee to form a right angle, keeping the left leg straight.
    Extend both arms parallel to the floor with palms facing down.
    Gaze over the right hand and hold for several breaths.
    Switch sides and repeat.

    Downward Dog (Adho Mukha Svanasana)

    Duration: 1–2 minutes
    Benefits: Stretches the full body, strengthens arms and legs, and boosts energy

    Downward Dog is a foundational yoga pose that lengthens the spine and stretches the hamstrings and calves. It also strengthens the shoulders and arms while promoting circulation and alertness.

    How to Do It:
    Begin in a tabletop position with hands under shoulders.
    Lift the hips up and back, forming an inverted V shape.
    Press the hands firmly into the mat and extend the legs comfortably.
    Hold for several breaths, focusing on spinal length and steady breathing.

    Standing Forward Fold (Uttanasana)

    Duration: 1–2 minutes
    Benefits: Stretches hamstrings and calves, calms the nervous system, eases neck tension

    Standing Forward Fold is a soothing posture that helps release tightness after rest. It encourages relaxation while gently stretching the lower body.

    How to Do It:
    Stand with feet hip-width apart.
    Inhale to lengthen the spine, then exhale and fold forward from the hips.
    Let the head hang freely and place hands on the floor or ankles.
    Breathe deeply and relax into the stretch.

    Seated Forward Fold (Paschimottanasana)

    Duration: 2–3 minutes
    Benefits: Stretches hamstrings, spine, and shoulders while calming the mind

    This seated pose offers a deep stretch that helps lengthen the spine and release stored tension. It is especially beneficial for slowing down the body and breath.

    How to Do It:
    Sit on the floor with legs extended straight.
    Inhale to sit tall and lengthen the spine.
    Exhale and fold forward, reaching toward the feet or shins.
    Hold for several breaths, deepening the stretch with each exhale.

    Corpse Pose (Savasana)

    Duration: 5 minutes
    Benefits: Promotes deep relaxation, mental calm, and full-body restoration

    Savasana allows the body to absorb the effects of the practice fully. It encourages complete relaxation and helps reset the nervous system.

    How to Do It:
    Lie flat on your back with arms relaxed by your sides and palms facing up.
    Close your eyes and bring attention to your breath.
    Allow the entire body to relax without effort.
    Remain in this pose for 5–10 minutes, breathing slowly and evenly.

  • Volumize Thin Hair Naturally Using Simple Effective Home Techniques

    Volumize Thin Hair Naturally Using Simple Effective Home Techniques

    The first time you notice your hair is thinner it feels like more than just hair. You see it in the bathroom light when your scalp shows through more than before. Your ponytail feels smaller when you hold it. The mirror stops being just a tool and becomes something that reveals too much. You tilt your head and fluff your hair & twist it around. You quietly ask yourself if it was always like this. For many people hair is not just about style. It frames your face and gives you confidence and makes you feel protected. When it starts to feel flatter or finer or more fragile you want to fix it quickly. You might grab a heavy mousse or tease it with a comb or use dry shampoo that promises to help. But often when you try to force volume with harsh products and rough techniques your hair just gets weaker. It wilts instead of looking full and natural. There is another approach. It is slower & kinder and works with your hair instead of against it. It is less like covering up a problem and more like taking care of something that needs attention. Think of each strand as something living that responds to more than just products. It responds to how you touch it & what you eat & how you sleep and how you live your life. Making thin hair look fuller naturally is not about finding one magic product. It is about making small simple choices that help your hair become fuller & healthier over time.

    Understanding Your Hair’s Landscape

    Understanding Thin Hair and Natural Volume Before learning how to add volume to thin hair you need to understand what you are dealing with. Think of your scalp like a garden where each hair follicle works like a small root. Some gardens grow thick strong trees while others resemble a sparse field with delicate grass moving in the breeze. Two factors matter most here: the thickness of individual hair strands and how many strands you actually have. You might have lots of very fine hairs or fewer hairs that are somewhat thicker or even both at once. Either way your hair can look flat & struggle to keep any volume throughout the day. Think about what happens when you use heavy creams or oils or products loaded with silicone. It works like flooding a field until everything gets pressed down and waterlogged. Even a small amount of extra weight drags fine hair down flat. Building volume naturally starts with keeping things light in both your washing routine and your daily care. Every scalp works differently too. Some make more oil and some make less. Some get irritated easily. Your scalp acts like soil that controls how well your hair can grow. When your scalp gets clogged or inflamed or ignored your thin strands cannot lift up and create volume. The real first step toward natural volume is not about styling products or techniques. It is about gently restoring balance to your hair and scalp.

    Nourish from Within: Food, Flow, and Follicles

    The Quiet Power of Everyday Nutrition

    There is something reassuring about knowing that every meal can help your hair stay healthy. No single food will transform your hair overnight, but the nutrients you consume directly affect how strong & shiny your new hair grows. Hair consists mainly of a protein called keratin, which means your follicles need plenty of protein-rich foods. Good options include eggs, beans lentils yogurt, nuts, seeds & lean fish or poultry for those who eat meat. You should also add iron from sources like leafy greens, beans and seeds. Healthy fats from avocado, olive oil and walnuts are important too. Eating a variety of colorful vegetables provides vitamins A, C & E that help with scalp circulation and collagen production.

    Meal Time Suggested Foods Hair Health Benefits
    Breakfast Oats prepared with dairy or plant-based milk, topped with fresh berries, chia seeds,
    and a small serving of yogurt
    Supports keratin production through protein, improves scalp condition with antioxidants,
    and enhances hair shine using omega-3 fatty acids
    Lunch Lentil or chickpea salad combined with leafy greens, olive oil, lemon juice,
    and pumpkin seeds
    Provides iron and zinc for reduced hair fall, along with healthy fats
    that improve blood circulation to the scalp
    Snack A handful of assorted nuts paired with one fresh fruit Supplies biotin and vitamin E for stronger hair roots,
    plus fiber to support overall body balance
    Dinner Grilled fish or tofu served with quinoa and roasted vegetables,
    lightly drizzled with healthy oil
    Delivers complete protein, essential minerals,
    and nourishing fats for long-term hair strength and repair

    The Subtle Role of Stress and Sleep

    There is another hidden factor that affects volume: stress. When stress becomes constant it can cause more hair than normal to enter the shedding phase. You might see more strands on your pillow or in the shower and this naturally makes your hair appear thinner and less full. You do not need an expensive getaway to help your hair. Small daily habits work just as well. Spending a few minutes on deep breathing before sleep or stretching your neck and scalp can make a difference. Even stepping outside briefly to feel the evening air helps. Getting enough sleep allows your body to repair itself and balance the hormones and processes that affect hair growth.

    Wash, Dry, and Care: The Everyday Rituals That Build Volume

    Light, Gentle Cleansing

    Think of wash day as your chance to bring back volume. Fine hair looks better when it is clean because natural oils make it flat quickly. However clean hair should not feel stripped bare. Strong shampoos that make your hair squeak can bother your scalp & damage the outer protective layer of each strand. Choose gentle shampoos without sulfates that are made for volume or fine hair types. These products remove extra oil without coating your strands. When you wash your hair apply shampoo mainly to your scalp since that is where oil builds up. Allow the foam to run down through the rest of your hair rather than rubbing it hard.

    Condition with Intention

    Fine or thin hair needs moisture but you have to apply it the right way. Using heavy conditioners & masks near your roots is like trying to fly a wet paper kite. It simply won’t work. Apply a light conditioner or detangler only from the middle of your hair down to the ends. This is where your hair is older and breaks more easily. If your hair goes flat very easily you can try conditioning first and then shampooing your scalp afterward. This method is called a reverse wash. It keeps your roots clean while protecting the ends of your hair.

    The Towel and the Air

    Gentle Hair Drying Techniques for Better Results The way you dry your hair has more impact than most people realize. Rubbing your hair vigorously with a standard towel generates friction that damages individual strands and creates unwanted frizz. A superior technique involves gently squeezing and pressing your hair with a soft cotton t-shirt or a microfiber towel instead. This simple adjustment keeps fine hair smoother and less puffy while allowing it to move more naturally throughout the day. For those seeking additional volume there is an effective trick to try. Flip your head upside down while blotting your hair dry. This position allows your roots to dry while lifted away from your scalp. The result is better root lift and more natural volume once your hair has dried completely.

    Heat with Care, Not Fear

    Heat itself is not harmful but excessive heat can damage your hair. A blow dryer can help create volume when you handle your hair gently like fine fabric. Start by applying a thin layer of heat protection product before you begin. Set your dryer to medium heat rather than maximum power and direct the air from your scalp down toward the tips to keep the hair smooth. To add volume you should bend forward and use your fingers to lift small sections near the scalp while drying. You do not need to dry your hair completely because working on the roots while your head is upside down usually creates good natural lift without much work. Allow the rest of your slightly damp hair to dry naturally while it stays in that raised position as it cools down.

    Scalp Rituals: Where Volume Truly Begins

    The Art of the Scalp Massage

    A slow scalp massage offers a calming experience. Your fingers provide warmth while moving in circles & releasing tension from behind your ears down to your neck. These massages do more than help you relax because they boost circulation at the roots and provide nutrients to hair follicles. Special tools are not required but a soft scalp brush can enhance the experience. Take two to five minutes once or twice daily to massage your scalp using your fingertips. Begin at the front hairline and move backward before working along the sides with small circular movements. This practice delivers blood flow and oxygen to the roots.

    Light Oils and Herbal Rinses

    Heavy oils can make fine hair look flat but using small amounts of lightweight oils like jojoba or grapeseed directly on your scalp before washing can help keep it comfortable & flexible. Put a few drops along your part lines and massage them in gently. Leave the oil on for 20 to 30 minutes and then wash your hair normally. This simple routine helps remove buildup and reduces dryness without making your hair feel greasy after you rinse it out. Herbal rinses offer a natural way to add volume to your hair. Make a tea using rosemary or green tea or hibiscus and let it cool down completely. After you finish shampooing and conditioning your hair pour the tea through it as a final rinse. You don’t need to wash it out afterward because the plant compounds will stay on your scalp and hair to give you a gentle lift & extra shine.

    Styling Tricks That Coax, Not Crush, Volume

    The Magic of the Part Line

    A small change can make a big difference in how your hair looks. When you part your hair in the same spot for a long time that section can start to look flat because of routine & gravity. Switch your part to the other side or make it slightly zigzag instead of straight. This hides the scalp better and makes your roots lift up in a new way. The best time to change your part is when your hair is a bit damp. Comb it in the new direction and let it air dry. You might be amazed at how much fuller your hair appears from this simple adjustment.

    Layering with Intention

    A good haircut helps thin hair more than any styling product can. Cutting too many layers makes the ends look thin and weak. The right kind of gentle layers inside the hair adds movement & volume. The goal is to remove enough weight so the hair moves freely without looking too sparse. When you visit your stylist you should show them how your hair naturally falls and where it parts or flattens. Tell them you want soft and airy movement instead of asking for heavy layers or thinning. Most people with fine hair find that a length between the collarbone & chest works best. This length keeps enough weight to look full while staying short enough to avoid pulling the hair down flat.

    Heatless Volume Techniques

    There’s something satisfying about waking up with hair that styled itself overnight. Heatless methods work with this idea by using braids and loose buns that add volume at the roots and texture along the hair. Velcro rollers at the crown work well on hair that’s slightly damp or nearly dry. Roll a few large rollers at the top of your head by pulling the hair straight up before rolling it back. Leave them in while you get ready and then take them out carefully. This gives you soft volume without needing heavy products. Loose top bun is another simple option. Put your almost-dry hair into a very loose bun on top of your head before bed and use a soft scrunchie to hold it. When you wake up let it down and use your fingers to separate the hair. This creates volume at the roots and a soft bend through the middle sections. Two loose braids give you more texture. Braid your damp hair into two loose sections & undo them in the morning. You’ll have soft waves that make your hair look fuller and thicker.

    Products That Enhance, Not Smother

    Product Strategy for Thin Hair Thin hair works best with fewer products. Using too many will weigh down your strands & make them look flat. Stick to one or two lightweight options like a volumizing mousse at the roots or a light texturizing spray through the middle sections. Put volumizing foam on damp hair near the roots only. Work it through with your fingers & then blow dry while flipping your head upside down or lifting sections with a round brush. You can add a light texturizing spray or salt spray from the middle of your hair down to create some grip & movement. This makes hair look thicker and less limp. The goal is not to create stiff hair but to give it gentle support. Products should feel almost invisible on your hair.

    Daily Habits That Quietly Protect Your Volume

    The Way You Touch Your Hair

    Pay attention to how much you touch your hair during the day. You might twist it or smooth it or tuck it behind your ear without thinking. Each time you do this you transfer oil from your fingers to your hair. This makes your hair look flat and greasy much faster. Touching your hair too much can also cause breakage if your strands are thin & delicate. You can fix this by being more aware of what you do. Keep a comb or brush close by instead of running your fingers through your hair all the time. If you need to tuck your hair away then switch which side you use or try soft clips. Avoid tight elastics because they put too much pressure on your hair and cause it to break.

    Sleep Protection

    Protecting Thin Hair While You Sleep Most hair damage occurs during the night without you realizing it. Rough cotton pillowcases create friction that weakens already delicate strands. Sleeping with your hair in tight styles pulls at the roots and causes breakage. Tossing and turning throughout the night creates knots that lead to more damage when you brush them out in the morning. The simplest fix is switching your pillowcase material. Cotton grabs onto hair and creates resistance with every movement. Satin or silk pillowcases let hair slide smoothly across the surface instead of catching and pulling. This small change can make a noticeable difference in how your hair looks & feels after a week of use.

    Knowing When to Seek Help

    Natural methods help with hair thinning but your body might be signaling something more serious. You should see a healthcare provider if you experience sudden thinning or bald spots or lose a lot of hair over several months. Hair density can be affected by low nutrients or thyroid problems or hormonal shifts or other medical conditions. Natural volumizing works best when you pay attention to what your body needs. You respond to these signals & make changes as necessary. This might mean eating more healthy fats or checking your iron levels or switching from a heavy shampoo that never worked well for your hair.

  • Top 10 Yoga Poses That Improve Posture and Body Alignment

    Top 10 Yoga Poses That Improve Posture and Body Alignment

    Top 10 Yoga Poses for Better Posture and Body Alignment Good posture matters for your health and how you feel each day. When you slouch or sit incorrectly for long periods your body suffers. You might notice back pain or general discomfort that gets worse over time. The good news is that yoga provides excellent solutions for these problems. Regular practice of specific poses can strengthen your muscles and help your body find its natural alignment.

    Mountain Pose (Tadasana)

    Mountain Pose is the base of all standing yoga postures and plays an important role in improving overall posture. Standing tall with feet together and weight evenly balanced helps build awareness of body alignment. Engaging the thighs, lifting the chest, and lengthening the spine creates a strong foundation that supports better posture in daily movements.

    Downward-Facing Dog (Adho Mukha Svanasana)

    Downward-Facing Dog helps lengthen the spine and open the shoulders, making it excellent for posture correction. This pose strengthens the core and back muscles that support spinal alignment. By grounding the hands and feet and lifting the hips upward, the body forms a stable shape that encourages proper alignment from head to heels.

    Cat-Cow Pose (Marjaryasana–Bitilasana)

    Cat-Cow is a gentle flowing movement that improves spinal flexibility and releases tension in the neck and back. Moving between arching and rounding the spine encourages smooth, controlled motion. This pose supports better posture by increasing spinal awareness and restoring natural alignment through mindful breathing.

    Cobra Pose (Bhujangasana)

    Cobra Pose focuses on strengthening the lower back while opening the chest and shoulders. Lifting the upper body with control engages the back muscles and promotes spinal extension. This pose is especially helpful for reversing the effects of slouching and supporting a more upright posture.

    Bridge Pose (Setu Bandhasana)

    Bridge Pose builds strength in the back, glutes, and legs while gently opening the chest and shoulders. Lifting the hips upward improves spinal flexibility and encourages better alignment. Pressing the feet firmly into the ground helps create stability and supports healthy posture.

    Tree Pose (Vrksasana)

    Tree Pose is a balancing posture that enhances alignment and core strength. Standing on one leg while maintaining an upright spine encourages proper posture and body awareness. This pose strengthens the legs, hips, and core, all of which contribute to improved balance and alignment.

    Warrior I Pose (Virabhadrasana I)

    Warrior I strengthens the legs while opening the chest and hips, helping to improve posture. Proper alignment of the front knee and lifting through the upper body supports spinal stability. This pose promotes strength, balance, and awareness of correct posture.

    Plank Pose (Phalakasana)

    Plank Pose is excellent for building core, arm, and shoulder strength. Maintaining a straight line from head to heels reinforces spinal alignment and stability. A strong core developed through this pose helps support proper posture throughout daily activities.

    Child’s Pose (Balasana)

    Child’s Pose is a calming posture that gently stretches the back and shoulders. It helps release tension in the spine, neck, and upper body. This pose encourages natural spinal alignment and provides relief from posture-related strain.

    Seated Forward Fold (Paschimottanasana)

    Seated Forward Fold lengthens the spine and stretches the hamstrings, supporting better posture. Folding forward from the hips while keeping the spine long encourages correct alignment. This pose helps relax the body while promoting flexibility and a balanced posture.

  • Heal Dry Cracked Heels Quickly Using Simple Ingredients From Your Kitchen

    Heal Dry Cracked Heels Quickly Using Simple Ingredients From Your Kitchen

    The first crack usually shows up during winter. You notice it when you get out of bed and your heel touches the cold floor with a small sting. You look down and see it: that pale dry patch that feels rough like sandpaper with a tiny split in the skin like a crack. If you ignore it then by the end of the week your feet feel like they belong to someone who walked barefoot across a desert. But here is the good news: you do not need a fancy spa visit or an expensive cream to fix things. The softest and most healing remedies are often sitting on your kitchen shelf waiting for you to remember they can do far more than flavor dinner.

    The Story Your Heels Are Trying to Tell You

    Before you start applying oils and masks it helps to understand what is happening under that dry chalky surface. Think of your heels as the workhorses of your body. They carry you everywhere day after day while being pressed against hard floors and trapped in shoes that may or may not fit perfectly while being exposed to hot showers and dry air. When the skin on your heels gets too dry and loses elasticity it does not just flake but starts to crack. Imagine mud in a dried up riverbed where the ground tightens and splits when the water disappears. Your skin behaves in almost the same way. Hot water strips away natural oils. Standing for long periods puts extra pressure on the edges of your heels and forces the skin to spread sideways. If the outer layer of skin is thick and dry it cannot stretch so it tears. Diet and hydration and even the weather play a role in this story too. A few days of not drinking enough water or a week of walking barefoot on rough tiles or a month of cold dry winds all affect your feet. The good news is that they also respond to care. With the right ingredients and a little consistency you can bring them back from cracked and sore to smooth & comfortable and soft enough to glide against your sheets without scratching the fabric.

    Gathering Healing Magic from Your Kitchen

    Walk into your kitchen & look at your shelves like you are stocking a medicine cabinet. The same things you stir into soups or spread on toast or whisk into cakes can work as soothing medicine for your skin. These ingredients do not just sit on the surface. They bring deep moisture & mild exfoliation & a gentle kind of nourishment that your heels have been asking for. You probably have most of what you need already. Honey works as a natural humectant that pulls moisture into your skin. Oatmeal calms irritation and softens rough patches. Coconut oil melts into dry cracks and creates a protective barrier. Sugar & salt scrub away dead skin without harsh chemicals.

    Olive Oil: Liquid Silk for Tired Heels

    Olive oil brings quick comfort when you apply it to dry skin. It contains healthy fats that sink into fine lines and rough areas to ease tightness right away. Warm a small amount between your palms until it feels pleasantly warm but not hot. Massage it slowly into your heels using your thumbs in gentle circular motions. As you rub the oil in you should feel the rough texture begin to soften. For better results wear clean cotton socks after you massage in the oil and keep them on through the night. When you remove the socks in the morning your heels will feel noticeably softer. Repeat this process for two or three consecutive nights and the hard dry skin will start to smooth out and become more flexible.

    Coconut Oil: A Comforting Blanket of Moisture

    If olive oil feels like silk then coconut oil feels like a warm blanket. It stays solid when kept at room temperature but melts fast when it touches your warm skin. It releases a light tropical smell that can make your bathroom feel like a small getaway. Coconut oil works well at keeping moisture locked in your skin. This matters a lot when your heels are dry & cracked. Use it right after your shower when your feet are still a bit damp but not soaking wet. Take about a teaspoon of coconut oil & rub it into your heels. Doing this at the right time helps trap water in your skin because the oil acts like a barrier. Wear socks afterward so the oil does not get on your floors. Let your heels absorb the oil overnight while you sleep.

    Honey: Golden Nectar That Clings and Heals

    Honey is thick and sticky & moves slowly. It stays on your skin instead of running off. This makes it perfect for cracked heels. Honey pulls moisture from the air and keeps it locked in your skin. It also fights bacteria gently which helps when small cracks feel tender and painful. To treat your feet with honey you should mix one or two tablespoons with some warm water so it spreads more easily. Apply it to clean heels and then cover your feet with a warm damp cloth for 15 to 20 minutes. It gets messy but the sticky feeling is actually soothing. Your heels feel like they are being coated in something sweet and healing.

    The Gentle Ritual: Soak, Smooth, and Soothe

    Healing dry & cracked heels quickly depends on more than just the products you apply to your skin. The routine you follow matters just as much. A basic evening practice can transform foot care from something tedious into a peaceful moment of calm. You do not need expensive spa treatments. A bowl of warm water and a few simple ingredients from your kitchen are enough. Start by soaking your feet for about ten minutes in warm water. This softens the hardened skin & prepares your heels for treatment. After soaking, gently pat your feet dry with a clean towel.

    Step 1: Warm Water and Salt or Baking Soda Soak

    Fill a basin or large bowl with warm water that feels comfortable on your skin. Add a tablespoon of salt or baking soda to help soften the tough outer layer and loosen dead skin cells on your heels. Place your feet in the water and soak them for 10 to 15 minutes. Let the warmth relax your soles and release the tension. This step softens your skin while giving your hardworking feet the attention they deserve.

    Step 2: Natural Scrubs for Instant Softness

    When your feet feel soft and wrinkled from soaking you can start removing the rough skin. The key is to scrub firmly but gently without being too aggressive. Here are some easy homemade scrub recipes that work well:

    Scrub Mix Name Required Ingredients Application Method
    Sugar & Olive Oil Scrub 1 tablespoon sugar + 1 teaspoon olive oil Apply on slightly damp heels and massage gently for 2–3 minutes. Rinse thoroughly with lukewarm water.
    Rice Flour & Honey Scrub 1 tablespoon rice flour + 1 teaspoon honey + a few drops of water Rub in slow circular motions, concentrating on cracked areas. Wash off once done.
    Baking Soda Exfoliating Paste 1 teaspoon baking soda + sufficient water to form a smooth paste Use as a mild exfoliator once or twice weekly. Rinse well after gentle scrubbing.

    Step 3: The Overnight Kitchen-Heel Mask

    This is when things really start working. After you soak and scrub your feet your heels become ready to absorb whatever treatment you put on them next. Pick one of these easy kitchen remedies and let it do its job while you rest: Banana and Honey Mix: Take half a ripe banana and mash it with one teaspoon of honey. Spread this mixture on your heels and put on cotton socks before bed. Bananas contain natural oils and vitamins that help soften dry skin. Yogurt and Olive Oil Mix: Combine one tablespoon of plain yogurt with one teaspoon of olive oil. Apply it to your heels for twenty to thirty minutes before sleeping and then rinse it off and add a thin layer of oil. Aloe and Coconut Oil Combination: If you have fresh aloe or plain aloe gel available mix it equally with coconut oil. Aloe helps calm the skin while coconut oil locks in moisture. This mixture works well if your cracked heels feel sore. It might seem strange to put food ingredients under your socks but when you wake up your heels will feel like they received careful attention throughout the night.

    Quick Kitchen Fixes for When You’re in a Hurry

    There will be days when you lack time for a complete soaking routine. On those evenings when you arrive home exhausted but still want to care for your heels there are quick kitchen methods that require only a few minutes but still produce noticeable results. You can apply a thick layer of petroleum jelly or coconut oil directly to your heels before bed. Cover them with cotton socks overnight & wake up to softer skin.

    The 5-Minute Oil Wrap

    Quick Evening Heel Care When You’re Short on Time Some days you won’t have time for a full soaking routine. When you get home tired but still want to take care of your heels there are fast kitchen solutions that take just a few minutes and still work well. You can put a thick layer of petroleum jelly or coconut oil straight onto your heels before going to sleep. Put cotton socks over them for the night and you’ll wake up with softer skin.

    Honey Dab for Painful Cracks

    When a crack in your heel feels especially painful or looks worse than the others you can treat it directly with pure honey. After you wash your feet and dry them completely put a small amount of honey right into the crack. Cover it with a small piece of clean cotton or gauze and then put a sock over it. By the next morning that spot usually feels less irritated & more comfortable.

    Helping Your Heels from the Inside Out

    Kitchen remedies work beyond what you apply to your feet. What goes inside your body matters just as much as what you put on your skin. Dry and cracked heels often mean you need to drink more water and eat better fats while watching daily habits that affect your skin health. Think of your skin as a garden. You can apply oils and masks on top but if the ground underneath stays dry the results will not last. A few simple changes can speed up healing and keep your heels smooth for longer periods. Drink more water by keeping a glass nearby and taking regular sips during the day. When skin stays hydrated it becomes more flexible and resists cracking. Add healthy fats through foods like avocados & nuts along with seeds & olive oil to feed your skin from inside. Include vitamin-rich foods by eating colorful fruits and vegetables that provide vitamins A and C and E to help skin repair itself. Limit long hot showers because very hot water removes natural oils and leaves your heels exposed to damage. These changes do not work overnight but they support the surface treatments you use and make each home remedy work better.

    Protecting Your Newly Soft Heels

    When your heels begin to improve it feels wonderful to slip them into bed or put on your slippers without any rough discomfort. The goal now is to maintain this condition & preserve the effort you have put in during your evening routines. Consider it a simple commitment you make with your feet: Wear soft socks indoors: Walking barefoot on hard floors removes moisture and causes rubbing. Cotton socks provide a protective layer. Moisturize every day: Even when you are busy apply a small amount of coconut or olive oil to your heels after bathing or showering. It only takes a few seconds. Do not walk barefoot outside: Hard surfaces like concrete and rough tiles along with dusty ground can reverse your progress within days. Check your feet regularly: Once each week take time to examine your feet closely. Spot any new dry areas early and address them before they turn into painful splits. If your cracks are very deep or bleeding or show no improvement despite consistent home treatment your body is sending a warning signal. In these situations you should consult a healthcare professional particularly if you have diabetes or blood flow problems. Home remedies can be effective but they work best alongside proper medical attention when necessary.

  • Safe Home Methods to Whiten Teeth Naturally Without Harsh Chemicals

    Safe Home Methods to Whiten Teeth Naturally Without Harsh Chemicals

    The first time I realized my teeth were not as white as I thought was when I saw my reflection in a café window. The sky outside was pale gray and made everything look clear & honest. I lifted my coffee cup & smiled at myself in the glass. My teeth looked more cream colored than white. They were not bad but they were not what toothpaste ads had made me expect. I did not want a perfect Hollywood smile. I just wanted my teeth to look naturally bright and healthy. I also did not want to use strange chemicals or damage my tooth enamel. That is when I started my own experiment to see how much I could whiten my teeth at home using safe and natural methods.

    The Subtle Reality Behind a “White” Smile

    Many people are surprised to learn that teeth are not naturally bright white. Healthy teeth usually fall somewhere in an off-white range, sometimes carrying soft yellow or grey undertones influenced by genetics, age, and enamel thickness. The flawless white smiles seen in advertisements and on social media are often enhanced by lighting, filters, or professional cosmetic work. In everyday life, natural teeth look different under real conditions.

    Tooth enamel is slightly transparent, and beneath it lies dentin, which has a warmer yellow tone. As enamel thins over time—whether from aggressive whitening, acidic foods, or heavy brushing—the dentin becomes more visible. Ironically, trying too hard to whiten teeth can actually make them look darker in the long run.

    This is why safe whitening matters. The goal is not to fight your biology but to remove surface stains, protect enamel, and allow your natural smile to look its healthiest. Gentle, consistent care almost always produces better results than harsh shortcuts.

    The Quiet Strength of Everyday Habits

    Small daily actions shape the appearance of your teeth far more than occasional whitening treatments. When approached thoughtfully, basic oral care becomes one of the most effective ways to maintain a brighter smile.

    Thoughtful Brushing Makes the Difference

    Rather than scrubbing aggressively, brushing should feel more like polishing. A soft-bristled toothbrush protects enamel and gums while still removing plaque and stains. Use gentle circular motions, angle the brush slightly toward the gumline, and brush for a full two minutes, twice a day.

    Fluoride toothpaste strengthens enamel, making it more resistant to discoloration. If you experience sensitivity, switching to a sensitivity-focused formula can help preserve enamel and maintain brightness without discomfort.

    Flossing: The Overlooked Brightness Booster

    Stains often develop between teeth where brushes cannot reach. Daily flossing removes plaque and pigment before they harden into tartar, which attracts and holds stains. By cleaning these hidden areas, flossing helps your teeth look more even in color and naturally lighter.

    Rinse, Don’t Rush

    After consuming coffee, tea, soda, wine, or richly colored foods, a simple water rinse can reduce staining. This quick habit washes away pigments before they settle on enamel. Alcohol-free mouthwash can also help reduce plaque buildup, supporting a cleaner and brighter appearance over time.

    Foods That Quietly Support a Brighter Smile

    Some foods actually help clean teeth naturally. Crunchy fruits and vegetables like apples, carrots, celery, and cucumbers gently scrub surface debris while increasing saliva production. Saliva neutralizes acids and helps remineralize enamel, protecting your teeth throughout the day.

    Dairy, Nuts, and Enamel Support

    Calcium-rich foods such as cheese, milk, and yogurt strengthen enamel and improve how light reflects off your teeth. Cheese also stimulates saliva and helps neutralize acids after meals. Nuts like almonds and cashews provide mild abrasion while delivering minerals that support dental health.

    Managing Staining Drinks Without Giving Them Up

    Coffee, black tea, red wine, and cola contain pigments and tannins that cling to enamel. Instead of avoiding them completely, limit how long you sip, rinse with water afterward, and consider using a straw for cold drinks. Occasionally choosing lighter teas can also reduce staining over time.

    Gentle At-Home Whitening Options

    Whitening toothpaste can help remove surface stains when used carefully. Choose formulas designed to be gentle and approved by dental associations. Avoid highly abrasive products that can scratch enamel and make teeth more prone to future staining.

    Using Whitening Strips Mindfully

    Over-the-counter whitening strips contain lower levels of peroxide than professional treatments. When used occasionally and according to instructions, they can offer subtle improvement. Overuse, extended wear time, or application on damaged teeth can lead to sensitivity and enamel damage.

    Baking Soda: Use With Restraint

    Baking soda can gently lift surface stains and neutralize acids, but it should be used sparingly. A small amount mixed with water and applied gently no more than a few times a week is enough. Overuse can thin enamel and increase sensitivity.

    Oil Pulling as a Supportive Ritual

    Oil pulling does not bleach teeth, but it may reduce plaque and bacteria. Swishing a small amount of coconut or sesame oil for several minutes can support oral hygiene and help prevent dull buildup. It works best as a supplement to brushing and flossing, not a replacement.

    Natural Whitening Myths to Avoid

    Acidic substances like lemon juice and vinegar can erode enamel, leading to long-term darkening and sensitivity. While they may make teeth appear shiny temporarily, repeated use damages enamel and exposes dentin.

    Why Fruit Pastes and Charcoal Can Backfire

    Strawberry mixtures and charcoal powders are often promoted as natural whiteners, but both can be harmful. Acids weaken enamel, and abrasive charcoal scratches the tooth surface, making stains return more easily. These trends often do more harm than good.

    A Simple, Sustainable Plan

    Ek naturally bright smile kisi unknown chemical box se nahi aati. Yeh dheere-dheere banti hai — roz ke chhote, safe habits ko layer by layer follow karne se. Neeche ek gentle daily routine diya gaya hai jise aap apni lifestyle ke hisaab se adapt kar sakte hain.

    Time Action Whitening Benefit
    Morning Soft-bristle toothbrush ke saath gently brush karein,
    mild fluoride ya gentle whitening toothpaste use karein.
    Raat bhar ka plaque remove hota hai, surface stains kam hote hain,
    aur enamel ko protection milti hai.
    Midday Coffee, tea ya dark-colored food ke baad paani se rinse karein;
    crunchy fruits ya vegetables snack karein.
    Pigments wash ho jaate hain, natural polishing hoti hai,
    aur saliva production badhta hai.
    Evening Proper flossing karein, 2 minutes brush karein,
    chahein to alcohol-free mouthwash use karein.
    Plaque aur tartar buildup rukta hai, jo stains ko hold karta hai.
    2–3 Times Weekly Optional: short oil pulling ya bahut halka baking soda polish. Surface film kam ho sakti hai aur overall oral freshness support hoti hai.
    Every 6–12 Months Professional dental cleaning aur routine checkup. Hardened tartar aur deep stains remove hote hain,
    long-term smile brightness maintain rehti hai.

    Is tarah ka gentle approach enamel-friendly hota hai aur time ke saath
    aapke natural smile ko healthy aur bright banaye rakhta hai — bina harsh treatments ke.

    Embracing a Realistic, Healthy Shade

    True whitening is not about achieving an artificial brightness. Healthy teeth often have subtle variations in color, especially near the gumline. Safe at-home whitening focuses on revealing your natural shade by removing buildup and protecting enamel.

    With consistent care—gentle brushing, regular flossing, mindful eating, and realistic expectations—your smile gradually becomes clearer and brighter. Not glaring or unnatural, but quietly healthy. A smile that reflects care rather than correction. One that is unmistakably your own.

  • At-Home Balayage Touch-Up: Refresh Hair Highlights Without Salon Visits

    At-Home Balayage Touch-Up: Refresh Hair Highlights Without Salon Visits

    The bathroom light looks different at 7 a.m. You notice it when you lean over the sink with your toothbrush and see your hair in the mirror. Those bright streaks that made you feel like you just finished a beach photoshoot a few months ago now look dull. The brightness has moved down toward the ends and your roots feel heavier and darker. The whole thing seems less like effortless style and more like you forgot your salon appointment twice. You tilt your head & pull a strand forward. Then a quiet rebellious thought appears in your mind about touching it up yourself. The idea feels both practical and slightly dangerous. You have watched enough tutorial videos to know the basic steps. You have seen the before and after photos that make it look simple enough. But you also remember the stories from friends who tried home coloring and ended up with unexpected results. The bathroom mirror shows you the truth about your current situation. Your hair needs attention and you are considering whether to handle it alone or schedule that overdue appointment. You think about the cost of salon visits & the time it takes to get there. You consider the convenience of fixing it at home on your own schedule. The box of hair color at the drugstore costs a fraction of what the salon charges. But you also know that professional colorists spend years learning their craft for good reasons. They understand things about hair chemistry and color theory that a tutorial video cannot fully explain.

    The Moment You Decide: “I Can Do This at Home”

    There’s a special rush that comes with deciding to refresh your balayage at home. It’s similar to trimming your own bangs—but this time, you’re doing it thoughtfully, with preparation and a bit of science on your side. Balayage is naturally forgiving. Unlike traditional foil highlights that start at the scalp in rigid sections, balayage is painted softly along the surface of the hair. It mimics natural sun-lightening: brighter at the ends, subtler near the roots. That gentle diffusion is exactly why balayage can be safely refreshed at home. You’re not rebuilding a pattern—you’re simply bringing light back where it’s faded.

    Studying Your Hair Before You Start

    Before touching any product, stand in good natural light and let your hair fall the way you usually wear it. Observe it carefully. Where has the brightness softened? Which lighter ribbons still pop, and which have blended away? You’re not just applying color—you’re reading your hair. The key to a confident at-home balayage touch-up is enhancement, not reinvention. Think of it as gentle maintenance, guided by what already looks good, rather than starting from scratch.

    Item Purpose Pro Tip
    Lightener (bleach) & developer Lifts your natural or colored hair lighter Choose a gentle 10–20 volume for a subtle touch-up
    Balayage or tint brush For painting precise, feathered strokes A brush with a tapered edge helps blend softly
    Plastic bowl (not metal) To mix your lightener and developer Mix small batches so it stays creamy and active
    Sectioning clips Keeps hair organized and manageable Four big clips (front and back on each side) are usually enough
    Gloves & old T-shirt Protects your skin and clothes Choose a dark or already-stained shirt you won’t miss
    Foil or plastic wrap (optional) Can help keep sections separate and process evenly Use sparingly; balayage loves open air
    Toner or gloss Refines the final shade (cooler, warmer, softer) Opt for a demi-permanent formula for softness and shine
    Deep conditioner Replenishes moisture after lightening Leave on for at least 10–15 minutes

    Take a moment to look at what you have in front of you. The goal is not to build a professional salon setup at home. You just need the basic items that give you control and help you take care of your hair properly. If this already feels like too much then you should make it easier. Work with fewer sections and use gentler lightening products. There is no rush here. You decide how fast or slow this goes.

    Creating a Small Color Studio at Home

    Your bathroom counter becomes your personal color station. Lay down a towel, set a calm mood, and arrange your tools deliberately. Treat it like a small creative project, not a rushed task. When everything is within reach and organized, your movements become steadier and your decisions more intentional. This calm setup alone reduces most at-home coloring mistakes.

    Mapping Your Hair: Where Light Naturally Belongs

    Balayage isn’t about coloring every strand. It’s about placement. Imagine your head as a map showing where sunlight naturally lands. These areas—especially the top layers and front—are where your focus should be. Strategic placement creates an effortless, sunlit look without over-lightening or flattening your color.

    Face-Framing “Money Pieces”

    The strands that fall around your face play a huge role in how fresh your hair looks. When these pieces are softly brightened, your entire face appears lifted and awake. For an at-home refresh, focusing only on these front sections can be enough. You don’t need to touch the back if you’re unsure. A little brightness in the right place can transform everything.

    Surface Hair vs. Inner Depth

    Lift a top layer of your hair and notice the contrast underneath. The inner layers are deeper and darker, creating dimension. Your balayage touch-up should stay mostly on the surface pieces. Leaving the depth intact prevents your hair from turning into one flat, overly light shade and keeps the color looking natural.

    Protecting the Root Shadow

    The soft root shadow is what makes balayage look expensive and low-maintenance. Avoid starting lightener at the scalp. Begin a few inches down and feather upward gently. This preserves the natural gradient and avoids harsh lines. You’re refreshing sunlight, not erasing shadows.

    Applying Lightener with Control

    Mixing lightener can feel intimidating, but calm, deliberate movements make all the difference. Start with a strand test on a hidden section to understand how your hair lifts. This tells you how fast to work and how long to process. Knowledge replaces fear here.

    Sectioning for Precision

    Divide your hair into four main sections, then work in thin slices—about the width of a pinky. Thin sections give you control and prevent chunky results. Skip every second or third slice to maintain depth. Balayage relies on negative space as much as color.

    The Balayage Brush Stroke

    Apply lightener starting at the mid-lengths, pressing gently, then glide downward with softer pressure. As you move upward, barely touch the hair to blur the transition. If a line looks harsh, soften it with your brush tip or gloved fingers. Think of watercolor edges, not straight lines.

    Processing Time and Patience

    Once the lightener is on, check your hair regularly based on your strand test. Hair often lifts through warm stages before reaching a soft blonde. You don’t need to push it too far. Subtle lift paired with toner usually gives the most natural result. Never exceed the recommended time—lighter isn’t always better.

    Rinsing Gently

    Rinse thoroughly with lukewarm water, treating your hair delicately. Avoid hot water and rough scrubbing. At this stage, hair is more fragile. Pat dry with a towel until damp if you plan to tone next.

    Toner: Setting the Final Mood

    Toner shapes the final personality of your balayage. Whether you prefer cool, neutral, or warm tones, apply toner mainly to the lightest areas first. Watch closely, as freshly lightened hair absorbs color quickly. Once satisfied, rinse and follow with a deep conditioning treatment.

    Seeing the Final Result

    As you blow-dry your hair, the results reveal themselves gradually. Brighter ribbons, softer blends, and face-framing light come together naturally. At-home balayage often looks best when it’s slightly imperfect—those small variations make it feel real and sun-kissed rather than manufactured.

    Maintaining Your Balayage Between Touch-Ups

    Gentle care extends the life of your color. Wash less frequently, use sulfate-free shampoos, and incorporate toning products sparingly. Weekly deep conditioning keeps the cuticle smooth so light reflects beautifully. Balayage is designed to age gracefully—don’t rush to fix every bit of regrowth.

    Confidence Beyond the Mirror

    Touching up balayage at home isn’t about replacing your stylist. It’s about understanding your hair and trusting yourself. With each session, you learn restraint, timing, and placement. That quiet confidence—earned through patience and care—shows in the final result just as much as the color itself.