Blog

  • Sleep Better Yoga: 5 Moves That Promote Deep Rest

    Sleep Better Yoga: 5 Moves That Promote Deep Rest

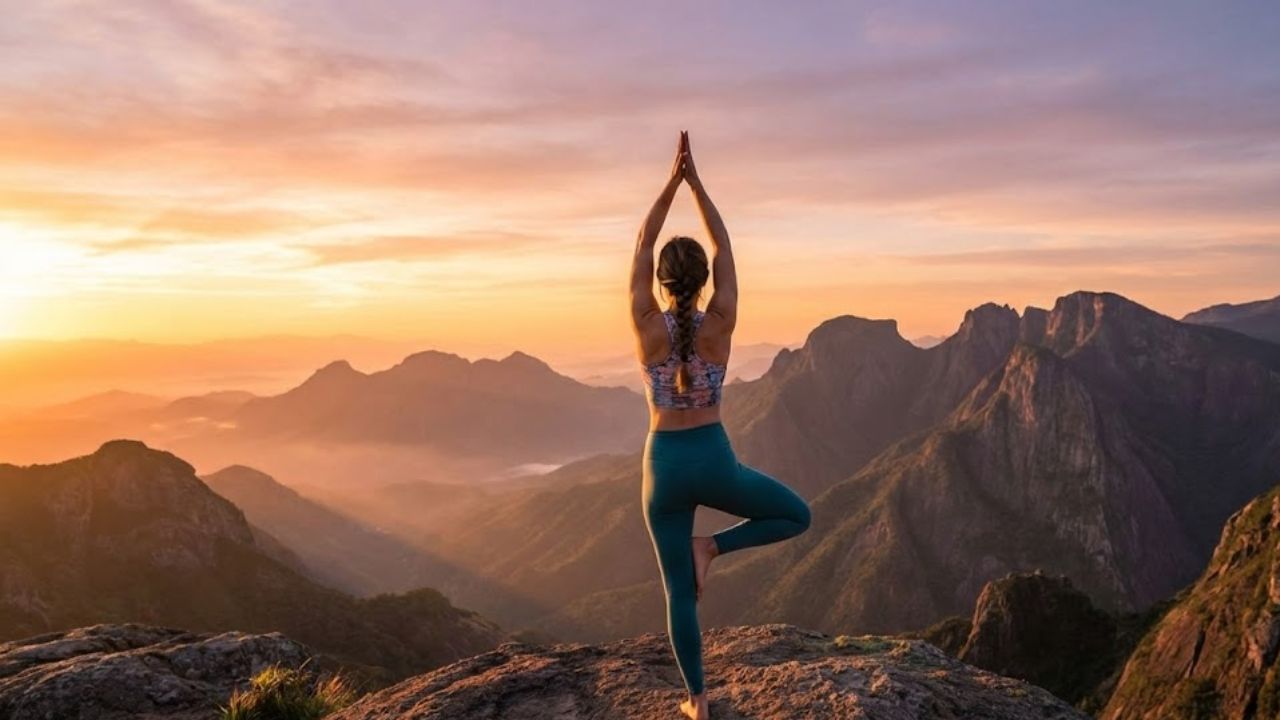
    Quality sleep plays a vital role in maintaining overall health, yet many individuals find it difficult to fall asleep or remain asleep through the night. Daily stress, mental strain, and physical discomfort often interfere with natural sleep rhythms. Yoga offers a gentle, natural way to relax the body, settle the mind, and create the right conditions for restful sleep. The following five yoga poses are designed to help you unwind fully and support a deep, refreshing night’s rest.

    1. Child’s Pose (Balasana): A Deeply Soothing Resting Posture

    Child’s Pose is a restorative posture that gently relaxes the nervous system while easing tension stored in the back and hips. The slow, grounding nature of this pose encourages steady breathing, helping signal to the body that it is time to slow down and prepare for sleep.

    How to do it:

    • Begin on your hands and knees in a tabletop position.
    • Bring your big toes together, widen your knees, and gently sit back onto your heels.
    • Lower your torso toward the floor, resting your forehead on the mat, with arms extended forward or relaxed by your sides.
    • Breathe deeply, allowing your body to soften into the pose.
    • Remain here for 1–3 minutes, focusing on slow, calming breaths.

    Benefits: This pose helps relieve stress, stretches the lower back and hips, and creates a calming effect that supports better sleep.

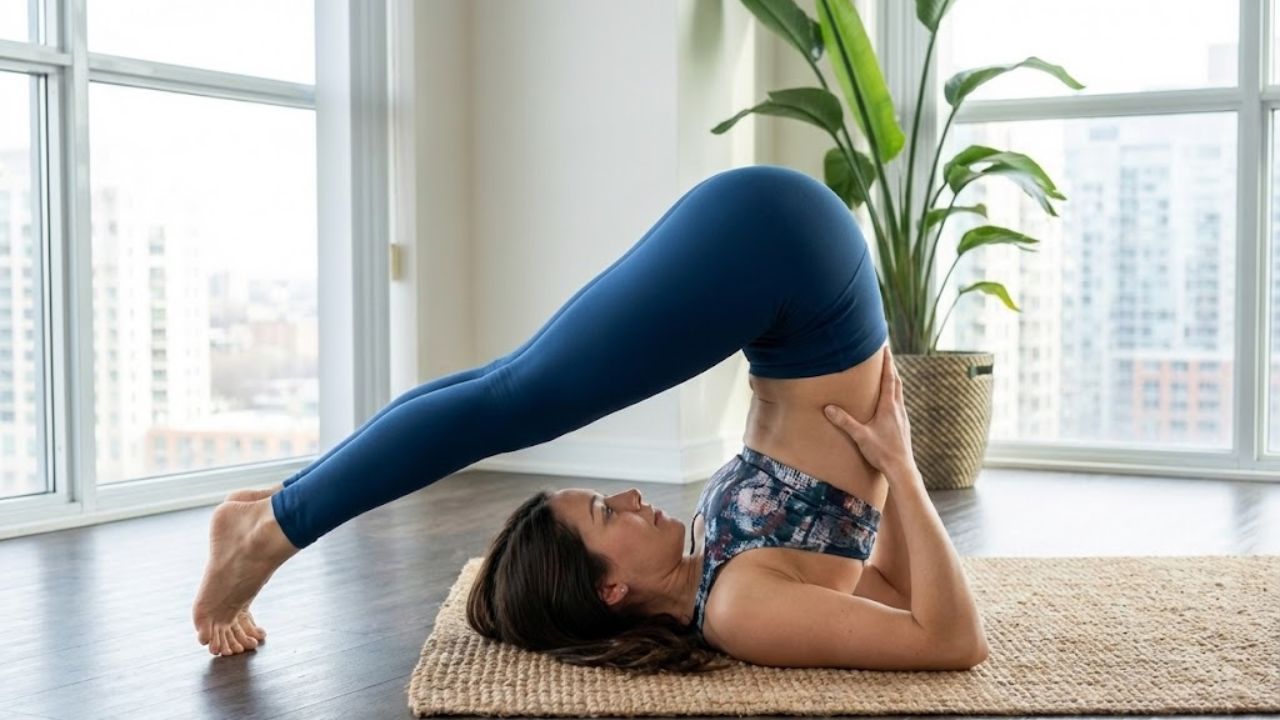
    2. Legs Up the Wall (Viparita Karani): Restorative Relief for Tired Legs

    Legs Up the Wall is a calming, restorative posture that promotes circulation and deep relaxation. It is especially helpful for easing leg fatigue caused by long periods of standing or sitting and reducing physical discomfort that can interfere with sleep.

    How to do it:

    • Sit close to a wall and gently lie down on your back.
    • Swing your legs upward so they rest comfortably against the wall.
    • Position your hips near the wall and rest your arms by your sides with palms facing up.
    • Close your eyes and focus on steady, relaxed breathing.
    • Stay in the pose for 5–10 minutes, allowing your body to fully relax.

    Benefits: This pose encourages circulation toward the heart, eases lower back tension, and calms the nervous system, making it ideal for winding down before sleep.

    3. Standing Forward Fold (Uttanasana): Ease Tension Along the Spine

    Standing Forward Fold gently releases tightness in the spine, neck, and hamstrings. The inward focus of the pose helps quiet the mind while encouraging slow breathing, supporting a relaxed state that is beneficial before bedtime.

    How to do it:

    • Stand with feet about hip-width apart and inhale to lengthen your spine.
    • Exhale and hinge forward from the hips, letting your head and neck relax.
    • Allow your hands to rest on the floor, shins, or feet, depending on comfort.
    • Hold the pose for 1–2 minutes while breathing slowly and deeply.

    Benefits: This pose stretches the hamstrings, reduces tension in the back and neck, and promotes mental calm, making it helpful for improving sleep readiness.

    4. Seated Forward Fold (Paschimottanasana): Gentle Stretch for Calmness

    Seated Forward Fold offers a deep yet soothing stretch for the spine and hamstrings while encouraging relaxation of the nervous system. It is particularly effective for releasing built-up tension from the day.

    How to do it:

    • Sit on the floor with your legs extended straight in front of you.
    • Inhale to lift and lengthen your spine.
    • Exhale and gently fold forward from the hips, reaching toward your feet or shins.
    • Maintain a long spine without forcing the stretch.
    • Hold for 1–2 minutes, breathing deeply throughout.

    Benefits: This posture helps stretch the spine and hamstrings, reduces stress, and promotes a sense of calm that supports restful sleep.

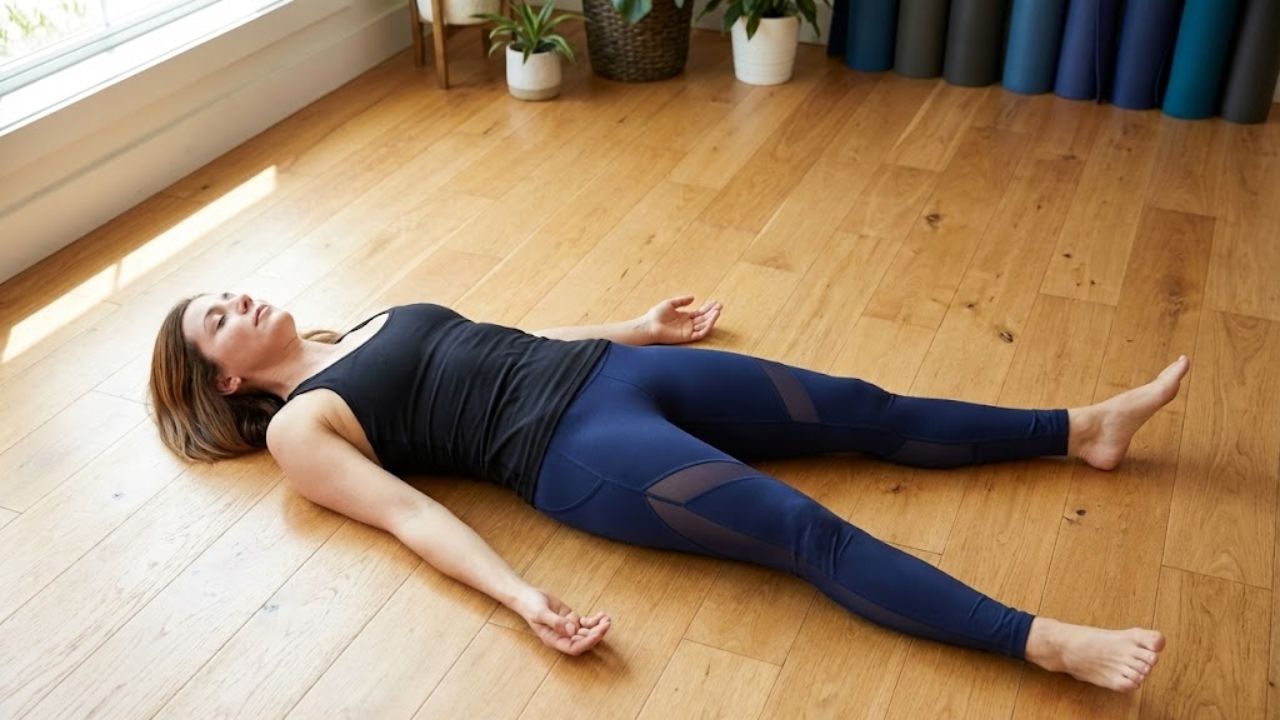
    5. Corpse Pose (Savasana): Complete Relaxation Before Sleep

    Corpse Pose is the final and most restful posture, allowing the body and mind to fully relax. It provides space for releasing lingering tension and helps integrate the calming effects of your practice before sleep.

    How to do it:

    • Lie flat on your back with legs extended and arms resting comfortably by your sides.
    • Turn your palms upward and gently close your eyes.
    • Bring awareness to your breath and gradually relax each part of your body.
    • Remain in the pose for 5–10 minutes, allowing your mind to become quiet.

    Benefits: Savasana deeply calms the nervous system, reduces stress, and prepares both body and mind for a peaceful night’s sleep.

    Final Thoughts

    Adding these five yoga poses to your evening routine can support better sleep by easing physical tension, calming the mind, and encouraging relaxation. Whether sleep issues stem from stress, anxiety, or daily fatigue, these gentle postures help create a smooth transition into rest. Practicing them consistently can train your body and mind to unwind more easily, leading to deeper, more restorative sleep and improved overall well-being.

  • The Best Natural Method to Unclog a Kitchen Sink Drain Without Harsh Chemicals

    The Best Natural Method to Unclog a Kitchen Sink Drain Without Harsh Chemicals

    The first time it happened you were probably cooking. The windows were steamed up and garlic sat on the cutting board while your favorite song played. You turned to rinse the pan and expected the water to drain away but instead it rose slowly and stubbornly up to your wrist. Bits of parsley floated on top. The kitchen became strangely quiet the way a room does when something small but important goes wrong. You jiggled the faucet handle thinking it might help. You poked at the drain with a spoon. You flipped the garbage disposal switch on and off repeatedly. Nothing worked. The water just sat there like a murky little pond where your sink used to be.

    What’s Really Happening Beneath Your Kitchen Sink

    Most days we treat the kitchen sink like it can handle anything. It takes coffee grounds & soup leftovers & pasta water and grease without much trouble. But down in the curved part of the pipes something is happening that we don’t notice until the water stops draining. Think about what your drain looks like after you finish cooking dinner. There is a thin layer of oil coating the inside of the pipe. Tiny bits of food stick to the walls. Soap residue settles into every corner. Hot water seems like it should wash everything away but it cools down as it moves through the pipes. When hot grease cools down it turns solid.

    Layer after layer builds up on the inside of the pipe and catches more debris. Coffee grounds act like sand & vegetable peels get stuck and maybe some eggshells add to the mess. Eventually your pipes stop looking like clean tubes and start looking like blocked passages. Most people grab a bottle of chemical drain cleaner when this happens. The bottle has warning labels all over it & smells like it belongs in a laboratory instead of a home. You pour it down the drain & wait and hope it works. The water might start draining again for a little while. But those harsh chemicals do more than just remove the blockage.

    Over time they can damage your pipes and eat away at metal and irritate your skin and lungs. A simple clog can turn into a costly plumbing repair. Plumbers understand this problem well. They also know something that most homeowners don’t realize. You don’t need that chemical bottle in most cases. The best natural way to unclog a kitchen sink is surprisingly simple and uses things you probably have in your kitchen already. It doesn’t look fancy and no company spends money advertising it. But it works reliably without filling your house with toxic fumes.

    The Surprisingly Simple Fix Already Sitting in Your Kitchen

    Some secret methods sound more like folklore than practical advice. Pour cola down the drain or sacrifice a lemon at midnight or chant to the plumbing gods. This one is different. It’s the kind of common sense solution that your grandmother might have used without needing a label or a brand name. It starts with heat. Real heat. Before you reach for baking soda or vinegar or any other magic ingredient the first and most underrated hero is boiling water.

    Not hot tap water or pretty warm water but truly boiling water with big rolling bubbles that sound like a tiny storm in your saucepan. This alone can break up a surprising number of clogs that are built from grease and soap. Think of it as a reset button for the soft fatty buildup inside your pipes. But when that’s not enough & often it isn’t the most powerful natural non toxic combo is this. Baking soda and vinegar and time. Not just tossed in randomly but used in a deliberate little ritual that lets them do their very quiet work.

    A Gentle Three-Step Drain Method That Actually Works’

    The method seems too gentle to work well if you are used to thinking that unclogging requires harsh chemicals and force. Think of it more like cleaning a cast iron pan rather than using a sandblaster. You do not need aggressive action but rather the correct steps done in order.

    Step Action to Take Purpose & Benefit
    1. Initial Hot Water Pour Carefully pour 1–2 full kettles of boiling water directly into the drain. The intense heat helps liquefy built-up grease and soften soap residue stuck inside the pipes.
    2. Baking Soda and Vinegar Treatment Add ½ cup baking soda first, followed by 1 cup warm vinegar. Cover the drain opening. The bubbling reaction works to lift trapped debris and break down the sticky film coating the pipe walls.
    3. Final Hot Water Rinse Wait 15–20 minutes, then flush the drain again with boiling water. Clears away loosened buildup and helps restore a smoother, faster water flow.

    This method looks simple because it actually is simple. However that simplicity can be misleading. When you do it correctly this approach is the best option available for clearing kitchen drains that are mildly or moderately clogged. It works without damaging your pipes or creating a dangerous chemical situation in your home.

    The Correct Way to Clear a Sink

    Before you start look down into your drain. If you see a thick layer of food scraps sitting on top of the strainer or drain cover remove as much as you can by hand first. Gloves are recommended. This is not the time to be squeamish because you are about to get familiar with the underside of your own kitchen.

    Step 1: Boiling Water Twice Bring a full kettle or large pot of water to a rolling boil. Slowly pour about half of it directly down the drain. Pour it slowly so it can soak & soften the buildup. Then wait a minute or two. Listen carefully. Sometimes you can actually hear the faint gurgle of things loosening. Pour the rest of the boiling water down. If your drain was only slightly clogged this alone may solve it. Run the tap and see if the water now flows freely.If it still pools then keep going.

    Step 2: Baking Soda Measure about half a cup of baking soda and gently sprinkle it straight into the drain. If your strainer is removable take it out. Try to get as much of the powder past any visible metal grates so it falls deeper inside. Baking soda looks unimpressive but it works well. It is mildly abrasive which helps scrub the inner surfaces and it neutralizes odors which is helpful for drains that have started to smell bad.

    Step 3: Warmed Vinegar Here is the part most people rush. Instead of grabbing cold vinegar from the pantry & dumping it in take a moment to warm it slightly first. Not boiling but just pleasantly warm. You can do this by placing a cup of vinegar in a microwave safe container and heating it for 20 to 30 seconds or setting the cup in a bowl of hot water. Warm vinegar reacts more actively with the baking soda and helps maintain some heat inside the drain.Slowly pour about one cup of this warm vinegar into the drain where the baking soda is waiting. Immediately there will be a soft hiss and fizz. The reaction between the alkaline baking soda and the acidic vinegar creates carbon dioxide bubbles that help lift & break up the film clinging to the inner walls. Now cover the drain. You can use a drain plug or a small plate or even an upside down bowl that sits snugly. The goal is to keep as much of that fizzing action down in the pipes as possible.

    Step 4: Let Time Work Walk away. Give it 15 to 20 minutes of undisturbed time. This waiting can feel strange but somewhere below your feet that quiet fizz is doing its job. It is eating away at buildup and loosening stubborn films and nudging small clogs toward surrender. While you wait you might notice the absence of the usual harsh chemical smell. Instead there is just the faint clean tang of vinegar.If anything leaks a bit back into the sink it is harmless enough that you could touch it without your skin protesting.

    Step 5: The Final Flush Boil another kettle or pot of water. Remove the drain cover and slowly pour all of that boiling water down. Think of this as a river washing through a newly loosened canyon and carrying away the debris. You may hear another series of sounds from the pipes. Now test it. Turn on the tap. Watch the water. Does it swirl and disappear smoothly? Listen for the pace of the drain. It should be quick and unhurried. If there is still some hesitation you can repeat the whole process once more. Most mild clogs give up after the second round.

    When a Stubborn Clog Needs a Bit of Extra Help

    Sometimes a clog is more than just soft buildup. Maybe someone sent a lemon peel down the drain or a large chunk of potato skin wedged itself in the wrong spot. In those moments even the best natural solutions need help from simple manual pressure. If your sink has two basins you should plug one side completely with a good stopper or a damp cloth pressed firmly in place. Fill the other side until there are a few inches of warm water above the drain.

    Then use a cup plunger which is the small flat-bottomed kind meant for sinks and not toilets. Place it directly over the drain and start plunging with steady rhythmic pushes. You want firm deliberate strokes that push and pull water against the clog rather than frantic jabs. What the baking soda and vinegar loosen can be nudged free by the plunger. You are not trying to pulverize anything but rather persuade it to move. Often you will feel the moment of victory when resistance vanishes and the water suddenly rushes away as if the sink has let out a breath it was holding. In many homes this simple combination of boiling water with baking soda and vinegar followed by plunging only if needed is enough to handle most kitchen sink clogs without using any toxic chemicals.

    The Plumbing Truth Most Professionals Don’t Emphasize

    Plumbers are not villains. Many of them will tell you to avoid chemical drain cleaners if you ask them. They have seen what those products do to pipes after years of use. The PVC gets soft & the metal joints corrode. Rubber seals fall apart sooner than they should. They have also met homeowners who mixed chemical cleaners by accident and learned too late that some combinations create dangerous fumes. What plumbers do not often say out loud is that many clogs are not that serious. They are not deep in the city pipes but right there in the first curve under your sink. With a towel and a bucket and some courage you could remove the P-trap under the sink yourself & rinse out the smelly sludge and put it back. But that sounds messy and scary so most people do not try it.

    The natural method works well for this situation. It is strong enough for everyday clogs and gentle enough not to damage your plumbing. It is simple enough to do without special tools. It does not replace a professional when you truly need one. That includes times when multiple drains in your house are backing up at once or there is a deep blockage in the main line. But it does mean you do not have to panic every time the sink starts to drain slowly. The other benefit plumbers do not rush to mention is this. Every time you clear a clog yourself you learn more about your home. You notice what you have been washing down the sink. You learn that grease really does harden like candle wax. You realize that a little maintenance can prevent those Saturday morning emergency calls.

    Daily Kitchen Habits That Keep Drains Clear Long-Term

    After your sink drains properly again you might want to forget about it and move on. The problem seems solved. But right now you understand something important: the stuff you rinse away doesn’t actually disappear. A few small habits can help you avoid clogs before they happen: Don’t pour grease down the drain: Let cooking oils and fats cool down in a container & throw them in the garbage instead of washing them down the sink where they turn solid. Remove food scraps first: Scrape your plates into the trash or compost before rinsing them. Garbage disposals seem handy but they can be hard on your pipes. Get a sink strainer: A basic mesh strainer catches pasta and rice and small food bits that tend to expand and create blockages.

    Do monthly maintenance: Once each month pour boiling water & baking soda & vinegar down your drain as a preventive measure instead of waiting for a problem. Rinse with hot water after greasy dishes: When you finish washing oily pots and pans pour a kettle of very hot water down the drain to prevent grease from building up. These habits are simple & easy to follow. You don’t need to buy special products or change your routine completely. They are just basic ways to take care of your plumbing. Over time these small actions mean fewer blockages & less need for harsh chemicals and fewer expensive plumber visits.

    Clear Warning Signs It’s Time to Call a Professional Plumber

    Of course not every plumbing problem can be fixed with a kettle and baking soda. Sometimes water backs up in several places at once like the kitchen sink & bathtub or the toilet starts making strange gurgling sounds. That means you’re dealing with something more serious than a simple kitchen clog. The problem is deeper in your main line where vinegar & baking soda can’t reach. Here are the clear signs that you need to call a professional plumber: The clog remains stuck after you’ve tried the natural method & plunging two or three times. Several drains in your house are slow or backing up together. You notice strong sewage smells coming from the sink or other drains. Water comes back up into the sink when you run other appliances like the dishwasher or washing machine.

    When these things happen a plumber’s specialized equipment like a long drain snake or hydro-jetter or inspection camera becomes essential rather than optional. But you’ve still done something valuable by not adding harsh chemicals to pipes that might already be old or damaged. The next time your sink drains slowly you’ll know exactly what to do. You’ll heat up the kettle and grab the baking soda and vinegar. You’ll hear the gentle hiss of bubbles working in the drain. The best natural method for unclogging your kitchen sink isn’t some secret product you need to hunt down at the store. It’s just a simple process and some basic kitchen knowledge combined with understanding that gentle solutions can work just as well as harsh ones.

  • Full-Body Stretch Yoga: 8 Poses You Can Do in 15 Minutes

    Full-Body Stretch Yoga: 8 Poses You Can Do in 15 Minutes

    Regular stretching plays a key role in improving flexibility, easing muscle tightness, and supporting overall well-being. Yoga is especially effective because it blends mindful movement with controlled breathing, helping muscles lengthen while increasing joint mobility. If time is limited but you still want a complete stretch, this 15-minute yoga routine is designed to work every major muscle group. The flow below delivers a full-body stretch that leaves you feeling relaxed, refreshed, and more flexible.

    1. Downward-Facing Dog (Adho Mukha Svanasana): Begin the Sequence

    Downward-Facing Dog is a classic yoga posture that offers a powerful full-body stretch. It lengthens the hamstrings, calves, and spine while activating the arms and shoulders, making it an ideal pose to start your practice.

    How to do it:

    • Begin in a tabletop position with wrists aligned under shoulders and knees under hips.
    • Lift your hips upward, creating an inverted V shape with your body.
    • Press your palms firmly into the mat, keep feet hip-width apart, and relax your head between your arms.
    • Hold for 30 seconds to 1 minute while breathing slowly and deeply.

    Benefits: This pose stretches the back of the body, particularly the hamstrings, calves, and lower back. It also strengthens the arms, shoulders, and core while encouraging healthy circulation.

    2. Cat-Cow Flow (Marjaryasana–Bitilasana): Gently Wake Up the Spine

    Cat-Cow is a smooth, flowing movement that warms the spine and improves its flexibility. By moving through flexion and extension, it helps reduce stiffness and supports spinal mobility.

    How to do it:

    • Start in tabletop with shoulders over wrists and hips over knees.
    • Inhale as you drop your belly, lift your chest, and tilt your tailbone upward.
    • Exhale as you round your spine, tucking your chin and drawing your navel inward.
    • Flow between these positions for about 1 minute.

    Benefits: This movement loosens the spine, eases tension in the neck and shoulders, and improves overall back flexibility.

    3. Low Lunge (Anjaneyasana): Lengthen Hips and Thighs

    Low Lunge deeply stretches the hip flexors, quadriceps, and hamstrings. It opens the hips and groin while gently engaging the core, preparing the body for deeper movements.

    How to do it:

    • Step your right foot forward into a lunge, keeping the knee stacked over the ankle.
    • Lower your left knee to the mat and shift your hips slightly forward.
    • Lift your arms overhead, creating length through the hips, chest, and shoulders.
    • Hold for 30 seconds, then repeat on the opposite side.

    Benefits: This pose helps release tightness in the hips and thighs, improving lower-body flexibility and comfort.

    4. Seated Forward Fold (Paschimottanasana): Release the Back of the Legs

    Seated Forward Fold provides a deep stretch for the hamstrings, lower back, and spine. It also encourages relaxation and a sense of calm as you fold inward.

    How to do it:

    • Sit with legs extended straight ahead and feet flexed.
    • Inhale to lengthen the spine, then exhale as you hinge forward from the hips.
    • Reach for your feet or shins while keeping the spine long.
    • Hold for 1 minute, breathing steadily.

    Benefits: This stretch targets the hamstrings and spine, helping reduce lower-back tension and improve leg flexibility.

    5. Cobra Pose (Bhujangasana): Open the Chest and Back

    Cobra Pose is a gentle backbend that stretches the chest, abdomen, and spine while strengthening the lower back. It helps counteract slouching and encourages better posture.

    How to do it:

    • Lie on your stomach with hands placed beneath your shoulders.
    • Inhale as you lift your chest, using your back muscles and lightly pressing into your hands.
    • Keep elbows slightly bent and avoid forcing the stretch.
    • Hold for 20 to 30 seconds, then slowly lower down.

    Benefits: Cobra Pose improves spinal flexibility, opens the shoulders and chest, and releases upper-body tension.

    6. Child’s Pose (Balasana): Rest and Unwind

    Child’s Pose is a restorative posture that gently stretches the back, hips, and shoulders. It also promotes mental relaxation, making it ideal for slowing down the body and breath.

    How to do it:

    • Kneel with big toes touching and knees slightly apart.
    • Sit back onto your heels and extend your arms forward.
    • Lower your chest and rest your forehead on the mat.
    • Remain here for 1 minute, breathing deeply.

    Benefits: This pose eases tension in the back and hips while calming the nervous system.

    7. Triangle Pose (Trikonasana): Stretch the Sides and Legs

    Triangle Pose is a standing posture that lengthens the legs, hips, and torso while opening the chest and shoulders. It also supports balance and body awareness.

    How to do it:

    • Stand with feet wide apart and arms extended at shoulder height.
    • Turn the right foot outward and the left foot slightly inward.
    • Lower the right hand toward the shin or ankle while lifting the left arm upward.
    • Keep the chest open and gaze upward.
    • Hold for 30 seconds, then switch sides.

    Benefits: This pose strengthens the legs, stretches the hips and sides of the body, and increases flexibility in the shoulders and torso.

    8. Supine Spinal Twist (Supta Matsyendrasana): Gently Unwind the Spine

    The Supine Spinal Twist offers a soothing stretch for the spine and lower back while releasing tension in the hips and torso.

    How to do it:

    • Lie on your back with knees bent and feet on the floor.
    • Extend your arms out to the sides with palms facing down.
    • Lower both knees to the right, keeping shoulders grounded.
    • Hold for 30 seconds, then repeat on the other side.

    Benefits: This twist helps relax the spine, reduce back tension, and ease stress throughout the body.

    Conclusion

    This 15-minute yoga routine provides an efficient and balanced approach to stretching the entire body. Each posture focuses on specific muscle groups to support flexibility, strength, and relaxation. Practicing this flow regularly can improve mobility, ease muscle tightness, and enhance overall well-being. Suitable for both beginners and experienced practitioners, these poses can be adjusted to match your comfort level while delivering meaningful results.

  • Beginner Yoga Guide: 5 Easy Poses for a Strong and Confident Start

    Beginner Yoga Guide: 5 Easy Poses for a Strong and Confident Start

    Yoga for Beginners: Five Simple Poses to Start Your Practice Yoga is a complete practice that improves both your mind and body. If you want to become more flexible or reduce stress or build strength, yoga provides many benefits. For people just starting out the key is to begin with poses that are simple and comfortable while helping you develop a solid base. This article covers five beginner-friendly yoga poses that work well for anyone new to yoga.

    Mountain Pose (Tadasana)

    Mountain Pose may look simple, but it forms the foundation of many yoga postures. It helps build correct posture, improves alignment, and enhances balance by teaching you how to stand with awareness and stability.

    How to Do It:

    Stand upright with your feet together, distributing your weight evenly across both feet. Firm your thighs, gently lift the kneecaps, and lengthen your spine. Relax your shoulders down and back, allowing your arms to rest naturally by your sides with palms facing forward. Take slow, deep breaths, grounding through your feet while extending upward through the crown of your head. Hold for 30 seconds to 1 minute.

    Benefits:

    Improves posture, strengthens thighs, knees, and ankles, and increases overall body awareness and balance. Mountain Pose is often used as a starting position, helping you connect breath with movement.

    Child’s Pose (Balasana)

    Child’s Pose is a deeply restorative posture that gently stretches the back, hips, and legs. It is commonly used to relax the body, calm the mind, and release built-up tension.

    How to Do It:

    Kneel on the floor with your big toes touching and knees comfortably apart. Slowly fold your torso forward, bringing your forehead to rest on the mat. Extend your arms forward or place them alongside your body, whichever feels more comfortable. Breathe deeply and remain in the pose for 1 to 3 minutes, softening with each exhale.

    Benefits:

    Stretches the spine, hips, and knees, relieves back and neck tension, and promotes relaxation while reducing stress. It is ideal between challenging poses to restore energy.

    Cat-Cow Pose (Marjaryasana-Bitilasana)

    Cat-Cow Pose is a gentle flowing sequence that warms up the spine and improves mobility. It is excellent for releasing stiffness in the back and encouraging healthy spinal movement.

    How to Do It:

    Begin on all fours with your wrists aligned under your shoulders and knees under your hips. Inhale as you drop your belly, lift your chest, and look slightly upward for Cow Pose. Exhale as you round your spine, tuck your chin, and draw your belly inward for Cat Pose. Continue flowing between these movements for 5 to 10 rounds, synchronizing breath with motion.

    Benefits:

    Increases spinal flexibility, strengthens the core and back muscles, and supports better posture and alignment. The rhythmic movement helps prepare the body for deeper poses.

    Downward-Facing Dog (Adho Mukha Svanasana)

    Downward-Facing Dog is a classic yoga pose that combines strength and stretch. It lengthens the spine, stretches the lower body, and builds upper-body strength.

    How to Do It:

    Start in a tabletop position with hands under shoulders and knees under hips. Spread your fingers wide, press firmly into your palms, and lift your hips upward. Straighten your legs as much as comfortable, forming an inverted “V” shape. Let your head relax and gaze toward your legs or abdomen. Hold the pose for 30 seconds to 1 minute.

    Benefits:

    Stretches the hamstrings, calves, and spine, strengthens arms, shoulders, and core, and boosts circulation while energizing the body.

    Bridge Pose (Setu Bandhasana)

    Bridge Pose is a beginner-friendly backbend that strengthens the lower body while opening the chest and hips. It helps counteract poor posture and restores balance to the spine.

    How to Do It:

    Lie on your back with knees bent and feet flat on the floor, hip-width apart. Place your arms alongside your body with palms facing down. Inhale and press through your feet to lift your hips upward, engaging your glutes. Keep your shoulders grounded and neck relaxed. Optionally clasp your hands beneath your back. Hold for 30 seconds to 1 minute before slowly lowering down.

    Benefits:

    Strengthens the lower back, glutes, and legs, opens the chest and hips, and improves posture. This gentle backbend also helps release tension from the lower back and upper body.

  • A Pilates instructor shares the only 3 core moves needed after 50

    A Pilates instructor shares the only 3 core moves needed after 50

    When you purchase through links on our site we may earn an affiliate commission. Here’s how it works. If we want to stay mobile and stable and pain-free as we age a strong core is key. From supporting your spine to improving balance and posture core strength plays a major role in how well we move through later life. And if there’s one type of workout that knows this it’s Pilates. Joseph Pilates famously called the core the powerhouse of the body and instructors will consistently tell you to engage your core as you move through a Pilates workout. Core work is indeed an inherent part of any Pilates flow but certain moves lend themselves especially well to building a stronger core. To find out which Pilates moves are the most important to focus on once you hit 50 I spoke to James Shaw. He is a Pilates instructor and founder of James Shaw Pilates. Shaw specializes in helping people build functional strength at every age. He says that most people don’t need complicated core routines. They just need a few key exercises done well and done consistently.

    A Pilates instructor’s go-to moves for building a strong core in your 50s

    The Pilates roll-up is one of the best exercises for building a stronger core.

    “The roll-up teaches you how to keep your lower body stable while moving your upper body. This creates a deep connection to your centre” Shaw says. “It builds internal strength and improves how your spine moves. It also helps train your body to move with control instead of momentum.”

    That’s reason enough to try it. Practice the roll-up a few times each week using the steps below.

    How to do it:

    – Lie on your back with your legs placed together.

    – Extend your arms above your head at shoulder width with your palms facing forward.

    – Breathe in and lift your head & shoulders off the mat.

    – Breathe out as you roll your spine off the mat by rounding forward and moving the top of your head toward your knees.

    – Keep your arms level with the mat and pull your abdominal muscles toward your spine.

    – Breathe in as you roll back down to the starting position.

    The Pilates spine twist might look like it only works your spine but it actually does wonders for your core. Shaw calls it one of the most underrated longevity moves because it teaches your body to rotate correctly. This becomes really important for balance & walking as you get older and it helps keep your back healthy too. If you want to strengthen your obliques & deep abdominal muscles while also improving how your spine moves & fixing your posture then you should try the Pilates spine twist by following these steps.

     How to do it:

    – Sit up straight with your legs stretched out in front of you and flex your feet.

    – Extend your arms out to both sides to form a T shape with your body.

    – Take a breath in & lengthen your spine as you do so.

    – When you breathe out twist your upper body to one side while keeping your hips still and your shoulders loose.

    – Breathe in again as you come back to the starting position and then breathe out while twisting to the opposite side.

    If you want a core exercise that is easy on the spine but still works your midsection effectively Pilates toe taps are an excellent option for people over 50. This movement works the deep stomach muscles including the transverse abdominis & helps create stability in your lower back & pelvis. The exercise moves slowly & deliberately which makes it perfect for anyone wanting to strengthen their core without the stress that comes from crunches or high-speed abdominal routines. How to perform the exercise:

    – Start by lying on your back with bent knees and your feet resting flat on the ground.

    – Tighten your core muscles and raise your legs into a tabletop position where your knees sit above your hips and your shins stay parallel to the ceiling.

    – Take a breath in to get ready and then breathe out as you slowly bring one foot down toward the floor & tap your toes lightly while keeping your lower back steady.

    – Breathe in as you bring your leg back to the tabletop position & then do the same thing with your other leg.

    – Keep switching between legs while maintaining control of the movement & keeping your core muscles gently engaged.

    Why should we strengthen our core after 50?

    As you get older your core muscles do more than help you lift things. They keep you steady on your feet. When your core is strong it helps you balance better and takes pressure off your lower back. This means you can move around more safely & feel more sure of yourself. Scientists have studied this and found clear results. Research published in Frontiers showed that core exercises help older people balance better whether they are moving or standing still. Another study in the Journal of Physical Therapy Science looked at people who did core workouts for eight weeks. These elderly participants ended up distributing their weight better and standing more steadily. The bottom line is simple. When you work on your core strength after age 50 you get more than stronger muscles. You become tougher overall and balance improves. Most importantly you protect your ability to stay independent as you age.

  • Sleep Support Yoga: 3 Poses That Help You Rest Better Tonight

    Sleep Support Yoga: 3 Poses That Help You Rest Better Tonight

    Getting quality sleep feels impossible in our busy modern lives. Work stress and endless distractions make it hard to relax at bedtime. Adding yoga to your evening routine offers a natural solution for better rest. These three easy poses can help you fall asleep faster and sleep more soundly tonight. The first pose to try is Child’s Pose. This gentle stretch calms your nervous system and releases tension from your back and shoulders. Kneel on your bed or a soft surface and sit back on your heels. Lower your chest toward the floor and extend your arms forward. Rest your forehead on the ground & breathe slowly for two to three minutes. This position signals your body that it’s time to wind down. Next is Legs-Up-The-Wall pose

    Child’s Pose (Balasana): A Gentle Reset for Body and Mind

    Child’s Pose is a deeply restorative yoga posture designed to relax the body and quiet the mind. It helps ease stress, soften tight muscles in the back, neck, and shoulders, and gently signal that it’s time to slow down. By lengthening the spine and encouraging slow, mindful breathing, this pose activates the parasympathetic nervous system, supporting the body’s natural relaxation response.

    How to Practice

    – Begin kneeling on the floor with your big toes touching and knees comfortably apart, creating space for your torso.

    – Gradually fold forward, lowering your torso between your thighs and resting your forehead on the mat.

    – Stretch your arms forward with palms down, or place them alongside your body with palms facing up—choose what feels best.

    – Breathe slowly and evenly, remaining in the pose for 1 to 3 minutes.

    Benefits

    – Soothes the nervous system

    – Releases tension in the back, neck, and shoulders

    – Encourages deep, calming breaths

    Child’s Pose is an ideal way to begin an evening wind-down routine, helping you let go of physical and mental stress before rest.

    Legs Up the Wall (Viparita Karani): A Simple Way to Unwind

    Legs Up the Wall is a mild inversion that supports relaxation and prepares the body for sleep. By resting the legs vertically against a wall, this pose promotes healthy circulation and helps transition the body from alertness to calm. It is especially helpful for easing restlessness and quieting a busy mind at night.

    How to Practice

    – Sit sideways next to a wall with your legs extended and your body relaxed.

    – Carefully lie back and swing your legs up so they rest comfortably against the wall, keeping your back flat on the floor.

    – Optionally place a cushion or bolster under your hips for extra support.

    – Rest your arms by your sides with palms facing upward and breathe deeply.

    – Remain in the pose for 5 to 10 minutes, allowing your body to fully relax.

    Benefits

    – Helps reduce stress and anxiety

    – Improves circulation and eases leg and foot discomfort

    – Calms the nervous system before sleep

    This pose gently balances blood flow and releases tension in the lower body, creating a peaceful state that supports restful sleep.

    Reclining Bound Angle Pose (Supta Baddha Konasana): Deep Relaxation Before Bed

    Reclining Bound Angle Pose is a restorative posture that helps soften tightness in the hips, groin, and lower back after a long day. It supports mindful breathing and relaxation, making it easier to quiet the mind and release lingering tension that can disrupt sleep.

    How to Practice

    – Lie on your back with knees bent and feet flat on the floor, about hip-width apart.

    – Bring the soles of your feet together and allow your knees to gently fall open to the sides.

    – Rest your arms by your sides with palms up, or place them on your abdomen for added grounding.

    – Close your eyes and focus on slow, steady breaths, noticing the movement of your belly.

    – Hold the pose for 5 to 10 minutes, allowing your body to relax completely.

    Benefits

    – Gently opens the hips and releases lower-body tension

    – Encourages deep relaxation and stress relief

    – Supports the parasympathetic nervous system for better sleep

    This pose helps the body fully unwind, making it easier to transition into a calm, restful night’s sleep.

  • Optical Illusion Challenge: Find 419 Hidden Among 416 in 7 Seconds

    Optical Illusion Challenge: Find 419 Hidden Among 416 in 7 Seconds

    Optical illusion challenges are getting more popular because they test how fast and well our brain handles what we see. They might seem easy but adding a timer makes them much harder. This 7 second challenge asks you to find the number 419 hidden in a grid filled with 416s. Only people who can focus well and observe carefully tend to find it quickly enough. When you first look at the image it seems repetitive and dull. The same number appears in rows everywhere and it seems impossible that anything different could be there. But that is how this illusion works. It uses repetition to make your brain overlook a small detail that matters.

    Why Optical Illusions Easily Confuse the Brain

    Optical illusions work because the human brain is designed to save time and energy. Instead of examining every small detail, it looks for familiar patterns and fills in gaps automatically. This shortcut helps us react faster in daily life, but it can also mislead us when visual information is repetitive.

    When the same number appears over and over, the brain quickly assumes all of them are identical. After a short while, it stops checking each one carefully. That mental shortcut is exactly why the hidden number becomes difficult to notice. Even if your eyes briefly see it, your brain may not process it immediately.

    This illusion proves that perception depends not only on eyesight but also on expectations and learned mental habits.

    Understanding the 419 Among 416 Challenge

    In this visual puzzle, nearly every number in the grid is 416. Hidden somewhere in the pattern is a single 419. The difference is very small, and when you are under time pressure, tiny variations are easy to overlook.

    The digits 6 and 9 are especially tricky because of their similar shapes. Both are curved and closed, so when scanned quickly, the brain often treats them as the same. Surrounded by dozens of identical numbers, your mind assumes uniformity unless you slow down enough to notice the change.

    This is why the puzzle feels frustrating. The answer is visible, yet it seems invisible at the same time.

    Why the 7 Second Time Limit Makes It Harder

    Without a time limit, most people would eventually find the odd number. The real challenge comes from the strict 7 second rule. Time pressure forces the brain to rely on fast pattern recognition instead of careful analysis.

    When rushed, the mind tends to see what it expects to see. Since it expects 416, it continues seeing 416 even when something different appears. This perfectly demonstrates how expectations shape perception.

    The pressure of the ticking clock increases stress, and stress reduces accuracy. Together, these factors make the illusion far more difficult.

    Smart Techniques to Spot 419 More Quicklya

    Solving this puzzle is less about raw speed and more about using the right strategy. Reading each number individually takes too long. A better approach is to focus only on the shape of the last digit.

    The number 9 has a tighter loop and a longer tail compared to 6. Training your eyes to scan for that specific shape instead of reading the full number saves time and reduces mental strain.

    Scanning in a structured way also helps. Move row by row or column by column. Random eye movement causes you to skip details and miss differences.

    Remaining calm is equally important. Panic leads to rushed scanning, while a steady approach improves accuracy.

    What Finding 419 Reveals About Your Focus

    If you managed to find the hidden number within 7 seconds, it suggests strong attention to detail and quick visual processing. Your brain can break repetitive patterns and detect small changes even under pressure.

    If you did not find it in time, that does not reflect poor intelligence. Optical illusions are specifically designed to exploit normal brain behavior. With practice, most people improve rapidly as they learn better scanning techniques.

    These puzzles measure perception, not intelligence.

    Common Errors People Often Make

    One frequent mistake is concentrating only on the center of the grid. Puzzle creators often hide the answer slightly off-center to catch viewers by surprise.

    Another error is expecting the different number to stand out clearly. In most optical illusions, the difference is deliberately subtle. Waiting for something obvious makes it easier to miss.

    Some people also give up too quickly. Just one extra second of calm scanning can completely change the result.

    Clear Explanation of the Solution

    If you could not locate the hidden number, here is the solution. The number 419 appears in the second column, third row from the bottom. It is the only number where the final digit is a 9 instead of a 6.

    Once you know its position, the difference becomes obvious. This sudden clarity is common with optical illusions. What once felt impossible suddenly looks simple.

    Why Practicing Optical Illusions Is Beneficial

    Regularly solving optical illusion puzzles can improve focus, patience, and visual awareness. They train the brain to slow down automatic assumptions and pay closer attention to details.

    These challenges also serve as effective mental breaks. Spending a minute on a puzzle can refresh your mind and improve concentration when you return to other tasks.

    Over time, you may notice faster reactions and sharper attention in everyday situations.

    Final Thoughts on the Eagle Eyes Challenge

    This 7 second optical illusion demonstrates how easily repetition can trick the brain. Spotting 419 among many 416s is not just about eyesight. It requires focus, strategy, and staying calm under pressure.

    Whether you found it immediately or needed the solution, the challenge still achieved its goal. It tested your perception, sharpened your attention, and gave your brain a quick workout. With practice, puzzles like this become easier and more enjoyable.

  • Optical Illusion Eye Test: Locate 37 and 75 Among 73s in 7 Seconds

    Optical Illusion Eye Test: Locate 37 and 75 Among 73s in 7 Seconds

    Optical illusion eye tests offer more than simple entertainment online. They train your brain to handle visual data more quickly and measure your attention span along with your ability to spot patterns. This challenge appears straightforward when you first look at it but it can trick people who usually notice details well. You need to find the numbers 37 and 75 that are hiding in a field full of 73s within seven seconds. It seems manageable until you give it a shot. This illusion works because your brain prefers what it already knows. When you look at the same number over and over your mind begins to skim rather than really look. The puzzle takes advantage of this tendency on purpose. The numbers 73 37, & 75 all have similar shapes and curves so telling them apart becomes difficult when you have limited time.

    Why This Optical Illusion Confuses the Brain

    The human visual system is designed to recognize patterns quickly so the brain can understand its surroundings without effort. In this illusion, the constant repetition of the number 73 creates a steady visual rhythm. Once your brain adapts to that rhythm, it automatically assumes everything follows the same pattern. As a result, the unusual numbers stop standing out and instead blend into the background, even though they are clearly different.

    Selective attention also plays a major role. When your mind expects to see only one number, your eyes may glide over differences without fully processing them. The number 37 reverses digit order, while 75 alters spacing and shape. However, when these are hidden among many similar-looking 73s, the brain filters them out unless you deliberately slow your visual scanning.

    How to Find 37 and 75 Within the Time Limit

    Success in this visual challenge depends more on strategy than speed. Rather than scanning the image randomly, break it into smaller sections. Move your eyes systematically—either row by row or column by column. This structured approach reduces cognitive overload and helps maintain focus.

    Another effective method is to focus on shape instead of reading numbers. The curve of the digit 5 is noticeably different from the shape of a 3, while the digit 7 usually has sharper angles. Let your eyes notice these visual cues naturally. Avoid silently reading each number, as that slows reaction time and increases confusion.

    If you feel stuck, relax your gaze for a moment. A softer focus often allows hidden differences to stand out without forcing concentration.

    What Your Result Reveals About Observation Skills

    Finding both 37 and 75 within seven seconds suggests strong visual discrimination and fast mental processing. People who perform well in these challenges often have sharp attention to detail and can manage visual pressure effectively.

    Taking longer is completely normal and not a sign of low intelligence. Optical illusions do not measure overall ability; they reflect how your brain processes visual information at that moment. Factors like tiredness, stress, or distractions can affect performance. Regular practice with similar puzzles can significantly improve both speed and accuracy over time.

    Why Optical Illusion Challenges Are Popular Online

    These puzzles have gained popularity because they deliver instant engagement. They are quick, entertaining, and slightly competitive, making them perfect for sharing with friends or testing reaction times.

    Beyond fun, optical illusion tests support mental fitness. They promote focus, visual awareness, and mindfulness. Spending even a few minutes a day on such challenges can sharpen perception and improve concentration in everyday activities.

    Can You Try Again and Improve Your Speed?

    Yes, and improvement often happens quickly. Once you understand how the illusion works, your brain adapts. On a second attempt, the hidden numbers may appear almost immediately. This rapid learning highlights the brain’s flexibility and ability to adjust.

    You can increase the challenge by setting stricter time limits or trying similar puzzles using letters, symbols, or faces. Regular practice is the key to faster recognition and stronger visual awareness.

  • The 7 Habits I Stopped at 55 to Become My Strongest Self and What I Do Instead

    The 7 Habits I Stopped at 55 to Become My Strongest Self and What I Do Instead

    There are some things you probably stopped doing as you got older. Staying out until 5am & wearing sky-high heels to work every day are good examples. The same applies to exercise & nutrition habits you developed when you first started training. Not all of them should stick with you forever. Deborah Moore is a 55-year-old fitness coach from Canada who says she only became the strongest she had ever been when she quit seven things. She wrote on Instagram that she never saw herself getting this strong. She was doing all the things that many people likely do. She tried to eat as little as possible while still getting through her workouts. Her value was attached to the size of jeans she fit into and whether she was as skinny as the women she saw around her. She never seemed to be skinny enough. Food was a minefield & she never thought she would break free of the body image prison she had created for herself. Then CrossFit and the barbell entered her life & everything changed. She is not sure whether it was reaching her 50s and caring less about what others thought or being tired of the exhausting negative cycle. Either way she finally decided to trust the process and trust the food to nourish her. She also decided to trust her body to perform.

    Letting Go of Restrictive Rules Changed Everything

    “The funny thing is, I actually believe I look better now after letting go of all those unrealistic rules I once forced on myself. One thing became very clear over time: choosing strength over skinniness was the biggest mindset shift I ever made—and it didn’t happen overnight. It was a genuine learning process.”

    From Chasing Skinny to Chasing Strength

    Instead of obsessing over the number on the scale, I became obsessed with how much weight I could move on the barbell. At one point, I weighed under 120lbs (54kg), had less than 15% body fat, and wore a US size 0–2 (roughly a UK size 4–6). Today, I’m about 10lbs (4.5kg) heavier, with around 5% more body fat, and I wear a US size 4–6 (UK size 8–10). But what truly matters to me now is the fact that I can lift over 100lbs on the barbell.

    Eating to Perform, Not to Shrink

    I also stopped under-eating and started fuelling my body for performance. I now eat roughly 2,300 calories a day, aiming for around 155g of protein, and occasionally track my macros. While it’s true that training fasted can increase fat oxidation, fat loss ultimately comes down to being in an overall calorie deficit.

    Why Fasted Workouts Didn’t Work for Me

    Training fasted while eating at maintenance—or above—throughout the day doesn’t lead to fat loss and can even result in fat gain. What often happens instead is that properly fuelling before workouts allows you to train harder or longer, which increases total calorie expenditure. That added intensity is also far more effective for building muscle than pushing through a low-energy, half-hearted session.

    Discovering Strength Through CrossFit at 50

    Today, Deborah trains CrossFit several times a week and credits it with completely transforming her life. “When I turned 50 and picked up a barbell for the first time, everything changed,” she says. “My self-confidence, my relationship with my body, and my approach to nutrition had been a mess for most of my adult life—and that’s putting it lightly.”

  • Optical Illusion Challenge: Spot the Number 119 in 8 Seconds

    Optical Illusion Challenge: Spot the Number 119 in 8 Seconds

    Optical illusion challenges have become a popular way to test focus, speed, and visual accuracy, especially among puzzle lovers in India. This particular challenge asks readers to spot the number 119 within just eight seconds, making it both exciting and mentally stimulating. Such visual tests are not only entertaining but also help sharpen observation skills and improve concentration in daily life. Whether you enjoy quick brain games during breaks or want to challenge friends and family, this optical illusion offers a fun way to push your limits while training your eyes to notice subtle differences.

    Optical Illusion Challenge to Spot Number 119 Quickly

    In this optical illusion challenge, the number 119 is cleverly hidden among similar-looking digits, making it tricky to identify at first glance. Your brain relies on visual scanning speed to process patterns, while distractions test your attention control. Many people initially overlook the correct number due to pattern confusion created by repeated shapes. The key is to stay calm and let your eyes move naturally instead of forcing focus. This challenge highlights how our minds sometimes rush to conclusions, missing small yet important details hidden in plain sight.

    Why Spotting 119 in Optical Illusions Feels Difficult

    Spotting the number 119 feels difficult because optical illusions are designed to trick the brain’s natural filtering system. When similar numbers repeat, the brain uses automatic recognition instead of careful checking. This leads to selective attention errors, where obvious differences go unnoticed. Time pressure also adds mental stress impact, reducing accuracy even further. In everyday life, this explains why people miss small details while multitasking. These challenges gently remind us to slow down, observe carefully, and trust our visual instincts.

    Benefits of Practicing Optical Illusion Number Tests

    Regularly practicing optical illusion number tests can offer surprising benefits beyond entertainment. They help strengthen focus endurance and improve detail awareness, which are useful for work and studies. Over time, such puzzles enhance cognitive flexibility, allowing the brain to switch strategies faster. They also promote mindful observation, encouraging you to look beyond first impressions. For students and professionals alike, these small exercises can sharpen mental clarity while providing a refreshing break from routine tasks.

    Summary and Visual Insight Analysis

    This optical illusion challenge featuring the number 119 demonstrates how perception and attention work together under time pressure. The experience reveals brain pattern bias, where familiarity overrides accuracy, and highlights visual patience value in problem-solving. By understanding these effects, readers can apply observation improvement habits to real-life situations. Ultimately, such challenges are not about speed alone but about training the mind to stay alert, flexible, and attentive even when distractions are intentionally placed in the way.

    Challenge Element Description Skill Tested
    Hidden Number 119 among similar digits Visual accuracy
    Time Limit 8 seconds Speed focus
    Difficulty Level Moderate Attention control
    Primary Benefit Mental sharpness Cognitive strength

    Frequently Asked Questions (FAQs)

    1. What is this optical illusion challenge about?

    It tests how quickly you can spot the hidden number 119 among similar digits.

    2. Is this challenge suitable for all ages?

    Yes, it is safe and enjoyable for both children and adults.

    3. Does practicing optical illusions improve focus?

    Regular practice can help enhance attention and visual concentration.

    4. Can I retry the challenge multiple times?

    Yes, repeating it can help train your observation skills further.