Blog

  • Grow Thicker Eyebrows and Eyelashes Naturally Using Everyday Household Oils With Consistent Use

    Grow Thicker Eyebrows and Eyelashes Naturally Using Everyday Household Oils With Consistent Use

    You rarely notice eyebrow thinning in a sudden or dramatic way. It happens gradually and quietly, usually under bright bathroom lighting while removing makeup. A few hairs near the tail seem shorter. The once-defined arch looks uneven. It could be linked to ageing, years of overplucking in the early 2000s, or even stress and dry indoor air. Whatever the reason, your face starts to feel subtly different, as if something around the eyes has faded. Soon, you find yourself watching every lash that lands in the sink while washing off mascara at night.

    The Gentle Strength of Everyday Oils

    Before spending money on expensive serums or analysing long ingredient lists, it helps to notice what is already within reach. In many UK homes, simple oils sit quietly on shelves—olive oil by the stove, coconut oil in the kitchen, or a small bottle of castor oil stored away. These oils lack luxury branding, but they offer something steadier: nourishment, patience, and consistency. Since brows and lashes are made up of fine hairs, this kind of gentle care can support noticeable improvements over time.

    Why Brows and Lashes Feel So Personal

    Eyebrows and eyelashes often hold emotional significance. Many women remember phases of heavy makeup, excessive tweezing, or hormonal shifts that affected hair growth. When brows thin or lashes weaken, the face can appear tired or unfamiliar, changing how you see yourself. A natural approach feels kinder and more aligned with a slower, more mindful way of living. Oils do not offer instant results, but with steady use, they support what your body naturally aims to restore.

    Household Oils That Help Support Hair Health

    Castor oil is widely discussed because of its thick texture, which helps it stay on fine hairs and reduce breakage. Coconut oil suits dryness caused by regular mascara use, while olive oil gently conditions eyebrow hairs. Lighter oils such as almond or argan absorb more easily and suit sensitive skin. These oils do not force growth; instead, they protect and strengthen hair, helping create healthier conditions for brows and lashes.

    • Castor Oil – Dense and slightly tacky, rich in ricinoleic acid, helps lock in moisture and strengthen hair fibres.
    • Coconut Oil – Light to medium texture, melts on contact, penetrates the hair shaft and reduces protein loss.
    • Olive Oil – Medium weight, antioxidant-rich, supports the skin barrier around hair roots.
    • Sweet Almond Oil – Smooth and gentle, absorbs well and suits sensitive eye areas.
    • Argan Oil – Lightweight and non-greasy, high in vitamin E and fatty acids for resilience.

    Building a Calm Evening Care Habit

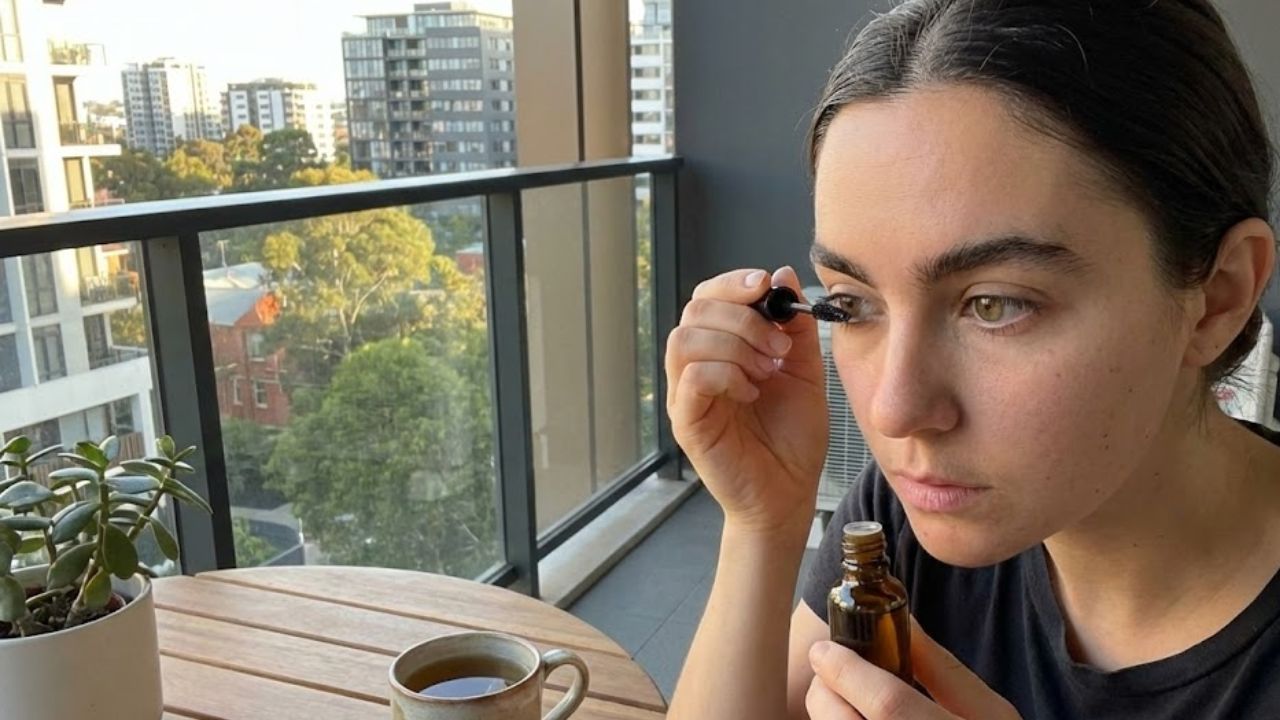
    Consistency makes the difference, and the easiest routines fit naturally into your evenings. Begin with clean, makeup-free eyes and washed hands. Select one oil or a simple blend, apply a small amount to brows using a clean spoolie, and lightly coat the upper lashes with care. Gently blot away any excess. Repeating this nightly over several weeks turns the routine into a soothing ritual rather than a task.

    Listening to Your Skin and Eye Area

    The skin around the eyes is delicate, so paying attention to how it reacts is important. Always patch test new oils and begin with very small amounts. If irritation appears, switch to a lighter option. Avoid getting oil directly into the eyes, and rinse gently if it happens. Anyone with existing eye conditions or treatments should consult a pharmacist or GP. Progress is subtle, so focus on reduced shedding and gentle fullness rather than fast results.

    Daily Habits That Support Better Growth

    Oils are most effective when combined with supportive habits. Reducing the use of waterproof mascara, removing makeup gently, and eating a balanced diet with enough protein, healthy fats, and minerals all play a role. Managing stress and hormonal balance also influences hair health. Oils provide external care, while nutrition, rest, and lifestyle form the foundation underneath.

    Blending Your Own Simple Oil Mix

    Once familiar with the routine, creating a small custom blend at home is easy. Combining castor oil for thickness, almond oil for softness, and argan oil for light nourishment works well. Store the blend in a clean bottle, label it with the date, and use it within a few months. This keeps your routine simple, transparent, and personal.

    Observing Progress Without Pressure

    Tracking changes gently helps prevent overthinking. Taking a makeup-free photo every few weeks in the same lighting can reveal subtle shifts. Fuller brows, fewer gaps, and stronger lashes usually develop gradually. Missing an occasional night does not undo progress—simply return to the routine when you can. The goal is not perfection, but consistent, quiet care for what you already have.

  • Blush Placement Technique: The Small Change That Visually Reshapes Facial Features After 30

    Blush Placement Technique: The Small Change That Visually Reshapes Facial Features After 30

    The woman staring back from the bathroom mirror looks almost the same as she did at 25—but not exactly. Her cheeks sit a little lower now. The soft fullness that once lifted when she smiled blends more smoothly into her jawline. She reaches for her trusted blush brush and follows the routine she has always known: smile, apply color to the apples of her cheeks. Then she pauses. Instead of looking fresh, her face appears slightly droopy. The shadows beneath her eyes seem deeper, and the center of her face looks heavier. She wipes the blush away and tries again, this time placing it a bit higher. Instantly, her cheekbones look sharper. Her face appears lifted, and her eyes seem more alert. It’s the same blush and the same person, yet her face looks entirely different. The product didn’t change—only where it was applied.

    Why Classic Blush Techniques Start Failing After 30

    There’s a strange phase in life when your makeup routine quietly stops working. It doesn’t happen overnight. You just notice that the techniques you’ve relied on for years no longer give the same result. Blush is often the first sign. Applied low and round, it can make a 32-year-old look tired by afternoon. The shade that once brightened the apples of the cheeks now drifts closer to the soft lines around the nose and mouth, settling rather than shaping. At this point, placement matters more than the product itself.

    A makeup artist in London once said she could estimate someone’s age simply by watching how they apply blush. Younger people naturally place it at the center of the cheeks, like a simple illustration. Many people over 30 continue doing this even as their face subtly changes. She recalled working with two sisters, aged 28 and 38, who shared similar skin tones and used the same products. On the younger sister, blush on the apples made her entire face glow. On the older sister, the same placement emphasized faint hollows under the eyes. When the artist moved the blush higher toward the temples on the 38-year-old, she suddenly looked well-rested. The color redirected attention to her eyes and cheekbones instead of the center of her face.

    The reason is simple. After 30, your bone structure stays the same, but facial fat gradually shifts downward. Muscle memory still guides your hand to where the fullness used to be, so color ends up placed in an area that’s beginning to drop. Blush applied there can make the face appear heavier. Move it slightly upward and outward, and the effect reverses. You’re not changing your features—just changing where the eye is drawn first. That’s why even a small touch of pink can make such a difference.

    A Modern Blush Placement That Instantly Lifts the Face

    The Simple Technique That Works Best After 30

    The makeup method gaining attention right now is surprisingly simple. Instead of smiling while applying blush, keep your face relaxed and look straight ahead. Imagine a diagonal line running from the top of your ear to the side of your nostril. Apply blush along the upper half of that line, closer to the ear than the nose. Shape it into a soft, slanted C that curves toward the outer corner of your eye. Blend the color upward into the temples, not downward toward the center of the face. Let it fade gently near the hairline, like watercolor spreading on paper.

    For most people over 30, this placement immediately reveals cheekbones they may have forgotten. One extra adjustment makes an even bigger difference: leave a clean gap under the eyes. About a finger’s width of bare skin between the under-eye area and the blush helps prevent color from settling into fine lines or emphasizing dark circles. For a natural flush, you can lightly tap a hint of blush on the bridge of the nose, but keep the main color high and toward the outer face.

    Many people worry about looking overdone as they age, and the concern is valid. Too much color placed too low can create an unflattering flushed look. This is why placement outweighs quantity. Start with less product than you think you need. Press it on gently instead of sweeping it across the skin. Build the color in thin layers rather than one heavy stripe. Cream blushes often suit mature skin better because they blend seamlessly instead of sitting on the surface.

    Real life isn’t a professional makeup tutorial. Most mornings are rushed, with one hand holding a brush and the other checking a phone. So remember one easy rule: higher and further back. That single guideline can make a visible difference. On tired days, a slightly higher blush placement can make your face look more awake, reflecting how you still feel inside.

    Key Points to Keep in Mind

    • Think diagonal, not circular when applying blush.
    • Keep the strongest color away from the nose and mouth.
    • Blend upward into the temples to create a lifted effect.
    • Choose cream or liquid formulas if powders settle into texture.
    • Revisit your blush placement every few years as your face naturally changes.

    How Blush Becomes a Quiet Confidence Reset Over Time

    There’s something quietly powerful about changing how you apply a product you’ve used for 15 years. It’s an acknowledgment that your face has evolved—and a decision to work with it rather than against it. A single diagonal sweep becomes a small negotiation with time. Friends often talk about looking tired or not quite like themselves, but it’s rarely a dramatic change. More often, it’s how light and shadow now move across the face.

    Adjust the placement of color, and you change where the light appears to land. It’s almost philosophical. The way you map your blush subtly influences the story your face tells before you say a word. We’ve all caught our reflection unexpectedly and felt surprised. Remapping blush doesn’t erase that moment, but it softens it. The right placement quietly says you’re still there. It doesn’t pretend you’re 22—it simply highlights the structure and expression you’ve earned.

    This small adjustment is also easy to share. Once you see the difference, it’s hard not to show someone else. Many people demonstrate it by applying blush the old way on one cheek and the new way on the other. The contrast usually speaks for itself. Over time, blush becomes less about following trends and more about understanding your own facial structure. There’s no universal diagram, just a guiding idea: color that moves upward suggests energy and youth, while color that settles in the center often reads as fatigue. That may be why this technique keeps resurfacing. It doesn’t require new products—just moving what you already own a few millimeters higher.

  • Knife Sharpening at Home: The Expert Technique That Brings Back Razor Edges Without Risk

    Knife Sharpening at Home: The Expert Technique That Brings Back Razor Edges Without Risk

    The first time I opened a bottle of store-bought cleaner after a long hike in the woods the smell hit me hard. It was artificial lemon mixed with chemical sharpness. My eyes stung and my throat tightened. The quiet moss-covered trail I had left an hour before suddenly felt like it belonged to another world. Out there water moved through soil & stone & was filtered by roots over time. In here under harsh lights surrounded by plastic bottles everything felt manufactured. I remember thinking about why my home had to smell like a laboratory just to be considered clean.

    The Day You Notice Your Home Is an Ecosystem

    Once you see it, it becomes impossible to ignore. The bright blue liquid swirling down the sink does not vanish—it travels through pipes, treatment systems, rivers, and eventually oceans already under strain. The fine mist from glass cleaner lingers in sunlit air, becoming a chemical haze you quietly inhale. The recycling bin fills with rigid plastic bottles that once held something strong enough to make your head spin. We often speak about the environment as if it exists somewhere distant—a forest, a shoreline, the Arctic—but the truth is simpler and closer. You are already living inside an active ecosystem. Your home is not sealed. Air moves freely, dust rides on socks and wind, and water enters and exits carrying traces of everything added to it.

    The Quiet Power of What Lives Under Your Sink

    The products tucked beneath the sink influence far more than the surfaces they touch. They shape the small daily environment you breathe and move through. There is something quietly transformative about opening a cupboard and seeing not neon bottles of unknown solutions, but a handful of familiar items: baking soda, vinegar, a simple bar of soap, a lemon, maybe a tiny vial of essential oil. These are ingredients your great-grandparents would recognize. When used thoughtfully, they make a home smell like a place where people cook, read, rest, and open windows—not like a showroom built on artificial shine.

    The Hidden Potential of Everyday Kitchen Staples

    Your kitchen already holds everything needed for effective cleaning. The shift comes from realizing that ordinary ingredients can be surprisingly powerful. Baking soda feels soft and fine between your fingers. White vinegar’s sharp scent clears the air as it cuts through grime. A lemon’s waxy skin leaves a faint stickiness after slicing. Olive oil pours slowly, heavy and smooth. Used correctly, these simple items can replace many commercial cleaners without sacrificing results.

    Simple Cleaning Recipes That Fit Real Life

    These methods work because they adapt to what you already have. There’s no need for special tools or stressful measurements. A bit of common sense and curiosity is enough. The recipes are forgiving—small adjustments won’t ruin them. Missing an ingredient often means swapping in something similar. The goal is not perfection, but solutions that fit easily into everyday routines.

    Everyday All-Purpose Surface Spray

    This is the cleaner you’ll reach for most—ideal for kitchen counters, door handles, light switches, and unexpected sticky spots.

    Mix equal parts white vinegar and water in a clean spray bottle. If you enjoy a mild scent, add a few drops of essential oil such as lemon, lavender, or tea tree, then shake gently.

    Spray onto hard surfaces and wipe with a cloth. Avoid natural stone like marble or granite, as vinegar can cause damage. The vinegar scent fades quickly, eventually becoming a familiar signal of cleanliness rather than harshness.

    Soft Scrub for Sinks, Tubs, and Stovetops

    This scrub works well on surfaces that look tired—bathtub rings, dull sinks, or residue around burners—cleaning thoroughly without scratching.

    Combine half a cup of baking soda with enough water to form a thick paste. For added grease-cutting ability, mix in a tablespoon of castile or plain liquid soap.

    Apply with a damp sponge or cloth, scrub gently, then rinse well. Stainless steel and enamel regain a natural, honest shine—clean without looking overpolished.

    Clear Glass and Mirror Cleaner

    This mixture focuses on clarity rather than scent, leaving glass nearly invisible when light hits it correctly.

    Mix equal parts white vinegar and water. For extra streak-free results, especially on mirrors, add one teaspoon of rubbing alcohol per cup of solution.

    Spray lightly and wipe with a lint-free cloth or old cotton T-shirt. The surface reflects space and light, not artificial fragrance.

    Natural Wood Conditioning Polish

    This blend is designed for wood that shows signs of use—coffee rings, softened armrests, or shelves needing more than dusting.

    Combine two parts olive oil with one part lemon juice or white vinegar in a small container. Shake before each use.

    Apply a small amount with a soft cloth, following the grain. Buff gently. The wood looks cared for, not disguised.

    Deodorizing Powder for Carpets and Mattresses

    For soft surfaces cleaned less often, this mixture removes odors quietly instead of masking them.

    Mix one cup of baking soda with 10–15 drops of essential oil if desired, stirring until evenly scented.

    Sprinkle lightly, let sit for 15–30 minutes, then vacuum thoroughly. What remains is simply the absence of unpleasant smells.

    Eco-Friendly Cleaning Basics at a Glance

    • Baking soda: scrubbing and deodorizing sinks, tubs, ovens, and refrigerators
    • White vinegar: degreasing and removing limescale; avoid natural stone
    • Castile or plain soap: base for dishes, floors, and general cleaning
    • Lemon or citrus: deodorizing and light bleaching with care
    • Salt: added abrasion for pans, boards, and drains
    • Essential oils: light scent and mild antimicrobial support when used sparingly

    Cleaning as Care, Not Combat

    Replacing harsh cleaners with pantry-based alternatives changes the feel of cleaning itself. It becomes intentional rather than aggressive, closer to cooking or tending plants. As you wipe surfaces, details appear—fingerprints on doorframes, smudges at child height, signs of real living. Cleaning shifts from erasing life to preparing space for what comes next.

    Safety, Balance, and Practical Boundaries

    Natural cleaning still requires attention. Ingredients cannot always be mixed freely, and not every situation suits homemade solutions. Never combine vinegar with bleach, as this creates toxic chlorine gas. Use caution on sensitive surfaces and label all mixtures clearly, especially around children or pets. Some situations—serious mold or illness-related disinfection—still call for commercial products. Thoughtful cleaning is about gentler defaults, not rigid rules.

    From Your Sink to the Wider World

    Everything used during cleaning continues its journey beyond your home. Water carries residues through pipes, treatment plants, and back into nature. Some substances linger; others break down easily. Simple ingredients like soap, vinegar, and baking soda are familiar to natural systems and easier for microorganisms to process.

    The benefits are immediate too—cleaner indoor air, gentler contact with skin, and less plastic waste. Over time, the space under the sink grows calmer: fewer bottles, more refillable containers, and a sense of order. Cleaning becomes a quiet partnership between your home and the world beyond it, guided by care instead of control.

  • 14 Yoga Poses That Help Open Tight Hips and Improve Mobility

    14 Yoga Poses That Help Open Tight Hips and Improve Mobility

    Tight hips affect many people who spend hours sitting or doing the same movements repeatedly. When your hips become stiff they can cause discomfort and bad posture & sometimes even pain in your lower back. Yoga offers an excellent solution for releasing this tension while building flexibility & better movement in your hip area. The 14 yoga poses described here focus on opening your hips and stretching the muscles around them to boost your overall flexibility.

    Child’s Pose (Balasana)

    Why it works for hip flexibility: Child’s Pose stretches your lower back and hip area while loosening tight thigh muscles. This makes it a good beginner pose for improving hip mobility.

    How to perform it: Start in a kneeling position with your hands flat on the floor. Sit back slowly until your bottom moves toward your heels and stretch your arms forward. Rest your forehead on the mat & breathe slowly and deeply.

    What you gain: This pose stretches your hips & thighs while releasing lower back tension. It also helps calm your mind and body.

    Pigeon Pose (Eka Pada Rajakapotasana)

    Why it works for hip opening: Pigeon Pose ranks among the most effective stretches for loosening hip flexors & releasing tension in the glutes and lower back. How to perform it: Start on your hands & knees in a tabletop position. Move one knee forward and position it behind the corresponding wrist. Straighten the other leg behind you & gently lower your hips down toward the ground. Stay in this position for multiple breaths before switching to the other side. Benefits: This pose provides a deep hip opening while stretching the glutes and hip flexors along with the lower back muscles.

    Lizard Pose (Utthan Pristhasana)

    Why it works for hip opening: Lizard Pose focuses on the hip flexors and groin area to provide an intense stretch that loosens tight hips. How to perform it: Begin in a high plank position & bring one foot forward to land outside your hands. Drop your hips down while keeping your back leg straight. For a more intense stretch you can lower your forearms to the floor. Benefits: This pose stretches the hip flexors & groin and hamstrings while building better flexibility.

    Butterfly Pose (Baddha Konasana)

    Why it works for hip flexibility: Butterfly Pose loosens tightness in your inner thighs and groin area while creating more space in your hip joints. How to perform it: Start by sitting down with the soles of your feet pressed together. Let your knees fall open to each side. Grab your feet with both hands and apply light pressure to push your knees closer to the ground. For a deeper stretch you can hinge forward from your hips. Benefits: Increases hip mobility and flexibility while targeting the inner thigh muscles and groin region.

    Reclining Bound Angle Pose (Supta Baddha Konasana)

    Why it works for hip opening: This version of Butterfly Pose gently stretches your hips while helping your body relax and unwind. How to perform it: Start by lying flat on your back. Press the bottoms of your feet together & allow your knees to drop naturally toward the floor on each side. Place your arms comfortably beside your body with your palms turned upward and take slow deep breaths. Benefits: Stretches the hip and groin areas while releasing tension throughout your lower body.

    Happy Baby Pose (Ananda Balasana)

    Why it works for hip flexibility: Happy Baby Pose opens up the hip joints while stretching your groin area & inner thighs. It also helps loosen your lower back muscles. How to perform it: Start by lying flat on your back. Draw both knees up toward your chest. Reach up & hold the outside edges of your feet with your hands while keeping your knees bent. Your hips should stay wide apart. Apply gentle pressure to push your knees down toward the ground. What you gain: This pose stretches your hip flexors and inner thigh muscles while releasing tightness in your lower back region.

    Low Lunge (Anjaneyasana)

    Why it works for hip flexibility: Low Lunge effectively stretches the hip flexors while building leg strength. This combination makes it excellent for releasing tension in tight hips. How to perform it: Begin by standing upright. Step one foot forward and bend that knee to form a right angle. Bring your back knee down to rest on the floor. Keep your hips facing forward and gently push them toward the front of your mat. For a deeper stretch you can lift both arms above your head. What it does: This pose lengthens the hip flexors and stretches both the quadriceps & hamstrings. It also builds strength throughout the legs.

    Crescent Lunge (Anjaneyasana)

    Why it works well for hip flexibility: Crescent Lunge builds on the basic Low Lunge position by creating additional stretch through the hip flexor muscles. This pose also helps develop better balance and core stability during practice. How to perform it: Begin by standing upright with feet together. Take a large step forward with one foot and lower into a lunge by bending the front knee. Your back leg should remain extended with the heel off the ground. Lift both arms straight up toward the ceiling & slowly push your hips forward to deepen the stretch. Benefits: This pose increases hip mobility & flexibility. It lengthens tight hip flexor muscles and builds strength throughout the leg muscles.

    Squat Pose (Malasana)

    Why it works well for hip flexibility Crescent Lunge takes the basic Low Lunge position and adds more stretch to your hip flexor muscles. It also improves your balance and strengthens your core while you hold the pose. # How to perform it Stand up straight & take a big step forward with one foot. Bend your front knee and keep your back leg straight with the heel lifted off the floor. Raise both arms overhead and gently push your hips forward. # What you gain This pose makes your hips more mobile and stretches your hip flexors while making your leg muscles stronger.

    Seated Forward Bend (Paschimottanasana)

    Why it works for hip flexibility: This pose mainly targets the hamstrings but also loosens tight areas in your hips and lower back. How to perform it: Start by sitting on the floor with both legs stretched out in front of you. Take a breath in while sitting up tall and lengthening through your spine. As you breathe out fold forward from your hips and reach your hands toward your feet. Try to maintain a straight back as you go deeper into the position. Benefits: This stretch works your hamstrings & hip muscles while also releasing tension in your lower back. It helps improve overall flexibility in these areas.

    Lunge with a Twist (Parivrtta Anjaneyasana)

    Why it works for hip flexibility: This position targets your hips and groin area while also stretching your lower back. The twisting motion helps your spine move more freely. How to perform it: Start in a Low Lunge position. Put the hand opposite to your front leg down on the ground. Turn your upper body toward your bent leg and reach your other arm straight up toward the ceiling. Try to keep your hips facing forward while you twist deeper. What you gain: Your hips become more open and flexible. Your groin muscles get a good stretch. Your spine gains better range of motion.

    Warrior II (Virabhadrasana II)

    Why it works well for hip flexibility: Warrior II builds leg strength & increases hip and chest mobility at the same time. This pose effectively enhances your flexibility and helps you maintain better balance. How to perform it: Stand with your feet positioned far apart and rotate one foot so it points outward. Lower your body by bending the front knee until it forms a right angle while your back leg stays extended. Stretch both arms out to the sides so they are level with the floor & look straight ahead. What you gain: Better hip mobility and stronger leg muscles along with improved balance.

    Frog Pose (Mandukasana)

    Why it works well for hip flexibility: Warrior II strengthens your legs & opens up your hips & chest at the same time. This pose improves your flexibility and helps you balance better. How to perform it: Stand with your feet wide apart and turn one foot outward. Bend your front knee to create a right angle while keeping your back leg straight. Extend both arms out to your sides at shoulder height and gaze forward. What you gain: Greater hip mobility & stronger legs with better balance.

    Bound Angle Pose (Baddha Konasana)

    Butterfly Pose for Hip Flexibility This seated position effectively stretches your hips and groin area while making your inner thighs more flexible. Start by sitting on the floor with your legs straight out in front of you. Bring the bottoms of your feet together so they touch. Let your knees fall naturally to the sides. Grab your feet with both hands and apply gentle pressure to push your knees closer to the ground. This pose helps open up tight hips and stretches the groin muscles. It also works on increasing flexibility in your inner thigh area.

  • Fast Ways to Repair Dry Cracked Heels at Home Using Safe Everyday Kitchen Ingredients

    Fast Ways to Repair Dry Cracked Heels at Home Using Safe Everyday Kitchen Ingredients

    The first time you notice the cracks, they look harmless. Thin, pale lines begin to appear across your heel, almost like patterns on dry earth. At first, it feels easy to ignore them. You might blame walking barefoot at home or wearing your favorite open sandals too often. But then one morning, as your feet touch the floor, you feel a rough pull and a faint sting. The cracks have deepened. They feel sore, sometimes even catching on your socks. Quietly, you realize it’s time to give your heels some care. Dry, cracked heels often appear slowly, and by the time we notice them, they’re already uncomfortable. The good news is that relief doesn’t need expensive products. Simple kitchen ingredients can gently restore softness over time.

    The Hidden Story Your Heels Are Sharing

    Your heels work harder than you realize. With every step, they absorb pressure and impact, especially when you stand or walk for long hours. Because they’re usually covered and out of sight, they’re easy to forget. You may feel roughness during a shower and plan to deal with it later, only to forget again. Over time, lack of moisture combined with pressure causes the skin to lose flexibility. Walking barefoot on hard floors, wearing thin-soled or open-back shoes, long hot showers, cold weather, and indoor heating all contribute to dryness. Heel skin is naturally thick for protection, but when it becomes too dry, it cracks instead of bending. The encouraging part is that skin repairs itself when given moisture, gentle care, and protection.

    Your Kitchen as a Healing Space

    Your kitchen is filled with simple ingredients that can comfort and heal dry skin. Oils like olive or coconut oil deeply moisturize and soften rough heels. Honey helps draw moisture into the skin while calming irritation. Milk and yogurt gently loosen flaky skin, thanks to natural lactic acid. When sugar or salt is mixed with oil, it becomes a mild exfoliator that removes dead skin cells. Using familiar ingredients feels comforting because you already trust them. There’s no need for complicated labels or expensive products. Understanding how each ingredient works makes your heel-care routine simple, effective, and soothing.

    Natural Ingredients and Their Benefits

    Natural Ingredient How It Helps Cracked Heels Best Way to Use
    Olive Oil / Coconut Oil Provides deep moisture, repairs dryness, and softens thick, rough heel skin Massage onto heels at night or use as a base for DIY scrubs
    Honey Locks in hydration, calms irritation, and promotes natural healing Apply as a moisturizing mask mixed with milk or oil
    Milk / Yogurt Helps loosen dead skin cells with gentle lactic acid exfoliation Use in a warm foot soak or as a softening foot pack
    Sugar / Salt Removes rough layers and improves overall heel smoothness Scrub heels gently after soaking feet in warm water
    Banana / Avocado Feeds dry skin with vitamins and healthy fats for repair Apply a thick mask on very dry or cracked heels

    A Gentle Evening Ritual for Heels

    Think of heel care as a calm moment at the end of your day. The house is quiet, and you take just fifteen minutes to focus on yourself and your feet.

    Step 1: Warm Milk and Salt Soak

    Fill a basin with comfortably warm water. Add half a cup of milk, one to two spoons of salt, and a small amount of olive oil. Soak your feet for ten to fifteen minutes. The warmth relaxes your skin, the milk softens dryness, and the oil begins restoring moisture.

    Step 2: Gentle Exfoliating Scrub

    Mix sugar or fine salt with olive or coconut oil to create a thick paste. Massage it gently onto your heels using circular movements. Focus on rough areas, but avoid scrubbing too hard. Gentle care works better than harsh rubbing. Rinse with warm water once finished.

    Step 3: Honey and Yogurt Mask

    Combine one tablespoon of honey with one tablespoon of thick yogurt and a few drops of oil. Apply generously to cracked areas and leave it on for ten to fifteen minutes. This mask deeply moisturizes and calms irritated skin. Rinse gently and pat dry.

    Overnight Oil Treatment

    Before bedtime, warm a small amount of olive or coconut oil and massage it into your heels for a few minutes. Put on clean cotton socks to lock in moisture while you sleep. By morning, your heels usually feel softer, smoother, and far less painful.

    Daily Habits to Prevent Cracks

    Once your heels heal, simple habits help keep them that way. Moisturize after showers, avoid very hot water, rotate your footwear, and drink enough water daily. Treat dryness as soon as it appears. Small, consistent steps prevent serious cracking later.

    When Home Care Is Not Enough

    If heel cracks become very deep, start bleeding, or don’t improve with regular care, professional advice may be necessary. Certain health conditions can slow healing, and a doctor or podiatrist can suggest proper treatment. Most cracked heels are simply a sign of dryness and neglect. With patience, warmth, oil, and everyday kitchen ingredients, your feet can become comfortable again and continue supporting you through daily life.

  • Optical Illusion Test: Can You Spot the Number 38 Among 83 and 23 in 8 Seconds

    Optical Illusion Test: Can You Spot the Number 38 Among 83 and 23 in 8 Seconds

    Optical illusions never fail to surprise and challenge our perception of reality. The latest puzzle making waves online is a number-based illusion that tests your visual focus and mental sharpness. The task appears straightforward—spot the number 38 hidden among a sea of confusing 83s and 23s within just eight seconds. However, as many have discovered, this challenge is trickier than it seems. The arrangement of similar numbers causes the eyes to miss subtle differences, leaving even the quickest observers second-guessing what they see.

    The Psychology Behind Optical Illusions

    Optical illusions work because our brains are wired to recognize familiar patterns quickly. This ability helps us understand our surroundings efficiently, but it can also make us prone to mistakes when visual cues are deliberately manipulated. In this number illusion, the similarity between the digits 8, 3, and 2 causes the brain to interpret them collectively as repetitive visual patterns. Since 83 and 23 dominate the grid, the eyes automatically expect to see them, allowing the hidden 38 to stay undetected for a few moments.

    This clever design highlights how perception doesn’t always align with reality. When our minds predict what should appear next, we unconsciously filter out anomalies that don’t fit the pattern. That’s what makes this illusion both challenging and fascinating—it directly confronts our brain’s natural bias toward visual consistency.

    The Eight-Second Challenge

    Time pressure amplifies the difficulty of this puzzle. The goal is to identify the number 38 in under eight seconds, which forces the brain to process a dense cluster of numbers at lightning speed. The repetition of 83s and 23s in alternating colors—usually blue and pink—strengthens the illusion by creating contrast that confuses depth and focus. Your eyes may instinctively jump from one cluster to another without picking out the exact difference that reveals the elusive 38.

    Many participants report that during their first attempt, their vision blurs slightly as the numbers blend together. This happens because your eyes are attempting to adjust between similar shapes in rapid succession. On the other hand, those with sharper visual discrimination or trained observation skills tend to spot the 38 more quickly.

    How to Train Your Eyes to Spot the Difference

    Overcoming optical illusions involves retraining your visual focus and adopting a systematic approach. Here are some effective tips to improve your ability to solve puzzles like this:

    – Scan methodically: Instead of looking at the entire image at once, divide it into sections and examine each part individually.

    – Focus on digit transitions: In this illusion, the distinguishing factor lies in where the second digit differs. Pay attention to how the numbers shift from “8” to “3” or “2”.

    – Relax your eyes: Straining your gaze makes you more likely to overlook details. Blink often and let your vision move naturally across the grid.

    – Take advantage of color patterns: Since colors separate rows or groups of numbers, use them as guides to isolate potential irregularities.

    – By practicing these techniques, your visual recognition skills become sharper and your mental alertness improves—helpful not just for puzzles but for real-life tasks that depend on observational accuracy.

    Where the Hidden 38 Is Located

    For those who gave it their all but came up short, the number 38 can be found in the lower-right region of the grid. Looking closely, you’ll notice a blue “3” followed by an “8”, which stands out subtly among neighboring 83s and 23s. Once your brain distinguishes this small difference, it instantly “clicks,” and you can’t unsee it afterward. The sense of achievement that follows feels surprisingly satisfying, reflecting how our visual cognition reacts when finding order in complexity.

    The Science of Focus and Perception

    This challenge is more than an entertaining game—it reveals how attention and perception interact under pressure. According to visual cognition research, humans process visual information selectively. Our minds filter an overwhelming amount of input every second, keeping only the details deemed important. Optical illusions exploit this by making unimportant details seem prominent and transforming the actual focus point into a hidden element. Through repeated exposure to such puzzles, the brain learns to process minor inconsistencies faster, improving your ability to detect irregularities in other contexts, from reading fine print to analyzing visual data.

    Why Optical Illusions Go Viral

    The popularity of visual puzzles like this can be traced to their balance of simplicity and depth. They offer instant engagement—anyone can attempt them—but the combination of psychological intrigue and competitive time limits keeps audiences hooked. Online platforms, especially social media feeds and discovery sections, amplify this effect as users challenge friends to “beat eight seconds.” The viral appeal lies in the universal human curiosity to test one’s limits and prove attentiveness in a world full of distraction.

    Final Thoughts

    The “Spot the Number 38 Among 83 and 23” challenge isn’t merely a test of eyesight—it’s a playful exploration of human perception. Each attempt reinforces the idea that seeing isn’t always the same as noticing. Whether you found the number in seconds or needed a few tries, the exercise stimulates cognitive flexibility and observation precision. Such simple yet scientifically rich challenges remind us that our brains, though powerful, can still be delightfully deceived—and that training focus can make a real difference in how we interpret the world around us.

  • Plank Hold Timing Explained: How Long to Hold Planks for Stronger Core Gains at Any Age

    Plank Hold Timing Explained: How Long to Hold Planks for Stronger Core Gains at Any Age

    The mat feels cool beneath your forearms as your toes dig in and your legs quietly strain. Your breathing evens out, steady and controlled. Somewhere between the tightness in your abdomen and the focus in your mind, a familiar question surfaces: how long should this be held? Ten seconds? Thirty? A full two minutes that stretches endlessly? Planks are often treated as a simple exercise with a universal answer, but in reality they are a living conversation between your body and gravityone that changes with time. What feels effortless at 18 becomes demanding at 48, and at 68 requires thoughtful care. At every stage of life, your core foundation supports the spine, protects the back, and allows smooth, confident movement. Finding the right hold time means understanding your body exactly as it is today.

    The Quiet Storm Inside Your Core

    Most workouts announce themselves loudly—pounding footsteps, clanging weights, sharp exhales echoing through the room. Planks arrive without noise. You align your body into one long line: shoulders stacked above elbows or wrists, heels reaching back, neck relaxed. From the outside, nothing appears to move.

    Inside, however, a subtle storm unfolds. The transverse abdominis tightens like a natural corset, the multifidus provides delicate spinal support, the diaphragm coordinates breath with effort, and the pelvic floor steadies everything from below. These deep stabilizers respond best to calm, precise effort performed consistently. This is why quality matters more than duration. A steady twenty-second plank with clean form often delivers far more benefit than a shaky minute fueled by tension and pride.

    The Myth of the Two-Minute Plank

    Modern fitness culture celebrates extremes. Two-minute holds. Five-minute challenges. Viral clips of bodies trembling under strain. Somewhere along the way, longer became equated with better.

    The quieter reality is less dramatic. After a certain point, extending a plank mainly builds tolerance to discomfort rather than meaningful strength. Coaches and research alike suggest that short, controlled holds, repeated regularly, support core strength and spinal health more effectively than occasional endurance tests. Long planks are not inherently harmful, but their return diminishes as fatigue increases and alignment quietly slips. With time, the goal naturally shifts from survival to support.

    Age, Gravity, and the Plank Equation

    As the years pass, the body recalculates. Recovery slows, tissues become less forgiving, and balance requires more attention. A plank that once felt automatic now asks for intention. This is not decline—it is biology.

    Rather than one fixed rule, flexible ranges work best. The ideal hold ends just before form begins to unravel. Below are realistic guidelines for healthy adults without major injuries, meant as reference points rather than rigid targets.

    Age Group Recommended Hold Duration (Per Set) Number of Sets Weekly Practice Frequency
    Teens (13–19 years) 20–40 seconds 2–4 2–4 days per week
    Adults (20s–30s) 30–60 seconds 2–4 3–5 days per week
    Midlife (40s) 20–45 seconds 2–4 3–4 days per week
    Older Adults (50s) 15–40 seconds 2–3 2–4 days per week
    Seniors (60s–70s+) 10–30 seconds 2–3 2–4 days per week

    Your 20s and 30s: Strength Without Restraint

    In early adulthood, the body often feels forgiving. Recovery is quick, tissues are resilient, and strength develops easily. Holding a plank for thirty to sixty seconds with good form can be productive.

    The risk here isn’t weakness—it’s ignoring subtle breakdowns. Hips dip, shoulders creep upward, and the lower back quietly protests. Dividing effort into multiple shorter holds often produces better results than one long, punishing attempt.

    Your 40s: Strength With Awareness

    By the 40s, feedback becomes clearer. Old injuries speak up and stiffness appears sooner. Strength remains, but it demands respect.

    For many, the most effective range sits between twenty and forty-five seconds per hold. Some days allow longer efforts; others call for restraint. The focus shifts toward sustainable strength—supporting posture, spine health, and daily movement for the long term.

    Your 50s, 60s, and Beyond: Resilient, Not Reckless

    Later decades redefine strength. Muscle mass may decline gradually and recovery may slow, but adaptation remains possible. Planks continue to offer value, even when modified.

    Shorter holds of ten to thirty seconds performed with excellent alignment are highly effective. Knee planks or incline planks are not compromises; they are smart adjustments that protect joints while maintaining core engagement.

    Knowing When to Stop

    Your body always signals when a plank shifts from helpful to risky. Sagging in the lower back, shoulders tightening toward the ears, held breath, or facial tension are all cues to stop.

    Ending a hold at the first sign of form loss is not failure—it is skilled training. Over time, this approach builds efficiency rather than collapse.

    Turning Planks Into a Practice

    Planks do not need drama. They can fit easily into daily life—a brief hold before coffee, another after work, one before bed. These small, consistent efforts quietly accumulate.

    The true reward isn’t a record-breaking time. It’s standing taller, moving with confidence, and supporting your body through everyday tasks. Hold only as long as your form remains honest. Rest. Repeat. That is where lasting core strength lives.

  • 7 Home Yoga Exercises That Help You Stay Fit Naturally

    7 Home Yoga Exercises That Help You Stay Fit Naturally

    Seven Simple Yoga Exercises to Stay Fit at Home Staying fit does not always require heavy workouts or gym equipment. Yoga offers a natural and balanced way to keep the body strong and flexible while boosting energy levels. Practicing yoga at home fits perfectly into modern routines where time and space are often limited. With consistent practice yoga supports muscle tone & improves posture while aiding digestion and stress control. These seven home yoga exercises are simple and effective for anyone who wants to stay fit naturally.

    Mountain Pose for Natural Posture and Strength

    Mountain Pose: The Foundation of Your Yoga Practice Mountain Pose serves as the starting point for countless yoga movements. To perform it correctly you should stand upright with your feet positioned close together. Let your arms hang naturally at your sides while keeping your spine in a straight alignment. Direct your attention to maintaining steady breathing patterns and feel the connection between your feet & the ground beneath you. This fundamental pose delivers several physical benefits. It works to strengthen the muscles throughout your legs while simultaneously working on your overall posture. Regular practice also sharpens your awareness of how your body moves and holds itself in space. Making Mountain Pose part of your daily routine can lead to lasting improvements in how you carry yourself.

    Downward Facing Dog for Total Body Fitness

    Downward Facing Dog engages nearly all the major muscle groups in your body. Start from a hands & knees position & lift your hips upward while pressing your chest gently toward your thighs. This pose provides a stretch for the back & shoulders along with the calves & hamstrings. At the same time it builds strength in both the arms and legs. The position enhances blood circulation throughout the body & increases your energy levels. Regular practice of this pose at home supports ongoing flexibility & builds stamina without putting excessive strain on your body.

    Cobra Pose for a Healthy Spine

    Downward Facing Dog works almost every major muscle group in your body. Begin on your hands and knees and then lift your hips up while gently pressing your chest toward your thighs. This pose stretches your back and shoulders as well as your calves and hamstrings. It also strengthens your arms and legs at the same time. The position improves blood flow through your body and boosts your energy. Practicing this pose regularly at home helps maintain flexibility & builds endurance without placing too much stress on your body.

    Bridge Pose for Core and Lower Body Strength

    Bridge Pose strengthens the glutes and lower back along with the core muscles. You start by lying on your back and bending your knees so your feet rest flat on the floor. Then you lift your hips upward and press your feet firmly into the mat. This pose supports spinal health and improves circulation while toning the lower body. Regular practice helps maintain natural body strength and stability over time.

    Tree Pose for Balance and Body Control

    Tree Pose helps you develop better balance and makes your legs stronger. To do this pose you need to stand on one leg while placing your other foot against your calf or inner thigh. Put your hands together in front of your chest & look at something that isn’t moving. This type of exercise works on your physical stability and mental concentration at the same time. When you practice balancing poses regularly you gain better control over your muscles and learn to focus your mind more effectively. These skills are important for maintaining your fitness through natural movement & body awareness.

    Plank Pose for Full Body Toning

    Plank Pose works as an effective exercise for building total body strength. You position yourself on your hands and feet while keeping your entire body straight & tight through the middle. This position works your stomach muscles along with your arms & shoulders while also strengthening your back and legs. When you practice plank consistently you develop better stamina and create firmer muscles using only your body weight. This makes it one of the most practical strength exercises you can do at home without needing any special gear.

    Child Pose for Recovery and Relaxation

    Fitness requires proper recovery to be effective. Child Pose provides deep relaxation and helps release muscle tension. Start by kneeling on the floor and sitting back on your heels before folding forward gently. This position relaxes your spine along with your shoulders and hips while it calms your nervous system. The pose helps your body recover and gets you ready for your next workout or daily activities.

    Why Home Yoga Supports Natural Fitness

    Yoga works on balancing your entire body instead of targeting individual muscles. The practice brings together physical strength with flexibility while also incorporating breathing techniques & mental awareness. Modern approaches to health & wellness place importance on moving in ways that feel natural to your body while reducing daily stress & maintaining regular exercise patterns. Yoga addresses each of these wellness goals effectively. When you practice yoga in your own home you gain a sense of comfort and the freedom to move at your own pace. This home environment helps you establish a consistent routine that supports lasting fitness habits without creating unnecessary pressure or stress about performance.

    Simple Tips to Stay Consistent

    Practice yoga at the same time each day before eating and keep your sessions manageable. Pay attention to how well you move instead of pushing yourself too hard. Just twenty minutes of daily practice can help maintain your natural fitness level. Yoga offers a gentle but effective approach to staying fit without artificial methods. These seven home exercises build strength throughout your body while increasing flexibility & sharpening your mind. When you practice consistently yoga transforms from a simple workout into something deeper. It becomes a natural part of your routine that promotes lasting health and wellbeing.

  • 8 Yoga Exercises at Home to Support a Healthy and Active Body

    8 Yoga Exercises at Home to Support a Healthy and Active Body

    Eight Simple Yoga Exercises to Keep Your Body Healthy at Home Staying healthy does not mean you need to spend hours at the gym or follow complicated workout routines. Yoga provides a natural and accessible way to maintain flexibility and strength while improving your overall balance. Practicing yoga at home makes it even better because you can work at your own speed without feeling rushed or judged. When you make yoga part of your daily routine you will notice improvements in how your joints feel and how well your body digests food. Your posture will get better & your immune system will become stronger. You will also feel calmer and more centered in your mind. The eight yoga exercises described here are straightforward and safe for most people to try. They work well for anyone who wants to build a healthier body through consistent practice at home. You do not need special equipment or previous experience to get started. Each exercise targets different parts of your body & contributes to your overall wellness in its own way. By practicing these poses regularly you create a foundation for long-term health that fits naturally into your daily life.

    Build Strong Alignment and Awareness with Mountain Pose

    Mountain Pose serves as the base for every standing yoga position. Stand straight with your feet placed together & let your arms hang naturally while keeping your spine extended. Pay attention to steady breathing and feel connected to the ground through your feet. This position helps correct your posture & makes your leg muscles stronger while increasing awareness of your body. Good posture keeps your spine healthy and prevents extra stress on your muscles and joints.

    Mobilise the Spine Gently Using Cat–Cow Flow

    Cat and Cow Pose helps move the spine gently and reduces stiffness. Start by getting on your hands and knees. Breathe in and curve your back downward while raising your head up. Breathe out and curve your spine upward while bringing your chin down toward your chest. This flowing motion makes the spine more flexible & increases blood flow to the area. The pose works well for anyone who sits most of the day or feels tightness in their back.

    Energise the Entire Body Through Downward Facing Dog

    Cat and Cow Pose helps your spine move gently and reduces stiffness. Get on your hands & knees to start. Breathe in and arch your back down while lifting your head up. Breathe out and round your spine up while tucking your chin toward your chest. This smooth movement makes your spine more flexible & brings more blood to the area. The pose works well for people who sit most of the day or have a tight back.

    Strengthen and Protect the Back with Cobra Pose

    Cobra Pose Cobra Pose works to strengthen your spine & open up your chest area. Start by lying flat on your stomach and place your palms directly under your shoulders. Slowly lift your chest upward while making sure your hips stay pressed against the floor. This position builds strength in your back muscles & helps improve your posture over time. It also increases your breathing capacity by expanding the chest. Regular practice of this pose can reduce the stiffness that develops from sitting too much during the day. People who work at desks or spend long hours in one position will find this especially beneficial for relieving tension in the back and shoulders.

    Improve Balance and Focus Through Tree Pose Practice

    Cobra Pose Cobra Pose strengthens your spine & opens your chest. Lie flat on your stomach and put your palms under your shoulders. Lift your chest slowly while keeping your hips on the floor. This position makes your back muscles stronger and improves your posture. It also helps you breathe better by expanding your chest. Doing this pose regularly reduces stiffness from sitting too long. People who work at desks or stay in one position for hours will find it helpful for easing back and shoulder tension.

    Activate Core and Glutes Using Bridge Pose

    Bridge Pose builds strength in your glutes and core muscles while supporting your lower back. Start by lying flat on your back and bending your knees so your feet rest firmly on the floor. Push through your feet and raise your hips toward the ceiling. This position helps align your spine properly and boosts blood flow throughout your body while toning your legs and buttocks. The pose naturally opens up your chest area and makes breathing easier.

    Increase Flexibility and Inner Calm with Seated Forward Bend

    Bridge Pose strengthens your glutes & core while providing support to your lower back. Begin by lying on your back and bend your knees with your feet flat on the floor. Press down through your feet and lift your hips upward toward the ceiling. This movement helps align your spine correctly & increases blood circulation through your body while firming your legs and buttocks. The pose opens your chest naturally and improves your breathing.

    Release Tension and Restore Energy in Corpse Pose

    Corpse Pose helps your body relax and recover completely. You lie flat on your back with your arms resting at your sides and your eyes closed. Focus on breathing slowly and naturally. This pose reduces stress & improves mental clarity while letting your muscles recover after exercise. It plays an important role in any healthy yoga routine.

    How Home Yoga Builds Long-Term Strength, Mobility, and Wellness

    Corpse Pose allows your body to relax and recover fully. You lie flat on your back with your arms at your sides & your eyes closed. Focus on breathing slowly and naturally. This pose reduces stress and improves mental clarity while helping your muscles recover after exercise. It serves as an essential part of any healthy yoga routine.

    Simple Home Yoga Tips to Maximise Daily Results

    Practice when your stomach is empty or after eating something light. Put on comfortable clothing & find a quiet spot. Move at a slow pace & pay attention to what your body tells you. Being consistent matters more than how long you practice. Just twenty minutes each day can create noticeable changes as time goes on. Building a healthy body happens through thoughtful movement & taking care of yourself regularly. These eight yoga exercises create a balanced routine that helps with strength and flexibility while improving posture & bringing inner peace. When you practice steadily at home yoga becomes a strong habit that supports your health and wellbeing throughout your life.

  • Goodbye hair dyes: the new trend that covers grey hair and helps you look younger

    Goodbye hair dyes: the new trend that covers grey hair and helps you look younger

    Not quite. She’s fixated on a delicate silver line near her temple, while the colourist scrolls through flawless-looking “before and after” photos on her phone.

    Just behind her, a man in his thirties leans toward his reflection, lifting his fringe to check a small cluster of pale strands. He laughs it off, but his shoulders tense. The stylist smiles and says, “We can blend it. No one has to know.”

    Outside on the street, the same scene repeats itself: roots catching the summer light, people tugging at ponytails, tilting their heads for selfies, zooming in on the greys. Across all these mirrors, something subtle is changing.

    And it’s not only about concealment.

    From solid dye to softer grey blending

    Step into a modern salon and it’s clear: fewer heavy, opaque colours, more gentle transitions and near-natural shades. Stylists no longer focus on “covering grey” but on blending it in. The aim isn’t to deny time—it’s to age with intention.

    Grey blending, translucent toners, glosses, and low-commitment colours are replacing the rigid monthly dye routine. These techniques don’t erase silver strands; they soften the contrast between grey roots and the base colour. The effect feels less like a disguise and more like good lighting.

    This shift matters for anyone tired of strict salon calendars or boxed dye stashed under the sink. It signals a new relationship with ageing—and with time itself.

    Emily, 46, once booked root touch-ups every four weeks without fail. By week three, she relied on headbands and hats, hoping no one would notice the harsh white line along her part. “It felt like my roots were shouting before I said a word,” she shared.

    Her colourist proposed a gentler approach: soft highlights around the face, a translucent toner close to her natural shade, and a gloss to bring it together. No attempt to look 25—just a smoother story growing from the scalp.

    Three months later, she still colours her hair, but less often and with less anxiety. When grey appears now, it blends into lighter strands. Friends comment that she looks “rested” or “fresh,” not dramatically changed. The praise shifted from “nice colour” to simply “you look good.”

    The change is subtle yet powerful. Full-coverage permanent dye creates a hard border between colour and regrowth, announcing every passing week. Grey blending and gentle toning soften that edge, like painting with a feathered brush instead of a marker.

    Our brains interpret strong contrast as harsh or ageing. By reducing contrast between grey and base colour—either lifting the base or adding lighter strands—the overall look appears more youthful, even if the number of grey hairs stays unchanged.

    This trend isn’t illusion. It’s optics, psychology, and honesty in front of the mirror.

    Subtle techniques that soften silver

    The most discussed approach today is grey blending, which uses fine highlights and lowlights to merge natural grey into a multi-dimensional finish. Instead of targeting every silver hair, colourists work with them, weaving shades just one or two tones lighter than the base.

    The result feels more like sunlit hair than a fresh colour appointment. Regrowth lines blur, often extending the time between visits by weeks or even months. It’s a deliberate move from sharp definition to soft focus.

    For those avoiding bleach or highlights, translucent glosses and demi-permanent toners have become essential. They gently tint grey, reduce brightness, and add shine that reflects light away from fine lines near the face.

    Practically, the routine becomes kinder. Many follow a cycle of grey blending every three to four months, with quick gloss sessions in between. At home, colour-depositing conditioners used weekly help maintain an intentional mix of tones.

    As one colourist put it, this is maintenance that doesn’t take over your life. The panic of visible roots fades, replaced by a looser, more forgiving rhythm.

    Of course, it’s not flawless. Some mornings, hair still has a mind of its own. Soyons honnêtes : personne ne fait vraiment ça tous les jours.

    “My clients no longer ask how to eliminate grey,” says London colourist Hannah Reid. “They ask how to make it look intentional, not like they’ve stopped caring.”

    The emotional layer runs deep: being the only one in a meeting with visible silver, a family joke at lunch, or the moment a selfie reveals streaks you can’t ignore.

    • Grey blending – Softens contrast, reduces regrowth stress, keeps dimension.
    • Glosses and toners – Add shine, calm wiry greys, low commitment.
    • Face-framing highlights – Draw attention to features rather than roots.
    • Partial coverage – Conceals dense areas while letting silver show.
    • Cut and texture – Movement and layers always read younger.

    Redefining “young hair” through softer ageing

    There’s a quiet rebellion here. Instead of chasing the promise of zero grey forever, more people are choosing hair that tells a gentler truth: time passed, but the story is styled. The youthful impression comes from cohesion, not denial.

    When hair, skin, and energy align, the result feels vibrant rather than artificially young. Grey blending, subtle toning, and thoughtful cuts protect that balance, allowing your reflection to match who you are now—not who you were at 22 or fear becoming at 70.

    At its core, this trend invites conversation: with friends, partners, and yourself at 7 a.m. under unforgiving bathroom light. On good days, those faint silver threads can even feel like evidence of a life well lived.

    Key takeaways for readers

    • Grey blending techniques – A mix of highlights, lowlights, and natural grey for smoother transitions and fewer visible roots.
    • Glosses and toners – Demi-permanent options that add shine and refresh tone without harsh regrowth.
    • Strategic placement – Lighter sections around the face and crown to highlight features, not roots.