Blog

  • Kitchen Ingredients Heal Dry Cracked Heels Faster Than Most Store Bought Treatments

    Kitchen Ingredients Heal Dry Cracked Heels Faster Than Most Store Bought Treatments

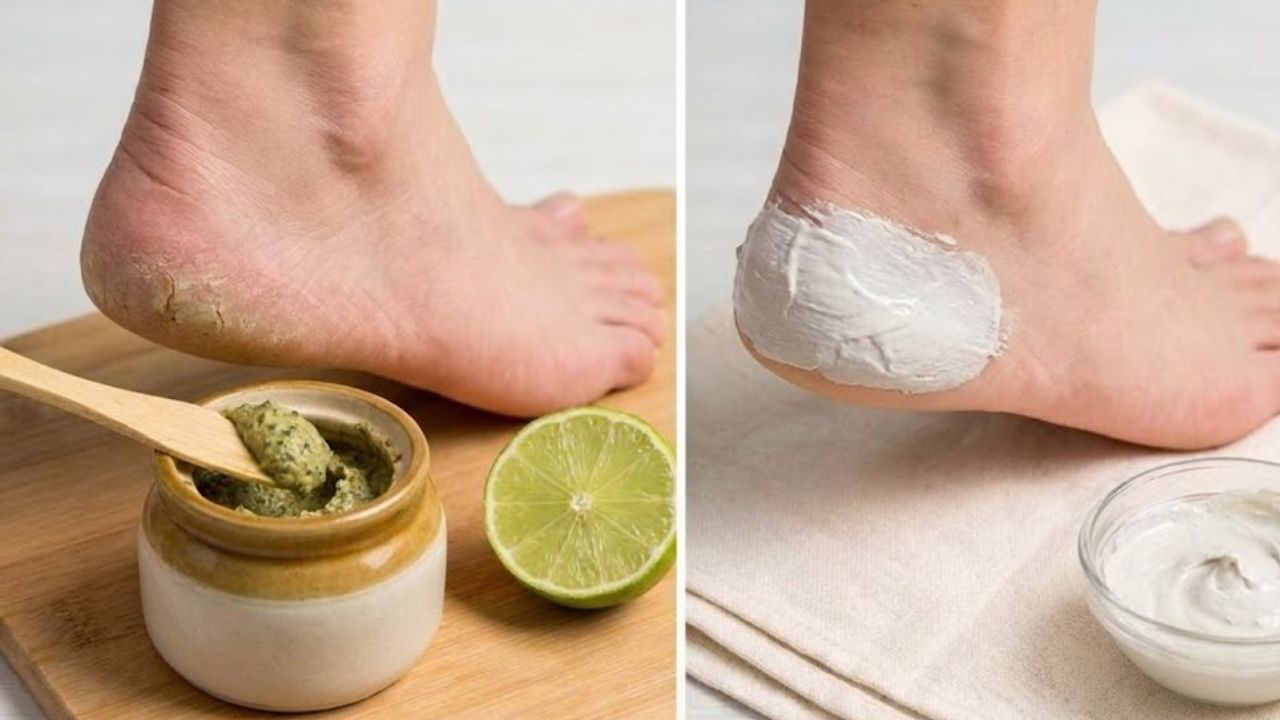
    The first signs of cracked heels often appear quietly. Fine white lines form across the skin, resembling a dry riverbed. At this stage, they are easy to ignore. You may assume they came from walking barefoot indoors or wearing open sandals daily. Over time, the sensation changes. Stepping out of bed, the floor feels rough, followed by a mild sting or pulling feeling. As the cracks deepen, they can become sore and may even catch on socks.

    A Fast-Acting Natural Approach for Dry, Cracked Heels

    At some point, a simple thought sets in that your feet need attention. Dry, cracked heels tend to develop slowly, and most people notice them only after discomfort begins. Each step becomes a reminder that your feet have been asking for care. They support you through long days and constant movement. The reassuring part is that healing does not require costly products or complex routines. Many effective remedies are already found in your kitchen. Familiar oils, milk, salt, and honey can help restore softness. Turning heel care into a calming evening habit allows neglected skin to recover gently over time.

    What Your Heels Reveal About Daily Wear and Tear

    Your heels absorb more impact than almost any other part of your body. With every step, they strike the ground first and carry pressure from standing or walking for long periods. Because they are often out of sight, they receive little attention. You might notice roughness during a shower and plan to deal with it later, only to forget. Dry, cracked skin usually signals repeated pressure, friction, and a lack of moisture. Walking barefoot on hard floors or wearing shoes with thin soles or open backs can worsen the issue.

    Environmental factors also play a role. Long hot showers, cold weather, and indoor heating systems strip moisture from the skin. Heel skin is naturally thick for protection, but when it becomes too dry, it loses flexibility. Instead of bending with movement, it splits, creating deeper cracks that can become painful. The skin continuously works to repair itself, and when given moisture, protection, and gentle care, it can recover faster than expected.

    Turning Your Kitchen Into a Natural Heel Care Station

    Your kitchen holds more than ingredients for meals. It contains simple items that support heel healing. Olive oil or coconut oil deeply moisturizes rough skin. Honey draws moisture into cracked areas and helps soothe irritation. Milk and yogurt gently soften flaky skin, while sugar or salt combined with oil creates a natural exfoliant. Using everyday ingredients feels reassuring because they are familiar and easy to use. Understanding how each one supports skin health makes your routine more effective.

    • Olive oil or coconut oil: Deeply hydrates cracked heels and softens hardened skin when used for massage or as a scrub base.
    • Honey: Helps retain moisture, calms irritation, and supports skin repair when applied as a mask.
    • Milk or yogurt: Uses natural lactic acid to loosen dead skin during foot soaks or softening packs.
    • Sugar or salt: Gently exfoliates rough layers and smooths uneven heel texture after soaking.
    • Banana or avocado: Provides vitamins and healthy fats for intense nourishment on very dry heels.

    A Calm Evening Routine to Repair Cracked Heels

    This routine works best as a quiet end-of-day ritual. In about fifteen minutes, you can give your feet focused care in a relaxed setting.

    Step 1: Warm Milk and Salt Foot Soak

    Fill a basin with comfortably warm water. Add half a cup of milk, one to two spoons of salt, and a small amount of olive oil. Soak your feet for ten to fifteen minutes. The warmth relaxes the skin, the milk softens dry areas, and the oil begins restoring moisture.

    Step 2: Mild Scrub for Smoother Heels

    Create a thick paste by mixing sugar or fine salt with olive oil or coconut oil. Massage it gently onto your heels using circular motions, focusing on rough spots. Avoid harsh scrubbing, as tender skin responds better to gentle care. Rinse with warm water once finished.

    Step 3: Honey and Yogurt Moisture Mask

    Combine one tablespoon of honey with one tablespoon of thick yogurt and add a few drops of oil. Apply generously to cracked areas and leave on for ten to fifteen minutes. This mask delivers deep moisture and helps calm irritated skin. Rinse gently and pat dry with a towel.

    Overnight Oil Therapy for Intensive Softening

    Before bedtime, warm a small amount of olive oil or coconut oil and massage it into your heels for several minutes. Put on clean cotton socks to seal in moisture overnight. By morning, heels often feel noticeably softer, smoother, and less painful.

    Simple Daily Habits to Stop Cracks From Coming Back

    Once healed, your heels can stay healthy with consistent habits. Apply moisturizer after showers, avoid excessively hot water, rotate your footwear, and stay well hydrated. Treat dryness as soon as it appears. These small actions help prevent cracks from returning.

    When Home Care Is No Longer Enough

    If heel cracks become deep, begin bleeding, or do not improve with regular care, professional advice may be needed. Certain health conditions can slow healing, and a doctor or podiatrist can suggest appropriate treatment. While home remedies provide relief for most cases, medical guidance ensures proper recovery. With patience, warmth, and common household ingredients, your feet can return to feeling comfortable and well cared for.

  • Goodbye to Grey Hair With This Simple Shampoo Add-In That Revives Natural Color

    Goodbye to Grey Hair With This Simple Shampoo Add-In That Revives Natural Color

    She studies her roots under the harsh mirror lights, leaning in, then stepping back as if to deny what she’s just noticed. Silver strands glint beneath the neon glow. With a quiet sigh, she picks up a random box labeled “dark chestnut”, scans the instructions, and slides it back onto the shelf. Too time-consuming. Too chemical. Far too much effort for an ordinary Tuesday evening.

    A couple of shelves away, another shopper scrolls through her phone, murmuring, “There has to be something simpler than this.” A short video appears: “Add this to your shampoo and your grey looks darker in weeks.” She stops. Ingredients already sitting in her kitchen. No gloves. No sharp line at the scalp. Just a bottle in the shower and a small habit that doesn’t shout, “I’m battling age.”

    The dye box remains untouched. Suddenly, her shampoo feels like a quiet secret.

    But could something this small really make a difference?

    Why Gentle Grey Darkening Has Become So Appealing

    Grey hair once felt like a final judgment. Now, it’s more of a conversation. Most people aren’t trying to erase it entirely; they want it softer, less stark, less like a spotlight on their roots. You notice it on the train: natural hair threaded with grey, not the harsh metallic stripe that signals a missed dye appointment.

    The shift isn’t only about hair — it’s about mindset. There’s growing weariness around intensive coloring routines and long salon sessions. In their place comes curiosity for smaller, quieter actions. A spoon mixed into shampoo. A familiar kitchen ingredient added to a bottle. A subtle adjustment instead of a total overhaul.

    On a rainy Monday in London, 49-year-old Emily shares her experience over coffee. When she noticed white at her temples during a video call, her first thought wasn’t about age — it was that she looked tired. She tried permanent dye once, but the shade felt flat, the smell lingered, and it didn’t feel like her own hair anymore.

    Later, she read about mixing coffee and black tea into shampoo to gradually deepen colour. No instant change, no dramatic reveal. Just a slow shift, wash by wash. Within weeks, friends asked if she was sleeping better or had updated her skincare. No one mentioned her hair — which, quietly, was the goal.

    She’s far from alone. Beauty retailers report rising searches for natural grey darkening and no-dye coverage. These searches aren’t just about looks; they’re about choice. Keeping some silver. Softening others. Trying something reversible, without committing to a chemical cycle. People want options that feel manageable and personal.

    Grey hair appears as pigment fades. Hair follicles rely on melanocytes to produce melanin, and as these cells slow down, strands lose color. Traditional dyes force color back in using strong chemicals that penetrate the hair shaft. Newer, gentler methods work on the surface, using plant pigments and natural tannins that cling lightly, much like tea staining fabric.

    They fade gradually, but they’re often kinder to the scalp. It’s less about forcing change and more about repeating a soft gesture, again and again, under warm running water. When someone says, “Just add this to your shampoo,” they’re really offering a slower agreement with time.

    The Simple Trick: Turning Shampoo Into a Subtle Darkening Wash

    The idea couldn’t be simpler. You transform your everyday shampoo into a mild, gradual darkening wash by mixing in a natural color source. The most popular choice right now? Strong black tea or coffee. Think of it as brewing a concentrated tint directly into the bottle you already use.

    You prepare a very strong tea or coffee, allow it to cool fully, then blend a small amount into a gentle shampoo and shake. Each wash lets the pigments lightly stain the outer layer of hair. No gloves, no timers, no sharp chemical scent clinging to towels. Just a slightly longer moment under the shower, massaging what looks like ordinary foam.

    Some take it further, adding small amounts of sage, rosemary, or amla. That’s when the process becomes a ritual. The kitchen turns into a quiet workspace: steam rising from a mug, a spoon tapping a jar. The result isn’t full coverage — it’s a soft change. Greys begin to look like gentle highlights instead of harsh lines.

    Frustration usually comes when expectations are unrealistic. Trying it once or twice won’t turn white hair dark overnight. These ingredients work in layers, building translucently over time, much like watercolor washes. Very light or coarse hair may show slower results at first.

    Hair texture matters. Thick hair may need stronger infusions or an occasional leave-on rinse before shampooing. Fine hair can darken faster but may show buildup sooner. Soyons honnêtes — no one follows this perfectly every day. Life interrupts, routines change, and that’s fine. The trick is meant to fit real life, not an ideal schedule.

    Overdoing it is the biggest mistake. Too much coffee can dry hair, while overly strong tea may leave a dull film. The balance between softly stained and overloaded is thinner than social media suggests. Like seasoning food, it’s easier to add more later than to undo excess.

    “At first, I was disappointed,” says Marco, 57. “My temples were still grey. Then someone told me I looked more rested. That’s when I understood — it didn’t erase my age, it just lowered the volume.”

    Many people prefer something concrete, almost like a note taped to the bathroom mirror:

    • Brew 250 ml of very strong black tea or coffee and let it cool completely.
    • Pour about half into a nearly empty bottle of mild shampoo and shake well.
    • Use 2–3 times a week, leaving lather on for 3–5 minutes.
    • Observe results for two weeks before increasing strength.
    • Dilute or pause if hair feels dry, adding conditioner if needed.

    On paper, it’s simple. In practice, it becomes a quiet moment of deciding how you want to age — alongside your reflection, not against it.

    Living With Softer Greys: What This Small Habit Really Shifts

    What often stays with people isn’t just darker hair — it’s a subtle mental change. When silver looks more like a shadow than a spotlight, some feel freer to grow their hair out, part it differently, or skip heavy makeup they once used to compensate. The mirror feels less like a challenge to face every month.

    There’s also relief. No rushed salon visits before events. No last-minute dye jobs before interviews. The shampoo trick doesn’t remove greys; it changes their intensity. They speak more quietly, leaving space for other features — texture, cut, confidence — to stand out.

    Some days, the light still reveals every white strand. That doesn’t disappear. What changes is the sense of control. You’re doing something small and repeatable, rather than waiting for a drastic fix. Over time, many describe reaching a kind of truce with their hair.

    The ritual invites experimentation. A warmer rinse here, a herbal addition there, a new way of styling that lets softened greys frame the face instead of hiding them. Conversations follow. When asked if they’ve changed their color, the answer feels surprisingly personal: “Not really, just tea in my shampoo.”

    Friends exchange tips the way they trade recipes. Rosemary with clove for depth. Coffee for warmth. Not everything comes with scientific proof, but shared experience builds its own quiet confidence — what works well enough to keep using.

    This isn’t about turning back time. It’s about adjusting contrast, not erasing lines. A series of small, almost invisible acts that feel meaningful when you rinse away the foam and watch the water swirl down the drain. Subtle, repeatable, and deeply personal — a gentle kind of magic that lives comfortably in everyday life.

    Key Takeaways at a Glance

    • Gentle darkening — Tea or coffee pigments slowly soften the contrast of grey.
    • Simple routine — Adds just one step to an existing shampoo habit.
    • Custom results — Strength and frequency can be adjusted to suit personal balance.
  • Add Two Drops to Your Mop Bucket and Enjoy a Fresh-Smelling Home for Days

    Add Two Drops to Your Mop Bucket and Enjoy a Fresh-Smelling Home for Days

    It wasn’t the familiar “just cleaned” scent you expect after mopping. Instead, a damp, tired odor lingered in the corners and under the sofa. An hour of scrubbing, fresh water, and effort still left the house smelling like overworked detergent and worn tiles. Later, stepping into a friend’s home, she felt the contrast instantly. Same old floors, same basic mop, yet the air felt soft, calm, and welcoming. Curious, she asked what was used. Her friend smiled, lifted the bucket, and revealed a tiny brown bottle. Two drops. No vinegar. No lemon. That’s where everything changed.

    Most homes don’t smell bad. They smell lived-in. A quiet mix of laundry, old wood, yesterday’s dinner, and forgotten corners. You only notice it after time away, or when a guest pauses for a split second at the door.

    The surprise is that floor cleaner scents fade fast. They shout “fresh” while wet, then disappear. What remains is the deeper smell of the floor itself — the mop water, the soap residue, the humidity. The secret isn’t overpowering perfume, but anchoring a gentle fragrance where smells begin: in the water, on the surface, right at breathing level.

    A small cleaning company tested this quietly. Homes cleaned normally were described as “neutral.” The same homes, cleaned with a mop bucket enhanced by fragrance oil, were called “spa-like” and “hotel fresh” a day later. Same cleaner, same dirt removed. Only the bucket changed.

    When you mop, you leave behind a microscopic film. Detergent alone fades quickly. Add a tiny amount of oil-based fragrance, and some scent molecules cling longer. As rooms warm and cool, the fragrance gently rises and settles again. The result is a slow, quiet release that lasts days instead of minutes.

    The simple two-drop method professionals swear by

    Fill your mop bucket with warm water and your usual cleaner. Nothing special required. Then take a bottle of high-quality essential oil or a floor-safe fragrance oil. Lavender, cotton, eucalyptus, white tea, or soft woody blends work beautifully.

    Add exactly two drops to the bucket. Not more. Swirl the mop to distribute the scent and clean as usual, focusing on the entryway, hallway, and living areas — your scent pathway. Let the floor dry, step outside for a few minutes, then return. The change is subtle but unmistakable.

    Using more is the fastest way to ruin the effect. Too much turns comfort into overload. Stick to the small dose. The goal is a background note, not a headache.

    Avoid cheap oils with dyes or harsh solvents. These can leave marks or sticky residue. Choose pure essential oils or floor-safe fragrance oils from trusted sources. If you have pets, be extra careful — strong oils like tea tree or peppermint can cause discomfort.

    Homes don’t need to smell like chlorine or baked goods. A clean, unidentifiable freshness feels far more refined than anything loud or artificial.

    Why this tiny habit changes how home feels

    At the end of a long day, the first thing you meet isn’t the sofa or the lights — it’s the air. It tells your body whether you’re safe, relaxed, or still surrounded by tasks. When your floors quietly release that calm scent days later, your shoulders drop without effort.

    Scent becomes one of the most persistent memories a home leaves behind. Guests won’t remember your candles, but they’ll remember that your place always smelled good. Children grow up recognizing the unique scent of home without ever naming it.

    This ritual is simple, affordable, and effective. No sprays, no plug-ins, no overpowering chemicals. Just water, cleaner, and two drops. No sharp vinegar. No fake citrus. Just a soft trail that stays with you. Soyons honnêtes : personne ne fait vraiment ça tous les jours. And that’s fine. The scent waits patiently anyway.

    Key reminders for lasting floor freshness

    Use only two drops to achieve a long-lasting, gentle scent without overpowering the room.

    Select safe oils like lavender, cotton, eucalyptus, or light amber to avoid irritation and residue.

    Focus on high-traffic areas such as entrances and living spaces for maximum impact.

  • Optical Illusion Challenge: Spot the Number 78 Among 73 and 37 in 10 Seconds

    Optical Illusion Challenge: Spot the Number 78 Among 73 and 37 in 10 Seconds

    Are you ready for a fun optical illusion puzzle? This brain teaser will test how well you see details and how fast you think. Your task is simple: find the number 78 hidden among many 73 and 37 numbers in just 10 seconds. When you first look at them they all appear almost the same but there is a small difference. One number is different from the others & only someone with sharp eyes will catch it. How quickly can you find the hidden number? Let’s start the puzzle!

    The Visual Puzzle: Can You Find the Hidden 78?

    This optical illusion challenge goes beyond simply recognizing numbers. It is designed to sharpen your attention to detail and strengthen your visual perception skills. The grid is packed with repeating numbers, mainly “73” and “37,” which appear almost identical at a glance. Hidden among them is a single, cleverly placed “78.”

    Your brain naturally groups similar shapes together, which makes spotting the odd number more difficult. With only 10 seconds on the clock, the challenge tests both your observation ability and speed of visual processing. The real difficulty lies in the subtle visual similarities that can easily mislead your eyes.

    What Makes Optical Illusions So Captivating

    At first look, the grid may seem busy or even overwhelming. That reaction is intentional. Optical illusions are designed to activate your brain and challenge its natural habit of quick pattern recognition. In this puzzle, your mind instinctively groups “73” and “37” together, making the hidden “78” harder to notice.

    These illusions are also an effective way to train focus and concentration. Learning to isolate small details while ignoring distractions is a valuable skill that applies to everyday tasks, whether at work or during personal projects. Challenges like this help build mental flexibility and keep your mind sharp.

    The Pressure of the 10-Second Countdown

    The 10-second time limit significantly raises the difficulty level. Along with testing observation, it pushes your cognitive speed. Many real-life situations require fast decisions with limited time, and this puzzle mirrors that pressure by forcing quick visual judgments.

    When time is limited, your brain relies more on instinct than overanalysis. The countdown prevents second-guessing and encourages rapid pattern detection. This balance between urgency and accuracy is what makes the challenge both fun and mentally stimulating.

    Tips to Identify the Number 78

    Finding the hidden “78” requires careful scanning and awareness of subtle visual differences. Although “73” and “37” look nearly the same, one number in the grid is positioned or oriented slightly differently. That small variation is the key.

    Focus your attention on the lower-left area of the grid. Among rows of purple “73” and red “37,” the number “78” is tucked away. Its flipped orientation makes it easy to miss at first, but once your eyes slow down, it becomes more noticeable.

    This puzzle highlights how optical illusions challenge your brain to filter distractions and focus on what truly matters, even when surrounded by nearly identical elements.

    Mental Advantages of Optical Illusion Challenges

    Beyond entertainment, optical illusions provide meaningful cognitive benefits. Regular engagement with these puzzles can enhance several mental abilities:

    • Sharper visual attention by training the eye to notice fine details
    • Faster information processing in time-sensitive situations
    • Stronger pattern recognition for problem-solving and analysis
    • Improved mental agility through flexible thinking

    These skills are useful not only for puzzles but also for tasks that require precision, speed, and logical thinking.

    The Answer Revealed: Where 78 Is Located

    If you couldn’t spot it in time, here’s the solution. The number “78” appears in the lower-left section of the grid, hidden among repeated “73” and “37” figures. Its subtle rotation makes it blend in, but once identified, it stands out clearly.

    This reveal demonstrates how small visual differences can have a big impact. Recognizing these details helps train your brain to process information more efficiently and accurately.

    Keep Training Your Brain

    Optical illusion challenges are more than simple games. They are effective tools for boosting visual awareness, mental focus, and thinking speed. Regular practice can improve how your brain handles complex visual information.

    Whether you found the “78” quickly or not, each attempt helps strengthen your skills. Every puzzle is an opportunity to refine your ability to focus, detect patterns, and react swiftly. Keep challenging your mind, and watch your cognitive sharpness grow with each illusion.

  • Optical Illusion Test: Spot the Numbers 72 and 75 Among 76 in 7 Seconds

    Optical Illusion Test: Spot the Numbers 72 and 75 Among 76 in 7 Seconds

    Welcome to the Optical Illusion Eye Test Challenge. This brain teaser will test your focus and visual processing abilities. Your task is to find the hidden numbers 72 and 75 among a grid filled with 76 numbers. You have only 7 seconds to complete this challenge. It might sound simple at first but it will truly test your observation skills. This puzzle offers an engaging way for puzzle enthusiasts to sharpen their cognitive abilities.

    The Visual Challenge: Finding the Hidden Digits

    At first look, the grid appears packed with repeating 76s, filling nearly every visible space. Your challenge is to quickly locate the numbers 72 and 75, which are carefully concealed within this pattern. This task is not only about speed but also about concentration and visual awareness. Because the numbers share the same size, color, and font style, the illusion easily causes the brain to overlook what does not immediately stand out.

    What makes this test particularly demanding is how perfectly 72 and 75 blend into the surrounding grid. With no visual cues to separate them, your eyes must scan efficiently while your mind stays alert to subtle differences. Only sharp observation and focused attention can reveal the hidden digits within the repetitive layout.

    Understanding How the Optical Illusion Tricks the Brain

    Optical illusions like this one reveal how the brain handles repetitive visual patterns. Our minds are naturally wired to recognize familiar shapes quickly, which helps us process information faster. However, this same strength can become a weakness when repetition causes important details to be missed. In this challenge, the brain automatically assumes uniformity, making it harder to notice the numbers that break the pattern.

    The strategic placement of 72 and 75 mirrors the surrounding numbers so closely that the brain fills in what it expects to see. This mental shortcut causes the hidden digits to fade into the background. Successfully spotting them depends on visual discrimination and cognitive alertness, forcing the brain to slow down and analyze rather than assume.

    Cognitive Benefits of Solving Optical Illusions

    Beyond entertainment, optical illusions offer meaningful mental benefits. Regularly engaging with visual challenges helps sharpen the brain and strengthen key cognitive skills. These puzzles train the mind to focus more deeply, improving the ability to notice fine details that are easy to miss in everyday situations.

    • Improved focus by directing attention toward subtle visual differences
    • Faster visual processing through repeated pattern recognition challenges
    • Stronger visual discrimination when comparing similar shapes and numbers
    • Enhanced mental flexibility by adapting to unfamiliar visual layouts

    The Answer Revealed: Where the Hidden Numbers Are

    If you attempted the challenge within the 7-second limit, you may be curious how close you were. The number 72 is located in the third row from the top, positioned toward the far right of the grid. Meanwhile, 75 appears in the fifth row, slightly left of center. Their identical appearance to the surrounding 76s is what makes them so difficult to detect.

    Once their positions are known, the numbers become noticeably easier to spot. On a second look, the brain quickly adjusts and identifies the differences without effort. This shift highlights how visual perception changes once awareness is established.

    Why Optical Illusions Are Engaging and Valuable

    Optical illusions are enjoyable because they challenge how we normally see the world. Instead of focusing on details, the brain often prioritizes overall patterns. These puzzles encourage a deeper level of observation, reminding us to question assumptions and look more carefully at what is in front of us.

    Consistent exposure to visual challenges also supports long-term brain health. By encouraging quick analysis and adaptability, optical illusions help maintain mental sharpness and problem-solving ability, which are essential skills in daily life.

    Final Thoughts on the Optical Illusion Challenge

    If you successfully identified 72 and 75 within the time limit, it reflects strong focus and visual processing skills. If not, there’s no need for concern—these illusions are intentionally designed to be misleading. With practice, spotting hidden details becomes faster and easier.

    This optical illusion eye test serves as both a fun activity and a powerful reminder of how easily the brain can be tricked. By continuing to explore similar challenges, you can strengthen your observation skills and gain a deeper appreciation for how the mind interprets visual information.

  • Better Posture Yoga: 5 Simple Poses to Improve Alignment Naturally

    Better Posture Yoga: 5 Simple Poses to Improve Alignment Naturally

    Maintaining good posture plays a vital role in overall health and daily comfort. With many people spending extended hours seated at desks or looking at screens, postural imbalance has become increasingly common. This often leads to back discomfort, neck strain, and low energy levels. Yoga offers a practical and accessible solution to these challenges. Through regular practice, yoga helps build muscle strength, enhance flexibility, and develop body awareness, all of which support better posture. Below are five beginner-friendly yoga poses that can noticeably improve the way you stand and sit.

    Mountain Pose (Tadasana): Building the Base for Alignment

    Mountain Pose, also known as Tadasana, is a foundational posture that encourages proper body alignment and postural awareness. Although it appears simple, this pose is highly effective for training the body to stand correctly. It helps activate the core muscles and elongate the spinal column, creating a strong base for all other movements.

    • Stand upright with feet hip-width apart, firmly rooted into the ground.
    • Lift your chest and engage your thighs without locking the knees.
    • Lengthen the spine by reaching the crown of the head upward.
    • Relax the shoulders and rest the arms alongside the body, palms facing forward.
    • Hold for 30 seconds to 1 minute while focusing on steady alignment.

    Cat-Cow Pose (Marjaryasana–Bitilasana): Improving Spinal Mobility

    Cat-Cow Pose is a gentle flowing sequence that enhances spinal flexibility and eases upper body tension. By moving the spine through controlled extension and flexion, this pose supports healthy spinal alignment and relieves stiffness in the back, neck, and shoulders.

    • Begin on hands and knees in a tabletop position, wrists under shoulders and knees under hips.
    • Inhale, dropping the belly while lifting the chest and tailbone upward.
    • Exhale, rounding the spine and drawing the chin toward the chest.
    • Continue flowing between these movements for 5–10 slow rounds.

    This rhythmic motion helps maintain spinal mobility, which is essential for an upright and balanced posture.

    Cobra Pose (Bhujangasana): Supporting the Upper Spine

    Cobra Pose is a gentle backbend that strengthens the upper back muscles while stretching the chest area. It is particularly beneficial for counteracting slouched posture caused by prolonged sitting and screen use.

    • Lie face down with legs extended and tops of the feet resting on the mat.
    • Place hands beneath the shoulders with elbows bent close to the body.
    • Inhale and press into the palms, lifting the chest while engaging the back muscles.
    • Hold the pose for 15–30 seconds, then lower slowly.

    This pose helps reinforce spinal support while opening the front of the body.

    Child’s Pose (Balasana): Gentle Relief for the Spine

    Child’s Pose is a deeply restorative posture that promotes spinal relaxation and releases built-up tension. It gently stretches the hips, thighs, and lower back, making it ideal for recovery after long periods of sitting.

    • Kneel on the mat with big toes touching and knees slightly apart.
    • Sit back onto the heels and stretch the arms forward.
    • Lower the forehead to the mat and focus on slow, deep breathing.
    • Hold for 1–3 minutes, allowing the spine to lengthen naturally.

    This pose supports spinal realignment and encourages relaxation.

    Bridge Pose (Setu Bandhasana): Activating Core Support

    Bridge Pose strengthens the lower back, glute muscles, and core stability while opening the chest and hips. These benefits work together to promote better spinal posture and reduce habitual slouching.

    • Lie on your back with knees bent and feet flat, hip-width apart.
    • Place arms alongside the body with palms facing down.
    • Press into the feet and lift the hips, engaging the core and glutes.
    • Hold for 30 seconds to 1 minute, keeping knees aligned.
    • Lower slowly and repeat 3–5 times.

    Small Daily Practice, Lasting Postural Benefits

    Practicing these five yoga poses consistently can lead to noticeable posture improvement over time. Even a few minutes each day can help strengthen key muscles, enhance flexibility, and build postural awareness. As your body adapts, you may experience improved comfort, reduced tension, and greater ease in daily movement. With regular practice and patience, these simple poses can support long-term posture health and overall well-being.

  • I tried Jennifer Aniston’s 5-move workout and felt major core activation

    I tried Jennifer Aniston’s 5-move workout and felt major core activation

    Jennifer Aniston may be famous for her Hollywood hair and iconic screen roles, but her true power lies elsewhere. According to her trainer, her core is so strong it’s described as “bulletproof.” That praise carries weight, especially coming from someone as athletic as her trainer, Dani Coleman, vice president of training at Pvolve.

    Now 56, Aniston isn’t just holding onto fitness — she’s fully in her strength-focused era. That journey didn’t happen overnight. She first discovered Pvolve years ago after suffering a back injury on a movie set and later became an official brand ambassador in 2023.

    After more than four years of consistent training, the results speak for themselves. “With Pvolve, I can avoid burnout and stay consistent with my fitness goals, even with my busy, on-the-go schedule,” Jennifer says. But what does this workout actually involve? And how demanding is it really? Let’s break it down.

    What Exactly Is the Pvolve Workout?

    You might picture Jennifer Aniston powering through high-intensity gym sessions and endless cardio. Those days are behind her. After admitting that intense workouts left her feeling burnt out and broken, she shifted to a low-impact method built on precise movements across three planes of motion.

    The goal is full-body strength while improving mobility and stability, all without the strain that comes with high-impact exercise. Below is a glimpse of what this style of training includes.

    This routine features five distinct exercises designed to build total-body strength, power and mobility. While some movements use Pvolve equipment, anyone with resistance bands and Pilates-style accessories can try it at home.

    For strength and toning, aim for three sets of 12–15 repetitions for each exercise.

    Squat to Overhead Press with Band

    Targets: Glutes, quads, shoulders and core.

    This full-body staple engages multiple muscle groups at once, with the resistance band maintaining tension throughout the movement.

    Stand with your feet hip-width apart, anchoring a resistance band under your feet and holding it at shoulder height. Lower into a squat, keeping your chest lifted and knees aligned over your toes. As you stand, press the band overhead until your arms are fully extended, then return to the starting position with control.

    Why it works: As the band stretches, resistance increases, forcing your muscles — especially your shoulders and core — to work harder at the top. It’s a dynamic, efficient movement that tones the body head to toe while elevating your heart rate.

    When I tried it: My glutes, legs and shoulders were all firing, with my core working to stabilize the press. It’s simple yet incredibly effective, proving you don’t need heavy weights to feel serious muscle engagement.

    Inner Thigh Glide with Overhead Oblique Reach

    Targets: Inner thighs, glutes and obliques.

    This exercise looks graceful, but it delivers a deep challenge. It targets the inner thighs, glutes and obliques while testing balance and coordination — a true example of Pvolve’s controlled, low-impact intensity.

    Place your right toes on a glider or towel, with your left foot grounded. Slowly slide your right leg out to the side, keeping your hips square and core engaged. Once extended, reach your right arm overhead toward the opposite side, activating your obliques. Move slowly and stay controlled throughout.

    Why it works: The deliberate leg slide activates the inner thighs, while the overhead reach strengthens the core, building stability through the hips and waist.

    When I tried it: My inner thighs lit up immediately, and the reach worked deeply into my obliques. It looks elegant, but it demands full-body focus.

    Standing Core Work with Band

    Targets: Core, obliques, glutes and stabilizers.

    This move functions like a standing ab workout — no crunches required. Continuous tension from the band challenges your deep core and shoulders to stabilize every rep.

    Hold a resistance band at chest height with arms extended. Step your right leg slightly in front of your left. Slowly lift your right leg while rotating your torso away from the anchor point, pulling the band across your body. Return to centre with control, keeping your hips steady. Complete all reps before switching sides.

    Why it works: This is an anti-rotation exercise, meaning your core must resist twisting. That builds the kind of strength that improves posture, balance and overall stability.

    When I tried it: I was noticeably unsteady at first. Slowing everything down made all the difference, and the focus it demanded was surprisingly rewarding.

    Abdominal Twist with Ball

    Targets: Core, obliques and transverse abdominis.

    This movement reworks the classic Russian twist with a Pilates-inspired approach. It focuses on the obliques and deep core muscles while enhancing balance and coordination.

    Sit upright with your knees bent and place a Pilates ball behind your lower back. Lean back slightly to engage your core while allowing the ball to support you. Lift your right leg and twist from the waist toward it, then return to centre. Repeat on the left side, keeping your spine long, shoulders relaxed and movements slow.

    Why it works: Though subtle, this exercise fires deep into the core, helping to sculpt the waist and strengthen the obliques.

    When I tried it: My abs were burning after just one round, proving that small, controlled movements can deliver powerful results.

  • 5-Minute Yoga Stretch: Simple Moves to Relieve Neck and Shoulder Tension

    5-Minute Yoga Stretch: Simple Moves to Relieve Neck and Shoulder Tension

    Neck and shoulder tightness is something many people experience, especially in modern lifestyles filled with long desk hours, constant screen use, and ongoing stress. These habits often lead to stiffness, discomfort, and reduced mobility. The good news is that a short and focused yoga routine can make a noticeable difference. In just five minutes, gentle stretches can help ease muscle tension, improve blood flow, and promote relaxation. This quick yoga sequence is designed to target the neck and shoulders, helping you feel lighter, looser, and refreshed.

    Common Causes of Neck and Shoulder Tightness

    Tension in the neck and shoulders often develops due to poor posture habits, ongoing mental stress, repetitive daily movements, or extended periods of sitting. When these factors persist, they can contribute to stiffness, discomfort, headaches, and lingering pain. Over time, untreated tension may interfere with daily comfort and mobility. Fortunately, incorporating regular stretching and gentle strengthening can help release built-up tension and reduce the likelihood of it returning.

    Yoga is especially effective for this purpose because it combines mindful movement, controlled breathing, and targeted stretches. These elements work together to relax tight muscles, improve flexibility, and support better posture. With consistent practice, yoga can enhance overall body awareness and comfort, helping prevent tension before it starts.

    How a 5-Minute Yoga Stretch Can Help

    This five-minute yoga routine focuses on the neck, shoulders, and upper back, which are common tension zones. Spending just a few minutes each day on these movements can deliver meaningful benefits without disrupting your schedule. Regular practice supports muscle relaxation, improved mobility, and a calmer state of mind.

    • Eases muscle stiffness in the neck and shoulders
    • Improves upper body flexibility and spinal movement
    • Helps reduce headaches linked to muscle tension
    • Encourages better posture and alignment
    • Supports stress relief and mental calm

    Below is a simple yoga stretch sequence designed to effectively release neck and shoulder tension in a short amount of time.

    Five-Minute Yoga Sequence for Neck and Shoulder Relief

    1. Gentle Neck Rolls

    Neck rolls are a simple movement that helps improve mobility while easing tightness in the cervical spine. This stretch promotes neck flexibility and encourages muscle relaxation through slow, controlled motion.

    Sit or stand with a straight spine and relaxed shoulders. Gently lower your chin toward your chest, then begin rolling your head in a smooth circular motion. Move slowly to one side, then the other, maintaining steady breathing. Continue for about 30 seconds in each direction to help release neck tension and improve range of motion.

    2. Controlled Shoulder Shrugs

    Shoulder shrugs help release tension stored in the upper back and shoulders, particularly in the trapezius muscles. This movement supports muscle relaxation and posture awareness.

    Stand or sit upright with your arms resting at your sides. Inhale as you lift your shoulders toward your ears, briefly holding the contraction. Exhale as you lower them back down, focusing on letting go of tightness. Repeat this movement about ten times, allowing each exhale to deepen the release.

    3. Thread the Needle Stretch

    This gentle twisting pose targets the upper back, shoulders, and neck while encouraging spinal mobility. It is especially helpful for opening the shoulder blades and easing upper body stiffness.

    Begin on all fours with your wrists under your shoulders and knees under your hips. Inhale as you lift one arm upward, opening the chest. Exhale as you slide that arm underneath your body, resting your shoulder and ear toward the floor. Hold for 30 seconds while maintaining deep, calm breathing, then switch sides to balance the stretch.

    4. Eagle Arms Stretch

    Eagle Arms is effective for stretching the shoulders and upper back, areas that often hold tension from daily activities. This pose helps improve shoulder mobility and upper body alignment.

    Sit or stand tall, extending your arms forward at shoulder height. Cross one arm over the other, bringing palms together or gently hooking the elbows if needed. Lift your elbows slightly while keeping your shoulders relaxed. Hold for 30 seconds, feeling a deep upper back stretch, then repeat on the opposite side.

    5. Restful Child’s Pose

    Child’s Pose is a calming stretch that gently releases tension across the neck, shoulders, and back. It also supports nervous system relaxation and full-body comfort.

    Start on all fours, then slowly shift your hips back toward your heels while lowering your forehead to the floor. Extend your arms forward and allow your chest to soften toward the mat. Breathe deeply for one minute, focusing on full-body relaxation and gentle spinal stretch.

    Conclusion: A Simple Practice for Daily Comfort

    This five-minute yoga stretch routine offers an easy and effective way to manage neck and shoulder tension. Practicing these movements daily can help release muscle tightness, enhance mobility, and promote relaxation without requiring much time. Whether tension comes from desk work or daily stress, this routine supports both physical comfort and mental ease.

    Consistency plays an important role in long-term relief. Making these stretches part of your daily routine can lead to better posture, reduced discomfort, and an improved sense of well-being. Taking just a few minutes each day to unwind can make a lasting difference for your neck and shoulders.

  • What Glycolic Acid Does for Skin and Why Dermatologists Call It a Multitasking Essential

    What Glycolic Acid Does for Skin and Why Dermatologists Call It a Multitasking Essential

    Glycolic acid truly does a bit of everything, which explains why it remains a favourite in so many skincare routines. This powerful exfoliating acid is especially helpful for acne-prone skin, offering a gentler alternative if rotating between salicylic acid, benzoyl peroxide, and retinol has left your skin dry or flaky. Swapping one of those out for glycolic acid can help restore balance while still keeping breakouts under control.

    What really sets glycolic acid apart is its versatility. Beyond clearing blemishes, it also targets hyperpigmentation, dullness, and visible signs of ageing such as fine lines and wrinkles. With regular, careful use, it can dramatically improve skin tone and skin texture, making it a true multitasking staple in modern skincare.

    What exactly is glycolic acid?

    Glycolic acid belongs to the alpha-hydroxy acid (AHA) family and is derived from sugarcane. It sits alongside other well-known AHAs, including lactic acid (from milk), tartaric acid (from grapes), and citric acid (from citrus fruits).

    What makes glycolic acid unique is its structure. It has the smallest molecular size of all AHAs, which allows it to penetrate the skin more easily. This low molecular weight is the reason it works so effectively, delivering noticeable results compared with larger-molecule acids.

    How glycolic acid benefits your skin

    The primary benefit of glycolic acid is chemical exfoliation. It works on the stratum corneum, the outermost layer of skin, by loosening the bonds that hold dead skin cells together. Once these bonds are weakened, dull and rough surface cells are shed more easily, revealing fresher, brighter skin underneath.

    Thanks to its small molecular size, glycolic acid can also reach deeper layers of the skin. There, it stimulates fibroblasts to increase collagen production, which helps improve skin firmness and soften the appearance of fine lines and wrinkles. The combined surface and deeper action results in smoother, more radiant, and more even-looking skin.

    Although commonly used on the face, glycolic acid is also effective on the body. It can help treat clogged pores, rough texture, and dark marks on areas such as the back, arms, and shoulders.

    How to use glycolic acid in your routine

    If you have sensitive skin or are new to exfoliating acids, it’s best to start gently. Using glycolic acid in a cleanser is often recommended, as it allows the ingredient to be rinsed off rather than left on the skin. This approach helps your skin adjust gradually and reduces the risk of irritation.

    Once your skin is accustomed to it, glycolic acid can be used in stronger formats, such as peels. Professional, in-office glycolic acid peels are more potent and are typically performed intermittently, often about once a month, for more noticeable results.

    For those who cannot visit a dermatologist regularly, at-home peel pads offer a milder alternative. These should not be used daily. Starting with twice-weekly use is advised, with frequency slowly increasing to every other day only if your skin tolerates it well.

    Which skin types benefit most from glycolic acid?

    Glycolic acid works best for normal, combination, and oily skin types. Those with very dry or highly sensitive skin may experience irritation, regardless of whether the acid is used in a cleanser, peel pad, or professional treatment.

    Seasonal changes also matter. During colder months, when the skin barrier is often compromised, glycolic acid may penetrate more deeply and increase the likelihood of irritation.

    It’s important to note that glycolic acid is not inherently better than other exfoliants. For example, salicylic acid may be more suitable for certain acne concerns, while glycolic acid is often preferred for anti-ageing benefits. The best choice depends on individual skin goals and conditions.

    Because glycolic acid removes dead skin cells, it can increase sun sensitivity. Daily use of broad-spectrum sunscreen (SPF 30 or higher) is essential year-round to reduce the risk of sun damage.

    Ingredients to avoid when using glycolic acid

    Glycolic acid should be used cautiously alongside other strong actives. Combining it with manual exfoliants, benzoyl peroxide, or retinol can significantly increase the risk of irritation.

    Retinol, in particular, speeds up cell turnover, which thins the outer layer of skin and allows glycolic acid to penetrate more deeply. This combination can overwhelm the skin, even for those who consider their skin resilient.

    A safer approach is to choose glycolic acid products formulated with low concentrations and pair them with hydrating ingredients such as hyaluronic acid in the rest of your routine.

    Is glycolic acid effective for acne?

    Glycolic acid can be very effective for acne-prone skin. It helps clear pores by loosening dead skin cells, which reduces the buildup of oil that leads to blackheads, whiteheads, and pimples.

    Those with mild to moderate acne can often use glycolic acid successfully by avoiding areas that are already irritated. However, people with rosacea or cystic acne may find it too harsh and should seek professional guidance.

    For treating hyperpigmentation or acne scars, products containing around 10% glycolic acid are commonly recommended. More sensitive skin types should opt for lower strengths.

    Possible side effects of glycolic acid

    As a strong exfoliating acid, glycolic acid can cause irritation or mild burning if misused. However, severe reactions are rare. It is considered safe enough that medical professionals may use glycolic acid peels to treat acne even during pregnancy, with proper supervision.

    One key safety feature is that glycolic acid is neutralised by water. If tingling occurs, it can be rinsed off immediately. Even when it penetrates deeper layers of the skin, it eventually encounters water in the dermis, where it becomes inactive and stops working further.

  • Aluminum foil in the freezer: the simple hack winning over more households

    Aluminum foil in the freezer: the simple hack winning over more households

    A friend opens their freezer and you notice something different. Instead of the usual plastic containers with mismatched lids, there are silver packages stacked neatly like bricks. Nothing is labeled & nothing falls out when the door opens. Everything looks organized & wrapped in aluminum foil. They pull out one package and tap it against the counter. “Lasagna from two months ago. Still tastes great.” You watch the foil reflect the kitchen light and think about your own freezer at home. You picture the unlabeled containers, the bread covered in ice crystals & the half-empty bag of vegetables you meant to cook last week. Your friend mentions that aluminum foil completely changed how they store food in their freezer. The statement seems like an overstatement at first. But you keep thinking about those neat silver packages and wonder if they might be right.

    Why Aluminum Foil Is Quietly Transforming Freezers Everywhere

    Freezers were once where good intentions disappeared. Leftovers, bulk groceries, and “I’ll cook this later” plans were shoved inside and forgotten. Aluminum foil is slowly changing that pattern in a surprisingly simple way: it makes freezing feel easy, intentional, and useful again.

    People are rediscovering foil as more than a baking accessory. It’s thin, flexible, and fast to use. You shape it around food, press out the air, and it holds its form. No bulky containers. No awkward lids. Just compact silver parcels that slide neatly into any freezer space.

    Behind this small habit is a larger shift in how households think about food waste, time, and comfort meals. The freezer stops feeling like a chaotic archive and starts working as a backup plan people actually trust.

    How One Simple Wrap Turns Past Effort Into Present Relief

    On a weeknight in a small London flat, a tired family faces a late dinner and picky eaters. The freezer opens, and out comes a compact foil-wrapped block, clearly marked in black marker: “Chicken curry – 12/09”.

    The foil peels away, the frozen portion slides into a pan with a splash of water, and within minutes the kitchen smells like a weekend meal. No searching through containers. No mystery leftovers. Just food they’re happy to eat.

    This is the quiet strength of the method. It turns previous cooking effort into instant relief, without extra decisions or frustration.

    Why Foil-Freezing Is Gaining Ground in the US and Beyond

    Similar stories are appearing in US households, especially among people trying to reduce waste. A 2023 consumer survey from a major retailer found that those who batch-cooked and froze meals using foil reported throwing away fewer meals and feeling less guilty about leftovers.

    Beyond the numbers, the experiences sound familiar: less freezer chaos, fewer forgotten meals, and more food actually eaten instead of tossed.

    The Practical Science Behind Aluminum Foil in the Freezer

    There’s straightforward logic behind the trend. When used correctly, aluminum foil creates a tight barrier against air and moisture, helping slow freezer burn. Freezer burn is what turns pizza rubbery and chicken dry and grey.

    By wrapping food snugly and pressing the foil close, you reduce trapped air. Less air means less ice on the surface, which helps preserve texture and flavor.

    Foil is also highly space-efficient. Its thinness allows portions to be shaped into flat bricks that freeze faster and stack neatly. That’s why rows of foil-wrapped lasagna, casseroles, or bread slices look so satisfying lined up like silver books.

    The Psychological Benefit of an Organized Freezer

    There’s also a mental shift. When opening the freezer doesn’t feel like digging through a junk drawer, people are more likely to use what’s inside. Neatly wrapped, clearly labeled foil parcels quietly signal: this food is ready, not abandoned.

    How to Freeze Food With Aluminum Foil Without the Hassle

    The method itself is simple. Tear a piece of heavy-duty aluminum foil large enough to fully wrap the food with extra room for folding. Place the food in the center. For saucy or delicate dishes, a thin inner layer like baking paper or a freezer bag helps prevent sticking.

    Wrap it like a small gift. Pull the foil up from opposite sides, press it gently around the shape, push out as much air as possible, and fold tightly. Rotate and repeat with the remaining sides. The goal is a compact, firm parcel, not a loose bundle.

    Finish by labeling it with a marker. Keep it short and clear: “Veg lasagna – Jan 3”. That brief step makes a noticeable difference.

    Common Mistakes That Reduce the Benefits

    One frequent mistake is using thin foil for sharp or bony foods. Edges can puncture it, letting air and ice in. A double layer or inner bag works better for these items.

    Another issue is skipping labels. Without dates, the freezer turns into a silver guessing game. People also often freeze food while it’s still warm, which raises the freezer’s temperature and causes uneven freezing. Let dishes cool first.

    While freezer inventories sound ideal, most people don’t maintain them daily. What works instead is keeping a few reliable “hero meals” ready at all times: a soup, a pasta bake, a curry.

    Habits Shared by People Who Make Foil-Freezing Work

    • They freeze realistic portions, usually single or double servings.
    • They stack flat parcels so nothing disappears at the back.
    • They rotate stock, eating older meals first.
    • They use containers only when necessary, such as for very liquid foods.
    • They choose heavy-duty foil to reduce tearing and allow reuse.

    At its core, this habit isn’t about perfection. It’s about a gentler, more forgiving approach to everyday meals.

    The Subtle Ripple Effects of a Silver-Wrapped Freezer

    Once people start wrapping with intention, the benefits spread. Cooking feels more purposeful. Extra effort on energetic days turns into future convenience. Freezing leftovers becomes a practical habit rather than an act of guilt.

    On a calm Sunday, vegetables get roasted, rice is cooked in extra portions, sauces are saved. Everything is wrapped, dated, and stacked in minutes. Later in the week, after a tiring day, those silver parcels feel like small promises kept.

    Many households notice secondary changes too: fewer takeaways, fewer last-minute grocery runs, and less food quietly spoiling on counters. Bread, cake, tortillas, and leftovers get wrapped, dated, and frozen instead.

    There’s no miracle involved. Just a thin sheet of metal, easily torn, becoming a daily kitchen ally. Tear, wrap, press, label, freeze. Over time, that simple rhythm can quietly reshape how people cook, eat, and care for tomorrow.

    Point clé Détail Intérêt pour le lecteur
    Better protection Tight foil wrapping limits air and moisture contact Reduces freezer burn and keeps food textures closer to fresh
    Space efficiency Flat, stackable parcels fit around other items Makes even small freezers feel bigger and more organized
    Everyday practicality Quick to use, easy to label and portion Turns leftovers and batch-cooking into ready-to-go future meals