Blog

  • Visual Challenge in 9 Seconds Spot Differences in the Shouting Girl and Boy Image

    Visual Challenge in 9 Seconds Spot Differences in the Shouting Girl and Boy Image

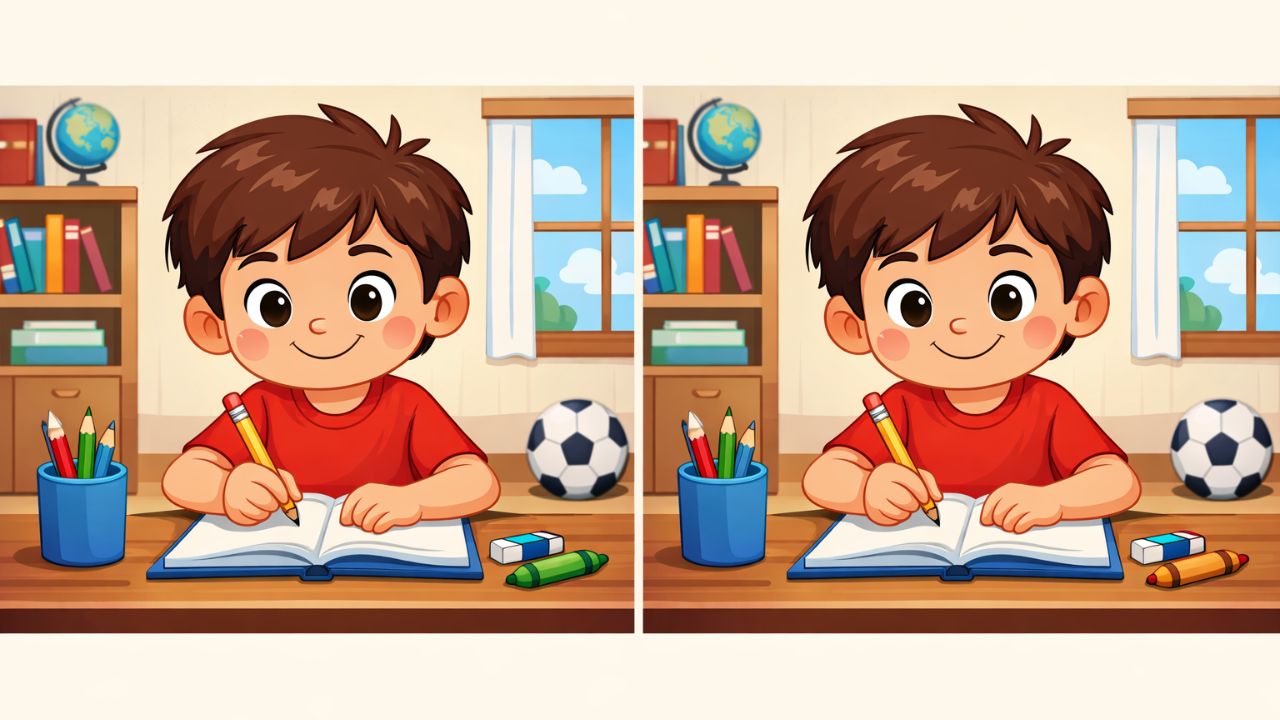
    Ready to put your observation skills to the test? If you enjoy picture puzzles, the “Spot the Difference” game is a fantastic way to keep your mind active while having fun. Today’s puzzle features a boy and a girl shouting at each other. Your challenge: find the three subtle differences between two almost identical images in just 9 seconds. It seems simple, but these puzzles are designed to keep you alert!

    Why Spot the Difference Puzzles Captivate Everyone

    Spot the Difference puzzles are loved by people of all ages because they are both engaging and mentally stimulating. These visual challenges require focus, attention to detail, and quick thinking. They may be simple in concept, but they provide an effective workout for your brain. Whether played for fun or as a mental exercise, these puzzles are excellent for enhancing cognitive skills.

    Research shows that puzzles like these can boost memory, improve problem-solving, and refine visual recognition. Regular practice can help you process information faster and maintain sharper focus, making them ideal for daily brain training.

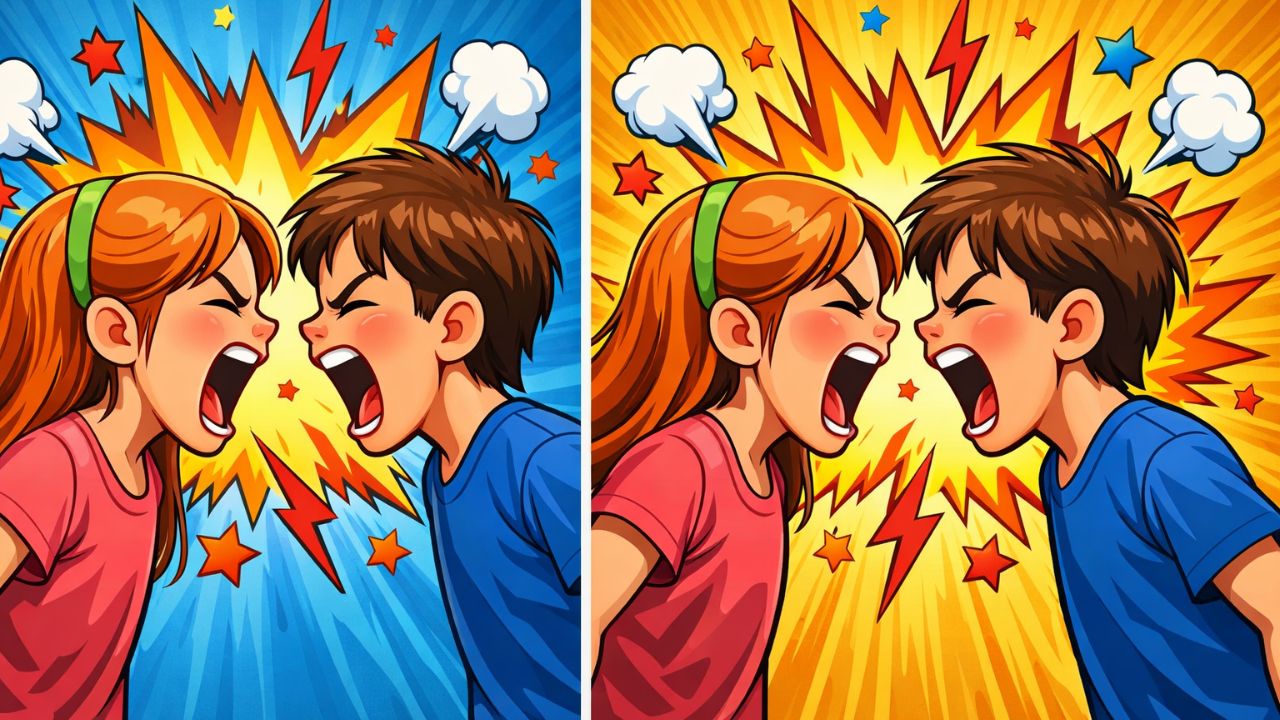
    The Puzzle: Spot 3 Differences in the Shouting Children Image

    This puzzle presents two colorful images of a boy and girl shouting at each other in an outdoor urban setting. Your task: identify three small but clear differences between the images—all within 9 seconds. These changes are subtle and intentionally tricky!

    In both images, the boy wears an orange shirt and dark pants, while the girl has a white top and blue skirt. The background shows buildings and a bright sky. At first glance, they look identical, but closer inspection reveals the hidden differences.

    How to Spot the Hidden Differences

    Boost your accuracy and speed with these strategies:

    • Scan the entire image first to understand the layout, then focus on details.
    • Compare side-by-side as if the images are mirror reflections—symmetry often reveals clues.
    • Look for subtle color or shape shifts that differentiate the images.
    • Use a timer to stay within 9 seconds and heighten focus.

    The 3 Key Differences in the Puzzle

    Here are the three differences to look for in the boy and girl shouting image:

    • Window Pattern Change: One image features a different window design behind the children.
    • Girl’s Sock Color: The girl’s socks vary in color or pattern between the two images—a tiny but noticeable detail.
    • Hair Length: The girl’s hair appears shorter in one image and slightly longer in the other.

    Why These Puzzles Are Great for Your Brain

    Spot the Difference puzzles are more than just entertainment—they enhance visual recognition and train your brain to analyze images actively. Over time, this skill helps you detect inconsistencies not just in puzzles but in real life as well.

    They also improve patience and concentration. Many differences are tiny, so careful observation is key. Playing with friends or family adds a fun competitive element that makes the challenge even more enjoyable.

    Tips to Improve Your Spot the Difference Skills

    • Practice regularly: Consistent play boosts speed and accuracy.
    • Try different puzzle styles: Variety helps you adapt to new challenges.
    • Set time goals: Start with 9 seconds, then aim to get even faster.
    • Focus on details: Small items like hair, background elements, or subtle color changes are often where differences hide.
  • Rice Water Hair Rinse Trend Shows Faster Hair Growth Results Within 14 Days

    Rice Water Hair Rinse Trend Shows Faster Hair Growth Results Within 14 Days

    Across India, women are embracing a time-honored beauty ritual that promises healthier, faster-growing hair without relying on costly products. Rice water hair rinse, once a quiet household practice, is now celebrated for delivering noticeable results in as little as two weeks. Packed with essential nutrients and simple to prepare at home, this natural rinse blends seamlessly into modern routines that favour gentle, chemical-free hair care. From students to working professionals, many women report a rapid improvement in hair texture, strength, and length.

    Faster Hair Growth With Rice Water

    Rice water works as a hair rinse by supplying direct nourishment to the scalp and hair strands. The starchy liquid left after soaking rice is rich in amino acids and vitamins that strengthen roots and enhance scalp circulation. Regular use can reduce breakage, allowing women to notice length retention sooner than expected. Many also report hair strands feeling smoother and stronger after just a few washes. In India’s diverse climate, this rinse is particularly effective at balancing dryness without leaving heavy residue that can weigh hair down.

    How Rice Water Promotes Overall Hair Health

    One reason rice water shows quick results is its positive impact on hair health. It helps repair damaged cuticles, enhancing elasticity and reducing snapping during combing. Women who gently massage it into the scalp often notice less hair fall within days. With continued use, it supports natural shine and strengthens the scalp, creating an optimal environment for hair growth. Instead of forcing new growth, rice water protects existing hair, which explains why length becomes noticeable faster without harsh treatments.

    Why Rice Water Hair Rinse is a Favourite at Home

    Rice water’s simplicity makes it easy to incorporate into weekly routines. It requires no special tools and provides budget-friendly hair care suitable for women of all ages. Its mild formulation is gentle on sensitive scalps and avoids the dryness often caused by shampoos. Users appreciate the low chemical exposure and the connection to a traditional beauty method passed down through generations. For busy lifestyles, rice water offers visible benefits without salon visits or expensive products.

    Practical Insights for Healthier Hair

    While not a miracle solution, rice water hair rinse is a practical method to encourage natural hair growth. In as little as 14 days, many women notice improved texture, reduced hair fall, and subtle length gains thanks to consistent scalp care. The key is a gentle, patient routine rather than overuse. When combined with balanced nutrition and basic hair hygiene, it becomes part of a sustainable hair care practice that respects natural growth cycles. For Indian women seeking simple, effective solutions, rice water provides a traditional yet realistic approach to hair growth.

    Rice Water Hair Rinse at a Glance

    • Preparation Time: 10–15 minutes at home
    • Recommended Use: 2–3 times per week
    • Suitable Hair Type: Dry, normal, mildly oily
    • Visible Results: Within 10–14 days
    • Main Benefit: Stronger, healthier hair length
  • Spot the Difference Puzzle Find All 3 Changes in the Park Image in 8 Seconds

    Spot the Difference Puzzle Find All 3 Changes in the Park Image in 8 Seconds

    Spot the Difference puzzles are an engaging way to sharpen your observation skills. They may seem simple at first, but once the timer starts, even the smallest details can be easily missed. This park scene challenge gives you just 8 seconds to find three hidden differences, making it a real test of focus and quick thinking. Loved by people of all ages, these puzzles are fast, stimulating, and require no special knowledge—just your eyes and a little concentration. The fun comes from spotting details others might overlook and enhancing your attention to detail without it feeling like work.

    Why Spot the Difference Puzzles Are So Popular

    Spot the Difference games have been around for decades. You may remember seeing them in newspapers, magazines, or puzzle books. Today, they frequently appear online on social media and brain game websites. These games are effective because they engage your brain in a relaxed way. Comparing two similar images and searching for tiny differences strengthens visual memory and attention to detail. Even a quick puzzle provides valuable mental exercise.

    Understanding the Man in the Park Challenge

    In this puzzle, you are presented with two pictures of a man sitting in a park. At first glance, they appear identical—the man, bench, bird, and background all seem the same. However, there are three subtle differences hidden in the images. Your task is to spot all three in just 8 seconds. The short time limit makes it both exciting and challenging. Success requires quick observation and trusting your instincts rather than scrutinizing every detail.

    Best Strategy for Scanning the Image

    Many players struggle when they examine the image haphazardly. A more effective method is to divide the image into sections. Start with the central figure, noting his facial features and clothing. Then focus on items nearby, such as the bench and his bag. Finally, examine the surrounding details, including animals, plants, and minor objects. This organized approach keeps your mind focused and minimizes the chance of missing subtle differences.

    The Three Hidden Differences

    • Hair: One image shows the man’s hair full and uniform, while the other has a small gap near the top.
    • Bird: The first image features a yellow bird on the bench; the second image shows the same bird in brown. Color differences are common because our brains often assume colors remain constant.
    • Briefcase: One image displays a handle on the man’s briefcase, while the other omits it entirely. This detail tests your ability to notice small elements in seemingly secondary objects.

    What Your Performance Reveals

    If you spotted all three differences in 8 seconds, your observation skills are strong. You likely notice details quickly and remain calm under time pressure. Taking longer is normal—these puzzles challenge even attentive observers. With regular practice, most people improve their speed and accuracy. Staying focused and methodical is more effective than rushing.

    Why Park Scenes Make Ideal Puzzles

    Park scenes are perfect for Spot the Difference challenges because they are familiar and relaxing. When the mind is at ease, it becomes harder to detect changes. Benches, birds, trees, and other objects create multiple opportunities for hidden differences. Your brain assumes the park looks as expected, making subtle alterations even trickier to spot.

    Benefits of Playing Spot the Difference Games Regularly

    Regularly playing these puzzles can enhance more than just observation skills. They improve focus, clarity of thought, and the brain’s ability to process visual information quickly. Many people use them as a quick mental exercise during busy days. These puzzles suit all ages: children improve concentration, adults refine attention to detail, and seniors maintain mental sharpness. Just a few minutes a day can lead to noticeable cognitive improvements over time.

  • Healthier Lashes and Brows Grow Naturally With a Simple Daily Castor Oil Routine

    Healthier Lashes and Brows Grow Naturally With a Simple Daily Castor Oil Routine

    The first time you notice the soft sound of your own eyelashes, it feels almost like a quiet enchantment. Leaning near a window on a windy evening or rubbing your eyes after a long day, you catch it—a delicate brushing, tiny hairs whispering against your skin. Lashes and brows are so subtle we often forget them, until one day they appear thinner, less dark, and less bold. Under bright bathroom light, you pause, wondering when this change began, and soon find yourself searching for serums, pencils, and gels promising instant results.

    Growing Healthier Lashes Naturally

    The Gentle Beauty of a Daily Ritual

    There’s another approach—slower, quieter, and deeply satisfying. It comes in a small amber bottle, thick and golden, with a faint earthy scent: castor oil. Not a flashy serum, but a simple, almost vintage remedy. Pressed from castor bean seeds, this oil has a long history of patient use. Its benefits for lashes and brows are not about instant drama, but about consistency, gentle care, and small daily rituals that feel personal and grounding.

    Creating a Nightly Routine

    Picture the end of the day: the house quiets, screens dim, and you stand at the sink. Warm water, cleanser, towel—the familiar steps of removing makeup. Then comes the extra minute for yourself. You pick up the bottle, feeling its weight, watching the oil catch the light. It doesn’t promise overnight transformation, but it fosters a kinder connection with your face and time itself, night after night.

    The Science Behind Castor Oil

    Castor oil surprises with its thick, syrupy texture. Warmed between your fingers, it spreads effortlessly. Its richness comes from ricinoleic acid, a fatty acid that locks in moisture. While research on lash growth is limited, its practical benefits are clear: it protects delicate hairs from dryness, friction, and daily makeup stress. It doesn’t create new hairs but preserves the ones you have.

    The Role of Gentle Massage

    Applying the oil changes how you touch your face. Movements slow, becoming softer and more mindful. This gentle massage supports local circulation and keeps follicles nourished. Paired with a calm routine, a simple step transforms into a moment of care rather than correction.

    Starting Your Lash and Brow Ritual

    The ritual begins in a quiet bathroom, water dripping softly, mirror slightly fogged. Each step is intentional, simple, and unhurried.

    Step-by-Step Castor Oil Routine

    • Cleanse: Gently remove all makeup with a mild cleanser to prevent residue from blocking follicles.
    • Prepare Tools: Use a clean mascara wand or cotton swab to ensure hygienic application.
    • Decant Oil: Place a small drop on your hand or dish to keep the oil clean and controlled.
    • Apply to Lashes: Brush lightly from mid-length to tips to reduce breakage without irritation.
    • Nourish Brows: Comb oil along the natural brow direction to support softness and fullness.

    Noticing Subtle Changes

    The hardest part of natural care is patience. In the first weeks, the main change is softness rather than length. Lashes feel less brittle, brows smoother, and makeup applies more easily. Over time—often after one or two months—you may notice subtle fullness, fewer gaps, and healthier-looking hairs that last longer in their growth cycle.

    Supporting Your Routine with Daily Habits

    This ritual works best with gentle everyday choices. Use lash curlers sparingly, take mascara-free days, avoid over-tweezing, and remove makeup carefully. Eating enough protein, healthy fats, and drinking water also strengthens hair from within.

    Listening to Your Skin

    Even natural oils need attention. If redness, itching, or bumps occur, pause and rinse gently. Some benefit from applying castor oil every other night. Always select a pure, fragrance-free oil, and if your eyes are sensitive, consult a professional before continuing.

    Letting Your Natural Beauty Shine

    As lashes and brows grow stronger, your face begins to feel more like itself. You may use less makeup or skip it entirely some days. The transformation is quiet and earned, like tending a small, private garden—one gentle night at a time.

  • Daily Collagen Broth Rituals Gradually Boost Skin Hydration Firmness and Elasticity

    Daily Collagen Broth Rituals Gradually Boost Skin Hydration Firmness and Elasticity

    The first time I prepared a pot of collagen-rich broth and let it simmer for hours, my home felt like a quiet winter retreat. Steam rose softly toward the windows, leaving delicate trails on the glass, while the pot barely stirred. There was no vigorous boil, just gentle bubbles appearing intermittently. The process felt less like cooking and more like nurturing something patiently. It was a gentle ritual requiring time instead of effort, and I didn’t realize then that it would become one of my favorite ways to care for my skin from within.

    Daily Collagen Broth Rituals

    Why Sipping Your Skincare Feels Grounding

    Most of us start skincare externally, reaching for creams and serums promising smoother or brighter skin. But nourishing from within carries a subtler, enduring strength. Drinking something warm creates the feeling of nourishment circulating through your body rather than resting on the surface. Collagen broth comes from a time when nothing was wasted—stocks were made from bones, and soups were crafted from leftovers. In a modern world dominated by screens and complicated routines, this simple, intentional practice can feel almost rebellious. Collagen broth requires just bones, connective tissue, water, a few aromatics, and time to simmer. As it cooks, collagen transforms into gelatin and amino acids, supporting skin, joints, digestion, and mood.

    The Hidden Structure Behind Soft, Hydrated Skin

    Healthy skin depends on the structure beneath the surface. Think of skin like fabric stretched over a frame—it only appears smooth when the underlying support is strong. Collagen provides this internal framework, giving the dermis firmness and elasticity. With age, natural collagen production slows, thinning the skin’s inner cushion, reducing elasticity, and allowing fine lines to form. While moisturizers work externally, collagen broth supports the body internally. Digested collagen and gelatin break down into amino acids like glycine and proline, aiding collagen rebuilding, moisture retention, and elasticity. Gelatin also supports gut health, allowing the body to focus on repair rather than inflammation. Over time, these benefits appear subtly—skin feels less tight after cleansing, makeup sits more smoothly, and fine dehydration lines soften, highlighting true internal hydration.

    Turning Broth Into a Daily Care Ritual

    A meaningful routine doesn’t have to be complicated. Collagen broth can become a steady part of your day. Some people enjoy it in the morning, savoring a warm mug before the day begins. Others take it in the afternoon as a pause from work, replacing coffee or sugary snacks with something nourishing. Simple touches, like using a favorite mug or pausing to notice the warmth spreading through your body, make the ritual feel intentional. Over time, this gentle practice becomes a form of self-care, supporting the skin and overall wellbeing.

    Preparing a Nourishing Collagen Broth at Home

    Making collagen broth at home is both calming and rewarding. While store-bought versions are convenient, slow-simmering your own broth offers a deeper sense of satisfaction. Start with collagen-rich bones such as joints, knuckles, chicken feet, necks, or fish frames. Cover with water and add a small amount of acid like apple cider vinegar or lemon juice to extract minerals and collagen. Let it simmer gently for several hours. Aromatics like onion, garlic, bay leaf, or peppercorns add subtle depth. The liquid becomes golden and cloudy, and once cooled, a well-made broth often gels, indicating collagen extraction. Store portions in the refrigerator for quick use, and freeze extras for later.

    Easy Flavor Variations for an Enjoyable Ritual

    To keep the routine enjoyable, experiment with flavors. A squeeze of lemon and pinch of sea salt brightens the broth. Fresh ginger adds warmth, soft herbs bring freshness, and a touch of turmeric with a bit of fat adds richness and color. These small variations allow the ritual to remain inviting and personalized.

    How Broth Supports a Skin-Healthy Lifestyle

    Collagen broth works best as part of a broader approach to skin health, including proper hydration, healthy fats, adequate sleep, and a balanced diet. Drinking warm broth contributes to hydration while delivering minerals and amino acids that water alone cannot provide. Nutrients from broth strengthen the skin’s foundation and support moisture retention from within. A healthier gut can also reduce skin issues. Combined with consistent rest, moderate activity, and balanced fluids, broth helps the body absorb nutrients efficiently.

    Creating a Gentle Daily Rhythm

    Broth fits seamlessly into everyday life. A small morning cup after water starts the day gently, and another in the afternoon supports energy during natural dips. In the evening, broth can serve as a base for a light soup. There’s no need for strict rules—the benefit comes from regular practice over time.

    Guidance for Selecting and Storing Broth

    For busy schedules, simplicity matters. Homemade or slowly simmered broths with minimal ingredients are ideal. Gelled broth after chilling indicates the presence of collagen. One to two cups per day is often sufficient. Store in the refrigerator for several days or freeze in portions for convenience. Plant-based diets do not provide collagen directly, but mineral-rich vegetable broths and vitamin C-rich foods support collagen production. Even without direct collagen, the ritual of warm, mindful nourishment is valuable.

    Returning to Care Through Nourishment

    When collagen broth becomes a regular practice rather than a trend, it takes on deeper significance. Skin care transforms from a surface-level task to a reflection of internal nourishment. Each pot and cup represents a small commitment to self-care. Over time, skin may appear more hydrated and radiant, but the greater value lies in treating the body with patience and respect. Collagen-rich broth is not about resisting aging—it’s about moving through life feeling supported and gentle. Let the steam rise, hold your warm mug, and enjoy this simple, restorative nourishment.

  • Natural Home Treatments Strengthen Hair Roots and Reduce Ongoing Hair Fall Over Time

    Natural Home Treatments Strengthen Hair Roots and Reduce Ongoing Hair Fall Over Time

    The moment you notice extra strands on your pillow or tangled in the shower drain, something quietly shifts. With damp fingers pressed to your scalp, you try to recall when your hair began to feel thinner. A gentle panic settles in—rarely shared with others, yet impossible to dismiss. You may blame stress, weather changes, a new shampoo, or tight hairstyles. These reasons feel easier than acknowledging that something deeper may be unfolding.

    Natural Home Care for Thinning Hair

    Listening to the Signals Your Hair Sends

    Hair communicates softly. It reflects late nights, missed meals, hurried showers, tight styling, harsh products, and prolonged stress. It responds to hormonal shifts, seasonal changes, and time itself. Long before hair fall feels alarming, the body sends subtle requests for rest, nutrition, and gentler care. Modern routines often drown out these signals. When shedding increases, many seek quick solutions, yet home remedies offer a slower, more supportive approach that works with the body.

    Also Read: A centenarian shares the daily habits behind her long life and independence.

    Oil Rituals That Nourish Hair from Root to Tip

    Hair oiling is a time-honored practice built on patience. Warming oil between the palms and massaging it into the scalp does more than soften strands—it supports circulation and relaxation. Coconut oil helps reduce protein loss, while castor oil, used sparingly, supports scalp moisture. Almond, sesame, and olive oils offer their own benefits. There is no single ideal oil; blends often work best. Consistent oiling combined with gentle massage helps nourish the scalp and strengthen roots.

    Also Read: A turmeric and milk face pack quietly used for natural glow before special occasions.

    Scalp Massage: A Simple Yet Powerful Practice

    The massage itself matters as much as the oil. Using fingertips in slow, circular motions boosts blood flow, allowing oxygen and nutrients to reach the follicles. Beginning at the hairline and moving backward gently awakens the scalp. Just five to ten minutes a few times weekly can create visible change. Beyond physical effects, this practice encourages calm, easing tension that often contributes to gradual hair loss.

    Herbal Oils and Thoughtful Infusions

    For a more mindful approach, oils can be infused at home using rosemary, curry leaves, hibiscus, or fenugreek. Slowly warming these herbs with oil allows their natural properties to transfer. Rosemary is commonly linked to improved circulation, while hibiscus and fenugreek support conditioning and strength. The slow preparation results in a personalized oil that feels deeply nourishing.

    Kitchen Remedies and Gentle Nourishment

    Many effective hair treatments already exist at home. Ingredients such as seeds, yogurt, eggs, and aloe vera help support scalp health and reduce breakage. These remedies do not promise instant results, but they reward consistency and care. Preparing them by hand reconnects hair care with everyday self-care.

    Fenugreek Seeds: Small in Size, Steady in Support

    Fenugreek seeds are traditionally soaked overnight and blended into a paste for scalp use. Rich in proteins and natural compounds, they are commonly used to reduce shedding and improve texture. Applied once or twice weekly for short periods, fenugreek can help hair feel thicker and stronger. Moderation and sensitivity awareness remain important.

    Aloe Vera for a Calm, Balanced Scalp

    Aloe vera provides soothing relief for irritated or oily scalps. Its gel helps calm inflammation, balance oil production, and clear buildup that may clog follicles. When applied directly for twenty to thirty minutes, it supports a healthier scalp environment. Aloe can also be blended with oils or yogurt for added nourishment.

    Protein Support from Simple Food Masks

    Hair benefits from protein, particularly after exposure to heat or sunlight. Masks made with egg and plain yogurt help temporarily strengthen the hair shaft, improving smoothness and reducing breakage. Applied to damp hair and rinsed with cool water, these masks are best used occasionally.

    Also Read: Why mixing kiwi peels with vinegar has drawn expert attention.

    Food, Stress, and the Deeper Foundations of Hair Health

    Hair health mirrors overall well-being. Nutrient deficiencies, chronic stress, hormonal changes, and poor sleep often appear first as thinning or excess shedding. While topical care supports the scalp, internal balance is equally important. Diets rich in protein, iron, zinc, and healthy fats provide essential building blocks. Hydration and mindful eating quietly support long-term strength.

    The Hidden Role of Stress in Hair Shedding

    Stressful periods or illness can trigger delayed hair fall, where strands enter a resting phase before shedding months later. Managing stress through gentle movement, breathing practices, adequate rest, and reduced screen time supports the body’s natural recovery. As stress hormones settle, hair growth cycles may gradually rebalance.

    Everyday Habits That Preserve Hair Strength

    Daily choices shape hair health. Using mild shampoos, avoiding excessive washing, and focusing cleansing on the scalp help preserve natural oils. Conditioning the lengths reduces friction and breakage. Limiting heat styling, choosing loose hairstyles, and sleeping on smooth pillowcases protect fragile strands from unnecessary damage.

    Key Nutrients That Support Healthy Hair

    • Protein: Essential for forming keratin; found in lentils, eggs, fish, paneer, tofu, nuts, and seeds.
    • Iron: Supports oxygen delivery to hair roots; found in spinach, beetroot, lentils, kidney beans, and pumpkin seeds.
    • Biotin & B Vitamins: Aid energy production and follicle renewal; found in whole grains, eggs, almonds, and leafy greens.
    • Omega-3 Fatty Acids: Maintain scalp moisture and reduce inflammation; found in flaxseeds, chia seeds, walnuts, and oily fish.
    • Zinc & Selenium: Help repair hair tissue and protect follicles; found in nuts, seeds, legumes, whole grains, and dairy.

    Gentle Detangling as a Daily Care Ritual

    How hair is handled makes a difference. Detangling slowly from the ends upward with a wide-toothed comb prevents unnecessary shedding. A small amount of oil or leave-in conditioner reduces friction. This simple habit turns grooming into a moment of awareness, helping address dryness or weakness early.

    Building a Sustainable Weekly Hair Routine

    Hair care does not need to feel overwhelming. A balanced rhythm—oil massage a few times weekly, one nourishing mask, gentle daily handling, wholesome meals, and regular stress relief—remains both manageable and effective. Changes appear gradually over months through reduced shedding, improved texture, and visible new growth.

    Strengthening Trust Between You and Your Body

    Home remedies are not instant solutions. They encourage patience, listening, and adaptation. What suits one person may not suit another, making observation essential. Caring for hair with familiar ingredients and gentle rituals builds trust with the body. Ultimately, these practices nurture more than hair—they support a kinder relationship with yourself, from root to tip.

  • Spot the Difference Test Challenges You to Find 3 Changes in the Boy Drawing

    Spot the Difference Test Challenges You to Find 3 Changes in the Boy Drawing

    Visual puzzles have a way of capturing attention effortlessly. They seem simple at first glance but challenge your brain in subtle, meaningful ways. This spot-the-difference puzzle featuring a boy drawing is a perfect example. You are presented with two nearly identical images and only 7 seconds to find three tiny differences hidden in the scene. It appears easy until the timer starts. Most participants miss at least one detail on their first try, which is exactly what makes this puzzle so captivating and addictive.

    Why Spot-the-Difference Challenges Trick Even Observant Minds

    Our brains are wired to detect patterns. When two similar images are placed side by side, the mind instinctively assumes they are identical and fills in gaps automatically. While this is useful in daily life, it becomes a hurdle in puzzles. Spot-the-difference games compel your brain to slow down and focus on details. Instead of scanning the entire image, you need to notice subtle changes in shape, position, or missing objects. In this boy drawing puzzle, the scene is calm and familiar—a child engrossed in drawing, surrounded by everyday items like pencils and an ink bottle. Because the setting appears ordinary, the differences blend in seamlessly, and the time pressure adds to the challenge.

    Effective Strategies for a 7-Second Observation Challenge

    Randomly scanning the image rarely works when time is limited. A smarter approach is to divide the image into sections. Begin with the boy, move to the objects on the table, and finish with the background details. This method helps your brain concentrate on one area at a time rather than wandering aimlessly. Another useful tactic is to look for missing objects instead of only altered ones. The human eye naturally detects vanished items more quickly than subtle shifts in color or shape. Applying this strategy often makes spotting the differences much faster and more efficient.

    What Sets the Boy Drawing Puzzle Apart

    This puzzle stands out because it relies on small, hidden details rather than obvious color changes. The differences are tucked away where you normally wouldn’t glance. The boy appears typical, and the surrounding items seem familiar, lulling you into a false sense of ease. Success requires both concentration and calmness. Some players rush and miss an obvious difference, while others overcomplicate the search, looking for intricate changes when the answers are actually simple. This balance of simplicity and challenge makes the puzzle enjoyable for all ages.

    How Observation Puzzles Improve Focus and Awareness

    Beyond entertainment, these puzzles sharpen cognitive skills. Regular practice enhances attention, short-term memory, and visual processing. Your brain learns to examine details carefully and methodically. Children benefit by developing stronger focus and problem-solving abilities, while adults gain a mental break from screens and everyday stress. Spending a few minutes on a puzzle can leave your mind feeling refreshed and alert.

    Common Mistakes That Make Differences Harder to Spot

    • Concentrating only on the center of the image, while many differences appear near the edges.
    • Assuming all changes will look similar, when they can range from missing items to subtle shifts or complete reshaping.
    • Overlooking ordinary objects like pencils or bottles, which often hide the most important clues in the puzzle.
  • Safe Henna Hair Dye Blends Deliver Rich Long-Lasting Colour Without Chemical Damage

    Safe Henna Hair Dye Blends Deliver Rich Long-Lasting Colour Without Chemical Damage

    The first time I applied henna to my hair, the kitchen filled with a scent reminiscent of an old apothecary. Notes of damp earth and dried leaves drifted through the air, warm and oddly comforting, like soil soaked in hot water. On the counter sat a ceramic bowl holding a thick, glossy green paste that looked like melted chocolate blended with finely ground plants. I hesitated with the spoon hovering above it, questioning whether this earthy mixture could truly compete with the polished dye boxes lining store shelves. Moments later, I dipped the brush into the paste, sectioned my hair, and worked it through each strand. The henna felt cool, dense, and soothing on my scalp, much like a facial mask, gradually staining my hands and hair—and quietly reshaping how I viewed beauty.

    Free From Chemical Damage

    Why Henna Still Feels Special in a Chemical-Filled Beauty World

    Walking through a modern hair dye aisle can feel overwhelming—sharp chemical smells, bold promises, and warning labels everywhere. Achieving a desired shade often means accepting ammonia, peroxide, and synthetic formulas. Henna offers a completely different path. Derived from the Lawsonia inermis plant, henna has colored hair, skin, and fabrics for thousands of years. When mixed with warm liquid, its natural pigment releases gradually and binds gently to keratin. Rather than stripping the hair, henna coats each strand with a translucent layer, leaving hair stronger, glossier, and healthier. Its herbal aroma—closer to tea leaves than perfume—turns hair coloring into a calm, intentional ritual.

    Choosing Pure and Clearly Labeled Henna

    The quality of henna makes all the difference. Authentic henna should be 100% pure, body-art-quality powder, free from metallic salts or synthetic dyes. Many poor outcomes result from compound hennas that conceal chemical additives. High-quality henna feels finely sifted, smells fresh and grassy, and never sparkles or carries artificial fragrance. Freshness matters, as henna’s staining power fades with time. Careful label reading and responsible sourcing are essential. You are not simply buying color—you are selecting a plant that has been grown, harvested, and ground with care. When henna is treated as a living ingredient, results become richer and more reliable.

    Setting Up a Simple and Effective Henna Routine

    Henna requires no elaborate tools. A glass, ceramic, or stainless-steel bowl, spoon, gloves, applicator brush, plastic wrap, and an old towel are enough. Reactive metals should be avoided, and skin and clothing should always be protected. More important than equipment is patience. Henna releases color slowly, working over hours instead of minutes. Compared to fast-acting chemical dyes, using henna feels like preparing a slow-cooked meal—steady, relaxed, and deeply rewarding.

    Natural Add-Ins That Customize Henna Results

    • Amla Powder – Softens bright red tones into cooler auburn shades while adding volume, ideal for reducing orange hues.
    • Indigo Powder – Deepens henna into dark brown or near-black tones, suitable for strong gray coverage.
    • Cassia (Neutral Henna) – Enhances shine with gentle golden warmth without dramatic color change.
    • Black Tea or Coffee – Adds depth and richness, especially for medium to dark hair.
    • Chamomile Tea – Lightly brightens hair with natural golden highlights.
    • Aloe Vera Gel – Improves moisture, smoothness, and paste texture for dry or damaged hair.
    • Essential Oils – Such as lavender or rosemary, improve aroma and support scalp comfort.

    A Classic Henna Blend for Warm Copper Tones

    The simplest henna recipe delivers warm copper shades. Pure henna powder is mixed with strong, warm tea until it reaches a yogurt-like consistency. Optional lemon juice or apple cider vinegar may help dye release if the scalp tolerates mild acidity. After resting for 4–8 hours, the paste deepens in color and is ready for application. Applied evenly to clean hair and wrapped securely, it processes for 2–4 hours. The initial shade may appear bright orange, but over several days it oxidizes into a more natural copper or auburn tone.

    Creating Auburn and Brown Shades with Plant Blends

    Henna colors can be softened or deepened using other plant powders. Mixing henna with amla reduces brightness, introduces cooler auburn tones, and supports hair texture. For brown or chocolate shades, a two-step process works best—henna first to establish a red base, followed by indigo to darken the color. This method offers greater control and consistent results, especially for light to medium hair.

    Henna Gloss for Gentle Color and High Shine

    For a subtle result, a henna gloss is an excellent choice. A small amount of henna paste is blended with a silicone-free conditioner and applied like a hair mask. After 45–90 minutes, it is rinsed out to reveal soft warmth, delicate highlights, and noticeable shine without a dramatic color shift. This approach is ideal for testing henna before committing to a full application.

    Finding the Right Shade Through Gradual Layering

    Henna builds color over time. Each application adds depth, richness, and gloss. Light hair shifts toward golden-copper, medium hair becomes chestnut or auburn, and dark hair reveals red tones in sunlight. Gray strands transform into warm highlights rather than disappearing completely. Because henna fades slowly, beginning gently allows better control, with future layers deepening the shade while preserving hair health.

    Safety Awareness and Hair History Matters

    Even natural colorants require care. A patch test is essential—apply a small amount to the skin, rinse, and observe for 24–48 hours. Extra caution is needed for hair previously treated with chemical dyes, especially those containing metallic salts. Pure henna is generally safe, but low-quality products can cause unpredictable reactions. Protect the hairline with oil, ensure good ventilation, and allow sufficient processing time.

    Aftercare for Long-Lasting Henna Color

    Rinsing henna takes patience, but warm water helps remove the paste completely. Many people avoid shampooing for the first 24 hours so the color can settle. Over the following days, the shade deepens and stabilizes. With gentle cleansing and minimal sulfates, henna color remains vibrant. Regular root touch-ups or occasional gloss treatments keep the tone even while maintaining strength and shine.

    The Quiet Power of Plant-Based Hair Color

    Henna works in harmony with natural hair. Grays become highlights, and individual variations remain visible. Choosing henna is a subtle shift away from harsh chemicals and rushed routines. It encourages patience, simplicity, and connection with natural materials. The result is not a perfectly uniform salon shade, but a living color shaped by time, light, and nature—one that feels authentic, grounded, and personal.

  • Quick Ways to Heal Dry Cracked Heels at Home Using Safe and Effective Kitchen Ingredients

    Quick Ways to Heal Dry Cracked Heels at Home Using Safe and Effective Kitchen Ingredients

    The first signs of cracked heels often appear quietly. Fine white lines form across the heel, resembling a dry riverbed. At first, they seem harmless and easy to ignore. You may blame walking barefoot indoors or wearing those favorite sandals every day. But then one morning, as you step out of bed, the floor feels rough beneath your feet. There’s a sharp sting and pulling sensation. The cracks have deepened, becoming sore, and sometimes they even catch on your socks.

    A Simple and Effective Way to Heal Dry Heels

    At some point, a quiet realization sets in that it’s time to act. Dry, cracked heels tend to creep up unnoticed until discomfort becomes unavoidable. Every step becomes a reminder that your feet have been needing care for some time. They support you through long hours and busy days. The encouraging part is that relief doesn’t require costly products or complicated routines. Many effective solutions are already sitting in your kitchen, stored in familiar jars and bottles you use daily.

    This approach is about reconnecting with your heels and turning the end of your day into a calming self-care moment. Simple ingredients like oil, honey, milk, and salt can gently soften neglected skin. With regular use, these natural remedies help cracks heal steadily and comfortably.

    The Quiet Message Your Heels Reveal

    Your heels work harder than you might realize. They absorb the first impact with every step and bear constant pressure when you stand or walk for long periods. Because they’re usually covered and out of sight, they’re easy to overlook. You might notice roughness during a shower and promise yourself you’ll deal with it later, only to forget again.

    Over time, your skin reflects what it endures. Dry, cracked heels often signal prolonged pressure, friction, and lack of moisture. Walking barefoot on hard floors, wearing open-backed shoes, or using footwear with thin soles can all contribute. Long hot showers, cold weather, and indoor heating further dry out the skin.

    The skin on your heels is naturally thick to protect you, but when it loses flexibility, it can’t bend as you walk. Instead, it splits and forms painful cracks. The good news is that your skin constantly repairs itself. When you provide moisture, gentle care, and protection, healing can happen faster than expected.

    Your Kitchen as a Gentle Healing Corner

    Your kitchen offers more than meals—it holds simple, effective skin remedies. Olive oil or coconut oil deeply moisturizes rough, dry heels. Honey helps draw moisture into the skin while soothing irritated areas. Milk and yogurt naturally soften flaky skin. When sugar or salt is mixed with oil, it creates a gentle scrub that removes dead skin cells.

    Using everyday ingredients feels reassuring because they’re familiar and easy to trust. There’s no need for complex labels or specialty products. These are basic items with textures and scents you already know. Understanding how each ingredient helps makes your care routine even more effective.

    • Olive Oil / Coconut Oil: Deeply hydrates cracked heels and softens hardened skin; ideal for night massages and DIY scrubs.
    • Honey: Seals in moisture, calms irritation, and supports skin repair; works well as a healing mask.
    • Milk / Yogurt: Gently loosens dead skin through natural lactic acid; suitable for foot soaks or softening packs.
    • Sugar / Salt: Exfoliates rough layers and smooths uneven skin; best used after soaking feet.
    • Banana / Avocado: Nourishes skin with vitamins and healthy fats; helpful for deeply cracked heels.

    A Calm Evening Routine for Cracked Heels

    Think of this routine as a peaceful pause at the end of the day. The house grows quieter, and you set aside just fifteen minutes to care for your feet.

    Step 1: Warm Milk and Salt Foot Soak

    Fill a basin with warm water that feels soothing on your skin. Add half a cup of milk, one or two spoons of salt, and a small amount of olive oil. Soak your feet for ten to fifteen minutes. The warmth relaxes the skin, the milk softens dry areas, and the oil begins restoring moisture.

    Step 2: Gentle Exfoliation for Smoothness

    Combine sugar or fine salt with olive oil or coconut oil to form a thick paste. Gently massage it onto your heels using slow, circular motions, focusing on rough patches. Avoid scrubbing too hard, as gentle care works better than harsh rubbing. Rinse with warm water when finished.

    Step 3: Honey and Yogurt Repair Mask

    Mix one tablespoon of honey with one tablespoon of thick yogurt and add a few drops of oil. Apply the mixture generously to cracked areas and leave it on for ten to fifteen minutes. This mask delivers deep hydration and soothing relief. Rinse gently and pat your feet dry.

    Overnight Oil Therapy for Lasting Softness

    Before bedtime, warm a small amount of olive oil or coconut oil and massage it into your heels for several minutes. Put on clean cotton socks to lock in moisture while you sleep. By morning, your heels often feel noticeably softer, smoother, and far less tender.

    Daily Habits to Keep Heels Healthy

    Once your heels heal, simple habits help prevent cracks from returning. Apply moisturizer after showers, avoid overly hot water, rotate your shoes, and stay well hydrated throughout the day. At the first sign of dryness, take action. These small steps can prevent more serious discomfort later.

    When Home Care Isn’t Enough

    If heel cracks become very deep, start bleeding, or fail to improve with consistent care, professional guidance may be necessary. Certain health conditions can slow healing, and a doctor or podiatrist can suggest appropriate treatment. While home remedies offer comfort and support, medical advice ensures proper recovery.

    In most cases, cracked heels are simply a sign of dry skin needing attention. With warmth, oils, patience, and everyday household ingredients, your feet can become comfortable again—ready to support you through daily life.

  • Plank Hold Timing Explained: How Long You Should Hold a Plank to Build Core Strength at Every Age

    Plank Hold Timing Explained: How Long You Should Hold a Plank to Build Core Strength at Every Age

    The floor feels cool beneath your forearms. Your toes press into the mat, your legs engage, and your breathing settles into a steady rhythm. Between the tightness in your core and the focus in your mind, a familiar question surfaces: how long should this last? Ten seconds? Thirty? Two long minutes that feel endless?

    Planks are often treated as a basic, one-size-fits-all exercise, yet they are really a conversation between your body and gravity—one that evolves over time. What feels strong and simple at 18 can feel demanding at 48, or require extra care at 68. At every age, your core remains your foundation, quietly supporting your spine, protecting your back, and helping you move with ease.

    So how long should you hold a plank to build strength without tipping into strain, pain, or ego? The answer lies in understanding your body exactly as it is today.

    Understanding Plank Hold Timing

    The Silent Work Happening Inside Your Core

    Most workouts announce themselves loudly—feet pounding, weights clanging, breath cutting through the air. Planks arrive differently. You line your body into one long shape, shoulders stacked over elbows or wrists, heels reaching back, head floating comfortably between them. On the surface, nothing seems to move.

    Inside, however, a quiet storm of coordination unfolds. The transverse abdominis wraps your midsection like a supportive belt. The multifidus offers subtle protection to the spine. The diaphragm links breath to effort, while the pelvic floor provides steady support from below. These muscles thrive on calm, precise effort, repeated consistently.

    This is why quality matters more than duration. A tense, collapsing one-minute plank delivers less benefit—and more risk—than a clean twenty-second hold performed with control and ease. Time matters, but only up to the point where your form begins to fade.

    Why the Two-Minute Plank Is Overrated

    Fitness culture often glorifies extremes: two-minute planks, five-minute challenges, and viral clips of bodies shaking under strain. Somewhere along the way, longer became synonymous with better.

    The quieter truth is less dramatic. Beyond a certain point, extending a plank builds tolerance for discomfort more than useful strength. Research and experienced coaching consistently show that short, high-quality holds repeated regularly are more effective for core strength and spinal health than occasional marathon efforts.

    Long planks aren’t automatically harmful, but the benefit-to-risk ratio shifts as fatigue creeps in. Over time, the focus naturally moves from “How long can I last?” to “How well am I supporting my body right now?”

    Age, Gravity, and Changing Needs

    As the years pass, the body recalculates. Recovery slows slightly, tissues become less forgiving, and balance asks for more attention. A plank that once felt effortless may now feel deliberate—and that change reflects normal biology, not weakness.

    Instead of one universal rule, it helps to think in flexible ranges. The ideal hold time ends just before your alignment begins to unravel. Below are general guidelines for healthy adults without major injuries or medical concerns.

    • Teens (13–19): 20–40 seconds, 2–4 sets, 2–4 days per week
    • 20s–30s: 30–60 seconds, 2–4 sets, 3–5 days per week
    • 40s: 20–45 seconds, 2–4 sets, 3–4 days per week
    • 50s: 15–40 seconds, 2–3 sets, 2–4 days per week
    • 60s–70s+: 10–30 seconds, 2–3 sets, 2–4 days per week

    These ranges are guideposts, not judgments. What matters most is the integrity of each second you choose to hold.

    Your 20s and 30s: Strength Without Limits

    In your 20s and 30s, the body often feels generous. Recovery is fast, tissues are resilient, and strength builds easily. This is when many people chase longer plank times, and with good form, thirty to sixty seconds can be an effective range.

    The hidden risk isn’t weakness—it’s overlooking subtle breakdowns. Hips begin to dip, shoulders inch upward, and the lower back sends quiet signals. Dividing your effort into multiple shorter, high-quality holds often delivers better results than one long, punishing attempt.

    Your 40s: Power With Awareness

    By your 40s, feedback becomes clearer. Old injuries may resurface, stiffness arrives sooner, and recovery requires more respect. Strength is still present, but it benefits from greater awareness.

    For many, the most effective plank range now sits between twenty and forty-five seconds, repeated a few times. Some days allow more; others call for less. The priority shifts toward sustainability and long-term spinal support.

    Your 50s, 60s, and Beyond: Smart, Steady Strength

    Later decades invite a new definition of strength. Muscle mass may slowly decline and recovery may take longer, but adaptation remains possible. Planks continue to offer value, even when they look different.

    Shorter holds—ten to thirty seconds—performed with excellent alignment can be deeply effective. Modified versions, such as knee or incline planks, aren’t compromises; they are intelligent adjustments that protect posture, stability, and confidence.

    Recognizing the Right Moment to Stop

    Your body always signals when a plank shifts from productive to risky. Common cues include sagging in the lower back, shoulders creeping toward the ears, held breath, or tension spreading across the face. When these appear, it’s time to stop.

    Ending a plank at the first sign of form loss isn’t quitting—it’s skilled training. This approach teaches efficiency and control rather than collapse.

    Making Planks a Sustainable Habit

    Planks don’t need drama. They can slip easily into daily routines—a brief hold before coffee, another after work, one more before bed. Over time, these small efforts add up.

    The true reward isn’t a personal record. It’s the quiet ease of standing taller, moving with confidence, and supporting your body through everyday life. Hold as long as your form feels honest. Rest. Repeat. That’s where lasting core strength is built.