Blog

  • Leg Workouts at the Gym The Most Effective Exercises for Strong Glutes Quads and Hamstrings

    Leg Workouts at the Gym The Most Effective Exercises for Strong Glutes Quads and Hamstrings

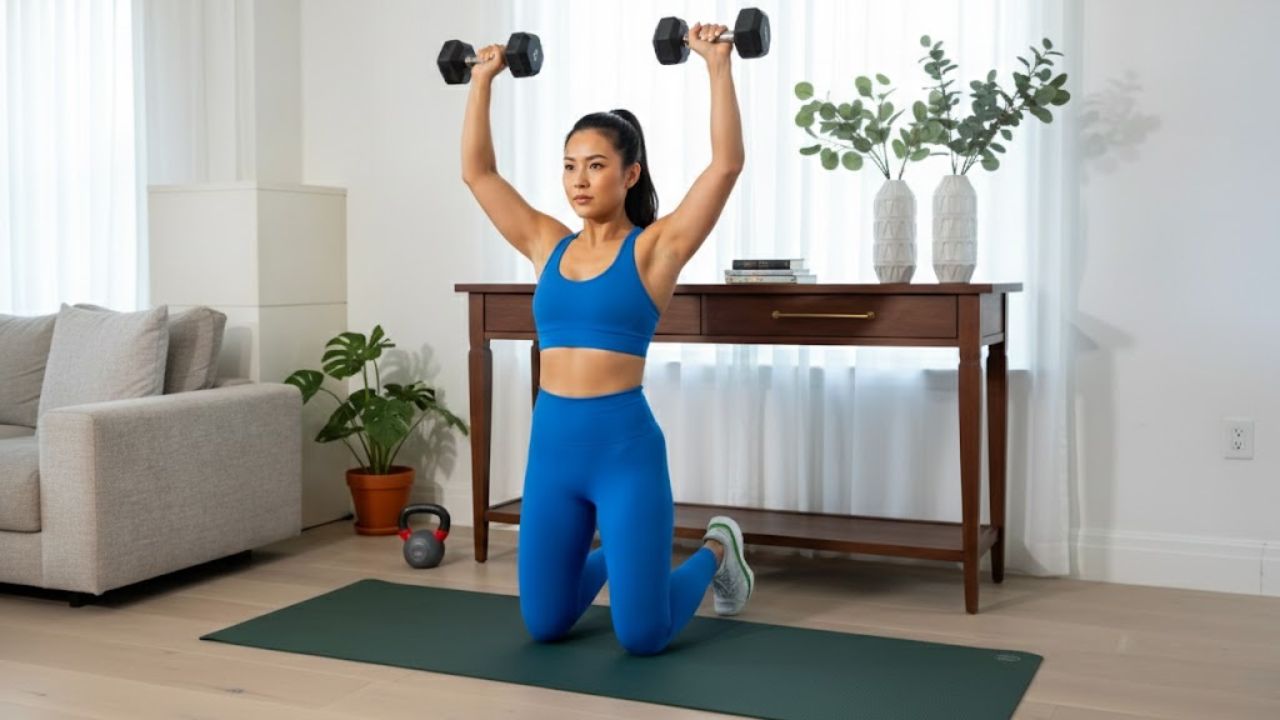
    Leg workouts at the gym play a major role in building overall strength, balance, and athletic performance, especially for fitness enthusiasts in India who train regularly. Targeting the glutes, quads, and hamstrings not only improves lower-body power but also supports better posture and injury prevention. A well-structured leg routine combines compound lifts and isolation movements to activate multiple muscle groups efficiently. When performed with proper form and consistency, these exercises help develop strength, endurance, and muscle definition while fitting easily into a balanced gym program.

    Leg Workouts at the Gym for Building Strong Glutes

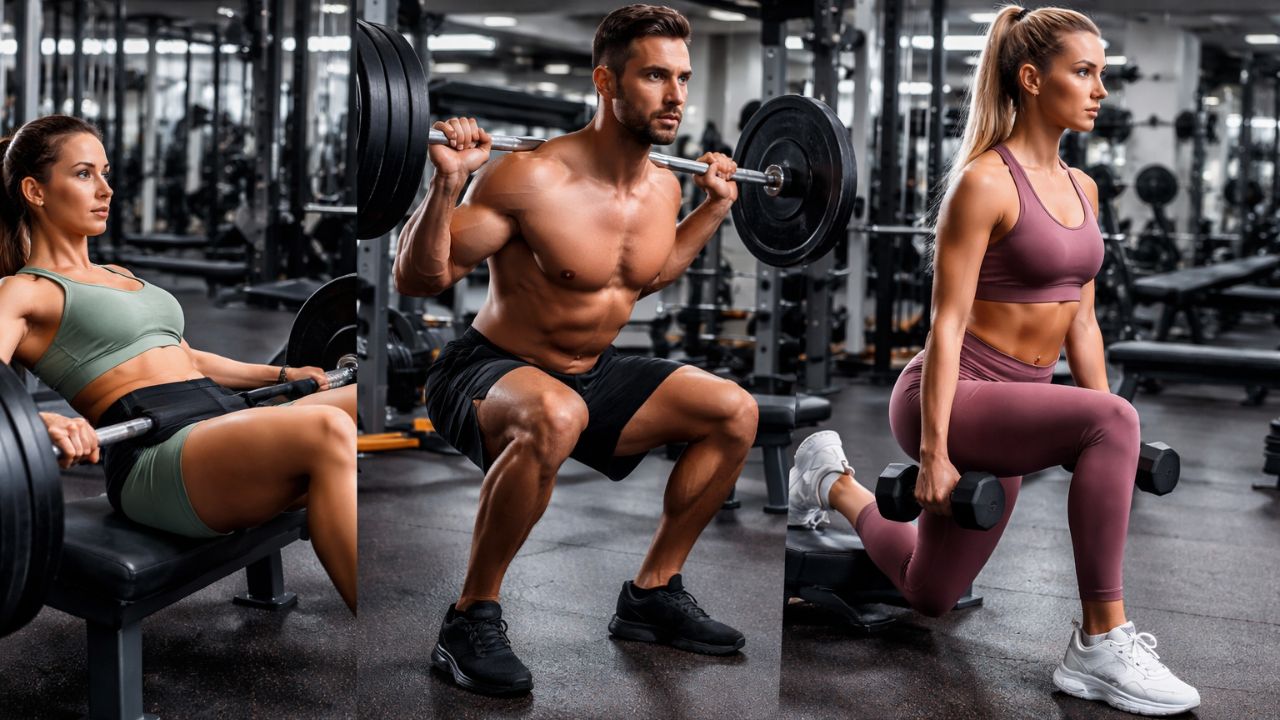
    Strong glutes are essential for lower-body power and stability, and leg workouts at the gym offer several effective ways to train them. Exercises like barbell squats, hip thrusts, and walking lunges engage the glute muscles through a full range of motion. Focusing on proper squat depth ensures better muscle activation, while controlled lifting tempo helps maintain tension. Adding mind muscle focus during each repetition improves results, and maintaining stable core position supports safe execution. Together, these movements help build strength while improving hip mobility and overall lower-body balance.

    Leg Workouts at the Gym to Develop Powerful Quads

    The quadriceps are the primary drivers of knee extension, making them crucial for daily movement and athletic tasks. Leg workouts at the gym commonly target quads through exercises like leg presses, front squats, and step-ups. Using full range motion during each rep maximizes muscle engagement, while moderate training load allows for consistent progress. Paying attention to knee alignment control reduces strain and improves efficiency. Including steady breathing rhythm during sets also supports endurance, helping the quads grow stronger without unnecessary fatigue.

    Leg Workouts at the Gym for Hamstring Strength

    Hamstrings play a key role in hip extension and knee stability, and leg workouts at the gym should never overlook them. Romanian deadlifts, lying leg curls, and good mornings are commonly used to strengthen this muscle group. Prioritizing hip hinge mechanics protects the lower back, while slow eccentric phase increases muscle control. Maintaining neutral spine posture ensures safety throughout the movement. Combining these exercises with balanced training volume helps improve flexibility, strength, and coordination in the posterior chain.

    Understanding Balanced Leg Training

    A balanced approach to leg workouts at the gym ensures that glutes, quads, and hamstrings develop evenly. This balance supports joint health, improves athletic movement, and reduces the risk of overuse injuries. Structuring workouts with both compound and isolation exercises encourages muscle group balance while promoting long term consistency. Adequate rest between sessions allows for proper muscle recovery, and tracking progress helps maintain training performance clarity. Over time, this structured approach leads to steady improvements in strength and functional fitness.

    Exercise Primary Muscle Recommended Reps
    Barbell Squat Glutes 8–12
    Leg Press Quads 10–15
    Romanian Deadlift Hamstrings 8–10
    Walking Lunges Glutes & Quads 12–16

    Frequently Asked Questions (FAQs)

    1. How often should leg workouts be done?

    Most people benefit from training legs two times per week with adequate rest.

    2. Are gym leg workouts suitable for beginners?

    Yes, beginners can start with lighter weights and focus on proper form.

    3. Do leg workouts help overall strength?

    Yes, they support full-body strength by engaging large muscle groups.

    4. Can leg workouts reduce injury risk?

    Properly balanced leg training improves joint stability and muscle coordination.

  • No vinegar or baking soda needed: the trick to cleaning your car seats and removing the toughest stains

    No vinegar or baking soda needed: the trick to cleaning your car seats and removing the toughest stains

    That faint blend of old coffee, fast-food fries, and something you can’t quite place. Sunlight hits the car seat and suddenly every mark you’ve been avoiding shows up: the muddy shoe print, the chocolate ice-cream ring, the takeaway spill from last week. You rub one with your sleeve out of habit. It doesn’t vanish. It spreads. What looked manageable now feels impossible, and the seat keeps that slightly sticky, slightly awkward look you promise yourself you’ll deal with later.

    In your mind, the usual advice pops up: bowls of vinegar, baking soda everywhere, a weekend sacrificed to home remedies. You already know you won’t do it. So the car stays like this — not terrible, but never really clean — quietly parked on your mental to-do list.

    Then, at a petrol station, someone wipes their seats with a quick spray. No vinegar. No powder. The stain disappears as if it was never there. You watch closely. Because this feels like cheating.

    No Vinegar, No Baking Soda: Why Seats Still Look Dirty

    Most drivers polish the outside of their car far more than the inside. The paint gleams, while the seats quietly collect coffee, sweat, sunscreen, and spilled drinks. A quick vacuum helps with crumbs, but it doesn’t touch those stubborn, shadowy marks that sink into fabric.

    The result is an interior that always feels a bit used, even in a newer vehicle. Light upholstery suffers most. Every spill becomes a tiny crime scene, soaking into the weave. You wipe with a damp cloth, the stain fades, then reappears once it dries — like it never left.

    The truth is simple: most seat stains aren’t permanent or mysterious. They’re layers of oil, sugar, pigment, and dust clinging together. Once you see that, vinegar and baking soda start to feel like noisy tools for a quiet problem.

    Why the “Kitchen Fix” Often Fails

    A UK valeting survey ranked interior stains among the top three reasons people booked a full detail — above dents and scratches. Many lived with those marks for nearly a year before giving up. Family cars with juice spills, rideshare back seats marked with makeup, commuters’ coffee splashes — the patterns repeat everywhere.

    Under the fabric, most seats are made from synthetic fibres with protective coatings. Vinegar and baking soda can help, but they often leave residue, which attracts fresh dirt. Modern upholstery cleaners work differently. They loosen the bond between stain and fibre, keeping dirt suspended so it can be lifted out instead of rubbed around. The secret isn’t scrubbing harder — it’s dissolving smarter.

    A Simple Two-Step Method That Actually Works

    The approach that quietly beats most home hacks is refreshingly basic: a proper fabric upholstery cleaner and a damp microfibre cloth. A small wet/dry vacuum improves results, but it isn’t essential.

    Start by vacuuming thoroughly so grit isn’t pushed deeper. Lightly mist the stain — no soaking — and let it sit for two or three minutes. With a soft brush or clean cloth, work in gentle circles, letting the cleaner do the work. Then wipe with a slightly damp cloth to lift the loosened dirt, or extract it with a wet vac. Repeat once or twice for older marks and let the seat air-dry. No sharp smells. No powder. Just fabric returning to its original colour.

    The biggest mistakes are rushing, over-wetting, and scrubbing too hard. Boiling water can set protein stains, stiff brushes can damage fibres, and mixing random kitchen chemicals rarely ends well. Using the right tool once beats using the wrong one ten times.

    Small Habits That Keep Seats Clean

    Most people don’t clean car seats daily. It happens after a big spill or when a smell won’t go away. What helps is avoiding common errors and keeping a small kit handy. One commuter put it simply: one bottle of proper cleaner in the boot beats pretending stains are modern art.

    • Fabric seats: Water-based upholstery cleaner, soft brush, light pressure, optional wet vac.
    • Leather or faux leather: Dedicated leather cleaner and conditioner, no soaking, no harsh scrubbing.
    • Stubborn odours: Neutral-pH cleaner, good ventilation, and proper drying.

    Living With Cleaner Seats Every Day

    Once old stains are gone, something shifts. Drinks get lids. Crumbs get contained. Fresh marks stand out immediately, making them easier to deal with on the spot. There’s relief in knowing you can offer someone a lift without apologising for the state of the car.

    People share this trick because it reduces hassle. A neighbour borrows the spray and ends up cleaning the whole back seat. A before-and-after photo sparks curiosity. The appeal isn’t perfection — it’s removing a small, constant irritation from daily life.

    That’s why the no-vinegar, no-baking-soda approach sticks. It saves time, spares your nose, and avoids unnecessary rituals. You clean the stain, once, and move on. And in a world that often feels like one long spill, that quiet sense of control is oddly satisfying.

  • Beauty Editor Empties Are Rare but These 9 Skincare Products Earned Multiple Full Refills

    Beauty Editor Empties Are Rare but These 9 Skincare Products Earned Multiple Full Refills

    As someone who adds a new skincare find to her routine nearly every week—sometimes more than one—I almost never finish products completely. My bathroom counter is crowded with upcoming launches and promising formulas, so reaching the final pump of anything is rare. When I do stay loyal to a product until it’s gone, it’s a clear sign it’s exceptional. And when I repeatedly repurchase and use a formula down to the last drop every time, it goes beyond good—it’s truly standout-worthy.

    That level of commitment doesn’t happen often. In fact, after nearly a decade in the beauty industry, I’ve narrowed it down to just nine skincare essentials I restock without hesitation. These are the formulas I genuinely miss when they’re almost empty. Below, you’ll find my current lineup of cult-favorite products I’ve finished not once, not twice, but three times or more.

    The Ultimate Moisture Staple

    U Beauty’s ultra-hydrating cream is a formula I never want to be without. I once ran out just days before my wedding and immediately replaced it without hesitation. Its silky texture delivers deep hydration that lasts overnight while remaining lightweight and pore-friendly. I use it morning and night because it leaves my skin looking dewy, calm, and smooth without feeling heavy. It has earned a permanent spot in my routine and remains one of the most reliable moisturizers I’ve ever used.

    A Gentle Yet Effective Retinol Essential

    This slow-release retinol serum from Shani Darden strikes the perfect balance between effectiveness and comfort. It’s designed to smooth fine lines while minimizing irritation, making it ideal for consistent use. I rotate through many active ingredients, so I rely on this formula for visible results without flaking or sensitivity. It’s a dependable over-the-counter option that keeps skin looking firm and refined without overwhelming it.

    A Beginner-Friendly Retinol Favorite

    Mother Science’s retinol-focused treatment is one I used repeatedly before transitioning to stronger options. It pairs retinol with powerful antioxidants to enhance results while supporting the skin barrier. This thoughtful combination helps reduce irritation, especially during colder months when skin is more vulnerable. It’s an approachable choice for anyone easing into retinol while still wanting noticeable skin improvements.

    A Dual-Action Hydration Booster

    After testing countless hyaluronic acid serums, I consistently return to this berry-infused formula from HPPY Skin. It delivers deep hydration while also offering antioxidant benefits that brighten and refresh the complexion. The blend works like two serums in one, combining plumping hydration with nourishing nutrients. It has become a regular part of my routine over the past year.

    A Timeless Sensitive Skin Cleanser

    Dove’s fragrance-free body wash remains a constant in my shower lineup. While I’ve tried many high-end alternatives, this gentle, hypoallergenic cleanser continues to deliver reliable comfort. Its creamy texture leaves skin feeling soft and soothed without irritation. It’s a familiar staple that still performs just as well today.

    A Nightly Skin-Repair Serum

    Dr. Diamond’s Metacine Instafacial Plasma serum is a nighttime essential I use without fail. I’ve finished multiple bottles thanks to its skin-repairing benefits and consistently smooth results. It plays a major role in maintaining a radiant, glass-like finish and remains a formula I trust completely.

    A Daily Exfoliating Solution

    This mandelic acid serum from Sofie Pavitt Face has become a morning staple. Its gentle exfoliating action helps remove dead skin and prevent congestion without disrupting the moisture balance. Using a mild exfoliant more frequently has noticeably improved my skin’s clarity and glow. It’s a formula I continue to rely on for consistent smoothness.

    A Calming Mineral Sunscreen Staple

    Sunsolve MD’s mineral SPF formula offers daily protection while also calming redness and evening skin tone. The luxurious texture makes it comfortable to wear every day, and its soothing benefits set it apart from other sunscreens. It’s a product I immediately replace when it runs out, thanks to its dependable performance and skin-comforting finish.

  • This 10 Minute Workout Builds Strong Arms Chest Back and Shoulders Using Simple Movements

    This 10 Minute Workout Builds Strong Arms Chest Back and Shoulders Using Simple Movements

    This 10 minute workout is designed for people who want real upper-body strength without long gym sessions or complicated equipment. By focusing on simple, controlled movements, it helps activate the arms, chest, back, and shoulders in a short but effective routine. In India, where busy schedules often make consistency difficult, this approach fits easily into daily life. Whether done at home or while traveling, the workout emphasizes efficiency, balance, and muscle engagement, making it suitable for beginners and experienced fitness enthusiasts alike.

    How This 10 Minute Upper Body Workout Builds Strength Fast

    The effectiveness of this routine comes from how it combines time efficiency with smart movement patterns. Instead of isolating muscles one by one, the workout relies on compound actions that engage multiple areas at once. This encourages muscle activation, improves upper body control, and supports functional strength. Short rest periods help maintain steady intensity, while simple exercises reduce mental fatigue. Over time, these sessions can enhance endurance and tone without overwhelming the joints. Because the structure is repeatable, it becomes easier to stay consistent and track progress, even when time is limited.

    Simple Movements That Target Arms Chest Back and Shoulders

    Each movement in this workout is chosen for clarity and effectiveness rather than complexity. Push-based actions strengthen the chest and shoulders, while pull-focused patterns activate the back and arms. This balance supports joint stability and encourages even muscle use. Controlled pacing helps maintain proper alignment, reducing the risk of strain. Since the exercises rely on bodyweight or light resistance, they promote accessible training for all fitness levels. The simplicity allows you to focus on form, breathing, and smooth transitions instead of memorizing complicated steps.

    Why a Short Workout Routine Works for Consistent Results

    Short workouts remove one of the biggest barriers to fitness: lack of time. A focused 10 minute session feels achievable, which supports daily consistency and builds momentum. Regular practice improves movement efficiency and helps reinforce healthy habits. Because the routine is not exhausting, recovery is faster, allowing more frequent sessions. This approach also supports sustainable progress, especially for people juggling work, family, and other responsibilities. Over weeks, these brief sessions can add up to noticeable strength and posture improvements.

    Summary and Practical Takeaways

    This workout shows that strength training does not need to be long or complicated to be effective. By using simple movements and a short time frame, it supports realistic fitness goals, encourages long term adherence, and delivers balanced upper strength. The routine fits easily into modern lifestyles and can be adjusted as strength improves. For anyone seeking a practical way to train arms, chest, back, and shoulders, this method offers a clear, repeatable structure that aligns well with everyday routines.

    Workout Element Primary Benefit Target Area
    Push movements Improves pressing strength Chest and shoulders
    Pull movements Enhances posture control Back and arms
    Bodyweight holds Builds endurance Shoulders and core
    Timed circuits Saves training time Full upper body

    Frequently Asked Questions (FAQs)

    1. Is this workout suitable for beginners?

    Yes, the simple movements make it easy for beginners to follow and adapt.

    2. Do I need any equipment?

    No, most exercises rely on bodyweight or very basic household items.

    3. How often can I do this workout?

    It can be done several times a week since the intensity is controlled.

    4. Can this replace longer gym sessions?

    It can support strength maintenance, but goals may vary depending on intensity.

  • Lip Definition Trick: The Strategic Liner Placement That Creates Fuller Lips Without Overdrawing

    Lip Definition Trick: The Strategic Liner Placement That Creates Fuller Lips Without Overdrawing

    The girl in the café bathroom remains unaware that several people in line are quietly observing her. With two swift strokes, she glides a pencil along her lips, presses them together, and finishes with a touch of gloss. She skips over exaggerated overlining and complex contouring. When she looks in the mirror, her lips appear soft, full, and naturally radiant, as if she just returned from a restful vacation. The effect is subtle and impossible to pinpoint — there’s no harsh outline or dramatic Instagram-style border, just a gentle, dimensional enhancement that makes her lips look effortlessly flawless. Later, when you try to replicate it in your mirror using the same pencil, gloss, and expression, the result looks flat. A small difference in pencil placement makes all the difference.

    Lip Definition Trick: Guiding the Eye, Not Just Enlarging Lips

    Traditional lip-liner advice teaches us to trace slightly outside the natural lip line, blur it, fill it in, and call it done. For years, this method worked adequately, but in real life under natural light, heavy overlining can appear disconnected. Instead of enhancing features, lips may seem out of sync with the face, particularly up close.

    The Subtle Shift Modern Lip Artists Are Making

    Contemporary lip artists focus on subtle precision rather than exaggeration. Rather than aiming for dramatically larger lips, they guide attention to specific areas. Fullness is a happy side effect. This approach works beautifully in photos, video calls, and in-person conversations. The change is understated, yet the impact is striking.

    Millimetres Matter More Than Bold Lines

    The magic lies in tiny adjustments, not thicker outlines. Correct pencil placement emphasizes the natural lip structure instead of creating an artificial shape. This micro-precision keeps lips looking believable, softly enhanced, and naturally full.

    Where Makeup Artists Really Place the Liner

    Observing TikTok and Instagram, you’ll notice the corners of the mouth are barely defined. Instead, pigment is concentrated on three key areas: the peak of the Cupid’s bow, the center of the lower lip, and the small “pillows” just off-center. The outer edges are softly diffused, creating a suggested outline rather than a bold statement.

    Why the Results Look Effortlessly Natural

    A London-based makeup artist explained that she uses the same lip pencil for every client but adjusts placement according to how light hits their lips. People often ask which filler clinic she recommends, but she simply points to an inexpensive lip liner and her subtle technique. The result? Fuller lips appear healthier and in balance with the rest of the face, creating a naturally refreshed look.

    The Science Behind Why This Technique Works

    Our eyes are drawn to contrasts and shapes. The dip of the Cupid’s bow, the curve at the center of the lower lip, and the light-catching areas of gloss guide attention. By enhancing these points and softening the corners, lips appear fuller without obvious outlining.

    Precise Liner Placement for Natural Fullness

    Start with dry, relaxed lips. Use a sharpened nude liner matching your lip tone. Draw a tiny bridge across the Cupid’s bow, connecting the peaks slightly above the natural dip — a softened plateau rather than a full M shape. On the lower lip, extend the pencil about a millimeter beyond the natural line at the fullest point only, sketching a short arc. Leave the outer thirds almost untouched. Join the central sections to natural corners with feathery strokes that fade outward. Lightly smudge and tap gloss or balm in the center. The corners remain soft while the center appears pillowy. Restraint is key: overdoing the sides or height can lead back to overlining, which looks fine on a screen but unnatural in daylight.

    Why This Soft-Blur Technique Works on Real Faces

    This gentle method feels like enhancing what already exists. On challenging mornings, applying a sharp line can feel restrictive, but soft placement creates a refreshed, effortless appearance. Minor hand tremors or slight unevenness don’t ruin the effect because the overall impression matters more than small imperfections. The technique adapts well to different lighting conditions, keeping lips defined yet natural, moving fluidly with expressions instead of appearing stiff. It’s makeup that complements a living face rather than freezing it.

    Key Principles for Achieving Soft, Natural Lip Definition

    • Central Focus: Apply liner mainly on the Cupid’s bow and center of the lower lip to create instant volume without harsh outlines.
    • Softened Corners: Minimal or no liner on the mouth corners with a light blur ensures a gentle, balanced look even in daylight.
    • Targeted Highlight: Apply gloss or balm only at the center of the lips to draw subtle attention and enhance dimension.
  • Awake Look Hack: The Brow Placement Technique Makeup Artists Use to Instantly Brighten the Face

    Awake Look Hack: The Brow Placement Technique Makeup Artists Use to Instantly Brighten the Face

    The woman in the café seemed exhausted. Her laptop was open, she clutched a triple espresso, and faint dark circles peeked from beneath her concealer. Yet, when she lifted her gaze, she looked genuinely alert. Not the kind of alert that comes from a spa day, but the kind that comes from actually getting rest. The secret was subtle, resting just above her eyes. Her eyebrows were softly lifted and lightly highlighted, making her eyes appear brighter even under harsh café lighting and poor Wi-Fi. Makeup artists from fashion weeks and social media consistently share this tip: if you have just one minute in the morning, focus on your eyebrows. A tiny adjustment can create a noticeable difference, making coworkers wonder if you’ve changed skincare routines when in reality you just drew your eyebrow pencil slightly higher. One small brow tweak can dramatically enhance your overall appearance.

    Awake Look Hack: Why Brows Are the Key to a Bright, Rested Appearance

    Backstage at any fashion show, you’ll notice one thing: models may have unfinished makeup, but their eyebrows are already perfected. Tails are subtly lifted, arches are shaped, and the area beneath the brow bone looks clean. This minor detail makes the upper face appear instantly awake. Professional makeup artists know that eyebrows catch the eye before most other facial features. The angle, start point, and framing all communicate whether someone looks tired, stern, surprised, or relaxed. Low or downward-tilted brows make the face appear sleepy, while gently lifted brows create a rested, alert look, even after a rough night.

    You can see this on any morning commute. A woman in gym attire without foundation can appear ready for the day if her brows are brushed up and inner corners brightened. A man in a suit with puffy eyes can look professional simply by tidying his brows and lifting the arch slightly. Social media trends highlight this too. Before-and-after videos often show only brow adjustments and subtle highlighter usage, yet the after shot looks noticeably awake, alert, and sometimes younger. The 2023 TikTok “eyebrow lift hack” went viral, illustrating how millions sought to look refreshed without heavy makeup. This works because it addresses a fundamental human concern: appearing presentable and professional even when tired.

    Eyebrows act like curtains for the eyes. Low or heavy brows press down on the eyelids, accentuating under-eye shadows and puffiness while reducing space between brow and lash line. Slightly lifting the tail and cleaning the arch area opens up vertical space, making the whites of the eyes appear brighter. Even though nothing physically moves, the illusion of lift changes facial perception instantly. Strategic light placement enhances this effect: brightening the brow bone, inner corner, and top of the arch reflects light naturally, creating a refreshed look in just minutes.

    The Three-Step Brow Lift Makeup Artists Swear By

    The method is simple and effective. Start with fill and lift: lightly fill the top edge of the brow, especially the outer third, using hairlike strokes to subtly raise the tail. Next, clean and brighten: tap a skin-tone concealer or brightening pen under the highest point of the arch and blend onto the lid to remove heaviness. Finally, highlight strategically: add a tiny amount of satin highlighter under the arch and at the inner corner. Tap gently rather than dragging. With practice, this takes about 45 seconds per eye and creates a natural, awake appearance.

    Common mistakes include overfilling the bottom of the brow, which adds unwanted weight and pulls the gaze down, and using concealer that’s too light, which can appear harsh in daylight. The lift should feel subtle, like a whisper, not a neon sign. A concealer close to your natural skin tone with slight brightness, blended carefully, achieves this effect. Simplicity is key: two strokes to lift the tail, a small swipe to clean under the arch, and a dot of light. Done—no extra products or time-consuming steps required.

    One Minimal Brow Shift That Changes Your Day

    Once adopted, this technique gradually transforms your appearance. Checking your reflection in the afternoon, you’ll notice you look less tired than you feel. On warm days, you might skip foundation entirely, relying only on eyebrow makeup and mascara to appear presentable. Beyond aesthetics, this small morning routine provides reassurance. Those ninety seconds in front of the mirror are often the only moments you observe your face intentionally. Adjusting brows or covering minor dark circles isn’t vanity—it’s a subtle way of preparing for the day. It signals that, despite fatigue or a busy schedule, you’re alert and ready. Whether in meetings, on video calls, or waiting in line for coffee, these tiny adjustments keep your eyes looking lively even if your mind is still waking up.

    Step-by-Step Eyebrow Adjustment Guide

    • Subtly lift the brow tail: Fill the top edge lightly and shorten the end slightly for an instant lift.
    • Brighten under the arch: Apply a small amount of concealer under the highest point of the brow and blend to widen the eyes and minimize drooping eyelids.
    • Add light accents: Dab a touch of highlighter under the arch and at the inner corner of the eye for a naturally refreshed look.
  • This New Grey Hair Coverage Trend Is Helping People Look Younger Without Using Hair Dye

    This New Grey Hair Coverage Trend Is Helping People Look Younger Without Using Hair Dye

    Grey hair is no longer something people feel compelled to conceal. In India, beauty trends are moving toward healthier, low-maintenance routines. A growing trend for covering grey hair allows individuals to look younger without relying on traditional hair dyes. Instead of harsh chemicals, this method focuses on gentle colour blending, nourishing treatments, and smart styling techniques that soften the appearance of greys. The result is a natural, refreshed look that suits modern lifestyles, busy schedules, and increasing attention to scalp and hair health.

    A Modern Approach to Grey Hair Covering

    This contemporary grey hair trend emphasizes subtle enhancement rather than complete colour change. Many are turning to tinted conditioners, colour-depositing masks, and herbal blends that gradually tone grey strands. These solutions work with your natural hair colour, creating depth, shine, and a soft colour blend instead of a flat, artificial look. Users appreciate the gradual, visible change and the natural finish it provides. Being gentle on hair, it also promotes healthier strands over time. This approach is perfect for those who want flexibility, minimal upkeep, and an authentic appearance.

    How This Grey Hair Trend Enhances a Youthful Appearance

    Looking younger often depends on the overall freshness and balance of hair. This grey hair trend reduces harsh contrasts between grey and dark strands, which can make the face appear older. By softening tone variations, it frames facial features more gently. Many users notice a brighter, polished look and shinier, fuller hair after regular use, naturally signaling youth and vitality without dramatic changes.

    Replacing Traditional Hair Dye with Smarter Options

    Unlike traditional hair dyes that require frequent touch-ups and expose hair to strong chemicals, this trend provides an easy, scalp-friendly alternative. Products are often incorporated into regular washing or weekly hair care routines. Benefits include a low-maintenance regimen, flexible colour control, and reduced chemical exposure. Users also enjoy the freedom to adjust intensity or pause usage at any time, offering more control without long-term commitment.

    Summary: Mindful Beauty and Natural Confidence

    This grey hair covering trend reflects a broader move toward mindful beauty choices. Instead of fully hiding greys, it enhances natural hair effortlessly and healthily. By combining care and colour, it delivers confidence, healthier-looking strands, and age-positive styling. For many in India, this approach strikes a balance between youthful appearance and authenticity, showing that modern beauty is about smart, subtle choices rather than dramatic transformations.

    Feature Modern Grey Hair Technique Conventional Hair Dye
    Application Method Soft, blended approach for a natural look Complete colour coverage from roots to tips
    Maintenance Low upkeep, easily adjustable over time High maintenance with regular touch-ups required
    Effect on Hair Nourishing and gentle, promotes hair health May dry out hair or weaken strands
    Time & Commitment Flexible, optional short-term commitment Long-term colour commitment needed
  • Collagen Rich Broth Rituals That Gradually Improve Skin Hydration Firmness and Elasticity

    Collagen Rich Broth Rituals That Gradually Improve Skin Hydration Firmness and Elasticity

    Most skincare routines focus on the outside. We rely on creams and serums promising smoother, more radiant skin. But nourishing your skin from within holds a quiet, powerful effect. When you drink something warm, you can feel the care moving through your body rather than just sitting on the surface. Collagen broth comes from an older tradition of cooking. People made stock from bones and soups from scraps, wasting nothing and finding nourishment without calling it wellness.

    In a modern world of screens and complicated routines, this simplicity feels almost revolutionary. Collagen broth is modest yet powerful. It requires only bones, connective tissue, water, a few aromatics, and patience. Over hours of gentle simmering, collagen transforms into gelatin and amino acids, which your body uses to support skin from within. This ritual benefits not only the skin but also joints, digestion, and mood, reminding us that skin is inseparable from the body it belongs to.

    The Structural Foundation of Plump, Hydrated Skin

    Healthy skin depends on what lies beneath the surface. Imagine skin as fabric stretched over a frame. Its smooth appearance relies on a strong underlying structure. Collagen forms this framework in the dermis, giving skin firmness and bounce. As we age, natural collagen production decreases, thinning the skin’s inner cushion and reducing elasticity, leading to fine lines.

    While moisturizers only work on the surface, collagen-rich broth supports skin from the inside. Digesting collagen and gelatin provides amino acids like glycine and proline, which help rebuild collagen, strengthen the moisture barrier, and preserve elasticity. Good digestion also plays a role, as gelatin can soothe the gut lining, allowing the body to focus on repair rather than inflammation. These effects appear gradually—skin feels softer, makeup applies more smoothly, and dehydration lines diminish over weeks and months. This is the difference between superficial moisture and deep, lasting hydration.

    Turning Broth into a Daily Care Ritual

    A daily ritual doesn’t need complexity to matter. Collagen broth can become a simple, nourishing habit. Some enjoy it in the morning, holding a warm mug and breathing in the steam before starting the day. Others prefer it in the afternoon, replacing coffee or a sugary snack with something more wholesome.

    Small details make this ritual special. Using a favorite mug or pausing to notice the warmth spreading through your body can transform the act into a moment of self-care. Over time, your body associates this ritual with comfort and nourishment, supporting overall healing, including your skin.

    How to Make Deeply Nourishing Collagen Broth at Home

    Making your own broth can be a calming, rewarding process. While store-bought versions work, home-simmered broth offers a unique sense of satisfaction. Start with collagen-rich bones—joints, knuckles, chicken feet or necks, or fish frames. Cover with water and add a small amount of acid, like apple cider vinegar or lemon juice, to extract minerals and collagen. Let it simmer gently for several hours. Aromatics like onion, garlic, bay leaf, or peppercorns enhance flavor without overpowering it.

    The broth will turn cloudy and golden, often setting into a soft gel when cooled, indicating proper collagen extraction. Pour into glass jars, refrigerate a portion for easy access, and freeze the rest for later use.

    Simple Flavor Variations to Keep the Ritual Enjoyable

    To make each cup feel inviting, try small flavor tweaks. A squeeze of lemon with sea salt brightens the taste. Fresh ginger adds warmth and depth. Stir in soft herbs just before drinking for freshness. Turmeric mixed with a bit of fat brings richness and color. These adjustments keep the routine enjoyable and adaptable to your mood.

    Integrating Broth into a Skin-Supportive Lifestyle

    Collagen broth works best alongside other habits that support skin health. Proper hydration, healthy fats, sufficient sleep, and a stable internal system all contribute to your skin’s appearance. Warm broth helps hydrate while delivering essential minerals and amino acids that plain water cannot provide. A healthy gut also reduces breakouts and skin issues. Combined with regular rest, moderate exercise, and adequate fluids, broth becomes part of a holistic approach, allowing your body to use nutrients effectively.

    A Gentle Daily Rhythm Featuring Broth

    Broth can fit smoothly into your day. Enjoy a small mug in the morning after water, another in the afternoon when energy dips, or use it as a base for a light evening soup with vegetables and protein. The key is regularity rather than perfection.

    Practical Tips for Choosing, Storing, and Using Broth

    • Simplicity matters—choose homemade or slowly simmered broths with minimal ingredients.
    • Chilled broth that gels indicates high collagen content.
    • One to two cups daily is usually sufficient when consumed consistently.
    • Refrigerate for a few days or freeze in small portions for convenience.
    • Benefits appear gradually over several weeks of regular consumption.
    • Vegetarians and vegans can use mineral-rich vegetable broths and vitamin C-rich foods to support natural collagen production.

    Returning to Care: Skin as a Reflection of Nourishment

    When broth becomes a daily practice, it gains true significance. Skincare evolves from a surface routine to a reflection of internal care. Every pot simmered and every warm cup consumed is a small act of self-commitment. Skin may look more hydrated and glowing over time, but the deeper value lies in treating your body with patience and care. Collagen-rich broth is not about fighting aging—it is about moving through life feeling gentle, strong, and nourished.

  • Speedy Yoga for Your Daily Schedule: Quick Poses That Energise Your Entire Day

    Speedy Yoga for Your Daily Schedule: Quick Poses That Energise Your Entire Day

    Quick Yoga Routines for Busy People Finding time to exercise can be tough when you have a packed schedule. Yoga often seems like it needs a big time commitment. But you can actually get real benefits from yoga even if you only practice for a few minutes each day. The key is knowing which poses work best when you’re short on time. You don’t need an hour-long session to feel the positive effects. A focused ten-minute routine can improve your flexibility & reduce stress just as well as longer practices. Start your day with three simple stretches right after you wake up. Cat-cow pose loosens your spine. Downward dog energizes your whole body.

    The Power of Speedy Yoga for Busy Lifestyles

    # Quick Yoga for Busy Lives Speedy yoga works well for people who need better flexibility and strength but have packed schedules. This approach lets you gain yoga’s advantages without spending hours on the mat. You can reduce stress & boost your energy through brief yoga sessions that fit into your daily routine. These short practices help improve your posture & mental focus while working around your existing commitments. The beauty of quick yoga is that it delivers real results without demanding major time investments. You can practice for just a few minutes between meetings or during breaks at home. Each session targets specific areas so you make the most of limited time. This style of yoga adapts to your lifestyle instead of forcing you to rearrange everything. You might do some stretches in the morning & breathing exercises at lunch. The flexibility of timing means you can maintain consistency even on your busiest days. Quick yoga sessions add up over time to create meaningful improvements in how you feel and move. Your body becomes more limber and your mind stays clearer throughout the day. The practice becomes sustainable because it never feels like a burden on your schedule.

    Mountain Pose (Tadasana): Build Instant Stability and Focus

    Mountain Pose This foundational pose is a great way to center yourself and start your practice. Stand tall with your feet together and keep your arms by your sides while focusing on your breath. Engage your core and lift your chest as you press down through your feet. Hold this position for one minute to improve your posture and alignment.

    Downward-Facing Dog (Adho Mukha Svanasana): Reboot Energy from Head to Toe

    This is a full-body stretch that targets the hamstrings, calves, and back. Start in a tabletop position and lift your hips toward the ceiling, forming an inverted “V” shape. Keep your hands and feet shoulder-width apart and press firmly into the ground. Hold for 30 seconds to 1 minute.

    Cat–Cow Flow (Marjaryasana–Bitilasana): Wake Up the Spine Fast

    This flowing exercise stretches your spine and makes it more flexible. Start on your hands and knees with your hands placed under your shoulders & knees under your hips. Breathe in while you arch your back and lift your head and tailbone up toward the ceiling for Cow Pose. Breathe out while you round your back & tuck your chin & tailbone down for Cat Pose. Do this movement for 1 minute.

    Warrior I (Virabhadrasana I): Ignite Strength and Confidence Quickly

    A great pose for building strength, Warrior I targets your legs, arms, and core. From standing, step one foot back and bend your front knee at a 90-degree angle. Extend your arms above your head, keeping your chest open. Hold for 30 seconds on each side.

    Simple Ways to Add Speedy Yoga to Your Daily Schedule

    Child’s Pose This gentle resting position works well for relaxing after a long day. Start by kneeling on the floor and sitting back so your bottom rests on your heels. Reach your arms out in front of you and lower your head until your forehead touches the ground. This position gently stretches your back muscles and creates a calming effect on your thoughts. Stay in this pose for one minute. The simplicity of this pose makes it accessible for most people regardless of their flexibility level. Your body naturally folds forward in a way that feels protective and soothing. As you breathe slowly in this position your spine lengthens & tension releases from your shoulders and neck. You can modify this pose based on your comfort needs. If your forehead doesn’t reach the floor easily you can place a folded blanket or cushion underneath for support. Some people prefer to keep their knees together while others find it more comfortable to separate them slightly wider than hip distance. Focus on taking slow deep breaths while holding the position. Each exhale allows your body to sink a little deeper into the stretch. This pose naturally encourages your nervous system to shift into a more relaxed state. Many people find it helpful to close their eyes and turn their attention inward during this time. Regular practice of this resting pose can improve your overall flexibility and reduce stress levels. It serves as an excellent transition between more active poses or as a standalone relaxation technique before bedtime.

    Smart Tips to Maximise Results from Short Yoga Sessions

    Even with a busy schedule you can still make time for yoga during your day. Here are some simple ways to add a quick yoga session to your routine: Morning Stretch Begin your day with a five-minute yoga session to energize your body & mind. A few sun salutations or a gentle flow will help you feel more awake and ready for whatever comes next. Lunchtime Yoga Use your lunch break to do five to ten minutes of yoga poses. Some seated stretches or basic standing poses can help reduce the tension that builds up from sitting for long periods. Evening Wind-Down Spend a few minutes before bedtime doing relaxing yoga poses such as Child’s Pose or Forward Fold. These poses will help your body relax & get you ready for better sleep. Desk Yoga When you work at a desk all day try doing short yoga breaks every hour. Simple seated stretches or standing poses can release tightness in your back and shoulders and neck.

  • Heal Dry Cracked Heels Faster at Home Using Powerful Kitchen Ingredients That Deliver Visible Results

    Heal Dry Cracked Heels Faster at Home Using Powerful Kitchen Ingredients That Deliver Visible Results

    The first signs of cracked heels are often subtle. Thin, white lines appear across your heel, resembling a dried riverbed. At first, they’re easy to ignore, perhaps caused by walking barefoot at home or wearing new sandals frequently. But over time, these cracks deepen, and you may notice a sting or slight pull when stepping on the floor. Sometimes they even catch on your socks, signaling that your heels need attention.

    Quick Healing for Dry, Cracked Heels

    Eventually, the thought arises: it’s time to do something about these dry, cracked heels. Often, we only notice them once they become uncomfortable. Every step reminds us that our feet have been neglected, despite carrying us through long, busy days. The good news? Relief doesn’t require expensive treatments or complicated routines. Many effective remedies are already in your kitchen, waiting in familiar jars and bottles. With simple ingredients like oil, honey, milk, and salt, you can soften and repair neglected skin. These natural treatments allow cracks to heal gently over time.

    Why Your Heels Crack

    Your heels do more work than you realize. They take the impact of every step and endure hours of standing or running. Yet, because they’re mostly covered, they often go unnoticed. Rough patches during a shower might be dismissed and forgotten. Dry, cracked heels usually indicate excessive pressure, friction, and insufficient moisture. Walking barefoot on hard surfaces or wearing thin-soled or open-back shoes can worsen the problem. Additionally, long hot showers, cold weather, and indoor heating dry out the skin further.

    The heel’s skin is naturally thick to protect your feet, but when it dries out, it loses flexibility. Instead of bending with your steps, it cracks, sometimes painfully. The encouraging news is that your skin constantly works to repair itself. Providing it with moisture, softening treatments, and protection accelerates healing.

    Your Kitchen: A Natural Healing Space

    Many common kitchen ingredients double as effective remedies for cracked heels. Olive oil and coconut oil deeply hydrate and soften hardened skin. Honey locks in moisture and soothes irritated areas. Milk and yogurt naturally loosen flaky skin, while sugar or salt mixed with oil exfoliates dead skin cells. Using familiar ingredients is comforting because you know them and don’t need complicated labels or special products. Understanding their benefits ensures maximum effectiveness:

    • Olive Oil / Coconut Oil: Deeply hydrates and softens hardened skin; best for night-time massage or DIY scrubs.
    • Honey: Locks in moisture, calms irritation, and encourages repair; use as a healing mask with milk or oil.
    • Milk / Yogurt: Gently exfoliates with natural lactic acid; ideal for foot soaks or softening packs.
    • Sugar / Salt: Exfoliates rough layers and smooths texture; mix into scrubs after soaking feet.
    • Banana / Avocado: Nourishes skin with vitamins and healthy fats; apply as a thick hydrating mask.

    A Gentle Evening Routine for Cracked Heels

    Think of this as a quiet evening pause. Take just fifteen minutes to care for your feet, creating a calming ritual at the end of your day.

    Step 1: Warm Milk and Salt Foot Soak

    Fill a basin with comfortably warm water. Add half a cup of milk, one to two spoons of salt, and a small amount of olive oil. Soak your feet for 10–15 minutes. The warmth relaxes your skin, milk softens dry areas, and the oil restores moisture.

    Step 2: Gentle Scrub to Smooth Skin

    Create a thick paste by mixing sugar or fine salt with olive or coconut oil. Massage gently onto your heels using circular motions, focusing on rough spots. Avoid harsh scrubbing; delicate skin needs a gentle touch. Rinse with warm water afterward.

    Step 3: Honey and Yogurt Healing Mask

    Combine one tablespoon of honey with one tablespoon of thick yogurt and a few drops of oil. Apply generously to cracked areas and leave for 10–15 minutes. This mask deeply hydrates and soothes your skin. Rinse gently and pat dry with a towel.

    Overnight Oil Treatment for Deep Healing

    Before bed, massage warm olive or coconut oil into your heels for several minutes. Slip on clean cotton socks to lock in moisture overnight. In the morning, your heels will feel softer, smoother, and less painful.

    Daily Habits to Keep Heels Healthy

    Maintain healthy heels with simple habits: moisturize after showers, avoid overly hot water, rotate shoes, and stay hydrated. Treat dryness early to prevent severe cracks. These small steps protect your heels from future damage.

    When to Seek Professional Help

    If cracks become deep, bleed, or fail to improve with home care, consult a doctor or podiatrist. Some medical conditions may hinder healing, and professional advice ensures proper treatment. For most, cracked heels stem from dry skin. With warmth, oil, patience, and household ingredients, your feet can regain comfort and continue supporting your daily activities.