Category: News

  • Find 3 Differences in the Dog Flying with a Parachute Picture

    Find 3 Differences in the Dog Flying with a Parachute Picture

    Spot the difference puzzles offer more than simple entertainment. They challenge your brain & force your eyes to examine details carefully under time pressure. In this visual challenge you see two pictures of a dog flying through the sky with a parachute. At first glance both images appear nearly identical. The colors match and the pose looks the same and the overall scene feels familiar. But three small differences hide within these pictures and your task is to find all of them within ten seconds. This puzzle works because your brain prefers patterns. When two images look similar your mind assumes they are identical. That assumption allows small changes to escape your notice. The real challenge involves breaking that habit and studying every part of the picture with fresh attention. The parachute and the dog and even the background elements all need close examination.

    Why This Dog Parachute Puzzle Is Harder Than It Looks

    Spot the difference puzzles provide more than just entertainment. They test your brain & make your eyes examine details carefully when time is limited. In this visual challenge you see two pictures of a dog flying through the sky with a parachute. At first glance both images look nearly identical. The colors match and the pose looks the same and the overall scene feels familiar. However three small differences hide within these pictures and your task is to find all of them within ten seconds. This puzzle works because your brain likes patterns. When two images look similar your mind assumes they are identical. That assumption lets small changes escape your notice. The real challenge involves breaking that habit and studying every part of the picture with fresh attention. The parachute and the dog and even the background elements all need close examination.

    How Spot the Difference Challenges Improve the Brain

    Puzzles like this serve a purpose beyond simple fun. They help develop your ability to notice details. When you look for differences your brain gets better at recognizing shapes colors and patterns. Regular practice can boost your focus and strengthen your visual memory & how long you can concentrate. These puzzles work well because they require you to be both fast and precise. You need to move quickly while staying careful. Research on how we process visual information suggests that doing observation puzzles regularly can improve concentration and help prevent mental tiredness. This explains why students and working adults often use these challenges as a quick way to exercise their minds.

    Best Strategy to Spot All 3 Differences in Time

    To boost your success rate you should split the image into different parts. Start by examining the sky because background details tend to be modified most often. Search for objects that have been removed or added like birds or clouds & watch for any shifts in color. After that check the parachute and its connecting lines since minor alterations in design can be tucked away there. Then look over the dog by focusing on its face and body along with any items it might be wearing. Try not to scan the picture in a random way. A steady and organized approach usually gives better results than rushing through it. Even when you feel pressed for time teaching yourself to look with intention will help you spot differences more effectively.

    Common Mistakes People Make While Solving

    One frequent error is concentrating solely on the primary subject. Most viewers fixate on the dog and overlook everything else in the scene. Designers understand this tendency and typically hide differences in unexpected locations. Another error involves thinking that after finding one difference the others will be close by. The truth is that differences are generally distributed throughout the entire image to require complete examination. Finally many people quit prematurely. The fact that you cannot identify all differences right away does not indicate they are absent. Taking a moment to breathe slowly & refocusing your attention can reveal what you initially overlooked.

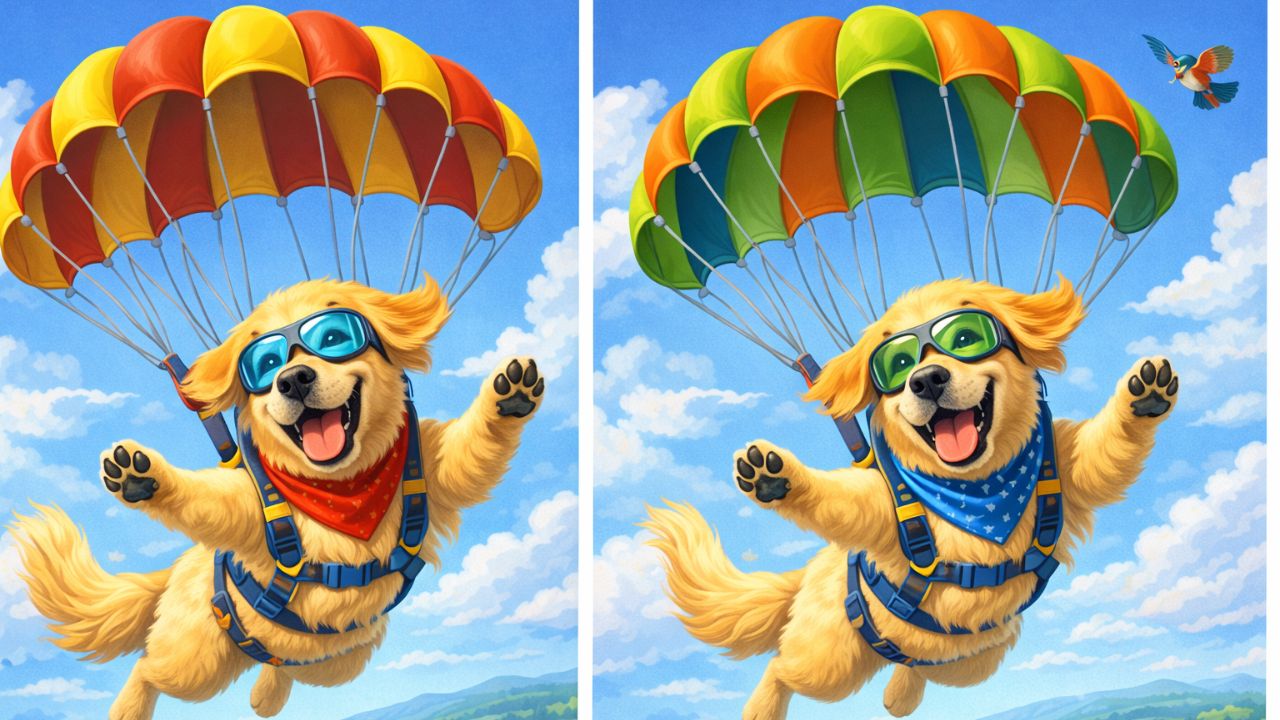
    Spot the Difference Puzzle Solution Explained

    Now let us examine the complete solution to this puzzle. While both images look almost the same there are three distinct differences when you know what to search for. The first difference is located in the sky area. The left image shows more birds flying in the distance. The right image has one bird removed and this makes the sky appear somewhat emptier. The second difference also occurs in the sky near the cloud formations. An additional cloud is present on the left side in the first picture. The right picture does not have this cloud & this creates a subtle shift in how the background looks. The third difference can be spotted on the dog. The eye detail of the dog has been altered in the right image. This might be a modification in its shape or expression or perhaps an added element. Although this change is minor it stands out when you examine the face closely.

    Why These Puzzles Are Perfect for All Ages

    Spot the Difference Challenges Appeal to Everyone Spot the difference challenges work well for people of all ages. Children find them entertaining while adults use them as a mental exercise. Seniors benefit from the focus and concentration these puzzles require. The best part is that anyone can participate without needing special skills or background knowledge. These puzzles only ask for two things from participants: patience and a careful eye. Kids are drawn to the colorful images and playful scenes. Adults value the cognitive benefits that come from scanning details and making comparisons.

  • Salon-Style Eyebrows at Home: A Simple 7-Step Process for Rich Colour and Sharp Definition

    Salon-Style Eyebrows at Home: A Simple 7-Step Process for Rich Colour and Sharp Definition

    Waking up with full and well-shaped brows without reaching for a pencil feels like the perfect beauty shortcut. When eyebrow tinting is done correctly at home, the colour can last anywhere from 3 to 6 weeks. The key is working carefully and with control so your brows look natural and flattering rather than dark or messy. This guide explains how to tint your eyebrows safely and neatly at home, without turning your bathroom into a disaster zone.

    Why At-Home Brow Tinting Is Worth Considering

    Tinting your brows at home is not just about convenience or skipping salon visits. A single tint kit usually lasts for several applications, while a professional appointment covers only one session. Doing it yourself gives you full control over how dark the brows appear, how soft the front looks, and how defined the final shape becomes. The colour stays in the brow hairs for about 3 to 6 weeks, while the skin stain fades within 5 to 7 days, creating a soft and gradual transition. Flexibility is another major advantage. You can adjust the shade or processing time whenever your hair colour changes or your makeup style shifts with the seasons. Managing this small detail yourself often makes your entire face look more refined and put together, even on days when you skip makeup.

    How Long Brow Tint Actually Lasts

    The longevity of brow tint depends on your skin type, daily habits, and the products you use. Brow hairs hold pigment much longer than skin, which is why the colour fades slowly instead of disappearing suddenly.

    Factor What You’ll Usually See
    Dry or normal skin with gentle cleansing Defined colour for 3–6 weeks; skin stain fades in about one week
    Oily skin, frequent swimming, or strong sun exposure Noticeable fading after 2–3 weeks
    Heavy oils, balms, or exfoliants near brows Colour fades faster, especially from the skin

    Treat freshly tinted brows gently. Less heat, minimal rubbing, and avoiding harsh cleansers will help the colour last longer and stay even.

    What You’ll Need Before You Start

    Professional tools are not necessary, but having the right basics ensures even colour and safer results. You will need a brow-specific tint or gel that is ammonia-free, the developer recommended by the brand, a glass or plastic mixing cup, a spatula, an angled or precision brow brush, cotton pads and swabs, thick cream or petroleum jelly, gloves, a clean spoolie, micellar water or gentle toner, and a timer or phone stopwatch.

    Safety matters. Never use regular hair dye on your eyebrows. Some dyes can cause serious eye injuries, and ingredients such as PPD (p-phenylenediamine) may trigger allergic reactions, especially on sensitive facial skin.

    Why Patch Testing Is Non-Negotiable

    Before applying any tint, place a small amount of the mixed product behind your ear or on the inside of your elbow. Leave the area uncovered for 48 to 72 hours. If redness, itching, swelling, or blistering appears, the dye is not safe for you. This simple step protects you from uncomfortable and visible reactions near the eyes.

    Seven Steps to Natural, Salon-Style Brows at Home

    Shape Your Brows a Day in Advance

    Remove only the obvious stray hairs above and below the brows and between them. Avoid thinning the main brow shape. Lightly sketch your desired brow outline with a pencil, then cleanse the area with micellar water to remove oil so the tint applies smoothly and evenly.

    Shield the Surrounding Skin

    Apply a thin layer of thick cream or petroleum jelly along the pencilled outline, keeping it off the brow hairs. This barrier prevents unwanted staining and creates cleaner, sharper edges.

    Mix the Tint Smoothly

    Mix approximately 0.5 to 0.75 inch of tint with the developer according to package instructions, usually in equal parts. Stir until the texture is smooth and creamy. Choose a shade one or two tones darker than your natural brows, avoiding colours that appear overly dark.

    Apply Where Brows Are Fullest

    Begin at the inner brow near the nose, using small strokes in the direction of hair growth. Ensure each hair is coated. Move toward the tail using less product. Pay extra attention to light or grey hairs so the result looks even.

    Process Carefully and Watch the Clock

    Set your timer based on brand instructions, usually between 7 and 15 minutes. At the 3 to 5 minute mark, gently comb through the inner brow with a clean spoolie to soften the front and avoid a harsh blocky look.

    Remove Gently and Condition

    Once processing time is complete, remove the tint carefully using gentle wiping motions. Avoid scrubbing, as this can irritate skin and damage brow hairs.

    Check in Natural Light and Begin Aftercare

    After about one hour, check your brows in natural daylight. Minor asymmetry is normal and can be balanced with makeup. Keep brows dry for 24 hours and avoid oil-based products and exfoliation around the area for several days.

    Common Brow Tinting Mistakes to Avoid

    Skipping the patch test can lead to irritation. Choosing a shade that is too dark often looks harsh and unnatural. Scrubbing during removal irritates the skin and weakens hair follicles. Ignoring aftercare causes faster fading due to heat, sunlight, and strong cleansers.

    A Small Change That Makes a Big Difference

    A well-done brow tint noticeably enhances your appearance. Your eyes look brighter, your face appears fresher, and even without makeup you look polished. With proper preparation, safe products, and good aftercare, at-home brow tinting can deliver weeks of effortless definition and quickly become an essential part of your beauty routine.

  • Observation Skills Tested as You Search for 3 Subtle Differences in This Puzzle

    Observation Skills Tested as You Search for 3 Subtle Differences in This Puzzle

    Spot the Difference puzzles are a fun and effective way to challenge your brain while improving your ability to notice visual details. The idea is simple: two images appear almost identical, but a few small differences are hidden between them. Your task is to find those differences within a limited time. These puzzles test how well you observe details, process visual information quickly, and maintain focus under pressure.

    Today’s Spot the Difference challenge is especially tricky. Only 1% of people with exceptional visual skills can spot all three differences within the given time. Are you ready to test your observation abilities? Let’s find out.

    Spot the Difference Challenge

    The Task: Find All Three Hidden Differences

    In this engaging challenge, you’re shown two nearly identical images featuring adorable puppies. At first glance, both pictures look exactly the same. However, closer observation reveals subtle changes. Your goal is to identify three hidden differences between the images.

    These differences may include small changes in shape, color, or object placement. Because the variations are so minor, they are easy to miss unless you stay fully focused and carefully scan every part of the image.

    Time is a key factor in this challenge. It’s not just about looking quickly, but about observing accurately. As the clock ticks, your attention to detail and visual awareness are put to the test, pushing your mind to stay alert while searching for even the smallest inconsistencies.

    Why Spot the Difference Puzzles Work So Well

    Spot the Difference puzzles are more than just entertaining—they offer meaningful mental benefits. One major advantage is improved attention to detail. Because the differences are often extremely subtle, your brain learns to detect fine visual details more effectively.

    These puzzles also support faster cognitive processing. Comparing two images side by side trains your brain to analyze visual information quickly, helping improve mental agility and clarity. The added time pressure further strengthens focus and concentration, encouraging sustained attention without distractions.

    Another important benefit is enhanced pattern recognition. Over time, your brain becomes better at identifying visual changes and irregularities, a skill that can be useful in real-life situations such as error detection and quick decision-making.

    The Answer: Revealing the Three Differences

    If you managed to find all three differences, great job. If not, don’t worry—this puzzle was intentionally designed to challenge even the most observant individuals. Let’s take a closer look at the three key differences between the puppy images.

    The first difference appears in the clouds near the top of the image. In the right-hand picture, the cloud on the right side has a slightly altered shape compared to the left image. This change is subtle and easy to overlook unless you examine the sky closely.

    The second difference involves the puppy’s tail. In the left image, the tail has a gentle curve, while in the right image, the tail’s shape is slightly different. This variation can be missed if your focus is mainly on the puppy’s face.

    The final difference is found in the flowers. In the right image, one flower has a dark brown center, while the same flower in the left image has a yellow center. The color shift is subtle but becomes clear once spotted.

    How Optical Illusions Improve Mental Agility

    Visual challenges like this Spot the Difference puzzle are excellent brain exercises. Regular practice helps strengthen problem-solving skills by encouraging your mind to approach challenges from multiple angles.

    These puzzles also improve visual processing speed. As your brain becomes accustomed to scanning and comparing images quickly, it handles visual information more efficiently under time pressure.

    In addition, optical illusions help build a stronger attention span and visual memory. Repeatedly identifying patterns, shapes, and colors trains your brain to retain visual details and stay focused for longer periods.

    Final Thoughts: Can You Be Part of the 1%?

    If you successfully spotted all three differences, congratulations—you’ve demonstrated strong observation skills and impressive focus. If not, there’s no reason to feel discouraged. These puzzles are designed to be challenging, and improvement comes with regular practice.

    Spot the Difference challenges offer a simple yet powerful way to sharpen your mind, enhance concentration, and support overall cognitive performance. Whether you’re looking to improve mental agility or enjoy a quick brain workout, puzzles like this make a valuable addition to your daily routine.

  • Yoga Poses Open Tight Hips Improve Mobility and Restore Natural Movement Flow

    Yoga Poses Open Tight Hips Improve Mobility and Restore Natural Movement Flow

    Tight hips are common among people who spend long hours sitting or repeating the same movements daily. When the hips lose mobility, they can lead to poor posture, discomfort, and even lower back pain. Practicing yoga is an effective way to ease stiffness, restore movement, and improve overall hip flexibility. The 14 yoga poses below are designed to gently open the hips and stretch the surrounding muscles for better mobility.

    14 Yoga Poses for Hip Flexibility

    Child’s Pose (Balasana)

    Why it supports hip mobility: This calming pose gently stretches the hips, lower back, and thighs, making it ideal for beginners working on hip flexibility.

    How to perform it: Kneel on the floor with your hands placed in front of you. Slowly sit back toward your heels while extending your arms forward. Lower your forehead to the mat and focus on slow, deep breathing.

    What you gain: Reduced tension in the hips and thighs, relief in the lower back, and a calming effect on the body.

    Pigeon Pose (Eka Pada Rajakapotasana)

    Why it opens the hips: This pose deeply stretches the hip flexors and glutes while releasing built-up tension in the lower back.

    How to perform it: Begin on hands and knees. Slide one knee forward behind the matching wrist and extend the opposite leg straight back. Lower your hips gently and hold for several breaths before switching sides.

    Benefits: A deep hip stretch that targets the glutes, hip flexors, and lower back muscles.

    Lizard Pose (Utthan Pristhasana)

    Why it helps tight hips: This intense stretch focuses on the hip flexors and groin, helping loosen deeply held stiffness.

    How to perform it: Start in a high plank and step one foot outside your hands. Sink your hips downward while keeping the back leg straight. Lower to your forearms for a stronger stretch.

    Benefits: Improved flexibility in the hips, groin, and hamstrings.

    Butterfly Pose (Baddha Konasana)

    Why it improves hip flexibility: This seated stretch opens the inner thighs and groin while easing tension in the hip joints.

    How to perform it: Sit upright and bring the soles of your feet together. Allow your knees to drop outward. Hold your feet and gently press the knees toward the floor. Lean forward slightly for added intensity.

    Benefits: Increased hip mobility and improved flexibility in the inner thighs.

    Reclining Bound Angle Pose (Supta Baddha Konasana)

    Why it works gently: This relaxing pose offers a mild hip stretch while allowing the body to fully unwind.

    How to perform it: Lie on your back and bring the soles of your feet together. Let your knees fall open naturally. Rest your arms by your sides with palms facing up and breathe deeply.

    Benefits: Gentle stretching of the hips and groin with full-body relaxation.

    Happy Baby Pose (Ananda Balasana)

    Why it enhances hip flexibility: This pose opens the hip joints and stretches the inner thighs while easing lower back tension.

    How to perform it: Lie on your back and pull your knees toward your chest. Hold the outer edges of your feet while keeping your knees wide. Gently press the knees downward.

    What you gain: Improved hip mobility and relief from lower back tightness.

    Low Lunge (Anjaneyasana)

    Why it stretches the hips: Low Lunge effectively lengthens the hip flexors while strengthening the legs.

    How to perform it: Step one foot forward and lower the back knee to the floor. Keep the hips facing forward and gently press them ahead. Raise your arms overhead for a deeper stretch.

    What it does: Stretches the hip flexors, quadriceps, and hamstrings while building leg strength.

    Crescent Lunge

    Why it boosts flexibility: This standing lunge increases the stretch in the hip flexors while improving balance and core control.

    How to perform it: Step one foot forward into a lunge, keeping the back leg straight and heel lifted. Raise both arms upward and push the hips slightly forward.

    Benefits: Greater hip mobility and stronger leg muscles.

    Squat Pose (Malasana)

    Why it benefits the hips: This deep squat opens the hips and groin while encouraging natural movement in the joints.

    How to perform it: Stand with feet slightly wider than hip-width and lower into a squat. Keep your heels grounded and chest lifted.

    What you gain: Improved hip flexibility and better joint mobility.

    Seated Forward Bend (Paschimottanasana)

    Why it helps hip tension: While targeting the hamstrings, this pose also releases stiffness in the hips and lower back.

    How to perform it: Sit with legs extended. Inhale to lengthen your spine, then exhale as you fold forward from the hips, reaching toward your feet.

    Benefits: Increased flexibility in the hips, hamstrings, and lower back.

    Lunge With a Twist (Parivrtta Anjaneyasana)

    Why it improves mobility: This pose stretches the hips and groin while adding a spinal twist for better movement.

    How to perform it: Start in Low Lunge. Place the opposite hand to the front foot on the floor and twist your torso toward the bent knee while lifting the other arm upward.

    What you gain: Open hips, stretched groin muscles, and improved spinal flexibility.

    Warrior II (Virabhadrasana II)

    Why it supports hip flexibility: This strong standing pose opens the hips while building strength and balance.

    How to perform it: Stand with feet wide apart and turn one foot outward. Bend the front knee and extend your arms parallel to the floor, gazing forward.

    What you gain: Stronger legs, better balance, and increased hip mobility.

    Frog Pose (Mandukasana)

    Why it deeply opens the hips: This pose provides an intense stretch for the inner thighs and hip joints.

    How to perform it: Come onto hands and knees, then widen the knees while keeping feet turned outward. Slowly lower your hips toward the floor.

    What you gain: Deep hip opening and improved flexibility in the groin.

    Bound Angle Pose

    Why it supports flexibility: This seated pose focuses on stretching the hips, groin, and inner thighs.

    How to perform it: Sit upright, bring the soles of your feet together, and allow your knees to fall open. Hold your feet and gently press the knees downward.

    Benefits: Increased hip flexibility and improved inner thigh mobility.

  • Visual Challenge in 8 Seconds Spot 3 Differences in the Duck Wearing Jacket Image

    Visual Challenge in 8 Seconds Spot 3 Differences in the Duck Wearing Jacket Image

    If you love optical illusions and the thrill of a brain teaser, you’re in for a treat. Today’s Spot the Difference puzzle will challenge your observation skills and quick thinking. The puzzle features a charming duck in sunglasses and a stylish jacket strolling beside a peaceful pond. But there’s a twist: two nearly identical images hide three subtle differences. Can you spot them in just 8 seconds? Only the sharpest eyes will succeed!

    8-Second Visual Challenge

    Why Spot-the-Difference Puzzles Captivate So Instantly

    Spot the Difference games have been popular for decades because they are easy to understand, highly engaging, and effective at sharpening cognitive skills. By focusing on tiny details, these puzzles enhance visual perception and boost mental speed. While they seem simple at first, the difficulty increases when differences are cleverly hidden, forcing your brain to work harder.

    These puzzles appeal to a wide audience. Children enjoy them as a playful activity, while adults use them as a quick brain exercise. Spot the Difference challenges also improve memory, focus, and attention to detail, making them a favorite among puzzle enthusiasts.

    The 8-Second Duck Puzzle That Tests Your Sharpness

    Today’s puzzle shows two images of a cute yellow duck wearing sunglasses and a jacket by a serene pond. At first glance, the images appear identical, but small differences are hidden throughout.

    Your task is to find three differences in just 8 seconds. Time flies, so you need to examine every detail carefully to catch all the changes. These differences are subtle, so close attention is key.

    Smart Techniques to Spot Differences Quickly

    Here are some ways to sharpen your observation and spot changes more effectively:

    • Start With a Fast Overview: Quickly glance at both images to grasp the overall layout before focusing on details.
    • Focus on Individual Elements: Examine specific areas like the duck’s jacket, the pond, or nearby objects to spot small variations.
    • Watch for Color, Size, and Shape Changes: Differences often involve tiny shifts in color, shape, or proportion.
    • Use Balance and Symmetry: Designers often place differences in mirrored or balanced positions; comparing sides helps spot inconsistencies.
    • Train With Short Time Limits: Practicing with tight timers, such as 7 seconds, improves your ability to detect subtle differences under pressure.

    Revealing the Three Hidden Differences in the Jacketed Duck

    Here’s a detailed breakdown of the three hidden differences to look for:

    1. The Disappearing Rock Near the Grass

    In the lower part of the image near the grass, a small rock is visible in the left image but missing in the right image. This change blends naturally into the background, so look carefully near the duck’s feet to spot it.

    2. The Missing Hoodie Drawstring

    The duck’s hoodie in the left image has a visible drawstring, but in the right image, the drawstring is gone. Since the hoodie looks almost identical otherwise, focus closely on the neckline to catch this subtle change.

    3. The Vanishing Frog by the Pond

    Near the pond, a small frog sits at the water’s edge in the left image but is absent in the right image. This detail is easy to miss but is crucial for spotting all three differences. Examine the pond area carefully to notice it.

    How Spot-the-Difference Puzzles Enhance Your Observation

    These puzzles do more than entertain—they train your brain. Searching for small differences teaches you to notice details often overlooked in daily life, improving your concentration. Regular practice strengthens focus, which can help in work, study, and everyday tasks.

    Playing these games also speeds up your brain’s visual processing and enhances short-term memory, since you need to remember details from one image while comparing them to another. This skill of analyzing and recalling information quickly is useful in many situations.

    Pro Tips to Master Spot-the-Difference Challenges

    • Practice Regularly: Frequent practice trains your eyes and brain to detect even the smallest differences.
    • Use a Timer: Recreate the 8-second challenge to improve speed while maintaining focus.
    • Pay Attention to Fine Details: Look closely at patterns, textures, outlines, and tiny objects that might be overlooked initially.
    • Move on to Advanced Puzzles: Once comfortable with simpler images, tackle more complex scenes to further enhance visual sharpness and observation skills.
  • Mental Clarity Yoga: 5 Poses That Sharpen Focus and Clear the Mind

    Mental Clarity Yoga: 5 Poses That Sharpen Focus and Clear the Mind

    Mental clarity plays a vital role in focus, productivity, emotional balance, and overall well-being. In today’s fast-paced lifestyle filled with constant notifications, packed schedules, and ongoing stress, clear thinking can feel difficult to maintain. Yoga offers a natural way to sharpen the mind by combining gentle movement with controlled breathing. This connection helps increase blood flow to the brain, lowers stress hormones, and supports calm alertness. These poses can be practiced almost anywhere, require minimal space, and need no equipment. Below are five yoga poses rooted in traditional practice and modern wellness trends that help enhance mental clarity quickly.

    Yoga unites breath and movement to relax the nervous system and reduce mental fog. Holding a posture with mindful attention sends signals to the brain to shift into a calmer state, which supports clearer thinking. The following poses are especially effective because they activate the parasympathetic nervous system, regulate oxygen flow, and release physical tension that interferes with mental focus.

    Balasana (Child’s Pose) for Deep Mental Calm

    Child’s Pose is well known for easing stress and tension. It gently lengthens the spine while encouraging deeper breath awareness. As the body relaxes into this posture, the heart rate slows and the brain receives more oxygen-rich blood, allowing stress and anxiety to gradually fade.

    Begin on your knees and lower your hips toward your heels, keeping the knees hip-width apart. Stretch your arms forward along the floor and rest your forehead lightly on the mat. Breathe in slowly through the nose and exhale through the mouth. Stay for one to three minutes, focusing on the steady rhythm of your breath and imagining tension releasing with each exhale.

    This pose also helps release neck and shoulder tension. When these areas are tight, mental focus often feels clouded. By easing that physical strain, Child’s Pose creates a sense of inner calm that supports clearer thinking.

    Uttanasana (Standing Forward Bend) to Refresh the Mind

    Standing Forward Bend is highly effective for improving circulation to the brain. With the head positioned below the heart, fresh blood flow is encouraged, delivering oxygen and nutrients that help sharpen concentration.

    Stand with feet hip-width apart. Inhale as you lift your arms overhead, then exhale and hinge forward from the hips. Allow your arms to hang freely or hold opposite elbows. Keep a gentle bend in the knees if needed. Relax the neck and let gravity guide the stretch. Hold for 30 seconds to one minute, observing each breath and picturing your thoughts settling.

    This forward fold also stretches the hamstrings and calves. Tightness in these muscles can create lower back discomfort that distracts the mind. Releasing them helps the body relax, supporting a more focused mental state.

    Viparita Karani (Legs Up the Wall) for Nervous System Reset

    Legs Up the Wall is valued for its restorative and calming effects. It helps quiet mental noise, reduce fatigue, and soothe the nervous system. Elevating the legs above the heart improves circulation and provides a gentle oxygen boost to the brain.

    Sit close to a wall and swing your legs upward so they rest vertically against it. Keep the lower back relaxed and place your arms by your sides with palms facing up. Close your eyes and breathe slowly, inhaling for four counts and exhaling for six. Remain in the pose for five to fifteen minutes, keeping your attention on the breath.

    This posture is especially beneficial after long periods of mental effort. The inverted position encourages the body to enter a parasympathetic state, helping calm the nervous system and clear mental clutter.

    Balancing Table Pose (Dandayamana Bharmanasana) to Improve Focus

    Balancing Table Pose enhances concentration while strengthening the core and grounding the mind. Holding this posture requires steady attention and controlled breathing, which helps eliminate distractions and build present-moment awareness.

    Begin on all fours with wrists aligned under shoulders and knees under hips. Inhale as you extend your right arm forward and left leg back, keeping hips level and gaze downward. Hold for about thirty seconds with smooth breathing, then switch sides.

    This pose supports core stability and posture, which encourages deeper, more efficient breathing. Improved oxygen intake helps boost mental clarity while the balance element trains the mind to remain focused.

    Sirsasana (Headstand) or Safe Supported Inversion

    Headstand is often referred to as the king of yoga poses. It significantly increases blood flow to the brain and, when practiced safely, stimulates glands involved in mood and focus regulation.

    For beginners, practicing near a wall or using support is recommended. Place your forearms on the mat, interlace your fingers, and rest the crown of your head on a folded blanket. Slowly walk your feet closer and lift one leg at a time until both are raised. Keep the core engaged, breathe steadily, and hold for ten to thirty seconds before lowering with control and resting in Child’s Pose.

    If you have neck issues, high blood pressure, or eye conditions, avoid headstand and choose gentler inversions instead. The benefit comes from improved oxygen-rich blood flow, which supports alertness and reduces mental fatigue.

    How to Practice These Poses Daily for Better Clarity

    Consistency is key when using yoga to support mental clarity. Practicing these poses in the morning or during a mid-day break can help reset focus and emotional balance. Even a short ten-minute sequence can create noticeable results, especially when paired with slow, mindful breathing.

    Begin with Standing Forward Bend to stimulate circulation. Move into Balancing Table Pose to sharpen focus, followed by Child’s Pose to release stress. Practice Legs Up the Wall to calm the nervous system, and finish with Headstand or a supported inversion if appropriate. Afterward, observe how your mind feels and notice any improvement in clarity and mood.

    These poses help retrain the nervous system to respond to stress with calm rather than tension. Over time, this practice strengthens resilience, sharpens focus, and supports better decision-making. Clear thinking is not about eliminating thoughts, but about creating space to think with intention. Yoga supports this process through body awareness and breath control, helping the mind stay present, focused, and calm in everyday life.

  • Relaxation Yoga Guide: 5 Calming Poses That Ease Stress and Tension

    Relaxation Yoga Guide: 5 Calming Poses That Ease Stress and Tension

    In a busy and demanding lifestyle, stress and mental tension are often unavoidable. Finding simple ways to slow down and reset is essential for maintaining both mental and physical balance. Yoga offers a gentle yet effective path to relaxation by calming the mind, easing muscle tightness, and encouraging slow, mindful breathing. The following five calming yoga poses are especially helpful for deep relaxation and stress relief, making them ideal for daily practice or unwinding after a long day.

    Calming Yoga Poses for Relaxation and Stress Relief

    1. Child’s Pose (Balasana)

    Child’s Pose is a restorative posture that supports relaxation and mental calm. Begin in a kneeling position with your big toes together and knees slightly apart. Gently sit back onto your heels, extend your arms forward, and rest your forehead on the mat. Allow your body to soften completely while maintaining slow, steady breathing.

    This pose helps release tension in the back, shoulders, and neck, making it highly effective for stress relief. It also promotes deep belly breathing, which activates the parasympathetic nervous system and encourages a sense of calm. Child’s Pose is ideal for grounding the body and clearing mental distractions.

    2. Legs Up the Wall (Viparita Karani)

    Legs Up the Wall is a gentle restorative pose known for calming the nervous system and improving circulation. Sit close to a wall, lie back, and extend your legs upward against the wall while keeping them straight. Rest your arms comfortably by your sides or on your abdomen. Remain in the pose for 5 to 10 minutes.

    This posture promotes deep relaxation by reversing blood flow and supporting restorative circulation. It helps ease tension in the legs, hips, and lower back while calming the mind and lowering stress levels. Practicing this pose before bedtime can also support better sleep quality.

    3. Seated Forward Fold (Paschimottanasana)

    Seated Forward Fold is a soothing posture that stretches the spine and supports slow, controlled breathing. Sit with your legs extended forward, inhale to lengthen the spine, and exhale as you hinge from the hips, reaching toward your feet or legs. Hold the pose for 30 seconds to 1 minute while breathing deeply.

    This forward fold helps calm the nervous system by releasing tension in the spine, hips, and hamstrings. It encourages mindful breathing, which activates the parasympathetic response and supports relaxation. This pose is especially useful for reducing anxiety and promoting inner calm.

    4. Corpse Pose (Savasana)

    Savasana, also known as Corpse Pose, is the primary relaxation posture in yoga. Lie flat on your back with your legs extended and arms resting comfortably at your sides, palms facing upward. Close your eyes and bring attention to your breath, allowing the body to fully sink into the mat. Stay in this pose for 5 to 10 minutes.

    This pose allows the body and mind to fully relax and recover. It supports mindful breathing and helps release lingering tension. Savasana also activates the parasympathetic nervous system, helping to lower heart rate and blood pressure while encouraging deep relaxation. It is commonly practiced at the end of a yoga session to absorb the benefits of the practice.

    5. Cat-Cow Pose (Marjaryasana–Bitilasana)

    Cat-Cow Pose is a gentle flowing movement that encourages relaxation through spinal mobility and breath awareness. Begin on all fours with wrists under shoulders and knees under hips. Inhale as you drop the belly and lift the chest and tailbone (Cow Pose). Exhale as you round the spine, tucking the chin and tailbone (Cat Pose). Continue for 1 to 2 minutes.

    This sequence helps release tension in the spine, neck, and shoulders while coordinating breath with movement. It supports deep breathing and calms the nervous system, making it effective for stress relief. Cat-Cow also improves spinal flexibility and posture, contributing to overall relaxation.

    Closing Thoughts on Relaxing Yoga Practices

    Yoga is a powerful tool for calming the mind and easing stress. These five poses—Child’s Pose, Legs Up the Wall, Seated Forward Fold, Savasana, and Cat-Cow—are particularly helpful for unwinding and restoring balance. By focusing on steady breathing and allowing the body to relax into each posture, you can release both physical and mental tension. Practicing these poses regularly supports greater relaxation and a calmer daily routine.

  • Quick Yoga for Busy Schedules: 6 Poses You Can Do Anytime

    Quick Yoga for Busy Schedules: 6 Poses You Can Do Anytime

    Quick Yoga Poses for Busy Days: Simple Ways to Relax and Reset

    In today’s fast-moving lifestyle, making time for self-care can feel challenging. Between work responsibilities, family demands, and personal tasks, finding even a few moments to unwind often seems out of reach. Yoga provides a practical and time-efficient solution for busy individuals who want to relax and recharge. With just a handful of easy poses, you can release built-up tension, improve flexibility, and restore energy in minutes. Below are six quick yoga poses designed to help you refresh your body and mind without disrupting your schedule.

    1. Mountain Pose (Tadasana): Building Stability and Inner Calm

    Mountain Pose may look simple, but it is a powerful posture for grounding and awareness. It supports better posture, balance, and mindfulness, making it ideal for starting the day or resetting between tasks. Standing tall and engaging your core activates multiple muscle groups and creates a sense of steadiness.

    To practice Mountain Pose:

    • Stand with your feet hip-width apart and arms resting naturally by your sides.
    • Distribute your weight evenly, gently lift your chest, and lengthen your spine.
    • Engage your thighs and lightly draw in your abdominal muscles.
    • Soften your shoulders, gaze forward, and focus on steady breathing.
    • Hold for 30 seconds, breathing deeply and feeling grounded.

    This pose can be practiced anywhere and offers a quick posture reset with minimal effort.

    2. Cat-Cow Pose (Marjaryasana-Bitilasana): Ease Back and Neck Tension

    Long hours at a desk or on your phone can leave your spine feeling tight. Cat-Cow Pose is a gentle, flowing movement that helps release tension in the back, neck, and shoulders. It also improves spinal mobility and encourages mindful breathing.

    To practice Cat-Cow Pose:

    • Begin on your hands and knees in a tabletop position.
    • Inhale as you arch your back, drop your belly, and lift your head and tailbone.
    • Exhale as you round your spine, tuck your chin, and draw your navel inward.
    • Continue flowing between the poses for 1–2 minutes, matching movement with breath.

    This gentle sequence is especially helpful for those with a sedentary routine.

    3. Seated Forward Fold (Paschimottanasana): Stretch the Lower Body Quickly

    Seated Forward Fold provides a deep stretch for the hamstrings, calves, and lower back. It is particularly beneficial after long periods of sitting and helps calm the mind while easing physical tension.

    To practice Seated Forward Fold:

    • Sit with your legs extended straight in front of you, feet flexed.
    • Inhale to lengthen your spine.
    • Exhale as you hinge forward, reaching toward your feet or shins.
    • Maintain a long spine without rounding your back.
    • Hold for 30 seconds to 1 minute, breathing slowly.

    This pose is simple yet effective, making it easy to include during short breaks.

    4. Child’s Pose (Balasana): Gentle Rest for Deep Relaxation

    Child’s Pose is a soothing posture that stretches the hips, thighs, and back while encouraging relaxation. It offers a quiet moment to pause and reconnect, helping calm the nervous system and reduce stress.

    To practice Child’s Pose:

    • Kneel with your big toes together and knees slightly apart.
    • Sit back onto your heels and extend your arms forward.
    • Lower your forehead to the floor.
    • Breathe deeply and allow your body to soften.
    • Remain in the pose for 1–2 minutes.

    This posture is ideal for recharging both body and mind during a busy day.

    5. Standing Forward Fold (Uttanasana): Refresh and Re-energize

    Standing Forward Fold helps stretch the hamstrings and back while calming the mind. It is especially useful for relieving stiffness and restoring alertness after sitting for extended periods.

    To practice Standing Forward Fold:

    • Stand with feet hip-width apart and knees slightly bent.
    • Inhale to lengthen your spine.
    • Exhale as you hinge forward from the hips, letting your head drop.
    • Hold your ankles or place your hands on the floor if comfortable.
    • Stay for 30 seconds to 1 minute, relaxing your neck and shoulders.

    This pose offers an instant energy lift and helps release built-up tension.

    6. Legs Up the Wall (Viparita Karani): Restore and Relax in Minutes

    Legs Up the Wall is a deeply restorative pose that supports circulation, relaxation, and lower-body relief. It is an excellent way to unwind and reset when time is limited.

    To practice Legs Up the Wall:

    • Sit sideways next to a wall and gently swing your legs upward.
    • Lower your back to the floor with legs resting vertically against the wall.
    • Place your arms comfortably by your sides, palms facing up.
    • Close your eyes and focus on slow, steady breathing.
    • Hold for 1–2 minutes.

    This pose is ideal for calming the mind and restoring energy quickly.

    Quick Yoga Relief for Tight Schedules

    These six time-efficient yoga poses are well-suited for busy individuals seeking fast relief from stress and stiffness. Whether your goal is to improve posture, ease tension, or feel refreshed during a demanding day, these poses deliver meaningful benefits in just a few minutes. By incorporating them into your daily routine, you can enjoy the physical and mental advantages of yoga without dedicating large blocks of time. Even brief moments of mindful movement can help you stay balanced, energized, and relaxed throughout the day.

  • 5-Minute Relaxation Yoga: A Quick Flow to Feel Calm Instantly

    5-Minute Relaxation Yoga: A Quick Flow to Feel Calm Instantly

    In a world that rarely slows down, finding time to truly relax can feel challenging. Ongoing responsibilities from work, family, and daily routines often leave the mind overwhelmed and the body tense. Thankfully, yoga provides a fast and practical way to ease stress, calm the mind, and restore balance. Even with just five minutes, a focused yoga flow can help you reset and feel noticeably calmer. Below is a simple 5-minute yoga sequence designed to reduce stress and support relaxation, even on the busiest days.

    1. Begin with Mindful Breathing (1 Minute)

    Before moving into physical postures, take a moment to connect with your breath. Conscious, deep breathing is one of the quickest ways to lower stress and bring your attention inward. Slowing the breath sends calming signals to the brain, helping the body shift into a relaxed state.

    • Sit comfortably on the floor or in a chair with your spine upright and shoulders relaxed.
    • Close your eyes and inhale deeply through your nose, allowing your lungs to expand fully.
    • Exhale slowly through your mouth, releasing built-up tension.
    • Continue this steady breathing for one minute, focusing on each inhale and exhale while letting distractions fade.

    This mindful breathing practice helps quiet the mind and gently prepares you for the movements ahead.

    2. Gentle Cat-Cow Flow (1 Minute)

    Move into Cat-Cow Pose to introduce gentle motion into the spine. This flowing sequence helps loosen the back, release tension in the neck and shoulders, and promote relaxation through synchronized breath and movement.

    • Come onto your hands and knees in a tabletop position, aligning wrists under shoulders and knees under hips.
    • Inhale as you lower your belly, lift your chest, and tilt your gaze upward into Cow Pose.
    • Exhale as you round your spine, tuck your chin, and draw your navel inward into Cat Pose.
    • Flow smoothly between these positions for one minute, moving with your breath.

    The rhythmic motion of Cat-Cow helps release stored tension in the spine while calming both body and mind.

    3. Relaxing Child’s Pose (1 Minute)

    Child’s Pose offers a deeply restful posture that gently stretches the hips, thighs, and back. It encourages stillness and relaxation by allowing the body to soften while the breath remains slow and steady.

    • From hands and knees, slowly lower your hips back toward your heels.
    • Extend your arms forward or rest them alongside your body, whichever feels more comfortable.
    • Rest your forehead on the mat and close your eyes.
    • Breathe deeply, allowing each breath to help your body sink further into relaxation.

    Holding this pose for one minute helps calm the nervous system and provides a peaceful pause within the flow.

    4. Soothing Seated Forward Fold (1 Minute)

    The Seated Forward Fold is effective for releasing tension in the back, hamstrings, and neck. It also supports mental relaxation by encouraging the body to turn inward and stretch areas that commonly hold stress.

    • Sit with your legs extended straight in front of you, feet gently flexed.
    • Inhale to lengthen your spine, then exhale as you fold forward from the hips.
    • Reach toward your feet or shins while keeping your spine long.
    • Remain in the stretch for one minute, breathing slowly and evenly.

    This posture helps ease physical tightness while quieting the mind, creating a sense of calm and release.

    5. Restorative Legs Up the Wall (1 Minute)

    To close your five-minute flow, settle into Legs Up the Wall. This restorative pose is deeply calming and helps relieve lingering tension in the legs and lower back, making it an ideal way to finish your practice.

    • Sit close to a wall and gently swing your legs upward, resting them vertically against the wall.
    • Support your hips with a cushion or folded blanket if needed.
    • Allow your arms to relax by your sides with palms facing upward.
    • Close your eyes and focus on slow, steady breathing.

    Remain here for one minute, letting your body fully relax as circulation improves and tension melts away.

    A Simple Five-Minute Reset for Mind and Body

    In just five minutes, this gentle yoga flow can help you feel calmer, more centered, and refreshed. Whether you are at home, at work, or short on time, these easy poses offer a quick mental and physical reset. The blend of mindful breathing, gentle movement, and restorative postures allows you to release stress and reconnect with your body.

    When your day feels overwhelming, taking a few minutes for yoga can make a noticeable difference. Practicing this short flow regularly can support relaxation, balance, and overall well-being, proving that even brief moments of self-care can have lasting effects.

  • Better Posture Yoga: 5 Simple Poses to Improve Alignment Naturally

    Better Posture Yoga: 5 Simple Poses to Improve Alignment Naturally

    Maintaining healthy posture plays a vital role in overall physical well-being. With modern lifestyles often involving long hours at desks and extended screen time, postural imbalance has become increasingly common. This can contribute to back discomfort, neck tension, and low energy levels. Yoga provides a gentle yet effective solution. Through consistent practice, yoga helps build strength, enhance flexibility, and increase body awareness, all of which support proper posture. Below are five easy yoga poses that can noticeably improve the way you sit, stand, and move.

    1. Mountain Pose (Tadasana): Building Postural Awareness

    Mountain Pose is a foundational yoga position that develops alignment awareness and encourages correct posture. Although it appears simple, it actively engages the body by teaching you how to stand tall, activate the core, and lengthen the spine, making it an essential starting point for posture improvement.

    To practice Mountain Pose:

    • Stand upright with feet hip-width apart, pressing evenly into the ground.
    • Lift the chest while engaging the thighs without locking the knees.
    • Extend the spine upward by reaching through the crown of the head.
    • Relax the shoulders and rest the arms by your sides, palms facing forward.
    • Hold for 30 seconds to 1 minute, maintaining steady alignment.

    2. Cat-Cow Pose (Marjaryasana-Bitilasana): Enhancing Spinal Mobility

    Cat-Cow is a flowing movement that gently stretches the spine while releasing tension in the neck, shoulders, and back. Alternating between spinal extension and flexion helps improve spinal flexibility and supports healthy posture.

    To practice Cat-Cow Pose:

    • Begin on hands and knees with wrists under shoulders and knees under hips.
    • Inhale, dropping the belly while lifting the chest and tailbone upward.
    • Exhale, rounding the spine and drawing the chin toward the chest.
    • Continue for 5–10 slow rounds, syncing movement with breath.

    This gentle flow increases spinal mobility, which is essential for maintaining an upright and balanced posture.

    3. Cobra Pose (Bhujangasana): Supporting the Upper Spine

    Cobra Pose strengthens the muscles along the spine while opening the chest and shoulders. It is especially helpful for counteracting slouching by activating the muscles that support the upper back.

    To practice Cobra Pose:

    • Lie face down with legs extended and the tops of the feet resting on the floor.
    • Place hands under the shoulders, elbows close to the body.
    • Inhale and gently lift the chest by pressing into the palms.
    • Keep the elbows slightly bent and engage the back muscles.
    • Hold for 15–30 seconds, then slowly release.

    This pose helps strengthen the back while stretching the chest, promoting a more open and upright posture.

    4. Child’s Pose (Balasana): Gentle Spine Release

    Child’s Pose offers a deeply relaxing stretch that soothes the back and lengthens the spine. It is ideal for relieving accumulated tension and encouraging spinal alignment, especially after prolonged sitting.

    To practice Child’s Pose:

    • Kneel on the floor with big toes together and knees slightly apart.
    • Lower the hips toward the heels and extend the arms forward.
    • Rest the forehead on the mat and relax the neck and shoulders.
    • Breathe deeply and hold for 1–3 minutes.

    This restorative pose helps reset the spine and provides gentle relief from postural strain.

    5. Bridge Pose (Setu Bandhasana): Strengthening the Lower Body

    Bridge Pose targets the lower back, glutes, and core, all of which are essential for proper posture. It also opens the chest and hips, supporting better spinal alignment.

    To practice Bridge Pose:

    • Lie on your back with knees bent and feet flat, hip-width apart.
    • Place arms alongside the body with palms pressing into the floor.
    • Press through the feet and lift the hips upward.
    • Engage the core and glutes while keeping knees aligned.
    • Hold for 30 seconds to 1 minute, then lower slowly.
    • Repeat 3–5 times.

    This pose activates key muscles that help maintain an upright posture and reduce the tendency to slouch.

    Conclusion: Small Daily Steps, Lasting Posture Benefits

    Adding these five simple yoga poses to your daily routine can create noticeable improvements in posture over time. Regular practice helps strengthen the spine, increase flexibility, and sharpen body awareness. Starting with just a few minutes each day and staying consistent can lead to long-term benefits.

    By making yoga part of your routine, you support not only better posture but also greater mindfulness and physical balance. Whether you are new to yoga or already experienced, these gentle movements can positively transform how you feel and carry yourself every day.