Category: News

  • Yoga for Flexibility at Any Age: Five Essential Poses for Mobility and Agility

    Yoga for Flexibility at Any Age: Five Essential Poses for Mobility and Agility

    In our busy modern lives we need to stay flexible & agile to remain healthy and active. Yoga provides a complete method for improving both of these qualities and works well for people at any stage of life. You might want to move more easily or feel less stiff or simply increase how far your body can stretch. Yoga gives you straightforward but effective poses that help everyone. This article presents five important yoga poses that will boost your flexibility and agility regardless of how old you are. These poses work because they gently stretch your muscles & joints while building strength at the same time. Regular practice helps your body become more responsive and coordinated. You don’t need special equipment or a gym membership to get started. All you need is a quiet space and a few minutes each day to practice these movements. The beauty of yoga is that you can adapt each pose to match your current ability level. Beginners can start with modified versions while more experienced practitioners can deepen the stretches. The key is consistency rather than perfection. Even short daily sessions will produce noticeable improvements in how your body moves and feels over time.

    Downward Dog (Adho Mukha Svanasana)

    Downward Dog is one of the most popular yoga poses for flexibility. It stretches your hamstrings, calves, and back while also strengthening your arms, shoulders, and core. This pose helps improve the range of motion in your hips, knees, and shoulders, all of which are key areas for maintaining agility and flexibility.

    How to do it:
    – Start on your hands and knees, with your wrists aligned under your shoulders and your knees under your hips.
    – Press into your palms and lift your hips towards the ceiling, forming an inverted “V” shape with your body.
    – Keep your feet hip-width apart, and press your heels toward the floor while keeping your legs straight.
    – Hold the pose for 30 seconds to a minute, focusing on your breath and deepening the stretch with each exhale.

    Cat-Cow Stretch (Marjaryasana-Bitilasana)

    The Cat-Cow Stretch is a dynamic movement that promotes spinal flexibility and improves posture. This pose helps lubricate the spine and enhances the mobility of your back. It also stretches the chest, shoulders, and neck while strengthening the core.

    How to do it:
    – Start on your hands and knees, with your wrists under your shoulders and knees under your hips.
    – Inhale as you arch your back (Cow Pose), dropping your belly toward the floor and lifting your head and tailbone toward the sky.
    – Exhale as you round your spine (Cat Pose), drawing your belly button toward your spine and tucking your chin toward your chest.
    – Repeat this movement for 10-15 rounds, breathing deeply with each movement.

    Seated Forward Fold (Paschimottanasana)

    The Seated Forward Fold is a great pose for improving flexibility in the hamstrings, lower back, and hips. It helps release tension in the spine and promotes deep relaxation. This pose is especially beneficial for those who spend a lot of time sitting, as it stretches areas that become tight from prolonged sitting.

    How to do it:
    – Sit on the floor with your legs extended straight in front of you.
    – Inhale and lengthen your spine, reaching your arms overhead.
    – As you exhale, hinge forward at your hips, keeping your back straight and reaching for your feet, ankles, or shins.
    – Hold the stretch for 30 seconds to a minute, breathing deeply and relaxing into the pose with each exhale.

     Lunge Pose (Anjaneyasana)

    The Lunge Pose targets the hip flexors, quads, and hamstrings, helping to increase flexibility and strength in the legs. It also improves balance and stability, which are essential for maintaining agility as we age.

    How to do it:
    – Start in a standing position, then step one foot back and lower your back knee to the floor.
    – Ensure your front knee is aligned over your ankle and your hips are squared.
    – Inhale and lift your chest, reaching your arms overhead to stretch the upper body.
    – Hold the stretch for 30 seconds, then switch sides.

     Child’s Pose (Balasana)

    Child’s Pose is a restorative posture that gently stretches the lower back, hips, and thighs. It promotes relaxation and is ideal for relieving stress and tension. This pose can be particularly helpful for anyone looking to improve flexibility without straining the body.

    How to do it:
    – Start by kneeling on the floor with your big toes touching and knees spread apart.
    – Sit back onto your heels and extend your arms forward, lowering your chest toward the floor.
    – Rest your forehead on the mat and breathe deeply, allowing your body to relax into the pose.
    – Stay in Child’s Pose for 1-2 minutes, focusing on releasing tension in your back and shoulders.

  • 6 Yoga Exercises at Home to Build Full Body Strength Without Equipment

    6 Yoga Exercises at Home to Build Full Body Strength Without Equipment

    Building full-body strength doesn’t always require heavy equipment or a gym membership. Yoga provides a simple yet highly effective way to strengthen the entire body using only your own body weight. When practiced regularly at home, yoga improves muscle tone, balance, posture, and endurance while staying gentle on the joints. These six yoga poses engage multiple muscle groups at the same time, making them ideal for developing complete body strength in a safe and sustainable way.

    Plank Pose for Core and Upper Body Strength

    Plank Pose is one of the most powerful yoga poses for total-body conditioning. Begin on your hands and toes, keeping your body in a straight line from head to heels. Engage your core, tighten your thighs, and keep your shoulders stable. This pose activates the abdominal muscles, arms, shoulders, back, and legs simultaneously. Practicing Plank Pose regularly improves posture, balance, and deep core strength, which supports everyday movement and stability.

    Warrior Pose for Lower Body Power

    Warrior Pose builds strength in the legs, hips, and glutes while also engaging the arms and core. Step one foot forward, bend the front knee, and keep the back leg strong and extended. Raise your arms overhead or stretch them outward, keeping your chest open and spine tall. This pose strengthens major muscle groups and improves stamina. Regular practice develops functional strength that supports walking, lifting, and daily activities.

    Downward Facing Dog for Strength and Stability

    Downward Facing Dog combines strength with gentle stretching. From hands and knees, lift your hips upward to form an inverted V shape. Press firmly through your palms and engage your arms, shoulders, thighs, and core. This pose strengthens the upper body, legs, and core while improving circulation and joint stability. Consistent practice builds endurance and supports overall body balance.

    Chair Pose for Leg and Core Strength

    Chair Pose is highly effective for strengthening the thighs, glutes, and core muscles. Stand with your feet together, bend your knees as if sitting back into a chair, and lift your arms overhead. Keep your chest upright and weight balanced in your heels. This pose improves lower-body strength, balance, and core engagement without placing stress on the joints.

    Bridge Pose for Glutes and Lower Back Support

    Bridge Pose strengthens the glutes, lower back, and core muscles. Lie on your back with knees bent and feet flat on the floor. Press into your feet and lift your hips upward while squeezing the glutes. This pose supports spinal alignment, improves circulation, and strengthens muscles that protect the lower back. It is especially beneficial for counteracting weakness caused by prolonged sitting.

    Cobra Pose for Spine and Upper Back Strength

    Cobra Pose focuses on strengthening the spine, shoulders, and upper back. Lie on your stomach with your palms under your shoulders and gently lift your chest off the floor. Keep your hips grounded and elbows slightly bent. This pose improves posture, increases back strength, and opens the chest, helping to reduce slouching and upper-body tension.

    Why Yoga Is Effective for Full-Body Strength

    Yoga builds strength through controlled movements and sustained holds rather than heavy resistance. Instead of isolating individual muscles, it trains the body to work as one connected system. This approach supports functional strength, joint health, and long-term consistency. Practicing yoga at home allows greater focus on alignment and form, making strength building both safe and effective.

    How to Practice Safely at Home

    Begin with a gentle warm-up and maintain steady breathing throughout each pose. Hold postures only as long as proper form can be maintained. Rest when needed and avoid forcing movements. Practicing on an empty or light stomach can improve comfort and focus.

    Full-body strength develops through regular, mindful practice. These six yoga poses offer a balanced and effective routine that can easily be done at home. With consistency, yoga helps create a strong, stable body while also enhancing flexibility, awareness, and mental focus.

  • 8 Yoga Poses That Support Mental Well Being and Emotional Balance

    8 Yoga Poses That Support Mental Well Being and Emotional Balance

    Yoga works as more than just physical exercise because it serves as an effective method for strengthening mental health. When you concentrate on breathing patterns along with body movements and present-moment awareness yoga decreases stress levels while lifting your mood and creating feelings of calmness and mental clarity. Anyone wanting to improve their psychological wellness can benefit from these eight yoga poses that reduce anxious feelings while sharpening concentration and building inner peace.

    1. Child’s Pose (Balasana) — Deep Relaxation for Emotional Release

    Why it helps your mental health: Child’s Pose is a gentle and soothing position that gives you a chance to be still and unwind. It reduces stress & helps clear your thoughts while creating a feeling of calm from within. How to practice it: Begin on your hands and knees & then sit your hips back toward your heels while reaching your arms out in front of you on the mat. Place your forehead on the ground and let your whole body soften as you breathe slowly. Benefits: Reduces stress and physical tension while soothing the nervous system and encouraging deep relaxation.

    2. Downward-Facing Dog (Adho Mukha Svanasana) — Stress Reset Through Gentle Inversion

    Why it helps your mental health: Downward-Facing Dog reduces stress by stretching your entire body and calming your mind at the same time. This pose works your whole body & helps blood flow better while lifting your mood & releasing physical tension. How to perform it: Begin on your hands and knees and then raise your hips up toward the ceiling to create an upside-down V shape with your body. Push your palms firmly into the mat and straighten your legs as far as you comfortably can while maintaining a straight back. Benefits: Reduces stress & physical tension & enhances blood circulation and increases your energy levels & improves your mood.

    3. Warrior II (Virabhadrasana II) — Building Inner Strength and Emotional Confidence

    Why it helps your mind: Warrior II builds your inner strength and helps you stay focused and steady. This pose teaches you to find your center and keep your balance. It works well for building mental toughness and boosting your confidence. How to practice it: Stand with your feet far apart and point one foot to the side. Bend your front knee until it makes a right angle. Stretch both arms out to your sides while keeping your shoulders loose and looking straight ahead. What it does for you: This pose makes you stronger & sharpens your focus. It clears your mind and builds confidence. It also gives you a feeling of personal power.

    4. Tree Pose (Vrksasana) — Finding Mental Stability and Focused Calm

    Why it helps your mental health: Tree Pose strengthens your balance & sharpens your focus while promoting a mindful state. Standing upright with intention creates a connection between your body and breathing that settles your thoughts and eases anxious feelings. How to practice it: Begin by standing with both feet placed together. Gradually raise one foot & position it against the inner thigh or calf of your standing leg while making sure to avoid placing it directly on the knee. Press your palms together at chest level or raise your arms above your head. Select a fixed point ahead of you to help maintain your balance. Benefits: Enhances mental focus & concentration; decreases stress and anxious thoughts; builds a sense of stability and being grounded.

    5. Seated Forward Bend (Paschimottanasana) — Quieting the Mind and Soothing Emotions

    Why it helps your mental health: Seated Forward Bend loosens up your hamstrings and back muscles while helping you feel more relaxed. This position activates your parasympathetic nervous system which naturally calms your thoughts and lowers stress levels. How to practice it: Sit down and stretch your legs out straight ahead of you. Breathe in while making your spine longer and then breathe out as you bend forward from your hips toward your feet. Make sure your back stays straight instead of curving into a rounded position. What you gain: Your nervous system becomes calmer and tension leaves your back and hamstrings while you develop better mindfulness & feel more relaxed.

    6. Cobra Pose (Bhujangasana) — Releasing Emotional Tension Stored in the Body

    Why it’s great for mental well-being: Cobra Pose is a gentle backbend that opens your chest & heart area. It helps improve your mood by activating energy centers throughout your body and creating feelings of openness & self-confidence. How to do it: Start by lying face down on the floor with your legs stretched out behind you. Place your palms flat on the ground directly under your shoulders. Take a breath in and slowly lift your chest upward using your back muscles instead of pushing with your hands. Keep a slight bend in your elbows and look straight ahead. Benefits: This pose opens your chest & heart region while promoting feelings of openness and confidence. It also helps improve mental clarity and focus.

    7. Savasana (Corpse Pose) — Complete Mental Reset and Emotional Grounding

    Why it helps your mental health: Savasana is the most relaxing yoga pose you can do. It gives your body and mind time to absorb all the good effects from your practice while easing stress and creating deep calm. This pose is key for quieting your thoughts and lowering anxiety levels. How to practice it: Lay flat on your back & stretch your legs out straight. Rest your arms at your sides with your palms turned upward. Close your eyes and pay attention to your breathing while releasing any thoughts or tightness in your body. Hold this position for 5 to 10 minutes. What it does for you: It lowers stress & anxiety levels. It creates deep relaxation throughout your body. It brings back your energy and creates balance in your system.

    8. Legs Up the Wall (Viparita Karani) — Nervous System Recovery for Inner Peace

    Why it helps your mind: Legs Up the Wall is a gentle pose that helps you relax and feel less stressed. It calms your body’s nervous system and helps you breathe more deeply while easing tightness in your legs & lower back. How to practice it: Sit sideways next to a wall and then lie back slowly while lifting your legs up against it. Let your arms rest comfortably at your sides and pay attention to your breathing. Hold this position for 5 to 10 minutes. What you gain: Less stress and worry; a calmer nervous system; better blood flow throughout your body.

  • 5 Easy Yoga Poses for At Home Practice to Stay Active Every Day

    5 Easy Yoga Poses for At Home Practice to Stay Active Every Day

    Practicing yoga at home is an easy and effective way to stay flexible, calm your mind, and build strength without needing a studio. Whether you are just starting out or already experienced, some yoga poses work especially well in a small space and require little to no equipment. These five poses are ideal for an at-home routine, offering a full-body stretch while helping you relax and refocus.

    1. Downward-Facing Dog (Adho Mukha Svanasana)

    Why It Works at Home:
    Downward-Facing Dog is a classic yoga pose that stretches and strengthens the entire body. It targets the arms, shoulders, legs, and spine while improving posture and flexibility.

    How to Practice:

    – Begin on your hands and knees with wrists under shoulders and knees under hips.

    – Press firmly into your palms and lift your hips upward, straightening your legs as much as comfortable.

    – Keep your feet hip-width apart and let your heels move toward the floor.

    – Hold for 5–10 deep breaths, staying long through the spine.

    Benefits:
    – Stretches the spine, calves, and hamstrings
    – Builds upper-body and core strength
    – Eases tension in the shoulders and back

    2. Child’s Pose (Balasana)

    Why It Works at Home:
    Child’s Pose is a gentle, restorative posture that helps you slow down and reconnect with your breath. It is perfect for rest between poses or for winding down your practice.

    How to Practice:

    – Kneel on the floor with big toes touching and knees slightly apart.

    – Sit back on your heels and reach your arms forward as you lower your forehead to the floor.

    – Allow your chest to relax and your hips to sink down.

    – Breathe slowly for 5–10 breaths.

    Benefits:
    – Releases tension in the back, hips, and neck
    – Encourages relaxation and calm breathing
    – Gently stretches the spine and shoulders

    3. Warrior II (Virabhadrasana II)

    Why It Works at Home:
    Warrior II is a strong standing pose that builds endurance and focus. It strengthens the lower body while opening the chest and hips.

    How to Practice:

    – Stand with your feet wide apart.

    – Turn your right foot outward and keep your left foot slightly forward.

    – Bend your right knee so it stacks over your ankle.

    – Extend your arms out to the sides and gaze over your front hand.

    – Hold for 5–10 breaths, then switch sides.

    Benefits:
    – Strengthens legs, arms, and core
    – Improves balance and concentration
    – Opens hips and chest

    4. Cat–Cow Pose (Marjaryasana–Bitilasana)

    Why It Works at Home:
    Cat–Cow is a flowing movement that warms up the spine and relieves stiffness. It is especially helpful if you sit for long hours during the day.

    How to Practice:

    – Start on all fours with a neutral spine.

    – Inhale, lift your chest, and gently arch your back (Cow Pose).

    – Exhale, round your spine, and tuck your chin toward your chest (Cat Pose).

    – Move slowly with your breath for 5–10 rounds.

    Benefits:
    – Improves spinal mobility
    – Stretches the back, neck, and abdomen
    – Reduces lower-back tension

    5. Bridge Pose (Setu Bandhasana)

    Why It Works at Home:
    Bridge Pose activates the lower body and core while opening the chest and hips. It is a great counterpose to long periods of sitting.

    How to Practice:
    – Lie on your back with knees bent and feet flat on the floor, hip-width apart.

    – Press your feet into the ground and lift your hips upward.

    – Keep your arms alongside your body with palms facing down.

    – Hold for 5–10 breaths, then gently lower back down.

    Benefits:

    – Strengthens glutes, legs, and lower back
    – Stretches the chest, neck, and spine
    – Supports better posture and reduces back discomfort

  • All-Day Energy Yoga: 7 Poses That Help You Feel Light and Energised

    All-Day Energy Yoga: 7 Poses That Help You Feel Light and Energised

    Feeling heavy, sluggish, or mentally dull during the day is more common than most people admit. Long screen time, irregular meals, poor posture, and stress slowly drain the body’s natural energy. Yoga offers a gentle yet powerful way to reset your system and bring back that light, refreshed feeling without relying on caffeine or sugar. The right poses stimulate circulation, improve breathing, and awaken sleepy muscles while calming the mind. Below are seven yoga poses that help you feel energized, clear, and balanced throughout the day when practiced consistently.

    Mountain Pose (Tadasana)

    Mountain Pose looks simple, but it sets the foundation for alert posture and steady energy. Standing tall aligns the spine, improves breathing capacity, and trains the body to stay active rather than collapsed. When you root your feet into the ground and lift through the crown of your head, the nervous system receives a signal of readiness and stability. This pose is especially helpful in the morning or after long periods of sitting, as it encourages better circulation and awareness of the body.

    Upward Salute (Urdhva Hastasana)

    Upward Salute instantly brings a feeling of openness and lightness. By stretching the arms overhead and lifting the chest, the lungs expand and oxygen intake improves. This pose helps release stiffness in the shoulders and upper back, areas where stress often accumulates. It also creates a gentle lift in energy, making it ideal for breaking afternoon fatigue. Practicing this pose with slow, deep breathing can quickly shift you out of a dull mental state.

    Cat Cow Pose (Marjaryasana Bitilasana)

    Cat Cow is one of the best poses for waking up the spine and nervous system. The rhythmic movement between rounding and arching the back massages the spinal nerves and improves blood flow. This gentle flow also connects breath with movement, helping clear mental fog. Cat Cow is especially useful if you wake up feeling stiff or mentally heavy. Just a few rounds can restore flexibility and create a sense of lightness in both body and mind.

    Warrior II (Virabhadrasana II)

    Warrior II builds strength without exhaustion, which makes it perfect for sustainable energy. Holding this pose activates the legs, hips, and core while keeping the chest open and breathing steady. It cultivates focus, confidence, and inner power. Unlike high intensity workouts that can leave you drained, Warrior II strengthens endurance and mental clarity. It is a grounding yet energizing pose that helps you feel stable and strong throughout the day.

    Triangle Pose (Trikonasana)

    Triangle Pose combines stretching and balance, which helps the body feel open and awake. The side body stretch improves digestion and stimulates abdominal organs, contributing to better energy levels. This pose also encourages spinal length and chest expansion, which supports deeper breathing. Practicing Triangle Pose can leave you feeling lighter, especially if sluggish digestion or stiffness has been weighing you down.

    Seated Twist (Ardha Matsyendrasana)

    Seated twists are excellent for refreshing the body from the inside out. They stimulate the digestive system, improve spinal mobility, and help release tension stored in the back. Twists also support detoxification by gently massaging internal organs. When digestion improves, energy naturally rises. This pose is especially helpful during mid day slumps when the body feels heavy or bloated.

    Standing Forward Fold (Uttanasana)

    Standing Forward Fold calms the mind while gently energizing the body. The mild inversion increases blood flow toward the head, helping improve focus and clarity. At the same time, it releases tension in the back, neck, and hamstrings. Unlike intense inversions, Uttanasana is accessible and grounding. It leaves you feeling refreshed without overstimulation, making it a great pose to practice anytime you need a quick reset.

    How to Practice These Poses for Best Results

    To feel energized all day, consistency matters more than duration. Practicing these poses for 15 to 20 minutes in the morning can set a positive tone for the day. You can also repeat a few poses during work breaks to prevent stiffness and mental fatigue. Focus on slow, steady breathing rather than rushing through movements. When breath and posture work together, energy flows more freely.

  • Reboot Your Energy: Seven Yoga Poses That Restore Vitality and Reduce Daily Fatigue

    Reboot Your Energy: Seven Yoga Poses That Restore Vitality and Reduce Daily Fatigue

    7 Rejuvenating Yoga Poses to Reboot Your Energy Modern life often leaves us feeling tired & stressed. Work demands and daily tasks can drain our energy reserves. Yoga offers a natural way to restore both physical and mental vitality. These seven poses can help you feel refreshed and energized

    Why Should You Incorporate Yoga into Your Routine?

    Yoga goes beyond simple stretching or working out. It represents a complete practice that links your mind with your body and spirit. When you practice yoga regularly it boosts blood flow throughout your system and helps you relax while lowering stress levels and making your body more flexible. The combination of focused breathing techniques & extended stretches works to activate your body’s energy points. This process clears out blocked energy and brings new vitality into your daily life.

    Downward-Facing Dog (Adho Mukha Svanasana)

    This classic yoga pose is known for its ability to stretch and strengthen the entire body. It targets your arms, shoulders, spine, hamstrings, and calves, all while encouraging blood flow to your brain. By turning your body upside down, you increase circulation and awaken the parasympathetic nervous system, helping to restore your energy.

    How to Do It:
    – Start on all fours, with your hands shoulder-width apart and your knees hip-width apart.
    – Tuck your toes and lift your hips toward the ceiling, forming an inverted V shape.
    – Keep your hands and feet pressed firmly into the floor, with your head between your arms and your ears aligned with your upper arms.
    – Hold for 30 seconds to 1 minute, breathing deeply.

    Cobra Pose (Bhujangasana)

    Cobra pose is a powerful backbend that opens the chest, stretches the spine, and promotes energy flow throughout the body. It encourages deeper breathing and activates your solar plexus chakra, which governs energy, vitality, and personal power.

    How to Do It:
    – Lie on your stomach with your legs extended behind you and your hands placed under your shoulders.
    – Press your palms into the floor as you lift your chest and upper body, keeping your elbows slightly bent.
    – Ensure your shoulders are relaxed and your elbows point down.
    – Hold for 20-30 seconds and repeat 2-3 times.

    Warrior II (Virabhadrasana II)

    Warrior II is an empowering pose that strengthens the legs, opens the hips, and encourages a sense of stability and confidence. This pose helps build stamina and vitality by opening the body and encouraging grounded energy.

    How to Do It:
    – Begin in a standing position with your legs wide apart.
    – Turn your right foot out 90 degrees and bend your right knee, ensuring it is directly over your ankle.
    – Extend your arms out to the sides, palms facing down.
    – Look over your right hand and hold for 30 seconds, then repeat on the left side.

    Child’s Pose (Balasana)

    While it may seem like a resting pose, Child’s Pose is incredibly restorative. It gently stretches the back, hips, and thighs while calming the nervous system. This pose helps to release tension and stress, allowing your body to replenish its energy reserves.

    How to Do It:
    – Start by kneeling on the floor, with your big toes touching and knees spread apart.
    – Sit back onto your heels, then fold forward, bringing your forehead to the floor.
    – Stretch your arms forward or rest them by your sides.
    – Breathe deeply and hold for 1-2 minutes.

    Seated Forward Fold (Paschimottanasana)

    Seated Forward Fold is a calming and rejuvenating pose that stretches the spine, hamstrings, and calves. It helps release stress while soothing the nervous system, making it perfect for restoring energy when you feel mentally drained.

    How to Do It:
    – Sit on the floor with your legs extended straight in front of you.
    – Inhale and lengthen your spine, then exhale as you fold forward, reaching your hands to your feet or shins.
    – Keep your spine long and avoid rounding your back.
    – Hold for 30 seconds to 1 minute, breathing deeply.

    Bridge Pose (Setu Bandhasana)

    Bridge Pose is a great way to open up the chest and activate the glutes, legs, and back. It’s also a fantastic heart-opener, which helps to boost circulation and invigorate the body, providing an instant burst of energy.

    How to Do It:
    – Lie on your back with your knees bent and feet flat on the floor, hip-width apart.
    – Press your feet into the floor and lift your hips towards the ceiling, squeezing your glutes.
    – Keep your arms by your sides, with your palms facing down.
    – Hold for 30 seconds and repeat 2-3 times.

    Mountain Pose (Tadasana)

    Mountain Pose may look simple, but it is a powerful posture for grounding and centering your energy. It helps align the body, improves posture, and encourages deep breathing, which can increase your energy levels and focus.

    How to Do It:
    – Stand with your feet together and arms by your sides.
    – Distribute your weight evenly across both feet and engage your thighs.
    – Lift your chest, roll your shoulders back, and reach the crown of your head toward the sky.
    – Hold for 30 seconds, focusing on your breath.

    Conclusion

    These seven yoga poses are simple yet effective ways to recharge your body and mind. By practicing these postures regularly, you can restore vitality, boost energy levels, and improve your overall well-being. Whether you’re looking for a way to combat fatigue, reduce stress, or improve circulation, yoga offers an accessible and natural solution to reinvigorate yourself.

  • 11 Gentle Yoga Stretches for Beginners to Boost Flexibility Safely and Comfortably

    11 Gentle Yoga Stretches for Beginners to Boost Flexibility Safely and Comfortably

    Starting yoga without being naturally flexible can seem scary at first. You might think you won’t do the poses right or that you’ll struggle to keep up with everyone else in class. But here’s the truth: yoga was made for regular people with regular bodies. You don’t need to be flexible before you start yoga. Flexibility comes from practicing yoga regularly. When you begin with easy stretches designed for beginners you allow your body to adjust at its own pace without forcing anything. If you stick with it you’ll notice real changes in how your body moves and feels during normal daily activities. The most important thing to remember is that yoga focuses on getting better over time rather than being perfect right away. Each stretch you do and each breath you take helps improve your movement and makes you feel better overall.

    Why Gentle Yoga Is the Safest Starting Point for New Flexibility Gains

    Beginning with a gentle approach is a wise decision when you start any flexibility program. Basic yoga stretches help you concentrate on correct positioning and understanding your body. This approach lowers your chance of getting hurt and creates a solid base for improvement down the road. Easy poses help you build a stronger connection between your mind and body. When the movements are simple you can better observe how your body reacts and recognize your boundaries & when you should back off. This understanding creates confidence and that confidence encourages you to keep practicing regularly. Studies on exercise patterns show that people who begin with reasonable routines have much better success staying with their program. Starting with difficult workouts too soon typically results in muscle pain or exhaustion or injuries. A steady progression leads to better long-term commitment and superior outcomes. When you learn fundamental stretches first you get your muscles and joints and nervous system ready for harder yoga poses in the future. This makes your practice safer & easier to maintain over time and more pleasant overall.

    11 Beginner-Safe Yoga Stretches That Gradually Unlock Full-Body Flexibility

    Beginner Yoga Stretches for Tight Muscles This collection of beginner yoga stretches helps loosen up areas that commonly feel tight. You’ll work on your neck and back along with your hips & hamstrings. The key is to move slowly and breathe steadily while staying comfortable. Don’t worry about how deep you can stretch.

    Slow Neck Circles to Release Daily Tension

    Neck Circles What it works:This exercise targets your neck muscles and the upper part of your shoulders.

    How to perform it: Move your head in gentle circular motions while breathing steadily throughout the movement.

    Why it helps:This stretch releases tightness that builds up from looking at screens and sitting at a desk all day. It also helps your neck move more freely.

    Tips for beginners:Make sure you move slowly and stay in control of the motion. Never push your neck beyond what feels comfortable.

    Seated Spinal Twist for a Looser, Healthier Back

    Seated Spinal Twist What it works:This exercise targets your spine along with your waist and the oblique muscles on the sides of your torso.

    How to perform it: Start by sitting in a comfortable position with your back straight. Slowly turn your upper body toward one side while keeping your hips facing forward. Hold this position briefly and then rotate back to center before repeating the movement on the opposite side.

    Why it helps: Regular practice of this twist promotes better spinal mobility & helps reduce stiffness in your back. It gently stretches the muscles surrounding your spine and can provide relief from tension that builds up from sitting for long periods.

    Advice for beginners: Place your hands on your knees or armrests to provide gentle support during the movement. Only rotate as far as your body allows without forcing the stretch or experiencing discomfort. Your range of motion will naturally increase over time with consistent practice.

    Cat–Cow Flow to Wake Up the Spine Gently

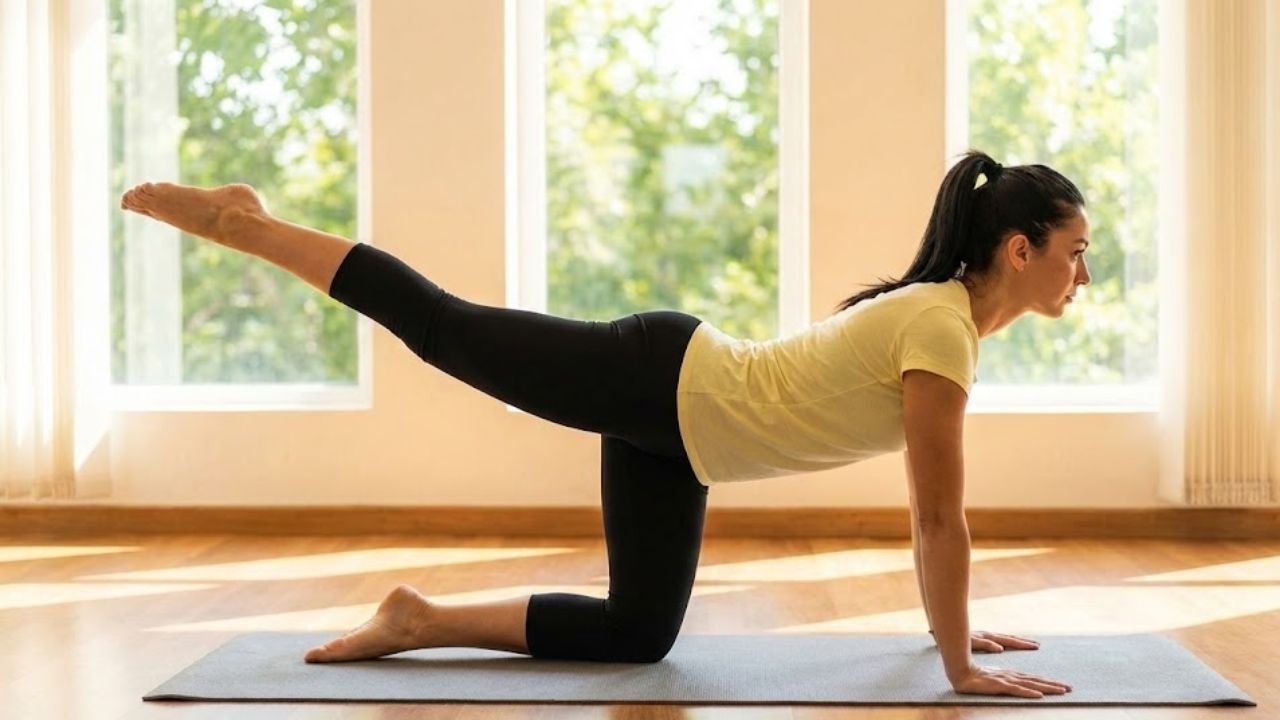
    Cat-Cow Stretch What It Works: This exercise targets your spine while engaging your core muscles and shoulders.

    How to Perform It: Start by positioning yourself on your hands and knees on the floor. From this base position you will move between two shapes. First round your back upward like a cat that feels threatened. Then reverse the movement by arching your back and letting your belly drop toward the floor. Continue switching between these two positions in a steady rhythm.

    Why It Helps: The cat-cow stretch makes your spine more flexible and mobile. It also helps your body relax and release tension that builds up during the day.

    Advice for Beginners: Focus on coordinating your breathing with each movement. Inhale during one position and exhale during the other. Make sure you transition slowly between the two shapes rather than jerking or moving too quickly. This controlled approach helps you get better results and prevents strain.

    Child’s Pose for Deep Relaxation and Hip Ease

    Child’s Pose  What it works: This pose targets your lower back along with your hips and shoulders.

    How to perform it: Start by sitting back so your bottom rests on your heels. Then stretch your arms out in front of you or place them alongside your body.

    Why it helps: Child’s Pose provides deep relaxation while giving your spine a gentle stretch.

    Tip for beginners: Place cushions or a folded blanket under you if you need extra support.

    Thread the Needle Stretch to Open Shoulders Safely

    Thread the Needle Stretch Targets: Upper back shoulders, neck

    How to do it: Start on your hands and knees in a tabletop position. Take one arm and slide it underneath your chest toward the opposite side. Allow your shoulder and the side of your head to gently rest on the floor. Your other hand can stay planted on the ground for support or you can extend it forward. Hold this position while breathing deeply and then switch to the other side.

    Benefits: This stretch effectively releases built-up tension in your shoulders and upper back area. It helps improve mobility in your thoracic spine and can reduce stiffness from sitting or poor posture throughout the day.

    Beginner tip: If you feel uncomfortable or your shoulder doesn’t reach the floor easily, place a folded pillow or yoga block under your shoulder for extra support. This modification allows you to ease into the stretch without straining.

    Seated Butterfly Pose for Flexible Hips and Inner Thighs

    Targets: This stretch works your glutes & hips

    How to do it: Start by lying flat on your back on a comfortable surface. Bend both knees & keep your feet flat on the ground. Take your right ankle and place it on top of your left knee. Your right knee should point out to the side while your left foot stays planted. You can gently pull your left thigh toward your chest to deepen the stretch. Hold this position for about 30 seconds and then switch sides.

    Benefits: This stretch helps reduce tightness in your hips and relieves discomfort in your lower back. It’s especially useful if you sit for long periods during the day or feel stiffness after workouts.

    Beginner tip: Make sure to keep your raised foot flexed throughout the stretch. This means pulling your toes back toward your shin. Keeping your foot flexed protects your knee joint from unnecessary strain and helps you get the most out of the stretch without risking injury.

    Reclined Figure-Four Stretch for Gentle Hip Mobility

    Targets: This stretch works your glutes and hips

    How to do it: Start by lying flat on your back on a comfortable surface. Bend both knees and keep your feet flat on the ground. Take your right ankle and place it on top of your left knee. Your right knee should point out to the side while your left foot stays planted. You can gently pull your left thigh toward your chest to deepen the stretch. Hold this position for about 30 seconds and then switch sides.

    Benefits: This stretch helps reduce tightness in your hips and relieves discomfort in your lower back. It works well if you sit for long periods during the day or feel stiffness after workouts.

    Beginner tip: Make sure to keep your raised foot flexed throughout the stretch. This means pulling your toes back toward your shin. Keeping your foot flexed protects your knee joint from unnecessary strain and helps you get the most out of the stretch without risking injury.

    Knees-to-Chest Pose to Relax the Lower Back

    argets: Hips, inner thighs, lower back

    How to do it: Grip the backs of your thighs or your ankles and slowly open your hips outward.

    Benefits: This position helps release tightness in your hips and takes pressure off your spine.

    Beginner tip: If you cannot reach your feet easily hold behind your knees instead.

    Happy Baby Pose for Stress-Free Hip Opening
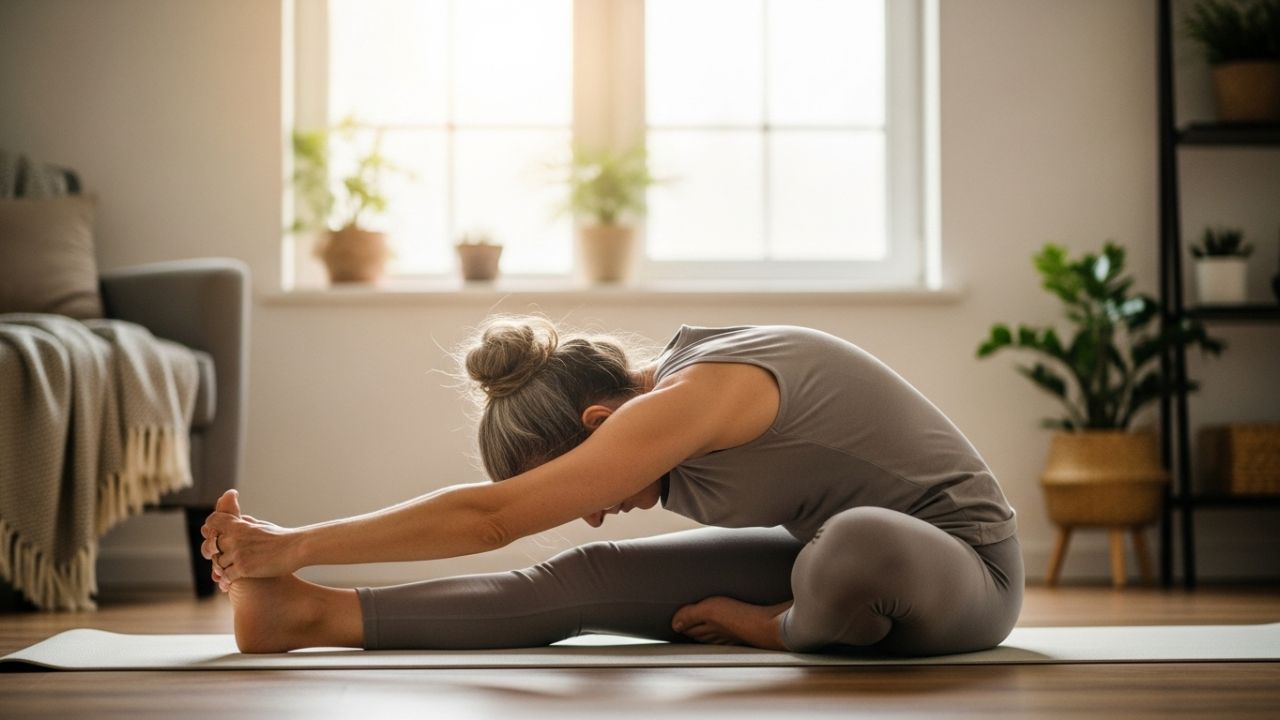
    Seated Forward Bend

    Targets: This pose works your hamstrings calves and spine.

    How to do it: Start by sitting up straight with good posture. Keep your back long as you fold forward from your hips. Let your upper body move toward your legs while maintaining length through your spine.

    Benefits: This stretch helps make your hamstrings more flexible over time. It also has a calming effect on your nervous system and can help you feel more relaxed.

    Beginner tip: If you’re new to this pose, it’s okay to keep a bend in your knees. Your main focus should be on keeping your spine long rather than trying to fold deeply. This approach protects your back and helps you build flexibility safely.

    Seated Forward Fold to Lengthen the Spine Calmly

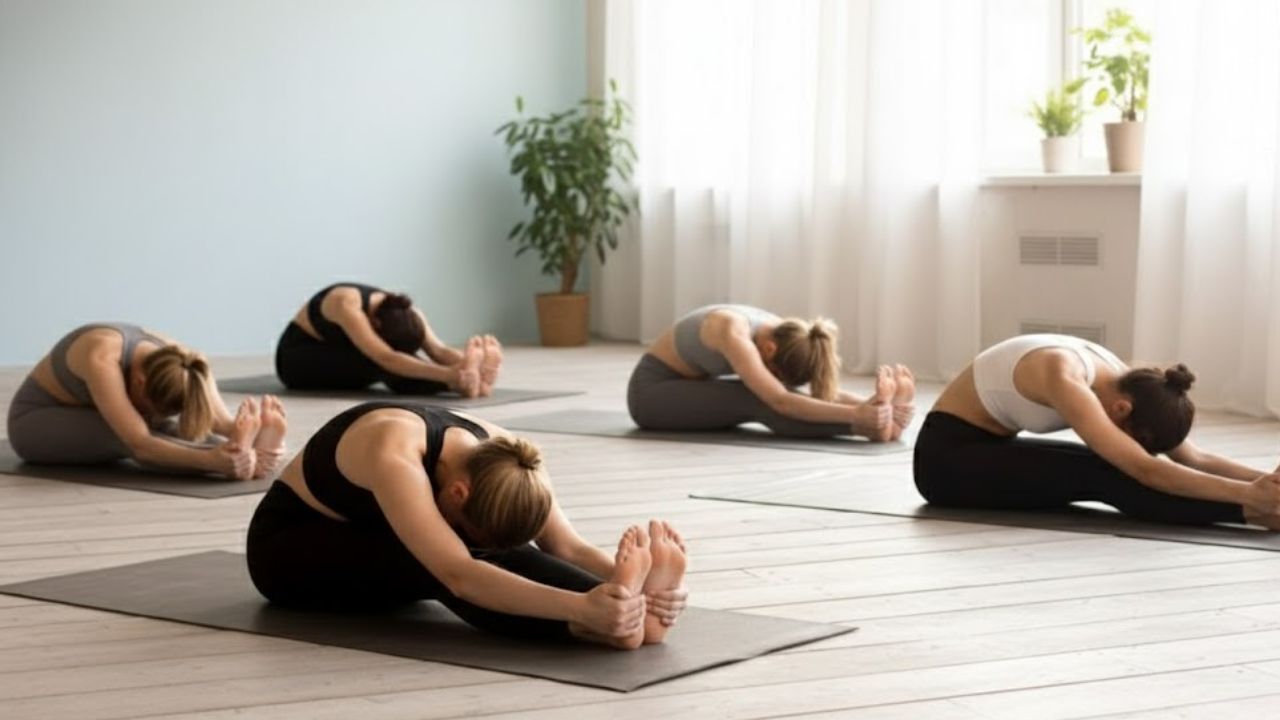
    Standing Forward Bend Targets: Hamstrings back, shoulders

    How to do it: Bend forward from your hips while keeping your knees slightly bent. Let your arms hang down naturally without any tension. Your head and neck should be completely relaxed as you fold over.

    Benefits: This pose stretches the entire back side of your body from your heels up to your neck. It helps release physical tension and calms your nervous system. Many people find it reduces mental stress and anxiety.

    Beginner tip: Allow your body to hang heavy and let gravity pull you deeper into the stretch. Avoid bouncing or forcing yourself down. Stay still & breathe steadily instead.

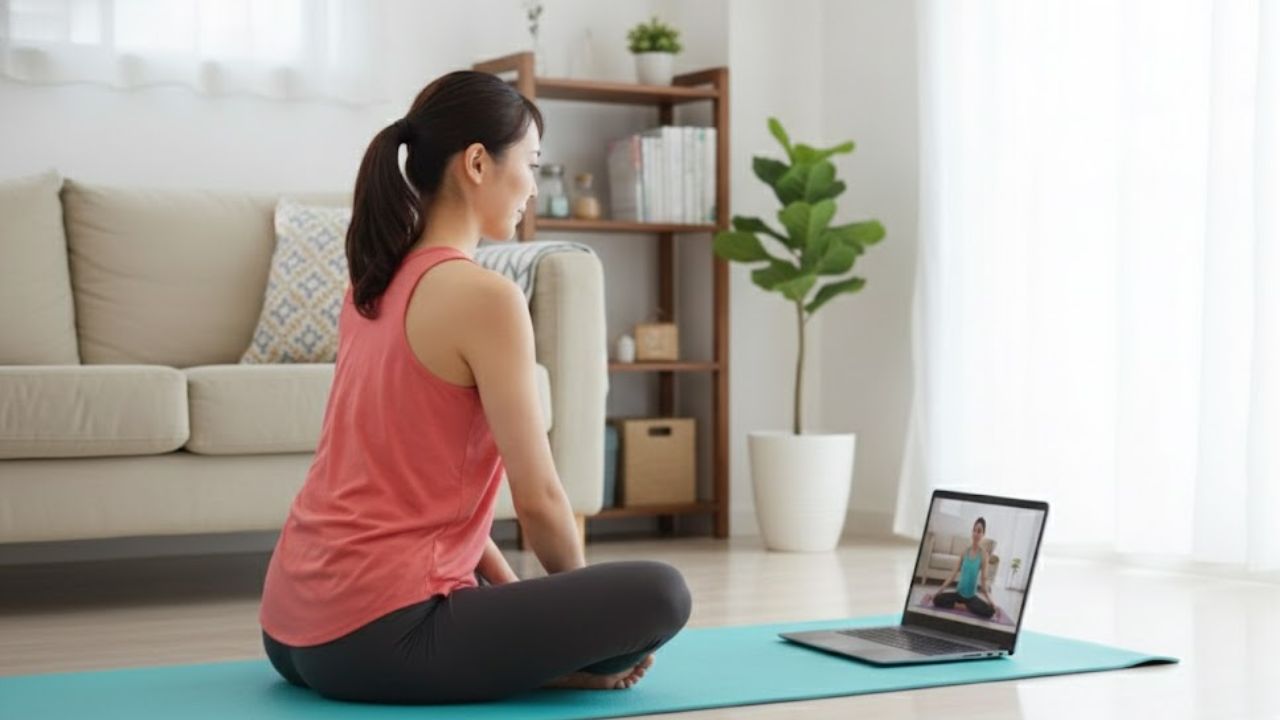
    Clear Signs Your Body Is Ready for Deeper Yoga Poses

    After about six to eight weeks of regular practice you might see signs that your body is ready for something different. You can hold simple poses without much difficulty. Areas that used to feel tight now move more easily. You practice regularly every week. You pay more attention to how you breathe & position your body. You feel interested rather than nervous about learning new poses. When you reach this point you can try longer practice sessions or beginner flow classes. You can also experiment with small changes to poses you already know. This approach works better than moving directly to advanced yoga.

    Creating Lasting Flexibility—One Comfortable Stretch at a Time

    Flexibility takes time to develop and there is no way to rush the process. Being consistent and patient with your body will give you better results than trying to force quick progress. These basic yoga stretches help build a solid foundation for better movement and reduced tension over the long term. Continue practicing regularly and remember that each small step contributes to your overall progress.

  • 11 Powerful Yoga Poses for Toning: Full-Body Shape, Strength and Muscle Engagement

    11 Powerful Yoga Poses for Toning: Full-Body Shape, Strength and Muscle Engagement

    11 Effective Yoga Poses for Building Strength and Toning Muscles Yoga is not just about relaxation or meditation. It is also a powerful workout that tones muscles & builds strength while improving flexibility. When you hold poses with proper alignment your body activates multiple muscle groups and uses body-weight resistance effectively.

    1. Downward-Facing Dog (Adho Mukha Svanasana) – Full Body Toning Pose

    Downward Dog is a basic but powerful pose that activates your arms, shoulders core and legs all at once. Start from a tabletop position and press your palms firmly into the ground. Lift your hips upward to create an inverted V shape with your body. Hold this position for 30 seconds to 1 minute. Benefits: This pose builds upper body strength and tones your legs and core while improving your posture. Tips: Press your heels toward the floor and keep your spine long. Avoid arching your back during the pose.

    2. Plank Pose (Phalakasana) – Core Strength Builder

    The plank pose works your entire core while also activating your shoulders arms & legs. Get into a push-up position and keep your body in a straight line while tightening your core muscles. Hold this position for 20 to 30 seconds. Benefits: This exercise tones your abdominal muscles and strengthens your arms and shoulders while improving your overall stability. Tips: Keep your hips level without raising them too high or letting them drop down. Maintain your neck in a neutral position throughout the exercise.

    3. Warrior I (Virabhadrasana I) – Legs aur Core Strength Pose

    Warrior I is a powerful standing pose that builds lower body strength. Place your feet wide apart and bend your front knee while extending your arms upward. Hold this position for 30 seconds to 1 minute. Benefits: This pose strengthens your thighs hips and core muscles while improving your balance. Tips: Keep your front knee aligned over your ankle and maintain an open chest throughout the pose.

    4. Warrior II (Virabhadrasana II) – Lower Body Sculpting Pose

    Warrior II involves extending your arms out to the sides while opening up your hips. Keep your front knee bent and your back leg straight as you direct your gaze toward your front hand. Benefits: This pose tones your thighs and glutes along with your shoulders while building endurance. Tips: Keep your shoulders relaxed and make sure your chest stays lifted and open.

    5. Boat Pose (Navasana) – Core Toning Pose

    Boat pose tests both your balance and core strength. Start from a seated position and lift your legs and torso to create a V shape with your body. Benefits: This pose tones your lower abs hip flexors & thighs. Tips: Keep your spine straight throughout the movement. If you find it challenging you can bend your knees slightly to make it easier.

    6. Chair Pose (Utkatasana) – Lower Body Strength Pose

    Chair pose is a yoga squat that fires up your legs and glutes. Bend your knees and push your hips back while raising your arms overhead. Benefits: This pose strengthens your quads glutes & core muscles. Tips: Keep your weight in your heels and make sure your knees don’t extend past your toes.

    7. Bridge Pose (Setu Bandhasana) – Glutes aur Back Strength

    Lie on your back and lift your hips to form the foundation of bridge pose. Press your feet into the floor & raise your hips toward the ceiling. Benefits: This exercise tones the glutes and lower back and core while improving posture. Tips: Keep your knees from falling outward and maintain an engaged core throughout the movement.

    8. Cobra Pose (Bhujangasana) – Upper Body Strength Pose

    Cobra Pose Cobra pose is a gentle backbend that strengthens the spine and shoulders. Lift your chest upward while keeping your elbows close to your body.

    Benefits This pose improves spine flexibility and tones your arms and shoulders.

     Tips Avoid compressing your lower back too much & keep your core muscles engaged throughout the pose.

    9. Downward Dog to Plank Flow – Dynamic Strength Sequence

    Flow Between Downward Dog & Plank This exercise involves moving smoothly from Downward Dog position into Plank and then returning back. The continuous movement helps build both endurance and strength throughout your body.

    Main Benefits The flow effectively tones your core muscles along with your shoulders and arms. Regular practice strengthens these areas and improves overall upper body definition.

    Practice Tips Focus on maintaining smooth transitions as you move between the two positions. Pay attention to proper alignment throughout the entire movement to maximize results and prevent injury.

    10. Locust Pose (Salabhasana) – Back aur Glutes Strengthener

    Locust Pose Lie on your stomach and lift your chest arms & legs off the ground. This is the locust pose that activates your back muscles.

    Benefits This pose strengthens your lower back along with your glutes and hamstrings.

    Tips Keep the lifting movement controlled & maintain your neck in a neutral position throughout the exercise.

    11. Dolphin Pose (Ardha Pincha Mayurasana) – Shoulder Stability Pose

    Dolphin pose is performed on the forearms and engages the shoulders & core more intensely. Benefits: This pose tones the shoulders arms and core while improving overall stability. Tips: Keep your elbows at shoulder width and avoid letting your shoulders scrunch up toward your ears.

  • 5 Yoga Poses That Target Upper Back Tension and Rebuild Mobility Safely

    5 Yoga Poses That Target Upper Back Tension and Rebuild Mobility Safely

    Top 5 Yoga Poses for Upper Back Pain Relief Upper back pain affects many people and usually stems from bad posture or spending too much time sitting at a desk. Physical stress from daily activities can also contribute to this problem. The discomfort often makes everyday tasks harder & reduces your overall wellbeing. Yoga provides practical solutions through specific stretches and poses that target the upper back region. These exercises help reduce pain while building strength and flexibility in the affected muscles. The following five yoga poses are particularly effective for addressing upper back discomfort.

    1. Child’s Pose (Balasana)

    How It Helps:

    Child’s Pose is a calming, restorative posture that gently stretches and relaxes the back muscles. Folding forward while kneeling allows the spine, neck, and upper back to release tension. This pose promotes deep relaxation and helps ease stiffness and discomfort in the back.

    Instructions:

    – Kneel on the mat with your big toes touching and your knees comfortably apart.
    – Lower your hips back toward your heels.
    – Slowly fold your torso forward, resting your forehead on the floor.
    – Extend your arms forward or relax them alongside your body.
    – Breathe slowly and remain in the pose for 30 seconds to 1 minute.

    2. Cat–Cow Stretch (Marjaryasana–Bitilasana)

    How It Helps:

    The Cat–Cow Stretch is a flowing spinal movement that enhances flexibility in the upper back. By alternating between spinal rounding and arching, it improves mobility, reduces stiffness, and increases blood flow to the back muscles.

    Instructions:

    – Begin on all fours with your wrists under your shoulders and knees under your hips.
    – Inhale as you drop your belly, lift your chest, and arch your spine (Cow Pose).
    – Exhale as you round your spine, tuck your chin, and draw your belly in (Cat Pose).
    – Continue moving with your breath for 10–15 slow, controlled rounds.

    3. Thread the Needle (Parsva Balasana)

    How It Helps:

    Thread the Needle deeply stretches the shoulders and upper back while improving movement in the thoracic spine. This pose helps release built-up tension and increases overall upper-body mobility.

    Instructions:

    – Start in a tabletop position with hands and knees grounded.
    – Inhale, then exhale as you slide your right arm under your left arm.
    – Lower your right shoulder and ear toward the floor.
    – Keep your left palm pressing into the mat for balance.
    – Hold for 30 seconds, then switch sides.

    4. Reclining Spinal Twist (Supta Matsyendrasana)

    How It Helps:

    This gentle twisting pose releases tightness in the upper back and shoulders. Rotating the spine improves flexibility and helps relax muscles along the spinal column.

    Instructions:

    – Lie flat on your back with your arms stretched out to the sides.
    – Draw your knees toward your chest.
    – Drop both knees to the right side while keeping your shoulders grounded.
    – Turn your head to the left to deepen the stretch.
    – Hold for 30 seconds to 1 minute, then repeat on the opposite side.

    5. Sphinx Pose (Salamba Bhujangasana)

    How It Helps:

    Sphinx Pose is a mild backbend that strengthens the spine and opens the chest. It helps relieve tension in the upper back and neck while supporting better posture through gentle spinal extension.

    Instructions:

    – Lie on your stomach with your legs extended straight back.
    – Place your forearms on the floor with elbows under your shoulders.
    – Press your forearms down to lift your chest.
    – Keep your neck relaxed and spine long.
    – Hold the pose for 30 seconds to 1 minute while breathing steadily.

  • Spot the Difference Challenge: Find 3 Changes in the Violin Player Images in 14 Seconds

    Spot the Difference Challenge: Find 3 Changes in the Violin Player Images in 14 Seconds

    Spot the Difference Can You Find 3 Changes in 14 Seconds? Spot-the-difference puzzles offer a fast way to measure your ability to catch small visual details when time is limited. When two images appear nearly identical your brain naturally treats them as the same. The countdown clock pushes you to challenge that automatic response. This puzzle presents two photos of a man playing the violin and gives you just 14 seconds to spot 3 differences. These puzzles work well because they reflect normal human vision patterns. People don’t examine every part of an image with the same focus. Your eyes naturally lock onto the central subject—in this case the violinist—while the surrounding areas get much less attention. Puzzle creators exploit this tendency by placing changes in spots that most people scan quickly without really looking. Common hiding places include the sky fine details on small objects or minor features on animals in the scene. The challenge tests whether you can override your brain’s efficiency shortcuts and force yourself to compare both images systematically before time runs out.

    How the violin visuals quietly trick your brain’s first impression

    Your brain works by spotting patterns quickly. When two images have the same basic structure your mind decides they match & then stops checking carefully. This works well in daily life but it means you might overlook a different cloud or a minor change on an object. Having limited time makes this worse. With only a short period available you cannot examine every section slowly. You end up looking fast & that kind of looking focuses on large shapes and recognizable outlines. Small changes like tiny curves or missing details or slight differences near a dog’s neck are simple to miss because they do not alter what the picture shows overall.

    A rapid eye-movement method designed for a strict 14-second countdown

    If you want to improve your odds then don’t search randomly. Use a plan that moves through the scene in a consistent order. A good rule is to scan from least important to most important because the least important areas are often where differences hide. Try this 14-second method: Spend 4 seconds on the background first which includes sky & clouds & distant objects. Spend 5 seconds on the main subject which includes the violin body and strings and hands & posture. Spend 5 seconds on smaller supporting elements which includes ground details and pets and accessories. When you think you have found a difference then confirm it immediately by checking the same spot in the other image. Quick confirmation prevents you from wasting time on maybe differences that are not real.

    Common hiding zones artists use to mask tiny visual changes

    Most puzzles are built the same way even if you have not seen the actual pictures. The differences usually come in three types and this violin puzzle includes all three. One difference appears in the background such as a cloud or a detail in the sky. Another difference involves the main object like a small change on the violin or the person playing it. The third type is a tiny detail such as a collar or button or tag or some other small item. This combination exists for a reason. The puzzle does not feel unfair because the changes are not all tiny and hidden in one spot. But it also stops you from solving it too fast because you need to look at different parts of the picture.

    Revealed: the three subtle edits most players miss at first glance

    Most puzzles are built the same way even if you have not seen the specific pictures. The differences usually come in three types and this violin puzzle includes all three. One difference appears in the background such as a cloud or a detail in the sky. Another involves the main object like a small change to the violin or the person playing it. The third is a minor detail such as a collar or button or tag or some other small item. This combination exists for a reason. It makes the puzzle feel fair because the changes are not all tiny & hidden in one spot. It also stops you from solving it too quickly because you need to examine different areas of the picture.

    How quick visual puzzles sharpen focus like a mental mini-workout

    Calling these challenges IQ tests might be misleading but they definitely help you develop useful abilities. Being able to quickly compare two similar images comes in handy during regular activities like spotting mistakes in documents or reviewing design work or proofreading page layouts or scanning through spreadsheets or verifying settings on a dashboard. The skills you develop include visual discrimination which means noticing small differences in shapes and details. You also improve focus control by learning to work systematically instead of looking around frantically. Another benefit is finding the right balance between speed and accuracy so you can move fast while still checking your work carefully. You also get better at switching your attention between background elements and main subjects and small objects without losing your place. The timer creates a realistic limitation. In actual situations you rarely have unlimited time to verify every detail so learning a quick method is what really matters.

    Ways to share the challenge while keeping the solution spoiler-free

    If you’re posting this challenge or sending it to friends you should set simple rules so everyone plays the same way. Many people will try to zoom in or stare for a minute which turns a time challenge into a slow search. A clean set of rules looks like this: One attempt at 14 seconds with no zooming allowed Score out of 3 and share your number found Optional second attempt at 20 seconds and compare improvement Only reveal the solution after everyone posts their result This format creates genuine competition and makes the results more interesting. You’ll also notice that people have different attention biases. Some always check the sky first while others stare at the main object and miss the background.