Author: admin

  • Optical Illusion Challenge: Find the Letter P Hidden Among Rs in 6 Seconds

    Optical Illusion Challenge: Find the Letter P Hidden Among Rs in 6 Seconds

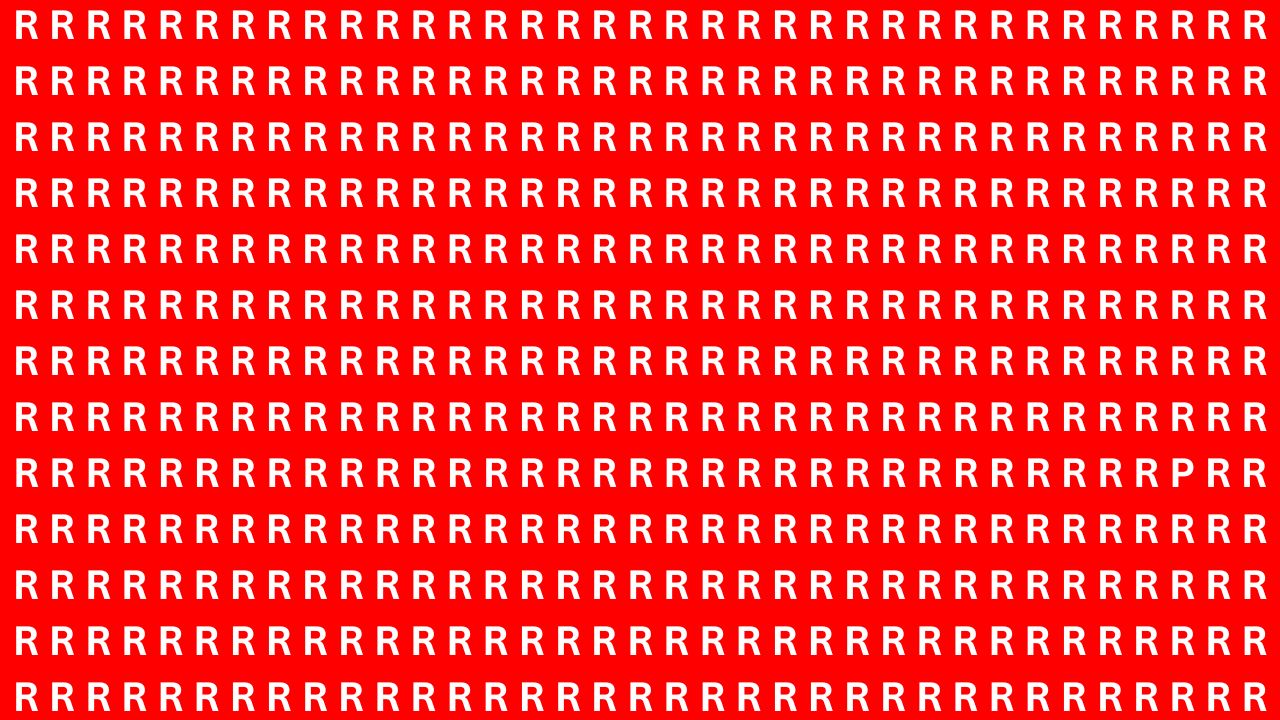
    Optical illusions have always captured our attention as an entertaining method to exercise the brain and test how we see things. Here is a new visual puzzle designed to stretch your observation abilities. The challenge appears straightforward but demands fast reactions and sharp focus on details. Your goal is to find the hidden letter P mixed in with many Rs within only 6 seconds. When you first look at the image it seems packed with nothing except the letter R. However there is one P concealed somewhere in this repeating design. This optical illusion checks whether you can detect small variations in a busy pattern while thinking quickly. Understanding why this challenge proves so tricky and learning about its benefits for your mental abilities makes it worth exploring. The difficulty comes from how similar the letters R & P look when surrounded by identical shapes. Your brain naturally wants to see patterns and can easily skip over small differences. This type of puzzle trains your mind to slow down and examine details more carefully. It also improves your concentration & helps develop faster processing skills that prove useful in everyday situations.

    Understanding the Core of the Challenge

    This optical illusion works by taking advantage of your brain’s natural habit of locking onto familiar visual patterns. Here, the letter “R” appears repeatedly, forming a dense field of nearly identical shapes. Your task is to identify the single character that breaks this pattern — the letter “P”.

    At first glance, the challenge feels simple. But the real test lies in your ability to override pattern repetition and notice the subtle structural difference in the odd letter. The similarity between “R” and “P” makes this harder than expected, especially under a strict 6-second time limit, which pushes your perception and speed to the edge.

    What Makes This Optical Illusion So Difficult

    The difficulty of this illusion comes from how the brain processes repetition. When exposed to rows of identical symbols, your mind quickly focuses on uniformity rather than differences. This natural shortcut helps in everyday life, but here it works against you.

    The letter “P” blends into the surrounding Rs because of its closely matching shape. The added pressure of the time constraint further limits careful inspection, forcing rapid scanning instead of deliberate analysis. Together, these factors make the illusion engaging and deceptively challenging.

    Mental Abilities Strengthened by Optical Illusions

    Optical illusions are more than visual tricks — they actively stimulate key cognitive functions. This puzzle, in particular, engages multiple mental skills at once, encouraging sharper perception and faster processing.

    1. Sharpening Attention to Detail

    This illusion strongly tests your attention to detail. Spotting tiny differences among similar shapes mirrors real-world tasks like reviewing documents, detecting errors, or analyzing information. Regular exposure to such puzzles helps improve focus and precision over time.

    2. Enhancing Pattern Recognition

    Recognizing a repeating sequence and identifying a deviation is at the heart of this challenge. Strong pattern recognition skills are valuable in fields like programming, design, and problem-solving. Optical illusions train your brain to detect inconsistencies more efficiently.

    3. Developing Visual-Spatial Awareness

    This puzzle also activates visual-spatial intelligence — the ability to interpret and compare shapes and structures. Strengthening this skill supports better navigation, design thinking, and interpretation of visual information in everyday tasks.

    4. Improving Speed and Mental Flexibility

    The short time limit forces rapid decision-making, encouraging cognitive agility. Practicing under time pressure improves how quickly your brain processes visual input, which is useful in fast-paced or high-pressure situations.

    5. Building Focus and Concentration

    To succeed, you must maintain strong concentration while filtering out distractions. Exercises like this train your mind to stay engaged, improving mental clarity and sustained attention in demanding environments.

    The Answer Revealed: Locating the Letter “P”

    If you’ve given it your best shot, here’s the solution. The hidden letter “P” is subtly placed among the Rs, making it easy to overlook.

    You’ll find the “P” in the center-right area of the image. Its vertical line differs slightly from the surrounding letters, which is the key clue. Once you notice this distinction, the contrast becomes obvious.

    This moment highlights how easily the brain becomes absorbed in repetition, missing small changes in plain sight. Identifying the “P” reinforces how such illusions enhance visual awareness and detail recognition.

    Ways to Strengthen Your Visual Perception

    If this illusion felt challenging, that’s completely normal. Visual perception improves with consistent practice. Below are simple strategies to help you perform better in similar puzzles.

    Practice Regularly with Visual Puzzles

    Frequent exposure to optical illusions helps train your eyes and brain to detect differences faster. Starting with simpler challenges and gradually increasing difficulty builds confidence and sharpens observation skills.

    Examine Elements One at a Time

    Instead of scanning the whole image at once, focus on individual letters or shapes. Breaking the image into smaller sections makes subtle differences easier to detect.

    Train with Time Constraints

    Introducing time limits boosts processing speed. As you improve, gradually shorten the time allowed to enhance mental speed and efficiency under pressure.

    Stay Calm Under Pressure

    Remaining composed is essential. A calm mind processes visual information more effectively, allowing you to identify differences without unnecessary stress.

    The Enjoyment and Brain Benefits of Optical Illusions

    Optical illusions offer a unique blend of entertainment and mental exercise. By searching for a single “P” among countless Rs, you engage multiple cognitive skills at once, including focus, perception, and processing speed.

    Each puzzle strengthens your ability to observe, analyze, and react quickly. With continued practice, spotting subtle differences becomes faster and more natural. Embrace these challenges — they’re not just fun, they’re a powerful workout for your brain.

  • Optical Illusion Challenge: Locate 96 Among Look-Alike 69s in 9 Seconds

    Optical Illusion Challenge: Locate 96 Among Look-Alike 69s in 9 Seconds

    Optical illusions offer an entertaining method to challenge how your brain handles what you see. This particular puzzle asks you to find the number “96” hidden within many “69s” scattered across the image. The catch is that you get just 9 seconds to locate it. This exercise goes beyond simply testing your vision as it provides an enjoyable way to measure your concentration & how quickly your mind can process information.

    Why Are Optical Illusion Challenges So Popular?

    Optical illusions have fascinated people for many years because they trick our brains in interesting ways. Our eyes send information to our brain but sometimes the brain processes these signals incorrectly and creates surprising images. The challenge we are sharing today can help boost your thinking skills by teaching your brain to spot patterns and unusual details more quickly. These puzzles also strengthen your memory and help you focus better while providing fun mental exercise at the same time.

    How Can You Spot the Hidden 96 Among 69s in Just 9 Seconds?

    The task is to find the number “96” hidden among numerous “69s.” This visual puzzle exploits the similarity between these two numbers since they look nearly identical and are essentially flipped versions of each other. This makes spotting the difference difficult when you first look at it. To solve this puzzle efficiently you need to focus on small details and examine the image in an organized way. Search for spots where “96” might appear different from the surrounding numbers. It could have slightly different spacing or positioning or the digits might be oriented differently than the rest. When you begin searching it helps to concentrate on one specific area of the puzzle at a time. Avoid trying to scan the whole grid quickly because dividing the puzzle into smaller sections will improve your ability to locate the hidden number faster.

    Why Are Observation Challenges So Engaging?

    These challenges are entertaining and good for your brain at the same time. When you work on observation tasks your brain learns to look past what is obvious and pay attention to small details that might not seem important. This practice strengthens your ability to understand visual information & recognize patterns or things that look out of place in complicated pictures. People enjoy these puzzles because finding the hidden object gives them a feeling of achievement. The competitive side also adds to the fun since you can try to improve your personal record or compete with friends.

    The Science Behind Optical Illusions

    Optical illusions are interesting tricks where what you see differs from what is actually there. They work by fooling your brain into reading visual information incorrectly. When you look at our optical illusion containing the numbers 69 and 96 your brain tries to see them as reflections of each other which creates confusion. This makes spotting the hidden number harder because your mind searches for a pattern that is not really present in the way you think it should be.

    How Can You Improve Your Ability to Spot Hidden Objects?

    Getting better at finding hidden objects works like any other skill and needs regular practice. When you spend more time with optical illusions you naturally get better at seeing small differences between objects or numbers. Here are some ways to sharpen your observation abilities: Work with Various Optical Illusions: Your brain gets faster at reading these images when you practice more often. Keep trying new challenges to maintain mental sharpness and stay interested. Improve Your Concentration Make an effort to focus completely on what you are doing. Your ability to notice small details gets stronger over time and helps you find things that blend into their surroundings. Take Your Time: Finding the hidden object can sometimes be difficult. Avoid rushing through the puzzle and instead examine the image carefully & systematically. Search for Small Variations: The numbers might appear almost identical but there are usually tiny visual hints that make one number different from the others.

  • 6-Second Visual Test: Spot the Numbers 96 and 69 Among 66s

    6-Second Visual Test: Spot the Numbers 96 and 69 Among 66s

    Optical illusions have always been an engaging way to challenge both eyesight and mental processing. In this puzzle, the goal appears simple yet proves surprisingly demanding: identify the hidden numbers 96 and 69 hidden among multiple 66s within just 6 seconds. Although it sounds straightforward, the difficulty comes from how closely the numbers resemble one another, requiring intense focus and quick visual judgment. This illusion evaluates not only how well you see, but also how efficiently your brain processes fine visual differences under pressure.

    Why This Puzzle Is More Difficult Than It Looks

    At a quick glance, 96, 69, and 66 can seem almost identical when clustered together. The digits 6 and 9 share similar shapes, and when repeated rapidly across the image, the brain tends to group them together as the same pattern. This similarity is exactly what makes the challenge so tricky.

    The brain is naturally wired to recognize familiar patterns quickly. When it detects repetition, it often stops analyzing individual details. As a result, subtle differences between the numbers can be missed unless deliberate attention is applied. The illusion exploits this tendency, pushing the brain to work harder than usual.

    The added time limit of 6 seconds increases the difficulty even further. With little time to pause or double-check, the challenge demands sharp concentration, rapid scanning, and confident decision-making—all at once.

    What Makes 96 and 69 Hard to Spot

    When viewed quickly, 96 and 69 blend easily into a pattern filled with 66s. Each number contains a 6, which immediately matches the surrounding digits. The 9, meanwhile, closely mirrors the shape of a 6, especially when seen in repetition.

    The key difference lies in the upper curve of the 9. Unlike the closed-loop structure of the 6, the 9 features a distinct curve at the top. Detecting this small variation is essential for solving the puzzle successfully.

    This illusion demonstrates how repetitive visuals can override careful observation. Under time pressure, the brain prioritizes speed over accuracy, making it easier to miss these fine details.

    How Optical Illusions Strengthen Mental Skills

    Challenges like this do more than test vision—they actively sharpen cognitive performance. Optical illusions push the brain to process visual information more precisely, improving focus and attention to detail.

    Regularly engaging with these puzzles can enhance mental flexibility, improve pattern recognition, and strengthen problem-solving abilities. The skills developed through such exercises can carry over into everyday tasks, such as noticing errors or identifying inconsistencies.

    Additionally, these challenges support brain plasticity, encouraging the formation of new neural connections. By repeatedly training the brain to spot subtle differences, visual processing becomes faster and more accurate over time.

    Tips to Solve Optical Illusions More Quickly

    The short time frame adds excitement, but it can also feel overwhelming. Applying a few focused strategies can improve your chances:

    • Identify unique features: Look closely for the curved top of the 9, which sets it apart from the 6.
    • Scan methodically: Move your eyes row by row instead of jumping around the image.
    • Watch for irregularities: Slight changes in shape or alignment can reveal the hidden numbers.
    • Stay calm: A brief pause can prevent mistakes caused by rushing.
    • Practice regularly: Repetition improves speed and accuracy over time.

    Why Visual Puzzles Are Both Fun and Beneficial

    Optical illusions offer more than entertainment—they provide a rewarding mental workout. These puzzles challenge perception, sharpen focus, and make cognitive training enjoyable rather than tedious.

    For those who enjoy brain teasers, this challenge is only one of many variations available. From hidden-object puzzles to visual distortions, optical illusions continue to attract people seeking to keep their minds active and engaged.

    The Final Takeaway: A True Test of Visual Skill

    Spotting the hidden 96 and 69 among a field of 66s within 6 seconds is a compelling way to test visual awareness and mental agility. The challenge pushes you to refine focus, strengthen observation skills, and respond quickly under pressure. With continued practice, identifying subtle visual differences becomes easier—and faster. Whether approached for fun or mental training, optical illusions remain a powerful tool for keeping the brain sharp and engaged.

  • Optical Illusion Visual Test: Spot the Word NEAR in 5 Seconds

    Optical Illusion Visual Test: Spot the Word NEAR in 5 Seconds

    Optical illusions are captivating visual puzzles that test how your brain interprets what it sees. They often cause your mind to perceive images differently from reality, demanding quick thinking, strong focus, and sharp attention to detail. Among the most entertaining formats is the “Spot the Word” challenge, a simple-looking test that can quickly turn into a true mental workout. In this article, you’ll face an engaging optical illusion designed to push your concentration and mental agility to the limit.

    This specific challenge asks you to locate the word “NEAR” hidden within repeated letter combinations that read “NAERs”. The catch is that you only have 5 seconds to find it. While it may seem easy at first glance, the ticking clock transforms this puzzle into an intense test of your observational skills and cognitive sharpness.

    The Task: Find the Word “NEAR” Hidden Among “NAERs”

    The Spot the Word optical illusion is created to assess how quickly you can recognize patterns and notice details within a visually confusing layout. Your goal is to identify the hidden word “NEAR” among a cluster of letters that closely resemble “NAERs”.

    At first, the image may appear like a random mix of characters. However, optical illusions are intentionally crafted to mislead the brain. Your challenge is to block out distractions and pinpoint the correct letter sequence within just five seconds.

    What Makes This Optical Illusion So Effective?

    The effectiveness of this visual test lies in how the brain naturally processes information. Optical illusions take advantage of our tendency to recognize familiar patterns and draw fast conclusions based on past experiences. When those patterns are subtly altered, the brain struggles to interpret what it sees accurately.

    In this illusion, the letters forming “NAER” are arranged so that the word “NEAR” blends seamlessly into the surrounding text. Because the brain processes words based on shape and familiarity, these slight changes make the correct sequence harder to detect immediately.

    This kind of exercise is excellent for strengthening visual perception, improving attention to detail, and enhancing overall mental flexibility. The added time pressure increases excitement while testing your ability to stay focused and make fast decisions.

    The Answer: Where the Word “NEAR” Is Located

    Did you manage to spot “NEAR” within the allotted 5 seconds? If not, there’s no need to worry. Once you know where to look, the solution becomes much clearer. The hidden word appears in the fourth row from the top and the eighth column from the left. Its similarity to surrounding letter patterns makes it easy to miss at first.

    The key to solving this puzzle is noticing subtle differences in letter order and identifying the correct sequence despite visual distractions. If you found it in time, congratulations—you’ve demonstrated strong focus under pressure and sharp visual awareness.

    How Optical Illusions Benefit Your Brain

    Beyond being entertaining, optical illusions offer several meaningful benefits for brain health. Regularly engaging with these puzzles helps strengthen cognitive skills in enjoyable and effective ways.

    • Improves Focus and Concentration: Solving visual puzzles requires sustained attention. By filtering out distractions, you strengthen your ability to concentrate in everyday tasks.
    • Enhances Mental Speed: Time-limited challenges push your brain to process information faster, sharpening decision-making skills.
    • Sharpens Observation Skills: Frequent practice with visual tests trains you to notice small details, making you more aware of your surroundings.
    • Builds Cognitive Flexibility: Optical illusions encourage your brain to adapt to changing information, supporting problem-solving and creative thinking.
    • Supports Stress Relief: Focusing on engaging puzzles can provide a mental break, helping reduce stress and promote relaxation.

    Tips to Improve at Optical Illusion Challenges

    While some people may naturally excel at optical illusions, anyone can improve with consistent practice. Here are a few effective ways to sharpen your skills:

    • Practice Consistently: Regular exposure to visual puzzles strengthens pattern recognition and visual processing abilities.
    • Stay Calm Under Pressure: Countdown timers can increase stress. Remaining calm helps maintain clarity and accuracy.
    • Focus on Fine Details: Small variations often hold the key. Pay attention to slight changes in shape, order, or position.
    • Balance Speed and Accuracy: While speed matters, careful observation leads to better results over time.
    • Use Peripheral Vision: Scanning the entire image rather than fixating on one spot can reveal hidden differences more easily.

    Final Thoughts

    Optical illusion visual tests are an enjoyable and effective way to enhance cognitive abilities, sharpen focus, and improve visual processing skills. This challenge—finding the word “NEAR” among similar letters in just five seconds—is an excellent exercise that pushes your attention to detail and quick-thinking abilities.

    Whenever you have a few spare moments, try challenging yourself with an optical illusion. You’ll not only enjoy the experience but also strengthen your mental sharpness and concentration through an engaging and stimulating activity.

  • Blush After Powder Method: Why This Pro Technique Creates a Softer and More Natural Finish

    Blush After Powder Method: Why This Pro Technique Creates a Softer and More Natural Finish

    We all know that brief pause in front of the mirror, wondering whether adding blush will ruin the base you just perfected. With tutorials debating blush before powder and friends defending the opposite, many people end up applying it randomly and hoping for the best. Yet behind the scenes at fashion shows and across social media, a quieter method is taking hold. Blush is applied after powder, almost like the final warmth added to a finished look. This subtle change does more than enhance color. It gently shifts how your face reflects energy and freshness, suggesting that the secret to believable blush may simply be applying it last.

    How Blush Over Powder Delivers a Softer, More Realistic Effect

    The first time you see a professional apply blush as the closing step, it feels counterintuitive. The skin is already set, mattified, and even. You expect the color to drag or settle into texture. Instead, the brush barely grazes the cheekbone and the pigment melts into the powder, creating a soft flush that looks like it comes from within. No harsh stripes or sticky patches appear. A model backstage once joked that her skin looked flawless but lifeless until the artist added blush over powder that had been sitting for a while. With just a few light touches, her face came alive. Powder creates a stable, blurred base, and placing blush on top allows precise placement without disturbing coverage. The result is controlled color that blends seamlessly and makes the face look natural in photos.

    Applying Blush Over Powder Without Creating Patchiness

    The technique depends on restraint. Use a clean, soft brush that is wide enough to diffuse color but not oversized. Lightly pick up product and tap off the excess before touching the skin. Apply with gentle circular motions or short arcs, avoiding any harsh rubbing that could disturb the base. Start slightly away from the nose on the upper cheekbone and blend upward toward the temple. Whatever remains on the brush can softly connect the look across the nose or chin. The goal is not instant color but a gradual build. Applying thin layers allows better control and prevents the powder base from looking heavy. With patience, the blush reads as a healthy flush rather than obvious makeup.

    The Quiet Power of Blush as the Final Makeup Touch

    What makes this approach so compelling is its subtle emotional effect. Once the complexion is finished and a hint of color is added last, the face stops looking corrected and starts looking present. Others may not notice exactly what changed, only that you appear more awake and alive. When blush comes at the end, it no longer feels technical. It becomes a soft signal of warmth and vitality. That alignment between how you feel and how you look is often worth those extra few seconds with the brush.

    Key Techniques Behind Blush Applied After Powder

    • Blush after setting: Applying blush on an already powdered base creates a softer, more controlled finish.
    • Light layering: Building color gradually avoids excess product and keeps the texture even.
    • Targeted placement: Focusing on the upper cheeks and blending toward the temples enhances natural dimension.
  • Simple Morning Hydration Routine That Enhances Skin Glow and Sustains Energy Throughout the Day

    Simple Morning Hydration Routine That Enhances Skin Glow and Sustains Energy Throughout the Day

    The first sip feels unexpected. You are awake earlier than usual, and the morning light looks pale and unsure through the window. Your thoughts feel slow and unfocused. You have not checked your phone or looked at the clock. You are simply standing barefoot in the kitchen, lifting a glass of water. This time is different. It is not a rushed swallow before coffee. You drink slowly, and the cool water seems to awaken something inside you. Your body responds the way dry earth absorbs rain after a long stretch without it.

    The Subtle Science Behind Your First Glass

    Most people wake up slightly dehydrated. Throughout the night, your body keeps working. It breathes, repairs skin, regulates temperature, and processes food from the previous day. All of this requires water. By morning, you rise feeling subtly depleted, like a plant left without watering. You may not feel intense thirst, but you notice quieter signs. Your skin looks dull and needs extra moisturizer. There is a heaviness behind the eyes, and thinking feels sticky. Mild dehydration affects nearly everything, even when it goes unnoticed.

    Now imagine spending just four minutes replacing what the night used. No supplements. No powders. No complicated steps. Just a simple water ritual that gently wakes your cells, supports your skin, and lifts your energy before the day begins. This four-minute routine is small, but it makes your body feel as if someone finally turned the lights on.

    The Four-Minute Water Ritual With Lasting Effects

    When morning arrives, your body is already running low on water. It has worked continuously overnight, breathing, repairing, and regulating itself. Sitting up in bed, you are slightly depleted, even if you do not realize it. This ritual is designed to restore balance gently, one minute at a time.

    Minute One: The Wake-Up Glass

    Before coffee, tea, or emails, drink your first glass of water at room temperature. Pour about 250 to 300 ml. Neutral water enters the body smoothly without shocking your system. Your stomach stays calm, and absorption happens easily. Stand by a window or step onto a balcony if possible. Keep your feet grounded and shoulders relaxed. Drink slowly and with focus, noticing the sensation as the water moves down. This glass ends the long overnight gap without hydration your cells have been waiting for.

    Minute Two: Mineral Support for Energy and Glow

    The second minute enhances your water with simple additions. Pour another 200 to 250 ml and add one option that suits you. This might be a small pinch of sea salt, a squeeze of fresh lemon, or a splash of coconut water. Mix gently and take a moment to observe the glass. This is no longer just water. It becomes a solution your cells recognize and use more efficiently. Light electrolytes help your body retain hydration, supporting skin cells as they become fuller, smoother, and better protected.

    Minute Three: Skin-Focused Awareness

    This minute is about attention rather than quantity. Continue sipping from your glass while gently touching your face. Notice your cheeks, forehead, and the area under your eyes that reflects late nights and missed water. You are simply observing, not judging. Hydration does not change skin in minutes, but with consistency it transforms how skin functions. Over time it supports healing, resilience, and recovery from dryness, stress, and lack of sleep. Improved circulation helps nutrients reach the skin while waste leaves more efficiently.

    Minute Four: Breath, Posture, and Intention

    In the final minute, focus on your breath and posture as you finish sipping. Stand tall, breathe deeply, and allow the water to settle. Regular hydration improves circulation, supporting blood flow and nutrient delivery throughout the body. These changes appear first on the skin, often before you notice them elsewhere. This minute is a quiet promise to begin the day with care and awareness rather than urgency.

    How This Habit Reflects on Your Skin

    Your skin is a living organ that mirrors internal health. When nourished from within, it becomes calmer and more stable. Over time, this four-minute habit can create visible shifts:

    • Smoother texture as hydrated cells expand slightly, evening the surface.
    • Stronger barrier function, helping skin hold natural oils and block irritants.
    • Improved bounce, making skin feel firmer and look less dull.
    • Calmer appearance, with redness and dryness gradually decreasing.

    These changes happen quietly, like a plant receiving consistent light and water. Nothing shifts overnight, but everything improves across days.

    Energy Benefits You Feel Before You See

    Slow mornings are often blamed on poor sleep or lack of caffeine, but hydration plays a major role. Blood and brain tissue are mostly water. Even slight dehydration can cause heaviness, irritability, and fog. Starting the day with water restores fluid needed to move oxygen, deliver nutrients, activate neurons, and regulate temperature.

    • Steadier energy replaces sharp caffeine spikes and crashes.
    • Clearer focus emerges as the brain receives what it needs.
    • Reduced cravings occur when thirst is no longer mistaken for hunger.

    You may not love mornings, but they begin to feel more stable and manageable.

    Adapting the Routine to Fit Your Life

    This ritual is flexible and personal. The goal is gentle consistency, not perfection.

    Adjusting the Amount

    If two full glasses feel like too much, begin with 150 to 200 ml each and increase gradually. Comfort matters more than volume.

    Choosing the Right Temperature

    Warm water suits sensitive stomachs and colder climates, while cool water feels refreshing in heat. Avoid very cold water immediately after waking to prevent discomfort.

    Creating a Habit Anchor

    Link the routine to something you already do, such as making your bed, boiling water, or starting skincare. Over time, the sequence becomes automatic.

    Patience Over Perfection

    This ritual does not replace sleep, nutrition, or movement, but it helps those systems work better. When you miss a day, nothing is lost. You simply begin again. On busy mornings, even one large glass still matters. Your body responds to patterns over time, not isolated days.

    Eventually, under harsh bathroom lighting, you may notice something different. Your skin looks more alive, even when you are tired. Your eyes seem clearer. You may remember the first morning you chose to drink water before everything else and decided to treat yourself as something worth caring for. Each morning, the glass waits. Four minutes. Two glasses. A quiet ritual that says one thing clearly: before the day asks anything of me, I meet this essential need for myself.

  • 10 Yoga at Home Essentials to Build a Consistent and Easy Routine

    10 Yoga at Home Essentials to Build a Consistent and Easy Routine

    Yoga is a powerful mind–body practice known for enhancing strength, flexibility, and overall well-being while also calming the mind and easing daily stress. For people with busy schedules, practicing yoga at home offers a simple and effective way to enjoy these benefits without stepping outside. This comprehensive guide walks you through 10 essential at-home yoga routines, combining physical postures with relaxation techniques that suit both beginners and experienced practitioners.

    Why Practicing Yoga at Home Makes Sense

    Convenience: No travel time or fixed schedules—practice whenever it suits you.

    Cost-effective: Skip studio memberships, class fees, and commuting costs.

    Comfort: Move freely in your own space and progress at your own pace.

    Personalized practice: Adjust sessions to match your goals, whether you want strength, flexibility, or stress relief.

    1. Energizing Morning Yoga Flow (15–20 Minutes)

    Best for: Starting the day feeling refreshed, focused, and energized.

    Routine includes: Mountain Pose, Sun Salutations, Warrior I, Downward-Facing Dog, and Seated Forward Fold.

    Benefits: Helps wake up the body, builds core strength, improves flexibility, and supports mental clarity.

    2. Gentle Stretch and Unwind Flow (15 Minutes)

    Best for: Releasing tension after a long day or during rest days.

    Routine includes: Cat-Cow, Child’s Pose, Reclining Bound Angle Pose, and Legs Up the Wall.

    Benefits: Eases neck and shoulder tightness, calms the nervous system, and improves circulation.

    3. Quick Stretch Break (5–10 Minutes)

    Best for: A fast reset when you’ve been sitting or working for long periods.

    Routine includes: Seated Forward Fold, Downward-Facing Dog, and Standing Side Stretch.

    Benefits: Reduces lower back stiffness, boosts blood flow, and restores focus.

    4. Core-Focused Strength Yoga (20 Minutes)

    Best for: Strengthening the core, improving posture, and toning muscles.

    Routine includes: Plank Pose, Boat Pose, Side Plank, Downward Dog Split, and Cobra Pose.

    Benefits: Builds abdominal strength, enhances balance, and supports full-body stability.

    5. Flexibility-Boosting Yoga Session (25 Minutes)

    Best for: Increasing mobility in the hips, hamstrings, and spine.

    Routine includes: Downward-Facing Dog, Pigeon Pose, Seated Forward Fold, Reclining Hand-to-Big-Toe Pose, and Butterfly Pose.

    Benefits: Improves joint mobility, releases lower-body tension, and encourages deep relaxation.

    6. Yoga for Stress Relief and Calm (15–20 Minutes)

    Best for: Soothing anxiety and calming the mind.

    Routine includes: Deep breathing, Child’s Pose, Seated Twists, and Legs Up the Wall.

    Benefits: Supports emotional balance, releases stored tension, and sharpens mental focus.

    7. Dynamic Power Yoga Flow (30 Minutes)

    Best for: A challenging full-body workout that builds stamina.

    Routine includes: Sun Salutations, Warrior I and II, Chaturanga, Chair Pose, and Plank Pose.

    Benefits: Develops strength, increases endurance, and elevates energy levels.

    8. Yoga to Support Better Posture (20 Minutes)

    Best for: Improving alignment and easing back and neck strain.

    Routine includes: Mountain Pose, Chest Openers, Warrior Poses, Bridge Pose, and Downward-Facing Dog.

    Benefits: Enhances postural alignment, relieves upper-body tension, and strengthens the back and core.

    9. Evening Yoga for Deep Relaxation (20 Minutes)

    Best for: Winding down before bedtime.

    Routine includes: Child’s Pose, Reclining Bound Angle Pose, Legs Up the Wall, and Shavasana.

    Benefits: Encourages deep relaxation, reduces anxiety, and prepares the body for restful sleep.

    10. Hip-Opening Yoga Practice (25 Minutes)

    Best for: Releasing tight hips and easing lower back discomfort.

    Routine includes: Downward-Facing Dog, Pigeon Pose, Lizard Pose, Butterfly Pose, and Happy Baby Pose.

    Benefits: Improves hip mobility, stretches the groin and hamstrings, and reduces lower back tension.

    Final Thoughts on Practicing Yoga at Home

    Practicing yoga at home allows you to build strength, improve flexibility, and calm your mind entirely on your own schedule. With these 10 thoughtfully designed routines, you can shape your practice around your daily needs—whether you want a short stress-relief session or a longer, strength-focused flow. Each routine requires minimal space and fits easily into 10–30 minutes, making yoga accessible no matter how busy life feels. Stay consistent, respect your body, and enjoy the lasting benefits of yoga.

  • Home Yoga Workouts Designed for Busy Days and Limited Time

    Home Yoga Workouts Designed for Busy Days and Limited Time

    In a world that moves quickly, finding time for the gym or scheduled yoga classes can feel nearly impossible. The good news is that yoga adapts easily to your lifestyle and can be practiced at home with minimal effort. Even a short session of mindful movement can support stress relief, improve flexibility, and enhance overall well-being. Whether you are balancing work, family, or daily responsibilities, at-home yoga makes it easier to care for your body and mind without adding pressure to your schedule.

    Why Practicing Yoga at Home Works for Busy Schedules

    Practicing yoga at home removes many common barriers. With no commuting required, you can begin whenever it suits you by simply rolling out your mat. Yoga is also time-efficient, as even 10 to 15 minutes can deliver meaningful benefits. Short sessions offer powerful stress reduction during hectic days. Most importantly, home practice is fully customizable, allowing you to choose energizing flows, gentle stretches, or calming routines based on what your body needs.

    Quick and Effective Yoga Routines You Can Do at Home

    The following yoga routines are designed to fit easily into packed days. Each sequence requires minimal space and can be practiced comfortably at home, making it easier to stay consistent no matter how full your schedule feels.

    Morning Wake-Up Yoga (10–15 Minutes)

    Best for: Starting the day with energy and mental focus.

    Child’s Pose (Balasana) – Gently calms the mind and lengthens the spine.

    Cat–Cow Pose – Warms the spine and improves mobility.

    Downward-Facing Dog – Stretches the back and hamstrings while building strength.

    Standing Forward Fold – Releases tension in the back and legs.

    Warrior I – Opens the hips and chest while strengthening the lower body.

    Seated Forward Fold – Encourages relaxation and flexibility.

    This routine stretches the full body, helps wake up muscles, and eases morning stiffness.

    Midday Energizer Flow (10–12 Minutes)

    Best for: Recharging during a demanding workday.

    Mountain Pose – Centers the body and steadies breathing.

    Chair Pose – Activates the legs and core for an energy lift.

    Warrior II – Builds strength while opening the chest.

    Plank Pose – Strengthens the core, arms, and legs.

    Downward-Facing Dog – Improves circulation and stretches the body.

    Seated Twist – Releases spinal tension and supports digestion.

    This sequence helps restore energy, improve mental clarity, and strengthen key muscle groups.

    Post-Work Yoga to Release Tension (15 Minutes)

    Best for: Letting go of physical and mental stress after work.

    Child’s Pose – Encourages deep relaxation.

    Cat–Cow Pose – Loosens the spine and back muscles.

    Reclining Bound Angle Pose – Opens the hips and relaxes the lower back.

    Bridge Pose – Strengthens the back while stretching the chest.

    Legs Up the Wall – Calms the nervous system and reduces fatigue.

    This routine supports stress release, eases back and neck tension, and encourages restful sleep.

    Quick Stretch Break (5–10 Minutes)

    Best for: A short reset during a busy day.

    Standing Forward Fold – Loosens hamstrings and the lower back.

    Cat–Cow Pose – Gently mobilizes the spine.

    Downward-Facing Dog – Stretches the entire body.

    Seated Twist – Relieves shoulder and spinal tightness.

    Warrior II – Strengthens and opens the lower body.

    This short flow enhances flexibility, eases muscle stiffness, and provides a mental refresh.

    Evening Relaxation Flow (15–20 Minutes)

    Best for: Winding down before bedtime.

    Child’s Pose – Helps the body fully relax.

    Downward-Facing Dog – Gently stretches the spine and legs.

    Pigeon Pose – Releases deep hip tension.

    Seated Forward Fold – Calms the nervous system.

    Legs Up the Wall – Prepares the body for sleep.

    This flow supports deep relaxation, reduces lower-body tension, and promotes better sleep quality.

    Helpful Tips for Practicing Yoga at Home on Busy Days

    Staying consistent matters more than session length. Even short daily practices can improve strength and flexibility over time. Creating a dedicated yoga space can help build routine and focus. Using online yoga resources makes it easier to find quick sessions that match your needs. Always listen to your body and adjust poses as needed. Most importantly, keep your practice simple—mindful basic poses can be just as effective as longer routines.

  • 7 Yoga Stretches You Can Do Daily to Improve Flexibility

    7 Yoga Stretches You Can Do Daily to Improve Flexibility

    Flexibility Through Yoga Flexibility is not about forcing your body into deep poses. It is about allowing your muscles and joints to open slowly & safely. Many people feel stiff due to long sitting hours or stress or poor posture or lack of regular movement. Yoga stretches improve flexibility by increasing blood flow and reducing muscle tightness and improving joint mobility. These seven yoga stretches are ideal for beginners and experienced practitioners alike. They focus on major tight areas like the hips and hamstrings and spine and shoulders and back. Practicing them consistently can help you move better and feel lighter & reduce everyday aches. ## Why Yoga Stretches Improve Flexibility Safely Muscles tighten when they are stressed or unused. Yoga uses steady breathing and controlled movement to gently lengthen muscles without strain. Unlike sudden stretching yoga allows the nervous system to relax which helps muscles release naturally. Over time this leads to lasting flexibility without injury. Flexibility also improves circulation and posture & balance which makes daily movements easier.

    Wake Up Your Body With Gentle Standing Forward Folds

    This stretch works on your hamstrings, calves lower back and neck. It helps reduce stiffness when you have been sitting for a long time. How to do it: Stand with your feet at hip width. Bend your knees a little & fold forward from your hips. Let your head hang down naturally. You can place your hands on the floor, your shins or use a block for support. Flexibility benefit: Doing this stretch regularly makes the back of your legs longer & reduces tension in your spine. Hold for: 45 to 60 seconds while breathing slowly.

    Release Tight Hips and Legs Through a Deep Low Lunge Stretch

    Low Lunge provides a deep stretch for the hip flexors that typically become tight from prolonged sitting. How to do it: Place one foot forward and bring your back knee down to the mat. Keep your chest upright while allowing your hips to sink forward gently. You can rest your hands on your thighs or on the mat. Flexibility benefit: This stretch enhances hip mobility and helps improve your posture. Hold for: 30 to 60 seconds on each side.

    Lengthen the Spine Daily Using a Calm Seated Forward Bend

    This gentle stretch targets your hamstrings along with your lower back and spine. Start by sitting on the floor with your legs straight out in front of you. Take a breath in while sitting up tall to extend your spine. Then breathe out as you bend forward at your hips. You can keep a slight bend in your knees if that feels more comfortable. This stretch helps your muscles lengthen slowly & naturally without pushing too hard. Stay in this position for 60 seconds while breathing normally and keeping your body relaxed.

    Open Inner Thighs and Improve Mobility With Butterfly Pose

    Butterfly Pose gently opens your hips and stretches the inner thighs. This position works well for releasing tension in your lower body. How to do it: Sit down and bring the bottoms of your feet together. Allow your knees to drop open to the sides in a relaxed way. Hold onto your feet or ankles while keeping your back straight. Flexibility benefit: This pose makes your hips more flexible and helps reduce tightness in the area around your pelvis.

    Stretch the Entire Body Effectively Using Downward Facing Dog

    Butterfly Pose opens your hips and stretches your inner thighs in a gentle way. This position helps release tension from your lower body. To perform this pose sit on the floor & press the soles of your feet together. Let your knees fall naturally toward the sides without forcing them. Grip your feet or ankles with your hands and maintain a straight spine throughout the stretch. This pose increases hip flexibility and loosens the muscles around your pelvis. Hold for:

    Strengthen the Back and Increase Flexibility With Cobra Pose

    Cobra Pose stretches your chest & abdomen & spine. It makes your spine more flexible too. Here’s how you do it. Lie face down on the floor. Put your palms flat on the ground right under your shoulders. Push gently with your hands and raise your chest up. Don’t push too hard or you might hurt your lower back. This pose is great for your flexibility. It helps fix bad posture from slouching forward all day. Your spine will move better after practicing this regularly. Hold the position for 20 to 40 seconds. Do it one more time after a short rest.

    Relax the Spine and Ease Stiffness Using Supine Spinal Twist

    This easy stretch helps your spine relax and gently massages the organs inside your body. How to do it: Start by lying flat on your back. Pull one knee up toward your chest and then move it across to the opposite side of your body. Stretch your other arm straight out to the side. Make sure your shoulders stay loose and comfortable. Flexibility benefit: This movement makes your spine more flexible and helps ease tension in your lower back. Hold for: 45 seconds on each side.

    How to Practice These Yoga Stretches Daily for Maximum Flexibility Gains

    Flexibility gets better through regular practice rather than pushing yourself too hard. You should do these stretches every day or at least five days each week. Always move in a slow controlled way & never use bouncing movements when stretching. Your breathing pattern matters a lot. Breathe in to make room in your body and breathe out to go a bit deeper into the position. Stop and ease back a little if you feel any pain. Here is a basic flexibility routine that takes 10 minutes: Start with Standing Forward Fold. Then do Low Lunge on your left side & then your right side. Move into Downward Facing Dog next. After that do Seated Forward Bend followed by Butterfly Pose. Then practice Cobra Pose. Finish with Supine Spinal Twist on both your left and right sides.

    Smart Daily Habits That Help You Stay Flexible for the Long Term

    Start with a warm up before you do any deep stretching. Your muscles will not stretch well when they are cold. Make sure you drink enough water because hydrated muscles are easier to stretch. Be patient with yourself since everyone improves their flexibility at different speeds. Do strength training along with your stretching routine to keep your joints and muscles safe.

    Who Should Practice These Yoga Stretches With Extra Care and Caution

    If you have recent injuries or joint problems or chronic pain you should keep your stretches gentle and well supported. You can use props like cushions or blocks whenever you need them. If you are pregnant you should adjust deep twists and forward bends to make them safer. You do not need to spend hours practicing to improve your flexibility. Just a few careful stretches each day can make a real difference in how your body feels and moves. If you would like I can put together a morning or evening flexibility yoga routine that fits your schedule and matches your comfort level.

  • 12 Yoga Poses to Release Body Stiffness and Improve Flexibility and Daily Comfort

    12 Yoga Poses to Release Body Stiffness and Improve Flexibility and Daily Comfort

    Body stiffness happens to many people because of sitting too long or not moving enough during the day. Stress and getting older can also make muscles tight. Even hard exercise sometimes causes stiffness instead of helping. When muscles & joints stay tight for a long time they stop moving as easily as they should. This creates pain in the neck & back & also in the hips & legs. Yoga helps loosen tight areas without pushing the body too hard. It works gently to bring back normal movement & makes the body more flexible over time. Here are 12 yoga poses that reduce stiffness and increase flexibility when you practice them often & breathe slowly while doing them.

    Mountain Pose (Tadasana) — Reset Body Alignment and Activate Stiff Muscles

    Mountain Pose helps improve how you stand and makes you more aware of your body position. When you stand up straight it helps your spine line up correctly and wakes up the muscles that help you stay flexible and balanced. This basic pose is the starting point for loosening up tight areas in your body.

    Neck Rolls — Relieve Neck Tightness Caused by Screens and Stress

    Neck rolls done gently can help reduce the stiffness that builds up from looking at screens & feeling stressed. When you move your neck slowly & with control it helps blood flow better through the area and makes the tension in your neck and shoulders feel less tight.

    Cat–Cow Flow — Gently Mobilise the Spine and Reduce Back Stiffness

    Cat-Cow is one of the best poses for relieving stiffness throughout your entire body. This flowing movement gently stretches your spine and also works your shoulders & hips and neck. It helps improve both flexibility and mobility at the same time.

    Downward-Facing Dog — Lengthen Muscles and Improve Full-Body Flexibility

    This pose works to lengthen your spine and open up your shoulders while also stretching the backs of your legs & calves. At the same time it builds strength in your arms & midsection. It works particularly well for easing the tightness that develops when you spend long periods sitting down.

    Standing Forward Bend — Release Hamstrings and Calm the Nervous System

    Standing Forward Bend provides a deep stretch for your back and the muscles along the back of your legs including the hamstrings and calves. This pose works to reduce tightness throughout your lower body while also helping to calm your nervous system and promote relaxation.

    Low Lunge — Open Tight Hip Flexors and Improve Lower-Body Mobility

    Low Lunge helps open up tight hips while stretching the thighs and groin area. This pose works particularly well for relieving stiffness that develops from sitting down for extended periods of time.

    Butterfly Pose — Ease Hip and Inner-Thigh Stiffness Naturally

    Butterfly Pose works to gently open your hips and inner thighs. The position helps decrease stiffness in your lower body & gradually increases how flexible your hips become.

    Seated Spinal Twist — Improve Spinal Rotation and Reduce Back Tension

    Seated twists help your spine move better & reduce tightness in your back and waist area. This twisting motion also aids your digestive system and makes your body more flexible overall.

    Cobra Pose — Counter Slouching and Relieve Lower-Back Tightness

    Cobra Pose builds strength in your back muscles and stretches both your chest and stomach area. This pose helps reduce the stiffness that comes from poor posture & slouching throughout the day. It also makes your spine more flexible and improves your overall spinal health.

    Child’s Pose — Deeply Relax Stiff Shoulders, Spine, and Hips

    Cobra Pose strengthens your back muscles while stretching your chest and stomach. This position helps reduce stiffness caused by poor posture and slouching during the day. It increases spine flexibility & supports better spinal health overall.

    Supine Figure Four — Target Hip Tension and Support Lower-Back Comfort

    This reclining position helps loosen tight hips and glutes while your spine stays supported. It works well for reducing stiffness in your lower body without putting stress on your muscles.

    Legs Up the Wall — Improve Circulation and Ease End-of-Day Body Fatigue

    Legs Up the Wall helps blood flow better through your body and makes your legs and lower back feel less tight. This pose also lets your whole body calm down and heal properly.