Author: admin

  • Blush Applied Too Close to the Nose Can Quietly Disrupt Facial Balance

    Blush Applied Too Close to the Nose Can Quietly Disrupt Facial Balance

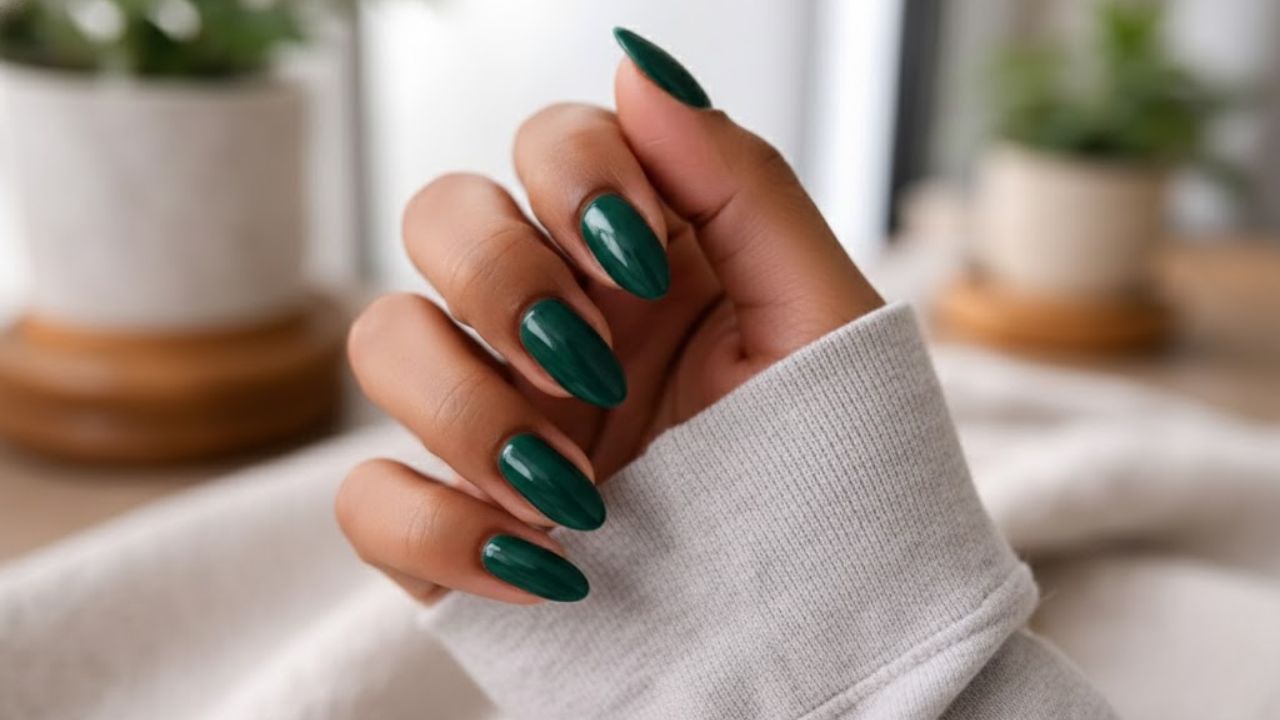
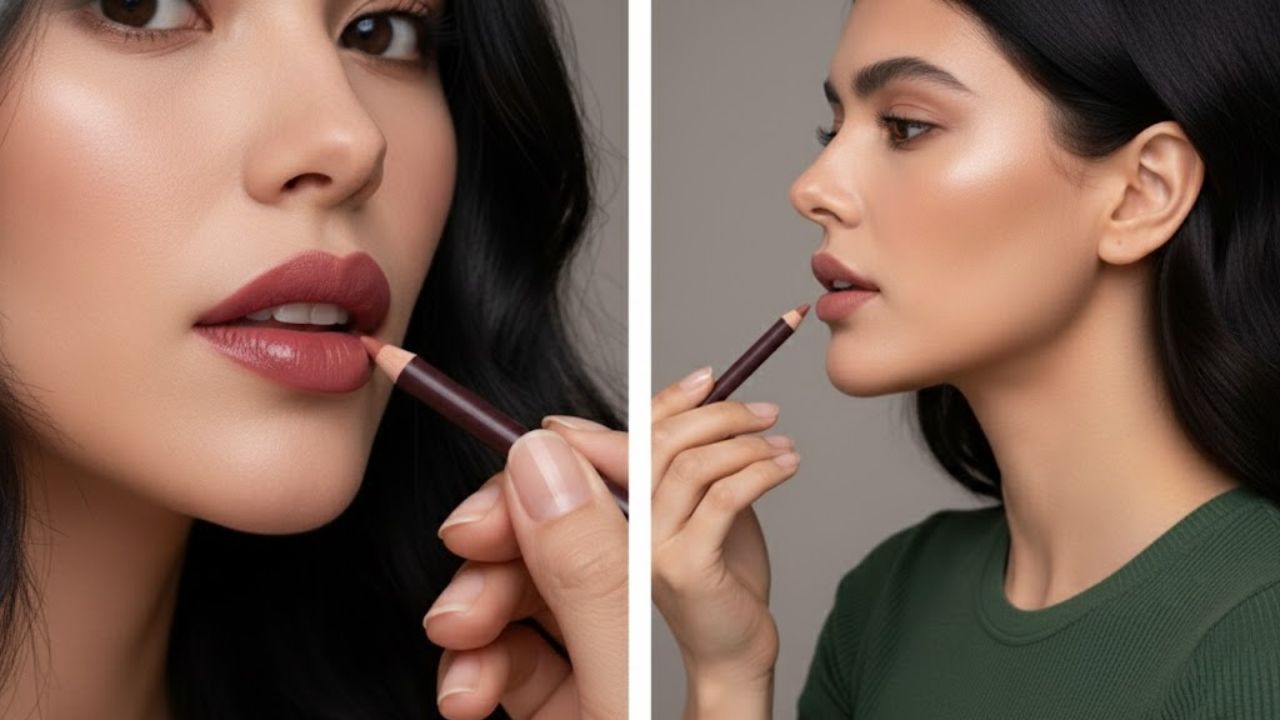
    The girl sitting in the café looked flawless from a distance. Her eyebrows were neatly shaped, her eyeliner was clean, and her lips had a soft shine. But as she moved closer to the window, something felt off. A heavy stripe of blush sat right beside her nose, as if her cheeks were flushed from running upstairs. The makeup quality was good, yet the placement was wrong. You have likely noticed this effect on social media or while passing people on the street. When blush sits too close to the center of the face, features can appear smaller and compressed. What looks balanced in a bathroom mirror can feel uneven in natural light or on camera. A difference of just a couple of centimeters can separate a fresh, healthy glow from a crowded look. This is less about trends and more about simple facial geometry.

    How Blush Too Close to the Nose Disrupts Facial Balance

    When blush is applied near the nose, the face can appear narrower and slightly strained. The center of the face becomes dominant, while the eyes and cheekbones fade into the background. Instead of lifting the features, the color pulls everything inward. The outer cheeks can seem to disappear, and redness around the nostrils may look more noticeable. From a distance, this placement can feel puffy or congested rather than soft. In photos, especially under harsh lighting, blush near the nose often blends with natural redness and forms a solid block of color. Phone cameras exaggerate this effect by sharpening contrast and shadows. Makeup professionals often describe a danger zone around the nose where excess color makes the face look smaller and more tired. This is why blush on red carpets is placed higher and further out, helping the face appear longer and more open.

    Also read: Microwaves Face a Serious Challenger as a Faster Kitchen Device Emerges

    Smarter Blush Placement That Lifts Instead of Compresses

    A simple guideline can help prevent blush from creeping too close to the nose. Imagine a vertical line running down from the center of your eye. This line marks your inner limit, and your blush should stay outside it. Place color on the part of the cheek that gently lifts when you smile slightly. From there, blend outward toward the top of your ear in a soft, curved motion. Applying thin layers is key, since it is easier to build color than to fix placement mistakes. Leaving a small strip of bare skin beside the nose helps maintain balance. Many people apply blush too far inward by taking advice about the “apples of the cheeks” too literally, especially when rushing. On round faces, this can add unwanted fullness. On angular faces, it can make the center look harsh. Often, the issue is not how much blush is used, but where it is placed.

    Also read: This Abs Exercise Targets the Core Deeply Without Stressing Your Back

    Quick Visual Checks to Keep Blush Away From the Nose

    • Leave at least one finger-width of bare skin between the nose and blush.
    • Angle the brush slightly upward instead of sweeping straight across.
    • Tap off excess product before touching the skin.
    • Blend more on the outer edge than the inner edge.
    • Step back from the mirror and check your face from arm’s length.

    Also read: This Winter Boiling Ritual Combines Lemon, Ginger, and Cinnamon for a Reason

    Because no one spends long minutes blending blush every day, these simple visual rules are often more effective than complicated techniques. The center-of-eye line and one-finger gap work whether you use an affordable cream stick or a luxury compact, even on busy mornings.

    Finding Facial Balance Beyond Social Media Makeup Trends

    There is no single correct blush placement, as the effect depends on what you want to achieve. Moving color slightly toward the nose can create a youthful, cold-weather flush on some faces, but going too far can look unbalanced. Preferences vary widely. Some people enjoy a bold, central blush inspired by Korean beauty styles, while others prefer a subtle touch high on the cheekbone. The key is understanding how placement changes where attention falls. A helpful exercise is to apply blush differently on each side of your face and compare them in natural daylight. Notice which side highlights your eyes and which allows your nose to blend naturally. This comparison is not about criticism but about learning how color guides attention. Over time, experimentation shows that the face is not something to fix, but a canvas to arrange with intention.

    Also read: Heating Rules Changed Quietly and the Old 19-Degree Advice No Longer Works

    Key Placement Guidelines and Why They Matter

    • Space near the nose: Keep a narrow strip of bare skin to avoid a congested center and preserve natural balance.
    • Blush stopping point: End application before the vertical line under the eye’s center to create a lifted look.
    • Blending direction: Diffuse color outward and slightly upward toward the temples to visually open the face.
  • 7 Signs You’re More Intelligent Than You Think Even Without External Recognition

    7 Signs You’re More Intelligent Than You Think Even Without External Recognition

    Have you ever noticed that the people with the sharpest minds often doubt themselves the most? For a long time, I believed I was intellectually average. Even with a psychology degree, I felt as though everyone around me understood life better than I did. In meetings, I often stayed quiet, assuming my ideas were too obvious to matter—only to see someone else share the same thought and receive recognition. It was only after years of writing and researching intelligence that I discovered a deeper truth: intelligence isn’t always loud or obvious. More often, it shows up in subtle, everyday ways.

    Highly intelligent people frequently underestimate themselves. This is sometimes described as the reverse of the Dunning–Kruger effect. While less skilled individuals may overrate their abilities, more capable people tend to assume that their way of thinking is normal for everyone. If you’ve ever felt less intelligent than you “should” be, that feeling itself may be a clue. Below are seven signs that suggest you may be far more intelligent than you realize.

    1. You constantly question ideas, including your own

    If you never outgrew the habit of asking “why,” that curiosity is a strong indicator of intelligence. People with sharp minds rarely accept information at face value. You might instinctively question the accuracy of a claim, consider the bias behind a news story, or challenge routines simply because they exist.

    What sets this apart is that you also turn that skepticism inward. Your beliefs, assumptions, and conclusions are all open to review. While this habit can feel mentally exhausting, it reflects deep intellectual curiosity. As Socrates famously suggested, examining life and thought isn’t overthinking—it’s evidence of an active, thoughtful mind.

    2. You’re at ease with saying “I don’t know”

    Many people assume intelligence means having quick answers. In reality, truly intelligent individuals are comfortable admitting uncertainty. When asked something you don’t know, you’re more likely to say so honestly rather than inventing an answer.

    This willingness reflects intellectual maturity. You see gaps in knowledge not as flaws, but as opportunities to learn. Beyond facts, this comfort with uncertainty often extends to life itself. While others crave simple, black-and-white answers, you can function well within ambiguity.

    3. You recognize patterns others overlook

    Do you often notice connections that seem invisible to others? Pattern recognition is a core trait of intelligence. Your mind naturally links ideas, behaviors, and events, allowing you to identify trends or predict outcomes before they become obvious.

    This might show up as understanding social dynamics, identifying shared root causes behind different problems, or anticipating changes in mood or behavior. It’s not just observation—it’s deep processing and synthesis, turning scattered information into meaningful insight.

    4. You adjust how you communicate depending on who’s listening

    Intelligent people tend to tailor their communication instinctively. You explain the same idea differently depending on whether you’re speaking to a child, a friend, or an expert. This isn’t about showing off knowledge—it’s about being understood.

    This adaptability reflects both cognitive and emotional intelligence. You know that clarity matters more than complexity, and connection matters more than sounding impressive. Translating ideas across different “languages” is a subtle but powerful sign of a sharp mind.

    5. You value time alone with your thoughts

    While many people constantly seek distraction, you may enjoy quiet moments of reflection. Whether it’s walking without music, sitting in silence with a cup of coffee, or letting your thoughts wander, solitude gives your mind space to work.

    This preference isn’t necessarily about introversion. It’s about mental processing and reflection. Research suggests that people who appreciate solitude often show higher creativity and intelligence, as the brain uses quiet time to form new connections and organize ideas.

    6. You’re able to laugh at yourself

    Self-directed humor is more complex than it seems. To laugh at yourself, you must step outside your own perspective, recognize flaws or mistakes, and frame them in a lighthearted way. That process requires flexibility, creativity, and awareness.

    People with high intelligence tend to avoid taking themselves too seriously. By finding humor in imperfections, you show emotional intelligence and mental adaptability. This ability also makes learning and growth easier, as mistakes become lessons rather than threats.

    7. You’re willing to change your mind when evidence changes

    One of the clearest signs of intelligence is the ability to revise beliefs. If you’ve genuinely changed your opinion after learning new information, you’re demonstrating intellectual humility.

    Smart individuals hold opinions firmly but not rigidly. They value truth over being right and learning over winning arguments. This openness reflects cognitive flexibility—a willingness to evolve as understanding deepens.

    Final thoughts

    Intelligence isn’t defined by memorized facts, test scores, or impressive language. It shows up through curiosity, adaptability, self-awareness, and humility. If you recognized yourself in these signs, self-doubt may be misleading you.

    The irony is that questioning your own intelligence is often proof of it. Minds that reflect, adapt, and continue learning are exactly what the world needs. So the next time uncertainty creeps in, remember: doubt and intelligence often walk hand in hand.

  • Winter Nail Polish Shades Everyone Is Choosing for a Fresh Modern Seasonal Look

    Winter Nail Polish Shades Everyone Is Choosing for a Fresh Modern Seasonal Look

    Royal purple and ruby red continue to top the list for True Winter palettes, while those drawn to neutral styles still have many polished options. Cool-toned preferences open the door to an unexpectedly broad spectrum of whites, similar to fresh snow catching sunlight. The same depth appears in gray variations and rich burgundy tones like cranberry, deep berry, and merlot. World champion nail artist and beauty educator Valeriia Telemaniuk shared with Byrdie that winter often revives classic nail looks, renewing interest in French manicures, cool grays, soft blues, and deep red shades in both bold and muted forms.

    11 Winter Nail Polish Shades to Try

    Refined Chocolate Ganache Brown

    Once-popular brownie pudding nails are being replaced by a more elevated winter choice: ganache brown. Nail artist and educator Sofiia Mazur describes it as a deep, indulgent shade inspired by melted dark chocolate. Comparable to tones like Red Iguana’s Ganache gel or Dazzle Dry’s Fringe, this color feels warm, luxurious, and polished. Ganache brown conveys quiet confidence and pairs effortlessly with gold jewelry, neutral outfits, and minimalist black looks.

    Soft and Subdued Berry Tones

    This winter marks a move toward deeper, grounding nail colors. Juanita Huber-Millet, founder and creative director of Townhouse Salons, notes rising interest in espresso browns, soft mauves, and muted berry shades. These tones strike a balance between warmth and elegance, making them ideal for daily wear. Muted berries offer a gentler alternative to bright reds, delivering richness without overpowering the look.

    Light Ocean Blue With a Pearly Finish

    A light ocean blue enhanced with a subtle pearlescent glow stands out this season. Nail professional Amy Ling Lin describes these shades as calming, luminous, and uplifting. Colors like Sundays Studio’s L09 provide a refreshing contrast to darker winter palettes, while the pearl finish softly reflects light, adding dimension and elegance.

    Modern Cool Gray Neutrals

    Cool gray nails are emerging as a go-to winter neutral. According to OPI Global Ambassador Coca Michelle, this shade feels chic, effortless, and sophisticated, pairing easily with seasonal wardrobes. Cool gray also complements mixed-metal jewelry. Standout options include OPI Peace of Mined, Case of Glamnesia, and Suzi Talks with Her Hands, each offering a sleek, versatile finish.

    Classic Deep Navy Blue

    Deep navy is widely seen as the perfect post-holiday reset shade. This calming color moves seamlessly through winter and into the New Year while remaining easy to wear. A true staple, navy works equally well for special occasions and everyday office styles. Popular picks include OPI Less is Norse, Havin’ a Candy Ol’ Time, and Suzi & the Arctic Fox.

    The Rise of Barely-There Nail Looks

    As winter settles in, many are gravitating toward nail shades that reflect calm and clarity. Huber-Millet highlights growing demand for soft milky tones, cool neutrals, and subtle pastels. Shades like Coconut Milk, Glazed Marshmallow, and Milkshake from Townhouse’s Flawless Collection feel clean, restorative, and fresh, offering a gentle shift away from autumn’s darker hues.

    Warm and Deep Red Staples

    A warm, deep red remains a winter essential. Amy Ling Lin describes this shade as chic, cozy, and quietly powerful. It brings instant warmth during colder months while maintaining a polished, festive edge. This versatile color transitions smoothly from everyday sophistication to holiday-ready styles.

    Earth-Toned Metallic Accents

    Earth-inspired metallic nail finishes are also gaining traction this winter. Sofiia Mazur points to shades like bronze, clay gold, and olive chrome, often paired with matte or stone-like textures. These finishes reflect light softly, creating a refined glow that feels luxurious without appearing flashy, whether worn alone or as subtle accents.

    Elegant Black Cherry Shades

    Black cherry nails offer understated drama by blending deep darkness with a touch of red warmth. Mazur explains that this balance keeps the color elegant and wearable. Long embraced by fashion icons, black cherry pairs just as well with eveningwear as it does with relaxed looks like oversized blazers or vintage denim.

    Clean and Crisp Winter Whites

    Crisp white nails are making a strong comeback this season. Following Pantone’s introduction of Cloud Dancer, pure white shades such as Mineral Fusion Ice Breaker are seeing renewed interest. This clean, modern color mirrors snowy landscapes and frosty mornings, reinforcing white as a key element of winter minimalism.

    Soft Gray-Lavender Combinations

    Gray-lavender nails blend cool gray bases with a gentle hint of purple, making them especially fitting for winter. Telemaniuk notes that shorter days and cooler atmospheres are drawing attention to muted, soothing tones like this. Gray-lavender feels modern, minimal, and refined, offering a versatile choice for the colder months.

  • 5-Minute Focus Yoga: A Quick Routine to Improve Concentration

    5-Minute Focus Yoga: A Quick Routine to Improve Concentration

    Staying focused has become difficult in our modern world. Distractions surround us whether we work from home or study or just try to concentrate during the day. Yoga offers an effective solution for improving mental clarity and focus. Adding a simple five-minute yoga routine to your daily schedule can clear your mind & reduce stress while sharpening your ability to concentrate. This article presents a short yoga sequence that helps boost focus and mental clarity. The practice works because it combines physical movement with controlled breathing and mindful awareness. These elements work together to calm the nervous system and bring attention back to the present moment. When you feel scattered or overwhelmed during your day you can use this quick routine to reset your mental state. The sequence requires no special equipment & can be done almost anywhere. You only need enough space to stretch your arms & a few minutes of uninterrupted time. The poses are simple enough for beginners but effective for experienced practitioners as well. Starting with intentional breathing helps transition your mind from external distractions to internal awareness. This breathing foundation supports the physical poses that follow. Each movement serves a specific purpose in releasing tension and directing energy toward mental clarity.

    Mountain Pose (Tadasana): Build Focus From the Ground Up

    Improving concentration begins with a strong foundation, and Mountain Pose offers exactly that. This simple standing posture helps align the body while gently centering the mind, making it an ideal starting point.

    How to Practice:

    – Stand upright with your feet hip-width apart and toes facing forward.

    – Spread your weight evenly across both feet, grounding through the soles as you lengthen through the crown of your head.

    – Activate your thighs, gently lift the kneecaps, and allow your shoulders to soften.

    – Rest your arms alongside your body with palms facing forward, taking a deep, steady breath.

    – Hold the pose for 30 seconds, keeping your attention on slow, even breathing.

    Benefits:

    – Supports better posture and body alignment

    – Increases awareness of the body

    – Refreshes the mind and reduces mental clutter

    – Mountain Pose encourages you to stand with confidence and clarity, preparing both body and mind for what comes next.

    Standing Forward Fold (Uttanasana): Release and Reset

    This gentle forward bend helps ease tightness in the back and neck while encouraging the body to fully relax. By improving circulation and calming the nervous system, it supports a clearer, more focused state of mind.

    How to Practice:

    – Begin in Mountain Pose and slowly fold forward from the hips.

    – Keep your knees slightly bent if your hamstrings feel tight.

    – Allow your head and neck to relax naturally toward the floor.

    – Hold opposite elbows or place your hands on the ground, based on comfort.

    – Stay here for 30 seconds to 1 minute, breathing deeply.

    Benefits:

    – Releases tension in the shoulders, neck, and back

    – Boosts blood flow and circulation to the brain

    – Promotes relaxation and nervous system balance

    – By easing physical tightness, this pose helps quiet the mind and restore focus.

    Seated Cat-Cow Flow (Seated Marjaryasana-Bitilasana): Move With Awareness

    This seated variation of Cat-Cow gently mobilizes the spine and neck while encouraging mindful breathing. Coordinating movement with breath helps clear distractions and sharpen mental clarity.

    How to Practice:

    – Sit comfortably on the floor or a cushion with legs crossed and spine upright.

    – Place your hands on your thighs or knees.

    – Inhale as you lift your chest and gently arch your back.

    – Exhale as you round the spine, tucking your chin and drawing the belly inward.

    – Continue flowing between these movements for 30 seconds to 1 minute.

    Benefits:

    – Improves flexibility and spinal mobility

    – Reduces stiffness in the upper back and neck

    – Encourages focus through breath-led movement

    – This smooth, rhythmic flow supports a calmer nervous system and a more centered mindset.

    Tree Pose (Vrksasana): Strengthen Balance and Concentration

    Tree Pose challenges balance while training the mind to stay present. It requires steady attention, making it an effective posture for enhancing focus and mental steadiness.

    How to Practice:

    – Stand tall in Mountain Pose and shift your weight onto one leg.

    – Lift the opposite foot and place it on the inner calf, ankle, or thigh, avoiding the knee.

    – Bring your hands together at your chest or raise them overhead.

    – Fix your gaze on a single point ahead to support balance.

    – Hold for 30 seconds to 1 minute, then change sides.

    Benefits:

    – Improves focus and mental clarity

    – Builds strength in the legs, core, and back

    – Enhances balance and body control

    – Tree Pose helps you stay grounded by blending physical stability with mindful attention.

    Seated Forward Fold (Paschimottanasana): Calm the Body, Clear the Mind

    The Seated Forward Fold offers a soothing stretch for the spine and legs while encouraging deep relaxation. It supports mental clarity by helping the body release stored tension.

    How to Practice:

    – Sit with your legs extended straight ahead and feet flexed.

    – Inhale to lengthen your spine, lifting your arms overhead.

    – Exhale and fold forward from the hips, moving your chest toward your thighs.

    – Hold your shins or feet, allowing your head to soften downward.

    – Remain in the pose for 30 seconds to 1 minute with slow breathing.

    Benefits:

    – Stretches the hamstrings, lower back, and spine

    – Helps calm the mind and reduce stress

    – Supports improved focus and mental clarity

    This gentle forward fold creates space for both physical relaxation and renewed concentration.

  • Blush Placement Method Subtly Reshapes Facial Appearance After Age 30

    Blush Placement Method Subtly Reshapes Facial Appearance After Age 30

    The woman studying her reflection looks almost exactly as she did at 25—but not entirely. Her cheeks sit a little lower now. The soft fullness that once lifted when she smiled blends more gently into her jaw. She reaches for her familiar blush brush and follows the habit she’s used for years: smiling and sweeping color onto the apples of her cheeks. Then she pauses.

    The blush makes her face appear heavier instead of lifted. Shadows beneath her eyes look deeper, and the center of her face seems slightly puffy. She wipes the color away and tries again, this time placing it just a bit higher. Instantly, her cheekbones appear more defined. Her face looks lifted, her eyes brighter. It’s the same blush, the same person. What changed wasn’t the product—it was where it was applied.

    Why Blush Placement Starts Feeling Off After 30

    There’s a subtle stage in life when your makeup routine stops delivering the same results. It doesn’t happen overnight. One day, you simply notice that techniques you’ve relied on for years no longer look quite right. Blush is often the first issue.

    Applied low and rounded, blush can make a 32-year-old look tired by mid-afternoon. The shade that once added freshness now settles closer to soft lines around the nose and mouth. Instead of shaping the face, it draws attention to the center. At this point, placement matters more than product choice.

    A London makeup artist once shared that she can often guess someone’s age just by watching how they apply blush. Younger faces naturally suit color placed directly on the center of the cheeks. Many people over 30 keep using the same method, even as their facial structure subtly shifts.

    She recalled working with two sisters, aged 28 and 38. They had similar skin tones and used the same products. On the younger sister, blush on the apples of the cheeks enhanced her whole face. On the older sister, that same placement emphasized faint hollows beneath the eyes. When the artist repositioned the blush higher, closer to the temples, the older sister suddenly looked rested, as if she’d slept well. The color redirected attention to her eyes and cheekbones rather than the middle of her face.

    The reason is simple. After 30, bone structure remains stable, but the fat beneath the skin gradually shifts downward. Muscle memory still guides the brush to where fullness used to be. Placing blush there highlights that movement. When the color moves slightly upward and outward, the face appears lifted. You’re not altering your features—just changing where the eye lands first.

    The Modern Blush Map That Creates a Natural Lift

    The technique showing up everywhere right now is refreshingly simple. Instead of smiling while applying blush, keep your face relaxed and look straight ahead. Imagine a diagonal line running from the top of your ear toward the side of your nostril. Apply blush along the upper half of that line, closer to the ear than the nose.

    The shape should form a soft, angled curve that sweeps toward the outer corner of the eye. Blend upward into the temples rather than dragging color toward the center of the face. Let the pigment fade gently into the hairline, similar to watercolor spreading on paper. For many people over 30, this instantly reveals cheekbones they forgot they had.

    One small adjustment makes an even bigger difference. Leave a clean space between the under-eye area and where the blush begins. About a finger-width of bare skin helps prevent color from settling into fine lines or accentuating dark circles.

    If a fresh flush is the goal, a tiny touch of color on the bridge of the nose can work—but keep the main application high and toward the outer face. This approach delivers glow without looking heavy.

    Many people share the same concern: wanting to look healthy without appearing overdone. That hesitation is understandable. One heavy swipe placed too low can make the face look flushed in an unflattering way. This is why placement outweighs quantity.

    Start with less product than you think you need. Tap it on instead of sweeping. Build color slowly in light layers. Cream formulas often suit mature skin better, as they blend into the complexion rather than sitting on top.

    Real life isn’t a makeup tutorial. Some mornings, you’re applying blush while checking your phone. So remember one easy rule: higher and further back. On tired days, that subtle shift can make your entire face look more awake—like the version of yourself you still recognize.

    Key Points to Keep in Mind

    • Think diagonally when applying blush, not in a circular shape.
    • Keep the strongest color away from the nose and mouth.
    • Blend upward into the temples to create a lifting effect.
    • Choose cream or liquid formulas if powder emphasizes texture.
    • Revisit your blush placement every few years as your face evolves.

    How Blush Becomes a Quiet Confidence Reset Over Time

    There’s something quietly powerful about changing how you apply a product you’ve used for over a decade. It’s an acknowledgment that your face has changed—and a decision to work with it. A single angled stroke becomes a small negotiation with time.

    Friends often talk about looking tired or unlike themselves. Often, it’s not dramatic change but how light and shadow now move across their features. Shift the color, and you shift the light. The placement you choose subtly shapes the story your face tells before you speak.

    We’ve all caught our reflection unexpectedly and wondered who we’re seeing. Adjusting blush placement doesn’t erase that moment, but it softens it. It highlights the structure and expression you’ve earned without pulling everything downward.

    This simple tweak is also easy to share. Once you see the difference, it’s hard not to show someone else—doing one cheek the old way and one the new. The contrast often says more than any tutorial.

    Blush becomes less about trends and more about understanding your own facial architecture. Where does color make you look instantly more awake? While no single diagram fits everyone, one principle holds true: color that moves upward suggests energy. Color that settles in the center often suggests fatigue. That may be why this technique keeps resurfacing. It doesn’t require new products—just moving what you already own a few millimeters higher.

    Practical Placement Guide

    • Lift the application zone: Apply blush above the ear-to-nose axis, toward the temples, for a natural lifting effect.
    • Preserve under-eye space: Leave about one finger of bare skin to soften the appearance of dark circles and fine lines.
    • Favor angled lines: Blend blush diagonally rather than in a circular motion for a more refined look.
  • Spot 3 Changes in the Waterfall Scene Using Sharp Observation

    Spot 3 Changes in the Waterfall Scene Using Sharp Observation

    Optical illusions and spot the difference challenges have become a popular way to test cognitive skills, sharpen observation, and give the brain a healthy workout. This time, the challenge is designed to seriously test your attention to detail. Your task is simple: spot three differences between two almost identical images of a beautiful waterfall scene filled with animals — all within just 10 seconds.

    The Challenge: Spot the 3 Differences in 10 Seconds

    At first glance, the two waterfall images appear exactly the same. Both show a peaceful scene with flowing water, lush greenery, rocks, and playful animals. But hidden among these elements are three subtle differences. You have only 10 seconds to find them, so sharp focus and quick thinking are essential.

    Why This Puzzle Tricks Your Brain

    Your brain naturally focuses on the overall scene rather than tiny details. When you see a waterfall surrounded by animals and plants, your brain quickly labels it as a familiar image. This leads to pattern blindness, where the mind assumes both images are identical and ignores small changes. The differences are intentionally placed in less obvious areas, such as animals, plants, or background details. Breaking this mental shortcut requires extra concentration and attention to fine details.

    How to Improve Your Chances of Finding the Differences

    Take a Methodical Approach: Scan one section at a time instead of looking at the whole image randomly.

    Focus on Small Details: Look closely at animals, plants, rocks, and water reflections.

    Zoom In: Enlarging parts of the image can help reveal tiny changes.

    Stay Calm: The time limit creates pressure, but staying relaxed improves accuracy.

    The Solution: The 3 Hidden Differences Revealed

    If you couldn’t spot all the changes, don’t worry — many people miss them on the first try. Here are the three hidden differences:

    The Red Parrot: In the second image, a bright red parrot appears on a tree branch in the upper-right corner. It is completely missing from the first image.

    The Fish in the Water: A small fish is swimming near the waterfall in the second image, while the first image has no fish at all.

    The Extra Flower: In the bottom-left corner of the second image, an additional flower appears near the baby animals. This flower is absent in the first image.

    Why These Puzzles Are Great for Your Brain

    Enhance Attention to Detail: Regular practice improves focus on small details.

    Improve Visual Perception: Helps the brain process images more accurately.

    Boost Cognitive Function: Strengthens memory, concentration, and problem-solving skills.

    Reduce Stress: Engaging puzzles provide a relaxing mental break.

    Final Thoughts

    This spot the difference challenge is a fun and effective way to test and improve your observation skills. While the waterfall scene looks calm and simple, the hidden differences require sharp focus. If you found all three within 10 seconds, well done. If not, keep practicing — each puzzle trains your brain to become faster and more precise.Challenge yourself regularly, and you’ll notice improvements in focus, speed, and attention to detail over time.

  • Safe Kitchen Ingredients Help Heal Dry Cracked Heels Faster Than Expected

    Safe Kitchen Ingredients Help Heal Dry Cracked Heels Faster Than Expected

    The earliest signs of cracked heels often develop quietly. Thin white lines start appearing across the heel, much like a dried riverbed. At first, they look minor and easy to overlook. You might blame walking barefoot indoors or wearing your favorite sandals too often. But then one morning, as your feet touch the floor, it feels rough. A sharp sting follows, along with an uncomfortable pulling sensation. The cracks have deepened, becoming sore and sometimes even catching on your socks.

    A Simple and Practical Way to Restore Dry Heels

    Eventually, there comes a moment of realization that action is needed. Dry, cracked heels often worsen gradually until the discomfort can no longer be ignored. Each step becomes a reminder that your feet have been lacking care. They carry you through long days and constant movement. The reassuring part is that relief doesn’t require expensive products or complicated routines. Many effective remedies are already available in your kitchen, stored in everyday containers.

    This method focuses on slowing down and turning the end of your day into a calming self-care ritual. Common ingredients such as oil, honey, milk, and salt can gently soften neglected skin. With consistent use, these natural solutions support steady and comfortable healing.

    The Subtle Signals Your Heels Send

    Your heels do more work than you may realize. They absorb impact with every step and carry pressure when you stand or walk for extended periods. Since they are often covered and out of sight, they’re easy to forget. You may notice roughness during a shower and tell yourself you’ll handle it later, only to forget again.

    Over time, the skin reflects daily wear. Cracked heels often point to ongoing pressure, friction, and lack of moisture. Walking barefoot on hard surfaces, wearing open-backed footwear, or using shoes with thin soles can all contribute. Hot showers, cold weather, and indoor heating also dry the skin.

    The skin on the heels is naturally thick for protection, but when it loses flexibility, it can’t move smoothly with each step. Instead, it splits and forms painful cracks. The encouraging fact is that skin continually repairs itself. With proper moisture, gentle care, and protection, healing can occur sooner than expected.

    Turning Your Kitchen Into a Healing Space

    Your kitchen holds more than food—it offers simple and effective skin care solutions. Olive oil and coconut oil deeply moisturize rough heels. Honey helps attract moisture while calming irritated skin. Milk and yogurt naturally soften flaky areas. When sugar or salt is combined with oil, it forms a gentle scrub that removes dead skin.

    Using familiar ingredients feels comforting and easy to trust. There’s no need to decode labels or search for specialty products. These everyday items have textures and scents you already recognize. Knowing how each ingredient works makes your routine even more effective.

    • Olive Oil / Coconut Oil: Deeply hydrates cracked heels and softens hardened skin; ideal for night massages and homemade scrubs.
    • Honey: Locks in moisture, soothes irritation, and supports skin repair; effective as a healing mask.
    • Milk / Yogurt: Loosens dead skin using natural lactic acid; suitable for foot soaks and softening packs.
    • Sugar / Salt: Gently exfoliates rough layers and smooths uneven skin; best used after soaking.
    • Banana / Avocado: Provides vitamins and healthy fats; helpful for deeply cracked heels.

    A Relaxing Evening Routine for Cracked Heels

    Think of this routine as a peaceful pause at the end of your day. The surroundings grow quieter, and you set aside just fifteen minutes to care for your feet.

    Step 1: Warm Milk and Salt Foot Soak

    Fill a basin with warm water that feels comfortable on your skin. Add half a cup of milk, one or two spoons of salt, and a small amount of olive oil. Soak your feet for ten to fifteen minutes. The warmth relaxes the skin, the milk softens dry areas, and the oil begins restoring moisture.

    Step 2: Gentle Exfoliation for Smooth Skin

    Mix sugar or fine salt with olive oil or coconut oil to create a thick paste. Massage it onto your heels using slow, circular motions, focusing on rough patches. Avoid scrubbing aggressively, as gentle care is more effective. Rinse with warm water afterward.

    Step 3: Honey and Yogurt Repair Mask

    Combine one tablespoon of honey with one tablespoon of thick yogurt and add a few drops of oil. Apply generously to cracked areas and leave it on for ten to fifteen minutes. This mask provides deep hydration and soothing comfort. Rinse gently and pat your feet dry.

    Overnight Oil Treatment for Long-Lasting Softness

    Before going to bed, warm a small amount of olive oil or coconut oil and massage it into your heels for several minutes. Wear clean cotton socks to seal in moisture overnight. By morning, your heels often feel noticeably softer, smoother, and less sensitive.

    Everyday Habits That Protect Heel Health

    Once your heels recover, simple daily habits help prevent cracks from returning. Apply moisturizer after bathing, avoid excessively hot water, rotate your footwear, and stay well hydrated. At the first sign of dryness, take action. These small steps can prevent discomfort from worsening.

    When Home Care May Not Be Enough

    If heel cracks become very deep, begin bleeding, or fail to improve with consistent care, professional guidance may be needed. Certain health conditions can slow healing, and a doctor or podiatrist can recommend appropriate treatment. While home remedies provide comfort and support, medical advice ensures proper recovery.

    In most cases, cracked heels simply indicate dry skin that needs attention. With warmth, nourishing oils, patience, and everyday household ingredients, your feet can regain comfort and continue supporting you through daily life.

  • Morning Energy Boost: 5 Fast-Acting Yoga Movements That Help You Feel Awake, Balanced and Mentally Prepared

    Morning Energy Boost: 5 Fast-Acting Yoga Movements That Help You Feel Awake, Balanced and Mentally Prepared

    Getting out of bed in the morning can feel difficult even after sleeping through the night. Including some basic yoga poses in your morning routine helps you begin the day feeling more energetic & focused. Yoga provides numerous advantages such as improved blood flow and greater flexibility while also lowering stress levels. These five yoga poses offer an excellent way to start your morning and get your body moving whether you want to stretch your muscles or refresh your mind. The first pose to try is the cat-cow stretch which gently wakes up your spine. You start on your hands & knees & alternate between arching your back upward & letting it curve downward. This movement helps loosen tight muscles in your back and neck while encouraging deeper breathing.

    Downward Dog: A Full-Body Wake-Up

    Downward Dog ranks among the most well-known yoga poses for good reason. This position stretches your whole body and activates muscles that tend to feel tight when you first wake up. The pose works on your hamstrings and calves while also engaging your shoulders & spine to give you a complete stretch. When you hold this position & take deep breaths you will notice the tightness beginning to fade away. This leaves you feeling energized and prepared for whatever the day brings. Begin on your hands & knees with your wrists positioned right under your shoulders and your knees under your hips. Raise your hips up toward the ceiling to form an upside-down V shape with your body. Push your hands firmly into the mat and extend your legs as much as possible while keeping your heels lifted off the ground. Stay in the pose for 5-10 breaths & then slowly come back to where you started.

    Cat-Cow Stretch: Energizing the Spine

    The Cat-Cow Stretch combines two positions with smooth transitions to warm up your spine and ease the stiffness that comes from sleeping. This active movement opens your chest and encourages deeper breathing to deliver fresh oxygen throughout your body as you wake up. Spending a few minutes on this stretch helps you feel centered and steady while providing an effective way to begin your day. Begin on all fours with your wrists positioned directly under your shoulders and your knees under your hips. Breathe in as you lower your belly toward the mat while raising your head and tailbone for the Cow pose. Breathe out as you arch your back toward the ceiling & bring your chin to your chest for the Cat pose. Keep moving between Cat and Cow for one to two minutes while paying attention to your breathing.

    Warrior I: Building Strength and Confidence

    Warrior I is a standing pose that builds physical strength & opens your hips chest and shoulders. This position helps improve your balance and stability while creating a positive start to your day. When you practice Warrior I you stretch key muscle groups and prepare yourself mentally for what lies ahead. The pose develops physical power & mental focus that you can use throughout your day. Start by standing with your feet hip-width apart. Step one foot back & bend your front knee to 90 degrees while turning your back foot outward at a 45-degree angle. Lift your arms overhead with your palms facing each other. Tighten your core muscles and hold this position for 5 to 10 breaths before switching to the other side.

    Seated Forward Fold: Calming the Mind

    The Seated Forward Fold gives your hamstrings & lower back a gentle stretch. This pose reduces physical tension and helps you breathe more calmly. It works well for people who feel stressed in the morning because it creates a peaceful feeling & clears your mind to start the day. Sit on the floor & stretch both legs out in front of you. Take a breath in while making your spine longer and then breathe out as you fold forward to move your chest toward your thighs. Reach for your feet or place your hands on the floor to keep steady. Hold this position for 5-10 breaths and focus on letting go of muscle tightness each time you breathe out.

    Mountain Pose: Grounding Yourself for the Day Ahead

    Mountain Pose looks easy but it builds strong balance and helps you feel grounded. When you stand up straight with proper posture you create alignment between your body and mind. This alignment boosts your confidence and sharpens your focus. The pose encourages deep breathing that centers you before you start your day. This fundamental position creates stability in both your physical body and mental state. Position your feet about hip-width apart and push them firmly against the ground. Allow your arms to rest naturally at your sides with your palms turned forward. Engage your leg muscles and core while standing upright and extending your spine. You may close your eyes if desired and breathe deeply several times while paying attention to how your body is positioned.

  • 10 Second Spot the Difference Challenge Pushes Focus With Nearly Identical House Images

    10 Second Spot the Difference Challenge Pushes Focus With Nearly Identical House Images

    Optical illusions and spot-the-difference puzzles are widely enjoyed brain teasers that appeal to people of all ages. These activities push your ability to observe carefully while testing mental focus and attention to detail. In this challenge, you are given just 10 seconds to examine two images of a charming house and identify three hidden differences. With limited time on the clock, quick thinking and sharp eyesight are essential.

    The 10-Second Visual Challenge

    Understanding the Task: Can You Find the Differences?

    At first look, both pictures seem almost identical. Each one shows a bright yellow house with a red roof, surrounded by a pleasant garden scene. However, subtle changes are carefully hidden within these nearly matching images. Your mission is straightforward but challenging: spot three differences between the two pictures before the 10-second timer runs out.

    While the task may appear simple, the strong similarity between the images combined with time pressure can make it surprisingly difficult. Spot-the-difference puzzles are designed to test how well you observe visual details, how quickly you process information, and how effectively you maintain focus under pressure. Are you ready to put your skills to the test?

    How Spot-the-Difference Puzzles Benefit the Brain

    Solving these puzzles offers more than just entertainment. They actively contribute to mental sharpness in several important ways:

    • Improved Attention to Detail: Searching for small visual changes trains your mind to notice details that are often missed.
    • Faster Visual Processing: Working within a time limit enhances how quickly your brain interprets visual information.
    • Stronger Focus and Concentration: These challenges demand sustained attention, helping reduce distractions.
    • Enhanced Problem-Solving Skills: Identifying differences strengthens pattern recognition and logical thinking.

    Smart Strategies to Solve the Puzzle Faster

    With only 10 seconds available, staying organized and calm is crucial. Using a simple approach can significantly improve your chances:

    • Scan the Images Quickly: Start with a broad look to understand the overall layout.
    • Divide the Scene into Sections: Examine areas like the sky, house exterior, and garden separately.
    • Look for Small Changes: Differences often involve missing objects or slight position shifts.
    • Move Systematically: Avoid spending too much time on one spot; keep scanning efficiently.
    • Practice Often: Regular practice increases both speed and accuracy.

    The Three Hidden Differences Revealed

    After understanding the approach, let’s identify the three differences between the left and right images. Although both pictures show the same lovely house, these small details set them apart:

    1. Missing Cloud in the Sky

    In the left image, a small cloud is visible near the roof area. This cloud does not appear in the right image, making it the first difference.

    2. Reduced Number of Wall Lamps

    The left image shows two wall lamps placed between the doors. In the right image, only one lamp remains.

    3. Extra Bush in the Garden

    In the lower-right section of the garden, the right image includes an additional small bush that is not present in the left image.

    Why These Challenges Are So Difficult

    These puzzles are tricky because the brain naturally focuses on similarities rather than differences. When two images closely resemble each other, minor changes are easier to overlook. Adding time pressure increases the difficulty, forcing quicker thinking and heightened concentration.

    By challenging normal visual habits, these puzzles help retrain the brain to detect subtle differences more efficiently.

    Final Thoughts: Strengthen Your Observation Skills

    Finding three differences in just 10 seconds is a fun yet demanding exercise that enhances visual awareness, focus, and critical thinking. Whether you found all the differences or missed a few, each attempt helps sharpen your observation skills.

    With consistent practice, these challenges become easier and more enjoyable. Over time, you may notice improved attention to detail not only in puzzles but also in everyday life.

  • 12 Second Visual Puzzle Challenges Observation Skills With Hidden Differences in Images

    12 Second Visual Puzzle Challenges Observation Skills With Hidden Differences in Images

    Optical illusions and visual puzzles are designed to test how effectively the brain processes information. Among them, Spot the Difference challenges are especially popular because they appear simple but often prove difficult. These puzzles help sharpen your ability to notice small visual details. In this challenge, you must identify three subtle differences between two images showing a boy relaxing with his dog. The real challenge lies in the 12-second time limit, which pushes your observation skills to their limits.

    The 12-Second Observation Test

    This challenge gives you only 12 seconds to spot all the differences. The limited time forces your brain to work quickly, making it easier to miss small changes. The goal is to test how well you can stay focused and alert under pressure while scanning similar-looking images.

    Why Number-Based Optical Illusions Confuse the Mind

    The human brain is naturally built to recognize patterns quickly. When you repeatedly see number sequences such as 8429, your mind starts assuming that every sequence is the same. While this fast pattern recognition is useful in daily life, it can be misleading in optical illusions.

    The number 8249 contains the same digits as 8429, just arranged differently. Because the digits look familiar, the brain often ignores the rearrangement. Your eyes may glance over the numbers, but your mind fills in what it expects to see, making everything appear unchanged.

    This effect becomes even stronger when time pressure is involved. With limited seconds, the brain relies more on mental shortcuts instead of slow, careful checking.

    Effective Strategies to Beat the 9-Second Number Challenge

    To spot 8249 more quickly, avoid reading the number as a single unit. Instead, break it down digit by digit. Focus on one position at a time, starting with the first digit and moving step by step.

    Another helpful approach is to change your scanning pattern. Rather than reading from left to right, try scanning from top to bottom. This disrupts your usual reading habit and makes subtle differences easier to catch.

    Remaining calm and relaxed is also important. Stress narrows your visual focus, which can make small changes harder to notice.

    What This Visual Puzzle Reveals About Your Focus

    Successfully finding the odd number suggests strong attention to detail and solid concentration skills. It shows that your brain can slow down automatic assumptions and focus carefully, even when time is limited.

    If the puzzle felt difficult, that is completely normal. These challenges are deliberately designed to trick the brain. Regular practice with optical illusions can gradually improve focus, memory, and mental speed.

    Many people enjoy these puzzles as short mental workouts because they challenge the brain without feeling exhausting.

    The Solution Breakdown

    If you managed to spot 8249 within 9 seconds, that reflects sharp observation and quick thinking. If not, take another careful look. Once the difference becomes clear, it usually feels obvious, which is part of what makes these illusions so engaging.

    There is no need to feel discouraged if it took longer. Each attempt helps train your brain to recognize patterns more accurately over time.